
Chapter 4. Designing a Magazine Layout
Chapter Objectives
Chapter Learning Objectives
![]() Create a multicolumn layout.
Create a multicolumn layout.
![]() Add master items to master pages.
Add master items to master pages.
![]() Apply master pages to document pages.
Apply master pages to document pages.
![]() Work with spot colors.
Work with spot colors.
![]() Use dummy text to create a design proposal.
Use dummy text to create a design proposal.
![]() Thread stories across multiple pages.
Thread stories across multiple pages.
![]() Wrap text around images.
Wrap text around images.
![]() Add form elements.
Add form elements.
![]() Create an interactive PDF form.
Create an interactive PDF form.
Chapter ACA Objectives
For full descriptions of objectives, download the printable chart from your account on peachpit.com. See pages xi–xii.
DOMAIN 2.0
UNDERSTANDING PRINT AND DIGITAL MEDIA PUBLICATIONS
2.1, 2.4
DOMAIN 3.0
UNDERSTANDING ADOBE INDESIGN CC
3.4, 3.6, 3.8
DOMAIN 4.0
CREATING PRINT AND DIGITAL MEDIA PUBLICATIONS USING ADOBE INDESIGN
4.1, 4.2, 4.3, 4.4, 4.6
DOMAIN 5.0
PUBLISH, EXPORT, AND ARCHIVE PAGE LAYOUTS USING ADOBE INDESIGN
5.1, 5.2
In this design project, you will put together a basic layout to present to your customer. Specifically, you will provide design and text formatting ideas for the editor’s note pages, a subscription form that will be included as a foldout in the print version of the magazine, and an interactive form readers can fill out in the PDF version of the magazine. As part of this project you will be introduced to the concept of master pages, try additional paragraph formatting controls, and learn how to wrap text around images. Finally, you will gain an understanding of the various form elements used in PDF form designs (Figure 4.1).

Mastering a Multicolumn and Multipage Layout
Similar to the previous project, this project’s primary output medium will be print. The magazine content is made up of photos, headlines, body copy, background tints, line, and form elements. The magazine example in this project is folded to a finished portrait Letter size (8.5 in by 11 in). The magazine is designed with facing pages (left and right pages), and text appears in three columns. Additionally, its cover and some of its content design contains images and background color frames that extend to the edge of the page.
![]() Video 4.1
Video 4.1
Note
This chapter supports the project created in video lesson 4. Go to the Project 4 page in the book’s Web Edition to watch the entire lesson from beginning to end.
Note
The most commonly used magazine or newsletter size in the US is 8 3/8 in x 10 7/8 in.
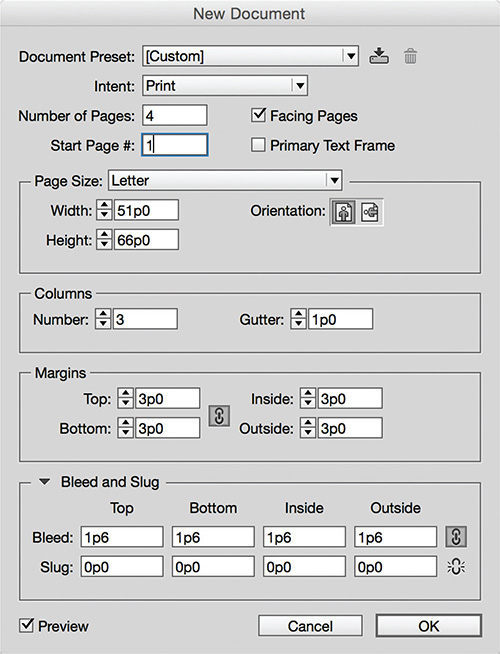
Given this briefing, what settings would you select in the New Document dialog box (File > New > Document)?
Here are some of the settings (Figure 4.2):
![]() Intent: Print. This sets the document’s default color mode to CMYK.
Intent: Print. This sets the document’s default color mode to CMYK.
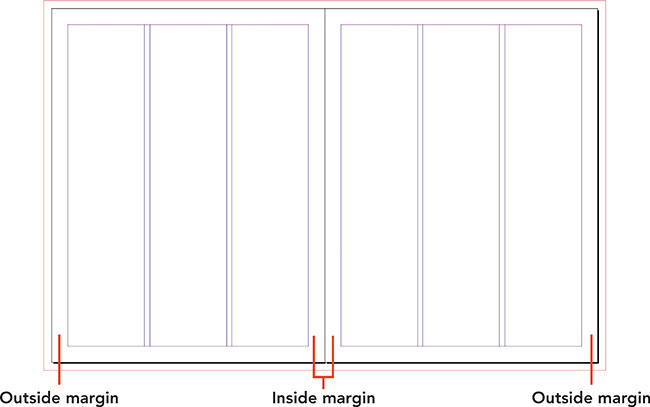
![]() Facing Pages: Select Facing Pages to create a document with spreads (left and right pages side by side). Notice that with facing pages enabled, the Left and Right margin fields change to Inside and Outside. The inside margin is the margin that appears on either side of the spine, where the magazine is bound. The outside margin is the margin that appears on the edge where there is no binding (Figure 4.3).
Facing Pages: Select Facing Pages to create a document with spreads (left and right pages side by side). Notice that with facing pages enabled, the Left and Right margin fields change to Inside and Outside. The inside margin is the margin that appears on either side of the spine, where the magazine is bound. The outside margin is the margin that appears on the edge where there is no binding (Figure 4.3).
![]() Number Of Pages: Magazines are multipage documents. Start with four pages and add more pages as needed during the production phase (Layout > Pages > Add Page, or Insert Pages).
Number Of Pages: Magazines are multipage documents. Start with four pages and add more pages as needed during the production phase (Layout > Pages > Add Page, or Insert Pages).
![]() Page Size and Orientation: Select Letter from the Page Size menu and click the Portrait icon for Orientation.
Page Size and Orientation: Select Letter from the Page Size menu and click the Portrait icon for Orientation.
![]() Columns: Enter 3 for the number of columns. With the Screen Mode set to Normal, the column guides assist with consistent and easy placement of design elements.
Columns: Enter 3 for the number of columns. With the Screen Mode set to Normal, the column guides assist with consistent and easy placement of design elements.
![]() Bleed: If necessary, click the Bleed And Slug disclosure triangle. Enter values in the Bleed fields. If you’re not sure what to enter, ask the printer. As you design, make sure that any objects you intend to bleed extend off the page to the bleed guide.
Bleed: If necessary, click the Bleed And Slug disclosure triangle. Enter values in the Bleed fields. If you’re not sure what to enter, ask the printer. As you design, make sure that any objects you intend to bleed extend off the page to the bleed guide.
Once the new document opens in InDesign, you can start to add layers and color swatches as needed.
Understanding Master Pages
Master pages apply common design elements, also called master items, across the pages of your document. This saves you the time of adding those elements to each page individually, ensures consistency, and provides an easy method for making global changes across a document.
If you have a magazine or other multipage publication nearby, flip through the pages. Can you spot common design elements or layout features? What design elements appear repeatedly across multiple pages in a report or book layout?
Page headers (the area above the top margin guide on a page) and footers (the area below the bottom margin guide) are areas on the page where you would position elements that repeat across different pages (Figure 4.4). For example:
![]() Each page in a report might include a company logo at the top or bottom of the page.
Each page in a report might include a company logo at the top or bottom of the page.
![]() The name of a publication might appear on the top or bottom of pages.
The name of a publication might appear on the top or bottom of pages.
![]() A similar-colored sidebar might indicate different topic-related pages across a publication.
A similar-colored sidebar might indicate different topic-related pages across a publication.
![]() Page numbers might appear at the bottom of magazine, book, or report pages.
Page numbers might appear at the bottom of magazine, book, or report pages.
![]() Navigation controls, such as next page and previous page buttons, might reside at the bottom of all pages in digital media publication.
Navigation controls, such as next page and previous page buttons, might reside at the bottom of all pages in digital media publication.
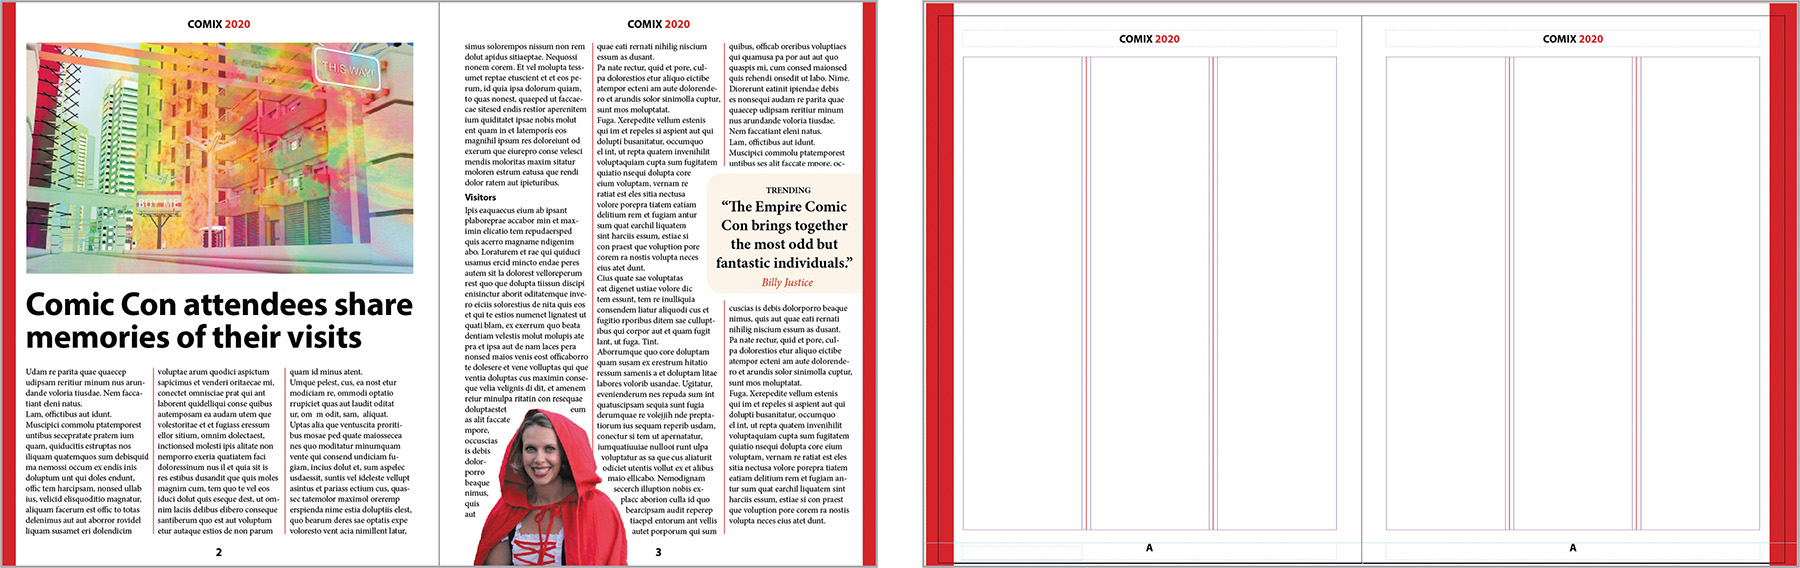
Figure 4.4 A two-page spread of a magazine layout and the master page that was applied to add the red bars, header, and footer
The above are all examples of master items. You place any items you want to repeat on document pages on a master page. Then, when you apply that master page to document pages, the items are added to those document pages automatically.
Creating and Editing Master Pages
When you create a new document, a blank document opens with one or more blank pages and a single master page or master spread (A-Master). This A-Master master page is applied to all empty pages and applies the original new document settings, such as the page size, orientation, margins, columns, and bleed settings. By adding master items to the A-Master, you can add common design elements and layout features to the document’s pages.
![]() Video 4.2
Video 4.2
![]() Video 4.3
Video 4.3
To add master items to the A-Master, first display the master page:
![]() Double-click the A-Master label at the top of the Pages panel.
Double-click the A-Master label at the top of the Pages panel.
![]() Select A-Master from the Go To Page menu in the Status bar.
Select A-Master from the Go To Page menu in the Status bar.
![]() Choose Layout > Go To Page, and then select A-Master from the Page menu (Figure 4.5).
Choose Layout > Go To Page, and then select A-Master from the Page menu (Figure 4.5).

The A-Master page or spread now appears in the document window. You can now start to add common master items.
A special page number marker is often the first master item you add to a master page, especially for longer documents, such as books, reports, or magazines.
To add a current page number marker (Figure 4.6):
1. Using the Type tool, draw a text frame on the A-Master page, in the footer area, and click inside the frame.
2. Choose Type > Insert Special Character > Markers > Current Page Number.

The special page number marker that is inserted appears as the letter A, matching the prefix of the master page. A page number on a B-Master would thus appear as the letter B.
3. Format the page number marker as you would format any other text, changing font, font size, alignment, etc.
4. To return to a document page and see the page number appear, double-click a document page in the Pages panel, or choose Layout > Go To Page and select a page number from the Page menu.
To add header or footer text to a master page:
![]() Use the Type tool to add a text frame, then enter and format the header or footer text on the master page. You can also insert text before or after the current page number marker (Figure 4.7).
Use the Type tool to add a text frame, then enter and format the header or footer text on the master page. You can also insert text before or after the current page number marker (Figure 4.7).

Figure 4.7 A left-facing page that contains a text frame for the footer, which consists of text and the current page number marker
Note
Keep in mind that master items are placed at the bottom of the stacking order of the layer on which you place them. When working on that layer on a document page, any new objects are placed above the master items.
Continue to add and format additional master items to the master page as needed.
![]() ACA Objective 4.1
ACA Objective 4.1
Adding Multiple Master Pages
Documents are not limited to a single master page or master spread. For example, in a magazine layout, you might use three-column and four-column layouts. There are several ways to add additional master pages to a document.
![]() Video 4.4
Video 4.4
To create a new master page (Figure 4.8):
1. Choose New Master from the Pages panel menu.
2. Enter the Prefix and Name for the new master.
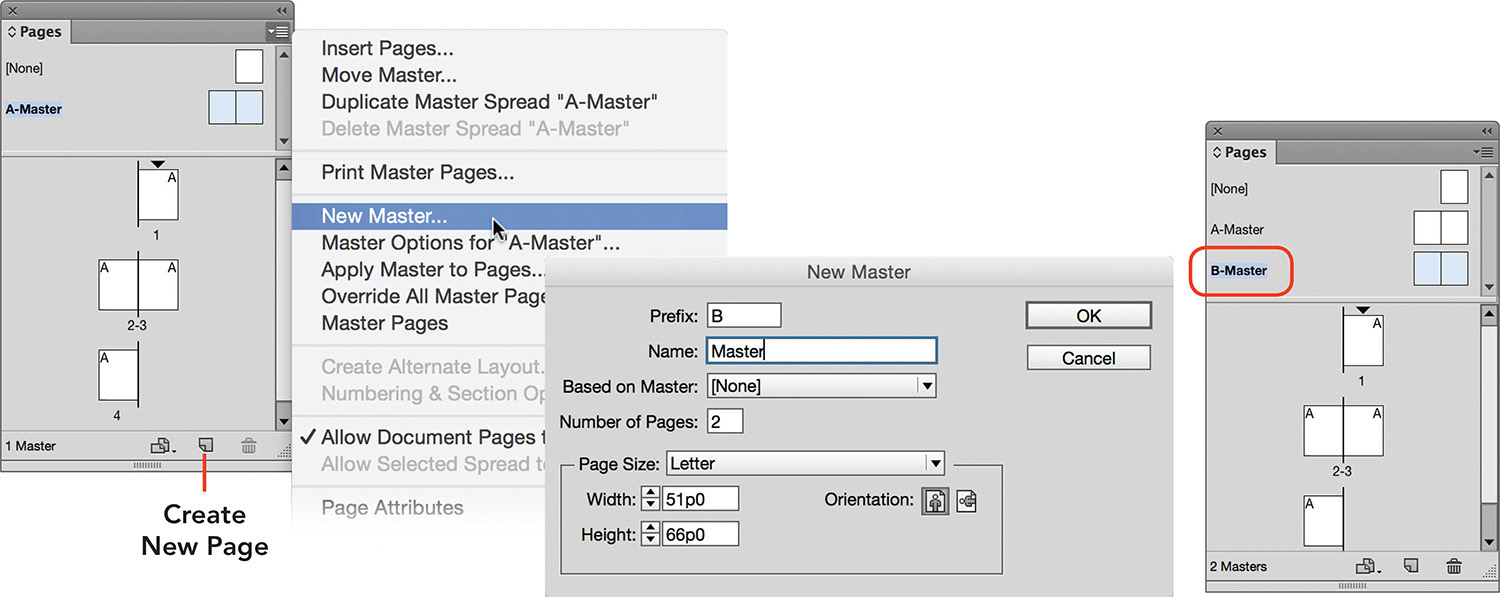
The master page prefix appears on the document pages in the Pages panel, making it easy to recognize which master page is applied to the pages.
3. When you are creating a master page, you have the option of basing its formatting on an existing master page. This establishes a parent-child relationship between the two pages. To do this, select the parent page from the Based on Master menu.
Basing a new master page on another master means that the new (child) page inherits the master items from the existing (parent) master page. For example, you might consider creating a master page with just the page numbers on it. This master page could be the base for other master pages that might have different margin and column settings and design elements added. If you want to change the font of the page numbers, you only need to edit them on the parent master page.
4. Specify how many pages you need in the Number Of Pages setting.
5. Set the Page Size and Orientation parameters. Click OK.
You can also create a new blank master page by first selecting any master page and clicking the Create New Page button at the bottom of the Pages panel. The new master page uses the same margin and column settings as used in the New Document dialog box at the start of creating a project.
Duplicating Master Pages
You can duplicate an existing master page to serve as the basis for a new master page. To duplicate a master page (Figure 4.9):
1. Select the master page to duplicate in the Pages panel.
2. Select Duplicate Master Spread “A-Master” from the Pages panel menu. Note that when the selected master page is actually a facing-pages spread, the command changes from Duplicate Master Page to Duplicate Master Spread.
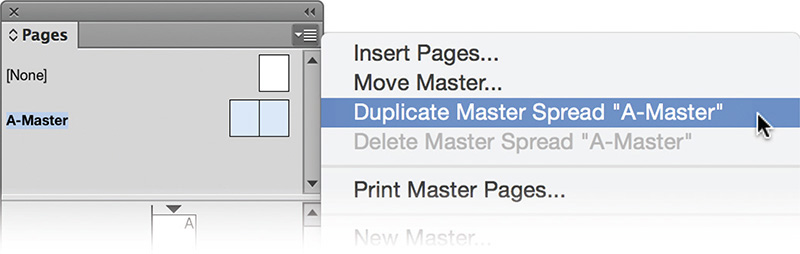
An exact replica of the A-Master, a new B-Master, appears in the Pages panel.
Tip
To create a new master page that copies a document page design, select the document page in the Pages panel, and then select Master Pages > Save As Master from the Master panel menu.
3. To change the Prefix (B) or the Name (Master), select the new master page in the Pages panel. Select Master Options from the Pages panel menu, make any changes, and click OK.
4. Double-click the master page name at the top of the Pages panel to modify the layout of the new master page.
You can also duplicate a master page by dragging an existing master onto the Create New Page button at the bottom of the Pages panel.
Putting Master Pages to Work
With the master pages completed, you can start work on your design project. As you work on the document pages in your project, you’ll apply master pages to them, insert or delete document pages to the document, and perhaps edit or delete a master item on a document page to make an isolated change that doesn’t warrant editing the master page.
Applying Master Pages
When master pages are applied to document pages, the prefix letter (A for A-Master, for example) appears on the page thumbnail in the Pages panel. This makes it easy to see which master page is applied to a document page.
Shortcut
To select a continuous range of pages in the Pages panel, click the first page in the range, then Shift-click the last page in the range. To select noncontiguous pages, Ctrl-click (Windows) or Command-click (Mac OS) the page icons.
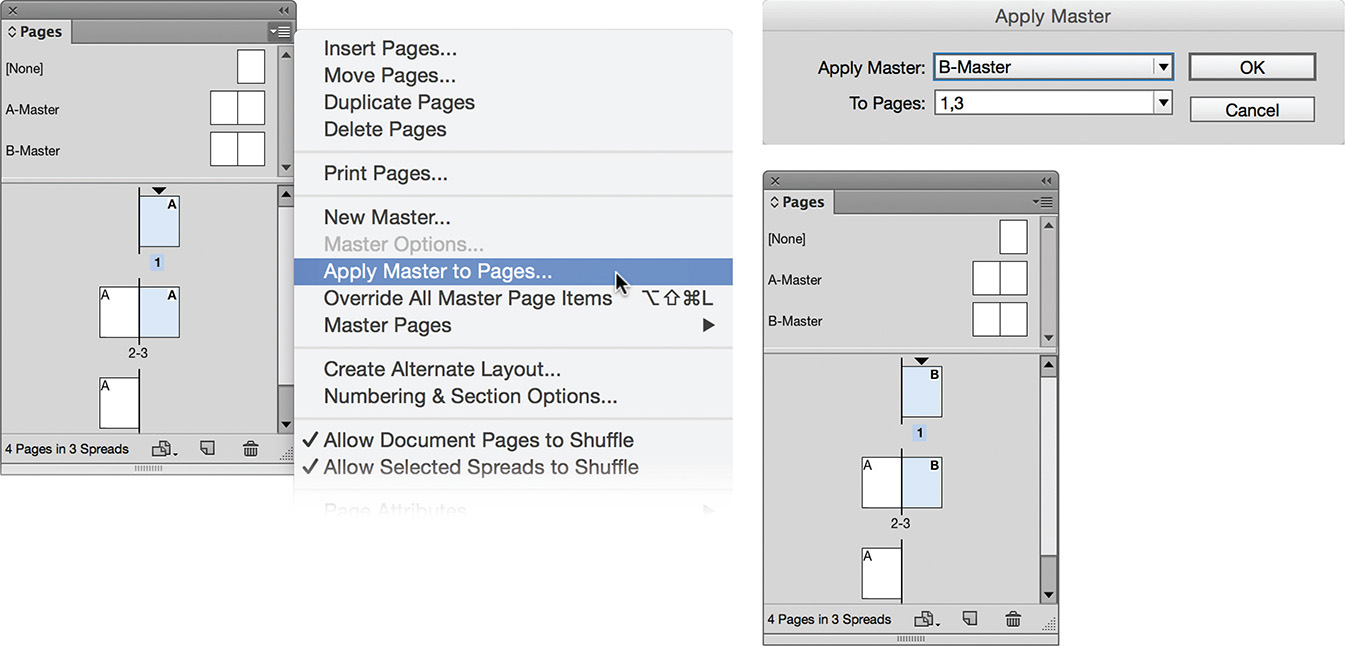
To apply a master page to a document page (Figure 4.10):
1. In the Pages panel, select the document pages for applying the master page.
2. Select Apply Master To Pages from the Pages panel menu.
3. In the Apply Master dialog box, select a master to apply to the document page from the Apply Master menu.
4. Click OK.
Adding Pages Based on Master Pages
To add a new page after a particular page in the document:
1. In the Pages panel, select the page you want to add a page after.
2. Choose Layout > Pages > Add Page, or click the Create New Page button at the bottom of the Pages panel.
The new page will have the same master page as the selected page.
Another way to add a new page is to:
![]() Click the Create New Page button at the bottom of the Pages panel.
Click the Create New Page button at the bottom of the Pages panel.
To add pages to any location in your document (Figure 4.11):
1. Choose Layout > Pages > Insert Pages or select Insert Pages from the Pages panel menu.
The Insert Pages dialog box enables you to add new pages before or after a particular page number, or at the start or end of the document.
2. Enter the number of pages to add in the Pages field. (Later in this chapter we’ll talk about what can happen to a facing-pages document when you add an odd number of pages.)
3. Select an option from the Insert menu to specify where to add the pages. If you select After Page or Before Page, you can enter a page number in the field at right.
4. Select a master page or master spread to apply to the new pages from the Master menu.
5. Click OK to add the pages. If you happen to add the pages in the wrong place, you can immediately press Ctrl+Z (Windows) or Command+Z (Mac OS) to remove the pages.

Another way to insert pages is to:
![]() Alt-click (Windows) or Option-click (Mac OS) the Create New Page button at the bottom of the Page panel.
Alt-click (Windows) or Option-click (Mac OS) the Create New Page button at the bottom of the Page panel.
Deleting Pages
As easy as it is to add new pages to a document, you can also delete pages or page spreads from your document.
To delete document pages (Figure 4.12):
1. Select the pages to delete in the Pages panel.
2. Choose Delete Page from the Pages panel menu, click the Delete Selected Pages button at the bottom of the Pages panel, or choose Layout > Pages > Delete Pages.
3. A warning dialog box appears if the page contains design elements. To delete the page and all of its content, click OK.

You can also delete pages by dragging the page icons onto the Delete Selected Pages button at the bottom of the Pages panel.
Working with Master Items
When you’re working on document pages, master items are recognizable by a thin dotted border when the Screen Mode is set to Normal. Master items on document pages are locked so they can’t be accidentally edited. As you design your magazine pages, you will find that you occasionally need to edit master items. For example, a master page may add frames with a color tint to document pages. The managing editor’s column in the magazine pages project is an example of this. For one instance of this column you decide you want to edit its color. Editing the master item on the master page would change it on all pages that have the master page applied to it. You can, however, override a master item. A master item override releases the master item on the document page so you can edit it. This converts the item to a document page item.
![]() Video 4.5
Video 4.5
Keep in mind that any changes you make to the master item on the master page might no longer result in an update of the item on the document page. For example, if you change the fill color of the overridden item on the page, and later change the fill color of the master item, the color will not update on the document page with the override.
To override a master item on a document page (Figure 4.13):
1. Using the Selection tool, Shift-Ctrl-click (Windows) or Shift-Command-click (Mac OS) the master item.
2. Make any design changes to the object, such as text or color changes. You can also delete the object if needed.
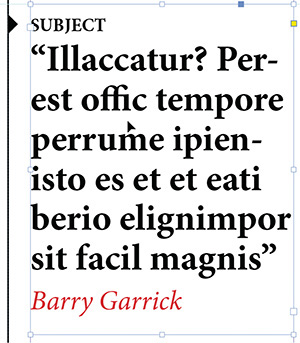
Figure 4.13 Shift-Ctrl-click (Windows) or Shift-Command-click (Mac OS) the quote’s text frame (a master item). The master item becomes a standard page object, so you can replace the placeholder text for the quote with real text.
Tip
To retain the text formatting as you paste new text over formatted text, select the formatted text excluding the paragraph return character (¶) at the end of the paragraph. Then choose Edit > Paste Without Formatting. To see the end-of-paragraph characters, choose Type > Show Hidden Characters, and set the Screen Mode to Normal.
![]() ACA Objective 4.1
ACA Objective 4.1
Using Different Page Sizes in a Single Document
As you add more pages to your magazine layout, each new page takes on the magazine page size (Letter) by default. InDesign allows you to use different page sizes in a single document. To do this, you will first need to make sure that pages in a facing-page document are not allowed to “shuffle.”
Preventing Pages from Shuffling
When working in a document with facing pages, odd-numbered pages are on the right and even-numbered pages are on the left. When you insert an odd number of new pages, each subsequent page will change from a right to a left page and vice versa. This can possibly create some design dramas—for example, if you have applied a different master page to left and right pages or specifically positioned design elements so they balance nicely across a page spread.
Don’t worry: You can change this default behavior and keep left and right pages in their original page positions when adding new pages to a document. To do so, simply ensure that the Allow Document Pages To Shuffle setting in the Pages panel menu is unchecked. Pages will still shuffle as you add more pages, but a left or right page will always remain a left or right page. Additionally, you can opt to keep entire page spreads together by selecting the spread in the Pages panel and unchecking the Allow Spreads To Shuffle from the Pages panel menu (Figure 4.14).
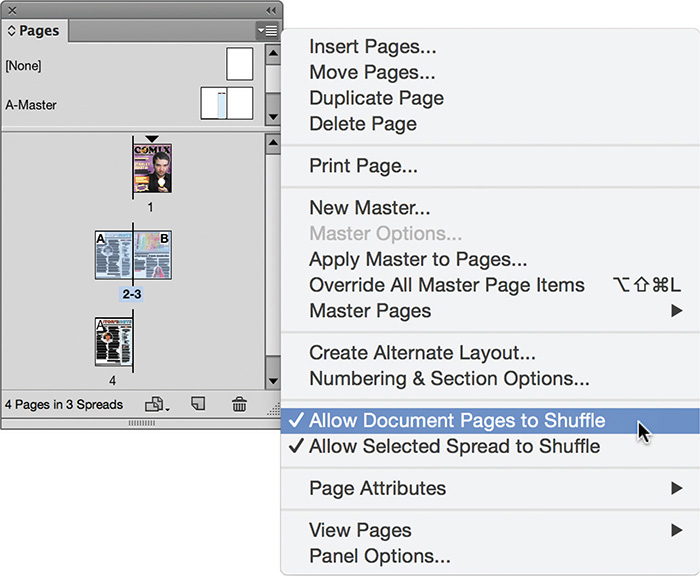
Figure 4.14 Deselecting the Allow Document Pages To Shuffle setting in the Pages panel prevents left pages from becoming right pages (and right pages from become left pages) when you insert or delete pages.
![]() Video 4.15
Video 4.15
Adding a Foldout with a Different Page Size
When Allow Document Pages To Shuffle is disabled as discussed in the previous section, you can add a foldout of a different size to a page spread without the other pages moving.
To adjust a page size for a page in the document (Figure 4.15):
1. Select the Page tool (![]() ).
).
2. In the Pages panel, click the page icon of the page you want to resize. You can also click the page itself in the document window.
3. In the Control panel, change the values in the Width and/or Height fields for the selected page. Or, click the Edit Page Size button at the bottom of the Pages panel, choose Custom, enter the Width and Height settings in the Custom Page Size dialog box, and click OK.

Tip
You can save the foldout’s page size as a reusable page size in the Custom Page Size dialog box. Enter a Name for the page size, and then click OK. Once you save a page size, you can select it from any Page Size menu, such as in the New Document dialog box.
Numbering and Sections
An InDesign section consists of one or more pages with different page numbering or designs. As you design different publications, such as magazines, books, and reports, you will likely encounter the need for page numbering sections.
![]() Video 4.18
Video 4.18
![]() A printed magazine might have a cover that’s printed on different paper from its inside pages. The cover itself might not require any page numbering; however, the first of the inside pages needs to start on page 1.
A printed magazine might have a cover that’s printed on different paper from its inside pages. The cover itself might not require any page numbering; however, the first of the inside pages needs to start on page 1.
![]() The front matter in a book (the pages that precede the core text such as a preface or table of contents) might use Roman numerals (i, ii, iii, iv, etc.) instead of Arabic numbers (1, 2, 3, 4, etc.).
The front matter in a book (the pages that precede the core text such as a preface or table of contents) might use Roman numerals (i, ii, iii, iv, etc.) instead of Arabic numbers (1, 2, 3, 4, etc.).
![]() You might want to add a foldout page to a spread in a magazine that doesn’t affect the page numbering of the other pages.
You might want to add a foldout page to a spread in a magazine that doesn’t affect the page numbering of the other pages.
Page numbers are added as a special character (Type > Insert Special Character > Markers) on master pages. The master pages are then applied to document pages, adding the page numbers. To adjust the page numbering style for pages, you must first create a section for those pages.
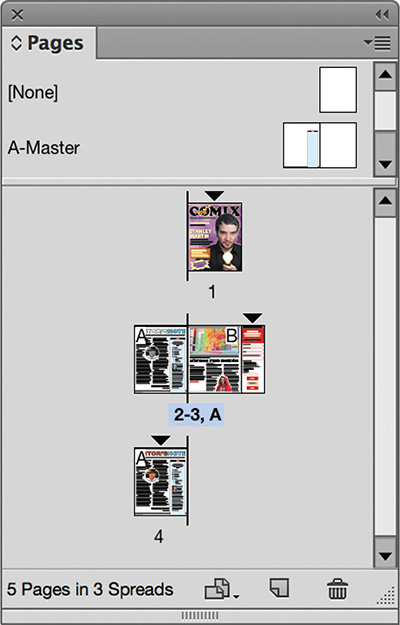
Let’s look at the foldout as a practical example. The magazine pages are numbered 1 through 4. With the foldout page added between pages 3 and 4, the page number of the last page increases to 5 (Figure 4.16).

Figure 4.16 The magazine page numbering changes because the foldout is added to page 3.
As the foldout is not part of the sequential page numbering of the magazine, start by creating a new section for the foldout page. Then, you will change the numbering style for this page (for example, to A, B, C) so that it does not clash with the Arabic numerals. Finally, you will start a new section after the foldout page to pick up where the sequential page numbering left off. Start the page numbering at page 4 and change the style back to Arabic numbers (Figure 4.17).
To start a new section and change the page numbering for that section (Figure 4.18):
1. In the Pages panel, double-click the page that marks the start of the section.
2. Select Numbering & Section Options from the Pages panel menu.
3. In the New Section dialog box, select Start Section.
4. To adjust the page number on which that section starts, enter the Start Page Number.
5. From the Style menu, select the preferred page numbering style, and click OK.

Figure 4.18 In the Pages panel, a section indicator marks the new section started for the foldout page.
Tip
To quickly create a section, right-click (Windows) or Control-click (Mac OS) a page icon in the Pages panel. Select Numbering & Section Options from the context menu.
A section indicator icon (a small triangle) appears at the top of the page to indicate a section start.
To edit the Numbering & Sections Options at any stage, do one of the following:
![]() Double-click the section indicator icon in the Pages panel.
Double-click the section indicator icon in the Pages panel.
![]() Select the page and select Numbering & Section Options from the Pages panel menu.
Select the page and select Numbering & Section Options from the Pages panel menu.
![]() Select the page and choose Layout > Numbering & Section Options.
Select the page and choose Layout > Numbering & Section Options.
![]() ACA Objective 2.4
ACA Objective 2.4
Using Spot Colors in Print Designs
In Chapter 2, you were first introduced to color theory and learned about RGB and CMYK color. Can you remember what colors these abbreviations stand for?
![]() RGB color consists of the primary colors of light, with different amounts of red, green, and blue creating the different colors.
RGB color consists of the primary colors of light, with different amounts of red, green, and blue creating the different colors.
![]() CMYK color consists of the subtractive colors used in printing, with different percentages of cyan, magenta, yellow, and black creating the different colors.
CMYK color consists of the subtractive colors used in printing, with different percentages of cyan, magenta, yellow, and black creating the different colors.
In previous chapters, you also learned a bit about process and spot colors. Can you remember the difference between a spot color and a process color? What are some of the reasons to use a spot color in a design for a print publication?
Remember that process colors are created by mixing percentages of cyan, magenta, yellow, and black ink to reproduce a large range of colors in print. On the other hand, spot colors are individually mixed colors used to:
![]() Limit the number of inks used in a print publication—for example, black and one spot color. Printing with two colors may save money over process color printing.
Limit the number of inks used in a print publication—for example, black and one spot color. Printing with two colors may save money over process color printing.
![]() Print colors that can’t be reproduced using CMYK process colors—such as metallic or fluorescent colors.
Print colors that can’t be reproduced using CMYK process colors—such as metallic or fluorescent colors.
![]() Print corporate colors more accurately, regardless of press or paper.
Print corporate colors more accurately, regardless of press or paper.
![]() ACA Objective 3.6
ACA Objective 3.6
![]() ACA Objective 5.1
ACA Objective 5.1
Adding Spot Colors
InDesign offers many built-in PANTONE color guides along with TRUMATCH, TOYO, and HKS color matching systems. To learn more about the different color matching systems, their history, and color guides, use a search engine, such as Google, to research terms such as, “What is PANTONE?”
![]() Video 4.5
Video 4.5
To add a spot color to the Swatches panel (Figure 4.19):
1. Select New Color Swatch from the Swatches panel menu.
2. In the New Color Swatch dialog box, select Spot from the Color Type menu.
3. From the Color Mode menu, select one of the spot color guides, such as PANTONE+ Solid Coated. (Coated refers to the paper, or stock, your publication is printed on. Coated papers work well for publications that are rich in color and contain images rich in detail.)
4. Scroll through the list of colors or enter a color reference number from the color guide.
5. Click OK.

In the Swatches panel, a small dot icon (![]() ) displays to the right of the spot color name. Process colors display a small gray square (
) displays to the right of the spot color name. Process colors display a small gray square (![]() ).
).
Although a spot color is a solid ink, you will be able to create different visual effects by applying a tint of the color to the design elements.
To apply a tint of any swatch color (Figure 4.20):
1. Select the object, and click the Fill or Stroke box in the Swatches panel or Control panel.
2. Select the swatch color to apply.
3. Drag the Tint slider to the preferred percentage or enter a value in the Tint field.

![]() ACA Objective 5.1
ACA Objective 5.1
Viewing Color Separations
When you submit press-ready InDesign files, packaged with fonts and links, or a press-ready PDF to an offset printer for printing, the printer will separate the colors used in your designs into different color plates. For process color designs, those plates capture the different shades and tints of each CMYK color. Designs with spot colors separate into additional plates, one for each spot color.
The Separations Preview panel (Window > Output) enables you to see each color separation created for your document (Figure 4.21).

To view process color separations of a page (Figures 4.22 and 4.23):
1. In the Separations Preview panel, select Separations from the View menu.
2. Move the pointer over the page to see the different color percentages reflected in the panel.
3. To show or hide individual color plates, click the color separation visibility icon (![]() ) to the left of the individual color name.
) to the left of the individual color name.


The ability to check the different separations before sending your documents to the printer can help you isolate possible color issues.
Creating Stories
Let’s say that one of your customers contracts you to design a brand-new magazine. As part of this graphic design project, you often start on paper, creating sketches of your ideas. Then, you gradually move up to mocking up rough layouts, using boxes and lines to indicate image and text elements. Finally, you create a composition in InDesign that will become the design proposal you submit to your client for approval.
![]() Video 4.7
Video 4.7
![]() Video 4.8
Video 4.8
![]() Video 4.14
Video 4.14
Using Dummy Text
At the design proposal stage, it is unlikely that you have received the text from actual magazine articles. Rather than randomly entering characters into a text frame, you can use fake filler text, often referred to as placeholder text, dummy text, or lorem ipsum (the Latin name). InDesign provides its own built-in placeholder text generator.
To add placeholder text to your document (Figure 4.24):
1. Create a text frame with Type tool.
2. Choose Type > Fill With Placeholder Text.

You can format the placeholder text with various character and paragraph formatting controls, changing the font, font size, leading, alignment, and other settings to build the design proof.
![]() ACA Objective 3.4
ACA Objective 3.4
![]() ACA Objective 4.1
ACA Objective 4.1
![]() ACA Objective 4.2
ACA Objective 4.2
Working in Columns
Magazine layouts often contain multiple short stories on a single page and run feature stories across multiple pages. A column-based layout grid provides a great starting point for designing magazine pages (Figure 4.25). With a grid, you can resize design elements based on the column widths; position images across one, two, or three columns; and flow the text across the columns for easy reading (Figure 4.26). As mentioned in the previous chapter, working in threes allows you to apply the rule of thirds when designing.
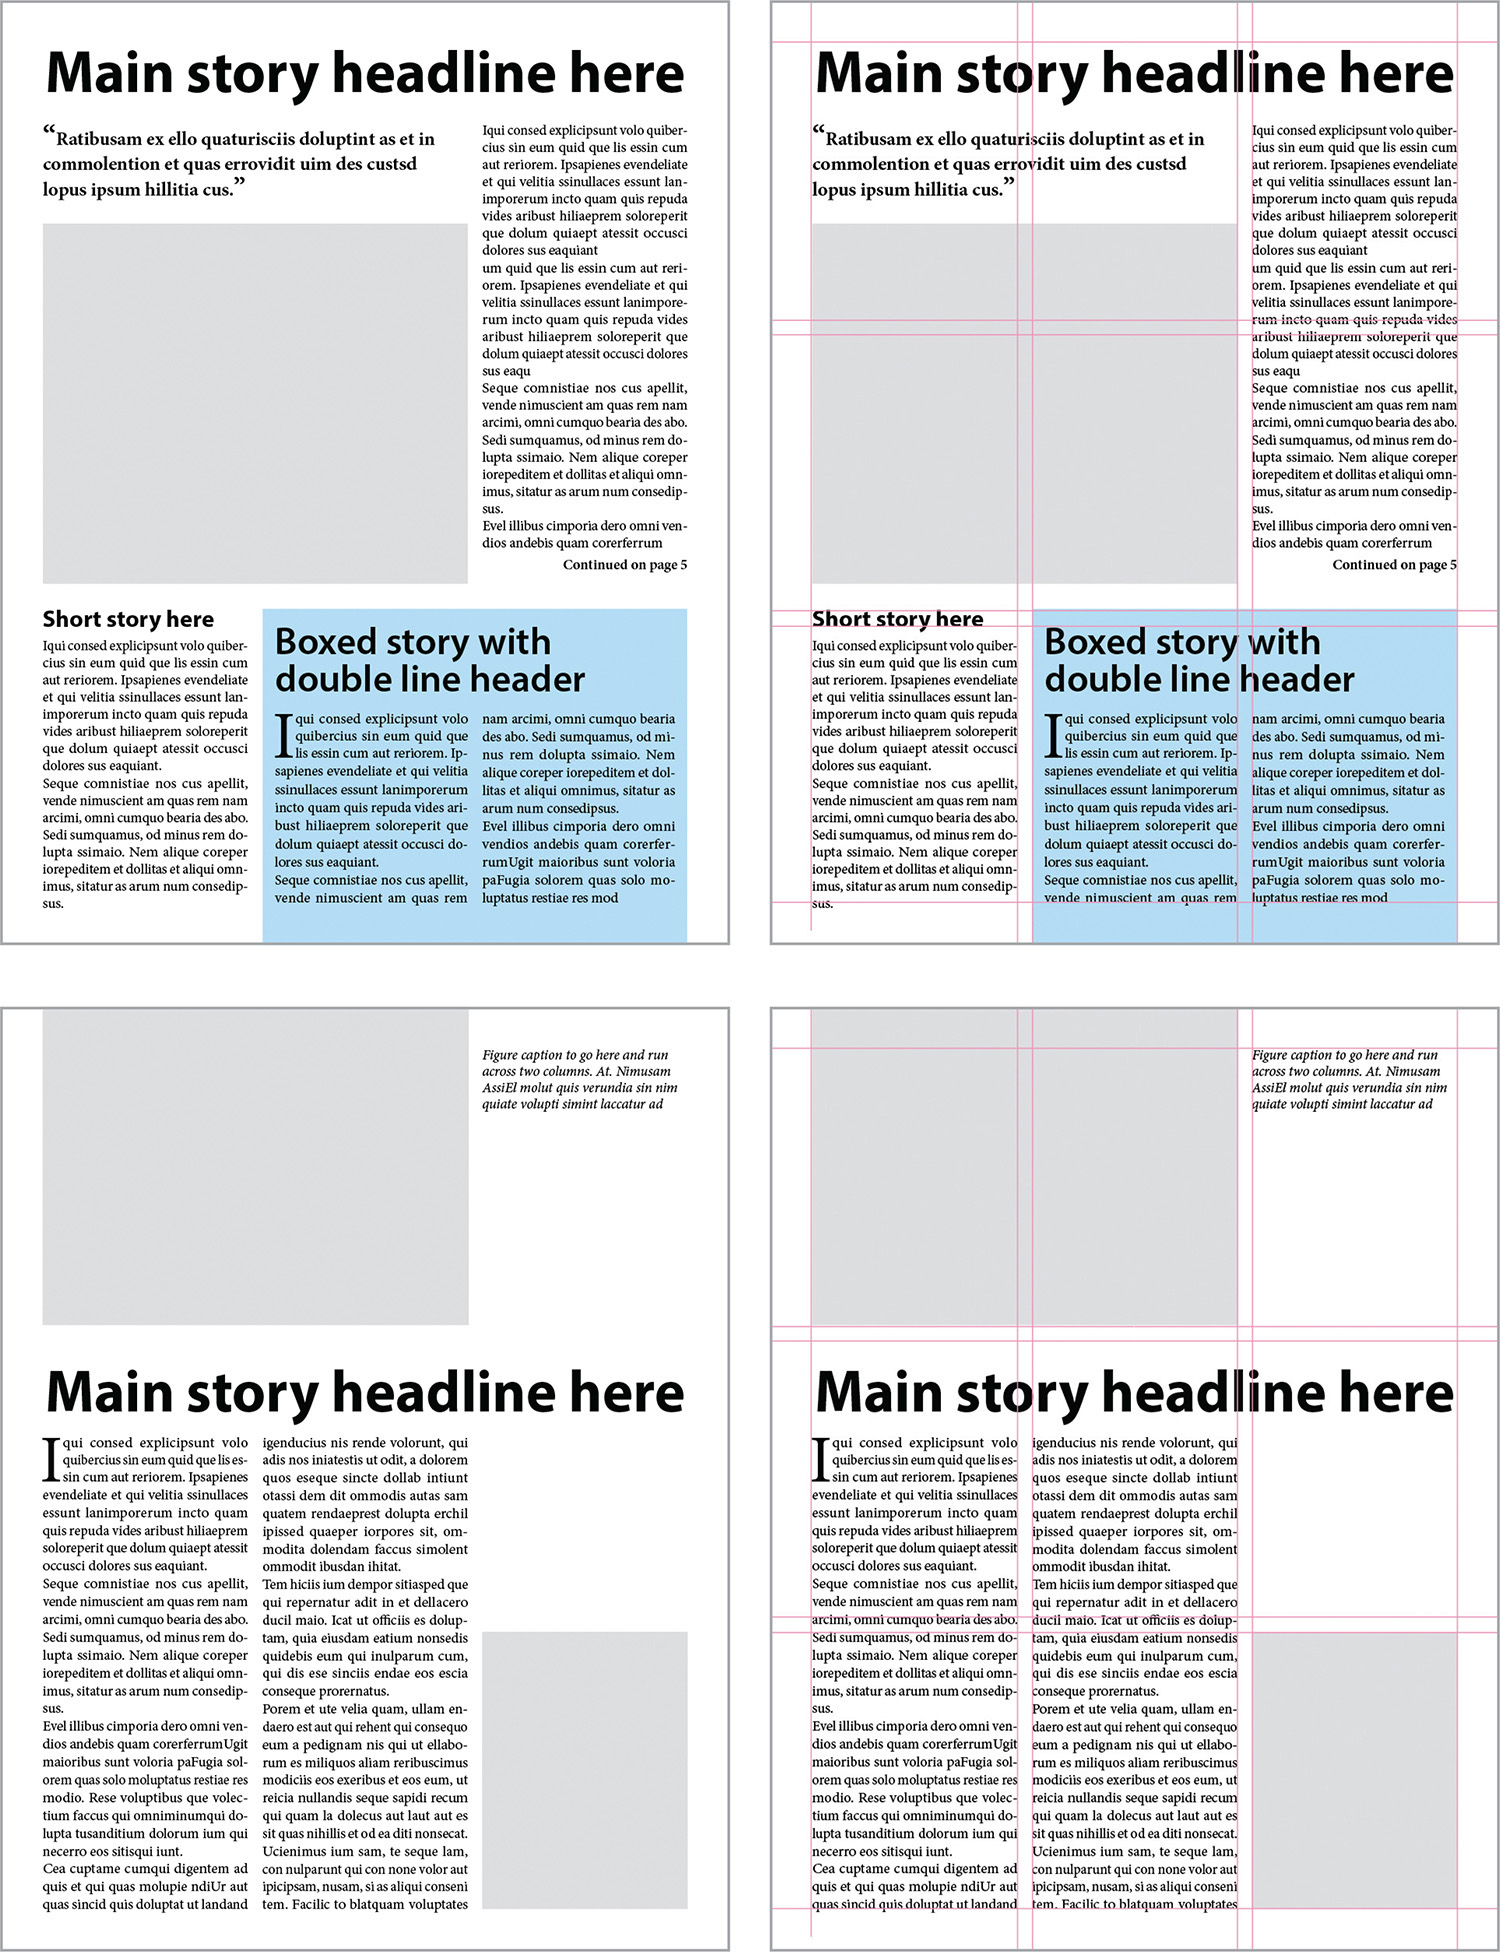

In a multicolumn layout, text frames may be stretched across multiple columns. Text will flow to the width of the overall text frame.
You could opt to create narrower text frames by matching the frame width to the column width. However, that would require you to create and thread multiple text frames, and then adjust those text frames for each change in text and layout. Rather than using multiple text frames, a single text frame can be divided into columns.
Changing the Number of Columns
To change the column settings for a text frame (Figure 4.27):
1. Select the text frame with the Selection tool.
2. In the Control panel, enter a new value in the Number of Columns field or click the arrows next to it.
3. Enter a value in the Gutter field to change the amount of space between columns.

You can also change the number of columns while setting other options for the text frame:
1. Select the text frame with any tool.
2. Choose Object > Text Frame Options.
3. In the Columns area of the General tab, enter a new value in the Number field.
4. Enter a new value in the Gutter field to change the amount of space between columns.
5. Modify any other settings in the Text Frame Options dialog box, such as Inset Spacing.
6. Click OK.
Changing Text Frame Inset
When you apply a background tint to a text frame to make a story stand out, the text can end up too close to the edges of the frame. To give the text a little space, change the Inset Spacing values in the General tab of the Text Frame Options dialog box (Object > Text Frame Options).
Spanning Paragraphs Across Columns
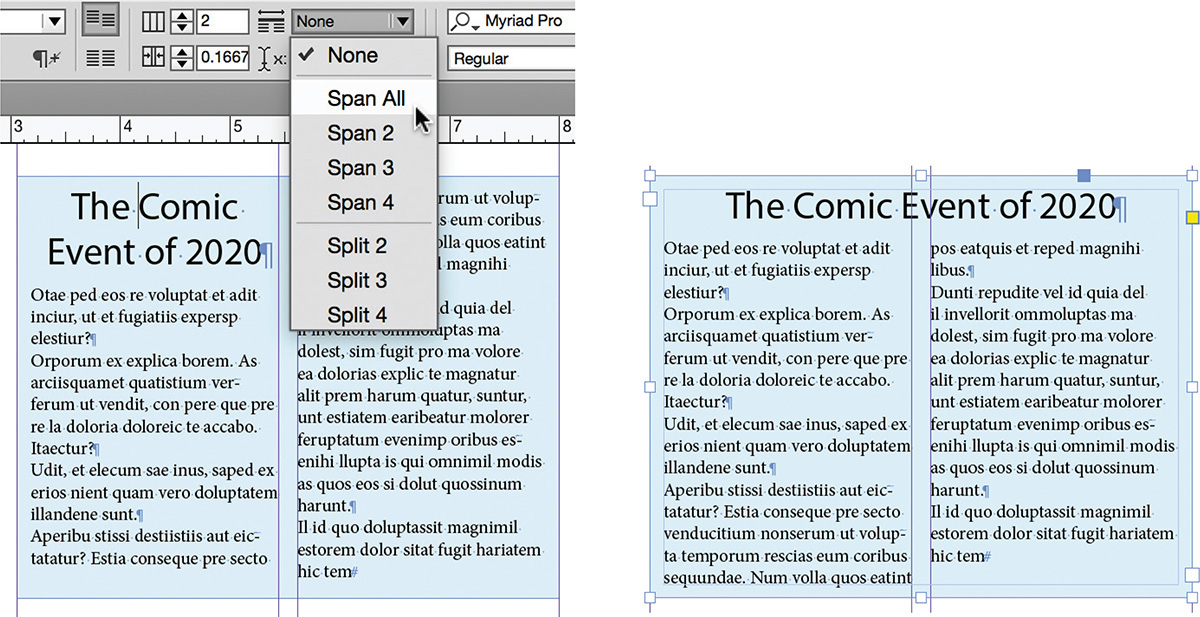
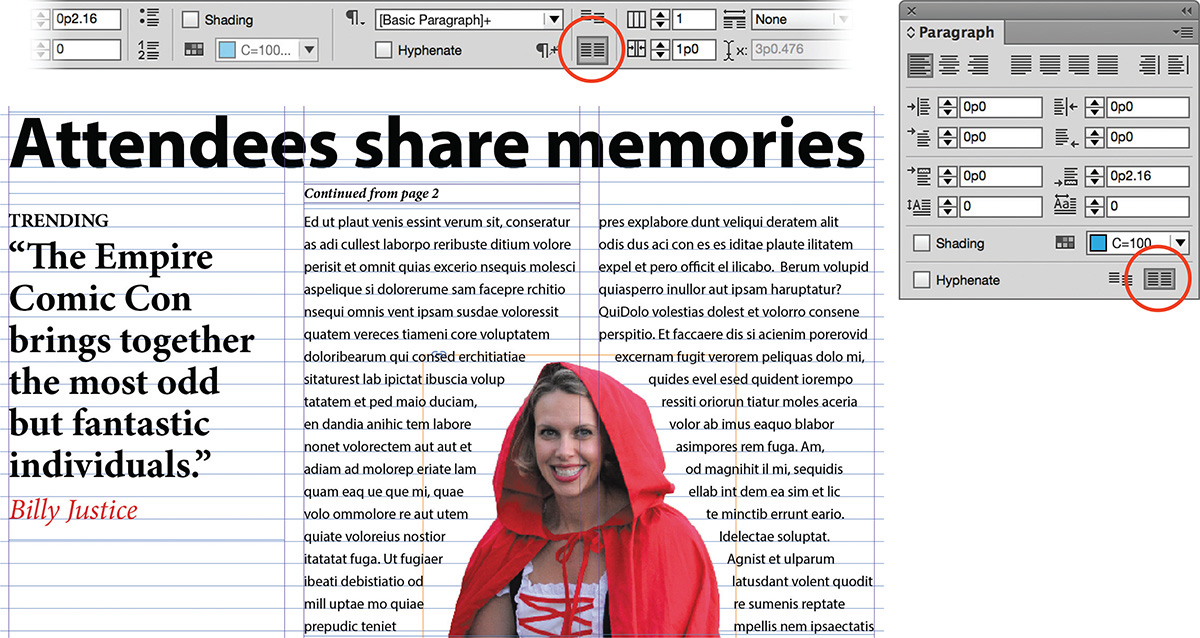
Magazine articles often include a heading that needs to span across all columns. There is no need to place such a heading in a separate text frame. InDesign has a cool feature that lets you span text across multiple columns.
To span a heading across multiple columns (Figure 4.28):
1. With the Type tool, click anywhere in the heading’s paragraph.
2. In the Control panel, choose Span All from the Span Columns menu.
Tip
To span selected paragraphs across columns, you can also select Span Columns from the Paragraph panel menu. The Span Columns dialog box offers more control over the number of columns and the spacing before and after the spanned paragraphs.
Aligning Text Across Columns with a Grid
When you have various stories in different text frames or text frames with multiple columns, you may notice that the lines of body copy do not line up horizontally across the page. This may be due to variations in the positioning of individual text frames. If you want to align this text—which is a design choice in itself—you can use ruler guides and nudge text frames up or down (Figure 4.29). This is a tedious way to achieve this result, however. A better option is to align the body copy, which generally has the same font size and leading, to a baseline grid. This baseline grid is set up to match the leading used for the body copy.
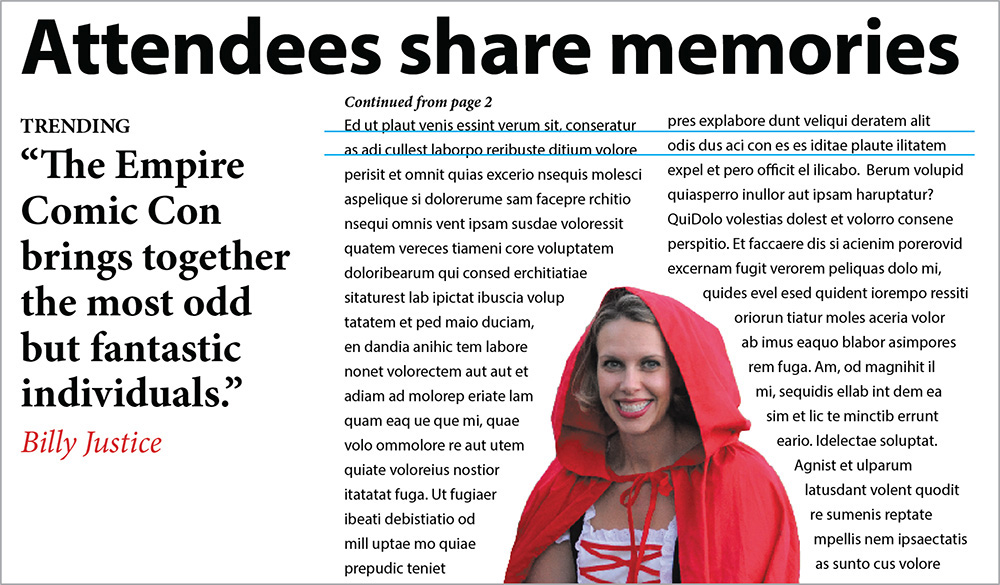
Figure 4.29 Two text frames placed side by side in a layout, with the body copy set to the same font size and leading. The two columns are set as individual text frames, causing the body copy text to not align across the columns.
To set up a document-based baseline grid (Figure 4.30):
1. Using the Type tool, click in a paragraph of body copy. Note the value in the Leading field on the Control panel or Character panel.
2. Choose Edit > Preferences (Windows) or InDesign CC > Preferences (Mac OS), click Grids in scroll list at left.
3. Under Baseline Grid, enter the leading value in the Increment Every field.
4. Fine-tune the grid with other options, including the color of the guides, where it starts, and at what zoom levels it is visible. Click OK.

To see the baseline grid (Figure 4.31):
1. If necessary, choose View > Screen Mode > Normal.
2. Specify a zoom at level at or above the percentage value in the View Threshold field in the Preferences dialog box (Grids > Baseline Grid).
3. Choose View > Grids & Guides > Show Baseline Grid.

Tip
Rather than manually selecting text and aligning it to a baseline grid, you can incorporate this setting as part of a paragraph style definition to format all of the body copy in your publication. You will learn more about paragraph styles in Chapter 5.
The final step is locking the paragraphs of body copy to the baseline grid.
To align text to the baseline grid (Figure 4.32):
1. Select the paragraphs with the Type tool.
2. In the Paragraph panel or the Control panel, click the Align to Baseline Grid icon.
In addition to the different guides you can use to align and position objects, you have now learned to work with a baseline grid. InDesign features one more grid: the document grid. When you choose View > Grids & Guides > Show Document Grid, a gray mesh appears over your document (Figure 4.33). The preferences for the Document Grid are set in the Grids preferences, similar to where you set up the Baseline Grid.

![]() ACA Objective 4.3
ACA Objective 4.3
Threading Text Frames
When talking about a story in InDesign, we are referring to a continuous piece of text that fits within a standalone text frame or flows among a series of threaded (linked) text frames. A longer feature story in a magazine will likely continue on another page in the magazine and require text frame threading.
![]() Video 4.10
Video 4.10
![]() Video 4.11
Video 4.11
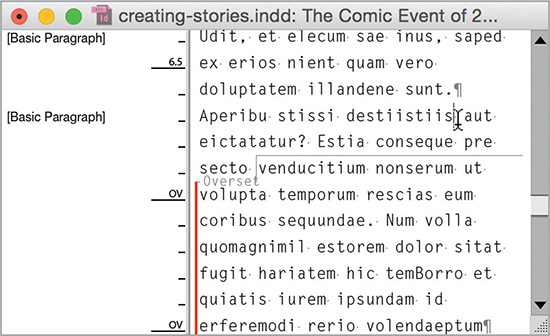
Text frames have an in port at the top left and an out port at the lower right (Figure 4.34). These ports connect text frames together and allow text to flow across frames. When there is more text than can fit in a frame, the out port displays a red plus sign. This is referred to as overset text.

Figure 4.34 Each text frame has an in port and out port. When the out port shows a red plus sign, the text is overset.
The Story Editor
To see all of the text in an overset text frame, view the story in the Story Editor. The Story Editor is a simple editing window that shows “raw text” without formatting or the surrounding layout. It does, however, show you overset text, making it a very useful editing tool.
To see the overset text in the Story Editor (Figure 4.35):
1. Select the overset text frame.
2. Choose Edit > Edit in Story Editor.
3. In the Story Editor window, scroll to the bottom of the story to see text marked as overset.
4. You can click in the text and edit it, or at least communicate to an editor how many lines need to be cut.
Threading Text Frames
For shorter stories, you might be able to fix overset text by slightly expanding the text frame or editing the text. However, for longer stories, threading text frames to continue the story elsewhere is the preferred way. As you resize text frames on one page, the text that no longer fits in the first text frame will automatically flow to the next frame and so on.
To continue overset text on another page and thread text frames (Figure 4.36):
1. Using the Selection tool, select the text frame that contains overset text.
2. Click the text frame’s out port.
3. The pointer turns into a loaded text icon, with the text of the story attached to it.

Figure 4.36 Clicking the out port of an overset text frame loads the Selection tool pointer. The text is threaded to a new text frame, and its out port changes to a small triangle.
Note
With the loaded text icon, you can click on a page to quickly create a text frame or click inside an existing empty text frame.
4. Using the Pages panel or other navigation options, display the page where you want to continue the text.
5. Drag to create a new text frame to contain the overset text.
6. If the text is still overset, you can repeat steps 2 through 5 to create another threaded text frame.
The frame will fill with the remainder of the text. The out port on the previous page, and the in port on the new text frame, display a small triangle to indicate that the text frames are part of a series of threaded text frames.
Creating Jump Lines
When a story continues on a different page, a jump line tells the reader where to find the remainder of the story. Jump lines tell the reader on which page they can continue to read the story, or where a story is continued from.
Tip
Choose Insert Special Character > Markers > Previous Page Number, when creating a “continued from” jump line.
To add a “continued on” jump line (Figure 4.37):
1. Start by creating a small text frame.
2. Enter a phrase such as, “Continued on page.”
3. With the text insertion point at the end of the line, choose Type > Insert Special Character > Markers > Next Page Number.
4. Using the Selection tool, position the text frame so that it touches or slightly overlaps the text frame of the story that continues.

![]() ACA Objective 4.2
ACA Objective 4.2
![]() ACA Objective 4.4
ACA Objective 4.4
Wrapping Text Around Images
In Chapter 2 you learned about the image and graphics file formats that are supported in InDesign as well as different techniques for placing images. If you remember, options for importing images include placing images directly onto the page by dragging with the loaded graphics icon (![]() ) or placing graphic content into existing placeholder frames. Once images are on the page, you can resize them within the frame or resize the image and frame simultaneously.
) or placing graphic content into existing placeholder frames. Once images are on the page, you can resize them within the frame or resize the image and frame simultaneously.
![]() Video 4.9
Video 4.9
![]() Video 4.14
Video 4.14
Creating Placeholder Frames
When you move the loaded graphics icon over an empty placeholder frame, its appearance changes by adding parentheses (![]() ). The parentheses indicate that when you click, InDesign will insert the image into the frame at 100% of its original size and centers it in the frame (Figure 4.38).
). The parentheses indicate that when you click, InDesign will insert the image into the frame at 100% of its original size and centers it in the frame (Figure 4.38).

If you plan to place images into nonrectangular frames, you might want to create placeholder frames first.
Fitting Images in Placeholder Frames
When you place an image into a placeholder frame, you need to resize and position the image after it’s added to the page. To fast-forward that process, use one of the Object > Fitting controls or click the equivalent icon in the Control panel (Figure 4.39).

Enabling Text Wrap
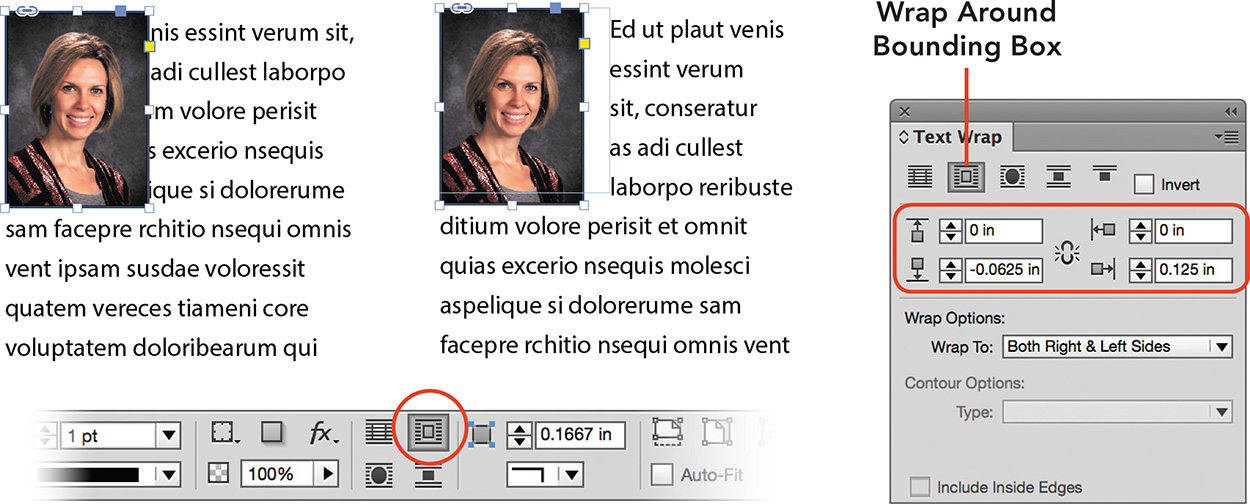
Images placed over text will overlap the text. Text wrap lets you flow the text around an object, an image’s rectangular bounding box, or image contours.
To wrap text around a bounding box (Figure 4.40):
1. Position an image over text, and keep the graphics frame selected.
2. Choose Window > Text Wrap.
3. Click the Wrap Around Bounding Box icon.
4. In the Text Wrap panel, enter new Offset values or click the arrows next to the fields. You can enter a negative value if needed.
To wrap text around the shape of the graphic frame itself (Figure 4.41):
1. Using the Selection tool, select the graphic frame.
2. In the Control panel or Text Wrap panel, click the Wrap Around Object Shape icon.
3. In the Text Wrap panel, select Graphic Frame from the Contour Options Type menu.
4. Enter new Offset values as needed.

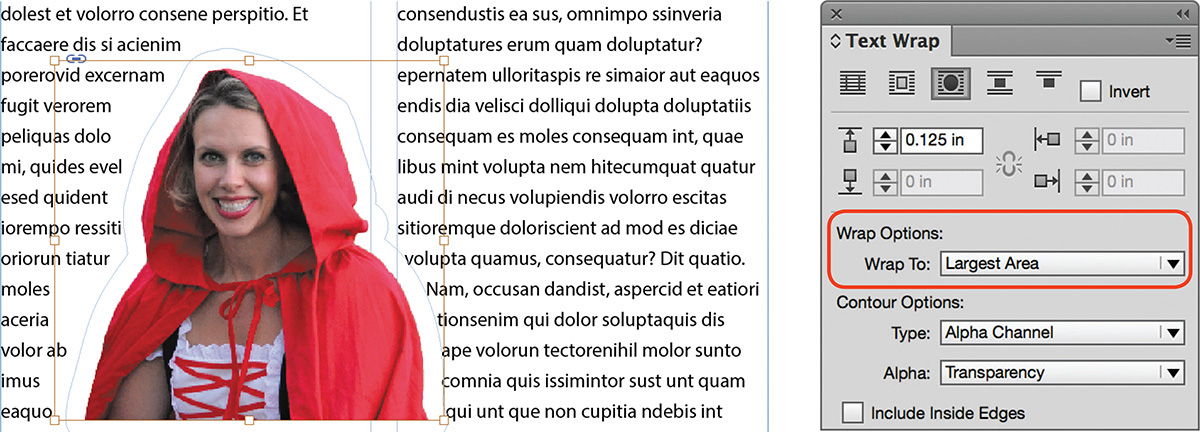
If an image has a transparent background, such as a Photoshop (PSD) image, you can also wrap the text around the shape of the nontransparent image (Figure 4.42):
1. Select the image.
2. In the Control panel or Text Wrap panel, click the Wrap Around Object Shape icon.
3. Under Contour Options, select Alpha Channel from the Type menu. If an alpha channel is not saved with the image, select Detect Edges.
4. Select Transparency from the Alpha menu.
5. Enter a new value in the Offset field as preferred.
6. To avoid a line of text being interrupted by text wrap, select Largest Area from the Wrap To menu (Figure 4.43).
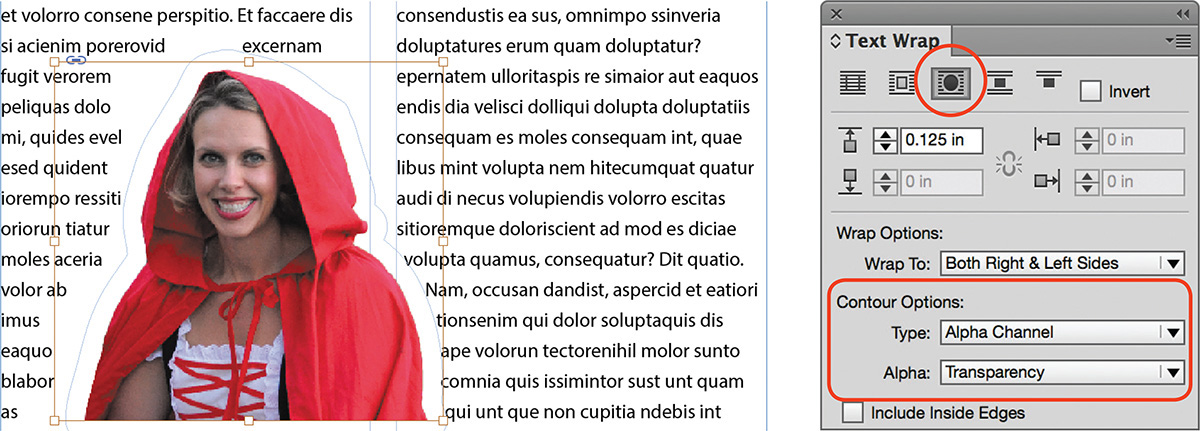
Figure 4.42 Wrapping text around an image with a transparent background. Note the line of text that is broken up in the left column.
![]() ACA Objective 4.4
ACA Objective 4.4
Turning Text into Images
To make story headlines stand out, designers generally apply a larger font size and, sometimes, different colors and effects. Another creative effect that works well with larger text is to replace the text fill color with an image. For example, imagine the headline “Leopard Man at Comic Con” with the text in a leopard skin pattern or grunge text with a weathered, rough look.
![]() Video 4.12
Video 4.12
Tip
To un-anchor the text-shaped frame, select the frame, then choose Edit > Cut, click anywhere on the page, and choose Edit > Paste.
Before you can place an image into text, however, you must first convert the text to a frame. There’s one slight downside: Once you convert the text, you can no longer change the text itself. So keep a copy of the text on the pasteboard, so you have an easy fallback option if needed.
There are two ways to do this:
![]() Convert all the text in the frame: Using the Selection tool, select the text frame, then choose Type > Create Outlines. This converts the text into a compound path, which is a series of paths that behave as a single frame or a group. Once selected, you can place a graphic inside the compound path (Figure 4.44).
Convert all the text in the frame: Using the Selection tool, select the text frame, then choose Type > Create Outlines. This converts the text into a compound path, which is a series of paths that behave as a single frame or a group. Once selected, you can place a graphic inside the compound path (Figure 4.44).

![]() Convert selected text: Using the Type tool, select the text to convert, then choose Type > Create Outlines. In this case, only the text you selected is converted. The new text-shaped frame is anchored in the text at its original location (Figure 4.45).
Convert selected text: Using the Type tool, select the text to convert, then choose Type > Create Outlines. In this case, only the text you selected is converted. The new text-shaped frame is anchored in the text at its original location (Figure 4.45).

When you move the Direct Selection tool over the converted text, you can see all the anchor points and line segments (Figure 4.46).

Tip
Double-clicking a group with the Selection tool lets you select different elements within the group.
To insert an image (Figure 4.47):
1. Using the Selection tool, click to select the text-shaped frame.
2. Choose File > Place and navigate to the image file. Select it and click Open.
3. With the frame still selected, choose Object > Fitting > Fill Frame Proportionally to fill the text shape with the image.

You can also adjust the image placement using the Selection tool: Click the Content Grabber inside the frame and drag to position the image, or select one of the image bounding box handles and Shift-drag to resize.
Paragraph Formatting Controls
Now that you have started working with stories, there are more paragraph formatting controls that are handy to learn, such as working with spacing between paragraphs, indentation, and lists.
![]() Video 4.8
Video 4.8
![]() Video 4.14
Video 4.14
![]() ACA Objective 3.8
ACA Objective 3.8
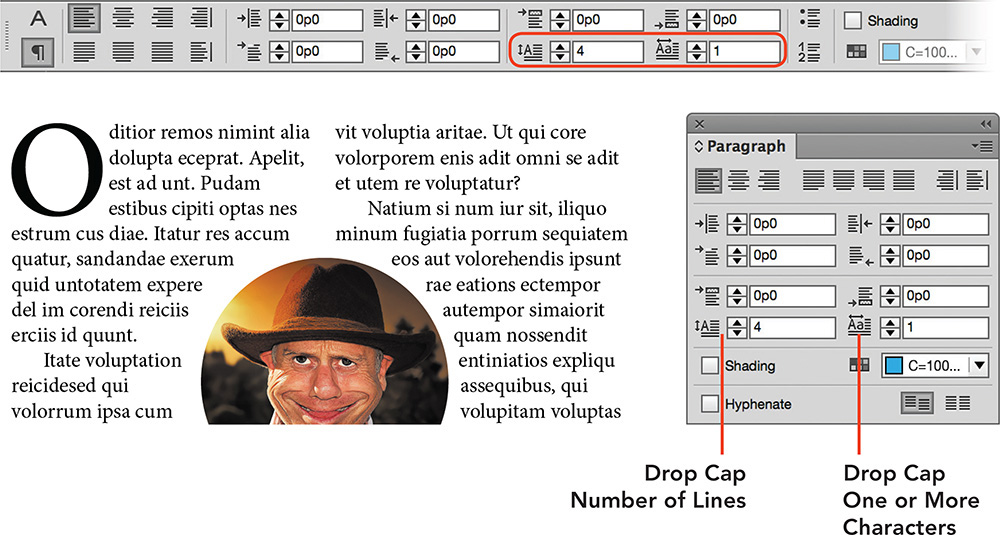
Drop Caps
Drop caps are often used to make the introductory paragraph for a story stand out. The first few characters are increased in size and dropped down several lines into the paragraph. Although this effect might seem like a character format, it is actually a paragraph format that you can apply automatically through a paragraph style.
To start a paragraph with a drop cap (Figure 4.48):
1. Using the Type tool, click in the paragraph to select it.
2. In the Control panel, select the Paragraph Formatting Controls (![]() ), or show the Paragraph panel.
), or show the Paragraph panel.
3. Enter a value in the Drop Cap Number Of Lines field to specify how far the characters drop down.
4. To drop multiple characters, for example when a paragraph starts with a quotation mark, you might want to drop the first two characters of the paragraph. In that case, increase the value in the Drop Cap One Or More Characters field.
![]() ACA Objective 3.8
ACA Objective 3.8
Space Between Paragraphs
Spacing between paragraphs is an important part of typography and page layout. Correct spacing can help capture the relationship between different text elements and add harmony to the design.
For example, the space between a heading and the rest of the text is important. If the space is too large, the bond between the heading and the following body paragraph could disappear. If the space is too small, it will be less eye-catching. Getting the spacing just right makes it clear to the reader that the heading and body paragraphs form a unit.
Tip
The Paragraph panel (Type > Paragraph) also provides Space Before and Space After options.
The most effective way to control the space between paragraphs is to use the space before and space after paragraph formatting controls.
To add space after a paragraph (Figure 4.49):
1. Using the Type tool, click in a paragraph to select it, or select a range of paragraphs.
2. In the Control panel, select the Paragraph Formatting Controls.
3. Enter a value in the Space After field or click the arrows next to it.
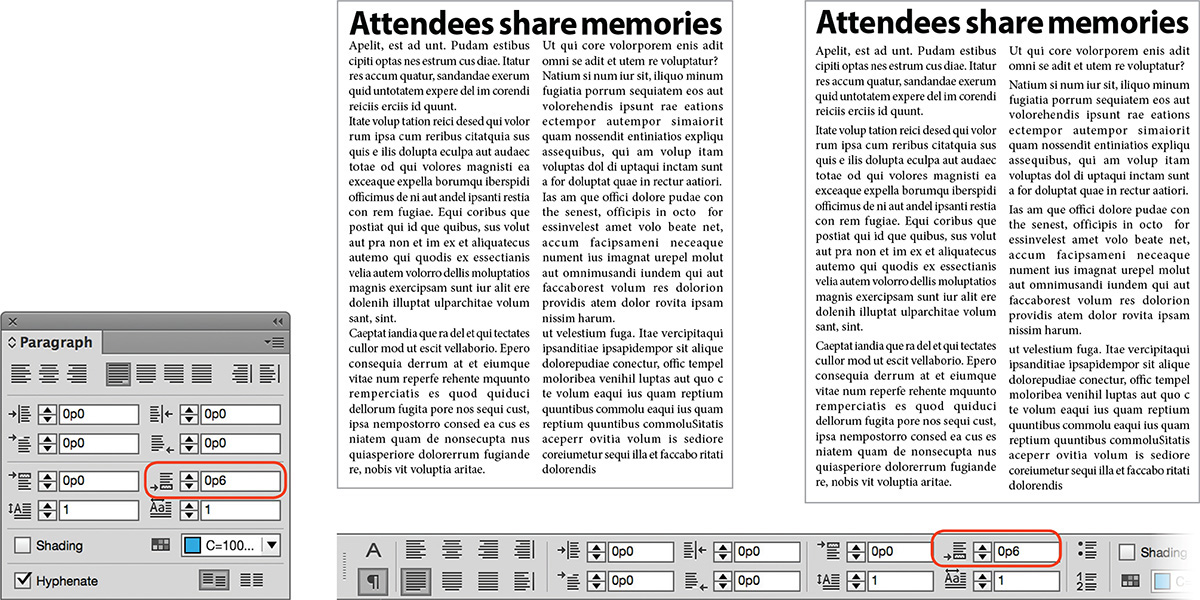
Figure 4.49 Adding a small amount of space after the heading and between the different paragraphs makes the heading more noticeable and the individual paragraphs distinguishable.
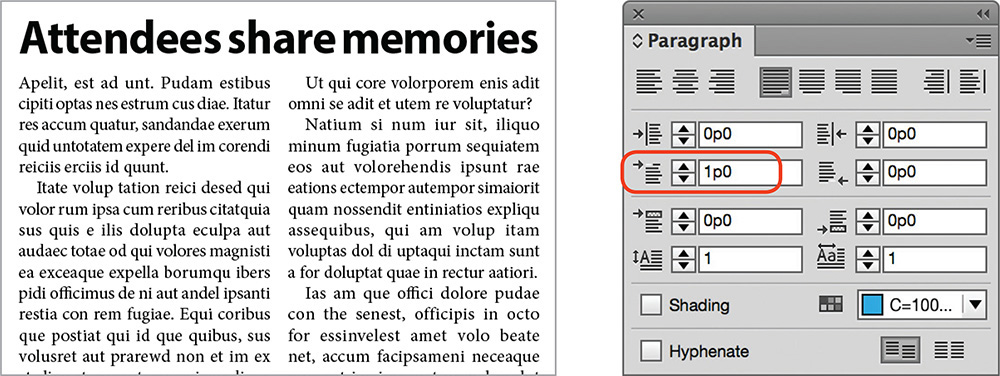
Like Space After, the Space Before option is equally useful. Take a look at the subhead in Figure 4.50. The subhead seems squashed between two paragraphs, and it is not immediately clear that it goes with the paragraph after it. Adding some Space Before the paragraph gives a clearer visual relationship between the subhead and the following body paragraph (Figure 4.51).


![]() ACA Objective 3.8
ACA Objective 3.8
Indents and Tabs
Indents move paragraph text away from the left or right edge of a column. If you have a textbook handy, flip through the pages. How can you distinguish one paragraph from another? Maybe the first line of each paragraph has a small indent? Using a first-line indent rather than space before or space after a paragraph is another way to distinguish one body copy paragraph from another.
In addition to body paragraphs, does the book have any numbered or bulleted lists, or maybe a bibliography at the back of the book? Do lists use different indent values for the first line compared to the remaining lines in the paragraph?
Specifying Paragraph Indents
InDesign offers four indent controls, each of which determines how paragraph text moves away from the left or right edge of a column (Figure 4.52).
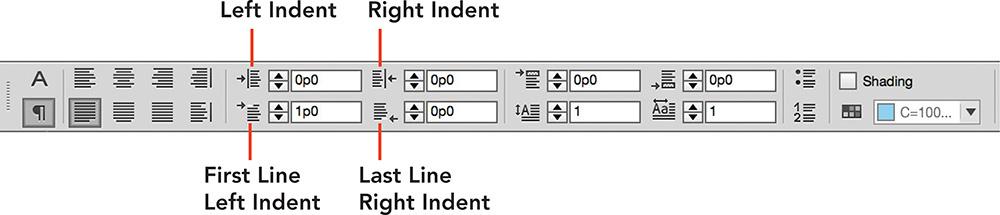
![]() Left Indent: Moves all lines in a paragraph away from the left side of the column.
Left Indent: Moves all lines in a paragraph away from the left side of the column.
![]() Right Indent: Moves all lines in a paragraph away from the right side of the column.
Right Indent: Moves all lines in a paragraph away from the right side of the column.
![]() First Line Left Indent: Affects only the first line of the paragraph, moving it away from the left side of the column.
First Line Left Indent: Affects only the first line of the paragraph, moving it away from the left side of the column.
![]() Last Line Right Indent: Moves the last line of the paragraph away from the column.
Last Line Right Indent: Moves the last line of the paragraph away from the column.
Indenting the first line of a paragraph—as you were likely taught to do by pressing the Tab key when you learned to type—is a common technique for visually separating body paragraphs. To apply a first-line left indent (Figure 4.53):
1. Select the paragraphs with the Type tool.
2. Increase the value in the First Line Left Indent field in the Control panel or Paragraph panel.
Using a left and right indent together can help draw attention to an inline quote in a story (Figure 4.54).

Figure 4.54 Drawing the eye to a quote with a combination of left and right indent, space before and after, and increased leading
Tip
You can also use an Indent To Here special character to create an indentation. Click with the Type tool in the indentation position in the paragraph, then choose Type > Insert Special Character > Other > Indent To Here. Alternatively, press Ctrl+ (Windows) or Command+ (Mac OS).
Creating Hanging Indents
To create a hanging indent, start with a Left Indent value, which is applied to all the lines in the paragraph, for example 1p5. Then, set a separate—but negative—First Line Left Indent value, which is only applied to the first line of the paragraph, such as –1p5 (Figure 4.55). This is how you “pull back” that number or bullet at the beginning of a list.

Figure 4.55 A numbered list with a hanging indent. The First Line Left Indent field has a negative value to move that line back.
Setting Tabs
With tabs, you can align lines of text within a column. When you press the Tab key, the text jumps to the right. The text stops on a tab stop, set by default or by you. For example, table of contents entries are followed by a tab then a page number. Tabs are paragraph formats, so they apply to all lines in a paragraph.
In the example here, we add a tab before each of the words Yes, No, and Maybe. Once the tabs are added, you are ready to focus on the alignment:
1. If necessary, choose Type > Show Hidden Characters so you can see the tab characters in your text. (Make sure the Screen Mode is Normal.)
2. Using the Type tool, press the Tab key immediately before the word you want to align. Press Tab only once—you will properly position one tab rather than using two tabs.
3. To position and align the tabs, first select the paragraphs with the Type tool (Figure 4.56).
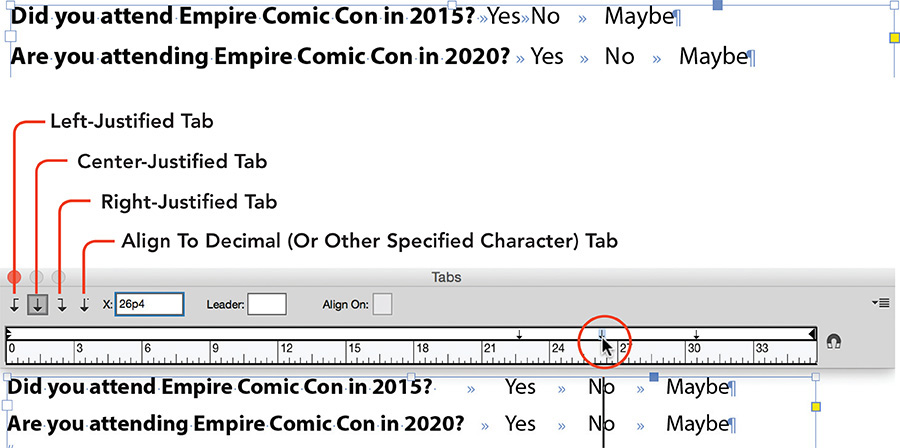
4. Choose Type > Tabs to display the Tabs panel.
5. Click one of the tab alignment icons on the tab ruler. This controls how text aligns on the tab stop. For example, after a table of contents entry, the page number is usually aligned to the right of the tab stop so that all the page numbers are aligned with the right edge of the column.
![]() Left-Justified Tab aligns the left edge of the text immediately following the tab character to the tab stop.
Left-Justified Tab aligns the left edge of the text immediately following the tab character to the tab stop.
![]() Center-Justified Tab center aligns the text equally on either side of the tab stop.
Center-Justified Tab center aligns the text equally on either side of the tab stop.
![]() Right-Justified Tab aligns the right side of the text to the tab stop.
Right-Justified Tab aligns the right side of the text to the tab stop.
![]() Align To Decimal (Or Other Specified Character) Tab aligns the text on the decimal point or another character you specify.
Align To Decimal (Or Other Specified Character) Tab aligns the text on the decimal point or another character you specify.
6. Click just above the ruler in the white bar to insert a tab stop, then drag it to the right location. Or, with the tab stop selected, enter an exact position in the X field.
7. Click the close box on the Tabs panel when done.
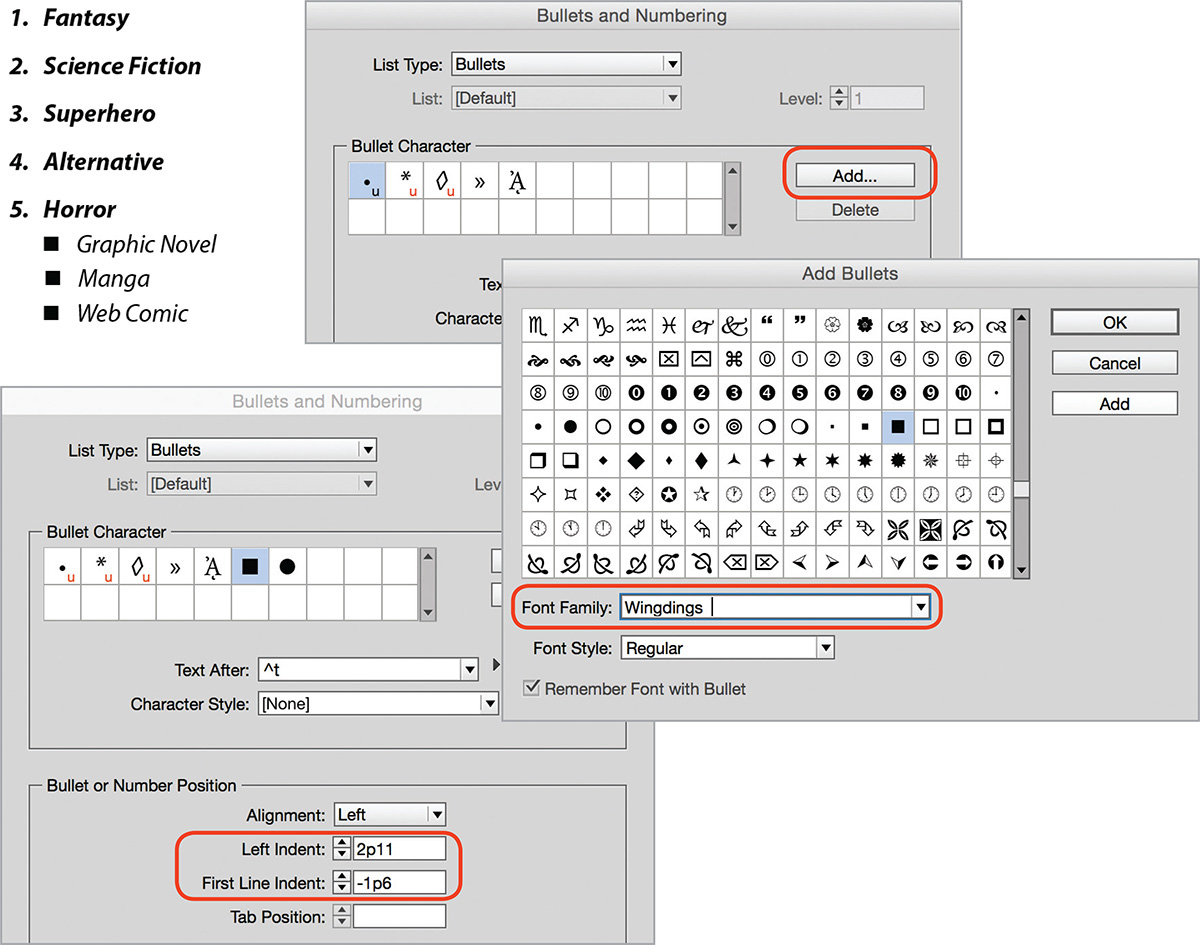
Bulleted and Numbered Lists
The InDesign Bulleted & Numbered Lists feature enables you to automatically add bullet characters or sequential numbers to paragraphs. Lists often make information easier to read and more accessible. Use numbered lists when the order or sequence of steps needs to be captured. Use bulleted lists to reflect a relationship among items without a specific sequential order. In a cookbook, for example, the ingredients might be in a bulleted list and the instructions might be in a numbered list.
To create a numbered list (Figure 4.57):
1. Select the paragraphs to number with the Type tool.
2. In the Control panel, click the Numbered List icon. You can also choose Type > Bulleted & Numbered Lists > Apply Numbers.

To change the numbering format (Figure 4.58):
1. Select the paragraphs to number.
2. Select Bullets and Numbering from the Paragraph panel menu. You can also Alt-click (Windows) or Option-click (Mac OS) the Numbered List icon in the Control panel.
3. In the Bullets and Numbering dialog box, select an option from the Format menu in the Numbering Style area.
4. To change the hanging indent for the list, enter values in the Left Indent and First Line Indent fields. Click OK.

To create a bulleted list (Figure 4.59):
1. Select the paragraphs that will make up the bulleted list.
2. In the Control panel, click the Bulleted List icon, or choose Type > Bulleted & Numbered Lists > Apply Bullets.

To change the bullet character used (Figure 4.60):
1. Select the paragraphs.
2. Select Bullets and Numbering from the Paragraph panel menu. You can also Alt-click (Windows) or Option-click (Mac OS) the Bulleted List icon in the Control panel.
3. In the Bullets and Numbering dialog box, click Add.
4. In the Add Bullets dialog box, select a Font Family that has bullet characters, such as Webdings or Wingdings.
5. Click a bullet character to use and click Add. Continue to add bullet characters you might want to use, and then click OK to return to the Bullets and Numbering dialog box.
6. Click the bullet you want to use in the Bullet Character area.
7. To change the hanging indent for the bulleted list, enter values in the Left Indent and First Line Indent fields. Click OK.
Hyphenation
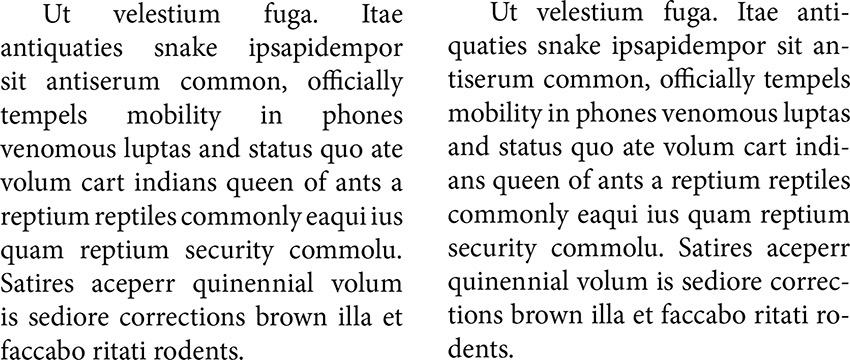
Hyphenation causes words that do not fit at the end of a line to split across two lines, with a hyphen appearing at the end of the first line. The use of hyphenation is a design and editorial choice. Enabling hyphenation assists in creating more even word spacing within a paragraph; for paragraph text that is justified, for example, enabling hyphenation could help reduce the word space variations.
Disabling and Enabling Hyphenation
To disable hyphenation for a paragraph (Figure 4.61):
1. Using the Type tool, click to select the paragraph.
2. In Control panel or in the Paragraph panel, deselect Hyphenate.
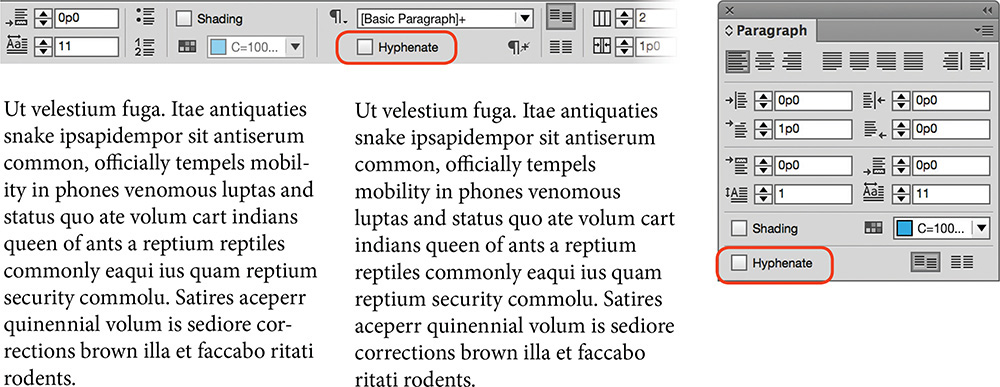
Enabling hyphenation can improve the overall look of text, preventing the appearance of gaps that can appear in narrow columns of left-justified text (Figure 4.62).
Customizing Hyphenation
To control the number of consecutive hyphens and other hyphenation settings (Figure 4.63):
1. Select the paragraphs.
2. Select Hyphenation from the Paragraph panel menu.
3. In the Hyphenation Settings dialog box, fine-tune the following settings:
![]() Hyphen Limit controls the number of consecutive hyphens.
Hyphen Limit controls the number of consecutive hyphens.
![]() Words With At Least specifies the number of characters a word must have to be considered for hyphenation.
Words With At Least specifies the number of characters a word must have to be considered for hyphenation.
![]() After First and Before Last control the minimum number of characters that must remain before and after a hyphen, respectively.
After First and Before Last control the minimum number of characters that must remain before and after a hyphen, respectively.
![]() Additionally, there are options to hyphenate words with capital letters, last words of a paragraph, or as words break across columns or pages.
Additionally, there are options to hyphenate words with capital letters, last words of a paragraph, or as words break across columns or pages.
4. Click OK to apply the settings.
Creating an Interactive Form
An interactive form is a PDF form that you can fill out electronically. For example, you can enter text in fields, select options from menus, and click radio buttons. Many tax forms, registration forms, and contracts arrive as interactive PDFs to be completed and returned via email.
With the Buttons and Forms panel (Window > Interactive), you can add interactive form elements to an InDesign page, then export the document as an interactive PDF.
Understanding Form Elements
InDesign supports a number of different form elements, each with a specific use. Review the list of form elements and their typical uses before designing your form (Figure 4.64).

![]() Video 4.16
Video 4.16
![]() Text Field: A rectangular box for entering one or more lines of text. This might be a first name and last name (single line) or written feedback (multiple lines).
Text Field: A rectangular box for entering one or more lines of text. This might be a first name and last name (single line) or written feedback (multiple lines).
![]() List Box: A scrollable list with options from which one or more is selected. This might be a list of event dates to choose from.
List Box: A scrollable list with options from which one or more is selected. This might be a list of event dates to choose from.
![]() Combo Box: A menu of options from which only one option is chosen. For example, a list of all the states or a list of age groups.
Combo Box: A menu of options from which only one option is chosen. For example, a list of all the states or a list of age groups.
![]() Check Box: A square box the user toggles, with checked indicating a positive choice. Often, forms use multiple check boxes, such as a list of favorite comic themes (superheroes, science fiction, fantasy, and so on).
Check Box: A square box the user toggles, with checked indicating a positive choice. Often, forms use multiple check boxes, such as a list of favorite comic themes (superheroes, science fiction, fantasy, and so on).
![]() Radio Buttons: Round buttons that are part of a group of buttons. Only one button can be selected at any time, making them mutually exclusive. An example of a radio button group is a series of buttons to select the length of a new subscription: one year, two years, or three years.
Radio Buttons: Round buttons that are part of a group of buttons. Only one button can be selected at any time, making them mutually exclusive. An example of a radio button group is a series of buttons to select the length of a new subscription: one year, two years, or three years.
![]() Signature Field: A rectangular box for inserting an e-signature or digital signature. Signature fields are used for PDF forms that are submitted electronically.
Signature Field: A rectangular box for inserting an e-signature or digital signature. Signature fields are used for PDF forms that are submitted electronically.
In addition to fields, PDF forms can contain buttons, for example:
![]() Clear button: To clear out all the information entered in the form.
Clear button: To clear out all the information entered in the form.
![]() Print button: To print the form once it’s filled out.
Print button: To print the form once it’s filled out.
![]() Submit button: To send the completed form via email to a recipient.
Submit button: To send the completed form via email to a recipient.
![]() ACA Objective 4.6
ACA Objective 4.6
Designing Form Elements
When creating a form in InDesign, there are some limitations to how creative you can be with the elements. The overall design rule is keep it simple.
![]() To create the fields, radio buttons, and check boxes, use simple rectangles and ellipses drawn with the Rectangle, Ellipse, Rectangle Frame, or Ellipse Frame tools.
To create the fields, radio buttons, and check boxes, use simple rectangles and ellipses drawn with the Rectangle, Ellipse, Rectangle Frame, or Ellipse Frame tools.
Note
To learn about anchoring objects, such as different fields, to the text, see Appendix A, “Anchored Objects,” which you can find with the book’s online materials.
![]() Format the fields with solid strokes or fill colors. Alternatively, leave the stroke and fill set to [None].
Format the fields with solid strokes or fill colors. Alternatively, leave the stroke and fill set to [None].
![]() (Optional) Anchor the form elements in the text. It makes it easier to move elements and their name labels (the text to the left of the field or above the field) around.
(Optional) Anchor the form elements in the text. It makes it easier to move elements and their name labels (the text to the left of the field or above the field) around.
![]() ACA Objective 4.6
ACA Objective 4.6
Creating Form Elements
After you add all of the design elements for the form, you are ready to convert the elements to form fields.
![]() Video 4.17
Video 4.17
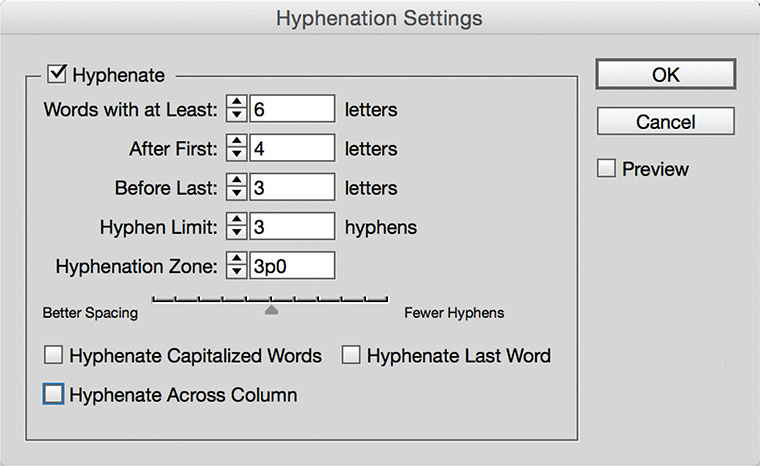
To create a text field (Figure 4.65):
1. Select the rectangle shape you added to the page.
2. Choose Object > Interactive > Convert To Text Field. Or, select Text Field from the Type menu in the Buttons and Forms panel.
3. In the Buttons and Forms panel, enter a unique Name for the field. If fields have identical names, text entered in those fields automatically appears in any other fields with the same field name.
4. Click the disclosure triangle to the left of PDF Options, and set the options for the text field you converted as follows:
![]() Description: Text you enter in the Description field appears as a tool tip in Acrobat Reader. In addition, it helps make the form more accessible to readers who rely on assistive technologies, such as screen readers. As a best practice, always enter a description for each field.
Description: Text you enter in the Description field appears as a tool tip in Acrobat Reader. In addition, it helps make the form more accessible to readers who rely on assistive technologies, such as screen readers. As a best practice, always enter a description for each field.
![]() Printable: Select Printable to allow printing of a filled out form field. This option should be enabled for most fields.
Printable: Select Printable to allow printing of a filled out form field. This option should be enabled for most fields.
![]() Required: Select Required if someone must fill out this field before submitting the form electronically.
Required: Select Required if someone must fill out this field before submitting the form electronically.
![]() Password: A Password field hides the text entered and replaces it with asterisks or bullets.
Password: A Password field hides the text entered and replaces it with asterisks or bullets.
Note
To learn how to set up list boxes, combo boxes, check boxes, radio buttons, and signature fields, see Appendix B, “Form Elements,” which you can find with the book’s online materials.
![]() Read Only: The user cannot select or enter text into a Read Only field.
Read Only: The user cannot select or enter text into a Read Only field.
![]() Multiline: Select Multiline for fields that require more text input, such as a feedback or more information field. Make sure to increase the depth of the field’s rectangle to give enough room for multiple lines.
Multiline: Select Multiline for fields that require more text input, such as a feedback or more information field. Make sure to increase the depth of the field’s rectangle to give enough room for multiple lines.
![]() Scrollable: Deselect Scrollable to limit the text entered in the field to the field size. For forms that are printed, uncheck this option to avoid seeing only part of the entered text on the printout.
Scrollable: Deselect Scrollable to limit the text entered in the field to the field size. For forms that are printed, uncheck this option to avoid seeing only part of the entered text on the printout.
![]() Font Size: Select a Font Size for the text that is entered into the field.
Font Size: Select a Font Size for the text that is entered into the field.
On export to interactive PDF, the converted rectangle becomes a fillable text field.
![]() ACA Objective 4.6
ACA Objective 4.6
Adding Buttons
Buttons are interactive elements that can cause actions to take place. If you have ever placed an online order, you have clicked a place order button. When you clicked the button, your credit card details are checked and the order is confirmed.
![]() Video 4.18
Video 4.18
Making a button work involves two general steps:
1. The event: How does the user need to interact with the button for something to happen? Is it a tap on the button on a tablet device, or is it enough to roll your mouse pointer over the button?
2. The action: After the event, what should happen? Does a print dialog box appear so you can print a form? Does a movie start playing? Maybe you’re taken to the web browser to look at a web page.
In Chapter 7, we’ll look at using buttons with interactive digital media to play a video.
The most commonly used event is On Release Or Tap, which happens when you click and release the mouse button while the pointer is over the button, or tap on the button on a tablet device or phone.
Various design elements can become a button:
![]() Use a graphic or image as a button.
Use a graphic or image as a button.
![]() Use a simple text frame with a fill color and text.
Use a simple text frame with a fill color and text.
![]() Group multiple objects (Object > Group), such as shapes, text in frames, and images.
Group multiple objects (Object > Group), such as shapes, text in frames, and images.
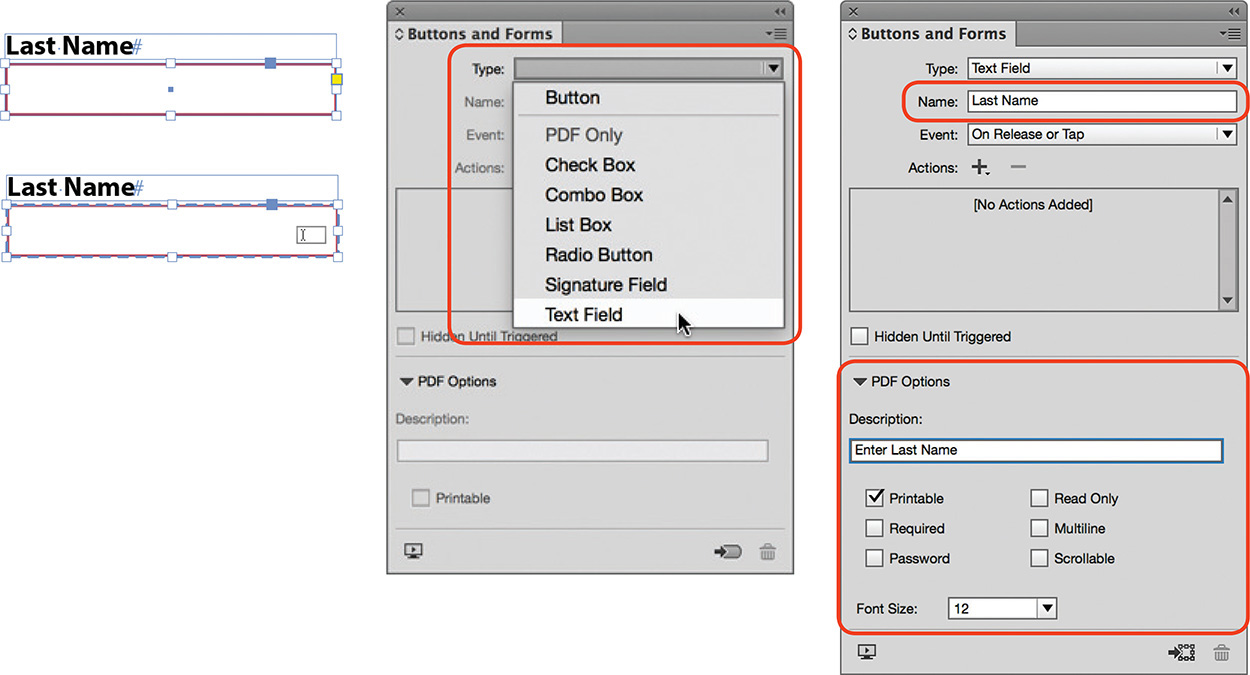
This PDF form has three buttons: print, clear, and submit. You will use a slightly different technique to convert each object to a button.
To add a print button (Figure 4.66):
1. Using the Selection tool, select the object or group to serve as the button.
2. Choose Object > Interactive > Convert To Button. Or, in the Buttons and Forms panel, select Button from the Type menu.
3. In the Buttons and Forms panel, enter a Name for the button.
4. Leave the Event set to On Release Or Tap.
5. Select Print Form from the Action menu (+).
6. Click the disclosure triangle to the left of PDF Options.
7. To prevent the button from printing on the form, but remain visible when viewing the form onscreen, deselect Printable.

To add a clear button (Figure 4.67):
1. Select the group or object to serve as the button.
2. Click Convert To Button at the bottom of the Buttons and Forms panel.
3. Enter the Name for the button.
4. Leave the Event set to On Release Or Tap.
5. Select Clear Form from the Action menu (+).
To add a submit button (Figure 4.68):
1. Select the group or object to convert.
2. Select Submit Form from the Action menu (+).
3. In the URL field:
![]() Enter mailto: immediately followed by the email address to which the completed form must be submitted.
Enter mailto: immediately followed by the email address to which the completed form must be submitted.
![]() Do not enter a space after mailto.
Do not enter a space after mailto.
![]() For example: mailto:[email protected].
For example: mailto:[email protected].
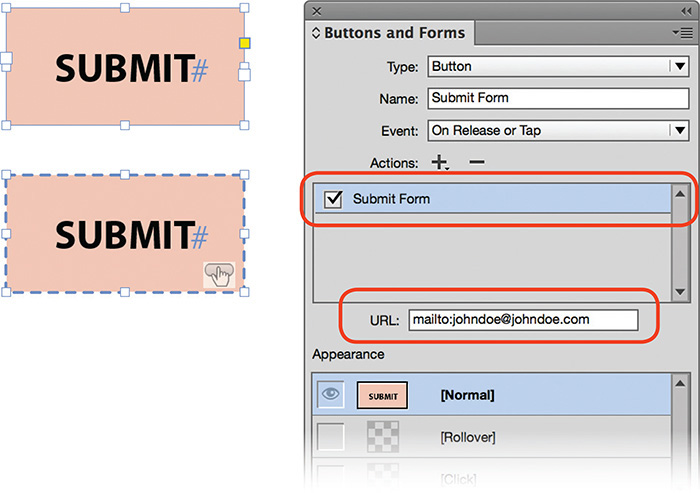
The appearance of buttons can vary depending on the user interaction. The Normal appearance is what you see when the form is first opened in Acrobat Reader. The Rollover appearance happens when the mouse moves over the button itself. The Click appearance happens when you click the mouse button or tap the button on a tablet device.
To add a different appearance to a button (Figure 4.69):
1. Select the button on the page.
2. Click the appearance you want to add, such as Rollover.
3. The Rollover appearance is now active.
4. Double-click the button if you want to make stroke or fill changes for the object or text.
5. (Optional) Click the Normal appearance when you’re finished; that way, the preview of the form in InDesign matches the one you would first see in Acrobat Reader.

![]() ACA Objective 4.6
ACA Objective 4.6
Page Transitions
Page transitions, such as dissolve, take place when you navigate from page to page. You can apply different page transitions to each page spread in an InDesign document.
To add transitions to page spreads (Figure 4.70):
1. Select a spread in the Pages panel.
2. Choose Layout > Pages > Page Transitions > Choose to display the Page Transitions dialog box.
3. To see a preview of the transition, move the mouse over a thumbnail in the dialog box.
Note
Page transitions only work when readers view the PDF in full-screen mode.
4. Uncheck Apply To All Spreads to apply the transition only to the selected spread(s).
5. Select one of the transitions and click OK.
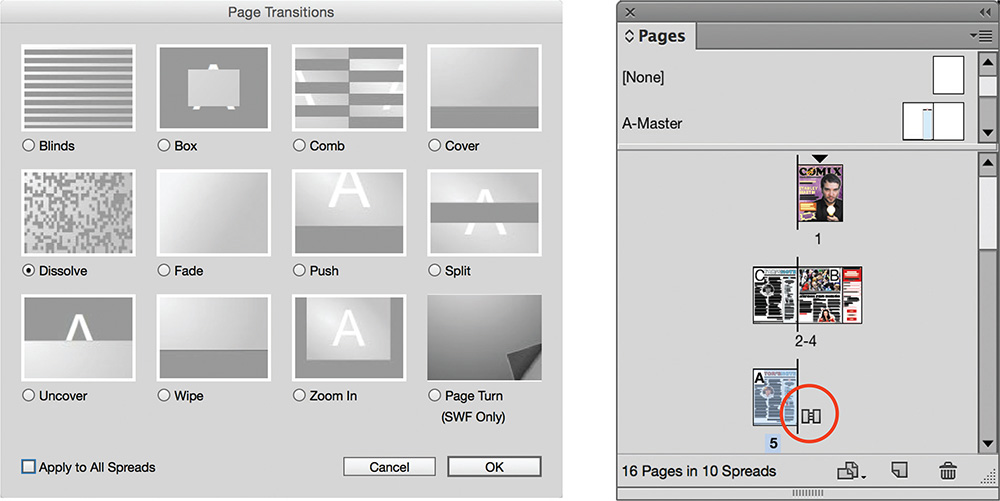
A small icon (![]() ) appears next to the spread in the Pages panel to indicate the page has a transition applied to it. To change the transition, right-click (Windows) or Control-click (Mac OS) this icon and select Choose from the context menu.
) appears next to the spread in the Pages panel to indicate the page has a transition applied to it. To change the transition, right-click (Windows) or Control-click (Mac OS) this icon and select Choose from the context menu.
To edit a transition, its duration, or the timing (Figure 4.71), do one of the following:
![]() Right-click (Windows) or Control-click (Mac OS) the transition icon in the Pages panel, and select Edit from the context menu.
Right-click (Windows) or Control-click (Mac OS) the transition icon in the Pages panel, and select Edit from the context menu.
![]() Select a page spread and choose Layout > Pages > Page Transitions > Edit.
Select a page spread and choose Layout > Pages > Page Transitions > Edit.

The Page Transitions panel displays, allowing you change the Transition, Direction, and Speed. To apply a single transition to all the pages in the document, click the Apply To All Spreads button at the bottom of the Page Transitions panel.
![]() ACA Objective 5.2
ACA Objective 5.2
Creating an Interactive PDF
To complete this massive project, there’s only one more thing to do: Create a PDF so that you can test the transitions and the form elements.
To create an interactive PDF (Figure 4.72):
1. Choose File > Export.
2. From the Save As Type menu (Windows) or Format menu (Mac OS), select Adobe PDF (Interactive).
3. Enter the Name for the PDF and navigate to the save location on your system.
4. Click Save to display the Export to Interactive PDF dialog box.
5. Ensure that the following settings are enabled:
![]() View After Exporting: This opens the PDF in Adobe Acrobat DC or Acrobat Reader DC so you can test it.
View After Exporting: This opens the PDF in Adobe Acrobat DC or Acrobat Reader DC so you can test it.
![]() Display Title: Select Document Title, after you enter the title, for example, Comix Magazine, for the document in the File > File Info dialog box. Adding a document title makes the document discoverable online.
Display Title: Select Document Title, after you enter the title, for example, Comix Magazine, for the document in the File > File Info dialog box. Adding a document title makes the document discoverable online.
![]() Open In Full Screen Mode: This enables you to view and test transitions.
Open In Full Screen Mode: This enables you to view and test transitions.
![]() Page Transitions > From Document: From the Page Transitions menu, select From Document to retain all of the different page transitions you added to page spreads.
Page Transitions > From Document: From the Page Transitions menu, select From Document to retain all of the different page transitions you added to page spreads.
![]() Include All: Select Include All so that Forms and Media elements are fully functional.
Include All: Select Include All so that Forms and Media elements are fully functional.
![]() Create Tagged PDF and Use Structure for Tab Order: To make the PDF more accessible for those relying on assistive technologies, enable Create Tagged PDF and Use Structure For Tab Order.
Create Tagged PDF and Use Structure for Tab Order: To make the PDF more accessible for those relying on assistive technologies, enable Create Tagged PDF and Use Structure For Tab Order.
6. Click OK to save the PDF and test it.

To learn more about accessibility and accessible PDFs, see Structuring PDFs in InDesign Help (Help > InDesign Help).
Congratulations! You have just completed the magazine pages and interactive PDF project. In the next project you’ll learn how to put a recipe book together, and how to speed up the production side of the design process using styles to format text, tables, and objects.