Chapter 1. Getting Started with InDesign
Chapter Objectives
Chapter Learning Objectives
![]() Identify and understand different elements of the InDesign CC interface.
Identify and understand different elements of the InDesign CC interface.
![]() Define common panels and clarify their usage.
Define common panels and clarify their usage.
![]() Identify tools and their functionality.
Identify tools and their functionality.
![]() Navigate through an InDesign document and change zoom levels.
Navigate through an InDesign document and change zoom levels.
![]() Organize and customize the InDesign workspace.
Organize and customize the InDesign workspace.
![]() Identify the correct document intent given a job scenario.
Identify the correct document intent given a job scenario.
Chapter ACA Objectives
DOMAIN 3.0
UNDERSTANDING ADOBE INDESIGN CC
3.1 Identify elements of the InDesign CC interface and demonstrate knowledge of their functions.
3.2 Define the functions of commonly used tools, including selection tools, frame tools, type tools, drawing tools, Line tool, etc.
3.3 Navigate, organize, and customize the workspace.
DOMAIN 4.0
CREATING PRINT AND DIGITAL MEDIA PUBLICATIONS USING ADOBE INDESIGN
4.1 Create a new project.
You are about to start your Adobe InDesign journey. As an industry-standard layout application, InDesign is a powerhouse used by graphic designers worldwide to design and produce print and digital media publications.
It’s very likely that you’ve looked at artwork created in InDesign just today. In print format, newspapers, magazines, yearbooks, reports, newsletters, and flyers are commonly designed with InDesign. In digital media format, interactive magazines on your smartphone or tablet might have been designed in InDesign and published with the Adobe Digital Publishing Solution. InDesign is also used for the creation of eBooks, PDFs, and PDF forms.
Whether you end up working as a graphic designer for a design studio; in communications, marketing, advertising, public relations, or elsewhere, there is a high probability that InDesign experience will be a required selection criteria for the job.
So let’s step into InDesign, and find your way around the program. In this chapter, you’ll learn to recognize and identify commonly used tools and panels, and to customize the look and feel of InDesign based on what works best for the project you’re working on.
![]() ACA Objective 3.2
ACA Objective 3.2
![]() ACA Objective 3.3
ACA Objective 3.3
Stepping into InDesign
When you first launch InDesign a Start workspace appears with links to recent files, CC Libraries, video tutorials, and Adobe Stock images and videos.
![]() Video 1.1
Video 1.1
![]() Video 1.2
Video 1.2
![]() Video 1.3
Video 1.3
To open an InDesign document (INDD), click Open in the Start workspace or choose Open from the File menu in the menu bar (File > Open). Navigate to an INDD file in the Open A File dialog box, select it, and click Open. The document window you see is your creative work area where document pages are displayed and designed. When you open multiple documents, they appear as tabbed document windows, each displaying its document name on a tab. To display a document in the window, click its document tab. Everything you see on the screen, such as the application with its Tools panel, Control panel, and other panels, is referred to as a workspace. The default workspace you see is the Essentials workspace (Figure 1.1).

Note
Earlier versions of InDesign will show a Welcome screen instead of the Start workspace.
The pasteboard area surrounding the pages is used to store design elements that don’t appear on a document page. You might use it to place some text that needs to be included in your page designs, to store some design variations, or simply as a work area.
Note
This chapter supports the project created in video lesson 1. Go to the Project 1 page in the book’s Web Edition to watch the entire lesson from beginning to end.
As you progress with your design, you will select different tools from the Tools panel to add new design elements, images, and text to the page, or to modify the appearance of existing objects. The Control panel is a context-sensitive dashboard (Figure 1.2). It displays settings for selected objects that you can edit. When you’re working on text, for example, the Control panel will show options such as font, font size, or alignment that you can adjust.

Figure 1.2 With text selected, the Control panel displays settings for font, font size, and much more.
The Essentials workspace includes the Pages, Layers, Links, Stroke, Color, Swatches, and CC Libraries panels. Panels are task specific, and you access panels based on the task you want to perform in InDesign. With the Color panel, for example, you can mix colors and apply them to artwork.
Note
On Mac OS, the document window opens as a floating window. To combine it with the application frame, as seen in Figure 1.1, choose Window > Application Frame.
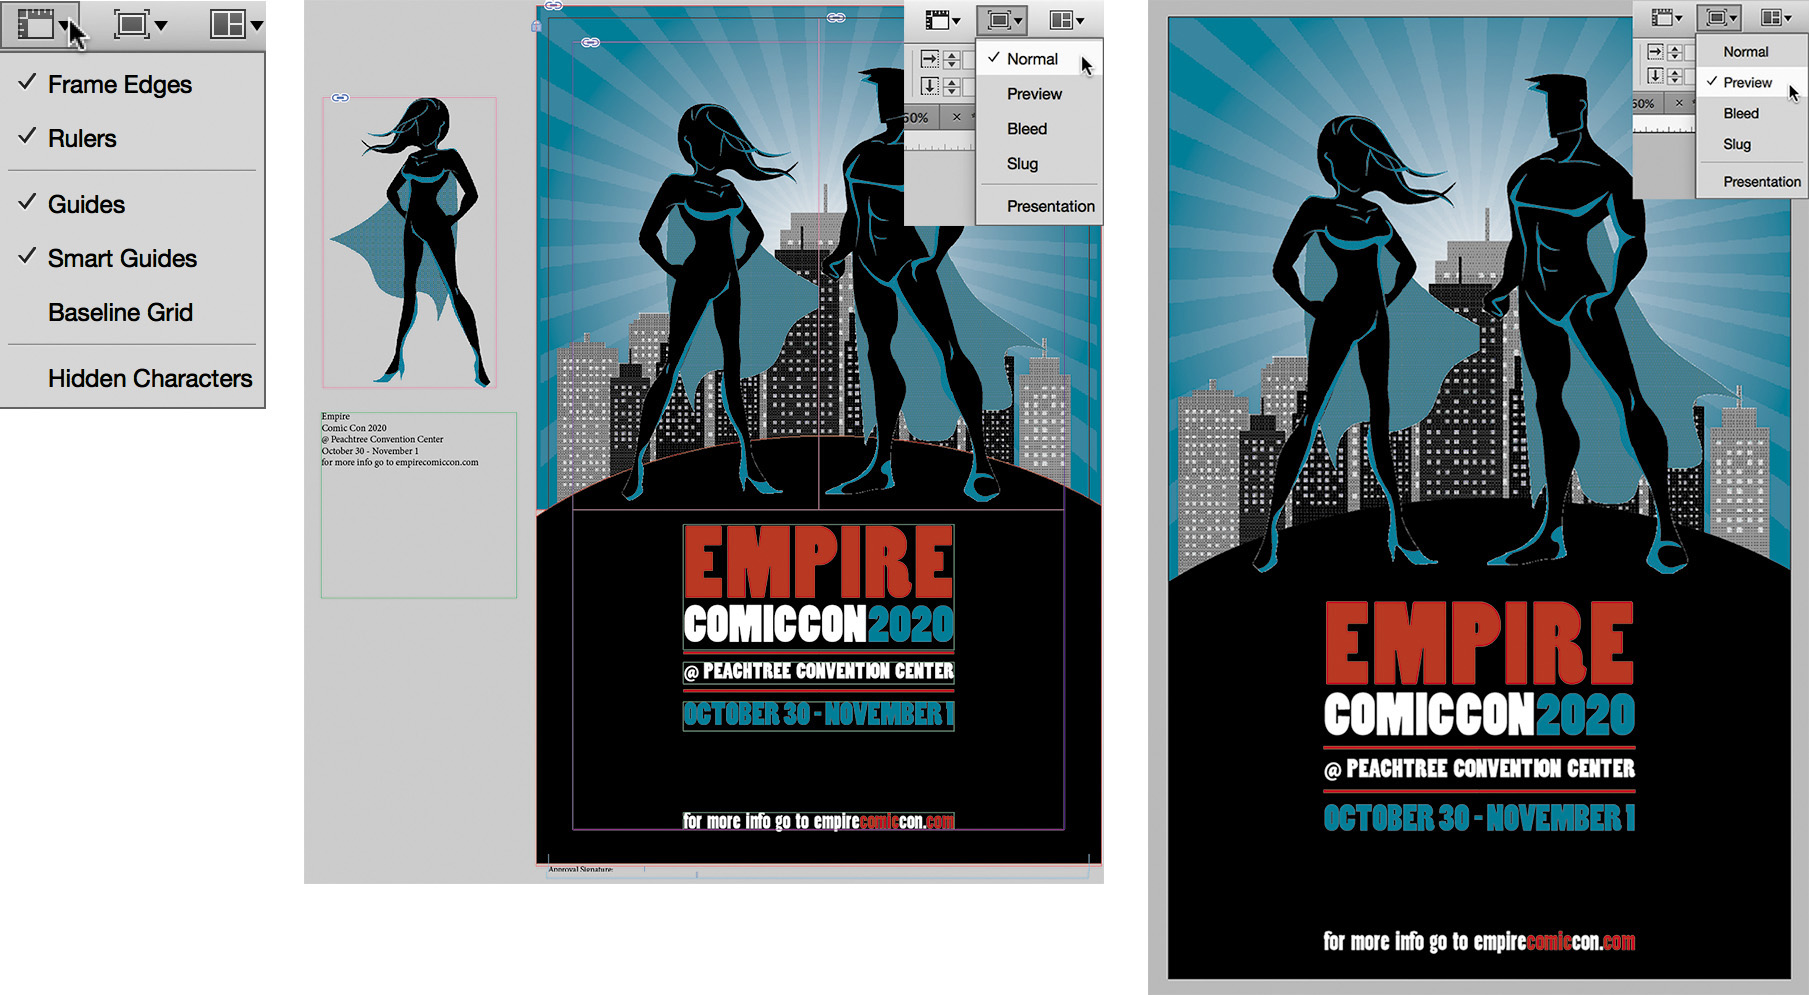
The Application bar has buttons that let you change the view options, screen mode, and document arrangement. The Screen Mode setting controls how you view your document.
With the screen mode set to Normal, for example, InDesign displays nonprinting elements (such as guides and frame edges that help you construct your artwork, align objects, and position objects). The elements displayed depend on the settings you enable in the View Options menu on the Application bar. The Preview screen mode hides all of the nonprinting elements as well as objects on the pasteboard. Preview is a great mode to use when you want to see what the finished artwork and pages will look like.
To change the screen mode (Figure 1.3):
1. Choose the Screen Mode menu in the Application bar, or choose View > Screen Mode.
2. Select the preferred screen mode.
Shortcut
To toggle between Preview and Normal Screen modes, press W. Note that this shortcut won’t work when the text insertion point is in text.
The Application bar also includes the workspace switcher menu that enables you to change from the default Essentials workspace to another workspace, resulting in the display of a different combination of panels onscreen.
Tools and Panels
As you start working in InDesign, you’ll discover the many different tools and panels that provide you with everything you need to build beautiful layouts.
![]() Video 1.4
Video 1.4
Selecting the Right Tool for the Job
Think of the Tools panel as your personal toolbox. As you work your way through a layout, you’ll select the right tool from it for the task at hand. For example, use the Selection tool (![]() ) to select, resize, or reposition an object on the page; the Type tool (
) to select, resize, or reposition an object on the page; the Type tool (![]() ) to edit or add text; and the Zoom tool (
) to edit or add text; and the Zoom tool (![]() ) to look at page content close up.
) to look at page content close up.
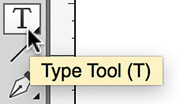
Once a tool is selected in the Tools panel, it remains the active tool until you click on a different tool. To learn the names of various tools and the shortcuts for quick access, move your pointer over each tool in the Tools panel and pause. A tool tip appears with the name and the tool’s single-letter shortcut (Figure 1.4).
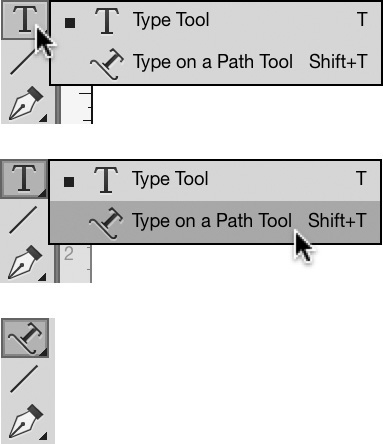
The Tools panel contains a number of hidden tools too. Any tool that includes the tiny triangle in the lower-right corner has one or more hidden tools hidden behind it.
To select and use a hidden tool (Figure 1.5):
1. Click and hold the pointer on the tool.
2. From the menu that appears, select the hidden tool you want to work with.
Let’s look at some of the more commonly used tools. This chapter presents the most commonly used tools, but InDesign offers many more. If you ever forget what a tool does or are curious about a particular tool:
![]() Select the tool in the Tools panel.
Select the tool in the Tools panel.
![]() Display the Tool Hints panel (Window > Utilities) for more information (Figure 1.6).
Display the Tool Hints panel (Window > Utilities) for more information (Figure 1.6).
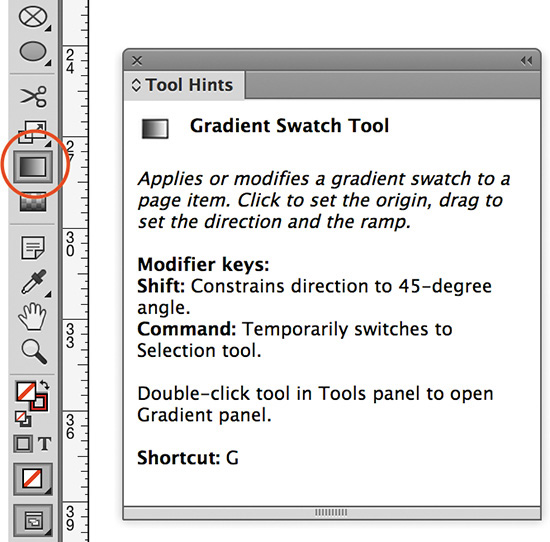
Figure 1.6 The Tool Hints panel provides a short description of each tool’s function as well as handy modifier keys and shortcuts.
![]() You can also consult the InDesign Help (Help > InDesign Help).
You can also consult the InDesign Help (Help > InDesign Help).
Selection Tool
The Selection tool (![]() ) is going to be your best friend. As the name suggests, you use it to select objects. The tool has many other purposes, however, and is a bit of a chameleon. The Selection tool’s pointer changes in appearance depending on how and where you use it.
) is going to be your best friend. As the name suggests, you use it to select objects. The tool has many other purposes, however, and is a bit of a chameleon. The Selection tool’s pointer changes in appearance depending on how and where you use it.
To select an object (Figure 1.7):
1. Click the Selection tool in the Tools panel to select it.
2. Position the pointer over an object on the page and click. A bounding box with eight handles appears around the object.
3. Move the object you selected by dragging it into a new position.
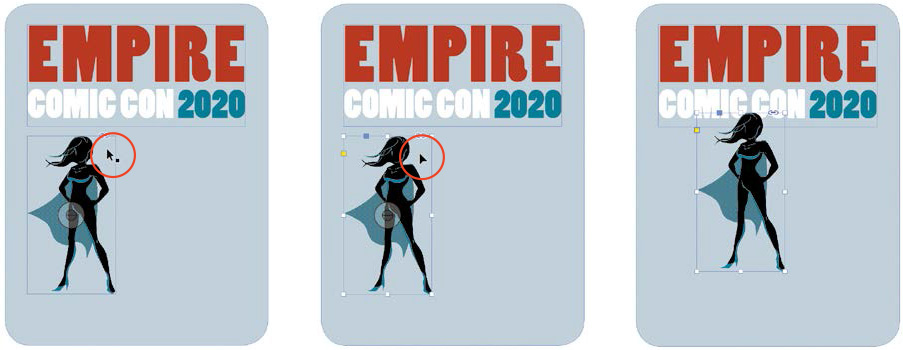
Keep an eye on the pointer: Did you notice it changed appearance as you selected the object and moved it? From a pointer, to a pointer with a dot (for selecting the object), to a small triangle (for moving an object)? Yup, the Selection tool is a multipurpose tool and the pointer will always tell you what it’s up to.
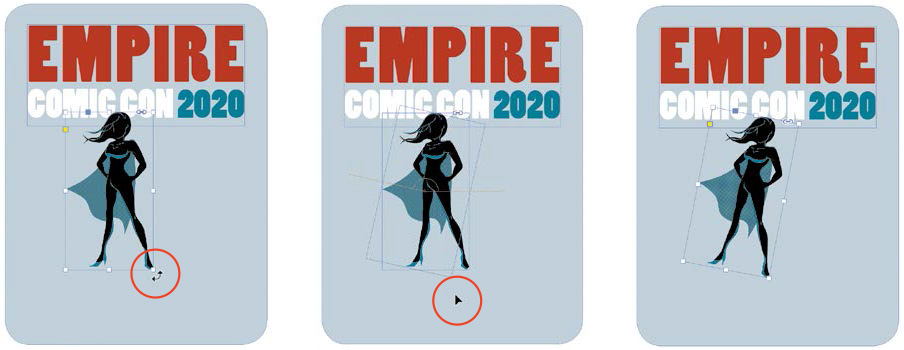
To rotate a selected object (Figure 1.8):
1. Move the pointer just outside the object’s bounding box, near one of the corners. The pointer indicates when you can rotate.
2. Drag in a circular motion to rotate the object.
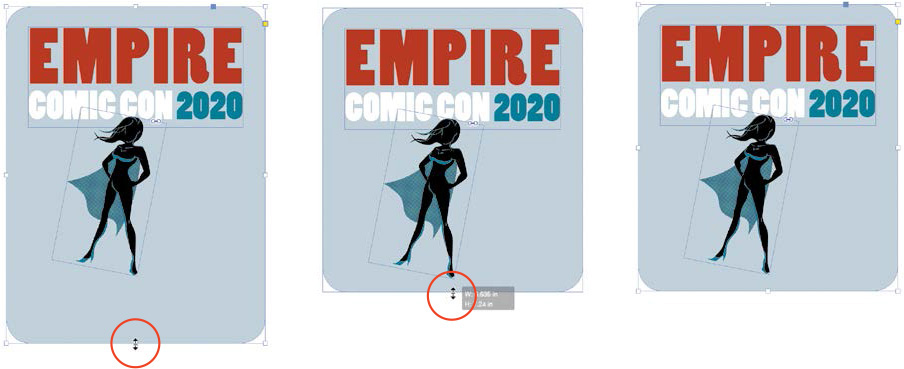
To resize a selected object, such as the colored background frame in Figure 1.9:
1. Move the pointer over one of the handles on the bounding box and click.
2. Drag in either direction that the little arrows indicate.
You can also make copies of objects with the Selection tool (Figure 1.10):
1. Select the object.
2. Press Alt (Windows) or Option (Mac OS), and drag the object to a new location.

You can also press Alt (Windows) or Option (Mac OS) after you start dragging the object. Make sure you release the mouse first, then the Alt/Option key in that case to ensure the copy is created.
Type Tool
Typography is an important part of design. Whether it’s a poster design, a newsletter, or a digital media publication, text will likely be included and need to be formatted. InDesign has an amazing set of typographic features and controls. To start working with type—including entering new text, formatting text, or editing text—you use the Type tool (![]() ). Text is inserted in box-like elements called text frames.
). Text is inserted in box-like elements called text frames.
To create a text frame (Figure 1.11):
1. Select the Type tool.
2. Click and drag from the upper-left corner to the lower-right corner.
Once the text frame is created, the text insertion point flashes inside the frame, indicating you can enter text into the frame.

If you need to resize a text frame, use the Selection tool (![]() ) to select it, then drag any of the bounding box handles.
) to select it, then drag any of the bounding box handles.
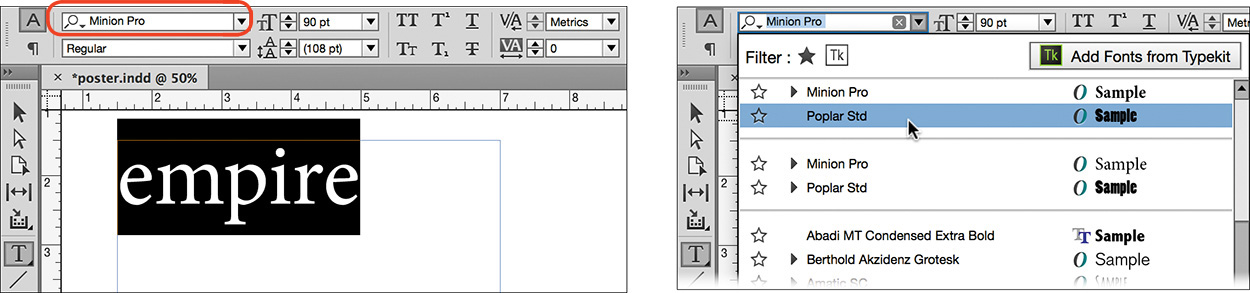
To change the font of the text (Figure 1.12):
1. With text entered in the text frame, select the text with the Type tool.
2. Click the Character Formatting controls (![]() ) in the Control panel, and choose a font from the fonts list.
) in the Control panel, and choose a font from the fonts list.
To change the size of the text (Figure 1.13):
![]() Choose a preset size from the Font Size menu, enter a new font size in the Font Size field, or click the increase or decrease size buttons.
Choose a preset size from the Font Size menu, enter a new font size in the Font Size field, or click the increase or decrease size buttons.

When working on commercial InDesign projects, your customer will likely supply you with text that’s already final, and it could be that you want to change text from lowercase to uppercase (capital) letters as part of the design. There’s no need to retype the text by holding down the Caps Lock or Shift key.
To change letters typed with the Caps Lock or Shift key to a different case, such as lowercase, choose Type > Change Case, and select the preferred case option.
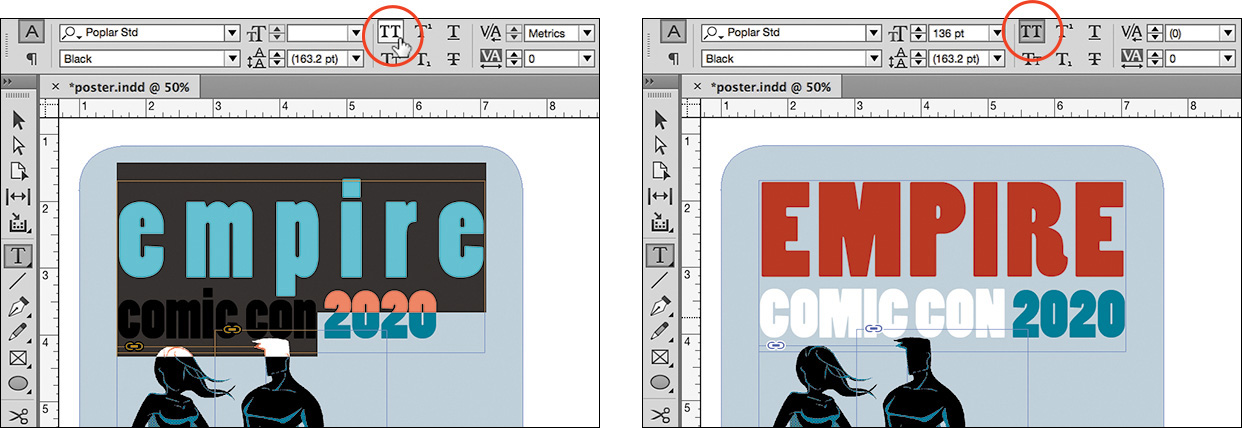
To change text to All Caps (Figure 1.14):
![]() Select the text that needs to be capitalized, and in the Control panel, click the All Caps button.
Select the text that needs to be capitalized, and in the Control panel, click the All Caps button.
You’ll learn more about InDesign’s typography features, adding text to documents, and working with text in the following chapters.
Shortcut
When placing and positioning text in a document, you often alternate between the Type tool and the Selection tool. When you have the Selection tool selected, double-clicking in a text frame automatically selects the Type tool. With the Type tool selected, pressing Esc selects the Selection tool again.
Frame and Shape Tools
As you start to build your designs, you can use the shape tools to add geometric shapes, such as circles, ellipses, rectangles with rounded corners, starbursts, and more. In InDesign, each design element you add to a page, whether it’s a shape, text, a background color, a photo, or a video, is a frame that contains content. Frames themselves can have color applied around their shape border (stroke), or within the shape itself (fill).
There are three different frame types:
![]() Graphic frames: Containers for photos, logos, video, or audio.
Graphic frames: Containers for photos, logos, video, or audio.
![]() Text frames: Containers that hold text.
Text frames: Containers that hold text.
![]() Unassigned frames: Holds neither text nor graphics.
Unassigned frames: Holds neither text nor graphics.
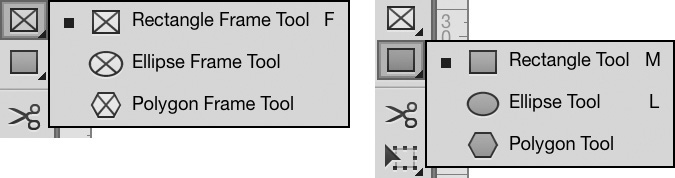
Two different groups of tools can create frames (Figure 1.15):
![]() The frame tools: Rectangle Frame, Ellipse Frame, and Polygon Frame tools create graphic frames, recognizable by the X within the frame.
The frame tools: Rectangle Frame, Ellipse Frame, and Polygon Frame tools create graphic frames, recognizable by the X within the frame.
![]() The shape tools: Rectangle, Ellipse, and Polygon tools create unassigned frames.
The shape tools: Rectangle, Ellipse, and Polygon tools create unassigned frames.
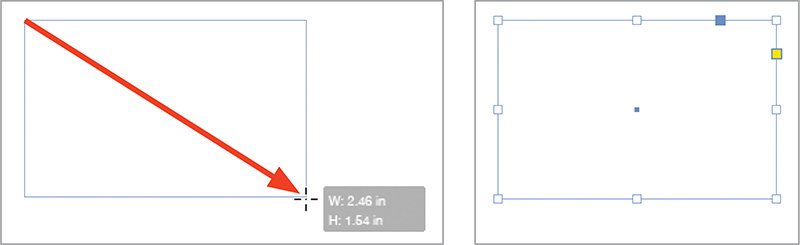
To create a frame with one of these tools, for example a rectangle (Figure 1.16):
1. Select the Rectangle tool (![]() ).
).
2. Drag diagonally across the page and release the mouse.
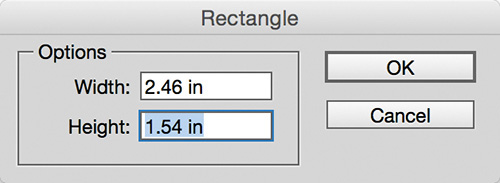
Alternatively, to create a shape with specific tool properties (Figure 1.17):
1. Select the Rectangle tool.
2. Click on the page.
3. Enter Width and Height options in the Rectangle dialog box.
4. Click OK.
Once the shape is created, you can adjust its width, height, and other settings from the Control panel, or use the Selection tool to resize the object.
To change the width and height (Figure 1.18):
1. Use the Selection tool to drag any of the bounding box handles.
2. Enter Width and Height settings in the Control panel.

With the shape created, you can now adjust its fill and stroke settings.
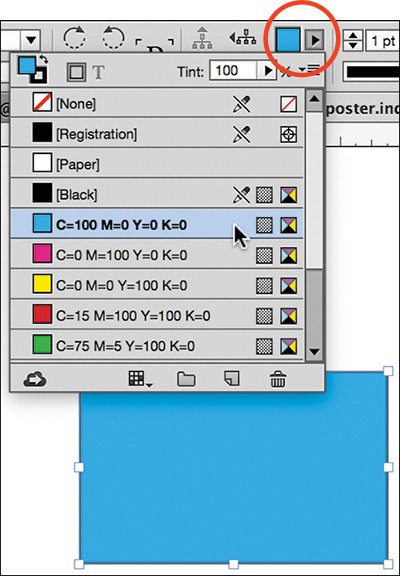
To change the fill color (Figure 1.19):
1. Select the object.
2. Click the arrow next to the Fill box in the Control panel. Alternatively, click the Fill box in the Swatches or Tools panel.
3. Click to select a swatch color from the Control panel or from the Swatches panel.
To adjust the stroke settings (Figure 1.20):
1. Select the object.
2. Click the Stroke box in the Control panel. You can also click the Stroke box in the Swatches or Tools panel.
3. Select a swatch color from the Control panel (or from the Swatches panel).
4. Select width from the Weight menu in the Control panel (or the Stroke panel.)
5. Select stroke type from Type menu in the Control panel (or the Stroke panel).

We’ll discuss various frame and shape tools, as well as working with color, in more detail in the following chapters.
Panels, Panels, and More Panels
InDesign has more than 50 different panels that provide access to design and production features. Yikes! When panels are not displayed as part of a workspace, you can access them from the Window menu. For panels that relate to text, such as the Paragraph panel, you can also head to the Type menu. As there are so many panels, the Window menu contains a number of submenus from which you select panels.
![]() Video 1.5
Video 1.5
Note
For a complete overview of every panel in InDesign, refer to the InDesign Help.
Each panel has its own unique usage, for example:
![]() Swatches panel: Manage document colors, including adding, editing, or deleting color swatches.
Swatches panel: Manage document colors, including adding, editing, or deleting color swatches.
![]() Pages panel: Navigating pages, adding and removing pages, setting up and applying master pages, and controlling page numbering.
Pages panel: Navigating pages, adding and removing pages, setting up and applying master pages, and controlling page numbering.
![]() Layers panel: Manage document layers, including adding, editing, showing, hiding layers, locking, and unlocking layers.
Layers panel: Manage document layers, including adding, editing, showing, hiding layers, locking, and unlocking layers.
![]() Links panel: Manage images and graphics links, flagging any link errors.
Links panel: Manage images and graphics links, flagging any link errors.
![]() Text Wrap panel: Wrap text around an object, such as a graphic.
Text Wrap panel: Wrap text around an object, such as a graphic.
![]() Paragraph Styles panel: Enable single-click text formatting.
Paragraph Styles panel: Enable single-click text formatting.
Panels can be expanded or docked on the side of the application window or floating. You can fully customize which panels display and where and how those panels appear. As you start working on more projects in InDesign, you’ll discover you have a series of favorite panels that you’d like to access quickly. You’ll learn how to save your favorite panels as a reusable workspace later in this chapter.
Panels that are docked are attached to the side of the screen. For example, the Control panel is docked to the top, the Tools panel is docked at left, and generally panels specific to InDesign’s default workspaces are docked at right. Floating panels can be positioned anywhere on the screen; you might even consider placing them on a second monitor.
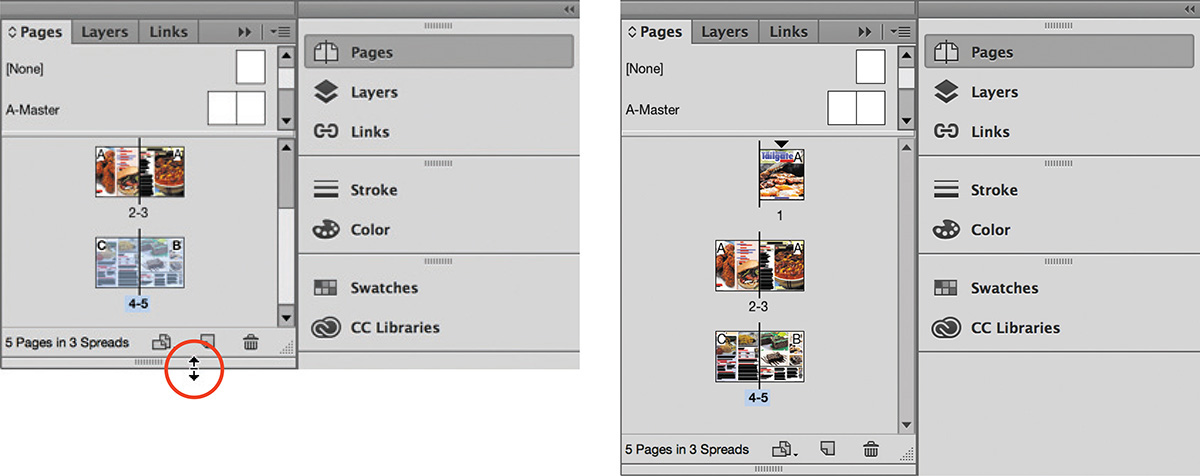
To show a panel that is docked (Figure 1.21):
![]() Click the panel icon. Once the panel is shown, you can drag the edges of the panel to make it larger (Figure 1.22). To close the panel, click the panel icon again, or click the double arrow at the top of the panel group.
Click the panel icon. Once the panel is shown, you can drag the edges of the panel to make it larger (Figure 1.22). To close the panel, click the panel icon again, or click the double arrow at the top of the panel group.

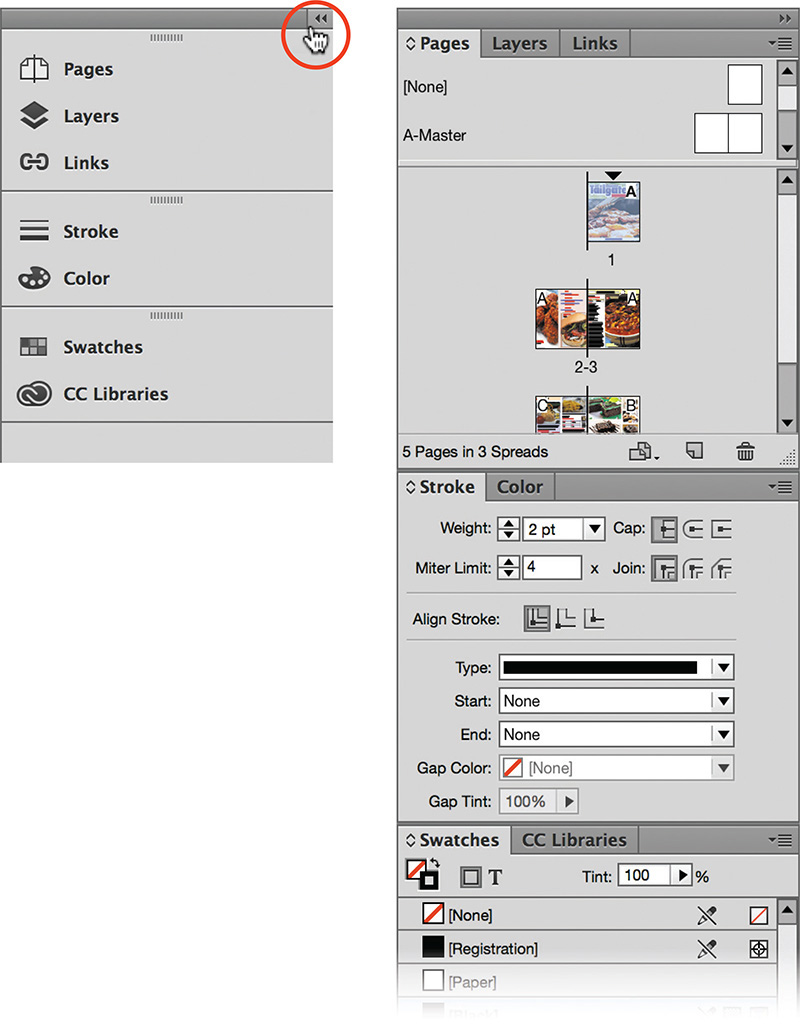
To expand docked panels (Figure 1.23):
![]() Click the double arrow in the top right of the panel. Click the double arrow again to collapse back to the docked panel.
Click the double arrow in the top right of the panel. Click the double arrow again to collapse back to the docked panel.
To dock a floating panel (Figure 1.24):
1. Select the panel by its panel tab.
2. Drag it to the side, and release the mouse when a blue horizontal or vertical line appears at the insertion point.

Similar to docking panels, you can also drag docked panels by their panel tab out of the dock and turn them into floating panels.
A lot of the panels in InDesign are nested into panel groups. You can create your own panel groups or amend existing panel groups.
To create a panel group (Figure 1.25):
1. Drag a panel by its panel tab into the empty area next to a panel tab.
2. Drag a panel into a docked group of panels, and release the mouse when a blue horizontal line appears at the insertion point in the panel group.

To hide panels (Figure 1.26):
1. Drag the panel by its panel tab out of a group.
2. Click its close box.
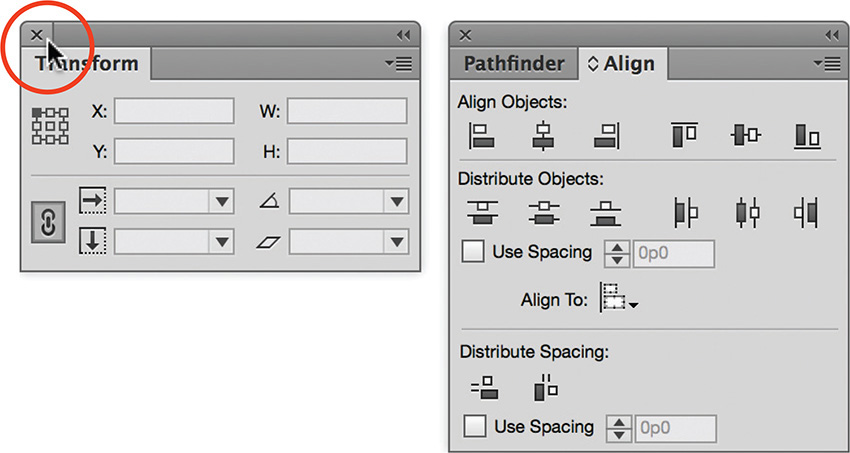
Almost all panels have a menu that provides a list of panel-related commands (Figure 1.27).

![]() Click the panel menu to see the commands.
Click the panel menu to see the commands.
Tip
You can also show or hide panels by choosing them from the Window menu. A checkmark to the left of the panel name means the panel is displayed already.
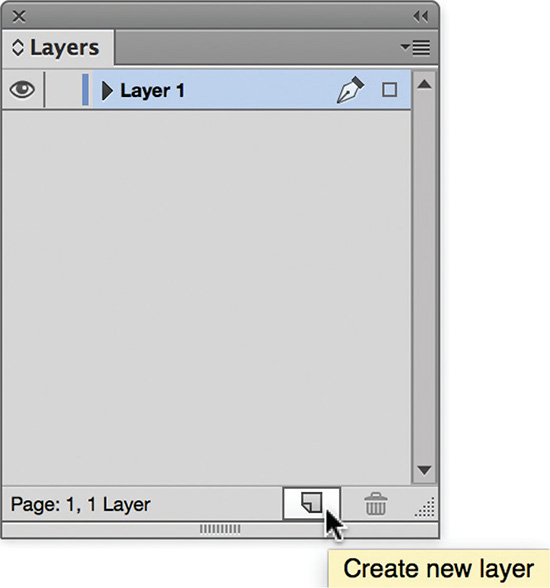
Some commands also appear at the bottom of a panel as a clickable button. A lot of these buttons are similar across panels. For example, the button that looks like a flipping page or notepad (![]() ) is found in panels such as the Swatches, Layers, and Paragraph Styles panels. In each of these panels, the button does something similar: It makes something new. It creates a new color swatch, new layer, or new style when clicked.
) is found in panels such as the Swatches, Layers, and Paragraph Styles panels. In each of these panels, the button does something similar: It makes something new. It creates a new color swatch, new layer, or new style when clicked.
To see what these buttons do in different panels (Figure 1.28):
1. Show the panel.
2. Position the pointer over the button.
A tool tip appears.
Shortcut
To view your design without seeing all the panels or to eliminate any panel clutter, press Tab. Every panel that was visible onscreen is hidden. Press Tab again to bring the panels back. To show and hide all panels except for the Tools panel and Control panel, press Shift+Tab. (Note that this does not work when the text insertion point is in text.)
Finding Your Way Around a Document
When working with a lot of content on a single page, the ability to zoom into a smaller section that you are working on is handy. InDesign provides quite a few ways to pan and zoom around a document.
![]() Video 1.7
Video 1.7
The Zoom tool (![]() ) enables you to change the zoom level of the document:
) enables you to change the zoom level of the document:
1. Select the Zoom tool.
2. Click an object you want to zoom into.
With each click, the zoom level increases. It might take several clicks to zoom into a section of the page.
3. To zoom back out, Alt-click (Windows) or Option-click (Mac OS) the Zoom tool.
A more practical way to zoom into an area of the document is to (Figure 1.29):
1. Select the Zoom tool.
2. Drag a marquee around the area of the page with the Zoom tool.
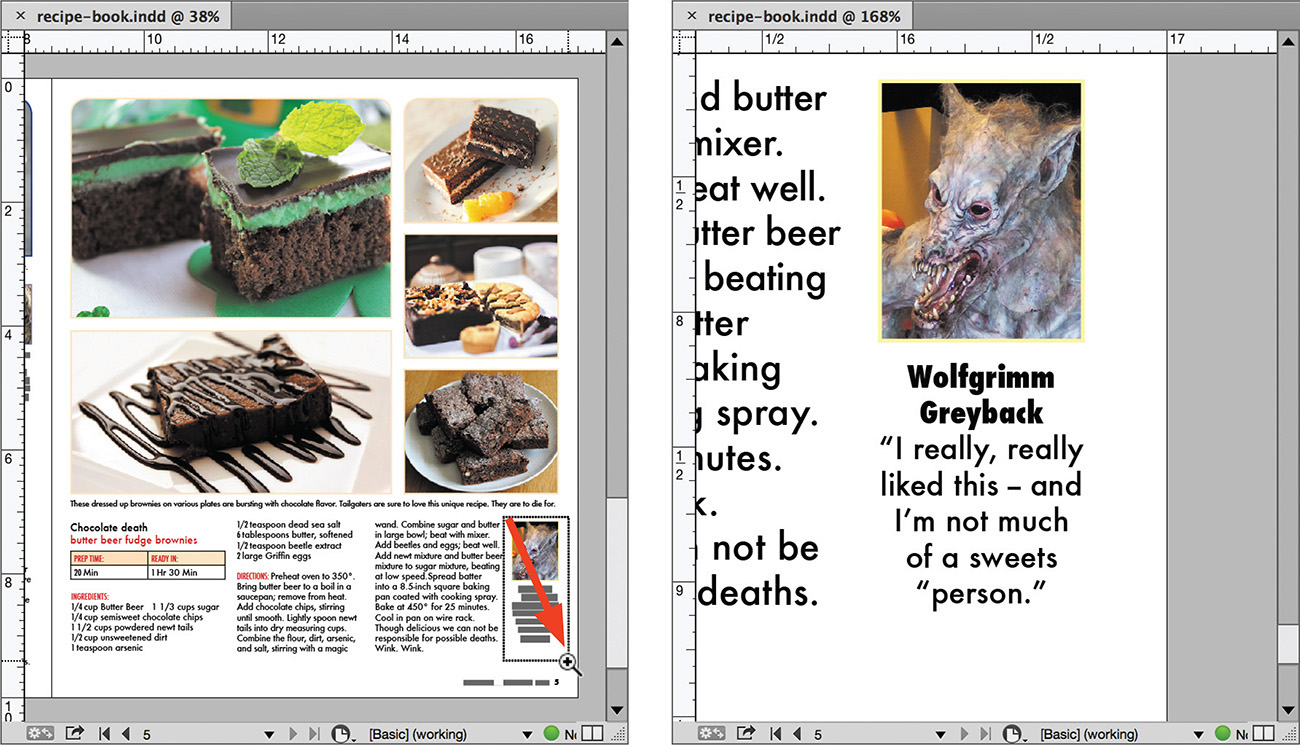
The marqueed area is now centered within the document window.
3. To quickly zoom back out and center the active page in the document window, choose View > Fit Page In Window or press or Ctrl+0 (zero) (Windows) or Command+0 (zero) (Mac OS).
The marquee technique works well when editing InDesign documents from a marked-up proof, such as a PDF with comments. You can see the full page, find the location for the change, and quickly zoom into the text to edit.
The View menu contains a number of other useful ways to view a document.
When you design reports, books, or magazines destined for print, viewing facing pages (with the right- and left-page designs side by side) will help with the placement of design elements and obtaining rhythm, balance, and harmony in your design. Pages that face each other are referred to as a spread.
To center the active spread in the document window (Figure 1.30):
![]() Choose View > Fit Spread In Window or press Ctrl+Alt+0 (Windows) or Command+Option+0 (Mac OS).
Choose View > Fit Spread In Window or press Ctrl+Alt+0 (Windows) or Command+Option+0 (Mac OS).

Shortcut
To quickly zoom out to 50% zoom level, press Ctrl+5 (Windows) or Command+5 (Mac OS). To quickly zoom to 200%, press Ctrl+2 (Windows) or Command+2 (Mac OS).
To set the zoom level to 100%:
![]() Choose View > Actual Size, or press Ctrl+1 (Windows) or Command+1 (Mac OS).
Choose View > Actual Size, or press Ctrl+1 (Windows) or Command+1 (Mac OS).
To increase zoom level using preset increments:
![]() Choose View > Zoom In, or press Ctrl along with the plus sign (+) on Windows or Command along with the plus sign (+) on Mac OS.
Choose View > Zoom In, or press Ctrl along with the plus sign (+) on Windows or Command along with the plus sign (+) on Mac OS.
To decrease zoom level using preset increments:
![]() Choose View > Zoom Out, or press Ctrl along with the hyphen (–) on Windows or Command along with the hyphen (–) on Mac OS. Think of the hyphen as a minus sign to remember this shortcut.
Choose View > Zoom Out, or press Ctrl along with the hyphen (–) on Windows or Command along with the hyphen (–) on Mac OS. Think of the hyphen as a minus sign to remember this shortcut.
With the Zoom Level menu in the Application bar (Figure 1.31), you can select from any of the preset zoom levels, as well as enter custom zoom levels.

To select a preset zoom level:
![]() Select a preset option from the Zoom Level menu.
Select a preset option from the Zoom Level menu.
To set a custom zoom level:
![]() Enter the preferred zoom level in the zoom field, and press Enter (Windows) or Return (Mac OS) (Figure 1.31).
Enter the preferred zoom level in the zoom field, and press Enter (Windows) or Return (Mac OS) (Figure 1.31).
When using the commands or shortcuts for incremental zoom and zoom levels, keep in mind that if nothing is selected on the page, the zoom is based on the center of the page or spread. If objects are selected or the insertion point is in text, the zoom level centers on that element.
Shortcut
To temporarily access the Zoom tool when another tool is selected, press Ctrl+Spacebar (Windows) or Command+Spacebar (Mac OS). Add the Alt (Windows) or Option (Mac OS) key to zoom out.
Note
Depending on your operating system settings, some shortcuts might conflict with your system.
Once you’ve zoomed into a small section of a page, you can use the Hand tool (![]() ) to pan to other sections of the page.
) to pan to other sections of the page.
To display nonvisible parts of a page in the document window (Figure 1.32):
1. Select the Hand tool.
2. Drag to move to other parts of the document.

You can also use the Hand tool as a power zoom tool, offering you zoom controls in combination with panning to different areas of a page or different pages. The area that will be displayed in the document window is marked by a red rectangle.
To use the power zoom (Figure 1.33):
1. After zooming in on a page, select the Hand tool, then click and hold with your mouse to access power zoom.
2. Press the Arrow Up or Arrow Down key to zoom.
3. Drag the red rectangle to another position on page.

Shortcut
To access the Hand tool, press the Spacebar. If you happen to be editing text with the Type tool, press Alt+Spacebar (Windows) or Option+Spacebar (Mac OS) instead.
![]() Video 1.8
Video 1.8
As you zoom into graphics, you might notice that they sometimes appear very jagged. Raster graphics, vector graphics, and transparency effects (such as drop shadows) display according to the View > Display Performance setting, which is set to Typical Display by default. You can change the Display Performance to High Quality, but keep in mind that this might slow the screen redraw as you move from page to page.
You have three choices for Display Performance (Figure 1.34):
![]() Fast Display: Graphics and images are grayed out and transparency effects are not shown. When copyediting a publication, this display performance ensures you’ll see the text only.
Fast Display: Graphics and images are grayed out and transparency effects are not shown. When copyediting a publication, this display performance ensures you’ll see the text only.
![]() Typical Display: Low-resolution appearance of graphics and transparency effects. As the default, this display performance works well while you are busy with your designs. It gives you fast previews for placement and image cropping, as well as a faster screen redraw.
Typical Display: Low-resolution appearance of graphics and transparency effects. As the default, this display performance works well while you are busy with your designs. It gives you fast previews for placement and image cropping, as well as a faster screen redraw.
![]() High Quality Display: High resolution. Vector graphics appear sharp and detailed, allowing you to position them with more precision in your design. When showing the onscreen design to your client, this display performance provides the best-quality view.
High Quality Display: High resolution. Vector graphics appear sharp and detailed, allowing you to position them with more precision in your design. When showing the onscreen design to your client, this display performance provides the best-quality view.

Figure 1.34 From left to right, Fast, Typical, and High Quality display applied at the document level
The display performance can be changed at the document or object level.
To change the display performance:
![]() For a document: Choose an option from the View > Display Performance menu.
For a document: Choose an option from the View > Display Performance menu.
![]() For a selected object: Choose an option from the Object > Display Performance menu.
For a selected object: Choose an option from the Object > Display Performance menu.
When you orient elements sideways on a page, such as a discount voucher placed in a magazine foldout or a wide table that is better placed sideways, working on the element can literally be a pain in the neck. Don’t worry! You can keep your head straight, and rotate your work instead. Spreads can rotate 90° clockwise, 90° counterclockwise, and 180° degrees, making it easier to view the content.
To rotate a spread (Figure 1.35):
1. Select the spread in the Pages panel.
2. Choose View > Rotate Spread View, and select one of the rotation options.

To clear the rotation, either:
![]() Right-click (Windows) or Control-click (Mac OS) the spread in the Pages panel, and choose Clear Rotation (Figure 1.36).
Right-click (Windows) or Control-click (Mac OS) the spread in the Pages panel, and choose Clear Rotation (Figure 1.36).
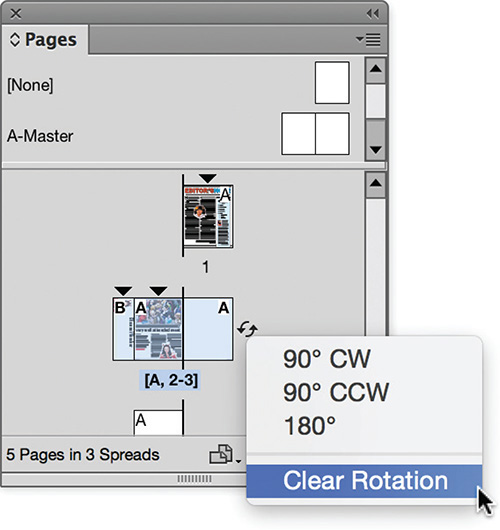
![]() Choose View > Rotate Spread > Clear Rotation.
Choose View > Rotate Spread > Clear Rotation.
When working with longer documents, such as newsletters, reports, books, or digital magazines, you can use the Pages panel (Figure 1.37) to insert new pages, move pages around, or quickly display a page in the document window.
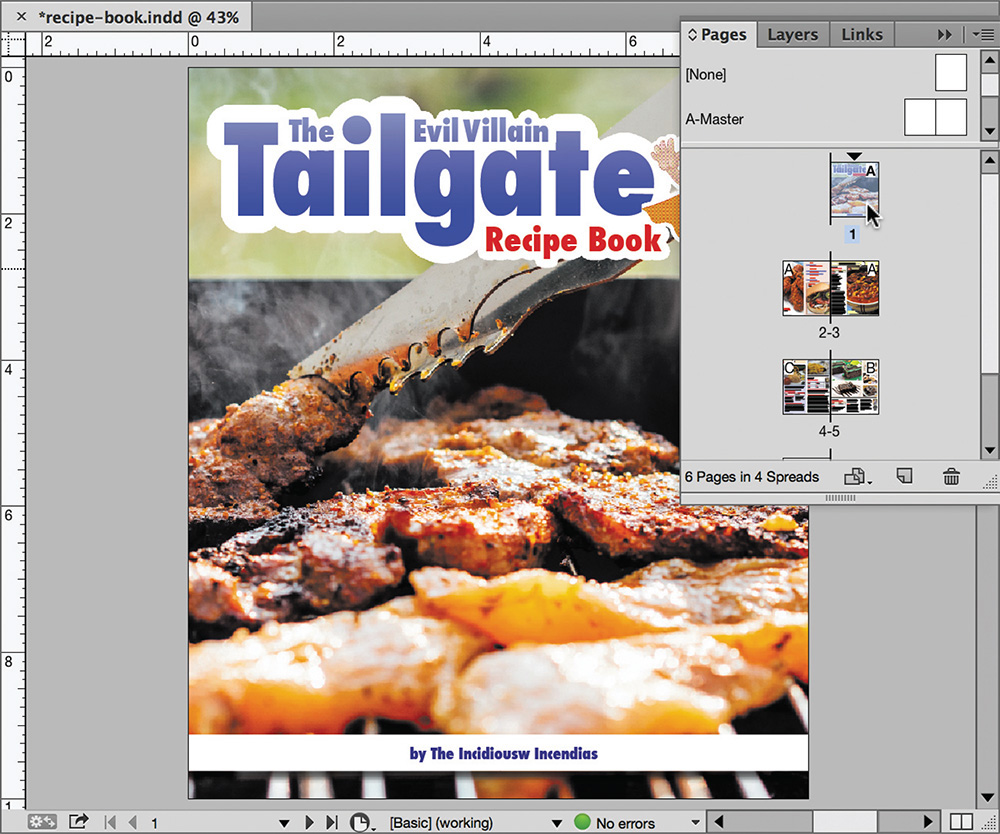
To access a page in a document:
![]() Double-click a page thumbnail in the Pages panel.
Double-click a page thumbnail in the Pages panel.
![]() Double-click the number below a page spread to display both pages of the spread in the document window.
Double-click the number below a page spread to display both pages of the spread in the document window.
The Pages panel is also used to apply master pages to document pages. Master pages add common design elements to pages, such as page numbers, headers, and footers. You’ll learn more about working with master pages in Chapter 4.
Aside from the Pages panel, InDesign offers several other ways to navigate to different pages in the document.
To navigate to a different page:
![]() Use the vertical and horizontal scroll bars.
Use the vertical and horizontal scroll bars.
![]() Use the status bar, at the bottom of the document window (Figure 1.38).
Use the status bar, at the bottom of the document window (Figure 1.38).

![]() Choose Layout > Go To Page, enter the page number, and click OK.
Choose Layout > Go To Page, enter the page number, and click OK.
![]() Choose Layout > First Page, Previous Page, Next Page, etc.
Choose Layout > First Page, Previous Page, Next Page, etc.
![]() ACA Objective 3.3
ACA Objective 3.3
Customizing Your Workspace, Shortcuts, and Menus
You’re about to start working on your first project in InDesign in the next chapter. Before you do, however, take a few minutes to organize InDesign so it works best for you. To do this, you will build your own workspace by creating custom shortcuts, displaying your favorite panels, and even highlighting menus.
![]() Video 1.5
Video 1.5
Because the panels in InDesign are so task specific, it is only natural that some panels are designed for use when working on projects for different media types. For example, you could be using InDesign to create an interactive PDF or an eBook with animations, which requires the use of specific panels such as Buttons And Forms, or the Animation panel. Adobe has added a number of workspaces based on specific types of jobs or tasks you might work on, making it easier to access the relevant panels.
The workspace switcher in the Application bar makes allows you to toggle between different workspaces, each with their own panel layout.
To switch the workspace, either:
![]() Click the workspace switcher and select a workspace (Figure 1.39).
Click the workspace switcher and select a workspace (Figure 1.39).
![]() Choose Window > Workspace and select a workspace.
Choose Window > Workspace and select a workspace.
Switch to the Interactive For PDF workspace. Can you see any panels you wouldn’t be using when designing a product for print?

The InDesign default workspaces (Figure 1.40) include:
![]() Essentials: The default panel set: Pages, Layers, Links, Stroke, Color, Swatches, and CC Libraries panels.
Essentials: The default panel set: Pages, Layers, Links, Stroke, Color, Swatches, and CC Libraries panels.
![]() Advanced: This workspace includes the panels from Essentials plus Gradient, Effects, Object Styles, Paragraph Styles, and Character Styles panels. In Advanced, the Color panel does not display.
Advanced: This workspace includes the panels from Essentials plus Gradient, Effects, Object Styles, Paragraph Styles, and Character Styles panels. In Advanced, the Color panel does not display.
![]() Book: Adds panels such as Cross-References, Conditional Text, Index, and Bookmarks.
Book: Adds panels such as Cross-References, Conditional Text, Index, and Bookmarks.
![]() Digital Publishing: Adds panels for Animation, Timing, Media, Object States, and much more.
Digital Publishing: Adds panels for Animation, Timing, Media, Object States, and much more.
Note
InDesign CC (2015.2) adds a Recent Files workspace that gives you quick and easy access to files you’ve worked on recently, by adding the Recent Files panel.
![]() Interactive for PDF: Adds the panels that support the creation of interactive PDF files, such as Page Transitions, Buttons And Forms, and Media.
Interactive for PDF: Adds the panels that support the creation of interactive PDF files, such as Page Transitions, Buttons And Forms, and Media.
![]() Printing and Proofing: Adds panels that help you check documents prior to delivery for commercial printing, and includes panels such as Separations Preview, Trap Presets, and Preflight.
Printing and Proofing: Adds panels that help you check documents prior to delivery for commercial printing, and includes panels such as Separations Preview, Trap Presets, and Preflight.
![]() Typography: With a big focus on working with text, this workspace adds panels such as Glyphs, Story, Paragraph, Paragraph Styles, Character, and Character Styles.
Typography: With a big focus on working with text, this workspace adds panels such as Glyphs, Story, Paragraph, Paragraph Styles, Character, and Character Styles.

![]() ACA Objective 3.3
ACA Objective 3.3
Using Shortcuts
Throughout the upcoming chapters you’ll find handy tips that often include keyboard shortcuts. By pressing the shortcut keys on the keyboard, you can skip navigation to a menu, submenu, or panel, and often apply commands faster. There are even global shortcuts that work across a lot of different applications that you might already be familiar with, such as:
![]() Video 1.9
Video 1.9
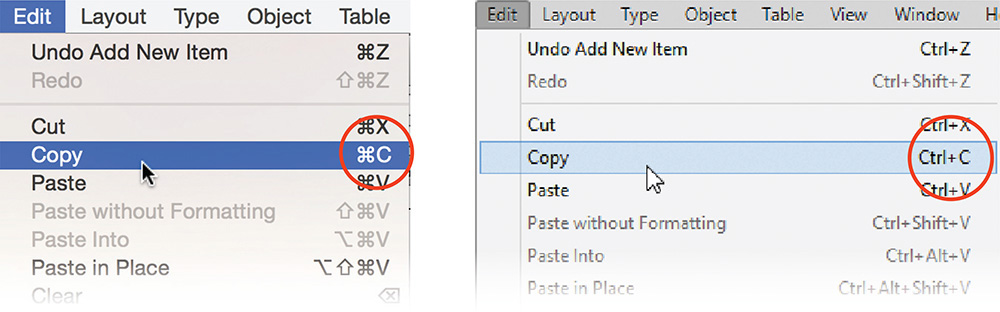
![]() Cut: Ctrl+X (Windows) or Command+X (Mac OS).
Cut: Ctrl+X (Windows) or Command+X (Mac OS).
![]() Copy: Ctrl+C (Windows) or Command+C (Mac OS).
Copy: Ctrl+C (Windows) or Command+C (Mac OS).
![]() Paste: Ctrl+V (Windows) or Command+V (Mac OS).
Paste: Ctrl+V (Windows) or Command+V (Mac OS).
![]() Print: Ctrl+P (Windows) or Command+P (Mac OS).
Print: Ctrl+P (Windows) or Command+P (Mac OS).
Many menu commands (Figure 1.41) display their shortcut, and the Tools panel shows you the shortcut for accessing each tool when you position the pointer over it.
The Shift key and the Alt key (Windows) or Option key (Mac OS) have their own superpowers (Figure 1.42). For example:
![]() Press Shift to constrain movement to horizontal, vertical, or 45° angles.
Press Shift to constrain movement to horizontal, vertical, or 45° angles.
![]() Press Shift when drawing a shape with a rectangle or ellipse tool to create squares or circles.
Press Shift when drawing a shape with a rectangle or ellipse tool to create squares or circles.

Use Alt (Windows) or Option (Mac OS) to:
![]() Copy when dragging selected object.
Copy when dragging selected object.
![]() Draw shapes from the center outwards.
Draw shapes from the center outwards.
Combining the keys, Shift+Alt (Windows) or Shift+Option (Mac OS), you can:
![]() Copy and constrain movement to a horizontal or vertical direction when dragging a selected object.
Copy and constrain movement to a horizontal or vertical direction when dragging a selected object.
![]() Draw circles or squares from the center outwards.
Draw circles or squares from the center outwards.
Menu commands that have a keyboard shortcut display the shortcut next to the command name. For example, next to Object > Lock you see Ctrl+L (Windows) or Command+L (Mac OS). Many menu commands, particularly commands in panel menus, do not have shortcuts, however. When you lack a shortcut for a feature you might use often, it becomes tedious. Let’s say you need to use the Interactive > Convert To Check Box command from the Object menu multiple times when designing a form. Luckily, you can create your own keyboard shortcut for any command that doesn’t have one.
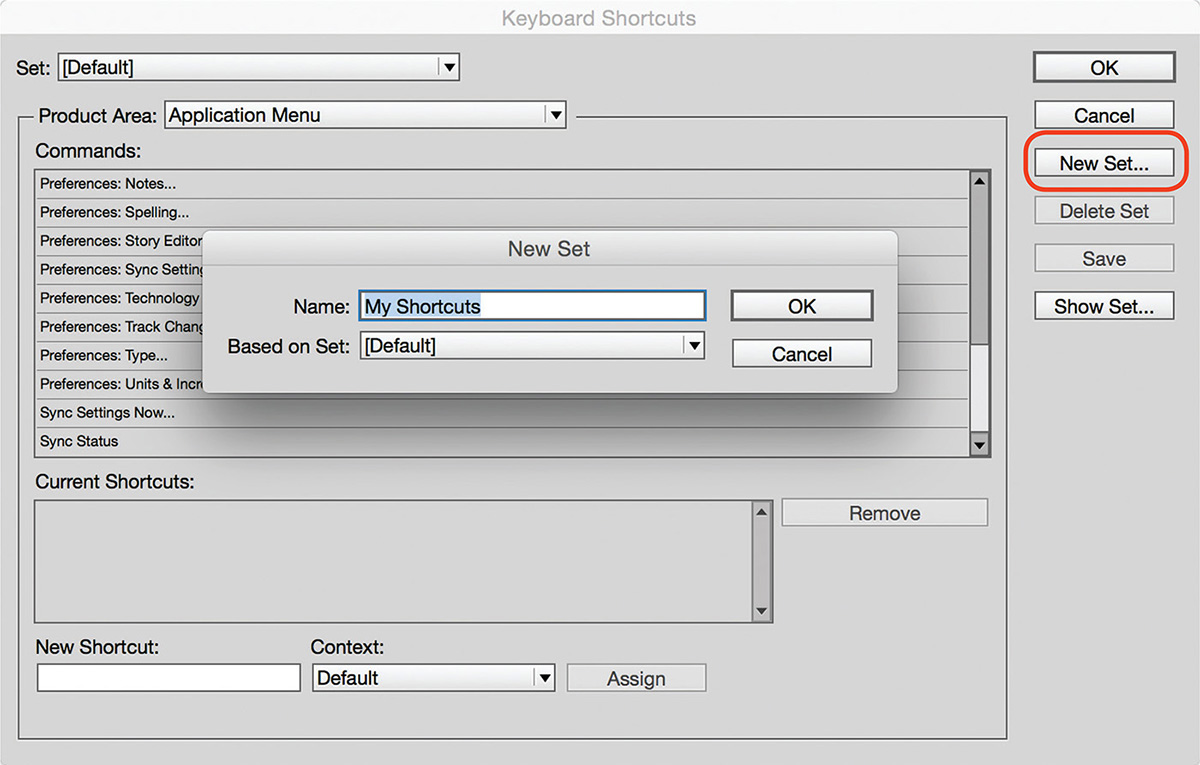
Before adding new shortcuts, you must first create a new keyboard shortcuts set (Figure 1.43):
1. Choose Edit > Keyboard Shortcuts.
2. Click New Set.
3. Enter the Name in the New Set dialog box.
4. Leave Based On Set set to [Default]. This ensures that all of the InDesign default shortcuts are part of your set.
5. Click OK; the newly added set is now the active set.
6. Click OK once more to close the Keyboard Shortcuts dialog box.
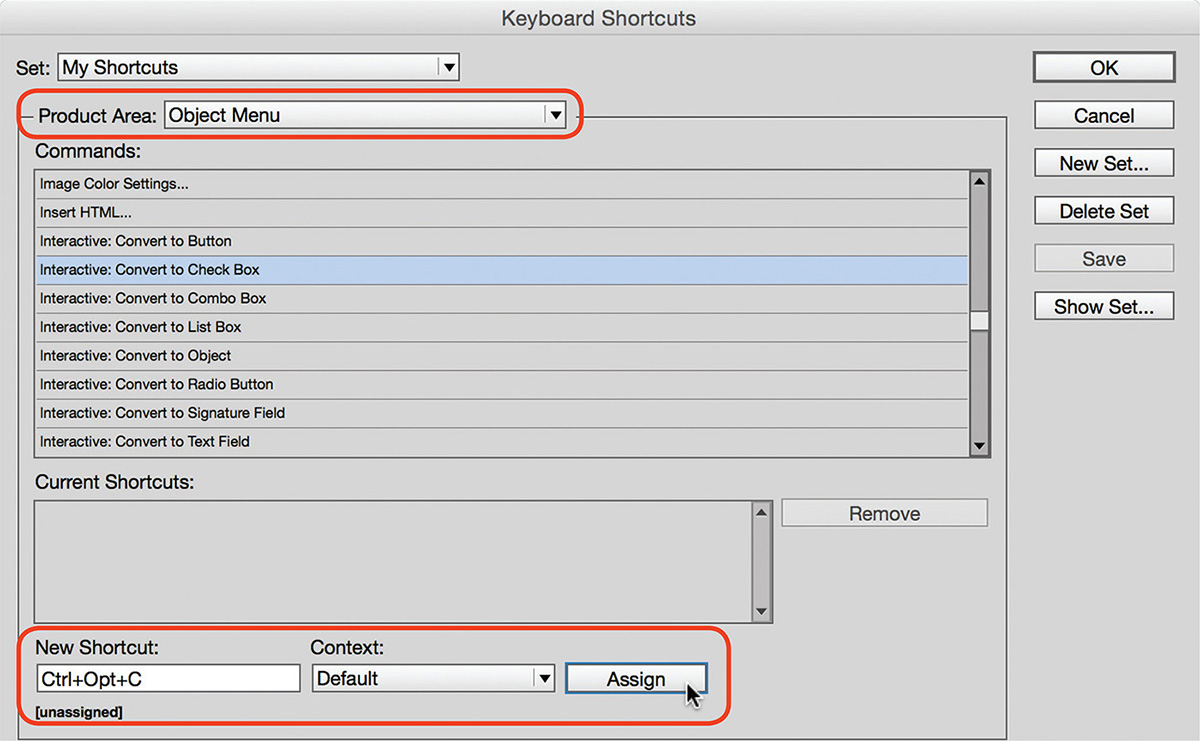
To add custom keyboard shortcuts (Figure 1.44):
1. Choose Edit > Keyboard Shortcuts.
2. Check that new shortcuts set you added previously is the active set.
3. Select a Product Area.
4. Click the Command name.
5. Click in the New Shortcut box.
6. Press the new shortcut keys on the keyboard.
7. Click Assign; this will list the new shortcut under Current Shortcuts.
8. Click OK.
Aside from customizing keyboard shortcuts, you can also customize the display of menus (Figure 1.45). Menus can be hidden or be highlighted with a color.

To edit menus:
1. Choose Edit > Menus.
2. Select a category from the Category menu in the Menu Customization dialog box.
3. Click the disclosure triangle to the left of an Application Menu Command.
4. Click the visibility icon to hide a menu.
5. Click a color name and select a color from the menu.
6. Click OK.
Creating Your Own Workspace
Now that you know all about menu, shortcuts, and panel customization, you’re all set to create your own workspace. Find those panels you love working with the most, group them as preferred, and create your own reusable workspace (Figure 1.46).
![]() Video 1.6
Video 1.6
To save a workspace:
1. Show and organize panels as preferred.
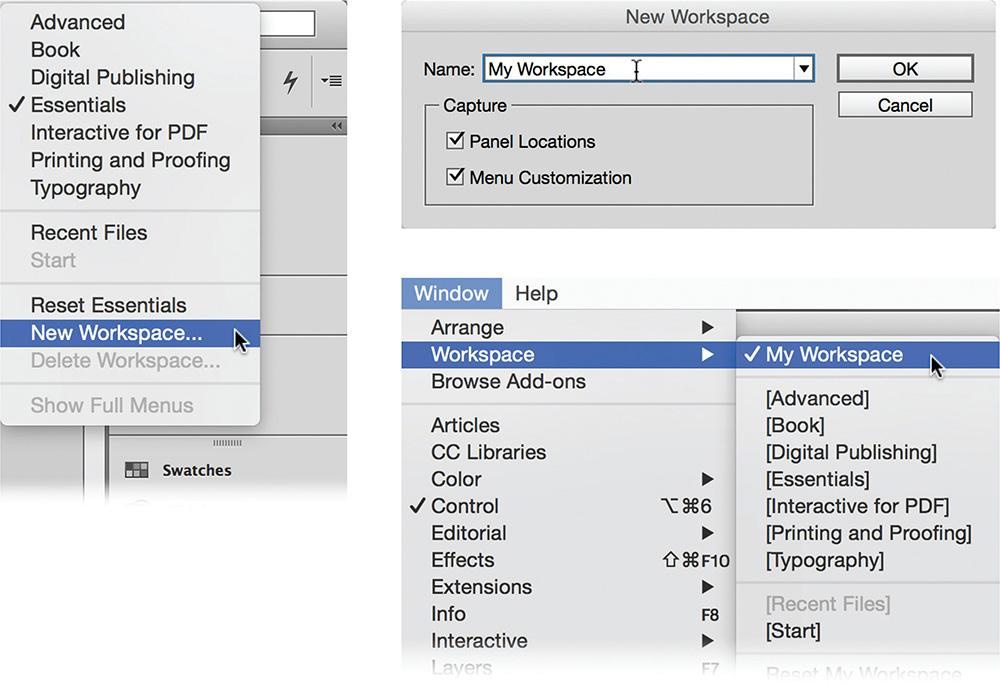
2. Choose New Workspace from the workspace switcher or Window > Workspace menu.
3. Enter the Name of your workspace in the New Workspace dialog box, and select the Panel Locations and Menu Customization options.
Panel Locations ensure that the position of the panels on your screen is captured as part of the workspace. Menu Customization preserves any changes you might have made to menu colors or visibility.
4. Click OK to save your workspace.
The newly added workspace becomes the active workspace.
InDesign is very clever, and it knows you are working in a particular workspace, but it also sees that you move things around during the day. The Paragraph Styles panel might be pulled out of the docked panels and be floating, or maybe you increased the depth of the Pages panel. When you quit InDesign and relaunch it, InDesign does not clean up your workspace for you. As far as InDesign knows, you might have left that Paragraph Styles panel as a floating panel on purpose.
When it comes to cleaning up your workspaces, a simple reset will tidy things up for you (Figure 1.47).

To reset a workspace:
![]() Choose Reset Workspace from the workspace switcher or Window > Workspace menu.
Choose Reset Workspace from the workspace switcher or Window > Workspace menu.
![]() ACA Objective 4.1
ACA Objective 4.1
Before You Begin
At the start of each print or digital media design project, you’ll consider what the intent of the document you’re designing is going to be. For example: Are you creating an interactive eBook, an advertisement that is printed in a magazine, or a design to be viewed on a tablet device, such as an iPad?
![]() Video 1.9
Video 1.9
Answering this question helps you choose the right page size, work with the correct units of measurement, such as pixels or inches, as well as choose the correct color mode for graphics.
As you create a new document (File > New > Document), you set the intent of the document at the top of the New Document dialog box (Figure 1.48). The next chapter covers the New Document dialog box in more detail, so for now just consider the basic differences between the settings.
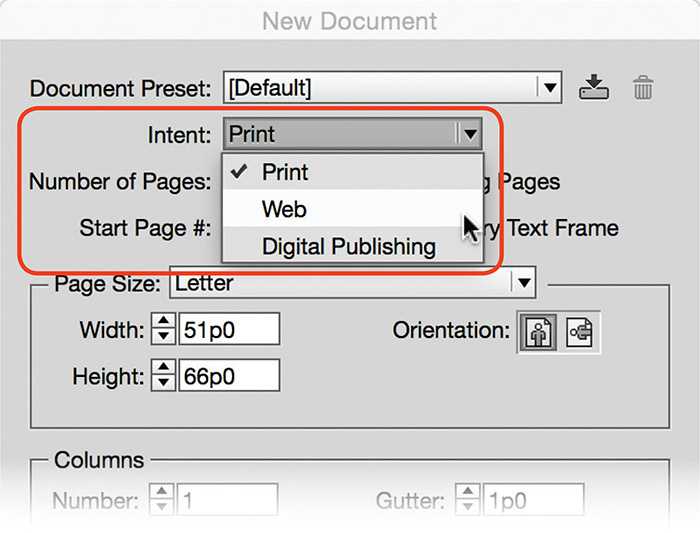
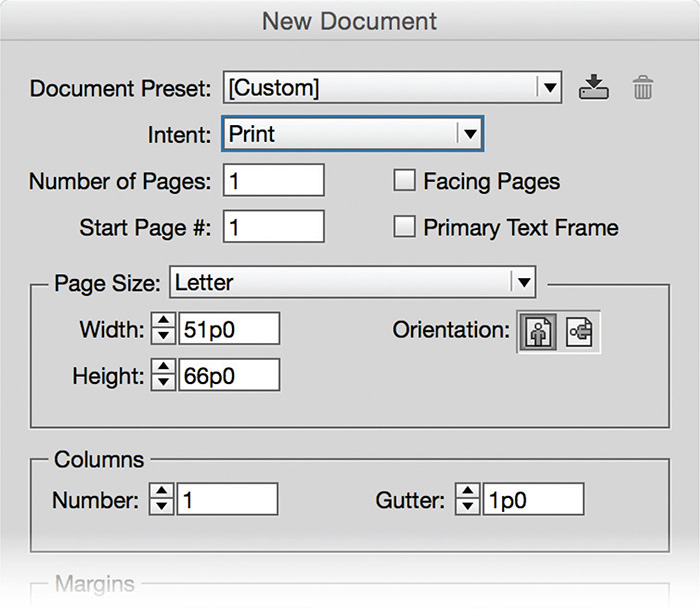
Choose the Print document intent when you plan to publish for commercial print, digital printing, or desktop printing. When you select this intent, InDesign applies the following settings in the document you create:
![]() The Swatches panel defaults to CMYK color.
The Swatches panel defaults to CMYK color.
![]() The Transparency Blend Space is set to Document CMYK (Edit > Transparency Blend Space). You’ll learn more about transparency in a later chapter.
The Transparency Blend Space is set to Document CMYK (Edit > Transparency Blend Space). You’ll learn more about transparency in a later chapter.
![]() The Page Size menu includes standard printed page sizes, such as Letter, and the default units of measurement is set to picas (p) (Figure 1.49).
The Page Size menu includes standard printed page sizes, such as Letter, and the default units of measurement is set to picas (p) (Figure 1.49).
Web
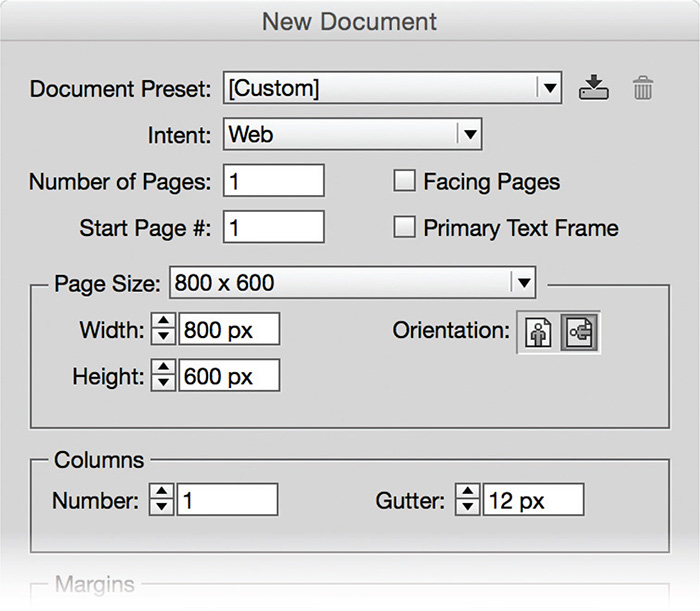
Web intent is useful when designing documents for online viewing. This could be an interactive PDF designed for viewing on an intranet or an eBook for an eReader. When you select this intent, InDesign makes the following changes:
![]() The Swatches panel defaults to RGB color.
The Swatches panel defaults to RGB color.
![]() The Transparency Blend Space is set to Document RGB (Edit > Transparency Blend Space).
The Transparency Blend Space is set to Document RGB (Edit > Transparency Blend Space).
![]() The Page Size menu displays standard computer screen sizes, such as 800x600px, 1024x768px, with measurements set to pixels (px) (Figure 1.50).
The Page Size menu displays standard computer screen sizes, such as 800x600px, 1024x768px, with measurements set to pixels (px) (Figure 1.50).
Digital Publishing
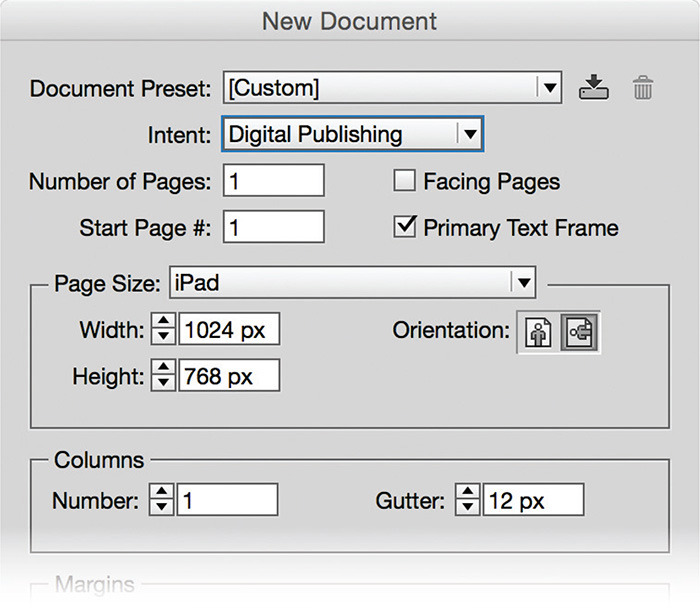
When designing for mobile or tablet devices, choose the Digital Publishing intent as a starting point in the New Document dialog box (File > New > Document). InDesign changes your document settings as follows:
![]() The Swatches panel defaults to RGB color.
The Swatches panel defaults to RGB color.
![]() The Transparency Blend Space is set to Document RGB (Edit > Transparency Blend Space).
The Transparency Blend Space is set to Document RGB (Edit > Transparency Blend Space).
![]() The Page Size menu options include standard mobile device sizes, such as iPhone, iPad, Kindle, and Android, with measurement units in pixels (px) (Figure 1.51).
The Page Size menu options include standard mobile device sizes, such as iPhone, iPad, Kindle, and Android, with measurement units in pixels (px) (Figure 1.51).