Appendix D. Building an Index
Chapter 6 covers a lot of the long-document features found in InDesign, but not all of them. Here, you’ll learn about one more important feature for long documents: indexes.
An index is a list of topics, also referred to as index entries, that includes page number references and “see also” references. The references allow the reader to easily navigate to the pages in the publication that cover the topic. When used in digital media publications, the page references in the index become clickable hyperlinks.
For the recipe book, an index could be a topic list of all the main ingredients used in the various recipes throughout the book. The reader could look up an ingredient in the index and find a reference to any pages or recipes that include the ingredient (Figure D.1).
An InDesign document can contain only one index. Because an index requires the insertion of special markers in the text, indexing is generally done toward the end of a design project to ensure that none of the markers are accidentally deleted.
Building an index is a multistep process:
1. First, you add index markers in the text. Index markers are hidden characters that provide a page reference for the topics listed in the index, which is generally at the end of the publication. For example, in the recipe book you would add index markers before each main ingredient in the ingredients list, and in the index entries at the end of the book a page number, referred to as a page reference, points the reader back to that page.
The topics listed in the index are called index entries. Most index entries consist of text and a page reference, such as “Road kill 3,” although they can also include “see also” references. How you build your topics list is up to you. You can create a list of topics (index entries) before you start adding the index markers, then link the markers to the topics. Or, you can automatically compile a list as you add new markers throughout a publication.

2. With the index markers added, you generate the index. This creates a list of all the index entries and page references.
For longer indexes, an index entry could provide a cross-reference to another topic; for example, if someone looks up “Yellow Teeth” in the index, it might say “see Teeth.”
3. As the final step, you add the index text to your publication.
![]() ACA Objective 4.5
ACA Objective 4.5
Adding Index Entries
The Index panel (Window > Type & Tables > Index) lets you add new index entries, add page references, and build an index.
Tip
To automatically capitalize index entries, select the index entry in the Index panel, and select Capitalize from the Index panel menu. Select the preferred option from the Capitalize dialog box.
To add a new topic and page reference for the index (Figure D.2):
1. Using the Type tool, select the new topic text on the page.
2. Click Reference at the top of the Index panel.
3. Select New Page Reference from the Index panel menu. The New Page
Reference dialog box opens, and the selected text is automatically entered in the first Topic Level.
The topics entered in the topic levels are added to the topic list in the Index panel. You can edit the text if necessary.
4. From the Type menu, select the index entry type. Select how you want to reference the page or page number ranges that cover the topic. For example, to only point to the first page of the recipe that contains the ingredients list, select Current Page.
5. Click Add to add only the current index entry position, and then click Done to close the New Page Reference dialog box.
If you click Add All, every occurrence of the selected text will have an index marker added to it, and the page references in the index for the topic would list multiple pages.
Shortcut
To quickly add a new index entry, select the entry text and press Shift+Ctrl+Alt+[(Windows) or Shift+Command+Option+[(Mac OS).

If you have already created an index entry with a page reference that points to a particular topic, you can cross-reference related topics to that topic.
To add a new index entry that points to another topic (Figure D.3):
1. Using the Type tool, select the topic text on the page.
2. Click Reference at the top of the Index panel.
3. Select New Page Reference from the Index panel menu. You can also click the Create A New Index Entry icon at the bottom of the Index panel.
4. Edit the Topic Level text if needed.
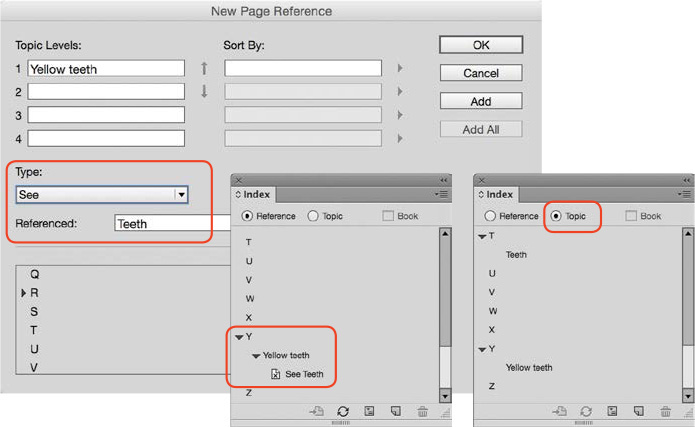
5. From the Type menu, select See and enter the topic text in the Referenced field. For example, for “Yellow Teeth,” you could cross-reference to “Teeth.”
6. Click Add, and then click Done.
Both topics appear in the Index panel, but only the cross-referenced topic will provide the page reference.
Note
You must create a page reference for the referenced topic as well in order for the reader to be directed to a page number. Consider first creating that index entry, and then creating the one that points to the other topic.
![]() ACA Objective 4.5
ACA Objective 4.5
Generating the Index
With all the index entries added, you are ready to generate the index and insert the index text into your document.
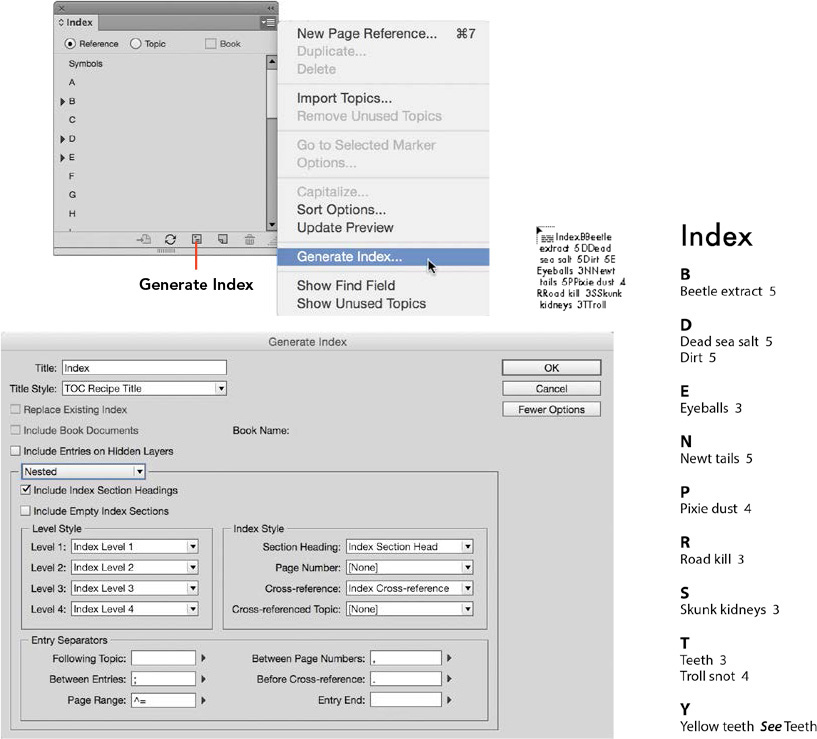
To generate the index and insert the index text (Figure D.4):
1. Select Generate Index from the Index panel menu.
2. Enter the title text in the Title field, and select a paragraph style to format the text with from the style menu in the Generate Index dialog box.
3. Click More Options to apply additional formatting controls for the index.
![]() You can apply different paragraph styles to the different index levels, as well as the section headings (alphabetical letters that precede index entries). For text such as page numbers, cross-references (see, see also) and cross-referenced topics, you can apply character styles.
You can apply different paragraph styles to the different index levels, as well as the section headings (alphabetical letters that precede index entries). For text such as page numbers, cross-references (see, see also) and cross-referenced topics, you can apply character styles.
![]() Under the Entry Separators section, you can control which characters to use between topics, entries, page ranges, and individual page numbers.
Under the Entry Separators section, you can control which characters to use between topics, entries, page ranges, and individual page numbers.
For example, a page number range might be listed as 4-7 and different page numbers as 3, 6, 8.
4. Click OK. The index text is generated and appears as a loaded text icon.
5. Drag place the index text into a newly created text frame, or click an empty placeholder text frame.
With the index text generated, you can edit the paragraph and character styles used to format the index text to further change the formatting if needed. Index text is not “live,” however, so if you add or remove index entries in the Index panel, the index text in your document does not update. You can update a placed index by generating the index again.
Removing an Index Entry
At times, you may need to add more index entries at the customer’s request or remove entries. Perhaps a last-minute change was made to a recipe, or maybe the index is too short or long to fit its allotted pages.
To remove an entry (Figure D.5):
1. Select the index entry in the Index panel.
2. Select Delete Topic from the Index panel menu, or click the Delete Selected Entry icon at the bottom of the panel.
3. Click Update Preview to update the preview for references and topics in the Index panel.

Updating an Index
You might need to update the index at some stage, because your client requested changes to index entries and formatting. Make all the required changes to the index, and then select Generate Index from the Index panel menu once more.
InDesign will replace the current index text with the newly generated index text; it informs you of that replacement with a warning dialog box (Figure D.6).