
Appendix B. Form Elements
In Chapter 4, you were introduced to form elements and learned to convert a rectangle into a text field. This appendix provides an overview of five additional field types and how you could format those.
List Box
A list box is a scrollable list with options from which one or more can be selected. For example, you could use a list box to provide a list of event dates for readers to choose from.
To create a list box (Figure B.1):
1. Select the rectangle shape you added to the page.
2. Choose Object > Interactive > Convert To List Box. Or, select List Box from the Type menu in the Buttons and Forms panel.
3. In the Buttons and Forms panel, enter the Name for the field.
4. Click the disclosure triangle to the left of PDF Options and set the following general options for the field.
![]() Description: Text you enter in the Description field appears as a tool tip in Acrobat Reader.
Description: Text you enter in the Description field appears as a tool tip in Acrobat Reader.
![]() Printable: Select Printable to allow printing of a filled out form field. This option should be enabled for most fields.
Printable: Select Printable to allow printing of a filled out form field. This option should be enabled for most fields.
![]() Required: Select Required if someone must fill out this field before submitting the form electronically.
Required: Select Required if someone must fill out this field before submitting the form electronically.
![]() Read Only: The user cannot select or enter text into a Read Only field.
Read Only: The user cannot select or enter text into a Read Only field.
![]() Font Size: Select a Font Size for the text that is entered into the field.
Font Size: Select a Font Size for the text that is entered into the field.
5. Enter the first list item text in the List Items field and click the plus button.
6. Repeat the previous step for each additional list item.
7. To sort list items alphabetically, select Sort Items. To sort items manually, drag them up or down in the list.
8. To have one of the list items selected by default when someone opens the PDF form, click the item in the list. To allow the selection of more than one item in the List Box, check Multiple Selection.

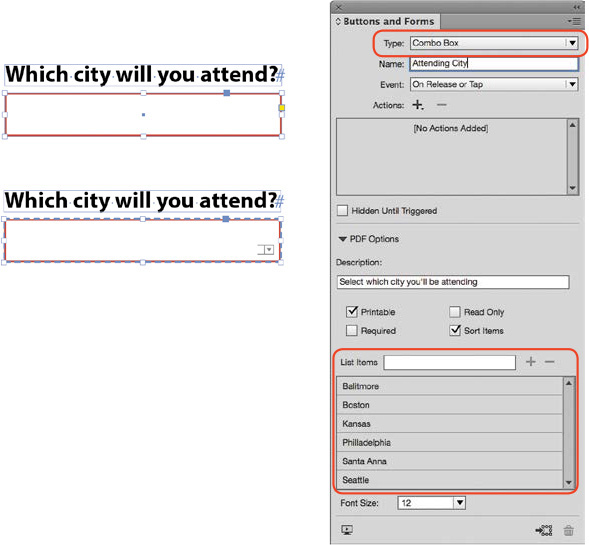
Combo Box
A combo box gives a menu of options from which only one option is chosen. For example, a list of all the states or a list of age groups would be a combo box. Creating a combo box is similar to creating a list box. There is one significant difference, in that a list box can only have a single item selected.
To create a combo box (Figure B.2):
1. Select the rectangle shape you added to the page.
2. Choose Object > Interactive > Convert To Combo Box. Or, select Combo Box from the Type menu in the Buttons and Forms panel.
3. In the Buttons and Forms panel, enter the Name for the field.
4. Click the disclosure triangle to the left of PDF Options, and set the general options for the field.
5. Enter the first list item in the List Items field, and click the plus button.
6. Repeat the previous step for each additional list item.
7. To sort list items alphabetically, select Sort Items. To sort items manually, drag them up or down in the list.
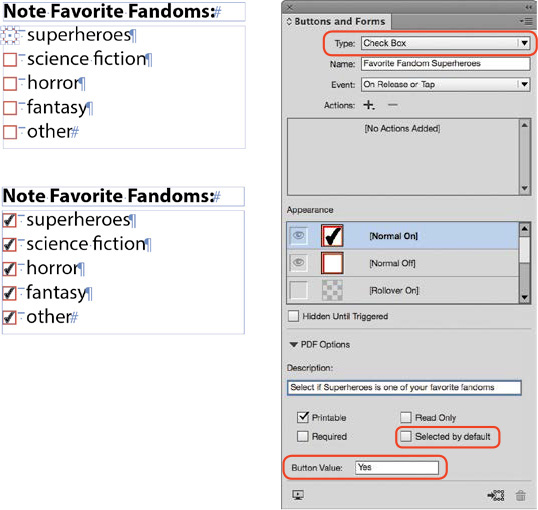
Check Box
A check box is a square box you can toggle on or off as it is clicked. Often, forms use multiple check boxes, such as a list of favorite comic themes (superheroes, science fiction, fantasy, and so on).
Note
To create a mutually exclusive list of check boxes, where only one option may be chosen, all check boxes must have the same field Name, but a different Button Value.
To create a check box (Figure B.3):
1. Select the square shape you added to the page.
2. Choose Object > Interactive > Convert To Check Box. Or, select Check Box from the Type menu in the Buttons and Forms panel.
3. In the Buttons and Forms panel, enter a Name for the field.
4. Click the disclosure triangle to the left of PDF Options, and set the general options for the field.
5. Select the option Selected By Default so the check box is checked by default when the PDF form is opened in Acrobat Reader. You might consider doing this if you have an opt-out check box in a form. For example, you might require the form user to opt out of receiving additional information from your company.
6. Leave the Button Value set to Yes for check boxes.
Radio Buttons
Radio buttons are generally round buttons that are part of a group of buttons. Only one button can be selected at any time, making them mutually exclusive. An example of a radio button group is a series of buttons to select the length of a new subscription: one year, two years, or three years.
Tip
Another way to create a mutually exclusive radio button group is to give each button the same name and retain an identical button value, then select all of the radio buttons and choose Object > Group. On PDF export, InDesign automatically numbers and uniquely names the button values, making the button group mutually exclusive.
To create radio buttons (Figure B.4):
1. Select the circle shape you added to the design.
2. Choose Object > Interactive > Convert To Radio Button. Or, select Radio Button from the Type menu in the Buttons and Forms panel.
3. Enter a Name for the field.
4. Click the disclosure triangle to the left of PDF Options, and set the general options for the field.
5. To make radio buttons mutually exclusive, so that you can select only one option from a group, ensure that each radio button has the exact same name. To distinguish between the different buttons in the group, give each radio button a unique export value.

Signature Field
A signature field is a rectangular box used to insert an e-signature or digital signature. Signature fields are used for PDF forms that are submitted electronically.
To create a signature field (Figure B.5):
1. Select the rectangle shape you added to the page.
2. Choose Object > Interactive > Convert To Signature Field. Or, select Signature Field from the Type menu in the Buttons and Forms panel.
3. In the Buttons and Forms panel, enter a Name for the field.
4. Click the disclosure triangle to the left of PDF Options, and set the general options for the field.
