
Chapter 5. Styling a Recipe Book
Chapter Objectives
Chapter Learning Objectives
![]() Style text with a gradient.
Style text with a gradient.
![]() Apply Corner Options to frames.
Apply Corner Options to frames.
![]() Import text from other file formats.
Import text from other file formats.
![]() Format text with paragraph styles.
Format text with paragraph styles.
![]() Highlight text in paragraphs with character styles.
Highlight text in paragraphs with character styles.
![]() Create tables.
Create tables.
![]() Format tables.
Format tables.
![]() Create table and cell styles.
Create table and cell styles.
![]() Add cross-references.
Add cross-references.
![]() Generate an index.
Generate an index.
![]() Create a table of contents.
Create a table of contents.
![]() Export as SWF.
Export as SWF.
![]() Combine documents into a book.
Combine documents into a book.
Chapter ACA Objectives
For full descriptions of objectives, download the printable chart from your account on peachpit.com. See pages xi–xii.
DOMAIN 2.0
UNDERSTANDING PRINT AND DIGITAL MEDIA PUBLICATIONS
2.5
DOMAIN 3.0
UNDERSTANDING ADOBE INDESIGN CC
3.6, 3.7, 3.8
DOMAIN 4.0
CREATING PRINT AND DIGITAL MEDIA PUBLICATIONS USING ADOBE INDESIGN
4.1, 4.2, 4.3, 4.4, 4.5, 4.6
DOMAIN 5.0
PUBLISH, EXPORT, AND ARCHIVE PAGE LAYOUTS USING ADOBE INDESIGN
5.1
You are becoming a seasoned InDesign user, so the project for this chapter focuses on learning to work smarter instead of harder. You will learn how to import text from other documents and quickly format it with paragraph and character styles. You’ll format objects with object styles so you no longer need to write down all the settings, such as those for effects, in order to apply them to another object. Using tables, you’ll format text in table format, and assign colors and shades to table rows and columns. Finally, this chapter covers some long-document features, such as cross-references, generating an index, and creating a table of contents. All these new skills add up to make longer, more complex documents easier to build.
Styling a Recipe Book
InDesign allows you to create beautiful artwork, pages, and designs. By using master pages and styles, you can create beautiful designs faster and more efficiently. The theme for this chapter is to teach you skills that make the production side of design work easier. You already learned a little about styles in the magazine cover project (Chapter 4), but in this chapter you’ll really put them to work. With the help of styles, formatting text, tables, and objects becomes quick and easy, so you can spend more time on graphic design (Figure 5.1).

Note
This chapter supports the project created in video lesson 5. Go to the Project 5 page in the book’s Web Edition to watch the entire lesson from beginning to end. Please refer to Appendix C, “Adjusting Master Pages,” for detailed steps on the process demonstrated in Video 5.2.
Before looking at working with the various styles, let’s look at two cool techniques that allow you apply gradients to text and add round or other corner settings to frames.
Styling Text with Gradient Swatches
In Chapter 2, you were introduced to gradients and working with the Gradient panel. Gradients are blends between two or more different colors or shades. For text set in larger font sizes, such as a book title, styling text with a gradient makes it stand out more.
![]() Video 5.1
Video 5.1
![]() Video 5.4
Video 5.4
When setting up gradients using the Gradient panel (Window > Color > Gradient), you learned to add a gradient swatch to the Swatches panel by dragging the gradient fill from the top of the panel into the Swatches panel. You can bypass the use of the Gradient panel and add a gradient swatch directly from the Swatches panel menu.
To create a gradient swatch in the Swatches panel (Figure 5.2):
1. Select New Gradient Swatch from the Swatches panel menu.
2. Enter the Swatch Name.
3. Select Linear or Radial for the Type menu.
4. Click a color stop on the Gradient Ramp to select it.
5. Select Swatches from the Stop Color menu to apply a swatch color to the color stop. Alternatively, select one of the other color modes, for example CMYK, and mix the color.
6. Add additional color stops, and set color stop and midpoint positions as needed, then click OK.
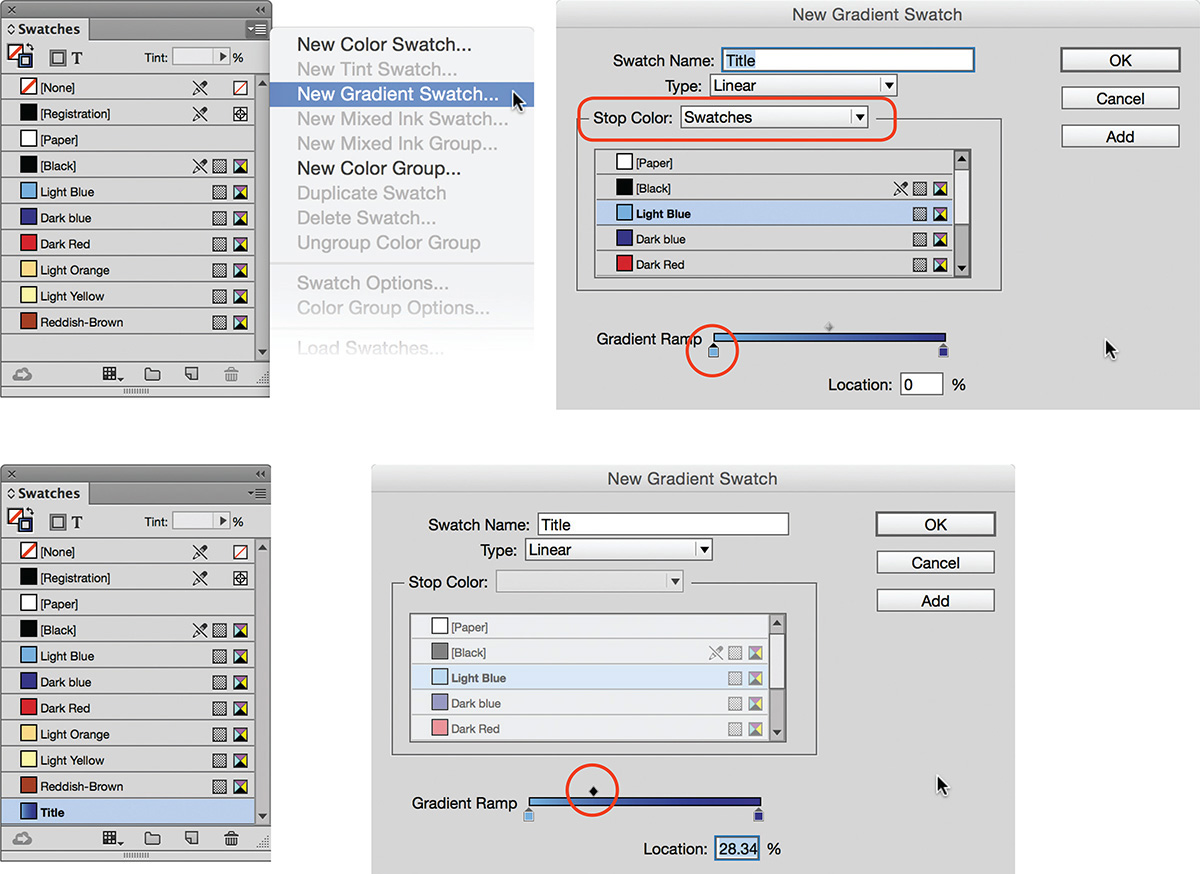
To add more color stops to a gradient blend, click anywhere on the Gradient Ramp, and repeat step 5 to change the color of each. To adjust the midpoint between two color stops, drag the diamond icon above the gradient ramp. The midpoint between two color stops marks the point where the color blend is 50% of each color. To adjust the position of a color stop, drag it to a different location on the gradient ramp.
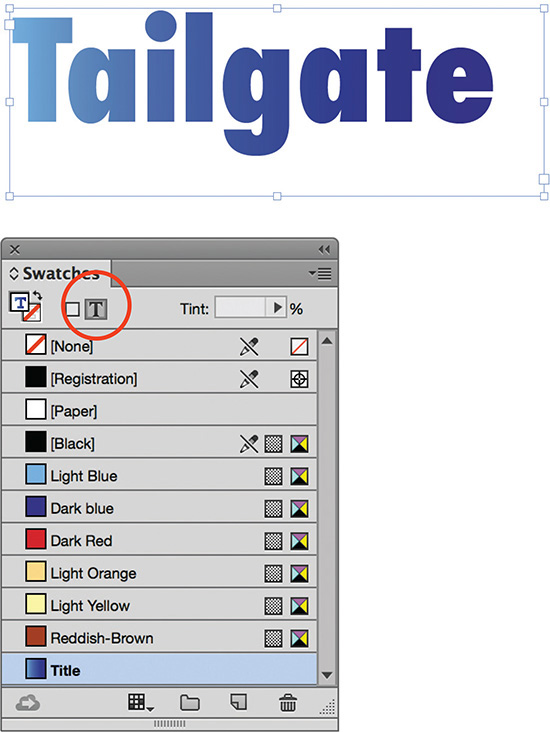
You can apply a gradient fill to all or some of the text in a text frame.
Tip
A quick way to tell whether a text frame is part of a series of threaded text frames is to select the frame and check the in and out port on the frames. If either displays a small arrow icon, the frame is threaded.
To apply a gradient fill to all of the text in a text frame (Figure 5.3):
1. Confirm that the text frame is not part of a series of threaded text frames, and then select the text frame with the Selection tool.
2. Click the Fill box in the Swatches or Control panel, and click the Formatting Affects Text icon.
3. Select the gradient swatch in the Swatches panel.
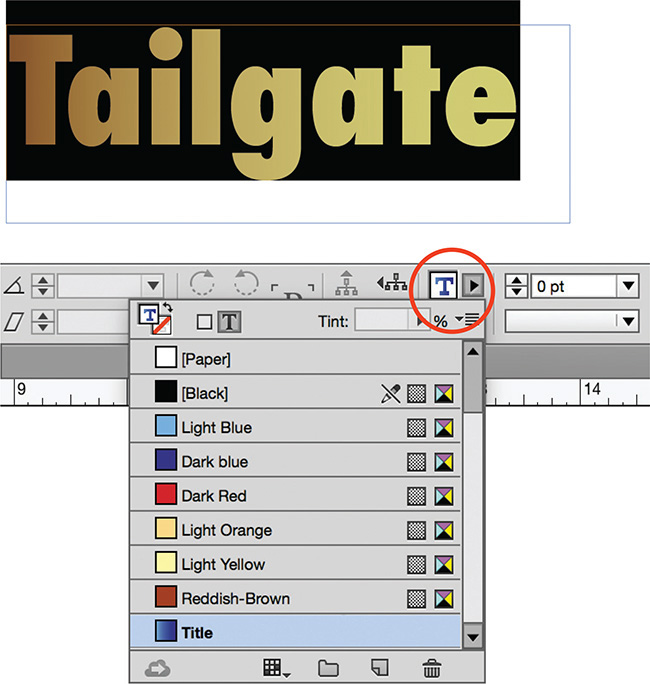
To apply a gradient to only some of text in a text frame (Figure 5.4):
1. Select the desired text with the Type tool.
2. Click the Fill box in the Swatches or Control panel.
3. Select the gradient swatch in the Swatches panel.
Note
When applying a gradient fill to selected text only, keep in mind that, if you want to amend the gradient settings, such as the angle, you must first reselect the text before changing the settings.
To change the angle of the gradient after applying a gradient swatch to text (Figure 5.5):
1. Select the text frame with the Selection tool, or select the text with the Type tool.
2. Click the Fill box in the Swatches or Control panel, and click the Formatting Affects Text icon if needed.
3. Select the Gradient Swatch tool (![]() ), and drag from the point where you want to start the gradient to the point where you want the gradient to end.
), and drag from the point where you want to start the gradient to the point where you want the gradient to end.
4. To adjust the angle, enter a value in the Angle field in the Gradient panel.

![]() ACA Objective 4.2
ACA Objective 4.2
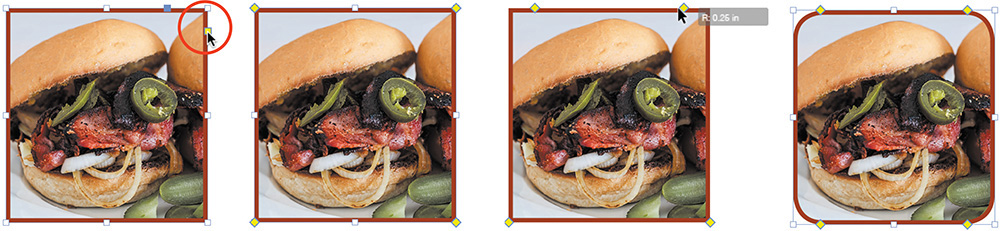
Styling Corners
Corner options enable you to change the appearance of design elements that contain sharp corners, such as rectangles, polygons, or starbursts. For instance, you can round those sharp corners, as demonstrated in the recipe book project, or apply any of the corner options shown in Figure 5.6.

![]() Video 5.5
Video 5.5
Applying corner options
To apply different corner options (Figure 5.7):
1. Select the design element with the Selection tool.
2. Choose Object > Corner Options.
3. Click the Make All Settings The Same icon (![]() ) to ensure the same corner settings are applied to all of the selected element’s corners.
) to ensure the same corner settings are applied to all of the selected element’s corners.
4. Enter the Corner Size amount, and select an option from the Shape menu. Select Preview to see the changes, and click OK when you’re satisfied.

To apply different settings for the various corners (Figure 5.8):
1. Select the design element with the Selection tool.
2. Choose Object > Corner Options.
3. Uncheck the Make All Settings The Same icon (![]() ).
).
4. For each of the four corners, enter the Corner Size amount, and select an option from the Shape menu. Select Preview to see the changes. Click OK.

Working in Live Corner mode
In the previous examples, you adjusted corner options by entering settings in the Corner Options dialog box. Live Corners allows you to adjust the corner options on the fly.
To edit corner options in Live Corner mode (Figure 5.9):
1. Choose View > Extras > Show Live Corner.
2. Using the Selection tool, select the frame. In Live Corner mode, a small yellow box appears on the frame’s edge.
3. Click the yellow box, and drag the yellow diamonds inward to change the corner size.
![]() The corner size for all corners changes as you drag the diamond.
The corner size for all corners changes as you drag the diamond.
![]() To adjust an individual corner, Shift-drag the diamond.
To adjust an individual corner, Shift-drag the diamond.
![]() To change the shape of the corners, Alt-click (Windows) or Option-click (Mac OS) click a diamond. Note that this changes all of the corners.
To change the shape of the corners, Alt-click (Windows) or Option-click (Mac OS) click a diamond. Note that this changes all of the corners.
![]() To change the shape of an individual corner, Shift-Alt-click (Windows) or Shift-Option-click (Mac OS) a diamond.
To change the shape of an individual corner, Shift-Alt-click (Windows) or Shift-Option-click (Mac OS) a diamond.
4. Click outside the frame to exit Live Corner mode.
Object Styles
As part of the graphic design process, you’ll regularly adjust the appearance of page elements by applying stroke and fill colors to elements, adjusting the text frame options to control the positioning of text within a text frame, and applying different effects, such as outer glows and drop shadows. In bigger design projects, you might find yourself applying the same appearance to different page elements. For example, each image might have its top corners rounded and a colored stroke applied to it.
Object styles let you quickly and consistently apply basic formatting attributes, such as fill, stroke, corner options, or text frame options, as well as effects such as drop shadows or outer glows, to objects with a single mouse click. Object styles for text objects (such as frames and table cells) can even include paragraph styles for the initial text formatting.
![]() ACA Objective 3.7
ACA Objective 3.7
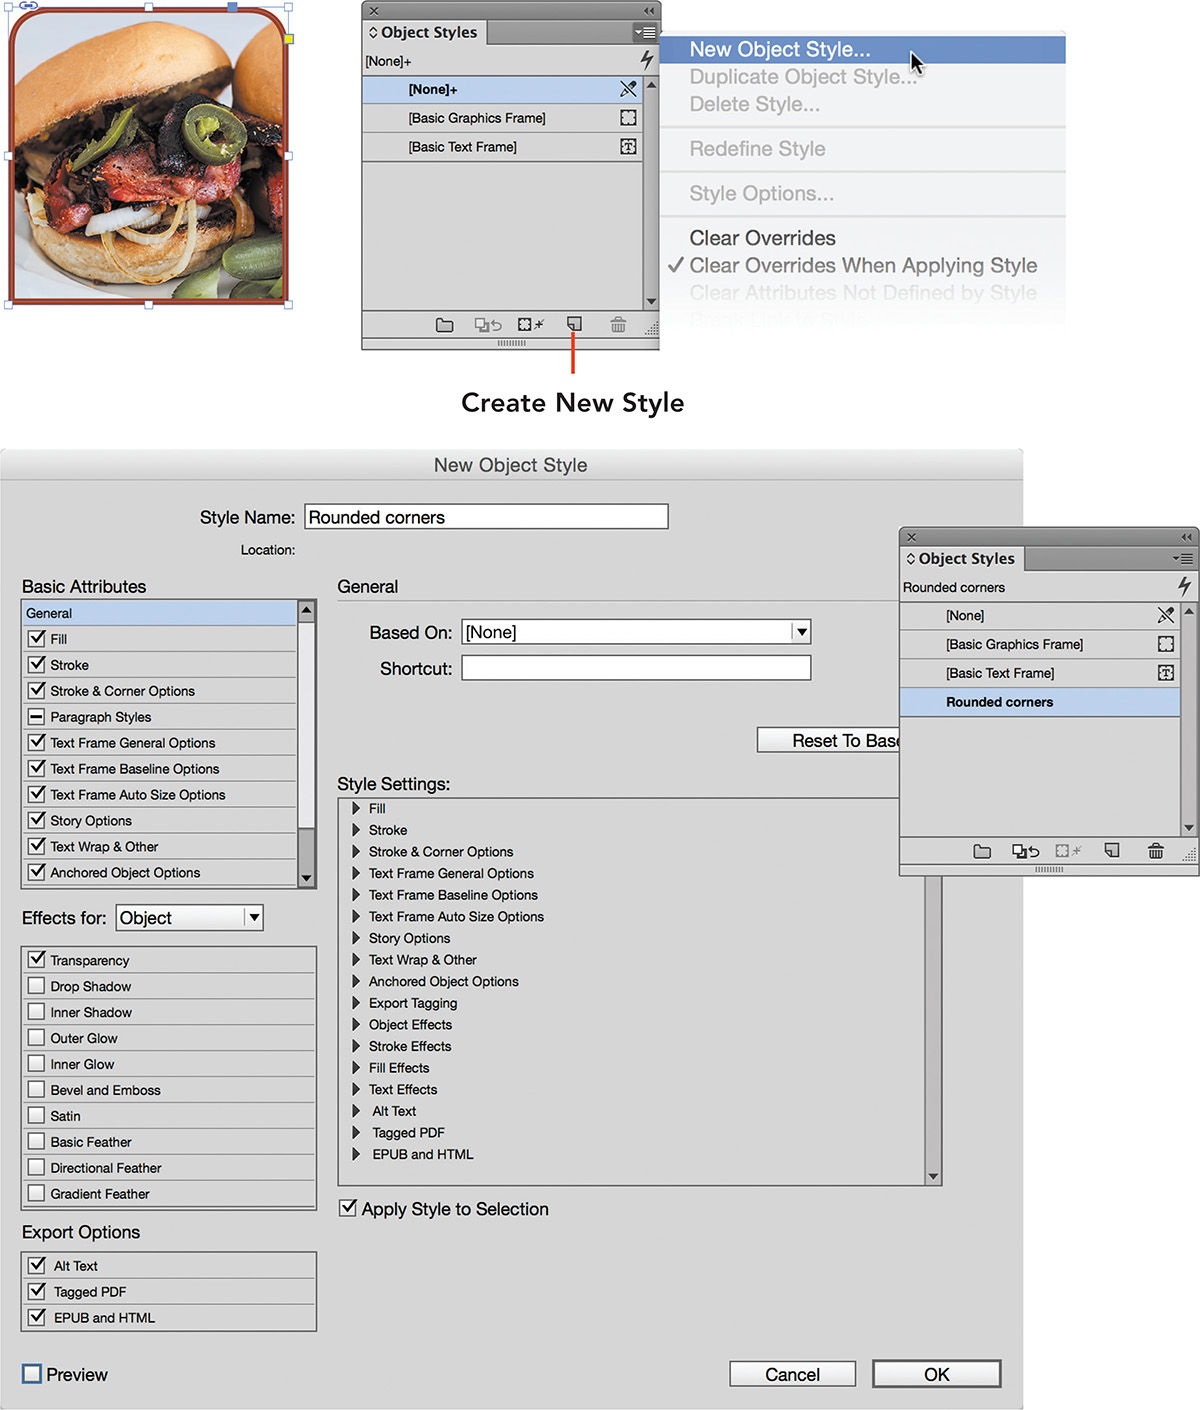
Creating Object Styles
The easiest way to create an object style is to first apply all of the preferred formatting to a design element on the page. You can then use this object and its formatting as the starting point to create a new style.
![]() Video 5.5
Video 5.5
![]() Video 5.6
Video 5.6
To create a new object style (Figure 5.10):
1. Select an element on the page that has the preferred formatting attributes applied to it.
2. Choose Window > Styles > Object Styles to show the Object Styles panel.
3. Select New Object Style from the Object Styles panel menu.
4. Enter the Style Name in the New Object Style dialog box, and select the attributes to include in the style.
![]() If a selected attribute has a checkmark next to its name (
If a selected attribute has a checkmark next to its name (![]() ), it overwrites any similar attribute that is already applied to an element. For example, if an element currently has a green stroke, and the object style includes a red stroke, the red stroke color will replace the green stroke when you apply the style.
), it overwrites any similar attribute that is already applied to an element. For example, if an element currently has a green stroke, and the object style includes a red stroke, the red stroke color will replace the green stroke when you apply the style.
![]() An attribute that is to be ignored displays a dash (
An attribute that is to be ignored displays a dash (![]() ) rather than a checkmark. For that attribute, an element to which you apply the object style retains its current appearance. For example, if the element has a blue fill and the object style specifies a yellow fill, the original blue fill color is not changed.
) rather than a checkmark. For that attribute, an element to which you apply the object style retains its current appearance. For example, if the element has a blue fill and the object style specifies a yellow fill, the original blue fill color is not changed.
![]() An attribute with an empty box (
An attribute with an empty box (![]() ) is off or disabled. A disabled attribute removes the attribute when applying the object style. For example, if an element has a drop shadow, and you apply an object style with the drop shadow effect off, the drop shadow is removed from the element.
) is off or disabled. A disabled attribute removes the attribute when applying the object style. For example, if an element has a drop shadow, and you apply an object style with the drop shadow effect off, the drop shadow is removed from the element.
Tip
To quickly toggle between ignoring all except for one basic attribute or select all basic attributes except one, Alt-click (Windows) or Option-click (Mac OS) the selection box.
5. At the bottom of the New Object Style dialog box, select Apply Style To Selection. This ensures that the new object style is applied to the element you used as the sample element from which to create the style. Click OK.
Shortcut
You can also click the Create New Style button at the bottom of the Object Styles panel to add a new object style with a generic name. If you Alt-click (Windows) or Option-click (Mac OS) the Create New Style button, the New Object Style dialog box appears so you can enter a name for the new style. This shortcut will also work when creating new swatches or other styles, such as paragraph or character styles.
![]() ACA Objective 3.7
ACA Objective 3.7
To apply an object style (Figure 5.11):
1. Select an element on the page.
2. Click the style name in the Object Style panel.

![]() ACA Objective 3.7
ACA Objective 3.7
Duplicating Object Styles
You can create new object styles by duplicating an existing style. This might be handy when you have a series of styles that apply similar attributes but with different settings.
Tip
You can also duplicate an object style by dragging a style onto the Create New Style button at the bottom of the Object Styles panel.
To duplicate an object style (Figure 5.12):
1. Click a style in the Object Styles panel, and select Duplicate Object Style from the Object Styles panel menu.
2. Enter a name for the new style in the Style Name field.
3. Click any attributes listed at left to adjust any of their settings. Click OK.

![]() ACA Objective 3.7
ACA Objective 3.7
Deleting Object Styles
To delete an object style (Figure 5.13):
1. Click a style in the Object Styles panel.
2. Select Delete Style from the Object Styles panel menu, or click the Delete Selected Style button at the bottom of the Object Styles panel.
Tip
To keep the current object settings when deleting an object style that is applied to design elements, choose [None] as the replacement style and select Preserve Formatting in the Delete Object Style dialog box.
3. If the style is applied to any design elements, select a Replace With Style option from your list of object styles. Click OK.

Figure 5.13 Deleting an object style. A warning dialog box appears if the style is applied to any design elements.
![]() ACA Objective 3.7
ACA Objective 3.7
Managing Object Styles in Style Groups
As you work through your project, you might find that you create more and more object styles. Style groups allow you to organize styles by adding related styles to folders that can be expanded or collapsed.
Tip
Another way to create a new style group is to click the Create New Style Group button at the bottom of the Object Styles panel.
To group object styles into a style group (Figure 5.14):
1. Select New Style Group from the Object Styles panel menu.
2. Enter the Name of the style group in the New Style Group dialog box, and click OK.
3. Drag the styles for the new group onto the style group.
4. You can now expand or collapse the style group by clicking the disclosure triangle to the left of the folder icon.
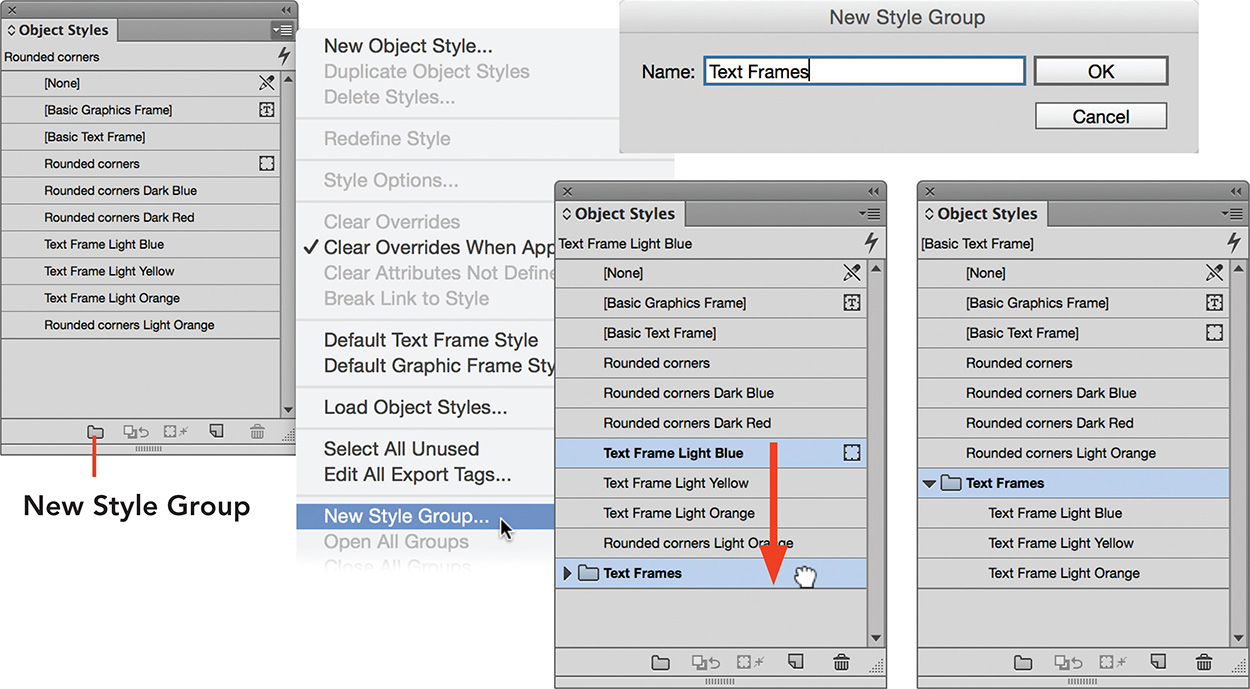
You can also create a new style group by first selecting a number of styles:
1. Ctrl-click (Windows) or Command-click (Mac OS) the styles you want to group in the Object Styles panel.
2. Choose New Group From Styles from the Object Styles panel menu.
Tip
To select contiguous styles, click the first style, then Shift-click the last style.
Adding Text from Other Applications
You have typed text into newly created text frames in InDesign, added placeholder text, and copied and pasted text. However, the most common way to receive text for inclusion in your design projects is straight from the client in a file from a text-editing or word-processing program. Importing text from a file rather than retyping it is great way to save time and work smarter.
![]() ACA Objective 2.5
ACA Objective 2.5
Supported Text Formats
Text can be typed into InDesign or imported from a range of native text-editing applications, such as Microsoft Word. Additionally, text can be imported from TXT and RTF file formats.
The most commonly used file formats for text import are:
![]() Microsoft Word (DOCX, DOC): You can use the style formatting provided in the Word document, map it to InDesign styles, or remove any style formatting during import.
Microsoft Word (DOCX, DOC): You can use the style formatting provided in the Word document, map it to InDesign styles, or remove any style formatting during import.
![]() Rich Text Format (RTF): An alternative export format supported by most text-editing programs. RTF retains style formatting, such as headings. When your client works with a nonsupported text-editing application, you can ask them to export the text from their application as RTF.
Rich Text Format (RTF): An alternative export format supported by most text-editing programs. RTF retains style formatting, such as headings. When your client works with a nonsupported text-editing application, you can ask them to export the text from their application as RTF.
![]() Text Only or Plain Text (TXT): This file format strips out all the styles applied to the text. Similar to RTF, this is an export format a client could use if they are unable to supply DOCX.
Text Only or Plain Text (TXT): This file format strips out all the styles applied to the text. Similar to RTF, this is an export format a client could use if they are unable to supply DOCX.
![]() Microsoft Excel (XLSX, XLS): Excel spreadsheets contain mostly numerical data. For example, the financials in an annual report might be supplied as an XLSX file. This text may be imported as tabbed text or in table format.
Microsoft Excel (XLSX, XLS): Excel spreadsheets contain mostly numerical data. For example, the financials in an annual report might be supplied as an XLSX file. This text may be imported as tabbed text or in table format.
![]() ACA Objective 4.3
ACA Objective 4.3
![]() ACA Objective 4.4
ACA Objective 4.4
Importing Text and Tables
There are a number of ways in which you can import text into InDesign:
![]() You can use the Type tool to create a new empty text frame, and import the text or tables at the text insertion point in that frame.
You can use the Type tool to create a new empty text frame, and import the text or tables at the text insertion point in that frame.
![]() If a document already contains text, you can import text at any point in the story (the text in a series of threaded text frames). To insert the text as the start of a new paragraph, insert a paragraph return at the insertion point, then import at that point.
If a document already contains text, you can import text at any point in the story (the text in a series of threaded text frames). To insert the text as the start of a new paragraph, insert a paragraph return at the insertion point, then import at that point.
![]() If a document contains empty placeholder frames, such as a primary text frame used for the primary story flow, imported text can be placed directly into these frames.
If a document contains empty placeholder frames, such as a primary text frame used for the primary story flow, imported text can be placed directly into these frames.
![]() You can also create a new text frame on the fly as you place text into your document. This technique works well when importing shorter stories, as you can skip the step of creating an empty text frame on the page first.
You can also create a new text frame on the fly as you place text into your document. This technique works well when importing shorter stories, as you can skip the step of creating an empty text frame on the page first.
To import a text or table and create a text frame on the fly (Figure 5.15):
1. Choose File > Place, and navigate to the location of the text file.
2. Select the file, and then click Open.
3. With the loaded text icon (![]() ), drag on the page to create the text frame and insert the text.
), drag on the page to create the text frame and insert the text.
4. Format the text or table. For example, change the font, font size, or leading, or resize the text frame if needed to make all of the text visible.

Primary Text Frames
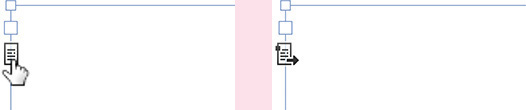
Figure 5.16 Click the primary text frame indicator to convert a text frame to a primary text frame (right).
![]() ACA Objective 4.3
ACA Objective 4.3
Importing RTF or DOCX Files
Because RTF, DOCX, or DOC files can contain style information, such as header styles, you might want to adjust how you import these files into your InDesign document. In some cases, you might opt to strip out any formatting your client has applied. In other cases, it might speed up the text formatting process to import text with formatting.
![]() Video 5.6
Video 5.6
To change the import options when placing text files (Figure 5.17):
1. Choose File > Place.
2. Select Show Import Options at the bottom of the Place dialog box.
3. Navigate to the text file and select it, then click Open.
4. In the Import Options dialog box, enter the settings to apply when importing the text. The Import Options dialog box for Rich Text and Microsoft Word files are similar.
![]() Select Remove Styles And Formatting From Text And Tables to clear any formatting applied in the text file before adding it to InDesign. This means you are in total control of the formatting once the text is added to your design.
Select Remove Styles And Formatting From Text And Tables to clear any formatting applied in the text file before adding it to InDesign. This means you are in total control of the formatting once the text is added to your design.
![]() Select Preserve Styles And Formatting From Text And Tables to bring in all the formatting, including any inline graphics. This will add color swatches to the Swatches panel, as well as styles to Paragraph and Character Styles panels. You will learn about Paragraph and Character Styles shortly.
Select Preserve Styles And Formatting From Text And Tables to bring in all the formatting, including any inline graphics. This will add color swatches to the Swatches panel, as well as styles to Paragraph and Character Styles panels. You will learn about Paragraph and Character Styles shortly.
5. Click OK to add the text to the document.

![]() ACA Objective 4.4
ACA Objective 4.4
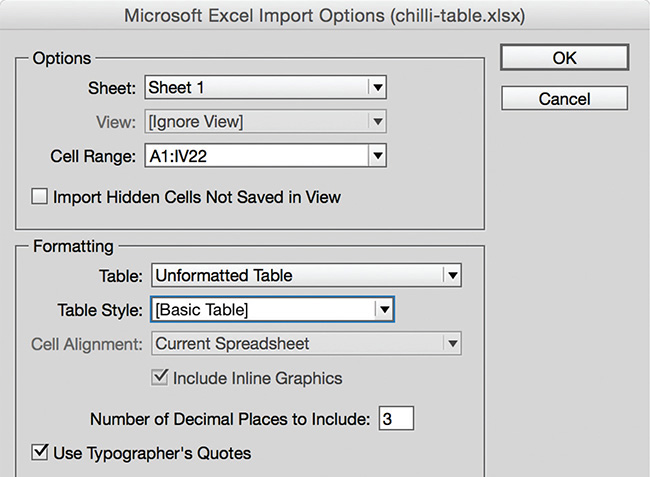
Importing Excel Files
Excel spreadsheets can contain different worksheets that contain numerical data (Figure 5.18). You can import text from only one worksheet at a time into InDesign.
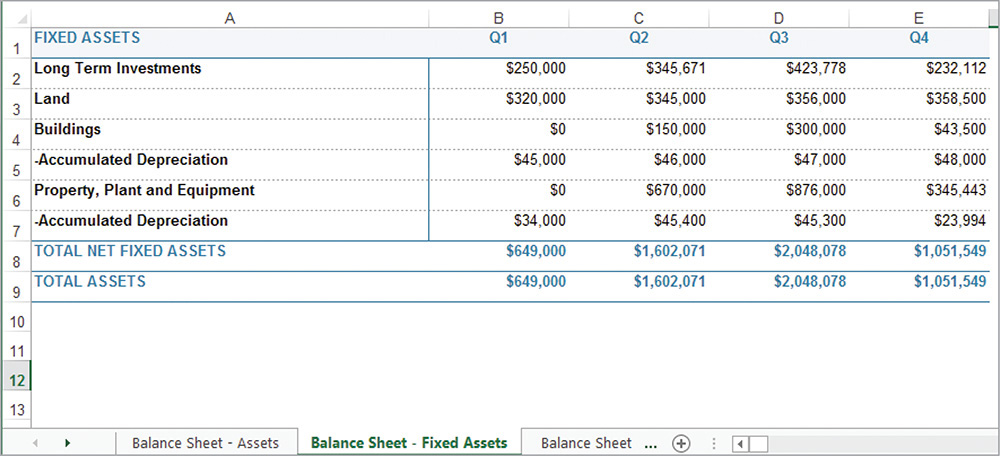
Text imported from an Excel spreadsheet can be inserted into InDesign as a table or as tabbed text. To control from which worksheet data is imported, which cell range, and the formatting, you must show the Import Options dialog box while placing Excel files.
To import Excel spreadsheet data (Figure 5.19):
1. Choose File > Place.
2. Select the Show Import Options at the bottom of the Place dialog box.
3. Navigate to the Excel spreadsheet file and select it, then click Open.
4. In the Import Options dialog box, enter the settings to apply when importing the worksheet.
![]() Under Options, select the Excel worksheet (Sheet) from which you want to import data. If necessary, define the Cell Range. By default, InDesign will import all data from a selected worksheet.
Under Options, select the Excel worksheet (Sheet) from which you want to import data. If necessary, define the Cell Range. By default, InDesign will import all data from a selected worksheet.
![]() Under Formatting, you can select whether you want to import the data as a table or tabbed text format. If the document contains Table Styles, you can immediately apply a style to the table.
Under Formatting, you can select whether you want to import the data as a table or tabbed text format. If the document contains Table Styles, you can immediately apply a style to the table.
5. Click OK to add the Excel data as text or a table to your document.
Faster Text Formatting with Paragraph and Character Styles
As you start to work with longer documents, manual formatting of text across pages can become tedious. Think back to the last project you worked on. What are some of the character and paragraph attributes that you applied to the Editor’s Note body text? And to the headings? There was a lot of selecting text, then choosing font, font size, leading, alignment, space before, space after, indents, and more.
Can you imagine formatting a 100-page recipe book by continuously selecting text and applying all those different text attributes? Or receiving client feedback that asks you for a font size change across all pages?
This is where styles save the day.
![]() Paragraph styles allow you to format all of the text in a paragraph with a single click, easily creating consistent text formatting across your document. They can capture all of the formatting you can apply to a paragraph, including the character-level formatting, font, font size, leading, alignment, and indents, among other attributes. Consider using paragraph styles for various headings, body copy, numbered or bulleted lists, caption text, and more.
Paragraph styles allow you to format all of the text in a paragraph with a single click, easily creating consistent text formatting across your document. They can capture all of the formatting you can apply to a paragraph, including the character-level formatting, font, font size, leading, alignment, and indents, among other attributes. Consider using paragraph styles for various headings, body copy, numbered or bulleted lists, caption text, and more.
Once a paragraph style is associated with text, you can easily make changes to any text that is formatted with a style. To do this, you simply edit the style. For example, that font change your client asked for? Not a problem. Edit the style, and ta-da—that 100-page document is updated within seconds.
![]() Character styles enable you to format words or phrases within a paragraph differently from the rest of the paragraph. For example, maybe all occurrences of a company name need to be set in an italic font style, or words between parentheses, such as figure references, need to be set in a bold font style. As with paragraph styles, once character styles are associated with text, they can be easily edited.
Character styles enable you to format words or phrases within a paragraph differently from the rest of the paragraph. For example, maybe all occurrences of a company name need to be set in an italic font style, or words between parentheses, such as figure references, need to be set in a bold font style. As with paragraph styles, once character styles are associated with text, they can be easily edited.
![]() Video 5.7
Video 5.7
![]() ACA Objective 3.8
ACA Objective 3.8
Working with Paragraph Styles
You might already have a design proof you created for your client that contains placeholder text (Type > Fill With Placeholder Text). These proofs provide a great starting point for creating paragraph styles, but also character styles, object styles, and table styles, because you already styled the text, table, and object examples in the proof.
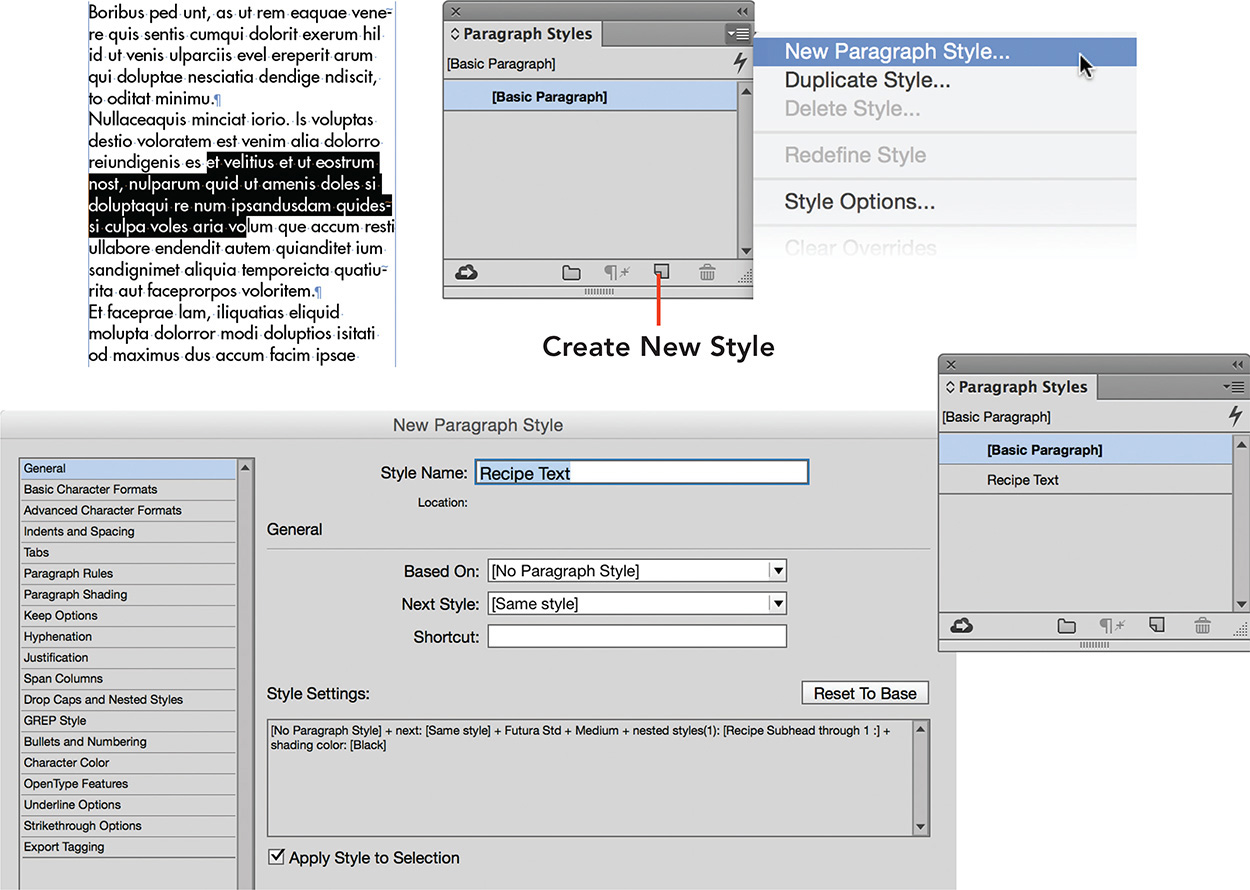
Creating a paragraph style
The easiest way to get started with paragraph styles is to follow the same approach you used for object styles: Base the new style on some text that is already formatted with all the character and paragraph attributes you want to incorporate in the paragraph style.
To create a new paragraph style (Figure 5.20):
1. Using the Type tool, click in a paragraph that is formatted, or select some of the text in the paragraph.
2. Choose Type > Paragraph Styles to show the Paragraph styles panel.
3. Select New Paragraph Style from the Paragraph Styles panel menu, or Alt-click (Windows) or Option-click (Mac OS) the Create New Style button at the bottom of the panel.
4. In the New Paragraph Style dialog box, enter a descriptive name for the style in the Name field.
5. Select Apply Style To Selection to ensure that the paragraph style you are creating is also applied to the paragraph you selected in step 1.
6. Deselect Add To CC Library, and click OK. (You will learn about libraries in the next chapter.)
Applying paragraph styles
Once you create paragraph styles, you can use them to quickly format text that you import or type.
To apply a paragraph style (Figure 5.21):
1. Using the Type tool, click in the paragraph or drag to select multiple paragraphs.
2. Click the style name in the Paragraph Styles panel.

You can also apply the paragraph style from the Control panel:
![]() Click Paragraph Formatting Controls (
Click Paragraph Formatting Controls (![]() ) in the Control panel and select the paragraph style from the menu of styles.
) in the Control panel and select the paragraph style from the menu of styles.
Tip
If style overrides are unintended, you can clear the style override and return to the paragraph formatting by placing the text insertion point in the paragraph, and Alt-clicking (Windows) or Option-clicking (Mac OS) the style name. You can also select Clear Overrides from the Paragraph Styles panel menu.
Updating a style
Once you’ve applied paragraph styles throughout a design project, there might be times you need to make changes to the style. For example, your client might request that hyphenation is disabled and the leading is increased.
An easy and visual way to update a paragraph style is to start by making the changes to a paragraph that is formatted with that particular style. For example, click in a paragraph and disable the hyphenation and increase the leading. A plus sign (+) to the right of the style name in the Paragraph Styles panel means that the paragraph is now formatted with more than just the paragraph style formatting. If you position the pointer over the style name in the Paragraph Styles panel, any style overrides (extra formatting) you applied appears in a tool tip (Figure 5.22).
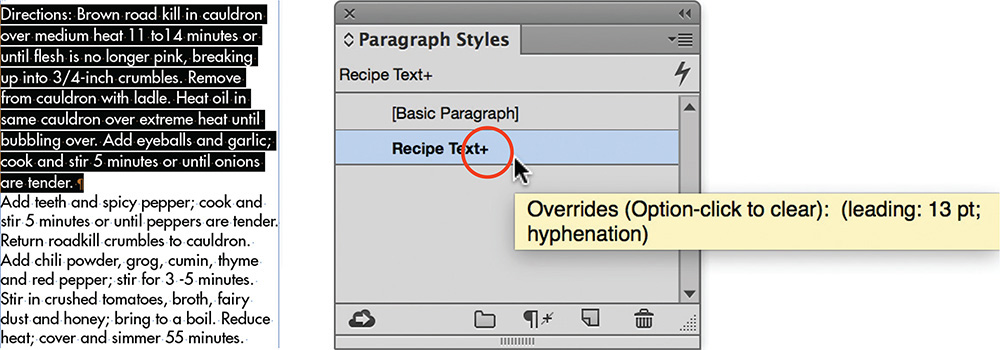
Figure 5.22 A plus sign (+) next to a paragraph style warns that additional formatting is applied on top of the paragraph style formatting.
To incorporate the additional formatting in the applied paragraph style, and thus update all paragraphs that have the same style applied (Figure 5.23):
1. Using the Type tool, click in the paragraph whose formatting you changed. The applied style name is highlighted in the Paragraph Styles panel.
2. Select Redefine Style from the Paragraph Styles panel menu.

Figure 5.23 Redefining a style updates the paragraph style by incorporating manual changes applied on top of the paragraph style formatting. All paragraphs formatted with the style are updated at the same time.
You can also update a paragraph style by opening the Style Options dialog box and adjusting any of the available settings (Figure 5.24):
1. Right-click (Windows) or Control-click (Mac OS) the style name in the Paragraph Styles panel and select Edit [Style Name] from the context menu. The Paragraph Style Options dialog box opens.
2. Click any of the categories listed in the left column to make changes to any of the formatting. For example, to add a first-line left-indent amount, click Indents And Spacing.
3. Select Preview to see the changes. Click OK when you have made all changes.
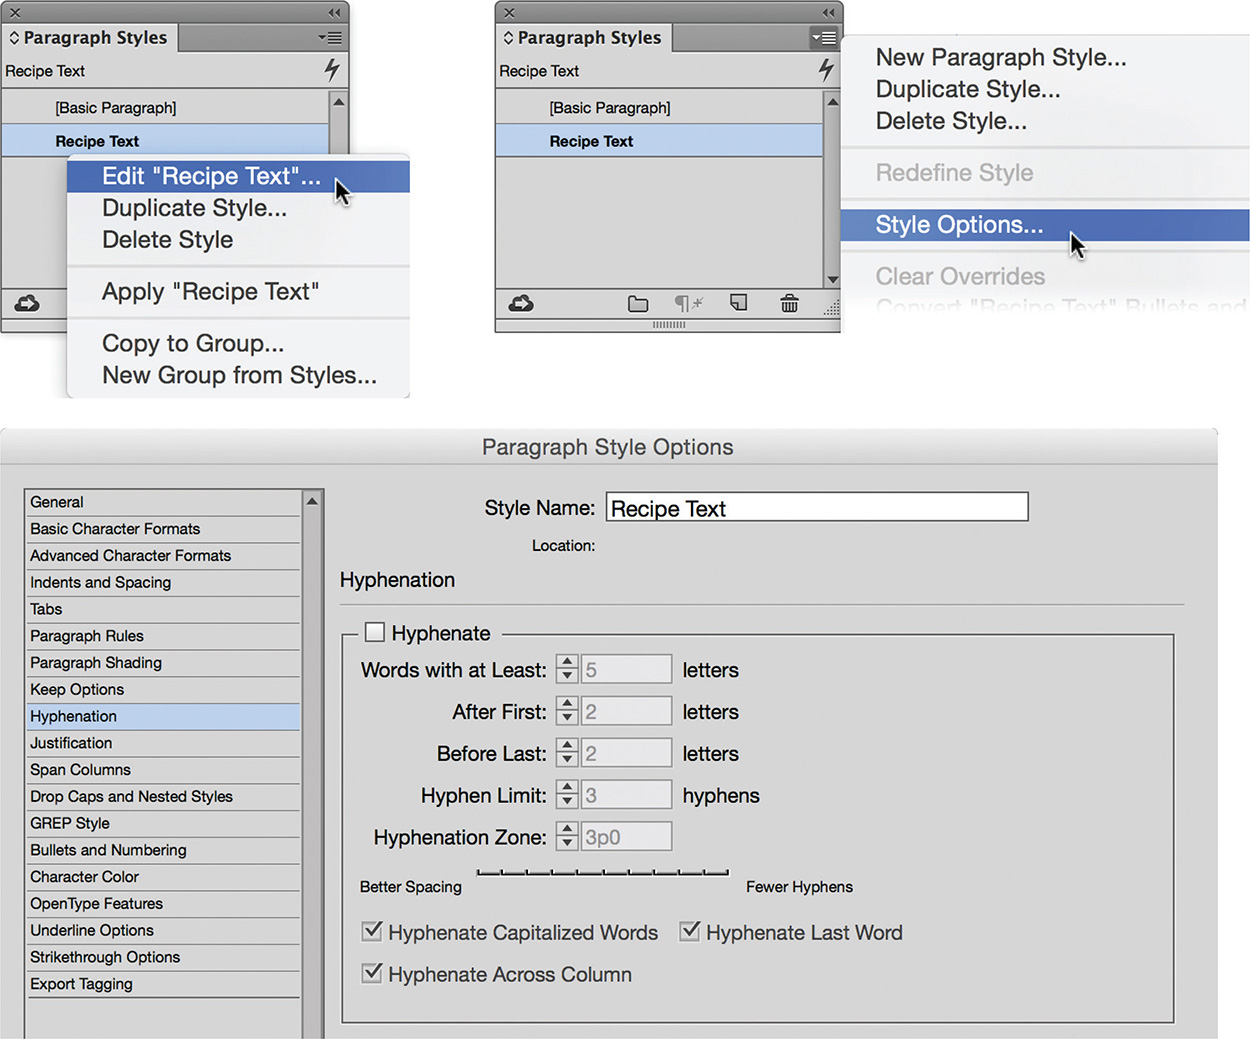
The paragraph style and any text formatted with the style updates throughout the document.
You can also edit a paragraph style by selecting the style in the Paragraph Styles panel and choosing Style Options from the Paragraph Styles panel menu. Keep in mind that selecting a style name in the Paragraph Styles panel will apply that style to any paragraph text if you happen to have the text insertion point in the text.
![]() ACA Objective 3.8
ACA Objective 3.8
Using Character Styles
Think of character styles as styles that apply extra or different formatting to text that is already formatted with a paragraph style. Character styles make certain characters, words, or phrases within a paragraph appear different. For example, think of the text in the recipe directions. You could draw attention to the ingredients in the directions by changing its font style to bold and the color to red.
You only want to capture two character formatting attributes with such a character style:
![]() Bold font style
Bold font style
![]() Red fill color
Red fill color
To quickly change the font style and color of ingredients in the recipe directions, select the words with the Type tool and apply the character style.
To create a character style that only captures those formatting attributes that are different from the rest of the paragraph formatting, start by applying a paragraph style to the text. With the paragraph style applied, select one or more words in the text and change their appearance. Using the previous example, change the color and font style of the selected words. The paragraph style shows an override (plus symbol) next to the style name.
To create a new character style (Figure 5.25):
1. Select the text in the paragraph for which you changed the appearance.
2. Choose Type > Character Styles to show the Character Styles panel.
3. Select New Character Style from the Character Styles panel menu, or Alt (Windows) or Option (Mac OS), and click the Create New Style button at the bottom of the panel.
4. In the New Character Style dialog box, enter a descriptive name for the style in the Name field.
5. Select Apply Style To Selection to ensure that the character style is applied to the text you selected in step 1.
6. Deselect Add To CC Library, and click OK. (You will learn about libraries in the next chapter.)

To apply a character style (Figure 5.26):
1. Using the Type tool, select some text within a paragraph.
2. Click the style name in the Character Styles panel, or select Character Formatting Controls (![]() ) in the Control panel and select the character style from the styles menu.
) in the Control panel and select the character style from the styles menu.

To edit a character style:
1. Right-click (Windows) or Control-click (Mac OS) the style name in the Character Style panel, and select Edit Style from the context menu.
2. Click any of the categories listed at left, make changes to the settings, and click OK.
![]() ACA Objective 3.8
ACA Objective 3.8
![]() ACA Objective 4.3
ACA Objective 4.3
Creating Styles for Bulleted and Numbered Lists
You learned back in Chapter 4 how to create bulleted lists and change the bullet character. What were the steps to create a bulleted list?
You formatted the text, including specifying a font, font size, and leading. Then, with the Paragraph Formatting Controls selected, you clicked the Bulleted List icon in the Control panel. You then Alt-clicked (Windows) or Option-clicked (Mac OS) the Bulleted List icon to further change the formatting, such as the bullet character and the Left and First Line Left Indent.
To create paragraph styles that automatically apply bulleted or numbered lists (which would be handy for recipe ingredients and steps), you follow the same steps as when creating any other paragraph style:
![]() Start by formatting a paragraph with a bulleted or numbered list.
Start by formatting a paragraph with a bulleted or numbered list.
![]() Use this formatting to define the new style.
Use this formatting to define the new style.
The real fun starts when you change the color of the bullet or the formatting of the number. This is when character styles come to the rescue. Although you cannot select the bullet or number in the paragraph with the Type tool, you can apply a character style as part of the Bullets And Numbering options.
Let’s assume you’ve already created a paragraph style called Ingredients List that applies round bullets to the start of each paragraph (Figure 5.27).
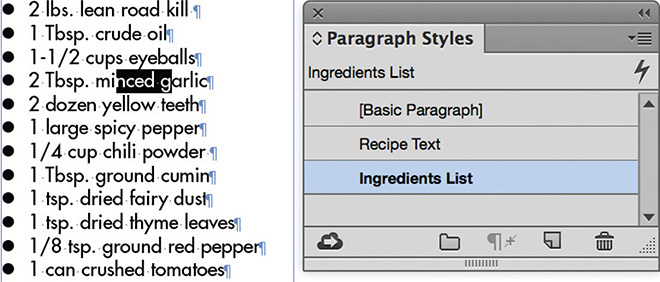
Figure 5.27 The Ingredients List paragraph style applies a bulleted list to each of the ingredient paragraphs.
To apply a character style to the bullet character (Figure 5.28):
1. Right-click (Windows) or Control-click (Mac OS) the paragraph style and select Edit [Style Name] from the context menu.
2. In the Paragraph Style Options dialog box, click Bullets And Numbering at left.
3. Under Bullet Character, select New Character Style from the Character Style menu.
Note
You can also select a character style you might have created earlier from the Character Style menu in the Bullets And Numbering settings.
4. Click Character Color in the New Character Style dialog box, and select a swatch color for the bullet under Character Color, and enter the Style Name.
5. Click OK to close the New Character Style dialog box and return to the Paragraph Style Options dialog box.
6. Click OK.

Figure 5.28 Applying a character style to the bullet character as part of the paragraph style speeds up the text formatting process
The paragraph style is updated, and all the bullets appear in the color defined by the character style.
Working with Nested Styles
Nested styles apply character styles to part of the text in a paragraph, without the need for you to select that text. They automatically know where they need to be applied, based on their definition. Let’s look at the recipe directions paragraph (Figure 5.29) as an example.

![]() Video 5.7
Video 5.7
For each recipe in the cookbook, there is a run-in head, which is a heading that is part of the paragraph text itself. Here the run-in head is “Directions” followed by a colon (:). To make this heading stand out from the rest of the paragraph, you want to apply a character style that changes the font style to a bolder font along with a different color.
You could manually select the text, including the colon character, and then apply a character style called Recipe Subhead. However, for a book with many recipes, that could be a bit of work. Instead of you doing the work, let InDesign do the job for you.
How do you know where the run-in head starts and finishes? It starts at the beginning of the paragraph, and stops after the first colon character in the text.
Okay, with that information, you are ready to edit the Recipe Text paragraph style and nest the Recipe Subhead character style in it (Figure 5.30):
1. Right-click (Windows) or Control-click (Mac OS) the Recipe Text style in the Paragraph Styles panel, and select Edit “Recipe Text” from the context menu.
2. Select Drop Caps And Nested Styles at left in the Paragraph Style Options dialog box. Select Preview to see the changes you make in your document.
3. Click New Nested Style under Nested Styles.
4. Select Recipe Subhead from the character style menu.
5. Select Through to ensure the character style applies to the colon character as well.

Figure 5.30 Creating a nested style that automatically applies the Recipe Subhead character style to the run-in head
Note that if you select Up To, the character style would stop just before the colon character.
6. Leave the number of instances to encounter set to 1, as you want to apply the character style only through the first colon in the text.
The menu at the end defines the item that controls when to stop applying the character style. There is a long list of predefined items; however, the colon character isn’t listed.
7. Instead of selecting from the menu, click where it says Words, and type a colon character.
8. Click OK to close the Paragraph Style Options dialog box.
Congratulations! You have just created your first nested style. Try to replace the text “Directions:” with “More Directions:” Notice how all the text including the colon is formatted with the character style? So instead of hard labor, you’ve got InDesign to do the work for you!
Beautiful Tables
Tables provide a great way to format content in a tabular format. Apart from text and data, InDesign also lets you add graphics and images to table cells.
Some facts about tables:
![]() Tables consists of rows, columns, and cells (Figure 5.31).
Tables consists of rows, columns, and cells (Figure 5.31).

![]() Table header rows are rows at the top of the table.
Table header rows are rows at the top of the table.
![]() Table footer rows are the bottom rows of a table.
Table footer rows are the bottom rows of a table.
![]() Header and footer rows are generally formatted differently from the rest of the table (body rows). Additionally, they repeat themselves when a table is long and breaks across multiple text frames, columns, or pages.
Header and footer rows are generally formatted differently from the rest of the table (body rows). Additionally, they repeat themselves when a table is long and breaks across multiple text frames, columns, or pages.
![]() Tables are not standalone objects. Tables always appear inline with text, either as part of a story or in a standalone text frame.
Tables are not standalone objects. Tables always appear inline with text, either as part of a story or in a standalone text frame.
![]() Tables are edited with the Type tool.
Tables are edited with the Type tool.
You can add tables to your designs in various ways:
![]() Import Word or Excel documents, as you learned earlier in this chapter.
Import Word or Excel documents, as you learned earlier in this chapter.
![]() Create a new table at a text insertion point in a story.
Create a new table at a text insertion point in a story.
![]() Create a table in a new standalone text frame.
Create a table in a new standalone text frame.
![]() Video 5.8
Video 5.8
![]() Convert text to tables, based on a recognizable delimiter for columns and rows, such as a tab character or an end of paragraph marker.
Convert text to tables, based on a recognizable delimiter for columns and rows, such as a tab character or an end of paragraph marker.
![]() ACA Objective 4.4
ACA Objective 4.4
Creating Tables
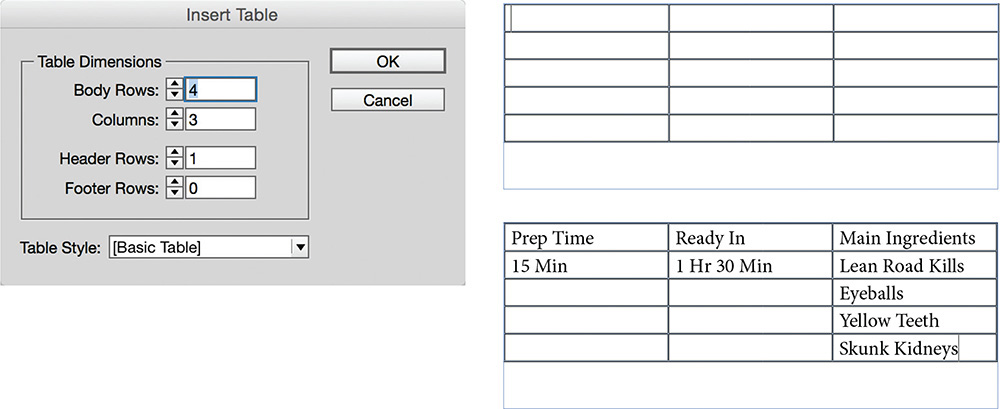
Creating a table from scratch works best if you are going to enter (type) all the data in yourself. To create a new inline table (Figure 5.32):
1. Using the Type tool (![]() ), click in a new paragraph to set the insertion point for the table.
), click in a new paragraph to set the insertion point for the table.
Tip
To more easily see where you insert the table, ensure you view the document in Normal screen mode and choose Type > Show Hidden Characters.
2. Choose Table > Insert Table.
3. In the Insert Table dialog box, enter the initial number of Body Rows and Columns you want in the table.
4. If you want Header or Footer Rows, enter the number of rows as well. Click OK.
5. Click in any table cell with the Type tool to set the insertion point and enter the text. Repeat this process for each cell.
Tip
Instead of clicking in each cell with the Type tool to set the text insertion point, press the Tab key to move the insertion point to the next cell in the table. Press Shift-Tab to navigate to the previous cell.
To add a new table in a separate text frame (Figure 5.33):
1. Choose Edit > Deselect All to make sure nothing is selected on the page.
2. Choose Table > Create Table.
3. In the Create Table dialog box, enter the initial number of Body Rows and Columns you want in the table.
4. If you want Header or Footer Rows, enter the number of rows as well. Click OK.
5. The table settings are loaded into the pointer (![]() ). Drag out the text frame that will contain the table. When you release the mouse, the text frame fills with the number of rows and columns specified in step 3.
). Drag out the text frame that will contain the table. When you release the mouse, the text frame fills with the number of rows and columns specified in step 3.
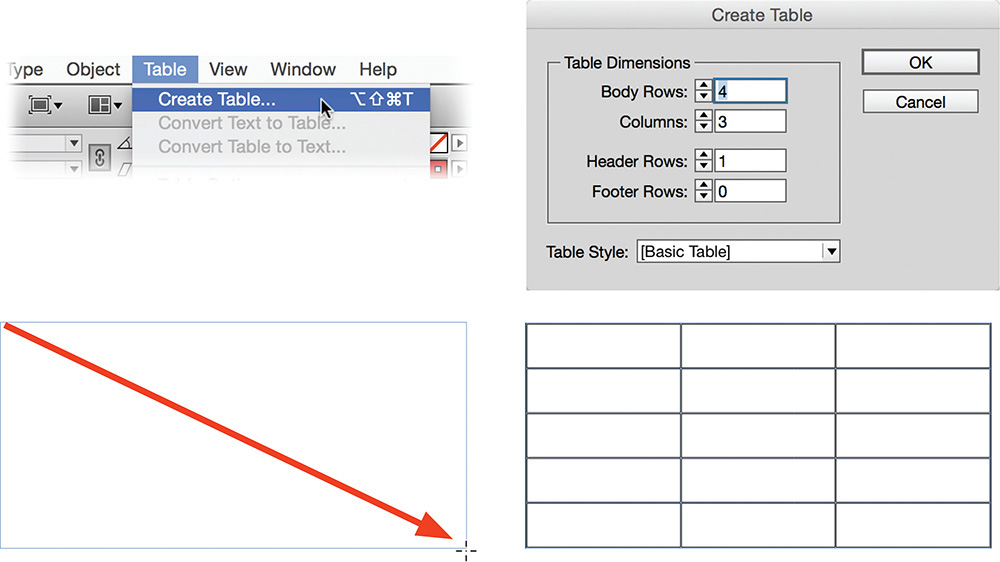
The Create Table command differs from the Insert Table command in that it creates tables that equally distribute rows and columns within the text frame that is created. The Insert Table command only distributes columns evenly.
Once you add the table and insert the text, you are ready to start formatting the rest of the table. The first thing to do is format the text. Create paragraph styles for the text formatting used for headers, footers, and body cells. This is particularly useful if you need to apply similar formatting to other tables in your project (Figure 5.34).
![]() ACA Objective 4.4
ACA Objective 4.4
Adjusting Column Widths and Row Heights
Once the text is formatted, you can change the width of the table columns.
To adjust the width of a column (Figure 5.35):
1. Using the Type tool, click the top edge of a column to select the column.
2. Choose Window > Type & Tables > Table to show the Table panel.
3. In the Table panel, enter a value in the Column Width field. You can also set the Column Width in the Control panel.
Tip
You can also select a range of cells, such as a column, columns, or rows, by clicking in one cell with the Type tool and then dragging across the cell ranges you want to select.
Another way you can change the column width is to (Figure 5.36):
![]() Position the pointer over the column edge. When a double arrow appears, drag left or right. The overall table width increases or decreases as you adjust the column width.
Position the pointer over the column edge. When a double arrow appears, drag left or right. The overall table width increases or decreases as you adjust the column width.
![]() Shift-drag to affect only the width of two neighboring columns rather than the overall table width.
Shift-drag to affect only the width of two neighboring columns rather than the overall table width.

Figure 5.36 Shift-drag the cell divider between two columns to change the column width in a way that affects only the two neighboring columns.
Tip
Another way to set the same column width for multiple columns is to select a range of columns and enter the column width amount. Each selected column will take on the width value entered.
To make multiple contiguous columns the same width (Figure 5.37):
1. Using the Type tool, click the top edge of the first column to select the column.
2. Shift-click the top of the last column of the range of columns to select.
3. Choose Table > Distribute Columns Evenly. You can also right-click (Windows) or Control-click (Mac OS) the selected columns and select Distribute Columns Evenly from the context menu.

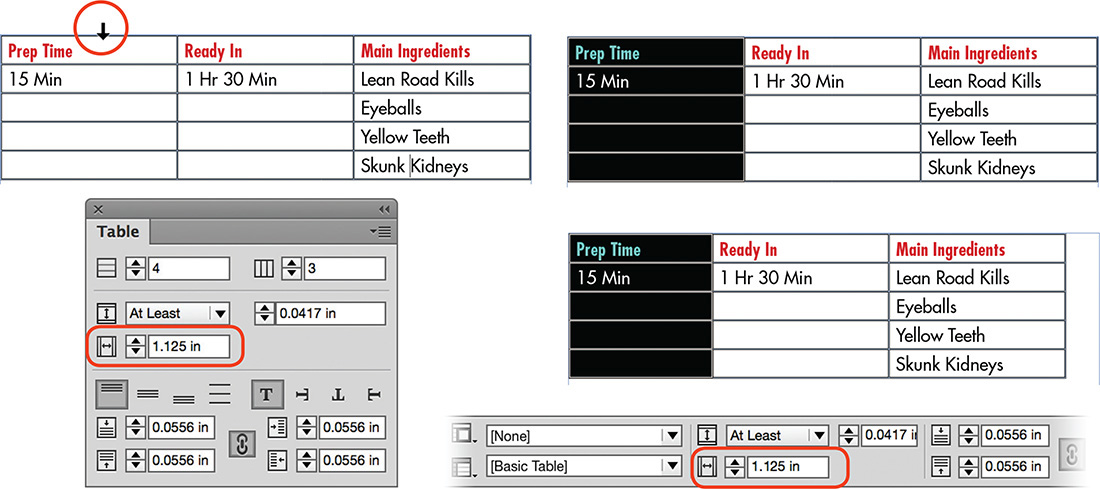
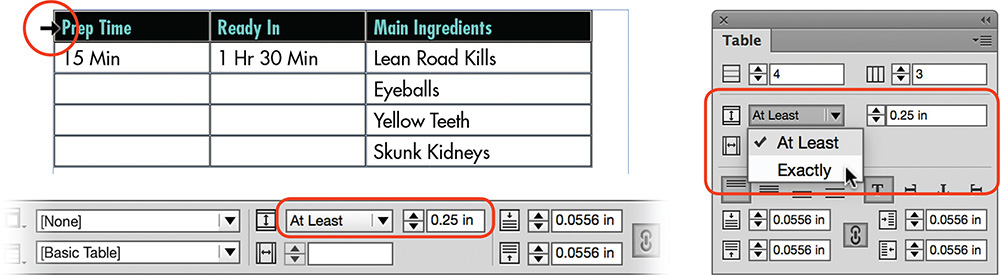
To specify the height of a row (Figure 5.38):
1. Using the Type tool, click the left edge of a row to select the row.
2. Choose Window > Type & Tables > Table to show the Table panel.
3. In the Table panel, enter a Row Height value. Alternatively, enter the amount in the Control panel. The Row Height options work as follows:
Tip
To set the same row height for multiple rows, select a range of rows by clicking the left edge of the first row and then Shift-clicking the last row. In the Table panel or Control panel, enter a new Row Height value.
![]() At Least: Use an At Least value to ensure that the row height is automatically adapted as more content is added to a cell. For example, when cells in a row contain paragraph text of varying length, the total row height increases to the height of the longest paragraph.
At Least: Use an At Least value to ensure that the row height is automatically adapted as more content is added to a cell. For example, when cells in a row contain paragraph text of varying length, the total row height increases to the height of the longest paragraph.
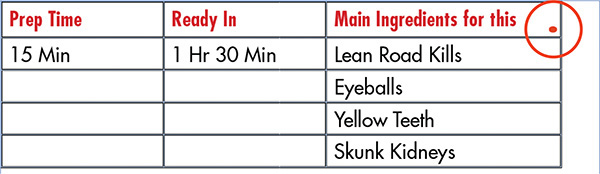
![]() Exactly: Setting the row height to Exactly locks in the row height. When more text is added to cells in rows that are locked in height, text that doesn’t fit will become overset. A red dot appears in the cell to indicate the cell is overset (Figure 5.39). This setting is more suitable for rows in which the cells contain a single line of text or just a few characters, such as a number.
Exactly: Setting the row height to Exactly locks in the row height. When more text is added to cells in rows that are locked in height, text that doesn’t fit will become overset. A red dot appears in the cell to indicate the cell is overset (Figure 5.39). This setting is more suitable for rows in which the cells contain a single line of text or just a few characters, such as a number.
Tip
To see the hidden overset text in a cell, choose Edit > Edit In Story Editor.
Other ways you can change the row height include (Figure 5.40):
![]() Position the pointer over the cell border. When a double arrow appears, drag up or down. The overall table row increases.
Position the pointer over the cell border. When a double arrow appears, drag up or down. The overall table row increases.
![]() Shift-drag to change only the height of two neighboring rows rather than the overall table height.
Shift-drag to change only the height of two neighboring rows rather than the overall table height.

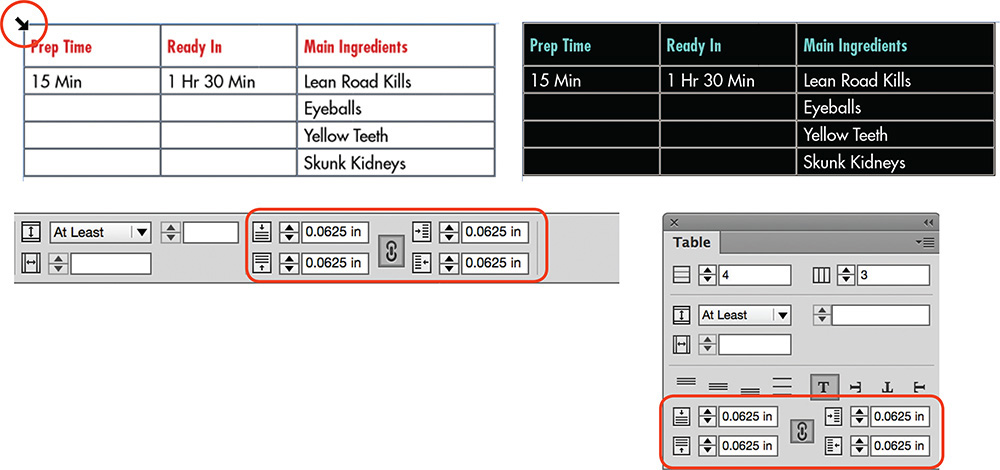
By default, text in a table cell is aligned to the top of the cell. A small amount of padding inside the cells (inset spacing) pushes the text away from the cell edges.
To adjust the vertical alignment of text in a cell (Figure 5.41):
1. Using the Type tool, select the cell or cell range.
2. Click one of the Align options in the Table panel or the Control panel.

You can also choose Table > Cell Options > Text, and set the alignment option under Vertical Justification in the Cell Options dialog box.
To set the cell inset spacing for the entire table (Figure 5.42):
1. Using the Type tool, click at the top-left corner of the table to select it. Alternatively, click in any cell to set the insertion point and choose Table > Select > Table.
2. Enter values in the Cell Inset fields in the Table panel or the Control panel.
3. Deselect the Make All Settings The Same icon to enter different insets for the top, right, bottom, and left edges of the cell.
Now that you’ve got the text formatting, column widths, row heights, vertical alignments, and cell inset sorted for the table, it’s time to add some color to the design.
![]() ACA Objective 4.4
ACA Objective 4.4
Changing the Table Appearance
You can enhance the design of tables by applying stroke and fill settings to rows, columns, and individual table cells.
To add a border to your table (Figure 5.43):
1. Click in any table cell with the Type tool to set the insertion point.
2. Choose Table > Table Options > Table Setup.
3. Under Table Border, enter a value in the Weight field, and select a stroke Type and Color. Select Preview to see the changes.
4. Click OK.

You can also set the table border from the Control panel (Figure 5.44):
1. Select the table (Table > Select > Table).
2. To deselect the table’s gridlines, click the center of the proxy (![]() ) in the Control panel.
) in the Control panel.
By clicking the gridlines in the proxy, you can select or deselect the strokes to which new stroke color, weight, and type will be applied. To specify the border, make sure that only the outer four lines are selected.
Tip
With the insertion point in a cell, tap the Esc key to select the cell and adjust both the fill and stroke settings for the cell.
You can also specify row and column strokes by selecting cell ranges within a table and using the proxy in the Control panel, similar to the previous table border example.
Take a look at the following example (Figure 5.45). You want to remove the stroke setting at the bottom of the header row. The proxy has no gridlines selected. Which gridline would you select before setting stroke color to [None]?

Figure 5.45 Which line in the proxy preview area would you select to change the color of the stroke at the bottom of the header row?
You would select only the bottom line (Figure 5.46), then change the stroke color to [None].

If your table design calls for alternating row or column strokes for the body cells, you can use the Table > Table Options > Alternating Row Strokes command or the Table > Table Options > Alternating Column Strokes command as well.
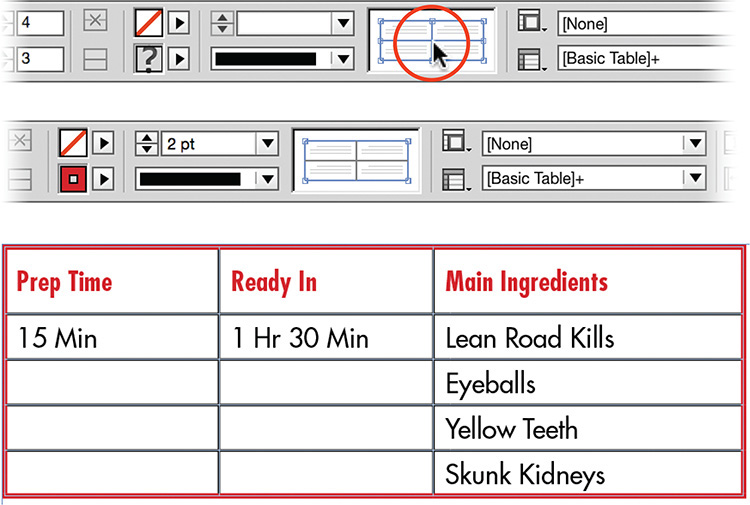
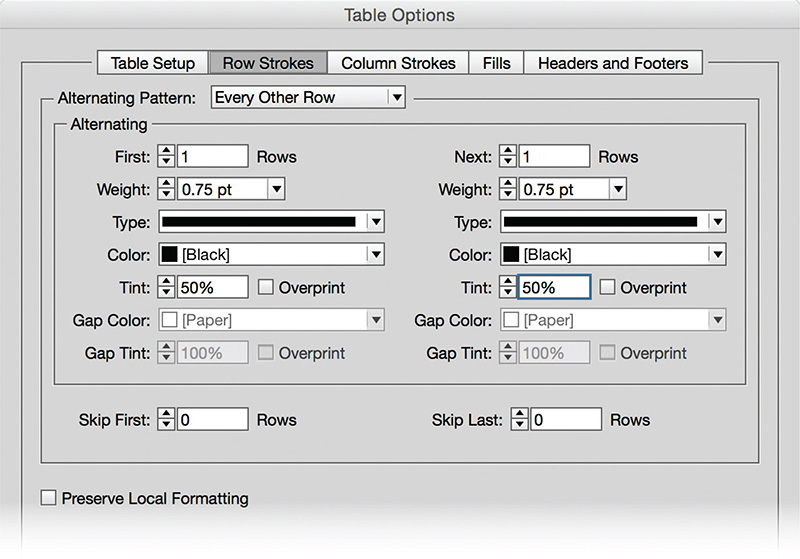
To specify alternating row strokes (Figure 5.47):
1. Using the Type tool, click in any table cell to set the insertion point.
2. Choose Table > Table Options > Alternating Row Strokes.
3. Select Every Other Row from the Alternating Pattern menu, and enter the stroke options under Alternating. Click OK.
To change the fill color for the header row (Figure 5.48):
1. Select the header row.
2. Click the Fill box in the Control panel or Swatches panel, and select the fill color.
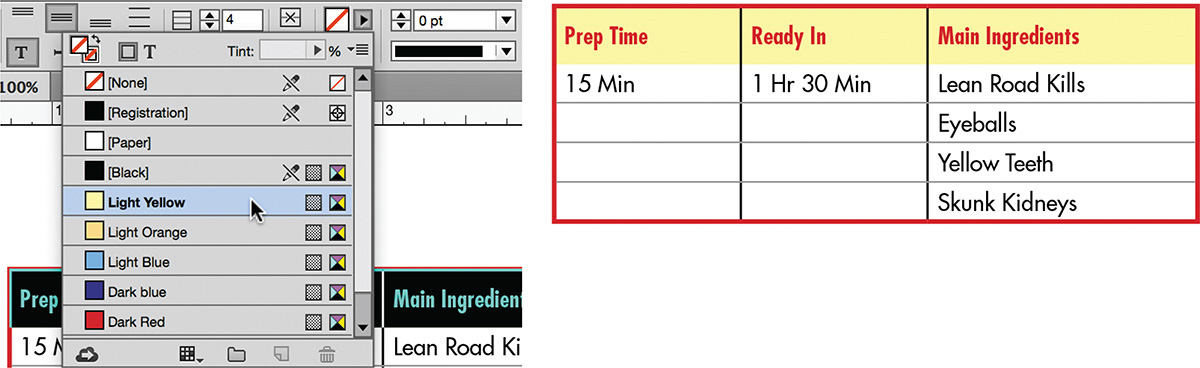
Similar to setting alternating strokes for columns, you can also set alternating fills for the body cells of the table.
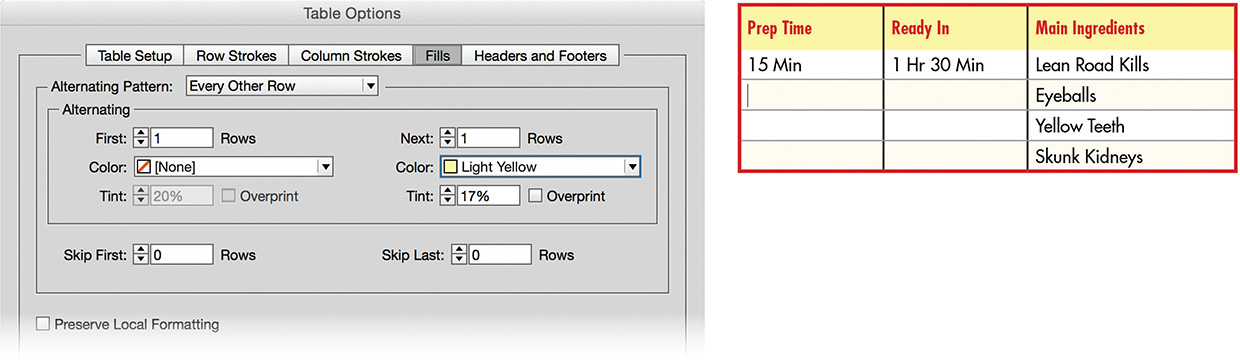
To set an alternating row fill pattern (Figure 5.49):
1. Using the Type tool, click in any table cell to set the insertion point.
2. Choose Table > Table Options > Alternating Fills.
3. Select Every Other Row from the Alternating Pattern menu, and enter the fill options under Alternating.
4. Select Preview to see the changes. Click OK.
![]() ACA Objective 4.4
ACA Objective 4.4
Converting Text to Tables
In some cases, you might receive text from a client that needs to be formatted as a table in your designs. Rather than manually creating the table and entering the text into cells, you can convert text to a table—provided that the text is clearly organized and separated by specific characters, such as a comma or tab between each item. Text that is organized this way is called comma-delimited or tab-delimited (tabulated) text.
To see hidden characters such as tabs in the text, choose Type > Show Hidden Characters. With the hidden characters displayed, it is easier to see the characters that separate columns and rows. For example, a tab (![]() ) might be a column separator and a paragraph return (
) might be a column separator and a paragraph return (![]() ) might be a row separator.
) might be a row separator.
Tip
When selecting the text to convert, consider excluding the last row separator character, for example the last paragraph return. This ensures that you do not generate an empty last row in the table when converting the text.
To convert tabulated text into a table (Figure 5.50):
1. Using the Type tool, select the text.
2. Choose Table > Convert Text To Table.
3. With tab-delimited text, select Tab from the Column Separator menu.
4. Select Paragraph from the Row Separator menu. Click OK.
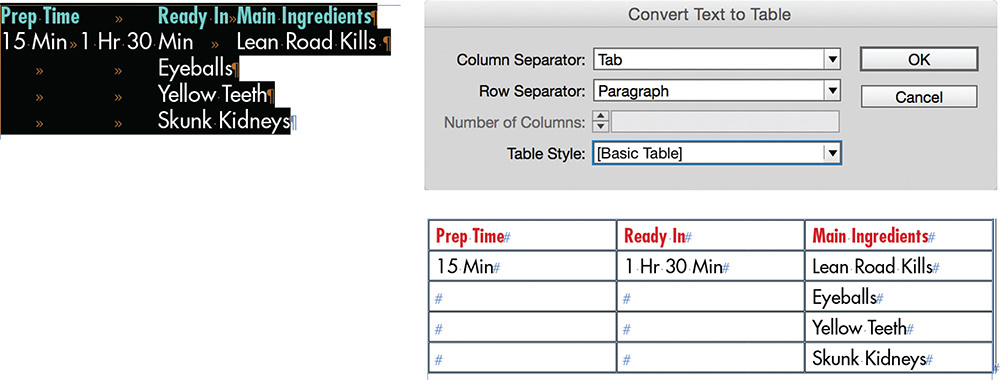
Figure 5.50 Converting text to a table, using the tab characters to separate columns and paragraph returns to separate rows
You can enter any single character in the Column or Row Separator box, or choose Tab, Paragraph, or Comma from the menu.
5. If the document already contains a table style that will work for this table, you can select it from the Table Style menu.
![]() ACA Objective 4.4
ACA Objective 4.4
Converting Tables to Text
Any table created in InDesign can be converted back to text. To convert tables to text, you will need to consider what separator characters you want to insert in the text so that original rows and columns can be distinguished. For example, each row might need to become a paragraph, and within that paragraph, each column could be preceded by a forward slash character.
To convert tables to text (Figure 5.51):
1. Using the Type tool, click in any table cell to set the insertion point.
2. Choose Table > Convert Table To Text.
3. Enter the forward slash character (/) or another character appropriate to the design in the Column Separator field.
4. Select Tab, Paragraph, or Comma from the Row Separator menu. To follow this example, select Paragraph. Click OK.

Figure 5.51 Convert a table to text, using the forward slash character to separate columns and paragraph returns for rows
You can enter any single character in the Column or Row Separator field, or choose Tab, Paragraph, or Comma from the menu.
![]() ACA Objective 4.4
ACA Objective 4.4
Adding Header or Footer Rows
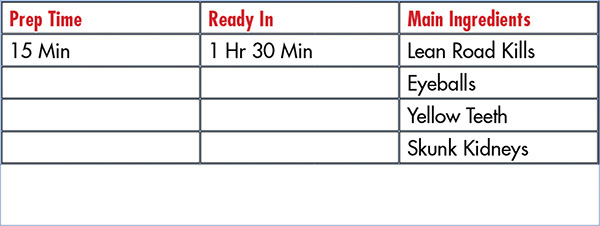
Tables imported from Word or Excel documents will not have header or footer rows, nor will tables created from converted text. All rows in these tables are body rows. Header rows add meaning to the table data by providing column titles. For example, imagine the sample table in this chapter without the headers Prep Time or Ready In. The time references provided would no longer make any sense. Table headers, like headings in text, are formatted differently from the rest of the table text. A footer row at the bottom of a table with data might be used to indicate where the data presented in the table was sourced from; this text would also be formatted differently.
To convert the top row of a table to a header row (Figure 5.52):
1. Using the Type tool, click to the left of the row to select it or simply click an insertion point in any cell in that row.
2. Choose Table > Convert Rows > To Header, or right-click (Windows) or Control-click (Mac OS) and select Convert To Header Rows from the context menu.

![]() ACA Objective 4.4
ACA Objective 4.4
Using Table and Cell Styles
Table and cell styles allow you to quickly and consistently format tables in your design projects. As you have seen with the creation of object styles and paragraph styles earlier in this chapter, the easiest way to create styles is to design the appearance with some dummy content, and then use the design as the basis for the style definition. You will do the same when creating cell styles and table styles.
Creating and applying cell styles
Cell styles allow you to quickly apply cell formatting attributes such as stroke, fill, cell inset, vertical alignment, and paragraph style. Start by formatting the cell as you’d like it to appear.
Tip
You can also click the Create New Style button at the bottom of the Cell Styles panel to create a new cell style.
To create a cell style (Figure 5.53):
1. Using the Type tool, click in a formatted table cell.
2. Choose Window > Styles > Cell Styles to show the Cell Styles panel.
3. Select New Cell Style from the Cell Styles panel menu.
4. Click General at left, and enter the Style Name for the new cell style.
5. From the Paragraph Style menu, select the style name for formatting the text in the cell. Click OK.

1. Using the Type tool, select a cell range.
2. Click the style name in the Cell Styles panel.
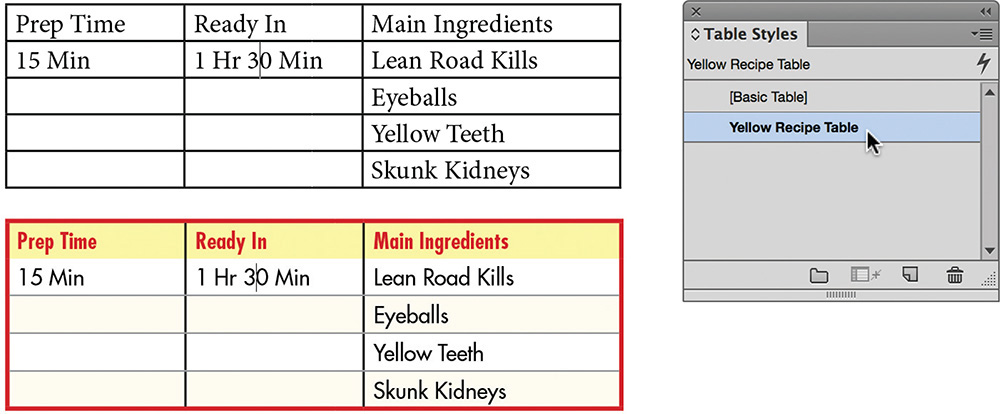
Creating and Applying Table Styles
Table styles can automatically apply border, alternating stroke or fill patterns, and cell styles to a table, thus formatting all the text and cells in the table.
To create a table style (Figure 5.54):
1. Using the Type tool, click anywhere in a formatted table.
2. Choose Window > Styles > Table Styles to show the Table Styles panel.
3. Select new Table Style from the Table Styles panel menu.
4. Click General at left, and enter the Style Name for the new table style.
5. Under Cell Styles, select the Header Rows cell style to apply and the Body Rows cell style to apply. Click OK.

Figure 5.54 Creating a new table style that also applies a cell style to the header rows and body rows of the table
You can apply up to five different cell styles as part of a table style definition. For example, you can apply different styles to the header rows, footer rows, body rows, as well as the left and right column of a table. To apply more than those styles, you will need to manually select cell ranges and apply additional cell styles.
To apply a table style (Figure 5.55):
1. Using the Type tool, click in any cell to select the table.
2. In the Table Styles panel, click the style to apply.
Working with Cross-References
Cross-references direct the reader to additional information about a topic elsewhere in the publication. For example, in a cookbook, basic cooking techniques, such as how to cook pasta, are covered at the start of the book. In a later recipe that includes cooked pasta as an ingredient, the reader is redirected to the earlier pages. The text in the recipe might be a phrase such as, “For more information on cooking pasta, see page 5.” In the recipe book project, you’ll use cross-references on the table of contents page, which link to a recipe page.
![]() Video 5.11
Video 5.11
![]() ACA Objective 4.6
ACA Objective 4.6
Inserting a Cross-Reference
In InDesign, cross-references point either to text that is formatted with a specified paragraph style, character style, or a text anchor position you specify somewhere in the text. You can create text anchors by selecting some text, then selecting New Hyperlink Destination from the Hyperlinks panel. For the recipe book project, you’ll learn how to create a cross-reference to a paragraph of text. You can insert a cross-reference using the Type menu or the Cross-References panel.
To create cross-references from the Type menu (Figure 5.56):
1. Using the Type tool, click a text insertion point at a location within the text, or select some text to replace.
2. Choose Type > Hyperlinks & Cross-References > Insert Cross-Reference.
3. Select Paragraph from the Link To menu in the New Cross-References dialog box.
4. Under Destination, select the paragraph style that is used to format the text you want to point to (for example, Recipe Title).

Figure 5.56 A cross-reference that points to a paragraph formatted with the Recipe Title paragraph style; the format is set to Page Number (page #).
The start of the paragraph text for paragraphs formatted with that style appears at right.
5. Select the paragraph text to link to.
6. Under Cross-Reference Format, select the Format for the cross-reference you want to insert (for example, Page Number).
7. Under PDF Appearance, select Invisible Rectangle from the Type menu, and None from the Highlight menu. Click OK.
Cross-references can become clickable links when you convert the InDesign project to a PDF. The PDF Appearance settings determine the visual appearance of these links.
The Cross-References panel is used to manage cross-references as well as create new cross-references.
To create a cross-reference from the Cross-References panel (Figure 5.57):
1. Using the Type tool, click to place a text insertion point at a location in the text, or select some text to replace.
2. Choose Window > Type & Tables > Cross-References to show the Cross-References panel.
3. Select Insert Cross-Reference from the Cross-References panel menu. You can also click the Create New Cross-Reference button at the bottom of the Cross-References panel.
4. Select Paragraph from the Link To menu in the New Cross-Reference dialog box.
5. Under Destination, select the paragraph style used to format the text you want to point to.
6. Select the paragraph text to link to.
7. Under Cross-Reference Format, select the Format for the cross-reference you want to insert (for example, Page Number).
8. Under PDF Appearance, select Invisible Rectangle from the Type menu, and None from the Highlight menu. Click OK.

![]() ACA Objective 4.6
ACA Objective 4.6
Editing Cross-References
Although InDesign offers several predefined cross-reference formats, sometimes you want to customize things a bit more. You can easily edit the supplied formats to fit your needs. The cross-reference format does two things:
![]() It determines what text is inserted—for example, before the text of a referenced paragraph heading, you might want to insert “to learn more see.”
It determines what text is inserted—for example, before the text of a referenced paragraph heading, you might want to insert “to learn more see.”
![]() How this text is formatted—for example, with a character style.
How this text is formatted—for example, with a character style.
To edit a cross-reference:
![]() Double-click the cross-reference in the Cross-References panel.
Double-click the cross-reference in the Cross-References panel.
![]() Select the cross-reference and select Cross-Reference Options from the Cross-References panel menu.
Select the cross-reference and select Cross-Reference Options from the Cross-References panel menu.
For example, to change the Page Number cross-reference format so that the word “page” appears in uppercase (Figure 5.58):
1. Select Define Cross-Reference Formats from the Cross-Reference panel menu.
2. Select Page Number at left.
3. Under Definition, change the text “page” to PAGE.
4. From the Character Style For Cross-Reference menu, select a character style to apply to the cross-reference text on the page.
5. Click OK.

Note
You can also access the cross-reference format settings by double-clicking on a cross-reference in the Cross-References panel, then clicking the Create Or Edit Cross-Reference icon (![]() ) in the New Cross-Reference dialog box or in the Edit Cross-Reference dialog box.
) in the New Cross-Reference dialog box or in the Edit Cross-Reference dialog box.
![]() ACA Objective 4.6
ACA Objective 4.6
Updating Cross-References
The status column in the Cross-References panel indicates whether a cross-reference is up to date. A green light means everything is OK, a yellow warning triangle indicates the cross-reference is out of date and must be updated, and a red flag means the text to which the cross-reference links is missing (Figure 5.59).

A cross-reference might become out of date if you edit the cross-reference text on the page. For example, if you change the word “page” to the phrase “see page.”
To update a cross-reference:
![]() Click the Update Cross-References button at the bottom of the Cross-References panel.
Click the Update Cross-References button at the bottom of the Cross-References panel.
Note
Missing cross-references can be fixed by editing the cross-reference and pointing it to a new destination in the Edit Cross-Reference dialog box.
![]() ACA Objective 4.5
ACA Objective 4.5
Creating a Table of Contents
A table of contents is generally part of the front matter of a publication. Tables of contents most commonly list the different headings used throughout a publication, for example the recipe titles and subtitles, or chapter titles and subheadings used within that chapter. As an exercise, find a book that has a table of contents in it, maybe even the one you are reading right now. Can you see a relationship between the table of contents text and the headings used throughout the book?
![]() Video 5.12
Video 5.12
Before you define a table of contents:
![]() Consistently apply paragraph styles to the text in your design project, especially titles and headings, as the table of contents relies on this formatting to create it.
Consistently apply paragraph styles to the text in your design project, especially titles and headings, as the table of contents relies on this formatting to create it.
![]() Create a dummy layout for the table of contents design.
Create a dummy layout for the table of contents design.
![]() Create paragraph styles for the title of the table of contents as well as the different levels (Figure 5.60).
Create paragraph styles for the title of the table of contents as well as the different levels (Figure 5.60).

Figure 5.60 A dummy table of contents design and paragraph styles defined for each level’s formatting
![]() Determine which text from your document must be included in the table of contents, and check which paragraph styles are applied to that text. Jot down each style name, as well as the level of importance they have. For example, for a recipe book, you might consider the different type of recipes, such as appetizers, entrees, or desserts, as the top level (Level 1) in the table of contents, and under each of these you could list the names of the different recipes (Level 2).
Determine which text from your document must be included in the table of contents, and check which paragraph styles are applied to that text. Jot down each style name, as well as the level of importance they have. For example, for a recipe book, you might consider the different type of recipes, such as appetizers, entrees, or desserts, as the top level (Level 1) in the table of contents, and under each of these you could list the names of the different recipes (Level 2).
![]() Record which paragraph styles are used to format text from your document that must appear in the TOC. These are the styles you will include in your TOC Style.
Record which paragraph styles are used to format text from your document that must appear in the TOC. These are the styles you will include in your TOC Style.
![]() ACA Objective 4.5
ACA Objective 4.5
Defining the Table of Contents Style
Once you’ve created the styles to format the table of contents text and determined which text needs to be added to it, you are ready to define the table of contents style. The table of contents style determines the included text, hierarchy, and formatting of the final table of contents.
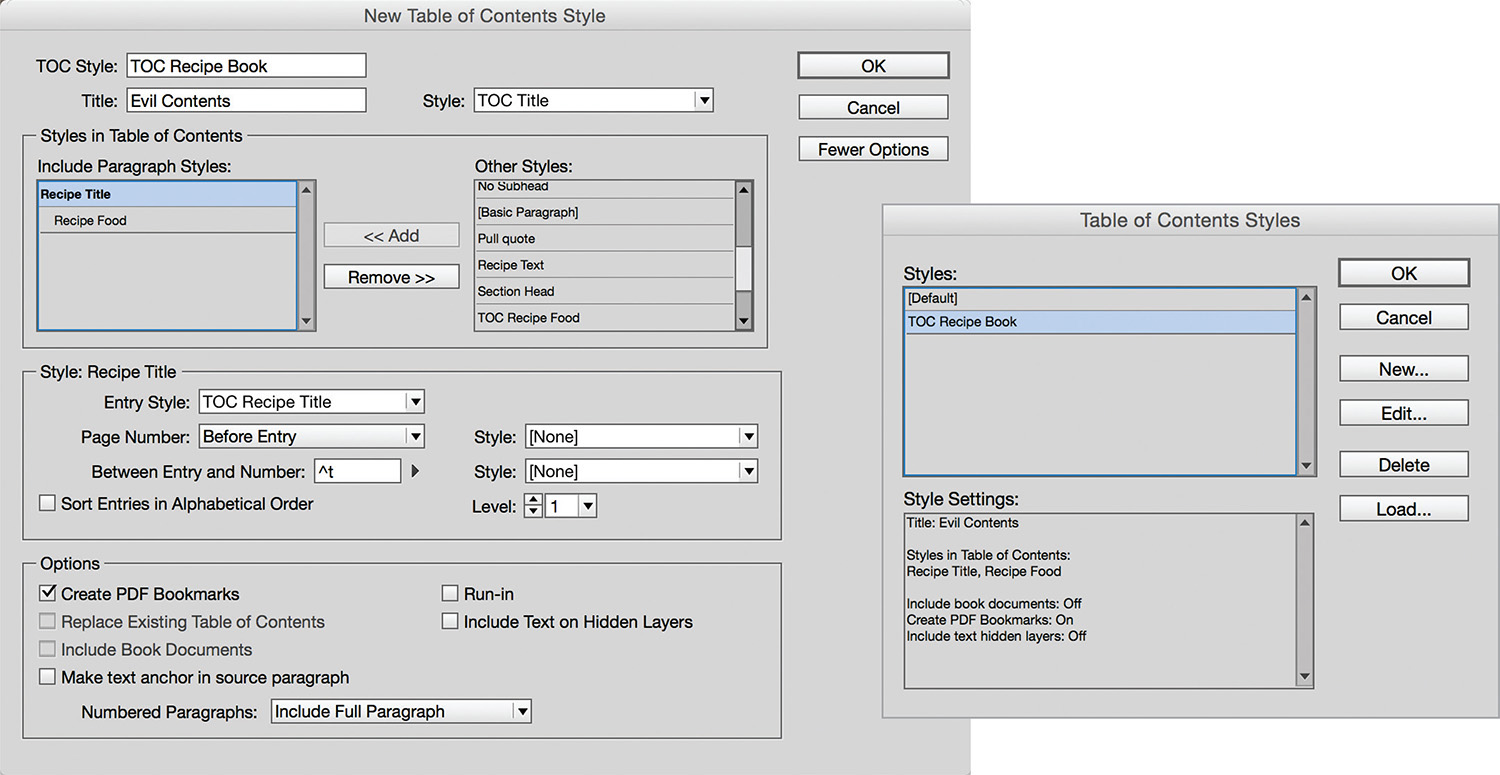
To define a table of contents style (Figure 5.61):
1. Choose Layout > Table of Contents Styles.
2. Click New. The New Table of Contents Style dialog box opens.
3. Click More Options to expand the dialog box.
4. Enter a descriptive name for the table of contents style in the TOC Style field.
5. Type the title that will appear at the top of the table of contents (such as “Contents”) in the Title field, and select a paragraph style from the Style menu to format the text.
You are now ready to add some of the styles used in your project to the Include Paragraph Styles list under Styles In Table Of Contents.
6. Under Other Styles, select a style you listed for inclusion in the TOC, and click Add. Repeat this step for each style that needs to be added. The styles will appear under Include Paragraph Styles.
With all the styles added, you can now set the formatting and levels for each of the included paragraph styles.
7. Select the style in the Include Paragraph Styles list, and select the hierarchy from the Level menu.
Tip
You can define multiple tables of contents in a single InDesign document by using the Table of Contents Style feature, and then selecting the style when generating the contents text. For instance, you might need to create a general table of contents that includes all the chapters in a book, a second one that lists all of the figures, and a third one for tables in a single document.
The level determines the order of the text in the table of contents. Level 1 is the top level and level 2 styles follow the level 1 text.
8. From the Entry Style menu, select the paragraph style that formats the text in the table of contents.
9. From the Page Number menu, customize the page numbers to be used with each entry. Use the Between Entry And Number field and Style menus to further customize the placement and look of the page numbers.
10. Repeat steps 7-9 for each style in the Include Paragraph Styles list.
11. Select Create PDF Bookmarks to automatically create navigation bookmarks that appear in Adobe Acrobat Reader’s Bookmarks pane.
12. Click OK, and OK again.
Note
To generate a table of contents from text across different InDesign documents, you must add the files to a book file first, and then select Include Book Documents in the Table of Contents Style. You will learn about books later in this chapter.
![]() ACA Objective 4.5
ACA Objective 4.5
Flowing the Table of Contents Text
With the table of contents style defined, you are now ready to add the table of contents text to the contents page in your project.
To add a table of contents to your document (Figure 5.62):
1. Choose Layout > Table of Contents.
2. Select your table of contents style from the TOC Style menu.
3. Click OK.
4. Click or drag with the loaded text icon to create a text frame filled with the table of contents text, or click an empty placeholder frame.
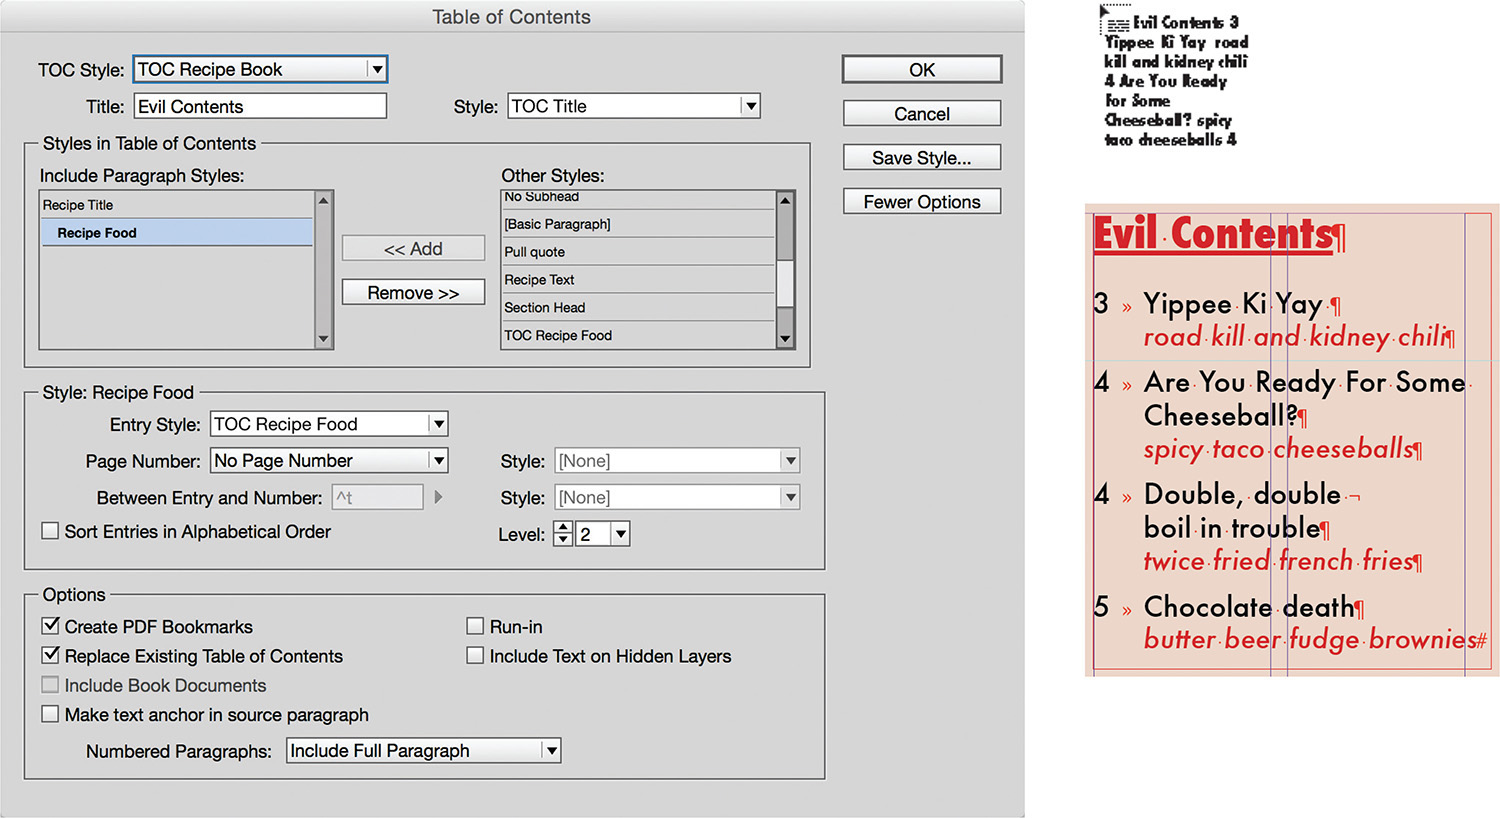
![]() ACA Objective 4.5
ACA Objective 4.5
Updating a Table of Contents
As you make changes to your InDesign documents, remember that the table of contents you might have generated earlier does not update automatically. Headings that are included in the table of contents may have changed as part of client change requests, or they may appear on different pages after additional text inserts or cuts.
To update a table of contents:
1. Using the Type tool, click to place the text insertion point anywhere inside table of contents text.
2. Choose Layout > Update Table of Contents.
Tip
To ensure that the table of contents text is the latest and greatest, update the table of contents before you convert an InDesign file to PDF or package it for the printer.
Combining InDesign Documents
When working on a large project of any kind, breaking it into smaller chunks often makes the job easier. After completing all the pieces, you can then assemble them into the final project.
Book files are useful when working on large publishing projects, such as a big book that contains multiple chapters. Instead of creating a single InDesign file to contain all of the chapters, you can create a file for each individual chapter. Combining the chapter documents into a book file allows you to control the page numbering across the documents, as well as synchronize colors, swatches, master pages, and styles across the multiple documents.
Note
Video 5.13 includes a workaround that teaches you to export a project as an interactive SWF and then bring this file back into InDesign after adding a page-flipping effect. For detailed steps, please refer to Appendix E, “Understanding SWF Export.”
![]() ACA Objective 4.1
ACA Objective 4.1
Creating a Book File
Before you can combine InDesign documents, you must first create a book file. A book file appears in InDesign as a panel that allows you to open, specifying page numbering, and easily generate a single PDF file from the multiple documents. This can be useful when you are working on a design project—for example, a new branding idea for a client. You can combine the design ideas for a logo, letterhead, business card, and newsletter into a single PDF to present.
![]() Video 5.13
Video 5.13
To create a new book file (Figure 5.63):
1. Choose File > New > Book.
2. In the New Book dialog box, navigate to the save location, and enter the name for the file in the File Name (Windows) or Save As (Mac OS) field.
The file extension for a book is .indb.
3. Click Save.
An empty book panel opens in InDesign, and you are ready to add InDesign documents to it. To add InDesign documents to the book (Figure 5.64):
1. Select Add Document from the book panel menu, or click the Add Documents (+) button at the bottom of the panel.
2. Navigate to the documents to add, select the documents, then click Open.
3. Drag the documents up and down in the list as necessary so the book files are in order.

Note
By default, documents added to the book panel automatically have their page numbers updated. Numbers continue from the previous document in the panel. To retain original document page numbers, you can select Book Page Numbering Options from the book panel menu, and uncheck Automatically Update Page & Section Numbers before adding documents to the book panel. (You can also change the page numbering for a chapter through the book panel menu.)
![]() ACA Objective 4.1
ACA Objective 4.1
Opening a Book File
Although a book file appears as a panel, you do not open books through the Window menu. Instead, you open a book file as you would any other file.
To open a book file:
1. Choose File > Open.
2. In the Open A File dialog box, navigate to the book file (.indb) and double-click it.
3. The panel opens and you can make further changes, such as adding more documents or deleting documents.
To close a book file, click the close box for its panel, or select Close Book from the book panel menu.
Synchronizing Files
There might be times you want to synchronize settings across multiple InDesign documents. For example, you might want to ensure that all documents have the same paragraph styles. To synchronize files, you must first determine which of the documents in the book panel has all the settings you want to use for synchronization. This document is the style source.
To set the style source:
![]() Click the empty box to the left of the document name.
Click the empty box to the left of the document name.
To synchronize settings in book files (Figure 5.65):
1. Select the files to synchronize in the book panel. To select multiple files, Shift-click the first and last file. To select noncontiguous files, Ctrl-click (Windows) or Command-click (Mac OS) the files.
Note
To control which settings synchronize across the documents, select Synchronize Options from the book panel menu.
2. Select Synchronize Book from the book panel menu, or click the Synchronize Styles And Swatches With The Style Source button at the bottom of the panel.
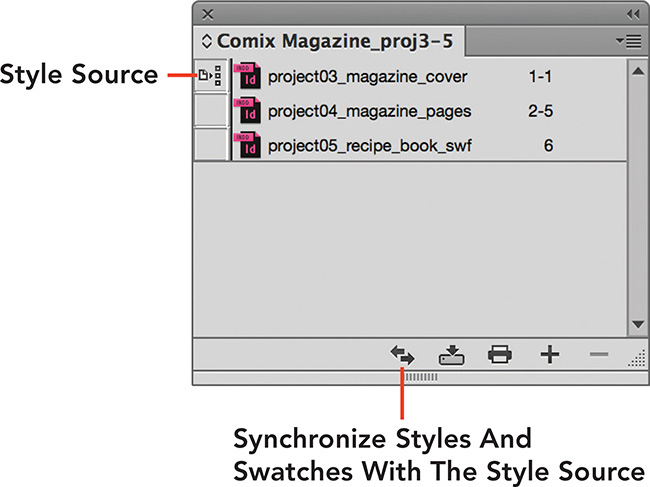
![]() ACA Objective 4.1
ACA Objective 4.1
![]() ACA Objective 5.1
ACA Objective 5.1
Exporting Book Files
You can package or preflight all the files in the book panel, or export the book as an EPUB or PDF. You will learn how to export an EPUB in Chapter 7.
To export multiple files as a PDF (Figure 5.66):
1. Select the files in the book panel.
2. Select Export Book To PDF from the book panel menu.
3. Enter the name of the PDF in the File Name (Windows) or Save As (Mac OS) field.
4. In the Export dialog box, select Adobe PDF (Interactive) from the Save As Type (Windows) menu or Format (Mac OS) menu. Click Save.
5. Enter and select preferred settings in the Export To Interactive PDF dialog box. Click OK.
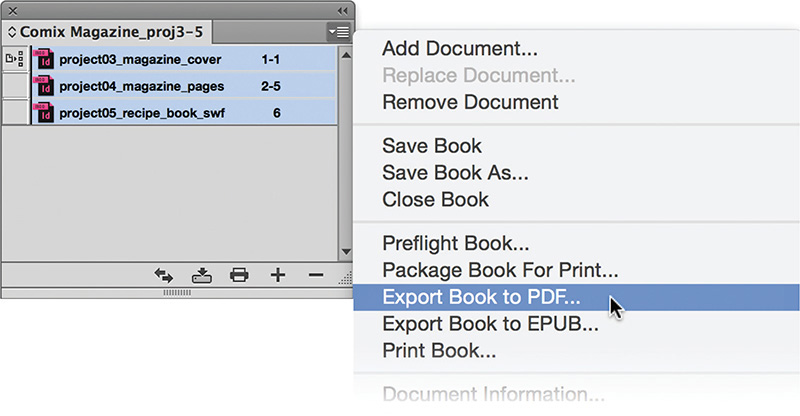
Note
This chapter has covered a lot of long-document features. There’s one more long-document feature: the index. An index is a list of topics, also referred to as index entries, that includes page number references and “see also” references. See Appendix D, “Building an Index” to learn more about indexes.
Well done! You have completed this chapter. From now on you’ll not only produce amazing designs, using tools and features learned in previous chapters, you’ll utilize styles, such as paragraph styles and object styles, to make work easier.