6 Working with Clips and Markers
Lesson overview
In this lesson, you’ll learn about the following:
Understanding the differences between the Program Monitor and the Source Monitor
Playing 360 video for virtual reality (VR) headsets
Using markers
Applying sync locks and track locks
Selecting items in a sequence
Moving clips in a sequence
Removing clips from a sequence
This lesson will take about 90 minutes to complete. Please log in to your account on peachpit.com to download the lesson files for this lesson, or go to the “Getting Started” section at the beginning of this book and follow the instructions under “Accessing the lesson files and Web Edition.” Store the files on your computer in a convenient location.
Your Account page is also where you’ll find any updates to the lesson files. Look on the Lesson & Update Files tab to access the most current content.
Once you have some clips in a sequence, you’re ready for the next stage of fine-tuning. You’ll move clips around in your edit and remove the parts you don’t want. You can also add comment markers to store information about clips and sequences, which can be useful during your edit or when you send your sequence to other Adobe Creative Cloud applications.
Adobe Premiere Pro CC makes it easy to fine-tune your edits with markers and advanced tools for syncing and locking tracks when you’re editing clips in your video sequence.
Starting the lesson
The art and craft of video editing is perhaps best demonstrated during the phase after the first version of your sequence is completed. Once you’ve chosen your shots and put them in approximately the right order, the process of carefully adjusting the timing of your edits begins.
In this lesson, you’ll learn about additional controls in the Program Monitor and discover how markers help you stay organized.
You’ll also learn about working with clips that are already on the Timeline—the “nonlinear” part of nonlinear editing with Adobe Premiere Pro CC.
Before you begin, make sure you are using the Editing workspace.
Open the file Lesson 06.prproj from the Lesson 06 folder.
Choose File > Save As.
Rename the file Lesson 06 Working.prproj.
Choose a location on your hard drive and click Save to save the project.
Reset the workspace to the default layout: in the Workspaces panel, click Editing, open the menu next to the Editing option, and choose Reset To Saved Layout.
Using Program Monitor controls
The Program Monitor is almost identical to the Source Monitor, but there are a small number of important differences.
What is the Program Monitor?
The Program Monitor displays the frame your sequence playhead is sitting on, or playing. The sequence in the Timeline panel shows the clip segments and tracks, while the Program Monitor shows the resulting video output. The Program Monitor time ruler is a smaller version of the one in the Timeline panel.
In the early stages of editing, you’re likely to spend a lot of time working with the Source Monitor. Once your sequence is roughly edited together, you will spend most of your time using the Program Monitor and the Timeline panel.

Adding clips to the Timeline with the Program Monitor
You’ve already learned how to make a partial clip selection with the Source Monitor and then add the clip to a sequence by pressing a key, clicking a button, or dragging and dropping.
You can also drag and drop a clip from the Source Monitor into the Program Monitor to add it to the Timeline.
In the Sequences bin, open the Theft Unexpected sequence.
 Tip
TipYou can use the Left Arrow and Right Arrow keys to expand and collapse bins that are selected in the Project panel when it’s in the List view.
Position the Timeline playhead at the end of the sequence, just after the last frame of the clip Mid John. You can hold the Shift key to snap the playhead to edits, or you can press the Up Arrow and Down Arrow keys to navigate between edits.
TipYou can press fn+Right Arrow key (macOS) or End key (Windows) to move the playhead to the end of the sequence. You can press fn+Left Arrow key (macOS) or Home key (Windows) to move the playhead to the start of the sequence.
Open the clip HS Suit from the Theft Unexpected bin in the Source Monitor. This is a clip that has already been used in the sequence, but you want a different part.
Set an In mark for the clip around 01:26:49:00. There’s not much going on in the shot, so it works well as a cutaway. Add an Out point around 01:26:52:00 so you have a little time with the man in the suit.
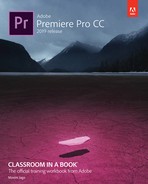
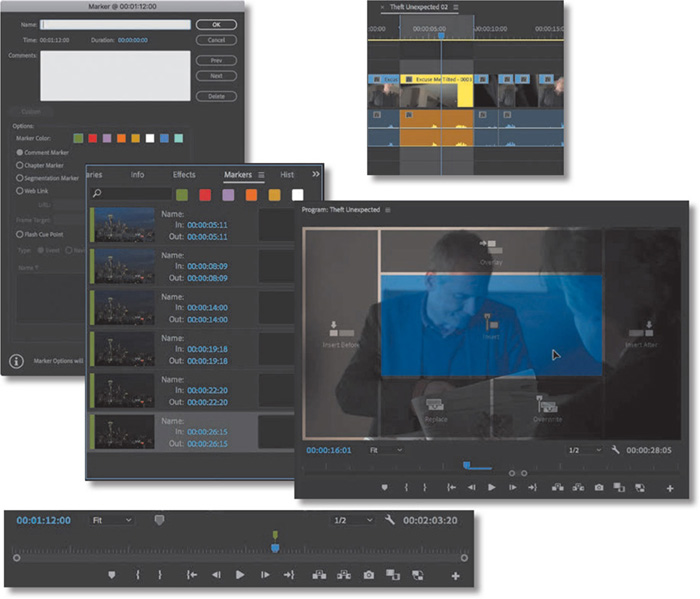
Click in the middle of the picture in the Source Monitor and drag the clip into the Program Monitor, but don’t release the mouse yet.

Several overlay images appear in the Program Monitor, each highlighting a drop zone that gives different options for the edit you’re about to perform.
The overlays give maximum flexibility when editing by touch, with a computer screen that allows touch interaction. You can use the mouse to drag clips in, as well as drag clips by touch.
As you move the pointer over each overlay, it’s highlighted to indicate the type of edit you will apply if you release the mouse button.
Here’s the list of options:
Insert: This performs an insert edit, using the source track indicators to choose the track (or tracks) the clip will land on.
Overwrite: This performs an overwrite edit, using the source track indicators to select the track (or tracks) the clip will land on.
Overlay: If you have a clip selected in the current sequence, the new clip will be added to the next available track above the selected clip. If there’s already a clip on the next track, the one above that is used, and so on.
Replace: The new clip will replace the clip currently under the Timeline playhead (more on replace edits in Lesson 8, “Mastering Advanced Editing Techniques”).
Insert After: The new clip will be inserted immediately after the clip currently under the Timeline playhead.
 Note
NoteWhen you drag a clip into your sequence, Premiere Pro still uses the Timeline panel’s source track indicators to control which parts of the clip (video and audio channels) are used.
Insert Before: The new clip will be inserted immediately before the clip currently under the Timeline playhead.
For this edit, no clip is selected on the Timeline, and there are no clips in the way to overwrite. Choose Insert—just because it’s the largest drop zone and easier to aim for.
When you release the mouse button, the clip is edited into the sequence at the playhead position, and your edit is complete.
Insert editing with the Program Monitor
Let’s try an insert edit into the middle of the sequence using the same technique.
Position the Timeline playhead on the edit at 00:00:16:01, between the Mid Suit and Mid John shots. The continuity of movement isn’t good on this cut, so let’s add another part of that HS Suit clip.
Add a new In mark and Out mark to the HS Suit clip in the Source Monitor. Choose any part you like, selecting about two seconds in total. You can see the selected duration at the lower-right corner of the Source Monitor.

Once again, drag the clip from the Source Monitor into the Program Monitor, making sure to drop the clip onto the Insert overlay. When you release the mouse button, the clip is inserted into your sequence.
If you prefer to drag clips into your sequence, rather than using keyboard shortcuts, clicking the Insert and Overwrite buttons on the Source Monitor, or dragging into the Program Monitor, there’s still a way to bring in just the video or audio part of a clip.
![]() Note
Note
Remember, only the source track selection indicators matter when editing clips into a sequence, not the Timeline track selection controls.
Let’s try a combination of techniques. You’ll set up your Timeline track headers and then drag and drop into the Program Monitor.
Position the Timeline playhead at 00:00:25:20, just before John takes out his pen.
On the Timeline track headers, drag the Source V1 track selection button next to the Timeline Video 2 track. For the technique you’re about to use, the track targeting is used to set the location of the clip you are adding.
Open the Mid Suit clip in the Source Monitor. At about 01:15:54:00, John is wielding his pen. Add an In mark there.
Add an Out mark at about 01:15:56:00. You just need a quick alternative angle.
At the bottom of the Source Monitor, you’ll see the Drag Video Only and Drag Audio Only icons
 .
.These icons serve three purposes.
They tell you whether your clip has video, audio, or both. If there is no video, for example, the filmstrip icon is dimmed. If there is no audio, the waveform is dimmed.
You can click one or other icon to switch between viewing the audio waveform or video.
You can drag them with the mouse to selectively edit video or audio into your sequence.
Drag the filmstrip icon from the bottom of the Source Monitor into the Program Monitor, and release it on the Overwrite option. When you release the mouse button, just the video part of the clip is added to the Video 2 track on the Timeline.
This works even if both the Source Video and Source Audio selection buttons in the Timeline panel are enabled, so it’s a quick, intuitive way to select the part of a clip you want. You could achieve the same effect by selectively disabling Source track selection buttons, but it would require more clicks.

Play your sequence from the beginning.
The timing may not be perfect, but the edit is off to a good start. The clip you just added plays in front of the end of the Mid John clip and the start of the HS Suit clip, changing the timing. Because Premiere Pro is a nonlinear editing system, you can adjust the timing later. You’ll learn how to do this in Lesson 8, “Mastering Advanced Editing Techniques.”
Setting the playback resolution
The Mercury Playback Engine enables Premiere Pro to play multiple media types, special effects, and more in real time. Mercury uses the power of your computer hardware to boost performance. This means the speed (and number of cores and breadth of instruction sets) of your CPU, the amount of RAM you have, the power of your GPU, and the speed of your storage drives are all factors that impact playback performance.
If your system has difficulty playing back every frame of video in your sequence (in the Program Monitor) or in your clip (in the Source Monitor), you can lower the playback resolution to make playback smoother. If you see your video playback stuttering, stopping, and starting, it usually indicates that your system is unable to play the file because of a hardware limitation.
It’s worth remembering that playing high-resolution video files is hard! A single frame of uncompressed full HD video is roughly equivalent to more than 8 million letters of text. UHD video (often described as 4K video) is four times that! And, of course, there are usually at least 24 frames per second.
Reducing the playback resolution means you won’t see every pixel in your pictures, but it can dramatically improve performance, making creative work much easier. It’s common for video to have a much higher resolution than can be displayed, simply because your Source Monitor and Program Monitor are often smaller than the original media size. This means you may not actually see a difference in the display when you lower the playback resolution.
Changing playback resolution
Let’s try adjusting playback resolution.

Open the clip Snow_3 from the Boston Snow bin in the Source Monitor. At the bottom right of the Source Monitor and Program Monitor, you’ll see the Select Playback Resolution menu.
By default, playback should be set to half-resolution. If it isn’t, choose that option now.
Play the clip to get a sense of the quality when it’s set to half-resolution.
Change the resolution to Full and play it again to compare. It probably looks similar.
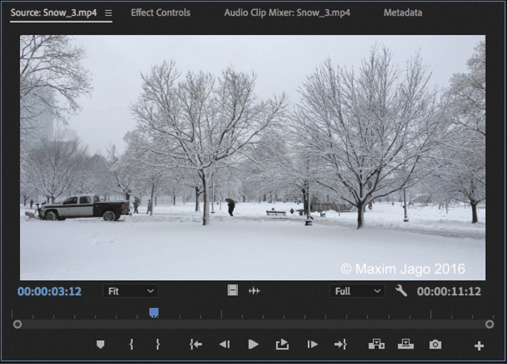
Try reducing the resolution to 1/8. Now you might begin to see a difference during playback. Notice that the picture is sharp when you pause playback. This is because the pause resolution is independent of the playback resolution (see the next section).
NoteThe choices on the Playback Resolution menu are the same on the Source Monitor and the Program Monitor, but the option you choose on one of the menus is independent of the other.
You’ll notice the biggest differences in images with lots of detail, like text. Compare the detail in the tree branches, for example.

Try dropping the playback resolution to 1/16. Premiere Pro makes an assessment of each kind of media you work with, and if the benefits of reducing resolution are less than the effort it takes to drop the resolution, the option is unavailable. In this case, the media is full 4K (4096 x 2160 pixels), and the 1/16 option is available.
Return the setting to 1/2, ready for the other clips in this project.
If you’re working on a powerful computer, you may want to maximize the playback quality when previewing at full resolution. There’s an extra option to do this. You can choose High Quality Playback from the Settings menu ![]() for the Source Monitor or Program Monitor.
for the Source Monitor or Program Monitor.
With High Quality Playback selected, playback is performed at the same quality as file export. Without this option enabled, a small amount of quality loss is allowed in exchange for better playback performance.
Changing resolution when playback is paused
The playback resolution control is also available in the Settings menu ![]() on the Source and Program Monitors.
on the Source and Program Monitors.
If you look in that Settings menu on either monitor, you’ll find a second set of options related to display resolution: Paused Resolution.
This menu works in the same way as the menu for playback resolution, but as you might have guessed, it changes the resolution only when the video is paused.

Most editors choose to leave Paused Resolution set to Full. That way, during playback you may see lower-resolution video, but when you pause, Premiere Pro reverts to showing you full resolution. This means when working with effects, you’ll see the video at full resolution.
If you work with third-party special effects, it’s possible you’ll find they do not make use of your system hardware as efficiently as Premiere Pro does. As a consequence, it might take a long time to update the picture when you make changes to the effect settings. You can speed things up by lowering the paused resolution.
The playback resolution and paused resolution settings have no impact on output quality when exporting to a file.
Playing back VR video
Virtual reality headsets for the home are now more commonplace. Premiere Pro has built-in support for 360 video for VR headset display, with clip interpretation options, immersive video visual effects, desktop playback controls, integrated VR headset playback, and Ambisonics Audio support.
Let’s try playing a 360 video clip.
Browse into the Further Media bin, and open the clip 360 Intro.mp4 in the Source Monitor. Play the clip.

This is an introduction to a 360 video film. The clip is in 4K resolution, which might be difficult for your system to play back—lower the playback resolution if you need to do so.
The center of the image is quite easy to make out, but if you look toward the edges, it gets harder to follow what you’re looking at.
That’s because the clip is equi-rectangular video, where a spherical video intended for VR headsets has been flattened into a 3D image. To see this clearly, you’re going to need to switch to the VR Video mode.
NoteThe Source Monitor and Program Monitor have identical VR video playback controls.
Click the Source Monitor’s Settings menu, and choose VR Video > Enable.

Now the clip looks more like regular video, and additional controls appear in the Source Monitor.
Play the clip again. This time, while it plays, click into the image, and drag to change the angle of view.
The numbers under the image and to the right of the image allow you to precisely control the angle of view. They’re helpful, but they take up a lot of space.
Open the Source Monitor Settings menu, and choose VR Video > Show Controls to deselect the option.
You can still click the image to change the angle of view, but now the image is much larger in the Source Monitor.
Also, by choosing VR Video > Settings from the Settings menu, you’ll open the VR Video Settings dialog box, where you can specify the height and width of the view in degrees to emulate different VR headsets.
By default, the height and width are quite small. Try changing the Monitor View Horizontal option to 150 degrees, and click OK.

Different VR headsets have different ranges of field of view. The ideal setting will match the intended VR headset field of view. In this sense, each VR headset you create content for is a little like a different screen you might prepare regular video for.
You’ll want to preview your content for each proposed display medium to be sure your audience will have the experience you expect.
Now open the Source Monitor’s Settings menu, and choose VR Video > Enable to deselect it.
Using markers
Sometimes it can be difficult to remember where you saw that useful part of a shot or what you intended to do with it. Wouldn’t it be useful if you could mark clips with comments and flag areas of interest for later?
What you need are markers.
What are markers?
Markers allow you to identify specific times in clips and sequences and add comments to them. These temporal (time-based) markers are a fantastic aid to help you stay organized and communicate with co-editors.
You can use markers for personal reference or for collaboration. They can be connected to individual clips or a sequence.
By default, when you add a marker to a clip, it’s included in the metadata for the original media file. This means you can open the clip in another Premiere Pro project and see the same markers. You can disable this option by choosing Premiere Pro CC > Preferences > Media (macOS) or Edit > Preferences > Media (Windows), and deselecting Write Clip Markers To XMP.
Exploring the types of markers
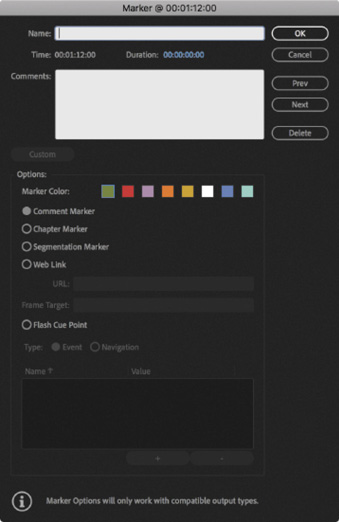
More than one type of marker is available, and like clips, each marker has a color. You can change a marker type by double-clicking it.
Comment Marker: This is a general marker you can assign a name, duration, and comments.
Chapter Marker: This is a marker that DVD and Blu-ray Disc design applications can convert into a regular chapter marker.
Segmentation Marker: This marker makes it possible for certain video servers to divide content into parts.
Web Link: Certain video formats can use this marker to automatically open a web page while the video plays. When you export your sequence to create a supported format, web link markers are included in the file.
Flash Cue Point: This is a marker used by Adobe Animate CC. By adding these cue points to the Timeline in Premiere Pro, you can begin to prepare your Animate project while still editing your sequence.
![]() Note
Note
If a single clip is selected in a sequence on the timeline when you add a marker, the marker will be added to the selected clip rather than the sequence. See “Selecting clips” later in this lesson for more information about selecting clips in sequences.
Sequence markers
Let’s add some markers to a sequence.
Open the City Views sequence from the Sequences bin.
This is a simple assembly with a few shots from a travelogue program.
Set the Timeline playhead to around 00:01:12:00, and make sure no clips are selected (you can click the background of the Timeline to deselect clips).
Add a marker in one of the following ways:
Click the Add Marker button
 at the top left of the Timeline panel.
Right-click the Timeline time ruler and choose Add Marker.
Press M.
Premiere Pro adds a green marker to the Timeline, just above the playhead.

The same marker appears at the bottom of the Program Monitor.

You can use this as a visual reminder of an important moment in time, or go into the settings and change it into a different kind of marker. You’ll do that in a moment, but first let’s look at this marker in the Markers panel.
TipThe Markers panel has a Search box at the top that works the same way as the Search box in the Project panel. Next to the Search box are marker color filters. Click one (or several) of these to see only markers with matching colors in the Markers panel.
Open the Markers panel. By default, the Markers panel is grouped with the Project panel. If you don’t see it there, choose Window > Markers.

The Markers panel shows you a list of markers, displayed in time order. The same panel shows you markers for a sequence or for a clip, depending on whether the Timeline, a sequence clip, or the Source Monitor is active.
TipYou can open the Marker dialog box by double-clicking a marker in the Markers panel or by double-clicking the marker icon.
TipYou can quickly add a marker and immediately display the Marker dialog by pressing M twice, in quick succession.
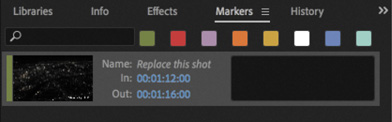
Double-click the thumbnail for the marker in the Markers panel. This displays the Marker dialog box.
Click the Duration field, and type 400. Avoid the temptation to press Enter or Return, as this will close the panel. Premiere Pro automatically adds punctuation, turning this into 00:00:04:00 (four seconds) as soon as you click away or press the Tab key to move to the next field.
Click in the Name box, and type a comment, such as Replace this shot.
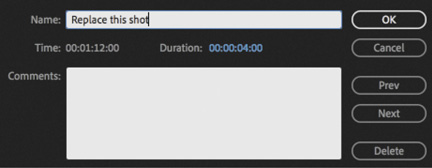
Click OK.
The marker now has a duration on the Timeline. Zoom in to the Timeline a little, and you’ll see the text you typed into the Name field.
 Tip
TipNotice that the entries in the Markers menu have keyboard shortcuts. Working with markers using the keyboard is generally much faster than using the mouse.
The name of the marker is also displayed in the Markers panel.
Take a moment to open the Markers menu, on the main menu bar, to see the available commands.
At the bottom of the Markers menu is the Ripple Sequence Markers command. With this enabled, sequence markers will move in sync with clips when you insert and extract clips, which are editing operations that change the sequence duration and timing. With this option disabled, markers stay where they are when your clips move.

The menu includes a command with the “snappy” name Copy Paste Includes Sequence Markers. With this option enabled, when you copy a section of a sequence that you’ve selected using In and Out marks and then paste that content somewhere else, any sequence markers in the selection are included.
![]() Note
Note
Markers can be added using a button or a keyboard shortcut. If you use the keyboard shortcut, M, it’s easy to add markers that match the beat of your music because you can add them during playback.
Clip markers
Let’s add markers to a clip.
Open the clip Seattle_Skyline.mov from the Further Media bin in the Source Monitor.
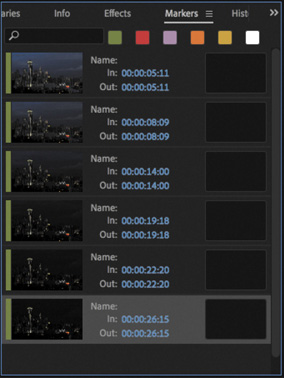
Play the clip, and while it plays, press the M key several times to add markers.

Look in the Markers panel. If the Source Monitor is active, every marker you added will be listed.
When clips with markers are added to a sequence, they retain their markers.
TipYou can use markers to quickly navigate your clips and sequences. If you single-click a marker in the Markers panel, the playhead will move to the location of the marker—a fast way to find your way around. If you double-click a marker in the Markers panel, the options for that marker will be displayed too.
Make sure the Source Monitor is active by clicking it. Choose Markers > Clear All Markers.
All the markers are removed from the clip.
TipYou can get to the same option to remove all markers—or a current marker—by right-clicking in the Source Monitor, in the Program Monitor, or on the Timeline time ruler and choosing Clear All Markers.
You can add a marker to a clip in a sequence by selecting it before you add the marker. Markers added to clips already edited into a sequence still appear in the Source Monitor when you view the clip.
Exporting markers
You can export markers associated with a clip or sequence as an HTML page with thumbnails, or a .csv (comma-separated value) file readable by spreadsheet-editing applications. This is great for collaboration and as a reference.
Export markers by choosing File > Export > Markers.
Finding clips in the Timeline panel
As well as searching for clips in the Project panel, you can search for them in a sequence. Depending on whether you have the Project panel active or the Timeline panel active, choosing Edit > Find or pressing Command+F (macOS) or Ctrl+F (Windows) will display search options for that panel.

When clips in a sequence are found that match your search criteria, Premiere Pro highlights them. If you choose Find All, Premiere Pro will highlight all clips that meet the search criteria.
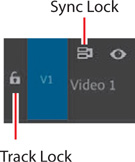
Using Sync Lock and Track Lock
There are two distinct ways to lock tracks on the Timeline.
You can lock clips in sync so when you use an insert edit to add a clip, other clips stay together in time.
You can lock a track so that no changes can be made to it.
Using sync locks
If an actor’s lips move out of time with the audio of their voice, it’s considered bad lip-sync. It’s obvious when this kind of synchronization (sync) is wrong but other examples may be harder to detect.
It’s helpful to think of syncing as coordinating any two things that are meant to happen at the same time. You might have a musical event that happens at the same time as some climactic action or something as simple as a lower-third title that identifies a speaker. If it happens at the same time, it’s synchronized.
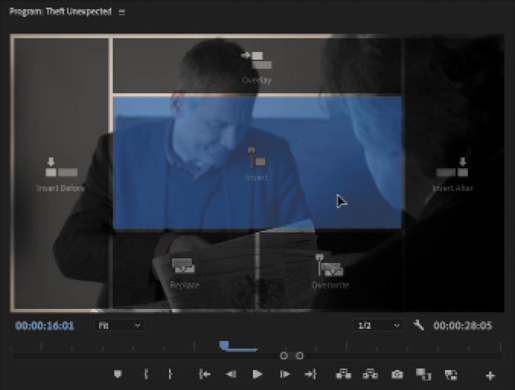
Open the Theft Unexpected sequence from the Sequences bin.
When John arrives, at the beginning of the sequence, the audience won’t know what he’s looking at.
Open the Mid Suit clip, from the Theft Unexpected bin, in the Source Monitor. Add an In mark around 01:15:35:18, and add an Out mark around 01:15:39:00.
Position the Timeline playhead at the beginning of the sequence, and make sure there are no In or Out marks on the Timeline.

Deselect Sync Lock for the Video 2 track.
Check that your Timeline panel is configured as in the following example, with the Source V1 track patched to the Timeline V1 track. The Timeline track header buttons are not important now, but having the right source track selection buttons enabled is.
 Note
NoteYou may need to zoom out to see the other clips in the sequence.
Before you do anything else, take a look at the position of the Mid Suit cutaway clip on the Video 2 track, toward the end of the sequence.

It’s just over the cut between the clips Mid John and HS Suit on Video 1.
Insert-edit the source clip into the beginning of the sequence.
Take another look at the location of the Mid Suit cutaway clip.

The Mid Suit cutaway clip on the Video 2 track has not moved, while the other clips, on the Video 1 track, have moved to the right to accommodate the new clip. This is a problem because the cutaway is now out of position with the clips to which it relates—it no longer covers the cut.
Undo by pressing Command+Z (macOS) or Ctrl+Z (Windows) and try it again with the Video 2 track Sync Lock turned on.
Turn on Sync Lock
 for the Video 2 track, and perform the insert edit again.
This time, the cutaway clip moves with the other clips on the Timeline, even though nothing is being edited onto the Video 2 track. This is the power of sync locks—they keep things in sync!
![]() Note
Note
Overwrite edits do not change the duration of your sequence, so of course they are not affected by sync locks.
Using track locks
Track locks prevent you from making any changes at all to a track. They are an excellent way to avoid making accidental changes to your sequence and to fix clips on specific tracks in place while you work.
For example, you could lock your music track while you insert different video clips. By locking the music track, you can simply forget about it while editing because no changes can be made to it.
Lock and unlock a track by clicking the Toggle Track Lock button ![]() . Clips on a locked track are highlighted with diagonal lines.
. Clips on a locked track are highlighted with diagonal lines.

Finding gaps in the sequence
Until now, you’ve been exclusively adding clips to a sequence (not removing them). Part of the power of nonlinear editing is in having the freedom to move clips around in a sequence and remove the parts you don’t want.
When removing clips or parts of clips, you’ll either leave a gap by performing a lift edit or not leave a gap by performing an extract edit.
An extract edit is a little like an insert edit but in reverse. Rather than other clips in a sequence moving out of the way to make space for a new clip, the other clips move in to fill the gap left behind by a clip you are removing.
When you zoom out of a complex sequence, it can be difficult to see smaller gaps left behind after performing an edit. To automatically locate the next gap, choose Sequence > Go To Gap > Next In Sequence.
Once you’ve found a gap, you can remove it by selecting it and pressing Delete.
You can remove multiple gaps by choosing Sequence > Close Gap.
If you have set In and Out marks in the sequence, only gaps between the marks will be removed.
Let’s learn a little more about working with clips in a sequence. Continue working with the Theft Unexpected sequence.

Selecting clips
Selection is an important part of working with Premiere Pro. For example, depending on the panel you have selected, different menu options will be available. You’ll want to select clips in your sequences carefully before applying adjustments.
When working with clips that have video and audio, you’ll have two or more segments for each clip: one video segment and one or more audio segments.
When the video and audio clip segments come from the same original media file, they are automatically treated as linked. If you select one, the other is automatically selected.
You can switch linked selections on and off in the Timeline panel globally by clicking the Linked Selection button ![]() at the top left of the Timeline panel. When Linked Selection is on, video and audio clips in a sequence are automatically selected together when you click them. When Linked Selection is off, clicking the video or audio part of a clip selects only that part. If there’s more than one audio clip, you’ll select just the one you click.
at the top left of the Timeline panel. When Linked Selection is on, video and audio clips in a sequence are automatically selected together when you click them. When Linked Selection is off, clicking the video or audio part of a clip selects only that part. If there’s more than one audio clip, you’ll select just the one you click.
Selecting a clip or range of clips
When selecting clips in a sequence, there are two approaches.
Make time selections by using In and Out marks.
Make clip segment selections.
The simplest way to select a clip in a sequence is to click it. Be careful not to double-click, which will open the sequence clip in the Source Monitor, ready for you to adjust the In or Out marks (these will update, live, in the Timeline panel).
When making selections, you’ll want to use the Selection tool ![]() which is selected in the Tools panel by default. This tool has the keyboard shortcut V.
which is selected in the Tools panel by default. This tool has the keyboard shortcut V.
If you hold the Shift key while you click sequence clips with the Selection tool, you can select or deselect additional clips.

You can also drag the Selection tool over multiple clips to select them. Begin by pressing the mouse button in an empty part of the Timeline panel and then dragging to create a selection box. Any clip you drag over (even partially) with the selection box will be selected.
Premiere Pro also gives you the option to automatically select whichever clip the Timeline playhead passes over. This is particularly useful for a keyboard-based editing workflow. You can enable the option by choosing Sequence > Selection Follows Playhead. You can also press the keyboard shortcut D to select the current clip under the Timeline playhead. The clip on the highest enabled track will be selected.
Selecting all the clips on a track
If you want to select every clip on a track, there are two handy tools to do just that: the Track Select Forward Tool ![]() , which has the keyboard shortcut A, and the Track Select Backward Tool
, which has the keyboard shortcut A, and the Track Select Backward Tool ![]() , which has the keyboard shortcut Shift+A. Try this now. Select the Track Select Forward tool, and click any clip on the Video 1 track.
, which has the keyboard shortcut Shift+A. Try this now. Select the Track Select Forward tool, and click any clip on the Video 1 track.

Every clip on every track, from the one you select until the end of the sequence, is selected. This is useful if you want to add a gap to your sequence to make space for more clips; you can drag all the selected clips to the right.
Look at the Track Select Forward tool icon in the Tools panel. Notice the tiny triangle next to the icon—this indicates the button is also a menu. If you press and hold on this tool, a menu appears with the Track Select Backward tool. When you click a clip with this tool, every clip up to the one you clicked is selected.
If you hold the Shift key while using either of the tools, you’ll select clips on only one track.
When you have finished, switch to the Selection tool by clicking it in the Tools panel or by pressing the V key.
Selecting audio or video only
It’s common to add a clip to a sequence and later realize you don’t need the audio or video part of the clip. You may want to remove one or the other to keep your Timeline panel tidy, and there’s an easy way to make the correct selection: If Linked Selection is on, you can temporarily override it.
Switch to the Selection tool and try clicking some clip segments in the Timeline panel while holding the Option (macOS) or Alt (Windows) key. Premiere Pro ignores the link between video and audio parts of your clips. You can even drag a selection across multiple clips in this way!
Splitting a clip
It’s also common to add a clip to a sequence and then realize you need it in two parts. Perhaps you want to take just a section of a clip and use it as a cutaway, or maybe you want to separate the beginning and the end to make space for new clips.
You can split clips in several ways.
Use the Razor tool
 . If you hold the Shift key while clicking with the Razor tool, you’ll split the clips on every track.
Make sure the Timeline panel is selected and choose Sequence > Add Edit. Premiere Pro adds an edit at the location of your playhead to clips on any tracks that are targeted (with the track selection button on). If you have selected clips in the sequence, Premiere Pro adds the edit only to the selected clips, ignoring track selections.
If you choose Sequence > Add Edit To All Tracks, Premiere Pro adds an edit to clips on all tracks, regardless of whether they are targeted.
Use the Add Edit keyboard shortcuts. Press Command+K (macOS) or Ctrl+K (Windows) to add an edit to targeted tracks or selected clips, or press Shift+Command+K (macOS) or Shift+Ctrl+K (Windows) to add an edit to all tracks.
![]() Tip
Tip
The keyboard shortcut for the Razor tool is C.
Clips that were originally continuous will still play back seamlessly unless you move them or make separate adjustments to different parts.
If you click the Timeline Display Settings icon ![]() , you can choose Show Through Edits to see a special icon on edits of this kind.
, you can choose Show Through Edits to see a special icon on edits of this kind.

You can rejoin clips that have the Through Edit icon by right-clicking the edit and choosing Join Through Edits.
Using the Selection tool, you can also click a Through Edit icon and press Delete (macOS) or Backspace (Windows) to rejoin the two parts of a clip.
Try it with this sequence. Be sure to use Undo to remove the new cuts you add.

Linking and unlinking clips
You can switch off and on the link between connected video and audio segments easily. Just select the clip or clips you want to change, right-click the selected clips, and choose Unlink.
You can also use the Clip menu. You can link a clip with its original audio again by selecting both clip segments, right-clicking one of them, and choosing Link. There’s no harm in linking or unlinking clips—it won’t change the way Premiere Pro plays your sequence. It just gives you the flexibility to work with clips in the way you want.
Even if video and audio clip segments are linked, you’ll need to make sure the Timeline Linked Selection option is enabled to select linked clips together.
Moving clips
Insert edits and overwrite edits add new clips to sequences in dramatically different ways. Insert edits push existing clips out of the way, whereas overwrite edits simply replace them. This theme of having two ways of working with clips extends to the techniques you’ll employ to move clips around the sequence and to remove clips from the sequence.
When moving clips using the Insert mode, you may want to ensure the sync locks are on for all tracks to avoid any possible loss of sync.
Let’s try a few examples.
Dragging clips
At the top left of the Timeline panel, you’ll see the Snap button ![]() . When snapping is enabled, clip segments snap automatically to each other’s edges. This simple but useful feature will help you position clip segments frame-accurately.
. When snapping is enabled, clip segments snap automatically to each other’s edges. This simple but useful feature will help you position clip segments frame-accurately.
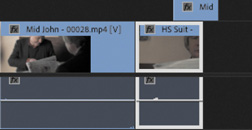
Select the last clip on the Timeline, HS Suit, and drag it a little to the right.

Because there are no clips after this one, you simply introduce a gap before the clip. No other clips are affected.
Make sure the Snap option is enabled, and drag the clip back to its original position. If you move the mouse slowly, you’ll notice that the clip segment jumps into position at the last moment. When this happens, you can be confident it’s perfectly positioned. Notice that the clip also snaps to the end of the cutaway shot on the Video 2 track.
Drag the clip left until the end of the clip snaps to the end of the previous clip so they are overlapping. When you release the mouse button, the clip replaces the end of that clip.
When you drag and drop clips, the default editing mode is Overwrite.
Undo repeatedly until the clip is in its original position.
Nudging clips
Many editors prefer to use the keyboard as much as possible, minimizing the use of the mouse because working with the keyboard is usually faster.
It’s common to move clip segments in a sequence using the arrow keys in combination with a modifier key, nudging the selected items left and right (earlier or later in time) or up and down between tracks.
Because of the separator between the video and audio tracks in the Timeline panel, when you nudge linked video and audio clips up or down, one or other clip may be left in its original position. This introduces a vertical gap between the linked clips. This won’t impact playback but can make it a little harder to see which clips are linked.
Rearranging clips in a sequence
If you hold the Command (macOS) or Ctrl (Windows) key while you drag clips on the Timeline, Insert mode (rather than Overwrite mode) is used to place the clip when you release the mouse button.
The HS Suit shot around 00:00:20:00 might work better if it appeared before the previous shot—and it might help to hide the poor continuity between the two shots of John.
![]() Tip
Tip
You may need to zoom in to the Timeline to see the clips clearly and move them easily.
Drag and drop the HS Suit clip to the left of the clip before it. The left edge of the HS Suit clip should easily line up with the left edge of the Mid Suit clip if snapping is enabled.
After you have begun dragging, hold the Command (macOS) or Ctrl (Windows) key. Release the modifier key after you’ve dropped the clip.

Play the result. This creates the edit you want, but it introduces a gap where the clip HS Suit was originally placed.
Let’s try that again with an additional modifier key.
Undo to restore the clips to their original positions.
Holding Command+Option (macOS) or Ctrl+Alt (Windows), drag and drop the HS Suit clip to the beginning of the previous clip again.
![]() Tip
Tip
Be careful when dropping the clip into position. The ends of clips snap to edges just as the beginnings do.
This time, no gap is left in the sequence. Play through the edit to see the result.

Using the clipboard
You can copy and paste clip segments on the Timeline just as you might copy and paste text in a word processor.
In a sequence, select any clip segment (or segments) you want to copy and then press Command+C (macOS) or Ctrl+C (Windows) to add them to the clipboard.
Position your playhead where you would like to paste the clips you copied and press Command+V (macOS) or Ctrl+V (Windows).
Premiere Pro adds copies of the clips to your sequence based on the tracks you enable. The lowest enabled track receives the clip (or clips). If no tracks are targeted, the clips will be added to their original tracks, which can be useful when rearranging clips.
Extracting and deleting segments
Now that you know how to add clips to a sequence and how to move them around, all that remains is to learn how to remove them. Once again, you’ll be operating in a kind of Insert or Overwrite mode.
There are two ways to select parts of a sequence you want to remove. You can use In and Out marks combined with track selections, or you can select clip segments.
Performing a lift edit
A lift edit will remove the selected part of a sequence, leaving blank space. It’s similar to an overwrite edit but in reverse.
Open the sequence Theft Unexpected 02 in the Sequences bin. This sequence has some unwanted extra clips. They have different label colors to make them easy to identify.
Set In and Out marks on the Timeline to select the part that will be removed. You can do this by positioning the playhead and pressing I or O. You can also use a handy shortcut.
Position the playhead so that it’s somewhere over the first unwanted clip, Excuse Me Tilted.
Make sure the Video 1 track header is turned on and that the clip is not selected; then press X.
Premiere Pro automatically adds an In mark and an Out mark that match the beginning and end of the clip. You’ll see a highlight that shows the selected part of the sequence.

Make sure Video 1 and Audio 1 tracks are targeted to prepare for the lift edit.
Click the Lift button
 at the bottom of the Program Monitor. If your keyboard has a ; (semicolon) key, you can press it instead.
Premiere Pro removes the part of the sequence you selected, leaving a gap. This might be fine on another occasion, but in this instance you don’t want the gap. You could remove the gap now, but for this exercise you’ll use an extract edit so no gap is left.
Performing an extract edit
An extract edit removes the selected part of your sequence and does not leave a gap. It’s similar to an insert edit but in reverse.
Undo the last edit.
Click the Extract button
 at the bottom of the Program Monitor. If your keyboard has an ’ (apostrophe) key, you can press it.
This time, Premiere Pro removes the selected part of the sequence, and the other clips in the sequence move to close the gap.
Performing a delete and ripple delete edit
Just as there are two ways to remove part of a sequence based on In and Out marks, there are also two similar ways to remove clips by selecting clip segments: Delete and Ripple Delete.
Click once to select the second unwanted clip, called Cutaways, and try these two options:
Pressing the Delete/Backspace key removes the selected clip (or clips), leaving a gap behind. This is the same as a lift edit.
Pressing Shift+Forward Delete (macOS) or Shift+Delete (Windows) removes the selected clip (or clips) without leaving a gap behind. This is the same as an extract edit. If you’re using a Mac keyboard without a dedicated Forward Delete key, you can convert the Delete key into a Forward Delete key by pressing the Function (fn) and Delete keys together.
The result seems similar to that achieved by using In and Out marks because you used In and Out marks earlier to select a whole clip. However, you can use In and Out marks to choose parts of clips, while selecting clip segments and pressing Delete will always remove whole clips.
Disabling a clip
Just as you can turn a track output off or on, you can also turn individual clips off or on. Clips that you disable are still in your sequence, but they cannot be seen or heard during playback or while scrubbing.
This is a useful feature for selectively hiding parts of a complex, multilayered sequence when you want to see background layers or compare different versions, or different performance takes that you have placed on different tracks.
Try this on the cutaway shot on the Video 2 track, toward the end of the sequence.
Right-click the Mid Suit clip on the Video 2 track, and choose Enable to deselect it.
 Note
NoteWhen right-clicking clips in a sequence, be careful not to right-click the FX badge
 as this will give you options relating to effects instead of the general clip options.
Play through that part of the sequence, and you’ll notice that the clip is present, but you can no longer see it.
Right-click the clip again and choose Enable. This reenables the clip.
Review questions
When dragging clips directly into the Timeline panel, what modifier key (Command/Ctrl, Shift, or Option/Alt) should you use to make an insert edit rather than an overwrite edit?
How do you drag just the video or audio part of a clip from the Source Monitor into a sequence?
How do you reduce the playback resolution in the Source Monitor or Program Monitor?
How do you add a marker to a clip or sequence?
What is the difference between an extract edit and a lift edit?
What is the difference between Delete and Ripple Delete?
Review answers
Hold the Command (macOS) or Ctrl (Windows) key when dragging a clip into the Timeline panel to make an insert edit rather than an overwrite edit.
Rather than grabbing the picture in the Source Monitor, drag and drop the filmstrip icon or the audio waveform icon at the bottom of the monitor to select only the video or audio part of the clip. You can also use the Source selection indicators in the Timeline panel to deselect the parts you want to exclude.
Use the Select Playback Resolution menu at the bottom of the monitor to change the playback resolution.
To add a marker, click the Add Marker button at the bottom of the monitor or on the Timeline panel, press the M key, or use the Marker menu.
When you extract a section of your sequence using In and Out marks, no gap is left behind. When you lift, a gap remains.
When you delete one or more clip segments in a sequence, a gap is left behind. When you ripple delete, no gap is left.