9 Putting Clips In Motion
Lesson overview
In this lesson, you’ll learn about the following:
Adjusting the Motion effect for clips
Changing clip size and adding rotation
Adjusting the anchor point to refine rotation
Working with keyframe interpolation
Enhancing motion with shadows and beveled edges
This lesson will take about 75 minutes to complete. Please log in to your account on peachpit.com to download the lesson files for this lesson, or go to the “Getting Started” section at the beginning of this book and follow the instructions under “Accessing the lesson files and Web Edition.” Store the files on your computer in a convenient location.
Your Account page is also where you’ll find any updates to the lesson files. Look on the Lesson & Update Files tab to access the most current content.
The Motion effect controls can add movement to a clip. You can animate a graphic or resize and reposition a video clip within the frame. You can animate an object’s position using keyframes and enhance that animation by controlling the way those keyframes are interpreted.
Starting the lesson
Video projects are often motion graphics-oriented, and it’s common to see multiple shots combined as complex compositions. These are often put into motion. Perhaps you’ll see multiple video clips streaming past in floating boxes, or you’ll see a video clip shrunk down and placed next to an on-camera host. You can create those effects (and many more) in Premiere Pro using the Motion settings in the Effect Controls panel, or a number of clip-based effects that offer Motion settings.
The Motion effect controls allow you to position, rotate, or change the size of a clip within the frame. Some adjustments can be made directly in the Program Monitor. It’s important to be clear that the adjustments you make in the Effect Controls panel relate exclusively to the clip you have selected and not to the sequence it is in. Think of the sequence settings, in the Sequence menu, as the output settings.
A keyframe is a special kind of marker that stores settings at a particular point in time. If you use two (or more) keyframes, Premiere Pro can automatically animate the settings for an adjustment between them. You can use advanced controls to control the timing of that animation using different types of keyframes.
Adjusting the Motion effect
Every visual clip in a Premiere Pro sequence automatically has a number of effects applied. These are referred to as fixed effects (also sometimes called intrinsic effects). Motion is the name of one of these effects.
To adjust a clip’s Motion effect, select the clip in a sequence and look in the Effect Controls panel. Expand the Motion effect to adjust the settings.
The Motion effect allows you to adjust the position, scale, or rotation of a clip. Let’s look at the way this effect has been used to reposition a clip in a sequence.
![]() Tip
Tip
Unlike other effect controls, if you expand or collapse the settings for the Motion effect, the settings will remain expanded or collapsed for all clips.
Open Lesson 09.prproj in the Lesson 09 folder.
Save the project as Lesson 09 Working.prproj.
 Tip
TipAs you have been saving projects with new names while working on them, you can go back to earlier lessons and experiment again with a fresh copy of the original project file.
Choose Effects in the Workspaces panel, or choose Window > Workspaces > Effects. Reset the workspace.
If necessary, open the sequence 01 Floating. This simple sequence has just one clip in it (Gull.mp4).
Make sure Fit is chosen from the Select Zoom Level menu in the Program Monitor. It’s important to see the whole composition when setting up visual effects. This menu does not change the contents of the sequence, only the way the contents are viewed. It can be helpful to zoom in or out to see fine details in an image or set up effects, but generally you will want to keep this menu set to Fit.
Play the sequence.
This clip’s Position, Scale, and Rotation properties have been changed. Keyframes have been added, with different settings at different points in time, so the clip animates.

Understanding Motion settings
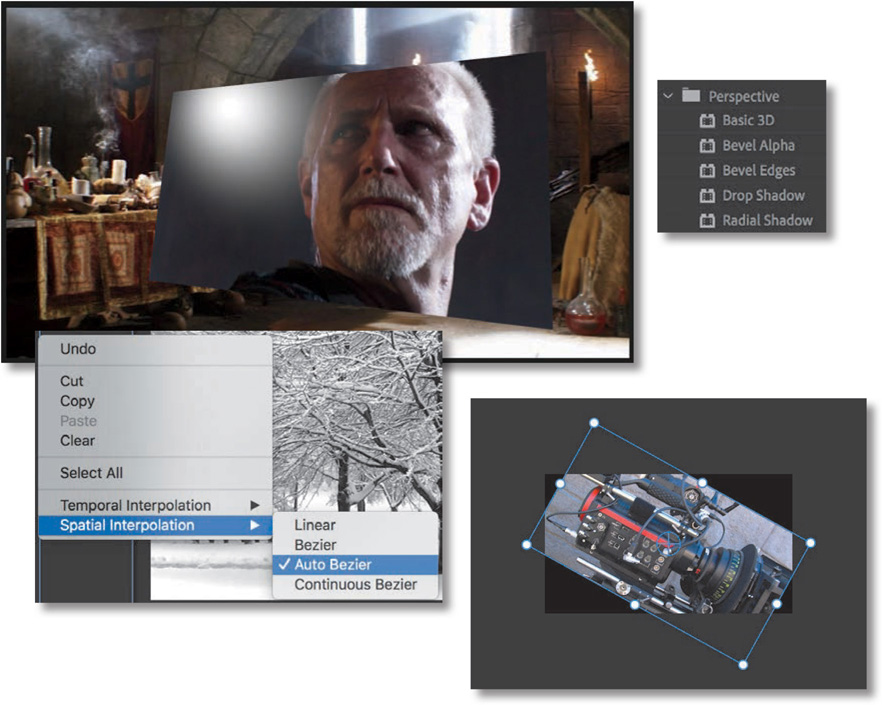
Though these controls are called Motion, there’s no movement until you add it. By default, clips are positioned in the center of the Program Monitor, at their original scale. Select the clip in the sequence and then click the disclosure triangle next to Motion in the Video Effects section of the Effect Controls panel to display the available settings.
Here are the options:
Position: This places the clip along the x-axis (horizontal) and y-axis (vertical). The position is calculated based on the position of an anchor point (covered later in this list) measured from the upper-left corner of the image. So the default position for a 1280x720 clip would be 640, 360 (which is the exact center of the image).
Scale (Scale Height, when Uniform Scale is deselected): Clips are set to their full size by default (100%). To shrink a clip, reduce this number. You can scale up to 10,000%—though be warned, scaling up will make images pixelated and soft.
Scale Width: Deselect Uniform Scale to make Scale Width available. This lets you change the clip width and height independently.
Rotation: You can rotate an image along the z-axis—a flat spin (as if viewing a spinning turntable or carousel from above). You can enter degrees or a number of rotations. For example, 450 is the same as 1x90 (one full 360° turn plus an additional 90°). Positive numbers give clockwise rotation, and negative numbers give counterclockwise rotation.
Anchor Point: Rotation and position adjustments are all based on the anchor point, which is a point at the center of a clip by default. This can be changed to any point, including one of the clip’s corners or even a point outside the clip.
For example, if you set the anchor point to the corner of the clip, when you adjust the Rotation setting, the clip will rotate around that corner rather than around the center of the image. If you change the anchor point in relation to the image, you may have to reposition the clip in the frame to compensate for the adjustment.
TipThe Anchor point position can be animated, just like every other Motion control, for more complex motion.
 Note
NoteIf the panel group containing the Effect Controls panel is too narrow, some of the controls will overlap, making it difficult to interact with them. If this is the case, make the group wider before working with the Effect Controls panel.
Anti-flicker Filter: This feature is useful for interlaced video clips and for images that contain high detail, such as fine lines, hard edges, or parallel lines (which can cause moiré effects). These high-detail images can flicker during motion. To add some blurring and reduce flicker, use 1.00.
Let’s look closer at the animated clip, continuing to work with the sequence 01 Floating.
Click the clip in the Timeline panel once to make sure it is selected.
Make sure the Effect Controls panel is visible. It should have appeared when you reset the Effects workspace, but if you can’t find it, look for it in the Window menu.
In the Effect Controls panel, if necessary, expand the Motion effect controls by clicking the disclosure triangle
 next to the word Motion.
At the upper right of the Effect Controls panel settings, to the right of the master clip name and sequence clip name (these can be different if you choose), a small triangle toggles the display of an integrated timeline
 . Make sure the Effect Controls timeline is visible.
If it isn’t, click the triangle to show it. The timeline in the Effect Controls panel displays keyframes.


Each setting control has its own keyframes. Click the Go To Previous Keyframe or Go To Next Keyframe arrows to jump between existing keyframes for a particular control.
NoteIt can be difficult to line up the playhead with an existing keyframe. Using the Previous/Next Keyframe buttons helps you avoid adding unwanted keyframes. You can assign a keyboard shortcut to position the playhead at the next or previous keyframe.
Drag the playhead back and forth in the Effect Controls panel, Timeline panel, or Program Monitor to see the way the position of the keyframe markers relates to the animation.
Now that you know how to view the settings for an existing animation, let’s begin by resetting the clip.
The Toggle Animation stopwatch button
 for each setting turns animation on or off. When the stopwatch is blue, animation is enabled for a setting. Click the stopwatch for the Position property to turn off its keyframes.
Because the setting already has some keyframes, a warning message lets you know they will be deleted if you continue. Click OK to continue.

Turn off keyframes for the Scale and Rotation properties in the same way.
Click the curved-arrow Reset Effect button
 to the right of the Motion effect heading in the Effect Controls panel.
Now the Motion settings are all set to their default values.
NoteEach control has its own Reset button. If you reset the whole effect, every control is returned to its default state.
NoteWhen the Toggle Animation button is on, clicking the Reset button will not change any existing keyframes. Instead, a new keyframe is added with default settings. It’s important to turn off animation before resetting the effect to avoid this.
Examining Motion properties
The Position, Scale, and Rotation properties are spatial. That means the changes you make are easy to see because the object will change in size and position. You can adjust these properties by entering numerical values, by using the scrubbable numbers (drag on the blue numbers), or by dragging the Transform controls.
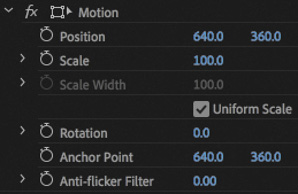
Open the sequence 02 Motion.
In the Program Monitor, make sure the zoom level is set to 25% or 50% (or a zoom amount that allows you to see space around the active frame).
Setting the zoom small like this makes it easy to position items outside the frame.
Drag the Timeline panel playhead anywhere in the sequence so you can see the video clip contents displayed in the Program Monitor.
Click the clip in the sequence once so it’s selected, with its settings displayed in the Effect Controls panel.
Click the Motion effect heading in the Effect Controls panel to select it.
When you select the motion effect, a bounding box with a crosshair and handles appears around the clip in the Program Monitor.
Click inside the clip bounding box in the Program Monitor, avoiding the crosshair in the center, and drag the clip around.
Position values in the Effect Controls panel update as you move the clip.
 Note
NoteSeveral effects, like the Motion effect, have a Transform icon
 next to the effect name to indicate that you can use direct manipulation in the Program Monitor when you select the effect heading. Try this with Corner Pin, Crop, Mirror, Transform, and Twirl.
Position the clip so that it’s centered in the upper-left corner of the screen. Make sure the anchor point
 is aligned with the upper-left corner of the frame.
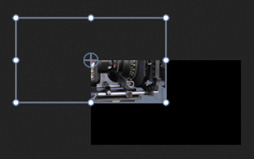
The crosshair is the anchor point, which is used for position and rotation controls. Be careful not to click the anchor point control, or you’ll move it in relation to the image.
The Position settings in the Effect Controls panel should be 0, 0 (or close to that, depending on where you placed the center of the clip).
This is a 720p sequence, so the lower-right corner of the screen is 1280, 720.
Click the Reset button for the motion settings to restore the clip to its default position.
Drag the blue number for the Rotation setting in the Effect Controls panel. As you drag left or right, the clip rotates.

Click the Reset button for the Motion heading in the Effect Controls panel to restore the clip to its default position.
![]() Note
Note
Premiere Pro uses a coordinate system that has the upper-left corner of the screen as 0, 0. All x and y values, respectively, to the left of and above that point are negative. All x and y values to the right of and below that point are positive.
![]() Tip
Tip
Hold Shift while dragging numbers and they’ll change ten times faster, for a more dramatic adjustment. Hold Command (macOS) or Ctrl (Windows) and they’ll change ten times slower, for a more precise adjustment.
Changing clip position, size, and rotation
Sliding a clip around the screen only begins to exploit the possibilities of the Motion effect controls. One feature that makes the Motion effect so useful is the ability to change the scale of the clip as well as rotate it. In the next example, you’ll build a simple intro segment for a behind-the-scenes featurette.
Changing position
Let’s begin by using keyframes to animate the position of a layer. For this exercise, the first thing you’ll do is change the clip position. The picture will begin off-screen and then move across the screen from right to left.
Open the sequence 03 Montage.
The sequence has several tracks, some of which are currently disabled. You’ll use them later.
Position the playhead to the start of the sequence.
Set the Program Monitor zoom level to Fit.
Click once to select the first video clip on track V3.
You might want to make the track taller to see it better.

The clip’s controls appear in the Effect Controls panel.
In the Effect Controls panel, click the Toggle Animation stopwatch button
 for Position. This turns on keyframing for that setting and automatically adds a keyframe
  at the playhead position, visible in the Effect Controls panel. The keyframe icon is partially obscured because it’s applied to the first frame of the clip.
Now that animation is enabled for Position, when you change the setting, Premiere Pro will add (or update) a keyframe automatically.
The Position control has two numbers. The first is the x-axis value, and the second is the y-axis value. Enter a Position setting of −640 for the x-axis value (the first number) as a starting position.
The clip moves off-screen to the left, revealing the clips on the V1 and V2 tracks below.

The clip Map.jpg on track V1 is revealed when the selected clip is moved off-screen.
Drag the playhead to the last frame of the selected clip (00:00:4:23). You can do this in the Timeline panel or in the Effect Controls panel.
Enter 1920 for the position x-axis. The clip moves off the right edge of the screen.

Where there are two numbers for a control, they often represent the x-axis and y-axis.
Play the sequence from the beginning. The clip moves from off-screen left to off-screen right.
The second clip on V3 appears suddenly. You’ll animate this clip and others next.
Reusing Motion settings
Now that you’ve applied keyframes and effects to a clip, you can save time by reusing them on other clips. It’s as easy as copying and pasting to apply effects from a clip to one or more other clips. In this example, you’ll apply the same left-to-right floating animation to other clips in the project.
There are several methods for reusing effects. Let’s try one now.
In the Timeline panel, select the clip you just animated. It’s the first clip on V3.
Choose Edit > Copy.
The clip and its effects and settings are now temporarily stored on your computer’s clipboard.
With the Selection tool (V), drag from right to left across the five other clips on the V2 and V3 tracks to select them (you may need to zoom out a little to see all the clips). You could also hold the Shift key and select the first and last of the five clips.

Choose Edit > Paste Attributes.
The Paste Attributes dialog opens, letting you selectively apply effects and keyframes copied from another clip.
NoteAs an alternative to copying a whole clip in the Timeline panel, you can always select one or more specific effect headings in the Effect Controls panel. Command-click (macOS) or Ctrl-click (Windows) to select multiple noncontiguous effects, and choose Edit > Copy. You can then select another clip (or clips) and choose Edit > Paste to paste the effects onto other clips.
Leave the check boxes with their default values, and click OK.

Play the sequence to see the result.

Adding rotation and changing the anchor point
Moving clips around the screen can be effective, but you can really bring things to life using two more properties. Let’s start with Rotation.
The Rotation property revolves a clip around its anchor point on the z-axis. By default, the anchor point is in the center of the image. However, you can change the relationship between the anchor point and the image for more interesting animation.
Let’s add some rotation to a clip.
In the Timeline panel, click the Toggle Track Output button
 for V6 to enable it
  . The clip on the track is a title graphic that reads Behind The Scenes.
This clip is a title graphic created in Premiere Pro, using vector-based design tools. This means it can be scaled to any size and will always look sharp, with smooth curves and no pixelation. Vector graphics work the same way as nonvector graphics; you can use the same controls, effects, and adjustments.
Move the playhead to the start of the graphic clip (00:00:01:13). Try holding the Shift key while you drag the playhead to do this.
Select the graphic clip in the sequence. The clip’s controls appear in the Effect Controls panel.
Because this is a vector graphic, there are two types of Motion effect available.
Motion: Treats the contents of the graphic as pixels. When you scale up, the pixels will increase in size, producing jagged edges and softening the image.
Vector Motion: Treats the contents of the graphic as vectors, allowing you to scale up the image and retain clean lines without pixelation.
Select the Vector Motion effect heading to see the anchor point and bounding-box controls in the Program Monitor. Notice the position of the anchor point, a small circle with a cross in the center of the title.
Let’s adjust the Rotation property in the Effect Controls panel and see the effect it has.

Click the disclosure triangle to reveal the Vector Motion effect controls, and enter a value of 90.0 into the Rotation field.
The title rotates in the center of the screen.
Choose Edit > Undo.
Make sure the Vector Motion settings heading is still selected in the Effect Controls panel.
In the Program Monitor, drag the anchor point until the crosshair sits in the upper-left corner of the letter B in the first word.

The Position settings in the Effect Controls panel control the location of the anchor point in relation to the sequence frame. The Anchor Point settings control the position of the anchor point in relation to the clip image.
Now that you have moved the anchor point in the image, both the Anchor Point and Position settings have updated in the Effect Controls panel.
Your playhead should still be on the first frame of the clip. Still in the Vector Motion effect settings, click the Animation stopwatch button for Rotation to toggle on animation. This adds a keyframe automatically.
Set the rotation to 90.0. This updates the keyframe you just added.
Move the playhead forward to 00:00:06:00, and set the clip rotation to 0.0. This adds another keyframe automatically.
Play the sequence to see your animation.

Changing clip size
There are a few approaches to changing the size of items in a sequence. By default, items added to a sequence come in at 100% of their original size. However, you can choose to manually adjust the size or let Premiere Pro do it for you automatically.
You can choose from these methods:
Use the Scale property of the Motion effect or Vector Motion effect in the Effect Controls panel.
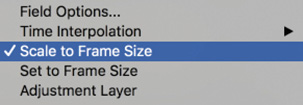
If the clip has a different frame size compared to your sequence, right-click the clip in the sequence and choose Set To Frame Size. This automatically adjusts the Scale property of the Motion effect to match the frame size of the clip with the size of the sequence.
If the clip has a different frame size compared to your sequence, right-click the clip in the sequence and choose Scale To Frame Size. This has a similar result to the Set To Frame Size option, but Premiere Pro resamples the image at the new (often lower) resolution. If you scale back up now using the Motion > Scale setting, the image might look soft, even if the original clip was very high resolution.
You can also select Scale To Frame Size or Set To Frame Size automatically by choosing Premiere Pro CC > Preferences > Media > Default Media Scaling (macOS) or Edit > Preferences > Media > Default Media Scaling (Windows). The setting is applied to assets as you import them (but won’t change assets you have already imported).
For maximum flexibility, use the first or second method so you can scale as needed without sacrificing quality. Let’s try this.
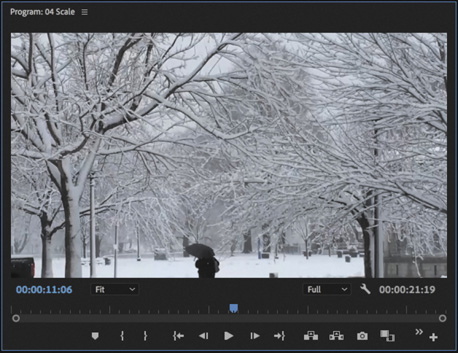
Open the sequence 04 Scale.
Scrub through the sequence to view the clips.
The second and third clips on the V1 track are much larger than the first clip. In fact, your system may struggle to play such high-resolution clips without dropping frames. They are dramatically cropped by the edge of the frame.
Move the Timeline playhead over the last clip in the sequence, on the V1 track.
Right-click the clip, and choose Scale To Frame Size.
This conveniently scales the image to fit the sequence resolution, though it resamples the image, losing the original picture quality. However, there’s an issue: The clip is full 4K, with a resolution of 4096x2160, and that is not a perfect 16:9 image. It doesn’t fit the aspect ratio of the sequence, and black bars are introduced at the top and bottom of the image. These bars are often called letterboxing.
This is a common outcome when working with content that has a different aspect ratio than your sequence, and there is no easy way around it. You’ll need to make a manual adjustment.

Right-click the clip again and select Scale To Frame Size again to deselect it. This is an option you can turn off and on at any time.
With the clip selected, open the Effect Controls panel.
Use the Scale setting to adjust the frame size until the clip image fits the sequence frame without showing letterboxing; a setting of roughly 34% should work. You can choose any framing and adjust the Position settings to reframe the shot if necessary.
When you scale an image to avoid letterboxing, you’ll have to crop the sides. When aspect ratios don’t match, you have to choose between letterboxing, cropping, and changing the aspect ratio of the image by deselecting the Uniform Scale option in the Effect Controls panel.

![]() Note
Note
The settings in the Effect Controls panel don’t indicate if they are pixels, percentages, or degrees. This can take a little getting used to, but you’ll find with experience the controls do make sense for each setting.
Animating clip size changes
In the previous example, the clip image has a different aspect ratio compared to the sequence.
Let’s try another example and animate the adjustment.
Position the Timeline playhead over the first frame of the second clip in the 04 Scale sequence, at 00:00:05:00.
This clip is 3840x2160-pixel ultra-high definition (UHD), which is the same image aspect ratio as the sequence, which is 1280x720 (16:9). It’s also the same aspect ratio as full HD, at 1920x1080. This makes shooting UHD content convenient if you intend to include it in an HD production.
Select the clip and look in the Effect Controls panel. The scale setting is 100%.
Right-click the clip in the Timeline panel and choose Set To Frame Size.
When you select Set To Frame Size, Premiere Pro resizes the clip using the Scale setting so that it fits inside the frame of the sequence. The amount of adjustment varies depending on the image size of the clip and the resolution of the sequence.

This clip scales down to 33.3% to fit the image. You now know you can scale this clip between 33.3% and 100% and maintain quality, while still filling the frame.

Turn on keyframing for Scale by clicking the Toggle Animation stopwatch button
for Scale in the Effect Controls panel.Position the playhead over the last frame of the clip.
Click the Reset button
for the Scale setting in the Effect Controls panel.Scrub through the clip to see the result.
This creates an animated zoom effect for the clip. Because the clip never scales to more than 100%, it maintains full quality.

Turn on the Track Output option for the V2 track.
This track has an adjustment layer clip on it. Adjustment layers apply effects to all footage on lower video tracks.
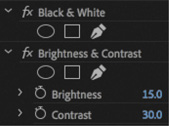
Select the Adjustment Layer clip to display its values in the Effect Controls panel.
You’ll see that two visual effects have been added: a Black and White effect, which removes color saturation, and a Brightness & Contrast effect, which increases contrast. You’ll learn more about adjustment layers in Lesson 12, “Adding Video Effects.”
Play the sequence.
You may need to render the sequence to see smooth playback because some of the clips are high resolution and will take a lot of computer processing power to play. To render the sequence, make sure the Timeline panel is active and choose Sequence > Render In To Out.
Working with keyframe interpolation
Throughout this lesson you’ve been using keyframes to define your animation. The term keyframe originates from traditional animation, where the lead artist would draw the key frames (or major poses) and then assistant animators would animate the frames in between. When animating in Premiere Pro, you’re the master animator, and the computer does the rest of the work as it interpolates values in between the keyframes you set.
Using different keyframe interpolation methods
While you’ve already used keyframes to animate, that’s only some of their power. One of the most useful yet least utilized features of keyframes is their interpolation method. This is a fancy way of saying how to get from point A to point B. Think of it as describing the sharp ramp-up as a runner takes off from the starting line and the gradual slowdown after they cross the finish line.
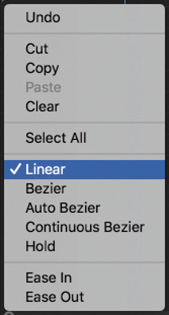
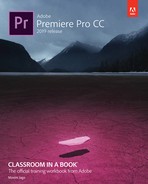
Premiere Pro has five interpolation methods. Changing the method can create a very different animation. You can access the available interpolation methods by right-clicking a keyframe icon to see the options (some effects have both spatial and temporal options).
 Linear: This is the default method of keyframe interpolation. This method gives a uniform rate of change between keyframes. Changes begin instantly at the first keyframe and continue to the next keyframe at a constant speed. At the second keyframe, the rate of change switches instantly to the rate between it and the third keyframe, and so on. This can be effective, but it can also look a little mechanical.
 Bezier: This gives the most control over keyframe interpolation. Bezier keyframes (named after the French engineer Pierre Bézier) provide manual handles you can adjust to change the shape of the value graph or motion path on either side of the keyframe. By dragging the Bezier handles that appear when the keyframe is selected, you can create smooth curved adjustments or sharp angles. For example, you could have an object move smoothly to a position on-screen and then sharply take off in another direction.
 Auto Bezier: Auto Bezier keyframes create a smooth rate of change through the keyframe. They automatically update as you change settings. This is a good quick-fix version of Bezier keyframes.
 Continuous Bezier: This option is similar to the Auto Bezier option, but it provides some manual control. The motion or value path will always have smooth transitions, but you can adjust the shape of the Bezier curve on both sides of the keyframe with a control handle.
 Hold: This is available only for temporal (time-based) properties. Hold-style keyframes hold their value across time, without a gradual transition. This is useful if you want to create staccato-type movements or make an object suddenly disappear. When the Hold style is used, the value of the first keyframe will hold until the next hold keyframe is encountered, and then the value will change instantly.
![]() Tip
Tip
If you are familiar with Adobe Illustrator or Adobe Photoshop, you will recognize Bezier handles; they work the same way in Premiere Pro CC.
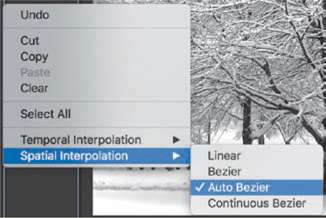
Temporal vs. spatial interpolation
Some properties and effects offer a choice of temporal and spatial interpolation methods for transitioning between keyframes. You’ll find that all properties have temporal controls (which relate to time). Some properties also offer spatial interpolation (which refers to space or movement).
Here’s what you need to know about each method:
Temporal interpolation: Temporal interpolation deals with changes in time. It’s an effective way to determine the speed at which an object moves. For example, you can add acceleration and deceleration with special kinds of keyframes called Ease or Bezier.
Spatial interpolation: The spatial method deals with changes in an object’s position.
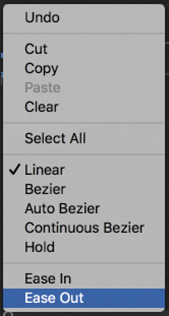
Adding Ease to Motion
A quick way to add a feeling of inertia to clip motion is to use a keyframe preset. For example, you can create a ramp-up effect for speed by right-clicking a keyframe and choosing Ease In or Ease Out. Ease In is used for approaching a keyframe, and Ease Out is used when leaving a keyframe.
Continue working with the 04 Scale sequence.
Select the second video clip in the sequence.
In the Effect Controls panel, locate the Rotation and Scale properties.
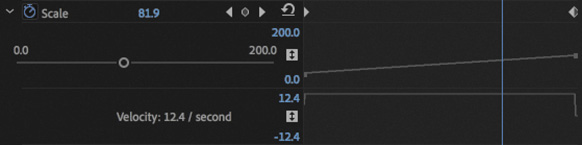
Click the disclosure icon next to the Scale property, and select the Scale property heading to reveal the control handles and velocity graphs.
You might want to increase the height of the Effect Controls panel to make room for the extra controls.
Don’t be overwhelmed by the next numbers and graphs. Once you understand one of these, you’ll understand them all because they all use a common design.
The graph makes it easier to view the effects of keyframe interpolation. A straight line means essentially no change in speed or acceleration.
Right-click the first Scale keyframe, displayed in the Effect Controls panel mini-timeline, and choose Ease Out. The keyframe is partially obscured by the left edge of the mini-timeline.
Right-click the second Scale keyframe and choose Ease In.
The graph now shows a curved line, which translates as a gradual acceleration and deceleration of the animation.

Play the sequence to see your animation.
Experiment by dragging the blue Bezier handles in the Effect Controls panel to see their effects on speed and ramping.
The steeper the curve you create, the more sharply the animation’s movement or speed increases. After experimenting, you can choose Edit > Undo repeatedly if you don’t like the changes.
Adding a drop shadow and bevel
Premiere Pro offers a number of other effects to control motion. While the Motion effect is the most intuitive, you may find yourself wanting more.
The Transform and Basic 3D effects are also useful and give more control over an object (including 3D rotation).
Adding a drop shadow
A drop shadow creates perspective by adding a small shadow behind an object. This is often used to help create a sense of separation between foreground and background elements.
Try adding a drop shadow.
Open the sequence 05 Enhance.
Make sure the Program Monitor zoom level is set to Fit.

In the Effects panel, browse into Video Effects > Perspective.
Drag the Drop Shadow effect onto the Journey to New York Title clip on the V3 track.
Experiment with the Drop Shadow settings in the Effect Controls panel. You may need to scroll down to see them. When you have finished experimenting, choose the following settings:
Set Distance to 15 so the shadow is further offset from the clip.
Drag the Direction value to about 320° to see the shadow’s angle change.
Darken the shadow by changing Opacity to 85%.
Set Softness to 25 to soften the edges of the shadow. Generally, the greater the Distance setting, the more softness you should apply.
Play the sequence to view the result.

![]() Note
Note
To make shadows fall away from a light source, add or subtract 180° from a perceived light source direction to get the correct direction for the shadow to fall.
You’ll learn how to add drop shadows to graphics in a later lesson. However, adding a Drop Shadow effect in this way maintains the position of the shadow if you adjust or animate settings like rotation, giving a more natural-looking result.
Adding a bevel
Another way to enhance the edges of a clip is to add a bevel. This type of effect is useful on a picture-in-picture effect or on text. There are two bevels to choose from. The Bevel Edges effect is useful when the object is simply a standard video clip. The Bevel Alpha effect works better for text or logos because it detects the complex transparent areas in the image before applying the beveled edge.
![]() Note
Note
The Bevel Edges effect produces slightly harder edges than the Bevel Alpha effect. Both effects work well on rectangular clips, but the Bevel Alpha effect is better suited to text or logos.
Let’s enhance the title a little.
Continue working with the 05 Enhance sequence.
Select the Journey to New York Title clip on V3 to see its controls in the Effect Controls panel.
TipYou can apply effects by dragging them onto clips, by dragging them into the Effect Controls panel when a clip is selected, or by double-clicking them in the Effects panel after selecting one or more clips.
In the Effects panel, choose Video Effects > Perspective and drag the Bevel Alpha effect into the Effect Controls panel, under the Drop Shadow effect.
The edges of the text should now appear slightly beveled, but the effect is perhaps too subtle.
In the Effect Controls panel, increase Bevel Alpha Edge Thickness to 10 to make the edge more pronounced. You might need to scroll down in the Effect Controls panel to see all the settings.
Increase Light Intensity to 0.80 to see a brighter edge effect.
The effect looks subtle because it’s currently applied to both the text and the drop shadow. This is because the effect is below the drop shadow in the Effect Controls panel (the stacking order matters).
 Note
NoteIf you’re not getting the look you want when applying multiple effects to a clip, drag the order around and see whether that produces a better result.
In the Effect Controls panel, drag the Bevel Alpha effect heading up, until it’s just above the Drop Shadow effect. You’ll see a black line where the effect will be placed. This changes the rendering order.
 Note
NoteYou may need to render the sequence to see smooth playback because of the high-resolution clips and nonaccelerated effect.
Reduce the Edge Thickness amount to 8.
Examine the subtle differences in the bevel.
Play the sequence to see view the result.
Adding motion with the Transform effect
An alternative to the Motion effect settings is the Transform effect. These two effects offer similar controls, but there are two key differences.
The Transform effect processes changes to a clip’s Anchor Point, Position, Scale, and Opacity settings in the stack with other effects, unlike the Motion settings. This means effects such as drop shadows and bevels can behave differently.
The Transform effect includes Skew, Skew Axis, and Shuttle Angle settings to allow a visual angular transformation to clips.
Let’s compare the two effects using a prebuilt sequence.
Open the sequence 06 Motion and Transform.
Play the sequence to familiarize yourself with it.
There are two sections in the sequence. Each has a picture-in-picture (PIP), rotating twice over a background clip, while moving from left to right. Look carefully at the position of the shadow on each pair of clips.
In the first example, the shadow follows the bottom edge of the PIP and appears on all four sides of the clip as it rotates, which obviously isn’t realistic because the light source producing the shadow wouldn’t be moving.
In the second example, the shadow stays on the lower right of the PIP, which is more realistic.
Click the first clip on the V2 track, and view the effects applied in the Effect Controls panel: the Motion effect and the Drop Shadow effect.

Now click the second clip on the V2 track. The Transform effect is producing the motion this time, with the Drop Shadow effect again producing the shadow.
The Transform effect has many of the same options as the Motion effect, with the addition of Skew, Skew Axis, and Shutter Angle. As you can see, the Transform effect also works more realistically with the Drop Shadow effect than the Motion effect because of the order in which the effects are applied; the Motion effect is always applied after other effects.
NoteWhen applying the Transform effect, deselect Use Composition’s Shutter Angle to allow the Shutter Angle setting to introduce natural-looking motion blur.

Manipulating clips in 3D space with Basic 3D
Another option for creating movement is the Basic 3D effect, which can manipulate a clip in 3D space. It allows you to rotate the image around horizontal and vertical axes as well as move it toward or away from you. You’ll also find an option to enable a specular highlight, which creates the appearance of light reflecting off the rotating surface.
Let’s explore the effect using a prebuilt sequence.
Open the sequence 07 Basic 3D.
Drag the playhead over the sequence in the Timeline panel (scrub) to view the contents.
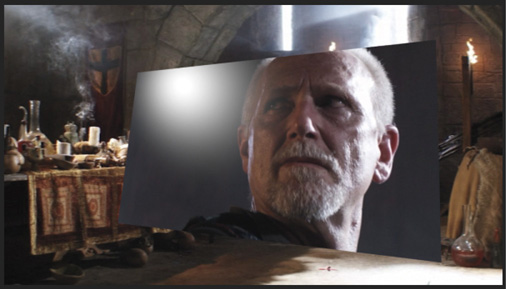
The light that follows the motion comes from above, from behind, and from the left of the viewer. Since the light comes from above, you won’t see the effect until the image is tilted backward to catch the reflection. Specular highlights of this kind can be used to enhance the realism of a 3D effect.
The following are four major properties of the Basic 3D effect:
Swivel: This controls the rotation around the vertical y-axis. If you rotate past 90°, you’ll see the back of the image, which is a mirror of the front.
Tilt: This controls the rotation around a horizontal x-axis. If you rotate beyond 90°, the back will also be visible.
Distance to Image: This moves the image along the z-axis to simulate depth. As the distance value gets larger, the image moves farther away.
Specular Highlight: This adds a glint of light that reflects off the surface of the rotated image, as though an overhead light were shining on the surface. This option is either on or off.
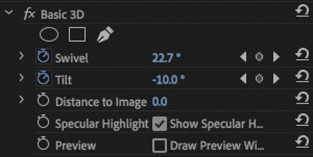
Experiment with the Basic 3D options. Note that the Draw Preview Wireframe option applies only when working in Software Only mode (without GPU acceleration enabled in the Project settings).
With this option enabled, only an outline of the clip frame will be shown. This is a quick way to set up the effect without your computer rendering the image. If you’re working with GPU acceleration enabled, the full image will always be shown.
Review questions
Which fixed effect will move a clip in the frame?
You want a clip to appear full-screen for a few seconds and then spin away. How do you make the Motion effect’s Rotation feature start within a clip rather than at the beginning?
How can you start an object rotating gradually and have it stop rotating slowly?
If you want to add a drop shadow to a clip, why might you choose to use a different motion-related effect from the Motion fixed effect?
Review answers
The Motion effect lets you set a new position for a clip. If keyframes are used, the effect can be animated.
Position the playhead where you want the rotation to begin, and click the Add/Remove Keyframe button or the stopwatch icon. Then move to where you want the spinning to end and change the Rotation parameter; another keyframe will appear.
Use the Ease Out and Ease In options to change the keyframe interpolation to be gradual rather than sudden.
The Motion effect is the last effect applied to a clip. Motion takes whatever effects you apply before it (including Drop Shadow) and spins the entire assemblage as a single unit. To create a realistic drop shadow on a spinning object, use Transform or Basic 3D and then place a Drop Shadow effect below that in the Effect Controls panel.