17 Multicamera Editing
Lesson overview
In this lesson, you’ll learn about the following:
Synchronizing clips based on audio
Adding clips to a sequence
Creating a multicamera target sequence
Switching between multiple cameras
Recording a multicamera edit
Finalizing a multicamera editing project
This lesson will take about 60 minutes to complete. Please log in to your account on peachpit.com to download the lesson files for this lesson, or go to the “Getting Started” section at the beginning of this book and follow the instructions under “Accessing the lesson files and Web Edition.” Store the files on your computer in a convenient location.
Your Account page is also where you’ll find any updates to the lesson files. Look on the Lesson & Update Files tab to access the most current content.
The process of multicamera editing begins with synchronizing multiple camera angles. You can do this using timecode or a common sync point (such as the closing of a clapboard or a common audio track). Once your clips are synced, you can seamlessly cut between multiple angles in Adobe Premiere Pro CC.
Starting the lesson
In this lesson, you’ll learn how to quickly edit multiple angles of footage that were shot simultaneously. Because the clips were shot at the same time, Adobe Premiere Pro CC makes it possible to cut seamlessly from one angle to another.
The multicamera production and post-production processes are more advanced than setting up and managing the media from a single camera. You may not use the techniques explored in this lesson. Still, it’s useful to understand the way Premiere Pro approaches multicamera source material and automated synchronization.
![]() Note
Note
Adobe uses “multicamera” and “multi-camera” interchangeably both in the Premiere Pro user interface and in the online Help documentation.
Even if you don’t work with lots of cameras capturing an event from multiple angles, you might find it useful to use two cameras: one set close and the other set wide.
The workflow described in this lesson applies just as well to two cameras as it does to six or more.
The Premiere Pro multicamera editing feature is a tremendous time-saver when you’re editing footage from a shoot or event captured with multiple cameras.
Open the project Lesson 17.prproj.
Save the project as Lesson 17 Working.prproj.
In the Workspaces panel, select Editing. Then open the menu adjacent to Editing and choose Reset To Saved Layout.

This project has five camera angles of a musical performance and a synchronized audio track.
You’ll use an automated workflow to create a synchronized multicamera sequence that can be edited “on the fly” during playback.
Following the multicamera process
While the workflow can seem complex the first time you perform a multicamera edit, once you know how to do it, it’s really straightforward.
There are six stages.
![]() Tip
Tip
When recording content with multiple cameras, avoid pausing and restarting recording when possible, as you are likely to have to synchronize your shots in post-production every time you restart the recording.
Import your footage: Ideally, the cameras will be closely matched in frame rate and frame size, but you can mix and match if needed.
Determine your sync points: The goal is to keep the multiple angles running in sync with each other so you can seamlessly switch between them. You’ll need to identify a point in time that exists in all angles to synchronize or use matching timecode. Alternatively, you can automatically sync if all the clips have the same audio.
Create a multicamera source sequence: The clips are added to a specialized sequence type called a multicamera source sequence. This is essentially a regular sequence that contains multiple video angles stacked on different video tracks.
Add the multicamera sequence to another sequence for editing: Editing one sequence into another is called nesting. This new sequence is the multicamera master sequence in which you will perform edits. Your original multicamera sequence is now a single multilayered source clip.
Record multicamera edits: A special Multi-Camera view in the Program Monitor lets you switch between camera angles during playback, adding an edit each time you switch.
Adjust and refine edits: Once the edit is roughed out, you can refine the sequence with standard Timeline editing and trimming commands.
Creating a multicamera sequence
You can play multiple camera angles at the same time; the only limiting factor is the computing power required to play back your clips. If your computer and storage drives are fast enough, you should be able to play back several streams in real time.
Determining the sync points
Decide how you want to synchronize the multiple angles of footage when creating the multicamera sequence. You can select from five options for the sync references. The method you choose will be partly a matter of personal choice and partly how the footage was shot.
In points: If you have a common starting point, you can set an In point on all clips you want to use. This method is effective as long as all cameras are rolling before the critical action starts.
Out points: This method is similar to syncing with an In point but instead uses a common Out point. Out-point syncing is ideal when all cameras capture the ending of critical action (such as crossing the finish line) but were started at different times.
Timecode: Many professional cameras allow timecode to be synchronized across multiple cameras. You can sync cameras by connecting them to a common sync source. In some cases, the Hours number is offset to identify the camera number. For example, camera 1 would start at 1:00:00:00, and camera 2 would start at 2:00:00:00. For this reason, you can choose to ignore the Hours number when syncing with timecode.
This will always be the fastest way to sync. It requires more preparation, and potentially different hardware for production, but can save a considerable amount of work in post-production.
 Tip
TipIf you don’t have a good visual clue in the video to sync multiple clips to, look for a clap or loud noise in the audio track. It’s often easier to sync clips by looking for a common spike in the audio waveform. Add a marker to each clip at that moment and then use the markers option to sync.
Clip marker: In and Out points can be accidentally removed from a clip. If you’d like to mark a clip in a more robust fashion, you can use a marker to identify a common sync point. Markers are more difficult to accidentally remove from a clip. They can also be based on any part of the action, perhaps an event partway through the recording that all cameras captured. If you don’t have sync timecode or audio, a marker is probably the most efficient way to work.
Audio: If every camera recorded audio (even if it’s just poor-quality reference audio from a camera-mounted shotgun or even an integrated microphone), Premiere Pro may be able to synchronize the clips automatically. The results with this method depend on your audio being reasonably clean.
Adding clips to a multicamera source sequence
Once you’ve identified the clips you want to use (as well as a common sync point), you can create a multicamera source sequence, the specialized type of sequence for multicamera editing.
The order in which you select the clips is the order in which they will be added to the sequence—and by extension, this sets the camera angle number.
By holding Command (macOS) or Ctrl (Windows), you can select one clip after another to define them as specific camera angles. For example, if you click to select clips 1, then 2, then 3, they’ll become Camera Angle 1, then 2, then 3.
If you select clips 1, then 3, then 2, they’ll become Camera Angle 1, then 2, then 3. You can easily change this later, of course.
Let’s try this.
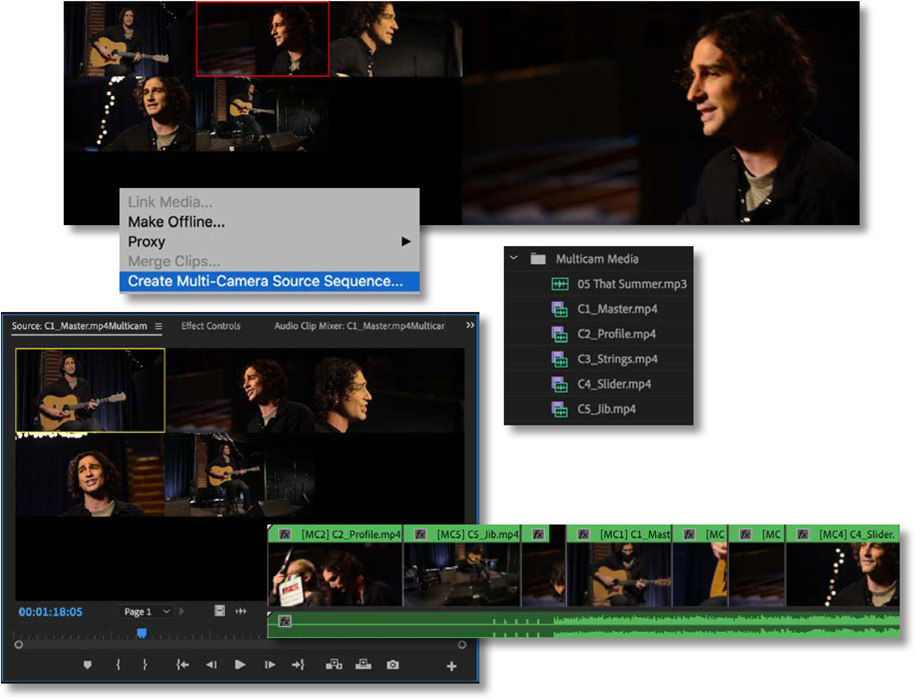
Select all the clips in the Multicam Media bin.
For this example, Command-click (macOS) or Ctrl-click (Windows) the clips in their numerical order. It doesn’t matter when you select the audio-only clip. When an audio-only clip is present, Premiere Pro automatically uses it as the audio for the multicamera sequence.
Right-click one of the selected clips and choose Create Multi-Camera Source Sequence. You can also choose Clip > Create Multi-Camera Source Sequence.
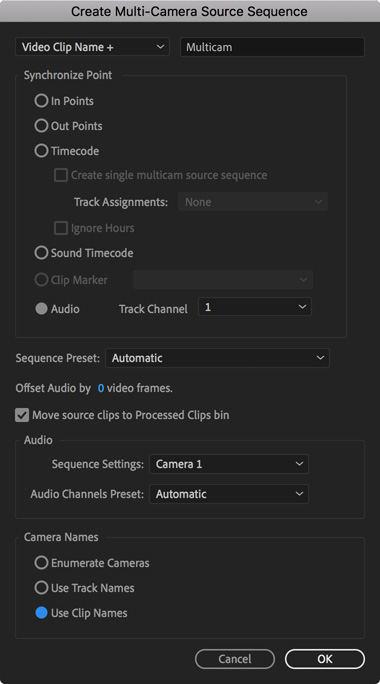
The Create Multi-Camera Source Sequence dialog box opens, asking how you want to create the multicamera source sequence.
Under Synchronize Point, select Audio, and leave Track Channel set to 1.
TipIf you’re not sure which clip audio is clear for syncing purposes, choose Mix Down from the Track Channel menu. This will use all audio channels to sync.
Leave the Sequence Preset menu set to Automatic. The newly created sequence will match the first clip you selected. All available sequence presets are listed here, so you could choose a particular option if you preferred.
Leave the Audio > Sequence Settings menu set to Camera 1. In fact, because one of the clips is audio-only, it will automatically be used as the audio for the newly created multicamera sequence. If you didn’t have that audio-only clip, Premiere Pro would use the first selected shot.
Another approach is to place a dedicated audio recording on another track and sync it. Alternatively, choose Switch Audio from the Audio > Sequence Settings menu to sync the audio changes to the video angle that’s chosen as you edit. This is useful if you are editing roving cameras that recorded in sync at different locations.
The clips have useful names that you can use as Camera Angle names. Under Camera Names, select Use Clip Names, and click OK.
Premiere Pro analyzes the clips and creates a new multicamera source sequence that appears in the Project panel.
Double-click the new multicamera source sequence to view it in the Source Monitor.
Drag the Source Monitor playhead through the clip to view the multiple angles.
The clips are displayed in a grid to show you all the angles at once. Some angles start in black because the cameras began recording at different times.


![]() Note
Note
Premiere Pro automatically adjusts the multicamera grid to accommodate the number of angles in use. For example, if you have up to four clips, you would see a 2x2 grid. If you used between five and nine clips, you’d see a 3x3 grid; if you used 16 angles, the grid would be 4x4; and so on.
In this workflow, you’re using an automated option in the Project panel to create a multicamera sequence. You could also manually create a multicamera sequence, giving you more control but taking more time. Explore the Adobe Premiere Pro Learn and Support website for more information about multicamera editing (choose Help > Adobe Premiere Pro Help).
Creating the multicamera target sequence
Once you’ve made the multicamera source sequence, you need to place it in another sequence, nesting it. The multicamera source sequence, when nested, will behave like any other clip in your master sequence. Of course, unlike regular footage clips, this clip has multiple angles of footage to choose from as you edit.
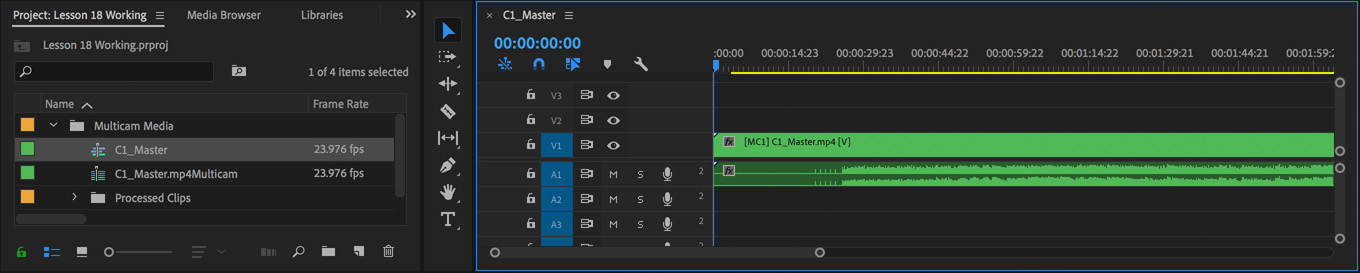
Locate the multicamera source sequence you just created. It should be named something like C1_Master.mp4Multicam.
Right-click the multicamera source sequence and choose New Sequence From Clip, or drag the clip onto the New Item button at the bottom of the Project panel.
 Note
NoteCreating a new sequence from a multicamera source sequence in this way will result in a multichannel audio mastering setting, which may not result in ideal panning (depending on your source audio). You can also manually create a new stereo sequence and drag the new multicamera sequence into it, producing mono audio panning, equally balanced between the left and right audio output.
You now have a ready-to-use multicamera target sequence.
Right-click the nested multicamera sequence in the Timeline panel and look at the Multi-Camera options.

For a multicamera sequence clip to work, Multi-Camera > Enable must be selected.
TipTo view the contents of a multicamera sequence, hold Command (macOS) or Ctrl (Windows) and double-click it. You can edit the contents of the sequence as you would any other. Changes you make to the source multicamera sequence will automatically appear in the target multicamera sequence.
Multi-Camera mode is automatically enabled for this clip because of the way you created it. You can turn this option off or on at any time. If the option is off, the nest sequence will work like any other nested sequence.
A camera angle is already selected. Try choosing another angle in this menu and see the Program Monitor update. The clip name updates in the sequence too.

Switching multiple cameras
Once you’ve built the multicamera source sequence and added it to a multicamera target sequence, you’re ready to edit. You can do this in real time using the Multi-Camera view in the Program Monitor. You can switch between the different angles by clicking in the Program Monitor or using a keyboard shortcut.
Performing a multicamera edit
Multicamera editing works by selecting camera angles for the current clip on the Timeline using a special Multi-Camera mode in the Program Monitor.
If playback is stopped, you can click an angle on the left of the Program Monitor, and the current clip in the sequence will update to match.
During playback, when you click an angle in the Program Monitor, the sequence clip updates and an edit is applied to the clip, separating the previous camera angle from the newly selected angle. The edits are not displayed in the Timeline panel until playback stops.
Let’s try it now.
Open the Settings menu on the Program Monitor and choose Multi-Camera.
Play the sequence to get familiar with it.

Featured track, used with permission: “That Summer,” by Jason Masi (www.jasonmasi.com)
The first few seconds are silent until the click track begins. You will hear a series of short beeps followed by the professionally recorded track.
Hover the pointer over the Program Monitor and press the ` (accent grave) key to maximize the panel. If your keyboard doesn’t have an ` (accent grave) key, double-click the panel name. This will make it easier to see the various camera angles you’ll choose between.
Set the playhead at the start of the sequence, and press the spacebar to start playback.
NoteThe first nine camera angles are assigned to keys 1–9 along the top of your keyboard (not the numerical keypad) by default. For example, press the 1 key to select Camera 1, press the 2 key to select Camera 2, and so on.
Click the images on the left to switch between the multiple camera angles during playback. You can also use the keyboard shortcuts, 1–5, that correspond to the camera angle you want to select.
When the sequence finishes playback or you stop playback, it will have multiple edits. Each separated clip’s label starts with a number that represents the camera angle used for that clip.

Hover the pointer over the Program Monitor and press the ` (accent grave) key, or double-click the panel name, to restore the panel to its normal size.
NoteIf you have effects applied to your clips, these are displayed as usual in the Program Monitor. This is helpful if you have applied color adjustments to match different angles.
Make the Video 1 track taller to see the thumbnails for each angle. Play the sequence and review your edit.
Now imagine that the director on this production decides the audio is too loud for the planned distribution medium.
Right-click the audio track and choose Audio Gain.
The Audio Gain dialog box opens.
In the Adjust Gain By field, enter −8 and click OK to lower the audio. You could also use the Essential Sound panel to set the audio level automatically.
Re-recording multicamera edits
The first time you record a multicamera edit, it’s possible you will miss a few edits. Perhaps you cut too late (or too early) to an angle. You also may decide that you like one angle better than another. This is easy to correct.
![]() Note
Note
After making your edits, you can always change them in the Multi-Camera view of the Program Monitor or on the Timeline. You can even trim parts of the multicamera sequence as you would any other clip.
Move the playhead to the start of the Timeline panel.
Click the Play button in the Program Monitor view to start playback.
The angles in the Multi-Camera view switch to match the existing edits in your Timeline.
When the playhead reaches the spot you want to change, choose a different angle.

If your keyboard has the keys, you can press one of the shortcuts (in this case, 1–5), or you can click your preferred angle in the Multi-Camera view of the Program Monitor.

When you finish editing, stop playback by pressing the spacebar.
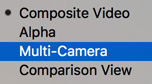
Open the Program Monitor Settings menu and choose Composite Video to return to a regular viewing mode.

Finalizing multicamera editing
Once you’ve performed a multicamera edit in the Multi-Camera view, you can refine and then finalize it. The resulting sequence is like any other sequence you’ve built, so you can use any of the editing or trimming techniques you’ve learned so far. There are some additional options available, however.
Switching an angle
If you’re happy with the timing of an edit but not the angle you chose, you can always swap the angle for another. There are a few ways to do this.
Right-click a clip, choose Multi-Camera, and specify an angle.
Use the Multi-Camera view of the Program Monitor (as you did earlier in the lesson).
If the correct track is enabled or the nested multicamera sequence clip is selected, use the shortcuts 1–9 along the top of the keyboard.
Flattening a multicamera edit
You can flatten a multicamera edit to reduce the amount of processing power needed for playback and to simplify the sequence. When you flatten the edit, the nested multicamera sequence clips are replaced with the original selected camera angle clips.
The process is simple.
![]() Note
Note
If you flatten your multicamera sequence, audio adjustments are lost. Leave audio work until later.

Select all the multicamera clips you’d like to flatten (you can flatten just part of the sequence if you prefer).
Right-click any selected clip and choose Multi-Camera > Flatten.

Once the clips are flattened, the process cannot be reversed, other than by choosing Edit > Undo.
Review questions
Describe five kinds of sync points for multicamera clips.
Identify two ways to have the multicamera source and multicamera target sequences match settings.
Name two ways to switch between angles in the Multi-Camera view.
How can you choose a different angle after closing the Multi-Camera view?
Review answers
The five ways are In points, Out points, timecode, audio, and markers.
You can right-click the multicamera source sequence and choose New Sequence From Clip, drag the multicamera source sequence onto the New Item button in the Project panel, or drag the multicamera source sequence into an empty sequence and let it auto-conform the settings.
To switch angles, you can either click the preview angle in the Program Monitor or, if your keyboard has the keys, use the corresponding shortcut key (1–9 along the top of the keyboard) for each angle.
If you want to swap the camera angle, right-click it in the Timeline, choose Multi-Camera from the context menu, and choose the camera angle you want to use, or press the corresponding keyboard shortcut, 1–9. You can also use any of the trimming tools in the Timeline to adjust the edit points for an angle.