16 Exporting Frames, Clips, and Sequences
Lesson overview
In this lesson, you’ll learn about the following:
Choosing the right export options
Exporting single frames
Creating movie, image sequence, and audio files
Using Adobe Media Encoder
Uploading to social media and Adobe Stock
Working with edit decision lists
This lesson will take about 90 minutes to complete. Please log in to your account on peachpit.com to download the lesson files for this lesson, or go to the “Getting Started” section at the beginning of this book and follow the instructions under “Accessing the lesson files and Web Edition.” Store the files on your computer in a convenient location.
Your Account page is also where you’ll find any updates to the lesson files. Look on the Lesson & Update Files tab to access the most current content.

One of the best things about editing video is the feeling you have when you can finally share it with your audience. Adobe Premiere Pro CC offers a wide range of export options. Exporting your project is the final step in the video production process. Adobe Media Encoder offers multiple high-level output formats. Within those formats you have dozens of options and can also export in batches.
Starting the lesson
The most common form of media distribution is via digital files. To create these files, you can use Adobe Media Encoder CC. Adobe Media Encoder is a stand-alone application that handles file exports in batches, so you can export in several formats simultaneously and process in the background while you work in other applications, including Premiere Pro and Adobe After Effects.
Understanding the export options
Whether you’ve completed a project or you just want to share an in-progress review, you have a number of export options.
You can export to a file for posting online or create a Digital Cinema Package (DCP) file for theatrical distribution.
You can export a single frame or a series of frames.
You can choose audio-only, video-only, or full audio/video output.
Exported clips or stills can be reimported into the project automatically for easy reuse.
You can play directly to videotape.
![]() Note
Note
Premiere Pro can export clips selected in the Project panel, as well as sequences or ranges within sequences or the Source panel. The content that’s selected when you choose File > Export is what Premiere Pro will export.
Beyond choosing an export format, you can set several other parameters.
You can choose to create files in a similar format and at the same visual quality and data rate as your original media, or you can compress them to a smaller size to make distribution easier.
You can transcode your media from one format to another to make it easier to exchange with creative collaborators.
You can customize the frame size, frame rate, data rate, or audio and video compression choices if an existing preset doesn’t fit your needs.
You can apply a color lookup table (LUT) to assign a look; set overlay timecode and other clip text information; add an image overlay; or upload a file directly to social media accounts, an FTP server, or Adobe Stock.
You can add timecode, name, and image overlays, and apply a video limiter or apply audio normalization, all at the time of exporting the file.
Exporting single frames
While an edit is in progress, you may want to export a still frame to send to a team member or client for review. You might also want to export an image to use as the thumbnail of your video file when you post it to the Internet.
When you export a frame from the Source Monitor, Premiere Pro creates a still image that matches the resolution of the source video file.
When you export a frame from the Program Monitor, Premiere Pro creates a still image that matches the resolution of the sequence.
Let’s give it a try.
![]() Note
Note
The music in this project is titled “Tell Somebody,” by Alex featuring AdmiralBob. Licensed under Creative Commons Attribution 3.0.
Open Lesson 16.prproj from the Lessons/Lesson 16 folder.
Save the project as Lesson 16 Working.prproj.
Open the sequence Review Copy. Position the Timeline playhead on a frame you want to export.
In the Program Monitor, click the Export Frame button
 on the lower right.
If you don’t see the button, it may be because you’ve customized the Program Monitor buttons. You might also need to resize the panel. You can also select the Program Monitor or the Timeline panel and press Shift+E (macOS) or Shift+Ctrl+E (Windows) to export a frame.

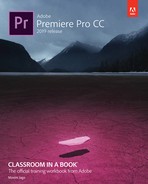
In the Export Frame dialog box, enter a filename.
Use the Format menu to choose a still-image format.
JPEG, PNG, GIF, and BMP (Windows only) are universally readable. JPEG and PNG files are commonly used in website design.
TIFF, Targa, and PNG are suitable for print and animation workflows.
DPX is often used for digital cinema or color-grading workflows.
OpenEXR is used to store high dynamic range picture information.
 Note
NoteIf your video format uses non-square pixels, the resulting image file will appear to have a different aspect ratio. This is because still image formats have square pixels. You can use Photoshop to resize the image horizontally and restore the original aspect ratio.
Click the Browse button to choose a location to save the new still image. Create a folder named Exports in the Lessons folder, select it, and click Choose.
NoteIn Windows, you can export to the BMP, DPX, GIF, JPEG, OpenEXR, PNG, TGA, and TIFF formats. On a Mac, you can export to the DPX, JPEG, OpenEXR, PNG, TGA, and TIFF formats.
Select the Import Into Project option to add the new still image into your current project, and click OK.
Exporting a master copy
Creating a master copy allows you to make a pristine digital copy of your edited project that can be archived for future use. A master copy is a self-contained, fully rendered digital file output of your sequence at the highest resolution and best quality possible. Once it’s created, you can use a file of this kind as a separate source to produce other compressed output formats without opening the original project in Premiere Pro.
Choosing the source range
On the lower left of the Export Settings dialog box you’ll find the Source Range controls, which you’ll use to define the portion of the source clip or sequence to export. You can export the entire sequence, a range defined by setting an In point and an Out point in the sequence, or a custom range set in this dialog box.
You can apply new In and Out points by using the small triangular handles and navigator directly above the menu, by positioning the playhead in this dialog box and clicking the Set In point and Set Out buttons, or by pressing I and O.


By default, if In and Out points have already been applied, they are used to define the export range.
Matching sequence settings
Ideally, the frame size, frame rate, and codec of a master file will closely match the sequence it’s based on. Premiere Pro makes this easy by offering a Match Sequence Settings option when you export.
Continue working with the Review Copy sequence.
With the sequence selected in the Project panel or open in the Timeline panel, with that panel active, choose File > Export > Media. The Export Settings dialog box opens.

You’ll learn more about this dialog box later. For now, select the Match Sequence Settings check box.
NoteIn some cases, the Match Sequence Settings option cannot write an exact match of the original camera media. For example, XDCAM EX will write to a high-quality MPEG2 file. In most cases, the file written will have an identical format and closely match the data rate of the original sources.

The blue text showing the output name is actually a button that opens a Save As dialog box. You’ll find the same type of text-as-a-button in Adobe Media Encoder. Click the output name now.

Choose a target location (such as the Exports folder you created earlier), name the file Review Copy 01, and click Save.
Review the Summary information to check that the output format matches the sequence settings. In this case, you should be using DNxHD media (as MXF files) at 29.97fps. The Summary information is a quick, easy reference that helps you avoid minor errors that can have big consequences. If the Source and Output Summary settings match, it minimizes conversion, which helps maintain the quality of the final output.
When exporting a sequence, the sequence itself is the source in the Export dialog box—not the clips inside the sequence, which will have already been conformed to the sequence settings.

Click the Export button to create a media file based on the sequence. Note that DNxHD media files can be viewed and edited in Premiere Pro but cannot (usually) be previewed in macOS or Windows.
Choosing another codec
When you export to a new media file, you can choose the codec that’s used. Some camera capture formats (such as the popular H.264 .MP4 files commonly produced by DSLR cameras) are already heavily compressed. Using a higher-quality mastering codec can help to preserve quality.
Choose your format and presets first, then pick the output, and finally decide whether you’d like to export audio, video, or both.
![]() Note
Note
The settings displayed change depending on the format you choose. Most of the critical options are accessed in the Video and Audio tabs.
With the same sequence selected, choose File > Export > Media or press Command+M (macOS) or Ctrl+M (Windows).
In the Export Settings dialog box, open the Format menu, and choose QuickTime. In the Preset menu, choose GoPro CineForm YUV 10-bit.
This is a rather specific-sounding preset, but it is just that—a preset, which automatically chooses options from other menus in this dialog box that you can change if you need to.
NoteOn the Video tab, you’ll also find the option Render At Maximum Depth. When working without GPU acceleration, this can improve the visual quality of your output by using greater precision to generate colors. However, this option can add to the render time.
Click the output name (the blue text), and give the file a new name, Review Copy 02. Navigate to the same destination you used in the previous exercise and click Save.
Below the Export Settings area is a tabbed group of important settings. Here’s an overview of those tabs:
Effects: You can add a number of useful effects and overlays as you output your media (see these options in the next section).
Video: The Video tab allows you to set the frame size, frame rate, field order, and profile. The settings available are based on the preset you chose.
Audio: The Audio tab allows you to adjust the bit rate of the audio and, for some formats, the codec. The default settings are based on the preset you chose.
Multiplexer: These settings specify whether the video and audio will be combined or delivered as separate files. These controls also let you determine whether the file will be optimized for compatibility with a specific device.
Captions: If your sequence has captions, you can specify whether they are ignored, “burned in” (added to the visuals permanently), or exported as a separate file (referred to as a sidecar file).
Publish: This tab lets you enter the details of several social media services for your file to be delivered to. You’ll learn more about this later in this lesson.
Click to select the Video tab near the bottom of the window.
In the Video Codec section of the dialog box, choose one of the available video codecs.
Try the GoPro CineForm codec. This produces a high-quality (but reasonably sized) file. Make sure the frame size and frame rate match your source settings. You might need to scroll down or resize the panel to see all the settings.
NoteGoPro CineForm is a professional codec that is supported natively by Adobe Creative Cloud applications. Like all codecs, it will play back only in media applications that support it.

Click the Match Source button in the Basic Video Settings area.
Below the Match Source button is a series of output format settings. If the setting is selected, the setting will automatically match the source.

Click to select the Audio tab. In the Basic Audio Settings section, make sure 48000 Hz is chosen from the Sample Rate menu and choose 16-bit from the Sample Size menu. Just below that, in the Audio Channel Configuration area, choose Stereo from the Output Channels menu.

 Tip
TipHEVC/H.265 is a new compression system formulated by the same Motion Picture Experts Group that brought us H.264. It’s more efficient, but fewer players support it. You may be asked to supply media using this codec when producing UHD content.
Click the Export button at the bottom of the dialog box to export the sequence and transcode it to a new media file. Files encoded with the GoPro CineForm codec cannot usually be previewed in macOS or Windows. Import the file into Premiere Pro, to preview and edit it.
The most popular delivery format and codec is an MPEG4 (.mp4) file, using the H.264 codec. If you choose H.264 in the Format menu, you’ll find presets for YouTube and Vimeo.
Cropping the source image
Moving to the left side of the Export Settings dialog box, you will find the Source and Output tabs.
Click the Source tab to bring it to the front. The Source tab gives access to cropping controls.
Click the Crop The Output Video button
 to enable the controls.
You can enter specific settings (in pixels) at the top of the dialog box or drag the handles in the Source preview to crop the image.

The Crop Proportions menu has several options to restrict the settings to a particular aspect ratio. Choose 4:3 from the Crop Proportions menu. Now, if you make changes to the crop settings they will be locked to a 4:3 aspect ratio.
Click the Output tab to bring it to the front.

The Output tab shows a preview of the video to be encoded. The Source Scaling menu let you choose the way a mismatch between the source aspect ratio and the output settings.
Try each of the options in the Source Scaling menu to see the results. The option Change Output Size To Match Source is not available for all export formats. It achieves the same result as clicking the Match Source button on the Video tab in the Export settings.
Leave the Source Scaling menu set to Scale To Fit. Switch to the Source tab and click the Crop The Output Video button to disable cropping. Switch back to the Output tab to make sure the image fills the screen.
After making changes on the Source tab or choosing a new output frame size, it’s always a good idea to check the Output tab to spot errors such as unwanted letterboxing or distortion caused by the irregularly shaped pixels used in some video formats.
Working with Adobe Media Encoder CC
Adobe Media Encoder CC is a stand-alone application that can be run independently of or be launched from Premiere Pro. One advantage of using Media Encoder is that you can send an encoding job directly from Premiere Pro and then continue working on your edit as the encoding is processed. If your client asks to see your work before you finish editing, Media Encoder can produce the file in the background without interrupting your flow.
By default, Media Encoder pauses encoding when you play video in Premiere Pro to maximize playback performance. You can change this in the Premiere Pro Playback preferences.

Choosing a file format for export
It can be a challenge to know how to deliver your finished work. Ultimately, choosing delivery formats is a process of planning backward; find out how the file will be presented, and it’s usually straightforward to identify the best file type for the purpose. Often, clients will have a delivery specification you must follow, making it easy to select the right options for encoding.
Premiere Pro and Adobe Media Encoder can export to many formats.
![]() Note
Note
If working with a professional mastering format (such as MXF OP1a, DNxHD MXF OP1a, or QuickTime), you can export up to 32 channels of audio where the format allows. The original sequence must be configured to use a multichannel master track with the corresponding number of tracks.
Configuring the export
To export from Premiere Pro to Adobe Media Encoder, you’ll need to queue the export. The first step is to use the Export Settings dialog box to make choices about the file you’re going to export.
Continue working with the Review Copy sequence. Either select the sequence in the Project panel or have it open in the Timeline panel, with that panel active.
Choose File > Export > Media, or press Command+M (macOS) or Ctrl+M (Windows).
It’s best to work through the Export Settings dialog box from the top down, starting with the Export Settings area.
Choose H.264 from the Format menu. This is a popular choice for files you’ll upload to online video websites.
In the Preset menu, choose Vimeo 720p HD.
These settings match the frame size and frame rate of the sequence. The codec and data rate match the requirements for the Vimeo.com website.
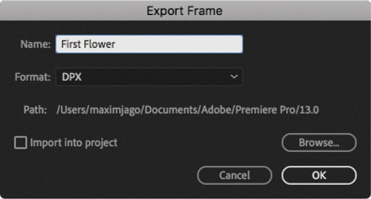
Click the output name (the blue text) and give the file a new name, Review Copy 03. Save it to the same destination you selected in the previous exercise.
Check the Summary information text to verify your choices.
Export effects
You have the option to apply several effects, add information overlays, and make automated adjustments to the output file.
Here’s an overview:
Lumetri Look/LUT: Choose from a list of built-in Lumetri looks or browse to your own, allowing you to quickly apply a nuanced adjustment to the appearance of your output file.
SDR Conform: If your sequence is high dynamic range, you can produce a standard dynamic range version.
Image Overlay: Add a graphic, like a company logo or network “bug,” and position it on-screen. The graphic will be incorporated into the image.
Name Overlay: Add a text overlay to the image. This is particularly useful as a simple watermark to protect your content or as a way of marking different versions.
Timecode Overlay: Display timecode for your finished video file, making it easy for viewers without specialized editing software to note reference times for commenting purposes.
Time Tuner: Specify a new duration or playback speed, up to + /−10%, achieved by applying subtle adjustments to periods of low action where the soundtrack is silent. Results vary depending on the media you are working with, so test different speeds to compare the end result. A continuous music soundtrack is likely to interfere with the results.
Video Limiter: While it’s usually best to get your video levels right in the sequence, you can apply a limiter here too, just in case.
Loudness Normalization: Use the Loudness scale to normalize audio levels in your output file. As with video levels, it’s best to get this right in the sequence, but it can be a helpful extra security to know your levels will be limited during export.

Queuing the export
When you’re ready to create your media file, you have a few more options to consider. These are found in the lower-right portion of the Export Settings dialog box.
Use Maximum Render Quality: Consider enabling this setting when scaling from larger image sizes to smaller image sizes. This option requires more RAM and can slow down the output. This option is usually not needed except when working without GPU acceleration (in software-only mode), when scaling the image down and seeking the highest quality possible.
Use Previews: When you render effects, preview files are produced that look like your original footage combined with the effects. If you enable this option, the preview files will be used as the source for the new export. This can save a significant amount of time that would otherwise be spent rendering the effects again. The result might be lower quality, depending on the sequence preview files format (see Lesson 2, “Setting Up a Project”).
Import Into Project: This option automatically imports the newly created media file into your current project so you can check it or use it as source footage.
Set Start Timecode: This allows you to specify a new file start timecode. This is particularly useful if you are working in a broadcast environment where a specific timecode start may be a delivery requirement.
Render Alpha Channel Only: Some post-production workflows require a separate grayscale file representing the alpha channel (the channel that defines opacity). This option produces just that file.
Time Interpolation: If your exported file will have a different frame rate than your sequence, this menu lets you specify the way the frame-rate change is rendered. The options are the same as those that apply when changing clip playback speed in a sequence.
Metadata: Click this button to open the Metadata Export panel. You can specify a wide range of settings, including information about copyright, creator, and rights management. You can even embed useful information such as markers, script, and speech transcription data for advanced delivery options. In some cases, you may prefer to set the Metadata Export Options setting to None, removing all metadata.

Queue: Click the Queue button to send the file to Adobe Media Encoder, which will open automatically, allowing you to continue working in Premiere Pro while the export takes place.
Export: Select this option to export directly from the Export Settings dialog box rather than sending the file to the Adobe Media Encoder queue. This is a simpler workflow and usually a faster export, but you won’t be able to edit in Premiere Pro until the export is complete.
Click the Queue button to send the file to Adobe Media Encoder, which starts up automatically.
Media Encoder will not begin encoding automatically. To begin encoding, click the Start Queue button ![]() in the upper-right corner.
in the upper-right corner.
Looking at additional options in Adobe Media Encoder
Using Adobe Media Encoder brings a number of benefits. Although it involves a few extra steps beyond simply clicking the Export button in the Export Settings panel of Premiere Pro, the extra options are worth it.
Here are some of the most useful features you’ll find in Adobe Media Encoder:
![]() Note
Note
Adobe Media Encoder does not have to be used from Premiere Pro. You can launch Adobe Media Encoder on its own and browse Premiere Pro projects to choose items to transcode directly.
Add files for encoding: You can add files to Adobe Media Encoder by choosing File > Add Source. You can even drag and drop files into it from Finder (macOS) or Windows Explorer (Windows). There’s a Media Browser panel too, which you can use to locate select items, just as you would in Premiere Pro.
Import Premiere Pro sequences directly: You can choose File > Add Premiere Pro Sequence to select a Premiere Pro project file and choose sequences to encode (without ever launching Premiere Pro).
Render After Effects compositions directly: You can import and encode compositions from Adobe After Effects by choosing File > Add After Effects Composition. Once again, you don’t need to open Adobe After Effects.
Use a watch folder: If you’d like to automate some encoding tasks, you can create watch folders by choosing File > Add Watch Folder and then assigning a preset to that watch folder. Watch folders exist in Finder (macOS) or Windows Explorer (Windows) like any other folder. If Adobe Media Encoder is running, media files placed into the folder are automatically encoded to the format specified in the preset.


Modify a queue: You can add, duplicate, or remove any encoding tasks using buttons at the top of the list.
Start encoding: You can set the queue to start automatically in the Media Encoder preferences. Alternatively, click the Start Queue button
 to start encoding. Files in the queue are encoded one after another. You can add files to the queue after encoding has begun. You can even add files to the queue directly from Premiere Pro while encoding is taking place.
Modify settings: Once the encoding tasks are loaded into the queue, changing settings is easy; click the item’s Format or Preset entry (in blue text), and the Export Settings dialog box appears.

When encoding has completed, you can quit Media Encoder.
Uploading to social media
Return to Premiere Pro, make sure the Timeline panel is active, and choose File > Export > Media to display the Export Settings dialog box.
Click the Publish tab to bring it to the front.
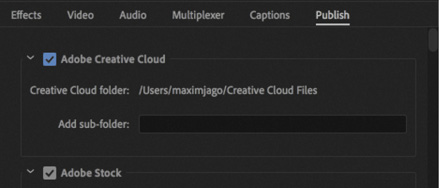
The Publish settings allow you to upload exported videos to your Creative Cloud Files folder, Adobe Stock, Adobe Behance, Facebook, an FTP server (FTP is a standard way to transmit files to a remote file server), Twitter, Vimeo, and YouTube when the encoding is complete.
Each platform will have its own delivery standards, though in many cases you can choose a high-quality master file and let the platform do the work of producing more highly compressed alternative versions from that file. Adobe Stock, for example, supports a range of video formats and codecs. If you produce a UHD (3840 x 2160) file, the rest can be handled by the server.
Social media platforms are increasingly important media distribution outlets, and Adobe is closely involved in developing new technologies and workflows to make it easier to share your creative work and maximize audience engagement. Click Cancel to close the Export Settings dialog box.
Exchanging with other editing applications
Collaboration is often essential in video post-production. Premiere Pro can both read and write project files and footage files that are compatible with many of the top editing and color-grading tools on the market. This makes it straightforward to share creative work, even if you and your collaborators are using different editing systems.
Premiere Pro supports EDLs, OMF, AAF, ALE, and XML import and export.
If you’re collaborating with an Avid Media Composer editor, you can use AAF as an intermediary, allowing the exchange of clip information, edited sequences, and a limited number of effects.
If you’re collaborating with an Apple Final Cut Pro editor, you can use XML as an intermediary in a similar way.
It’s easy to export an AAF or XML file from Premiere Pro. Just select a sequence you want to export and either choose File > Export > AAF or choose File > Export > Final Cut Pro XML.
For more information about best practices when sharing creative work between applications, see the online help.
Exporting to OMF
Open Media Framework (OMF) is an industry standard file type for exchanging audio information between systems (typically for audio mixing). When you export an OMF file, the typical method is to create a single file that contains all the audio files included in a sequence, arranged as clips on audio tracks. When the OMF file is opened by a compatible application, the clips will appear on tracks, timed and edited, just as they do in the Premiere Pro sequence.
Here’s how to create an OMF file:
With a sequence selected, choose File > Export > OMF.
In the OMF Export Settings dialog box, enter a name for the file in the OMF Title field.

Check that the Sample Rate and Bits Per Sample settings match your footage; 48000 Hz and 16 bits are the most common settings.
From the Files menu, choose one of the following:
Embed Audio: This option exports an OMF file that contains the project metadata and all the audio files for the selected sequence.
Separate Audio: This option separates all audio files, including stereo audio, into new multiple mono audio files, which are exported into a folder called omfiMediaFiles. This is a popular standard for audio engineers who are using advanced audio mixing workflows.
If you’re using the Separate Audio option, choose between the AIFF and Broadcast Wave formats. Both are high quality, but check with the system you need to exchange with. AIFF files tend to be the most compatible.
Using the Render menu, choose either Copy Complete Audio Files or Trim Audio Files (to reduce the file size). You can specify that handles (extra frames) be added to give you some flexibility when modifying the clips.
Click OK to generate the OMF file.
Choose a destination, and click Save. You can target your lesson folder for now.
When the export is complete, the OMF Export Information dialog box appears. It displays information about the export and reports any errors that were encountered. Click OK to close the dialog box.
![]() Note
Note
All OMF files have 2GB file limit—if you’re working on a long sequence, you may need to separate it into two or more sections and export them separately.
Final practice
Congratulations! You have now learned enough about Adobe Premiere Pro to import media; organize projects; create sequences; add, modify, and remove effects; mix audio; work with graphics and titles; and output to share your work with the world.
Now that you have completed this book, you may want to practice a little. To make this easier, the media files for a few productions have been combined in a single project file so you can explore the techniques you have learned.
These media files can be used only for personal practice and are not licensed for any form of distribution, including YouTube or any other online distribution, so please do not upload any of the clips or the results of any editing work you do with them. They are not for sharing with the public; they are just for you to practice with privately.
The Final Practice.prproj project file, in the MEDIA folder, contains original clips for a few productions.
360 Media: A short excerpt from an introduction to a 360 Video feature film. Use this media to experiment with the playback controls for 360 Video.
Andrea Sweeney NYC: This is a short road-movie diary piece. Use the voice-over as a guide to practice combining 4K and HD footage in a single timeline. Experiment with panning and scanning in the 4K footage if you choose to use HD sequence settings.
Bike Race Multi-Camera: This is simple multicamera footage. Experiment with live editing on a multicamera project.
Boston Snow: This is a mixture of shots of Boston Common filmed in three resolutions. Use this media to experiment with Scale To Frame Size, Set To Frame Size, and keyframe controls to scale shots. Try using the Warp Stabilizer effect to lock one of the high-resolution clips and then scale up the clip and create a pan from one side to the other.
City Views: This is a series of shots from the air and on land. Use these to experiment with image stabilization, color adjustment, and visual effects.
Desert: Use the diverse colors to try color correction tools and combine the footage with music to produce a montage.
Jolie’s Garden: This consists of atmospheric tableaux shot at 96fps, set to play back at 24fps, filmed for a new feature film social media marketing campaign. Use these clips to experiment with the Lumetri Color panel looks and speed change effects.
Laura in the Snow: This is a spec commercial shot at 96fps, set to play back at 24fps. Use this footage to practice color correction and grading adjustments. Experiment with ramping slow motion and masking both the video and the effects you apply.
Music: Use these music clips to practice creating an audio mix and editing visuals to music.
Music Video Multi-Camera: This is a music video shoot. Practice multicamera editing skills with this media. For more information, see Lesson 18, “Multicamera Editing,” which is integrated into ebook and Web Edition versions of this book. Purchasers of the print edition can download Lesson 18 from peachpit.com along with the lesson files. See “Getting Started” in the opening pages of this book for instructions.
She: This is a series of stylized, mostly slow-motion clips that will be useful for experimenting with speed changes and visual effects.
TAS: This is footage from a short film, The Ancestor Simulation. Use this footage to try color grading and, as the footage is in two aspect ratios, mixing and matching the shots.
Theft Unexpected: This is footage from an award-winning short film directed and edited by the author. Use this footage to experiment with trimming, and practice adjusting timing in simple dialogue to achieve different comic and dramatic results.
Review questions
What’s an easy way to export digital video if you want to create a self-contained file that closely matches the original quality of your sequence preview settings?
What Internet-ready export options are available in Adobe Media Encoder?
What encoding format should you use when exporting to most mobile devices?
Must you wait for Adobe Media Encoder to finish processing its queue before working on a new Premiere Pro project?
Review answers
Use the Match Sequence Settings option in the Export dialog box.
This varies by platform, but both macOS and Windows include H.264.
H.264 is the encoding format used when exporting to most mobile devices.
No. Adobe Media Encoder is a stand-alone application. You can work in other applications or even start a new Premiere Pro project while the render queue is processed.