
10 Editing and Mixing Audio
Lesson overview
In this lesson, you’ll learn about the following:
Working in the Audio workspace
Understanding audio characteristics
Adjusting clip audio volume
Adjusting audio levels in a sequence
Automatically lowering music level
Using the Audio Clip Mixer
This lesson will take about 90 minutes to complete. Please log in to your account on peachpit.com to download the lesson files for this lesson, or go to the “Getting Started” section at the beginning of this book and follow the instructions under “Accessing the lesson files and Web Edition.” Store the files on your computer in a convenient location.
Your Account page is also where you’ll find any updates to the lesson files. Look on the Lesson & Update Files tab to access the most current content.

Until now, our focus has been primarily on working with visuals. No doubt about it, the pictures count, but professional editors generally agree that sound is at least as important as the images on the screen—sometimes more important! In this lesson, you’ll learn some audio-mixing fundamentals using the powerful tools provided by Adobe Premiere Pro CC.
Starting the lesson
It’s rare to have audio recorded on-camera that is perfect for your final output. There are several things you might want to do with sound in Premiere Pro.
Set Premiere Pro to interpret recorded audio channels differently from the way they were recorded in-camera. For example, audio recorded as stereo can be interpreted as separate mono tracks.
Clean up background sound. Whether it’s system hum or the sound of an air-conditioning unit, Premiere Pro has tools for adjusting and tuning your audio.
Adjust the volume of different frequencies in your clips (different tones) using EQ effects.
Adjust the volume level on clips in the bin and on clip segments in your sequence. The adjustments you make to clips in a sequence can vary over time, creating a complete sound mix.
Add music and mix levels between music clips and dialogue clips.
Add audio spot effects, such as explosions, door slams, or atmospheric environmental sound.
Consider the difference it makes if you turn the sound off when watching a horror movie. Without an ominous soundtrack, scenes that were scary a moment ago can seem like comedy.
Music works around many of our critical faculties and directly influences our emotions. In fact, your body reacts to sound whether you want it to or not. For example, it’s normal for your heart rate to be influenced by the beat of the music you’re listening to. Fast music tends to raise your heart rate, and slow music tends to lower your heart rate. Powerful stuff!
In this lesson, you’ll begin by learning how to use the audio tools in Premiere Pro and then make adjustments to clips and a sequence. You’ll also use the Audio Clip Mixer to make changes to your volume “on the fly” while your sequence plays.
Setting up the interface to work with audio
Let’s begin by switching to the Audio workspace.
Open Lesson 10.prproj.
Save the project as Lesson 10 Working.prproj.
In the Workspaces panel, click Audio. Then double-click the Audio workspace name and click Yes in the Confirm Workspace Reset dialog box. This is a convenient shortcut to reset the workspace to the saved layout.

Working in the Audio workspace
You’ll recognize most of the components of the Audio workspace from the video-editing workspaces you’ve used. One obvious difference is that the Audio Clip Mixer is displayed in place of the Source Monitor. The Source Monitor is still there; it’s just hidden right now, grouped with the Audio Clip Mixer.
You can modify the appearance of timeline track headers to include an audio meter for each track, along with track-based level and pan controls. This is useful when mixing audio as it helps you locate the sources of audio levels you might want to adjust.
Try it now:
In the Project panel (on the left side of the Premiere Pro interface), open the Theft Unexpected sequence in the Master Sequences bin.
Open the Timeline Display Settings menu
 and choose Customize Audio Header.
The Audio Header Button Editor appears.
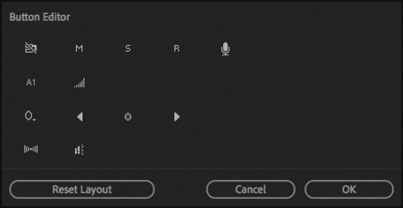
Drag the Track Meter button
 onto a Timeline audio header and click OK.
When you click OK, the audio track headers return to their previous size. You may need to resize an audio header vertically and horizontally to see the new meter.
Now every audio track will have a small built-in audio meter.

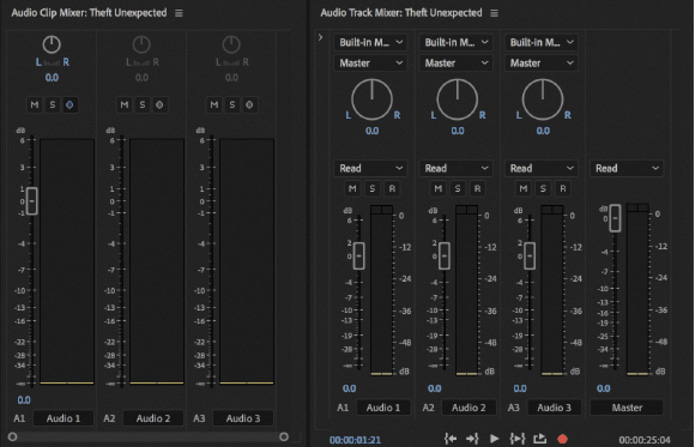
There are two audio mixer panels in Premiere Pro. Let’s look at the differences between the two.
Audio Clip Mixer: This provides controls to adjust the audio level and pan of sequence clips. As you play your sequence, you can make adjustments, and Premiere Pro will add keyframes to clips as the playhead moves over them.
Audio Track Mixer: This adjusts audio level and pan on tracks rather than clips. The controls are similar, but the Audio Track Mixer offers more advanced mixing options.
Clip adjustments and track adjustments are combined for final output. So if you reduce a clip’s audio level by −3 dB and reduce the track audio level by −3 dB, you’ll have a total drop of −6 dB.
You can apply clip-based audio effects and modify their settings in the Effect Controls panel, but track-based audio adjustments can be modified only in the Audio Track Mixer or directly on the timeline.
Clip-based audio adjustments and effects are applied before track-based adjustments and effects. The order in which adjustments are applied can have a big impact on results, especially when working with effects.
Defining master track output
Sequences have settings that closely match the way a media file would be defined. These settings include a frame rate, frame size, and pixel aspect ratio, for example.
The audio mastering setting defines the number of audio channels the sequence outputs. This is a little like configuring the audio channels for a media file. In fact, if you export the sequence using the option to match sequence settings, the sequence audio mastering configuration will be the audio format for the new file.
When you create a new sequence, the audio mastering setting is in the Tracks tab of the New Sequence dialog box, under Audio.

Stereo has two audio channels: Left and Right. This is the most common option for delivered content.
5.1 has six audio channels: Middle, Front-Left, Front-Right, Rear-Left, Rear-Right, and Low Frequency Effects (LFE)—that’s the sound that gets played through the subwoofer.
Multichannel has between 1 and 32 audio channels you can choose (this option is commonly used for more advanced multichannel broadcast television workflows).
Mono has one audio channel, which is useful for web video if you want to minimize file size.
You can change most sequence settings later, but not the audio master setting. This means that, with the exception of multichannel sequences, you cannot change the number of channels that your sequence will output.
You can add or remove audio tracks at any time, but the audio master setting is fixed. If you need to change your audio master setting, you can easily copy and paste clips from a sequence with one setting to a new sequence with a different setting.

Using the audio meters
The primary function of the audio meters is to give you the overall mix output volume for your sequence. As your sequence plays, you’ll see the level meter dynamically change to reflect the volume.
To view the audio meters, you can do either of the following:
If the audio meters are not already displayed, choose Window > Audio Meters.
In the default Audio workspace, the audio meters are displayed, but they are relatively narrow. You may want to make the panel wider when working with them.
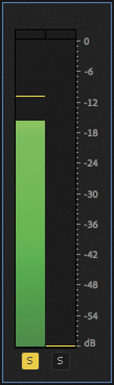
There is a Solo button at the bottom of each audio meter, which allows you to exclusively hear the selected channel (or multiple channels). If the Solo buttons are displayed as small circles, drag the edge of the panel a little to make the meters wider. Larger Solo buttons will be displayed.

![]() Note
Note
The Solo buttons are not displayed when using the more advanced multichannel audio mastering option.
If you right-click the audio meters, you can choose a different display scale. The default is a range from 0 dB to −60 dB, which clearly shows the main information about the audio level you’ll want to see.
You can also choose between static and dynamic peaks. When you get a loud “spike” in audio levels that makes you glance at the meters, the sound is usually gone by the time you look. With static peaks, the highest peak is marked and maintained in the meters so you can see what the loudest level was during playback.
You can click the audio meters to reset the peak. With dynamic peaks, the peak level will continually update; keep watching to check the levels.
Viewing samples
Let’s look at an individual audio sample.
In the Project panel, open the Music bin, and double-click the clip Cooking Montage.mp3 to open it in the Source Monitor. This is music created by composer Patrick Cannell.
Because this clip has no video, Premiere Pro displays the waveforms for the two audio channels.

At the bottom of the Source Monitor and Program Monitor, the time ruler represents the total duration of the clip.
Open the Source Monitor Settings menu and choose Time Ruler Numbers. The time ruler now shows timecode indicators on the time ruler.

Try zooming in to the time ruler using the navigator just below the time ruler (drag the handles all the way together). The maximum zoom shows you an individual frame.

Open the Source Monitor Settings menu again and choose Show Audio Time Units.
This time, you’ll see individual audio samples counted on the time ruler. Try zooming in a little more. Now you can zoom in to an individual audio sample—in this case, one 48,000th of a second, the sample rate of this audio!
 Note
NoteThe audio sample rate is the number of times per second the recorded sound source is sampled. It’s common for professional camera audio to take a sample 48,000 times per second.

The Timeline panel has the same option to view audio samples in the panel menu (rather than the Timeline Settings menu).
For now, use the Source Monitor Settings menu to disable Time Ruler Numbers and Show Audio Time Units.
Showing audio waveforms
When you use the waveform display option in the Source Monitor or Program Monitor, you’ll see an extra navigator zoom control for each channel, to the right of the waveform. These controls work in a way that’s similar to the navigator zoom control at the bottom of the panel. You can resize the vertical navigator to view the waveforms larger or smaller, which is particularly useful when navigating quiet audio.
![]() Note
Note
Viewing an audio waveform is great if you are trying to locate specific dialogue and you are not so concerned about the visuals.

You can choose to display audio waveforms for any clip that has audio by choosing Audio Waveform in the Source Monitor Settings menu.
If a clip has video as well as audio, the video will be displayed in the Source Monitor by default. You can switch to viewing the audio waveform by clicking the Drag Audio Only button ![]() .
.
Let’s look at some waveforms.
Open the clip HS John from the Theft Unexpected bin.
Open the Source Monitor Settings menu and choose Audio Waveform.
You can easily see where the dialogue begins and ends. Notice the clip’s In and Out marks are shown as a highlighted region on the waveform.
Notice also, you can click the waveform to move the Source Monitor playhead.

Switch back to viewing the composite video using the Source Monitor Settings menu.
You can also turn off and on the display of waveforms for clip segments on the Timeline.
The sequence Theft Unexpected should already be open in the Timeline panel. If not, open it from the Master Sequences bin.
Open the Timeline Display Settings menu, and make sure the Show Audio Waveform option is enabled.
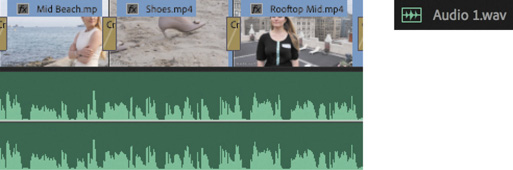
Resize the Audio 1 track to make sure the waveform is fully visible. Notice that two audio channels are displayed on the audio clips in this sequence: The clips have stereo audio.
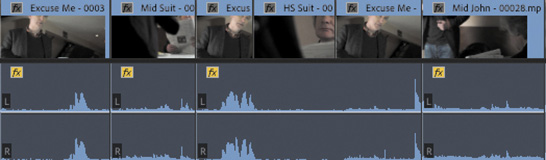
The audio waveform on these clips looks a little different from the waveform in the Source Monitor. That’s because it’s a Rectified audio waveform, which makes it easier to see lower-volume audio, like the dialogue in this scene. You can switch between Rectified and regular audio waveforms.
Open the Timeline panel menu
 (not the Settings menu), and choose Rectified Audio Waveforms to deselect it.
The regular waveform display works well for louder audio, but notice the quieter parts of the speech; it’s much harder to follow the level changes.
Open the Timeline panel menu and restore the Rectified Audio Waveforms option.
Working with standard audio tracks
In a sequence, the standard audio track type can accommodate both mono audio clips and stereo audio clips. The controls in the Effect Controls panel, the Audio Clip Mixer, and the Audio Track Mixer work with both kinds of media.
If you’re working with a combination of mono and stereo clips, you’ll find it more convenient to use the standard track type than the traditional separate mono or stereo tracks.

This standard audio track has a mix of stereo and mono clips.
Monitoring audio
You can choose which sequence audio channels you hear when monitoring.
Let’s try this with a sequence.
Open the Desert Montage sequence.
Play the sequence, and while you do, try clicking each of the Solo buttons at the bottom of the audio meters.
Each Solo button allows you to hear only the channel you select. You can solo multiple channels to hear a specific combination—though in this example it wouldn’t help much, as you have only two channels to choose between. When working with multichannel sequences, you’ll solo output channels more often.
Soloing is particularly useful if you’re working with audio where the sound from different microphones is recorded onto different tracks. This is common with professionally recorded location sound.
The number of channels and associated Solo buttons you’ll see depends on your current sequence audio master setting.
You can also use the track header Mute button ![]() or Solo button
or Solo button ![]() for individual audio tracks in the Timeline panel. This gives you precise control over what’s included or excluded in your mix.
for individual audio tracks in the Timeline panel. This gives you precise control over what’s included or excluded in your mix.
Examining audio characteristics
When you open a clip in the Source Monitor and view the waveform, you’re seeing each channel displayed. The taller the waveform is, the louder the audio for that channel will be.
Three factors affect the way audio sounds to your ears. Consider them in terms of a television speaker.
Frequency: This refers to how fast the surface of the speaker moves. The number of times the surface of the speaker beats the air per second is measured as Hertz (Hz). Human hearing ranges from approximately 20 Hz to 20,000 Hz. Many factors, including age, affect the frequency range you can hear. The higher the frequency, the higher the perceived tone.
Amplitude: This is how far the speaker moves. The bigger the movement, the louder the sound will be because it produces a higher air pressure wave, which carries more energy to your ears.
Phase: This is the precise timing with which the surface of the speaker moves out and in. If two speakers push out air and pull in air in sync, they are considered “in phase.” If they move out of sync, they become “out of phase,” and this can produce problems with sound reproduction. One speaker can reduce the air pressure at exactly the moment the other speaker is attempting to increase it. The result is that you may not hear parts of the sound.
The movement of the surface of a speaker as it emits sound provides a simple example of the way sound is generated, but, of course, the same rules apply to all sound sources.
Recording a voice-over track
If you have a microphone set up, you can record audio directly to the into a sequence using the Audio Track Mixer or a special Voice-over Record button on each audio track header. To record audio in this way, check that your Audio Hardware preferences are set up to allow input. You can check your audio hardware input and output settings by choosing Premiere Pro CC > Preferences > Audio Hardware (macOS) or Edit > Preferences > Audio Hardware (Windows).
Try the Voice-over Record button by following these steps:
Open the Voice Over sequence in the Master Sequences bin. This is a simple sequence with visuals only; you’ll add the voice-over.
Take a look at the header for the A1 track. You should already be able to see the Voice-over Record button
 .
.Mute your speakers or wear headphones while recording voice-over to avoid getting microphone feedback.
Position the playhead at the beginning of the sequence and click the Voice-over Record button. The Program Monitor gives a short countdown, and you can begin. Describe the shots that come up to create an accompanying voice-over.
As you record, the Program Monitor shows that you are recording, and the audio meter shows the input level.

When you’re finished recording, press the spacebar or click the Voice-over Record button to stop.
The new audio appears in the Timeline panel, and an associated clip appears in the Project panel.
In the following example, audio was recorded onto a stereo track, and so two audio channels were recorded. If this were a mono track, only one channel would be recorded.

Premiere Pro will create a new audio file in the location specified in the Scratch Disks settings (in the project settings). By default, this is the same location as your project file.
You can use this technique to record professional-quality audio using a studio microphone and sound booth. Or you can use it with the built-in microphone on a laptop to record guide-track voice-over while on your way back from a shoot. That voice-over can form the basis for an outline edit, saving significant time later.
Adjusting audio volume
There are several ways to adjust the volume of clips with Premiere Pro, and they are all nondestructive. Changes you make don’t affect your original media files, so you can experiment freely.
Adjusting audio in the Effect Controls panel
Earlier, you used the Effect Controls panel to make adjustments to the scale and position of clips in a sequence. You can also use the Effect Controls panel to adjust volume.
Open the Excuse Me sequence from the Master Sequences bin.
This is a simple sequence with two clips in it. In fact, it’s the same clip added to the sequence twice. One version has been interpreted as stereo, and the other has been interpreted as mono channels. For more on clip interpretation, see Lesson 4, “Organizing Media.”
Click the first clip to select it, and open the Effect Controls panel.
In the Effect Controls panel, expand the Volume, Channel Volume, and Panner controls.

Each control gives the right options for the type of audio you have selected.
Volume adjusts the combined volume of all the audio channels in the selected clip.
Channel Volume allows you to adjust the audio level for individual channels in the selected clip.
Panner gives you overall stereo left/right output balance control for the selected clip.
Notice that the keyframe toggle stopwatch icon is automatically enabled (in blue) for all the controls, so every change you make adds a keyframe.
If you add just one keyframe to a setting and use it to apply an adjustment, the adjustment will apply to the whole clip.
Position the Timeline playhead somewhere over the first clip where you would like to add a keyframe (it doesn’t make too much difference where you choose if you intend to make only one adjustment).
Click the Timeline Display Settings menu, and make sure Show Audio Keyframes is selected.
Increase the height of the Audio 1 track so you can see the waveform and special thin white line for adding keyframes, often referred to as a rubber band.

In the Effect Controls panel, drag left on the blue number that sets the volume level.
Premiere Pro adds a keyframe, and the rubber band has moved down, indicating the reduced volume. The difference is subtle, but as you become more familiar with the Premiere Pro interface, it’ll stand out more and more clearly.
NoteThe rubber band uses the entire height of the audio clip to adjust the volume.

Now select the second version of the Excuse Me clip in the sequence.
You’ll notice you have similar controls available in the Effect Controls panel, but now there is no Channel Volume option. This is because each channel is its own clip segment, so the Volume control for each channel is already an individual one.
The Balance control has now become a Pan control. This has a similar purpose but is suited to multiple-mono channel audio.
Experiment with adjusting the volume for these two independent clips.

Adjusting audio gain
Most music is created with the loudest possible signal to maximize the difference between the signal and the background noise. This is too loud to use in most video sequences. To address this issue, you can adjust the clip’s audio gain.
This method works in a similar way to the adjustment you made in the last exercise but is applied to the clip in the Project panel, so any parts of the clip you use in a sequence will already include the adjustment. You can also apply audio gain adjustments to multiple clips in a single step, both in the Project panel and in the Timeline panel.
Open the clip Cooking Montage.mp3 from the Music bin. You may need to adjust the zoom level on the Source Monitor to see the waveform.

Right-click the clip in the bin and choose Audio Gain.
There are two options in the Audio Gain dialog box that you should learn about now.
Set Gain To: Use this option to specify a particular adjustment for your clip.
Adjust Gain By: Use this option to specify an incremental adjustment for your clip.
 Note
NoteNone of the changes you make to the volume of your clips will change the original media files. You can make a change to the overall gain here, in the bin, or in the Timeline panel, in addition to any changes you make using the Effect Controls panel, and your original media files will remain unmodified.
For example, if you apply −3 dB, this will adjust the Set Gain To amount to −3 dB. If you go into this menu a second time and apply another −3 dB adjustment, the Set Gain To amount will change to −6 dB, and so on.
Select Set Gain To, set the gain to −12 dB, and click OK.
Right away, you’ll see the waveform change in the Source Monitor.

Changes like this, where you are adjusting the audio gain in the bin, will not update clips already edited into a sequence. However, you can right-click one or more clips in a sequence, choose Audio Gain, and make the same kind of adjustment there.
Normalizing audio
Normalizing audio is similar to adjusting gain. In fact, normalization results in an adjustment to the clip gain. The difference is that normalization is based on automated analysis rather than on your subjective judgment.
When you normalize a clip, Premiere Pro analyzes the audio to identify the single highest peak—in other words, the loudest part of the audio. The gain for the clip is then adjusted automatically so that the highest peak matches a level you specify.
You can have Premiere Pro adjust the volume for multiple clips so that they match any perceived volume you like.
Imagine working with multiple clips of a voice-over, recorded over several days. Perhaps because of different recording setups or working with different microphones, several clips might have different volumes. You can select all the clips and, in a single step, have Premiere Pro automatically set their volumes to match. This saves significant time you might have spent manually going through each clip, one by one, to make adjustments.
Try normalizing some clips by following these steps:
Open the Journey to New York sequence.
Play the sequence, and watch the level on the audio meters.
The voice level varies quite a lot, with clip one noticeably quieter than the third and fourth clips.
NoteYou may need to adjust the track size to see the audio waveforms. Do this by dragging the divider on the track header.

Select all the voice-over clips in the sequence on Track A1. To do so, you can lasso them or make an item-by-item selection.

Right-click any of the selected clips and choose Audio Gain, or press the G key.
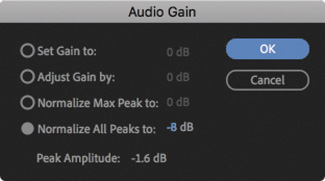
Select Normalize All Peaks To, enter –8 dB, and click OK.
![]() Tip
Tip
You can apply normalization in the bin too. Just select all the clips you want to automatically adjust, go to the Clip menu, and choose Audio Options > Audio Gain, or you can select the clips and press the G key.
Listen again.
Every selected clip is adjusted so that the loudest peaks are at −8 dB.
The music adds to the overall level displayed in the Audio Meters. To see the level for the voice-over clips only, enable the Solo ![]() option for the Audio 1 track. Be sure to disable this option before continuing.
option for the Audio 1 track. Be sure to disable this option before continuing.
Notice the way the waveforms for the clips level out.

If you choose Normalize Max Peak To, rather than Normalize All Peaks To, Premiere Pro will make an adjustment based on the loudest moment of all the clips combined, as if they were one clip. That same amount of adjustment will be applied to every clip, maintaining the relative levels of all the clips.
Auto-duck music
One of the most common tasks when working on an audio mix is reducing music level during sections of speech. If there’s a voice-over track, for example, you may want the music to get quieter just when information is being shared and then become the dominant element in the mix again. This is commonly the way radio DJs will speak over music, with the music automatically getting quieter when the DJ speaks. The technique is called ducking.
You can manually add audio keyframes to apply ducking (and you’ll explore this technique later), but there’s an automated way to do it too, with the Essential Sound panel.
You’ll learn about the Essential Sound panel in more detail in Lesson 11, “Sweetening Sound.” Still, this is a quick and easy workflow that saves time when creating your mix, and it’s worth learning right away.
Continue working in the Journey to New York sequence. Make sure all the voice-over clips on the Audio 1 track are selected.
In the Essential Sound panel, click the Dialogue button to assign the dialogue audio type to the selected clips. Assigning the dialogue audio type gives access to tools and controls that are relevant to dialogue.

Resize the Audio 2 track so you can see the music clip’s audio waveform clearly. Select the clip, and in the Essential Sound panel select the Music audio type.
In the Essential Sound panel, select the box to enable Ducking, and take a look at the options.

Duck Against: There are multiple types of audio. You can select whether one, several, or all types of audio will trigger automatically ducking.
Sensitivity: The higher the sensitivity, the lower the trigger audio will need to be to cause ducking.
Reduce By: The amount the music level will be reduced in dB.
Fades: The slower the fade setting, the longer it will take for the music to get quieter and then louder again.
Generate Keyframes: Click this button to apply the settings and add keyframes to the music clip.
Applying the right settings for audio ducking is a science and an art, and the type of audio you are working with will influence the choices you make. Experimentation is the key.

For this audio, choose these settings:
Duck Against: Dialogue Clips should already be selected (it’s the default).
Sensitivity: 6.0
Reduce By: -8.0 dB
Fades: 500 ms
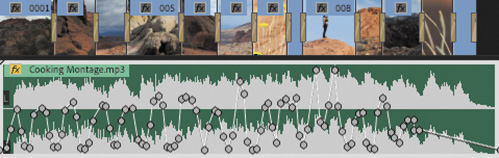
Click Generate Keyframes.
Keyframes are added to the music clip, appearing in the Effect Controls panel and on the clip segment in the sequence.
Play the sequence to listen to the result. It’s not perfect, but it’s closer to a finished mix.
You can adjust the settings and click the Generate Keyframes button repeatedly to remove and replace existing keyframes, making it easy to experiment.
You can also manually adjust the keyframes that have been added. You can remove, move, and add keyframes at any time.
Creating a split edit
A split edit is a simple, classic editing technique that offsets the cut point for audio and video. The audio from one clip is played with the visuals from another, carrying the feeling of one scene into another.
Adding a J-cut
The J-cut gets its name from the shape of the edit. Picture the letter J over an edit. The lower part (the audio cut) is to the left of the upper part (the video cut).
Open the Theft Unexpected sequence.
Play the last cut in the sequence. The join in the audio between the last two clips is rather abrupt. You may need to turn up your speaker volume to hear the join. You’ll improve things by adjusting the timing of the audio cut.

Select the Rolling Edit tool
 , accessible by pressing and holding the Ripple Edit tool icon
  .
.Press and hold Option (macOS) or Alt (Windows)—this temporarily overrides linked selections—and drag the audio segment edit (not the video) a little to the left. Congratulations! You’ve created a J-cut!

 Tip
TipWith the default Premiere Pro preferences, you can use the Selection tool to apply a rolling edit if you hold Command (macOS) or Ctrl (Windows).
TipFor more information on keyboard shortcuts, see “Using and setting keyboard shortcuts” in Lesson 1, “Touring Adobe Premiere Pro CC.”
Play through the edit.
You might want to experiment with the timing to make the cut seem more natural, but for practical purposes the J-cut works. You can smooth it over and improve it further with an audio crossfade later.
Remember to switch back to the Selection tool (V).
Adding an L-cut
An L-cut works in the same way as a J-cut but in reverse. Repeat the steps in the previous exercise, but drag the audio segment edit a little to the right while holding Option (macOS) or Alt (Windows). Play through the edit and see what you think.
Adjusting audio levels for a clip
As well as adjusting clip gain, you can use the rubber band to change the volume of clips in a sequence. You can also change the volume for tracks, and the two volume adjustments will combine to produce an overall output level.
If anything, using rubber bands to adjust volume is more convenient than adjusting gain because you can make incremental adjustments at any time, with immediate visual feedback.
The result of adjusting the rubber bands on a clip is the same as adjusting the volume using the Effect Controls panel. In fact, one control automatically updates the other.
Adjusting overall clip levels
Try this now.
Open the Desert Montage sequence in the Master Sequences bin.
The music already fades up and down at the beginning and end. Let’s adjust the volume between those fades.
Use the Selection tool to drag the bottom of the A1 track header down, or hover the pointer over the track header and scroll to make the track taller. This will make it easier to apply fine adjustments to the volume.

The music already fades up and down, and keyframes have been added to slow down those fades. The middle part of the music is a little too loud. Drag the middle part of the rubber band on the clip down a little.

As you drag, a tooltip appears, displaying the amount of adjustment you are making.
Each time you make an adjustment of this kind, the only way to review the result is to play the audio. Try this now, and if you are not happy with the result, you can adjust the level and review the result again.
Because you’re dragging a segment of the rubber band rather than a keyframe, you’re adjusting the overall level for the clip between the two existing keyframes. If the clip did not have existing keyframes, you’d be adjusting the overall level for the entire length of the clip.
Keyframing volume changes
You can use the Selection tool to adjust audio keyframes added to sequence clips in the same way that you might adjust visual keyframes. If you drag a keyframe up, the audio will get louder; drag a keyframe down to make the audio quieter.
![]() Tip
Tip
If you adjust the clip audio gain, Premiere Pro combines the effect with the keyframe adjustments dynamically. You can change either at any time.
The Pen tool ![]() adds keyframes to rubber bands. You can also use it to adjust existing keyframes or to lasso lots of keyframes to adjust them together.
adds keyframes to rubber bands. You can also use it to adjust existing keyframes or to lasso lots of keyframes to adjust them together.
You don’t need to use the Pen tool, though. If you want to add a keyframe where there is none, you can hold Command (macOS) or Ctrl (Windows) when you click the rubber band.
The result of adding and adjusting the position of keyframes up or down on audio clip segments is that the rubber band is reshaped. Just as before, the higher the rubber band, the louder the sound.
Add a few keyframes now, with dramatic level adjustments to the music, and listen to the results. Go crazy with the keyframes so the adjustments are clear, and then play the sequence to hear the results.

Smoothing volume between keyframes
The adjustments you made in the previous exercise are probably pretty overwhelming. You might want to smooth the adjustments over time.
To do so, right-click any of your keyframes. You’ll see a range of standard options, including Ease In, Ease Out, and Delete. If you use the Pen tool, you can lasso multiple keyframes and then right-click any one of them to apply a change to them all.
The best way to learn about the different kinds of keyframes is to select each kind, make some adjustments, and see or listen to the results.
![]() Note
Note
Adjustments you make to your clips are applied before adjustments you make to your tracks.
Using clip vs. track keyframes
Until now, you’ve made all your keyframe adjustments to sequence clip segments. When working with the Audio Clip Mixer, as you will in a moment, all adjustments are made directly to clips in the current sequence.
Premiere Pro has similar controls for the audio tracks those clips are placed onto. Track-based keyframes work in the same way as the clip-based ones. The difference is that they don’t move with the clips.
This means you can set up keyframes for your audio level using track controls and then try different music clips. Each time you put new music into your sequence, you’ll hear it via the adjustments you have made to your track.
As you develop your editing skills with Premiere Pro and create more complex audio mixes, explore the flexibility offered by combining clip and track keyframe adjustments.
Working with the Audio Clip Mixer
The Audio Clip Mixer provides intuitive controls to adjust clip volume and pan keyframes over time.
Each sequence audio track is represented by a set of controls. You can mute or solo a track, and you can enable an option to write keyframes to clips during playback by dragging a fader or adjusting a pan control.
What’s a fader? Faders are industry-standard controls based on real-world audio-mixing decks. You move the fader up to increase the volume and move it down to decrease the volume. You can also use the volume faders to add keyframes to clip audio rubber bands while you play a sequence.
Try this now.

Continue working with the Desert Montage sequence. Make sure the Audio 1 track is set to show audio keyframes, using the Timeline Display Settings menu.
Open the Audio Clip Mixer (not the Audio Track Mixer), and play the sequence from the beginning.
Because you already added keyframes to this clip, the Audio Clip Mixer fader moves up and down during playback.
Position the Timeline playhead at the beginning of the sequence again. In the Audio Clip Mixer, enable the Write Keyframes button
 in the fader for Audio 1.
Keyframes appear when you stop playback. Play the sequence, and while it plays, make some dramatic adjustments to the Audio 1 fader.

This example is a little over the top (it would be very unusual to make such wild adjustments to audio level), but it illustrates the challenge of having too many keyframes.
NoteYou won’t see new keyframes until you stop playback.
If you repeat the process, you’ll notice that the fader follows existing keyframes until you make a manual adjustment.
When you use the fader control to add keyframes, a lot of keyframes are added. By default, a keyframe is added with every adjustment. You can set a minimum time gap for keyframes.
Choose Premiere Pro CC > Preferences > Audio (macOS) or Edit > Preferences > Audio (Windows). Select Minimum Time Interval Thinning and set a minimum time of 500 milliseconds (half a second is relatively slow, but it provides a balance between precise adjustment and keyframe overload). Click OK.
Set the playhead to the beginning of the sequence, and use the Audio Clip Mixer to add level keyframes using the fader control.
The result is a much more orderly adjustment. Even with dramatic adjustments, the smaller number of keyframes is much more manageable.
You can adjust keyframes you have created this way just as you would adjust keyframes that were created using the Selection tool or the Pen tool.
![]() Tip
Tip
You can adjust pan in the same way as you would adjust volume using the Audio Clip Mixer. Simply enable keyframing, play your sequence, and make adjustments using the Audio Clip Mixer’s Pan control.
You have now discovered several ways to add and adjust keyframes in Premiere Pro. There’s no right or wrong way to work with keyframes; it’s entirely a matter of personal preference or the needs of a particular project.
Review questions
How can you isolate an individual sequence audio channel to hear only that channel?
What is the difference between mono and stereo audio?
How can you view the waveforms for any clip that has audio in the Source Monitor?
What is the difference between normalization and gain?
What is the difference between a J-cut and an L-cut?
Which option in the Audio Clip Mixer must be enabled before you can use the fader controls to add keyframes to sequence clips during playback?
Review answers
Use the Solo buttons at the bottom of the audio meters to selectively hear an audio channel.
Stereo audio has two audio channels, and mono audio has one. It’s the universal standard to record audio from a Left microphone as Channel 1 and audio from a Right microphone as Channel 2 when recording stereo sound.
Use the Settings menu on the Source Monitor to choose Audio Waveform. You can also click the Drag Audio Only button at the bottom of the Source Monitor. Clips in a sequence can display waveforms in the Timeline panel.
Normalization automatically adjusts the Gain setting for a clip based on the original peak amplitude. You use the Gain setting to make manual adjustments.
The sound for the next clip begins before the visuals when using a J-cut (sometimes described as “audio leads video”). With L-cuts, the sound from the previous clip remains until after the visuals begin (sometimes described as “video leads audio”).
Enable the Write Keyframes option for each track you would like to add keyframes to.