
7 Adding Transitions
Lesson overview
In this lesson, you’ll learn about the following:
Understanding transitions
Understanding edit points and handles
Adding video transitions
Modifying transitions
Fine-tuning transitions
Applying transitions to multiple clips at once
Using audio transitions
This lesson will take about 75 minutes to complete. Please log in to your account on peachpit.com to download the lesson files for this lesson, or go to the “Getting Started” section at the beginning of this book and follow the instructions under “Accessing the lesson files and Web Edition.” Store the files on your computer in a convenient location.
Your Account page is also where you’ll find any updates to the lesson files. Look on the Lesson & Update Files tab to access the most current content.
Transitions can help create a seamless flow between two video or audio clips. Video transitions are often used to signify a change in time or location. Audio transitions provide a useful way to avoid abrupt edits that jar the listener. While the most common transition is a cut—where one clip abruptly ends and another begins—there are great opportunities for creativity using transition effects you can animate.
Starting the lesson
In this lesson, you’ll learn to use transitions between video and audio clips. Video editors often use transitions to help an edit flow more smoothly. You’ll learn best practices for choosing transitions selectively.
For this lesson, you’ll use a new project file.
Start Adobe Premiere Pro CC, and open the project Lesson 07.prproj in the Lessons/Lesson 07 folder.
Save the project as Lesson 07 Working.prproj in the same folder.
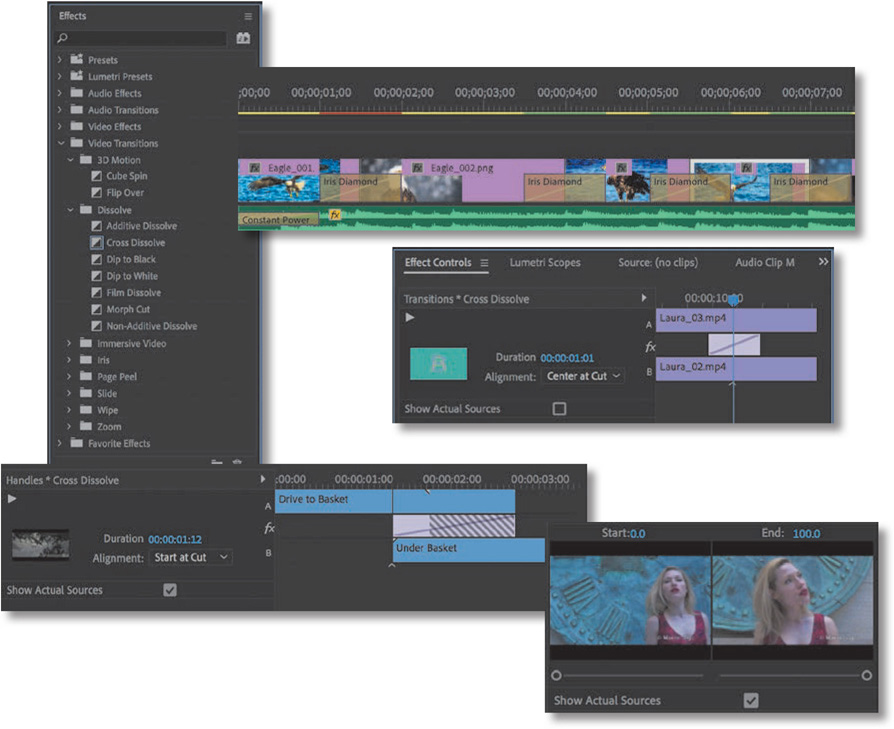
Choose Effects in the Workspaces panel, or choose Window > Workspaces > Effects. Reset the workspace to the saved layout.
This changes the workspace to the preset that was created to make it easier to work with transitions and effects.
This workspace uses stacked panels to maximize the number of panels that can be on-screen at a time.
![]() Note
Note
If you have been using Premiere Pro for a while, there’s a small chance your settings will prevent the Workspaces panel from being displayed. You can always restore it by choosing the correct workspace from the Window menu and then going back to the Window menu and choosing Workspaces > Reset To Saved Layout.

You can enable stacked panels for any panel group by opening the panel menu ![]() and choosing Panel Group Settings > Stacked Panel Group. The same option will toggle off stacked panels.
and choosing Panel Group Settings > Stacked Panel Group. The same option will toggle off stacked panels.
You can click the name of any panel in a stack to view its contents. Start with the Effects panel.
As you click effect category disclosure triangles to display their contents, the panel will automatically change height to accommodate the list.
What are transitions?
Adobe Premiere Pro offers several special effects and preset animations to help you bridge neighboring clips in the sequence. These transitions—such as dissolves, page wipes, dips to color, and so on—provide a way to ease viewers from one scene to the next. A transition can also be used to grab viewers’ attention to signify a major jump in the story.
Adding transitions to your project is an art. Applying them is simple enough; drag the transition you want onto the cut between two clips. The skill comes in their placement, length, and settings, such as direction, motion, and start/end positions.
You can adjust some transition settings in the Timeline panel, but it’s usually easier to make precise adjustments in the Effect Controls panel. To view the settings for a transition in the Effect Controls panel, select a transition effect in a sequence.
In addition to the unique options for each transition, the Effect Controls panel features an A/B timeline display. This makes it easy to change the timing of transitions relative to the edit point, change the transition duration, and apply transitions to clips that don’t have enough head or tail frames—that is, additional content to provide an overlap at the beginning/head or end/tail of a clip.
You can also apply a transition effect to all the edit points in a group of selected clips.
Knowing when to use transitions
The rules for transitions are similar to the rules of screenwriting. They’re effective when they help the viewer understand the story or a character. For example, you may switch from indoors to outdoors in a video, or you may jump forward in time by several hours in the same location. An animated transition, a fade to black, or a dissolve helps the viewer understand that time has passed or that the location has changed.
Transitions are a standard storytelling tool in video editing. A fade to black at the end of a scene is a clear indication that the scene has finished. The trick with transitions is to be intentional—and this often means using restraint—unless, of course, a total lack of restraint is the result you want to achieve.
Only you can know what is right for your creative work. As long as it looks like you meant to include a particular effect, your audience will tend to trust your decision (whether or not they agree with your creative choices). It takes practice and experience to develop sensitivity for the right time, and the wrong time, to use effects such as transitions. If in doubt, less is usually better.
Following best practices with transitions
New editors sometimes overuse transitions, perhaps because it’s an easy way to add visual interest. You may be tempted to use a transition on every cut. Don’t! Or at least, get them out of your system with your first project.
Most TV shows and feature films use cuts-only edits. You’ll rarely see any transition special effects. Why? An effect should be used only if it gives a particular additional benefit; transition effects can sometimes be a distraction from the story, reminding viewers they are watching a story and not experiencing it.
If a news editor uses a transition effect, it’s for a purpose. The most frequent use in newsroom editing is to take what would have been a jarring or abrupt edit and make it more acceptable.
A jump cut is a good example of a scenario where a transition effect can help. A jump cut is a cut between two similar shots. Rather than looking like a continuation of the story, they look a little like a piece of the video was missing unintentionally. By adding a transition effect between the two shots, you can make a jump cut look intentional and less distracting.
Dramatic transition effects do have their place in storytelling. Consider the Star Wars movies with their highly stylized transition effects, such as obvious, slow wipes. Each of those transitions has a purpose. In this case, it’s to create a look reminiscent of old serialized movies and TV shows. The transition effects send a clear message: “Pay attention now. We’re transitioning across space and time.”
Using edit points and handles
To understand transition effects, you’ll need to understand edit points and handles. An edit point is the point in your sequence where one clip ends and the next begins. This is often called a cut. These are easy to see because Premiere Pro displays vertical lines to show where one clip ends and another begins (much like two bricks next to each other).

When you edit part of a clip into a sequence, the unused sections at the beginning and end are still available but hidden. Those unused sections are referred to as clip handles, or simply handles.
When you first edited a clip into a sequence, you set In and Out marks (also known as In and Out points) to select the part you wanted. There’s a handle between the clip’s original beginning and the In mark you chose. There’s also a handle between the clip’s original end and the Out mark you chose.

Of course, you may not have used In or Out marks, or you may have set just one or other mark at the beginning or end of the clip. In this case, you would have either no unused media or unused media at only one end of the clip.
In the sequence, if you see a little triangle in the upper-right or upper-left corner of a clip, it means you’ve reached the end of the original clip and there are no additional frames available.

In this example, the first clip has no handles (triangles at both ends). The second clip has a handle available at the start (on the left) but no handle at the end (on the right).
For transitions to work, you need handles because they provide the overlap needed when creating a transition effect.
These unused sections of clips are not visible unless you apply a transition effect. The transition effect automatically creates an overlap between the outgoing clip and the incoming clip. For example, if you wanted to add a two-second Cross Dissolve transition centered between two video clips, you’d need at least a one-second handle on both clips (one additional second each that would not normally be visible in the sequence).

The transition effect icon gives a visual indication of the duration of the effect and the clip overlap.

Adding video transitions
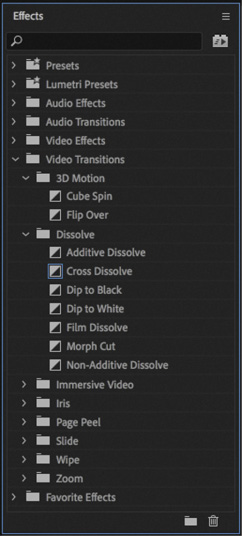
Premiere Pro gives you multiple video transition effects to choose from. Most options are available in the Video Transitions group in the Effects panel.
The transitions are organized into eight effect subcategories. You’ll find some additional transitions in the Video Effects > Transition group in the Effects panel. These effects are meant to be applied to an entire clip and can be used to reveal the visual contents of the clip between its start and end frames (not using clip handles). This second category works well for superimposing text or graphics.
![]() Note
Note
If you’d like more transitions, check the Adobe website. Visit https://helpx.adobe.com/premiere-pro/compatibility.html and click the Plug-ins link. There, you’ll find several third-party effects to explore.
Applying a single-sided transition
The easiest transition to understand is one that applies to just one end of a single clip. This could be a fade from black on the first clip in a sequence or a dissolve into an animated graphic that leaves the screen on its own.
![]() Note
Note
You can use the Search field, at the top of the Effects panel, to locate an effect by name or keyword, or you can browse the folders of effects.
Let’s give it a try.
If necessary, open the sequence Transitions.
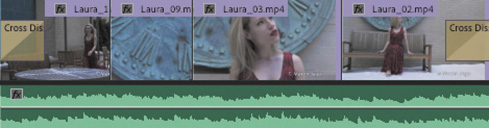
This sequence has four video clips and background music. The clips have handles long enough for transition effects to be applied between them.
In the Effects panel, open the Video Transitions > Dissolve group. Find the Cross Dissolve effect.
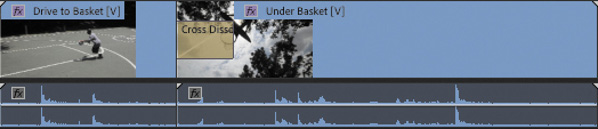
Drag the effect onto the start of the first video clip. A highlight shows you where the transition effect will be added. When the transition is in the right position, release the mouse button.
Drag the Cross Dissolve effect onto the end of the last video clip.
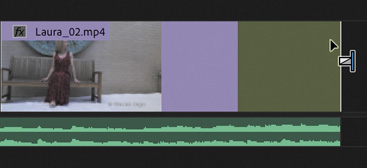
The Cross Dissolve icon shows the timing for the effect. For example, the effect you just applied to the last clip in the sequence will start before the end of the clip and complete by the time it reaches the clip’s end.
Because you’re applying the Cross Dissolve transition effect at the ends of clips, where there is no connected clip, the picture dissolves into the background of the Timeline (which happens to be black).
Transitions of this kind don’t extend the clip (using the handle) because the transition doesn’t reach past the end of the clip.
Play the sequence to see the result.
You should see a fade from black at the start of the sequence and a fade to black at the end.
When you apply a Cross Dissolve effect in this way, the result looks similar to the Dip to Black effect, which transitions to black. However, in reality you are causing the clip to become gradually transparent in front of a black background. The difference is clearer when you work with multiple layers of clips, with different-colored background layers.
Applying a transition between two clips
Let’s apply transitions between several clips. For the purposes of exploration, you’ll break some artistic rules and try a few different options. As you go through these steps, play the sequence regularly to view the results.
Continue working with the previous sequence, called Transitions.
Move the playhead to the edit point between clip 1 and clip 2 on the Timeline and then press the equal sign (=) key two or three times to zoom in fairly close. If your keyboard does not have the = key, use the navigator at the bottom of the Timeline panel to zoom. You can also create a custom keyboard shortcut for this purpose–see Lesson 1, “Touring Adobe Premiere Pro CC.”
Drag the Dip to White transition from the Dissolve group in the Effects panel onto the edit point between clip 1 and clip 2. The effect will snap to one of three positions. Be sure to line up the effect with the middle of the edit, not the end of the first clip or beginning of the second clip.
 Tip
TipIt’s easy to remember that pressing the = key (if your keyboard has one) zooms in because it normally has a + symbol on the same key.

The Dip to White transition effect gradually builds to a completely white screen, which obscures the cut between the first clip and the next.
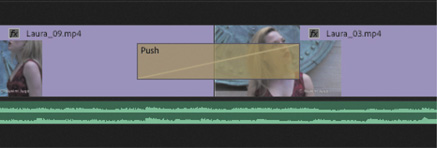
In the Effects panel, click the disclosure triangle for the Slide category to display its contents. Drag the Push transition onto the edit point between clip 2 and clip 3 in the sequence.
Play through the transition to see the result. Then position the playhead on the edit between clip 2 and clip 3 by pressing the Up arrow on your keyboard. The Up and Down arrow keys are shortcuts to move the Timeline playhead to the previous or next edit.
Click the Push transition effect icon in the Timeline panel to select it, and open the Effect Controls panel (remember, if you can’t see a panel, it will always be listed in the Window menu).
Change the direction of the clip from West to East to East to West by clicking the small direction control on the thumbnail, at the top left of the Effect Controls panel.
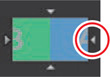
Each small white triangle changes the direction for the Push transition effect. Hover the pointer over a triangle to see a tooltip describing the option.
Play through the transition to see the result.
Drag the Flip Over transition from the 3D Motion group onto the edit point between clip 3 and clip 4.
Review the sequence by playing it from beginning to end.
Having watched this sequence, you can probably see why it’s a good idea to use transitions with restraint!
Let’s try replacing an existing effect.
 Note
NoteWhen you drag a new video or audio transition effect from the Effects panel on top of an existing transition, it replaces the existing effect. It also preserves the alignment and duration of the previous transition. This is an easy way to swap transition effects and experiment.
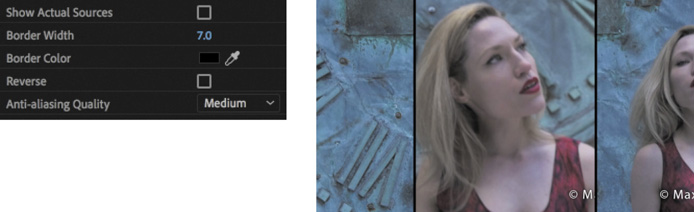
Drag the Split transition from the Slide category onto the existing Push transition effect icon, between clip 2 and clip 3. The new transition effect replaces the old one, taking the duration of the old effect.
Select the Split transition effect icon on the Timeline so its settings will be displayed in the Effect Controls panel. Using that panel, set Border Width to 7 and Anti-aliasing Quality to Medium to create a thin black border at the edge of the wipe.
 Note
NoteYou may need to scroll down in the Effect Controls panel to access further controls.
The anti-aliasing method reduces potential flicker when the line animates during the effect.
Play through the transition to view the result. The best way to do this is probably to click a little farther back in the sequence to watch the video leading up to the transition.
If the video does not play smoothly during the transition, press the Return/Enter key to prerender the effect (more on this later), and try again.
Video transitions have a default duration, which can be set in seconds or frames (it’s frames by default). The duration of the effect will change depending on the sequence frame rate, unless the default duration is set in seconds. The default transition duration can be changed in the Timeline section of the Preferences panel.
Choose Premiere Pro CC > Preferences > Timeline (macOS) or Edit > Preferences > Timeline (Windows).

Depending on your region, you may see a default Video Transition Duration setting of 30 Frames or 25 Frames.
This is a 24-frames-per-second sequence, but this doesn’t matter if you change the Video Transition Default Duration option to 1 second. Do so now, and click OK.
Existing transition effects keep their existing settings when you change the preference, but any future transitions you add will have the new duration.
The duration of an effect can dramatically change its impact, and later in this lesson, you’ll learn about adjusting the timing of transitions.
Applying transitions to multiple clips at once
So far, you’ve been applying transitions to video clips. However, you can also apply transitions to still images, graphics, color mattes, and even audio, as you’ll see in the next section of this lesson.
It’s common for editors to create a photo montage, which might look good with transitions between photos. Applying transitions one at a time to 100 images would take a long time. Premiere Pro makes it easy to automate this process by allowing the default transition effect (that you set) to be added to any group of clips.
In the Project panel, find and open the sequence Slideshow.
This sequence consists of several images placed in a particular order. Notice that a Constant Power audio crossfade has already been applied to the beginning and end of the music clip to create a fade in and out.
Play the sequence by making sure the Timeline panel is active and pressing the spacebar.
There’s a cut between each clip.
Press the backslash () key to zoom out the Timeline so the whole sequence is visible.
Increase the height of the V1 track to see thumbnails on the clips (you can drag the dividing line between V1 and V2 in the track header).
With the Selection tool, draw a marquee around all the clips to select them. You’ll need to begin outside of the clips to make this selection, or you’ll move the first clip you click on instead.

Choose Sequence > Apply Default Transitions To Selection.
This applies the default transition between all the currently selected clips. Notice that the Constant Power audio crossfade at the beginning and end of the music clip is now shorter.

The default video transition effect is a one-second Cross Dissolve, and the default audio transition effect is a one-second Constant Power Crossfade. The shortcut you just used replaced the existing audio crossfades with new, shorter ones.
You can change the default transition by right-clicking a transition effect in the Effects panel and choosing Set Selected As Default Transition.
TipYou’ll find the option to apply audio-only or video-only transition effects in the Sequence menu too.
Play the sequence to see the difference the Cross Dissolve transitions make to the montage.
NoteIf you’re working with clips that have linked video and audio, you can select just the video or audio portions if you Option-drag (macOS) or Alt-drag (Windows) with the Selection tool. Then choose Sequence > Apply Default Transitions To Selection.
You can also copy an existing transition effect to multiple edits using the keyboard. Let’s try it.
Press Command+Z (macOS) or Ctrl+Z (Windows) to undo the last step, and press Esc to deselect the clips.
Choose any transition effect in the Effects panel, and drag it onto the cut between the first two video clips in the Slideshow sequence.
Select the transition you just applied by clicking its effect icon once on the Timeline.
Press Command+C (macOS) or Ctrl+C (Windows) to copy the effect. Then hold Command (macOS) or Ctrl (Windows) while you drag out a marquee with the Selection tool around multiple other edits to select them, rather than clips.

With the edits selected, press Command+V (macOS) or Ctrl+V (Windows) to paste the transition effect onto all the selected edits.
This is a great way to add transition effects with matching settings to multiple edits, especially if you have taken the time to customize an effect.
Sequence display changes
When you add a transition to a sequence, a red or yellow horizontal line may appear above it in the Timeline panel. A yellow line indicates that Premiere Pro expects to be able to play the effect smoothly. A red line means that this section of the sequence may need to be rendered before you can record it to tape or view a preview without dropped frames.
Rendering happens automatically when you export your sequence as a file, but you can choose to render at any time to make these sections preview more smoothly on a slower computer.
The easiest way to render is to use the keyboard shortcut Return (macOS) or Enter (Windows). You can also add In and Out marks to select a part of your sequence and then render. Only the selected section of the sequence will render. This is useful if you have many effects that need to render, but you’re concerned with only one part for now.

Red or yellow lines will turn to green. Premiere Pro creates a video file for each section where the line turns green. The new video files are stored in the Preview Files folder (as set in the Scratch Disk settings). As long as the line is green, playback should be smooth.
Using A/B mode to fine-tune a transition
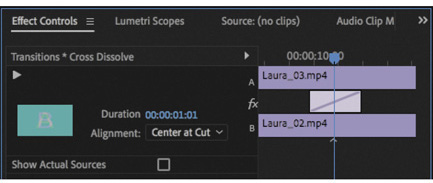
When you review transition effect settings in the Effect Controls panel, you have access to an A/B editing mode that splits a single video track into two. What would normally be displayed as two consecutive and contiguous clips on a single track are now displayed as individual clips on separate tracks, with a transition between them. Separating the elements of the transition in this way allows you to manipulate the head and tail frames (or handles) and to change other transition options.
Changing parameters in the Effect Controls panel
All transitions in Premiere Pro can be customized. Some effects have just a few customizable properties (such as duration or starting point). Other effects offer more options, such as direction, color, border size, and so on. A major benefit of the Effect Controls panel is that you can see the outgoing and incoming clip handles (unused media in the original clip). This makes it easy to adjust the position of an effect.
Let’s modify a transition.
In the Timeline, switch back to the Transitions sequence.
Position the Timeline playhead over the Split transition you added between clips 2 and 3, and click the transition effect icon to select it.
In the Effect Controls panel, select Show Actual Sources to view frames from the actual clips.
This makes it easier to assess the changes you’ll make.
In the Effect Controls panel, open the Alignment menu, and choose Start At Cut.
The transition icon in the Effect Controls panel and the Timeline panel switches to show the new position.
Click the small Play The Transition button at the upper-left corner of the Effect Controls panel to preview the transition.


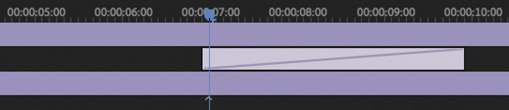
Now change the transition duration. In the Effect Controls panel, click the blue numbers for the effect Duration, type 300, and click away or press the Tab key to apply the new number for an effect that is three seconds in duration (remember, Premiere Pro will add the correct punctuation automatically).
The Alignment menu changes to Custom Start because the effect now reaches beyond the beginning of the next transition effect. To make the new transition duration fit, Premiere Pro sets the start a little earlier.
Examine the right side of the Effect Controls panel, which displays the transition in the context of a timeline.
NoteThe Effect Controls Timeline may not currently be visible. Clicking the Show/Hide Timeline View button in the Effect Controls panel toggles it on and off. You might need to resize the Effect Controls panel to make the tiny Show/Hide Timeline View button visible.
TipThe bottom of the Effect Controls panel timeline includes a zoom navigator that works the same way as the one in the Monitors and Timeline panel.
In this example, the Effect Controls panel playhead is centered on the cut, and you can see the way the effect timing has been adjusted automatically. These adjustments can be subtle, so always double-check the results of new settings.
Play the transition to see the change.
It’s important to play through transitions to be sure you’re happy with the newly revealed media in the handles—this media was hidden from view until you added the transition effect. While it’s useful that Premiere Pro automatically modifies the timing of effects when necessary, it makes it even more important to check the transition before you move on.
Let’s customize the transition.
TipYou may need to move the playhead out of the way—earlier or later—to see the edit point between two clips.
In the Effect Controls panel timeline, hover the pointer over the thin vertical black line that crosses all three layers (both clips and the transition effect between them). The line is the edit point between the two clips.
This edit line is close to the left edge of the effect, so you will probably want to zoom in to the Effect Controls panel timeline to conveniently make adjustments.
The pointer changes to a red Rolling Edit tool.

In the Effect Controls panel, the Rolling Edit tool lets you reposition the edit point by dragging the edit line.
NoteWhen trimming, it’s possible to shorten a transition to a duration of one frame. This can make it hard to grab and position the transition effect icon, so try using the Duration and Alignment controls. If you want to remove a transition, select it in the sequence in the Timeline panel and press Delete (macOS) or Backspace (Windows).
In the Effect Controls panel, drag the Rolling Edit tool left and right. As you do, you’re changing the timing of the cut. The Out mark of the clip on the left of the edit and the In mark of the clip on the right of the edit update in the Timeline panel when you release the mouse button. This is also called trimming.
You’ll explore trimming in more detail in Lesson 8, “Mastering Advanced Editing Techniques.”
Move the pointer to the left or right of the edit line in the Effect Controls panel, and the cursor changes to the Slide tool. The blue line is the Timeline playhead.

The edit line is the small black vertical line on the effect icon in the Effect Controls panel.
TipYou can position the start time of a dissolve asymmetrically by dragging it. This means you don’t have to settle for the Centered, Start At Cut, and End At Cut options. You can drag the position of a transition effect directly on the Timeline too; there’s no need to use the Effect Controls panel.
Using the Slide tool changes the start and end points of the transition without changing its overall duration. Unlike using the Rolling Edit tool, moving the transition rectangle by using the Slide tool does not change the edit point between the two sequence clips. Instead, it changes the timing of the transition effect.
Use the Slide tool to drag the transition rectangle left and right and compare the results.
Using a Morph Cut effect
Morph Cut is a special transition effect that aims to be invisible. It’s designed specifically to help with “talking head” video interviews, where a single speaker looks in the direction of the camera. If your subject pauses a lot or there is inappropriate content in the footage, you may want to remove a section of the interview.
This would normally produce a jump cut (when the image seems to jump suddenly from one piece of content to another), but with the right media and a little experimentation, the Morph Cut effect might yield an invisible transition that seamlessly hides what you have removed. Let’s try it.
Open the sequence Morph Cut. Play the beginning of the sequence.
This sequence has one clip, with a jump cut near the start. It’s a small jump cut but enough to jar the audience.
In the Effects panel, look in the Video Transitions > Dissolve group for the Morph Cut effect. Drag this effect to the join between the two clips.
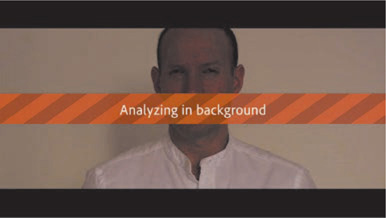
The Morph Cut transition effect begins by analyzing the two clips in the background. You can continue to work on your sequence while this analysis takes place.
Depending on your media, you may achieve improved results with the Morph Cut transition effect by experimenting with different durations.
Double-click the Morph Cut transition effect to display the Set Transition Duration dialog. Change the duration to 18 frames (you can double-click in this way on any transition effect to access the duration setting).
When the analysis is complete, press Return (macOS) or Enter (Windows) to render the effect (if your system requires it) and play a preview.
The result is not perfect, but it’s close, and it’s unlikely an audience will notice the join. It’s worthwhile experimenting with the duration of this effect to achieve the best results.
Dealing with inadequate (or nonexistent) head or tail handles
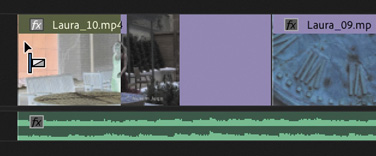
If you try to extend a transition for a clip that doesn’t have enough frames as a handle, the transition still appears but has diagonal warning bars through it. This means Premiere Pro is using a freeze frame to extend the duration of the clip.
You can adjust the duration and position of the transition to resolve the issue.
Open the sequence Handles.
Locate the edit between the two clips.

These two sequence clips have no heads or tails. You can tell this immediately because of the little triangles in the corners of the clips; a triangle indicates the last frame of an original clip.
Select the Ripple Edit tool
 in the Tools panel, and use it to drag the right edge of the first clip to the left (begin dragging just to the left of the cut between the two clips). Drag to shorten the duration of the first clip to about 1:10 and then release. A tooltip appears while you trim to show the new clip duration.
The clip to the right of the edit point ripples to close the gap. Notice that the little triangle at the end (the right edge) of the clip you have trimmed is no longer present.
Drag the Cross Dissolve transition effect from the Effects panel onto the edit point between the two clips.
You can drag the transition onto the right side of the edit but not the left. That’s because there’s no handle available at the beginning of the second clip to create a dissolve overlapping the end of the first clip without using freeze frames.
Press V to select the Selection tool
 , or click to select the tool in the Tools panel. Click the Cross Dissolve transition effect icon once to select it. You may need to zoom in to make it easier to select the transition.
In the Effect Controls panel, set the duration of the effect to 1:12.
There aren’t enough frames of video to create this effect; the diagonal lines on the transition, both in the Effect Controls panel and on the Timeline, indicate still frames that have been automatically added to fill the duration you set. The result is a freeze frame wherever you see the diagonal lines.

Play the transition to see the result.
In the Effect Controls panel, change the alignment of the transition to Center At Cut.

Drag the Timeline playhead slowly through the transition and watch the result.
For the first half of the transition (up to the edit point), the B clip is a freeze frame, while the A clip continues to play.
At the edit point, the A clip and the B clip start to play.
After the edit, a short freeze frame is used.
There are several ways to fix this kind of issue.
You can change the duration or alignment of the transition effect.
You can use the Rolling Edit tool
 , accessible by pressing and holding the Ripple Edit tool in the Tools panel, to change the timing of the transition in the Timeline panel. This won’t necessarily remove all the freeze frames, but it may improve the overall result. Be sure to click the edit between the clips and not the transition effect icon. Note
The Rolling Edit tool lets you move the transition left or right but does not change the overall length of the sequence.

You can use the Ripple Edit tool to shorten a clip. Again, be sure to click the edit between the clips and not the effect icon.

You’ll learn more about the Rolling Edit and Ripple Edit tools in Lesson 8.
Adding audio transitions
Audio transitions can dramatically improve a sequence’s soundtrack by removing unwanted audio pops or abrupt edits. Audiences are usually much more aware of inconsistency in the soundtrack than they are of the overall quality of the soundtrack, and crossfade transitions can have a big impact in smoothing variation between clips.
Creating a crossfade
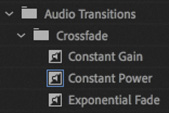
There are three styles of crossfade.

Constant Gain: The Constant Gain crossfade (as its name implies) transitions audio by using a constant audio gain (volume) adjustment between the clips. Though this transition leads to a slight perceived dip in the audio level, some find it useful. It can result in a slight drop in overall level as the sound of the outgoing clip fades out and the incoming clip then fades in at an equal gain. It’s most useful in situations where you do not want much blending between two clips but rather more of a dip out and in between the clips.
Constant Power: The default audio transition in Premiere Pro creates a smooth, gradual transition between two audio clips. The Constant Power crossfade works in a similar way to a video dissolve. The outgoing clip fades out slowly at first and then faster toward the end of the clip. For the incoming clip, the opposite occurs—the audio level increases quickly at the start of the incoming clip and more slowly toward the end of the transition. This crossfade is useful in situations where you want to blend the audio between two clips, without a noticeable drop in level in the middle.

Exponential Fade: The Exponential Fade transition creates a fairly smooth fade between clips. It uses a logarithmic curve to fade out and fade up audio. Some editors prefer the Exponential Fade transition when performing a single-sided transition (such as fading in a clip from silence at the start or end of a program).

Applying audio transitions
There are several ways to apply an audio crossfade to a sequence. You can, of course, drag and drop an audio transition effect just as you would a video transition effect, but there are also useful shortcuts to speed up the process.
Audio transitions have a default duration, measured in seconds or frames. You can change the default duration by choosing Premiere Pro CC > Preferences > Timeline (macOS) or Edit > Preferences > Timeline (Windows).
Let’s take a look at the three methods for applying audio transitions.
Open the sequence Audio.
The sequence has several clips with audio.
Open the Audio Transitions > Crossfade group in the Effects panel.
Drag the Exponential Fade transition to the start of the first audio clip.

Navigate to the end of the sequence.
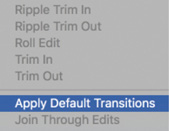
Right-click the final edit point in the Timeline and choose Apply Default Transitions.
New video and audio transitions are added.
NoteTo add only an audio transition, hold Option (macOS) or Alt (Windows) when right-clicking to select only the audio clip.
The Constant Power transition is added to the end audio clip as a transition to create a smooth blend as the audio ends.
You can change the length of any transition by dragging its edge in the Timeline. Drag to extend the audio transition you just created and then listen to the result.
To polish the project, add a Cross Dissolve transition at the beginning of the sequence. Move the playhead near the beginning, select the first clip, and press Command+D (macOS) or Ctrl+D (Windows) to add the default video transition.
You now have a fade from black at the beginning and a fade to black at the end. Now let’s add a series of short audio dissolves to smooth out the sound mix.
With the Selection tool, press Option (macOS) or Alt (Windows) and marquee all the audio clips on track Audio 1, being careful not to select any video clips—drag from below the audio clips to avoid accidentally selecting items on the video track.
Pressing Option (macOS) or Alt (Windows) lets you temporarily unlink the audio clips from the video clips to isolate the transitions.
 Note
NoteThe selection of clips does not have to be contiguous. You can Shift-click clips to select individual clips in a sequence.
TipYou could choose Apply Audio Transition in the Sequence menu to add transitions exclusively to audio clips, but if you have already chosen audio-only clips, there’s no need, as the default transition option will have the same effect.
Choose Sequence > Apply Default Transitions To Selection.

Play the sequence to see and hear the changes you made.
Choose File > Close to close the current project. Click Yes to save the file if you are prompted.
TipTo add the default audio transition to an edit point near the playhead, between selected clips, or at selected cut points, press Shift+Command+D (macOS) or Shift+Ctrl+D (Windows). Track selection (or clip selection) is used to work out where exactly the effects should be applied.
It’s common for audio editors to add one- or two-frame audio transitions to every cut in a sequence to avoid jarring pops when an audio clip begins or ends. If you set your default duration for audio transitions to two frames, you can use the Apply Default Transitions To Selection option in the Sequence menu to quickly smooth your audio mix.
Review questions
How can you apply the default transition to multiple clips in a sequence?
In the Effects panel, how can you locate a transition effect by name?
How do you replace a transition with another one?
Explain three ways to change the duration of a transition.
What is an easy way to gradually increase the audio level at the beginning of a clip?
Review answers
Select the clips, and choose Sequence > Apply Default Transitions To Selection. You can also use the keyboard shortcut Shift+D.
Start typing the transition name in the Contains text box in the Effects panel. As you type, Premiere Pro displays all effects and transitions (audio and video) that have that letter combination anywhere in their names. Type more letters to narrow your search.
Drag the replacement transition on top of the transition you’re rejecting. The new one automatically replaces the old one while adopting its timing.
Drag the edge of the transition icon in the Timeline, do the same thing in the Effect Controls panel’s A/B timeline display, or change the Duration value in the Effect Controls panel. You can also double-click the transition icon in the Timeline panel and change the Duration value in the dialog box that appears.
Apply an audio-crossfade transition to the beginning of the clip.