
8 Mastering Advanced Editing Techniques
Lesson overview
In this lesson, you’ll learn about the following:
Performing a four-point edit
Changing the speed or duration of clips in your sequence
Replacing a clip in a sequence
Replacing footage in a project
Creating a nested sequence
Performing basic trimming on media to refine edits
Applying slip and slide edits to refine your edit
Dynamically trimming clips
This lesson will take about 120 minutes to complete. Please log in to your account on peachpit.com to download the lesson files for this lesson, or go to the “Getting Started” section at the beginning of this book and follow the instructions under “Accessing the lesson files and Web Edition.” Store the files on your computer in a convenient location.
Your Account page is also where you’ll find any updates to the lesson files. Look on the Lesson & Update Files tab to access the most current content.

In Adobe Premiere Pro CC, the main editing commands are easy to master. More advanced techniques take a little time to learn, but they’re worth it! They’ll accelerate your editing and provide the understanding you’ll need to produce the highest-level professional results.
Starting the lesson
In this lesson, you’ll use several short sequences to explore advanced editing concepts in Adobe Premiere Pro CC. The goal is to get hands-on with the techniques you’ll need for advanced editing.
Open the project Lesson 08.prproj in the Lesson 08 folder.
Save the project as Lesson 08 Working.prproj in the Lesson 08 folder.
Choose Editing in the Workspaces panel, or choose Window > Workspaces > Editing.
Reset the workspace to the saved version by clicking the Editing menu in the Workspaces panel or by choosing Window > Workspaces > Reset To Saved Layout, or by double-clicking the Editing workspace name.
Performing four-point editing
In previous lessons, you used the standard technique of three-point editing. You used three In and Out points (split between the Source Monitor as well as the Program Monitor or Timeline panel) to set the source, duration, and location of an edit.
But what happens if you have four points defined?
The short answer is that you have to make a choice. It’s likely that the duration you’ve marked in the Source Monitor differs from the duration you’ve marked in the Program Monitor or in the Timeline panel.
In this case, when you attempt to perform the edit using a keyboard shortcut or on-screen button, a dialog box warns you the durations don’t match and asks you to make a decision about what to change. Most often, you’ll discard one of the points.
Setting editing options for four-point edits
If you perform a four-point edit, Premiere Pro opens the Fit Clip dialog to alert you to the problem. You’ll need to choose from five options to resolve the conflict. You can ignore one of the four points or change the speed of the clip.
Change Clip Speed (Fit To Fill): The first choice assumes that you set four points with different durations deliberately. Premiere Pro preserves the source clip’s In and Out points but adjusts its playback speed to match the duration you set in the Timeline panel or in the Program Monitor. This is an excellent choice if you want to precisely adjust clip playback speed to fill a gap.
Ignore Source In Point: If you choose this option, Premiere Pro ignores the source clip’s In point, converting your edit back to a three-point edit. When you have an Out point and no In point in the Source Monitor, the In point is worked out automatically based on the duration set in the Timeline panel or Program Monitor (or the end of the clip). This option is available only if the source clip is longer than the duration set in the sequence.
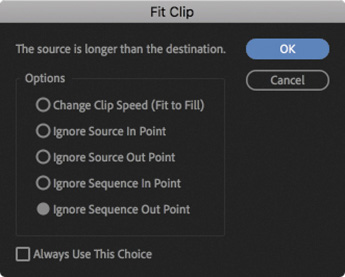
Ignore Source Out Point: When you select this option, the source clip’s Out point is ignored, converting your edit back to a three-point edit. When you have an In point and no Out point in the Source Monitor, the Out point is worked out based on the duration set in the Timeline panel or Program Monitor (or the end of the clip). This option is available only if the source clip is longer than the targeted duration.
Ignore Sequence In Point: When you select this option, the In point you’ve set in the sequence is ignored, making this a three-point edit using only the sequence Out point. The duration is taken from the Source Monitor.
Ignore Sequence Out Point: This option is similar to the previous one. It tells Premiere Pro to ignore the Out point in the sequence you set and perform a three-point edit. Again, the duration is taken from the Source Monitor.
![]() Tip
Tip
You can choose to set a default behavior when a four-point edit occurs by selecting an option and selecting Always Use This Choice. If you change your mind, open the Preferences dialog box, click Timeline, and select Fit Clip Dialog Opens For Edit Range Mismatches. The Fit Clip dialog box will then open when an edit range mismatch occurs.
Making a four-point edit
Let’s perform a four-point edit. You’ll change the playback speed of a clip to fit a duration set in the sequence.
Open the sequence 01 Four Point. Play through the sequence to review the content.
Scroll through the sequence and locate the section with In and Out points already set. You should see a highlighted range in the Timeline panel.

Browse inside the bin called Clips To Load, and open the clip called Laura_04 in the Source Monitor.
Clip In and Out points should already be set on this clip.
In the Timeline panel, check that the source track indicators are patched correctly, with Source V1 positioned next to Timeline Video 1. There’s no audio in this source clip, so you just need to check the Source V1.
In the Source Monitor, click the Overwrite button to make the edit.
In the Fit Clip dialog box, select the Change Clip Speed (Fit To Fill) option, and click OK.
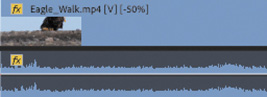
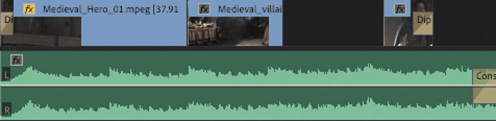
The edit is applied. Zoom in to the Timeline panel using the Navigator controls at the bottom of the panel until you can see the name and speed information on the Laura_04 clip you just edited into the sequence.
The percentage shows the new playback speed. The speed has been adjusted perfectly to fit the new duration.
 Note
NoteChanging the playback speed of a clip counts as a visual effect. Notice the small “fx” badge on the clip changes color to indicate an effect has been applied.

Play the sequence now to see the effects of your edit and the speed change.
Changing playback speed
Slow motion is one of the most commonly used effects in video post-production. You might change the speed of a clip for technical reasons or for artistic impact. It can be an effective way to add drama or to give the audience more time to experience a moment.
![]() Note
Note
When changing the speed of a clip, you will usually achieve smoother playback if the new speed is an even multiple or fraction of the original clip playback speed. For example, changing a 24fps clip to play back at 25% speed will result in 6fps, and this will usually look smoother than if the clip is set to a nonequally divided playback speed, like 27.45%. Sometimes you’ll get the best results by changing clip playback speed and then trimming to get a precise duration.
The fit to fill edit you just learned about is one way to change clip playback speed, and its results can vary. If the media originally had clear smooth motion, you’ll probably get better results. Also, because fit to fill edits often result in precise partial frame rates, they may produce inconsistent motion.
Usually the best way to achieve high-quality slow motion is to record at a higher frame rate than your sequence playback frame rate. If you play the video at a slower frame rate than it was recorded at, you’ll see slow motion—provided the new frame rate is still at least as high as your sequence frame rate.
For example, imagine a 10-second video clip was recorded at 48 frames per second but your sequence is set to 24 frames per second. You can set your footage to play at 24 frames per second, matching the sequence. Playback will be smooth, with no frame rate conversion when the clip is added to the sequence. However, the clip will be playing at half its original frame rate, resulting in 50% slow motion. It will take twice as long to play back, so the clip will now have a 20-second duration.
Let’s try this.
Open the sequence 02 Laura In The Snow. Play the clip in the sequence.
The clip plays in slow motion for the following reasons:
The clip was recorded at 96 frames per second.
The clip is set to play back at 24 frames per second (this was actually set by the camera).
The sequence is configured for 24 frames per second playback.
In the Timeline panel, right-click the clip and choose Reveal In Project.
This highlights the clip in the Project panel.
Right-click the clip in the Project panel and choose Modify > Interpret Footage. We’ll use the Interpret Footage dialog box to tell Premiere Pro how to play back this clip.

Select the Assume This Frame Rate option, and enter 96 in the box. This tells Premiere Pro to play the clip at 96 frames per second. Click OK.
Look back at the Timeline panel. The clip has changed appearance.

You have given the clip a faster frame rate, so the original clip duration is no longer used. Because the clip plays faster, its duration is shorter, and diagonal lines indicate the portion of the clip that has no media.
Premiere Pro does not change the duration of the Timeline clip segment because doing so might change the timing of your sequence. Instead, the part of the sequence clip that has no media is empty.
NoteIf you’re using a system with slow storage, you may need to lower the playback resolution in the Program Monitor to play the clip at a fast frame rate without dropping frames.
Play the sequence again.
The clip plays at regular speed because it was originally recorded at 96 frames per second. It’s much less smooth—not because there’s anything wrong with the clip but because the original camera recording was bumpy.
Drag the Laura_01.mp4 clip onto the sequence close to the first instance, so you can see both versions side by side.

The new clip instance is shorter and matches the total playback time at the new frame rate. If you slow down the playback speed of the clip now, to 25%, it will restore the original frames, producing slow motion.
Changing clip speed or duration
Although it’s more common to slow clips down, speeding up clips is a useful effect as well. The Speed/Duration command in the Timeline panel can change the playback speed for a clip in two different ways. You can set the duration of a clip to match a certain time, or you can set the playback speed as a percentage.
For example, if you set a clip to play at 50% speed, it will play back at half-speed; 25% would be one-quarter speed. Premiere Pro allows you to set playback speeds up to two decimal places, so you could have 27.13% if you wanted.
Let’s explore this technique.
Open the sequence 03 Speed and Duration. Play the sequence to get a sense of the normal playback speed.
Right-click the Eagle_Walk clip in the sequence and choose Speed/Duration. You can also select the clip in the sequence and choose Clip > Speed/Duration.
The Clip Speed/Duration dialog box gives you several options for controlling the clip playback speed.
If you click the small chain icon
 , you can toggle on and off keeping the clip duration and speed ganged together. If this is on, changing one updates the other.
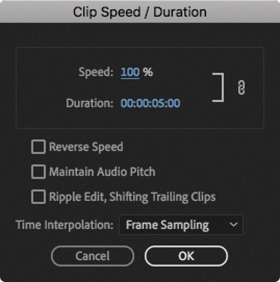 Note
NoteThere’s one exception to the way the chain icon works in the Clip Speed/Duration dialog box: If a new, higher speed reduces the duration so much that all the original clip media is used and the result has a shorter duration than the Timeline clip segment, then the Timeline clip will still shorten to fit. This way, you won’t have blank video frames in your sequence.
Clicking the chain icon now so that it shows a broken link
 ; indicates that the duration and speed are unganged. Now, if you enter a new speed, the duration won’t update.
Once the settings are unganged, you can also change the duration without changing the speed. If there’s another clip immediately after this one in the sequence, shortening a clip will leave a gap. By default, if you make the clip longer than the space available, the speed change will have no effect. That’s because the clip can’t move the next clip to make room for the new duration when you change these settings. If you select the Ripple Edit, Shifting Trailing Clips option, the clip will make space for itself, pushing other clips later in the sequence.
To play a clip backward, select the Reverse Speed option. You’ll see a negative symbol next to the new speed displayed in the sequence.
If you’re changing the speed of a clip that has audio, consider selecting the Maintain Audio Pitch check box. This will keep the clip’s original pitch at the new speed. With this option disabled, the pitch will naturally go up or down as the speed changes. This option is more effective for small speed changes; dramatic resampling can produce unnatural results—consider adjusting the audio in Adobe Audition if you need to make a more significant speed change. See the Adobe Audition Classroom in a Book for audio speed change workflows and more.
Make sure Speed and Duration are linked with the chain icon on, change the speed to 50%, and click OK.

Play the clip in the Timeline panel. You may need to render the clip by pressing Return (macOS) or Enter (Windows) to see smooth playback. Notice that the clip is now 10 seconds long. That’s because you slowed it to 50%: Half the playback speed means twice the original length.
Choose Edit > Undo or press Command+Z (macOS) or Ctrl+Z (Windows).
Select the clip on the Timeline and press Command+R (macOS) or Ctrl+R (Windows) to open the Clip Speed/Duration dialog box.
Click the chain icon to make sure the Speed and Duration settings are unlinked
. Then change Speed to 50%.Click OK; then play the clip. The clip plays back slower, with unlinked duration, so it’s the same length on the Timeline.
 Tip
TipYou can change the speed of multiple clips at the same time. To do so, select multiple clips and choose Clip > Speed/Duration. When you change the speed of multiple clips, be sure to pay attention to the Ripple Edit, Shifting Trailing Clips option. This will automatically close or expand gaps for all the selected clips after the speed change.

The clip is now playing at 50% speed, so it should play for twice as long. But because you’ve turned off the link between playback speed and duration, the second half has been trimmed to maintain the five-second duration in the sequence.
Now try reversing playback.
Select the clip and open the Clip Speed/Duration dialog box again.
Leave Speed at 50%, but this time select Reverse Speed; then click OK.
Play the clip. Now it plays in reverse at 50% slow motion.
Changing clip speed/duration with the Rate Stretch tool
Sometimes you’ll have a clip that has perfect content to fill a gap in your sequence, but it is just a little too short or a little too long. This is where the Rate Stretch tool helps.
Open the sequence 04 Rate Stretch.
This sequence is synchronized to music, and the clips contain the desired content, but the first video clip is too short. You can make a guess and try to make an exact Speed/Duration adjustment, but it’s much easier and faster to use the Rate Stretch tool to drag the end of the clip to fill the gap.
In the Tools panel, press and hold the Ripple Edit tool
 to select the Rate Stretch tool
  .
.With this tool, drag the right edge of the first video clip to the left edge of the second video clip.
The speed of the clip changes to fill the gap. The contents haven’t changed; the clip is playing more slowly.
 Tip
TipIf you change your mind about a change made with the Rate Stretch tool, you can always use it to stretch a clip back. Alternatively, you can use the Speed/Duration command and enter a Speed value of 100% to restore the clip to its default speed.
Using the same tool, drag the right edge of the second video clip to the left edge of the third clip.


Drag the right edge of the third clip until it matches the end of the audio. Notice that you must drag somewhere other than the transition effect icon to be able to change the duration this way.
The duration of the video now matches that of the music. You may need to zoom in to the Timeline panel to see the new playback speed of a clip.

Play the sequence to view the result.
Press the shortcut key V or click the Selection tool in the Tools panel to select it.
Right-click the third clip and choose Time Interpolation > Optical Flow. This smooths playback when changing clip speed. This is a more advanced system for rendering motion changes and takes longer to render and preview.
Render and play the sequence to see the result.
![]() Note
Note
Using Optical Flow to render a new playback speed can produce visual artifacts, particularly with footage that has motion blur as a result of a slow camera shutter speed.
Replacing clips and footage
During the editing process, it’s common to swap one clip in a sequence for another as you try different versions of an edit.
This might mean making a global replacement, such as replacing one version of an animated logo with a newer file. You might also want to swap out one clip in a sequence for another that you have in a bin. Depending on the task at hand, you’ll use different methods.
Dragging in a replacement clip
You can drag a new shot onto the existing sequence clip you’d like to replace. This is called a replace edit.
Let’s try it.
Open the 05 Replace Clip sequence.

Play the sequence.
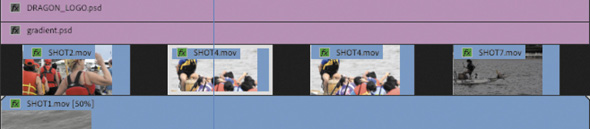
On the Video 2 track, clips 2 and 3 are actually the same SHOT4 clip repeated. The clip has motion keyframes applied to make it spin onto the screen and spin off again. You’ll learn how to create these kinds of animation effects in Lesson 9, “Putting Clips in Motion.”
Let’s replace the first instance of the clip (SHOT4) with a new clip called Boat Replacement. You don’t want to have to re-create the effects and animation, as these are already set perfectly. This is an ideal scenario for replacing a sequence clip.
From the Clips To Load bin, drag the Boat Replacement clip straight from the Project panel over the first instance of the SHOT4 clip in the sequence, but don’t release the mouse button yet.

For this technique, it’s not necessary to position the pointer precisely; just make sure it’s over the clip you want to replace.
The clip is longer than the existing clip that you intend to replace.
Hold the Option (macOS) or Alt (Windows) key. While you’re holding this modifier key, the replacement clip snaps to fit the exact length of the clip it’s replacing. Just enough of the new clip will be used to replace the existing clip in the sequence.

Release the mouse button while still holding the modifier key to replace the clip.
Play the sequence. All the picture-in-picture clips have the same effect applied to different footage. The new clip inherits the settings and effects from the clip it replaced. This is a quick and easy way to try different shots in a sequence.
Performing a synchronized replace edit
When you drag and drop to replace a sequence clip, Premiere Pro synchronizes the first frame (or In point) of the replacement clip with the first visible frame of the existing clip in the sequence. This is often fine, but what if you need to synchronize a particular moment in the action, such as hands clapping or a door closing?
If you’d like to have more control, you can use additional options of the Replace Edit command. This allows you to synchronize a particular frame of the replacement clip with a particular frame of the clip it’s replacing.
Open the sequence 06 Replace Edit.
This is the same sequence you previously fixed, but this time you’ll position the replacement clip precisely.
Position the playhead in the sequence at approximately 00:00:06:00. The playhead will be the sync point for the edit you are about to perform.
Click the first instance of the SHOT4 clip in the sequence to select it.
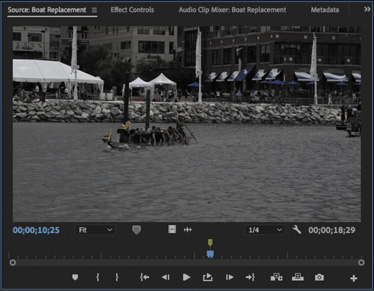
From the Clips To Load bin, open the clip Boat Replacement in the Source Monitor.
In the Source Monitor, position the playhead to choose a good piece of action for the replacement. There’s a marker on the clip for guidance. You can click the marker to line up the playhead with it.
Make sure the Timeline panel is active, with the first instance of SHOT4.mov selected, and choose Clip > Replace With Clip > From Source Monitor, Match Frame.
The clip is replaced.
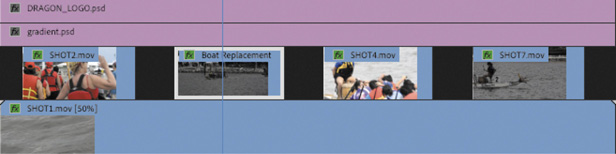
Play the newly edited sequence to check the edit.
The playhead position in the Source Monitor and Program Monitor was synchronized. The sequence clip duration, effects, and settings are all applied to the replacement clip. This technique can be a huge time-saver when the precise timing of action needs to be matched.
Using the Replace Footage feature
While a replace edit replaces a clip in a sequence, the Replace Footage feature replaces footage in the Project panel so that the clip links to a different media file. This can be of great benefit when you need to replace a clip that occurs several times in a sequence or in multiple sequences. You might use this to update an animated logo or a piece of music, for example.
When you replace footage in the Project panel, all instances of the clip you replace are changed anywhere the clip is used.
Load the sequence 07 Replace Footage.
Play the sequence.
Let’s replace the graphic on the fourth video track with something more interesting.
In the Clips To Load bin, click to select the clip DRAGON_LOGO.psd in the Project panel.
Choose Clip > Replace Footage, or right-click the clip and choose Replace Footage.
Navigate to the Lessons/Assets/Graphics folder, and choose the DRAGON_LOGO_FIX.psd file. Double-click to select it.
 Note
NoteThe Replace Footage command cannot be undone. To switch back to the original clip, choose Clip > Replace Footage again to navigate to and relink the original file, or choose File > Revert to restore the current project to the last saved version (you’ll lose changes made since you last saved).
Play the sequence. The graphic has been updated throughout the sequence and project.
Even the clip name in the Project panel has updated to match the new file.

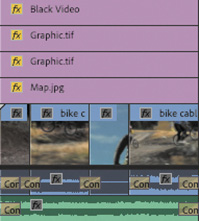
Nesting sequences
A nested sequence is a sequence contained within another sequence. You can break up a long project into more manageable parts by creating separate sequences for each section. Then, you can drag each sequence—with all its clips, graphics, layers, multiple audio/video tracks, and effects—into another, “master” sequence. Nested sequences look and behave like single audio/video clips, but you can edit their contents and see the changes update inside the master sequence.
Nesting sequences is quite an advanced workflow, but if you can get to grips with treating sequences as clips, it can be a powerful addition to your post-production workflow. Nest sequences do the following:
Simplify editing by allowing you to create complex sequences in separate parts. This can help you avoid running into conflicts or accidentally moving clips and ruining your edit.
Allow you to apply an effect to a group of clips in a single step.
Let you use sequences as a source in multiple other sequences. You can create one intro sequence for a multipart series and add it to each episode. If you need to change the intro sequence, you can do so once and see the results update everywhere it’s nested.
Allow you to organize your work in the same way you might create subfolders in the Project panel.
Allow you to apply transitions to a group of clips as a single item.
When editing one sequence into the Timeline for another sequence, an important button in the upper-left corner of the Timeline panel lets you choose between adding the contents of the sequence ![]() or nesting it
or nesting it ![]() .
.
Adding a nested sequence
One reason to use a nest is to reuse an existing edited sequence. Let’s add an edited opening title into a sequence now.
![]() Tip
Tip
A quick way to create a nested sequence is to drag a sequence from the Project panel into the appropriate track or tracks of the currently active sequence. You can also drag a sequence into the Source Monitor, apply In and Out points, and perform insert and overwrite edits to add a selected section to another sequence.
Open the sequence 08 Bike Race, and make sure the option is set to nest sequences
 .
.Set an In point at the start of the sequence.
When a clip or sequence is selected in the Project panel, or open in the Source Monitor, its source track indicators appear in the Timeline panel, so you can configure track patching.
In the Project panel, single-click on the sequence 09 Race Open to select it. In the Timeline panel, make sure that source track V1 is patched to the Video 1 track.
You can use any method to edit a sequence into another sequence—sequences really do behave just like clips when you nest. On this occasion, drag the sequence 09 Race Open into the Program Monitor (rather than the Timeline panel), dropping the clip onto the Insert option.

This performs an insert edit. Because you set an In point in the sequence, it’s not important where the Timeline playhead is—the In point will be used for timing.
Play the 08 Bike Race sequence to see the result.
The 09 Race Open sequence is added as a single clip, even though it contains multiple video tracks and audio clips.

Undo that last edit by pressing Command+Z (macOS) or Ctrl+Z (Windows).
Turn off sequence nesting
 .
.Drag the sequence 09 Race Open into the Program Monitor, choosing the Insert option again.
The individual clips in the Race Open sequence are added to the current sequence.
![]() Tip
Tip
If you need to make a change to a nested sequence, double-click it, and it will open in a new Timeline panel.
Performing regular trimming
You can adjust the part of a clip used in a sequence in several ways. This process is generally called trimming. When you trim, you can make the selected part of the original clip shorter or longer in the sequence. Some trimming types affect a single clip, and others adjust the relationship between two adjacent clips, or even multiple clips.
Trimming in the Source Monitor
A clip edited into a sequence is a separate instance from the original clip in the Project panel. You can view a sequence clip in the Source Monitor by double-clicking it in the Timeline panel. The clip will open in the Source Monitor, where you can adjust its In and Out points. The clip will update in the sequence.
By default, when you open a sequence clip segment in the Source Monitor, the Source Monitor navigator will be set to zoom in to the existing selection.

You may need to adjust the navigator zoom to easily explore all of the available content in the clip.
There are two basic ways to change existing In and Out points in the Source Monitor.
Add new In and Out points: In the Source Monitor, set new In or Out points, replacing the current selection. If the clip has another clip adjacent to it in the sequence, before or after the current clip, you cannot extend the In or Out point in that direction.

Drag In and Out points: Position your pointer over an In or Out point in the mini timeline at the bottom of the Source Monitor. The cursor changes into a red-and-black icon, indicating that a trim can be performed. Now you can drag left or right to change the In or Out point.
Once again, if the clip has another clip adjacent to it in the sequence, you cannot extend the current clip in that direction.
Trimming in a sequence
Another, faster way to trim clips is directly in the Timeline panel. Making a single clip shorter or longer is called a regular trim, and it’s fairly easy.
Open the sequence 10 Regular Trim.
Play the sequence.
The last shot is cut off, and it needs to be extended to match the end of the music.
Make sure you have the Selection tool
 selected.
Position the pointer inside the right edge, at the end of the last clip in the sequence.
The pointer changes into the red Trim Out pointer with directional arrows.
TipThe keyboard shortcut for the Selection tool is V.

Precisely hovering the mouse cursor over the end of a clip changes it between trimming the Out point (open to the left) and trimming the In point of the next clip (open to the right). In this case, there’s no next clip, of course.
NoteIf you make a clip shorter, it will leave a gap between it and any adjacent clips. Later in this lesson you’ll learn to use the Ripple Edit tool to automatically remove any gaps or push clips later in a sequence when you trim a clip longer.
This clip has a transition effect applied to the end. You may need to zoom in to make it easier to trim the clip and not retime the transition effect.
Drag the edge to the right until it meets the end of the audio file.
A tooltip shows you how much you’ve trimmed.

Release the mouse button to apply the trim.
Performing advanced trimming
The trimming methods you’ve learned so far have their limitations. They can leave unwanted gaps in the sequence caused by shortening a clip. They can also prevent you from lengthening a shot if there’s an adjacent clip.
Fortunately, Premiere Pro offers several more ways of trimming.
![]() Note
Note
When performing a ripple edit, you might shift items on other tracks out of sync. By default, sync locks keep items on all tracks in sync.
![]() Tip
Tip
The keyboard shortcut for the Ripple Edit tool is B.
Making ripple edits
You can avoid introducing gaps when trimming by using the Ripple Edit tool ![]() rather than the Selection tool.
rather than the Selection tool.
You use the Ripple Edit tool to trim a clip in the same way you use the Selection tool. When you use the Ripple Edit tool to change the duration of a clip, the adjustment ripples through the sequence. That is, clips after the clip you adjust slide to the left to fill the gap, or they slide to the right to make room for the longer clip.
Let’s try it.
Open the sequence 11 Ripple Edit.
In the Tools panel, press and hold the Rate Stretch tool to reveal the tools hidden underneath and select the Ripple Edit tool in the Tools panel.
Hover the Ripple Edit tool cursor over the inside-right edge of the seventh clip (SHOT7) until it turns into a yellow, left-facing bracket and arrow.

The shot is too short, so let’s add some more footage from the clip handle.
Drag to the right until the timecode in the tooltip reads +00:00:01:10.

Notice that while you’re using the Ripple Edit tool, the Program Monitor displays the last frame of the clip on the left side of the edit, and the first frame of the clip on the right side. The image updates dynamically while you trim.

Release the mouse button to complete the edit.
The clip you have trimmed expands, and the clip to its right slides along with it. Play that portion of the sequence to see whether the edit works smoothly.

Trim again—this time add another +2:00 seconds to the SHOT7 clip and play through the newly trip edit between SHOT7 and SHOT8.
TipYou can temporarily use the Selection tool as a Ripple Edit tool by holding Command (macOS) or Ctrl (Windows). Be sure to click to one side of the edit to avoid performing a rolling edit (described next).
This time, the trim has exposed a slight on-camera shake that you’ll work on next.
Making rolling edits
When you use the Ripple Edit tool, it makes changes to the overall length of the sequence. This is because one clip gets longer or shorter while the rest of the sequence moves to close the gap (or moves out of the way).
There’s another way to change the timing of an edit: a rolling edit.
With a rolling edit, the overall length of the sequence does not change. Instead, a rolling edit shortens one clip and lengthens another at the same time, adjusting the clips by the same number of frames.
For example, if you use the Rolling Edit tool to extend a clip by two seconds, you will also shorten the adjacent clip by two seconds.
![]() Note
Note
A rolling edit trim is sometimes referred to as a double-roller or dual-roller trim.
![]() Tip
Tip
Zoom in to the Timeline panel to make more accurate adjustments.
![]() Note
Note
When trimming, it’s possible to trim a clip to a 0 (zero) duration (removing it from the Timeline altogether).
![]() Tip
Tip
The keyboard shortcut for the Rolling Edit tool is N.
Continue working with the sequence 11 Ripple Edit.
Several clips are already in the sequence, with enough leftover handle frames to allow the edits you’re about to perform.
Press and hold the Ripple Edit tool
to select the Rolling Edit tool  in the Tools panel.
Drag the edit point between SHOT7 and SHOT8 (the last two clips on the Timeline). Use the Program Monitor split screen to find a better-matching edit between the two shots, dragging the edit left to remove the camera shake.

![]() Note
Note
You can use the Selection tool with the Command (macOS) or Ctrl (Windows) key as a shortcut for the Ripple Edit tool or Rolling Edit tool.
Try rolling the edit to the left 1 second and 20 frames (–01:20). You can use the Program Monitor timecode or the pop-up timecode in the Timeline panel to find the edit, and if you pre-position the playhead, the edit will snap to it as you drag.
Making slip edits
A slip trim changes both the In point and Out point of a sequence clip segment at the same time, by the same amount, rolling the visible contents in position.
Because a slip trim changes the beginning and end by equal amounts, it doesn’t change the duration of your sequence. In this way, it’s the same as a rolling trim.
Slip trims change only the clip you select; adjacent clips before or after the clip you adjust are not affected. Using the Slip tool to adjust a clip is a little like moving a conveyor belt: The visible part of the original clip changes inside the Timeline clip segment without changing the length of the clip or the sequence.
Continue working with the sequence 11 Ripple Edit.
Select the Slip tool
 . The keyboard shortcut for the Slip tool is Y.
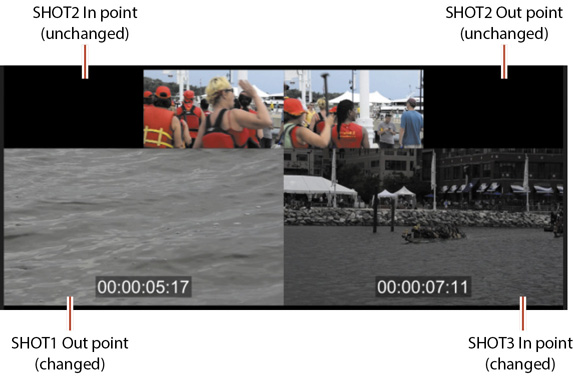
Drag SHOT5 left and right.
Take a look at the Program Monitor while you perform the slip edit.

The two top images are the Out point of SHOT4 and the In point of SHOT6, before and after the clip you are adjusting; they don’t change. The two larger images are the In point and Out point of SHOT5, the clip you are adjusting; these edit points do change.
The Slip Trim tool is well worth taking time to get to grips with. It can be the fastest tool for adjusting timing when cutting action.
Making slide edits
The Slide tool works by leaving the duration of the clip you’re sliding unchanged. Instead, the Out point of the clip to the left and the In point of the clip to the right are changed by equal amounts, in opposite directions. It’s another form of dual-roller trim.
Because you’re changing the other clip durations by an equal number of frames, the length of the sequence doesn’t change.
Continue working with the sequence 11 Ripple Edit.
Press and hold the Slip tool
in the Tools panel to select the Slide tool  . The keyboard shortcut for the Slide tool is U.
Position the Slide tool over the middle of the second clip in the sequence, SHOT2.
Drag the clip left or right.
Take a look at the Program Monitor as you perform the slide edit.
The two top images are the In point and Out point of SHOT2—the clip you are dragging. They do not change because you are not changing the selected part of SHOT2.
The two larger images are the Out point and In point of the previous and next clips. These edit points change as you slide the selected clip over those adjacent clips.
Trimming in the Program Monitor
If you’d like to trim with more control, you can use the Program Monitor Trim mode. This allows you to see both the outgoing and incoming frames of the trim you’re working on and has dedicated buttons for making precise adjustments.
When the Program Monitor is set to Trim mode, pressing the spacebar to play the sequence loops playback around the edit you have selected. This means you can continually adjust the timing of an edit and view the result immediately.
You can perform three types of trim using the Program Monitor Trim mode controls. You learned about each of these earlier in this lesson.
Regular trim: This basic type of trim moves the edge of the selected clip. This method trims only one side of the edit point. It moves the selected edit point either forward or backward in the sequence, but it doesn’t shift any of the other clips.
Roll trim: The roll trim moves the tail of one clip and the head of the adjacent clip. It lets you adjust an edit point (provided there are handles). No gap is created, and the sequence duration doesn’t change.
Ripple trim: This moves the selected edge of the edit either earlier or later. Clips after the edit shift to close a gap or make room for a longer clip.
Using Trim mode in the Program Monitor
When you’re in Trim mode, some of the Program Monitor controls change to make it easier to focus on trimming. To use Trim mode, you need to activate it by selecting an edit point between two clips. There are three ways to do this.
Double-click an edit point (the left or right end of a clip) on the Timeline with a selection tool or trimming tool.
With the correct Timeline track indicator enabled, press Shift+T. The playhead will move to the nearest edit point, and Trim mode will open in the Program Monitor.
Drag around one or more edits using the Ripple Edit tool or Rolling Edit tool to select them and open the Program Monitor to Trim mode.
![]() Tip
Tip
You also can select edits by dragging around them using the Selection tool if you hold Command (macOS) or Ctrl (Windows).
When invoked, Trim mode shows two video clips. The box on the left shows the outgoing clip (also called A side). The box on the right shows the incoming clip (also called B side). Below the frames are five buttons and two indicators.
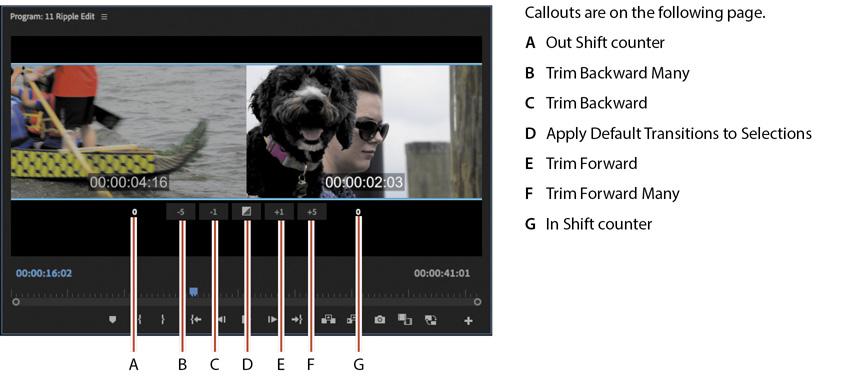
Out Shift counter: This shows how many frames the Out point for the A side has changed.
Trim Backward Many: This performs the selected trim, adjusting by multiple frames earlier. The size of the adjustment depends on the Large Trim Offset option in the Trim Preferences tab of Preferences.
Trim Backward: This performs the selected trim, adjusting by one frame at a time earlier.
Apply Default Transitions to Selection: This applies the default transition (usually a dissolve) to video and audio tracks that have their edit points selected.
Trim Forward: This is like Trim Backward except it adjusts the edit one frame later.
Trim Forward Many: This is like Trim Backward Many except it adjusts the edit multiple frames later.
In Shift counter: This shows how many frames the In point for the B side has changed.
Choosing a trimming method in the Program Monitor
You’ve already learned about the three types of trims you can perform (regular, roll, and ripple). Using Trim mode in the Program Monitor makes the process easier because it provides rich visual feedback. It also provides subtle control when dragging, regardless of the Timeline panel view scale: Even if the Timeline panel is zoomed a long way out, you’ll be able to make frame-accurate trim adjustments in the Program Monitor Trim view.
Open the sequence 12 Trim View.
With the Selection tool (keyboard shortcut V), hold down Option (macOS) or Alt (Windows) and double-click the video edit between the first video clip and the second video clip in the sequence. Holding this modifier key selects just the video edits and leaves the audio tracks untouched.
In the Program Monitor, hover the pointer over the A and B clip images (but don’t click yet).
As you move the pointer from left to right, you’ll see the tool change from Trim Out (left side) to Roll (center) to Trim In (right).
Drag in between both clips in the Program Monitor to perform a rolling edit trim.
Adjust the timing until the time display on the lower-right side of the Program Monitor, as an overlay on the B clip image, reads 01:26:59:01.
 Note
NoteClicking the A or B side will switch which side is being trimmed. Clicking in the center will switch to a rolling edit.
Press the Down Arrow key three times to jump between edits until you have selected the edit between the third and fourth clips (the cut in the audio track counts as one jump).
The outgoing shot is too long and shows the actor sitting down twice.
When dragging in the Program Monitor to trim, the color of the tool indicates the type of trim you’ll perform. Red indicates a regular trim and yellow indicates a ripple trim.
You can quickly change the trim type by holding Command (macOS) or Ctrl (Windows) and clicking one of the images in the Program Monitor. After clicking, you’ll need to move the pointer in order for the color of the tool to update.
Now, Command-click (macOS) or Ctrl-click (Windows) one of the images in the Program Monitor until the trim tool pointer turns yellow. This indicates that you’ve selected the Ripple Trim tool.

Drag to the left on the outgoing clip (on the left side of the Program Monitor) to make the clip shorter.
Make sure the time display on the left reads 01:54:12:18.

Play the edit by pressing the spacebar. Notice that playback loops over the edit to allow you to review it.
Performing dynamic trimming
Much of the trimming work you will perform will be to tune the rhythm of an edit. In many ways, achieving perfect timing for a cut is the point at which the craft of editing becomes the art.
Because playback using the spacebar will loop in Trim mode, it’s easier to get a feel for the timing of an edit. You can also trim using keyboard shortcuts or buttons while the sequence plays back in real time.

![]() Note
Note
To control the pre-roll and post-roll durations, go to Premiere Pro Preferences and select the Playback category. You can set the duration in seconds. Most editors find a duration of two to five seconds most useful.
Continue working with the sequence 12 Trim View.
Press the Down Arrow key to move to the next video edit point, between the fourth and fifth video clips. Set the trim type to a rolling trim.
You can stay in Trim mode while switching between edit points.
Press the spacebar to loop playback.
You’ll see a playback loop lasting a few seconds, with the shot before and after the cut playing back. This helps you get a feel for the content of the edit.
Try adjusting the trim using the methods you’ve learned while the playback loops.
The Trim Forward and Trim Backward buttons at the bottom of Trim mode view work well and can adjust the edit while the clip plays back.
Now let’s try using the keyboard for more dynamic control. The same J, K, and L keys you use to control playback can also be used to control trimming.
Click Stop or press the spacebar to stop the playback loop.
Press the L key to shuttle the trim to the right.
Pressing once trims in real time. You can tap the L key multiple times to trim faster.
If you are in regular trim mode and trimming a clip extends to the next clip, the trim will be blocked. If you are in ripple trim mode, clips will move to accommodate the new clip duration.
These clips are quite short, so you’ll reach the end quickly. Let’s refine and trim with a little more precision.
Press the K key to stop trimming.
Hold down the K key and press the J key to shuttle left in slow motion.
Release both keys to stop the trim.
Exit Trim mode by clicking away from the edit on the Timeline to deselect the edit.
![]() Note
Note
Timeline clip segment durations update when you press K to stop trimming.
Trimming with the keyboard
Here are some of the most useful keyboard shortcuts to use when trimming.
macOS |
WINDOWS |
|---|---|
Trim Backward: Option+Left Arrow |
Trim Backward: Ctrl+Left Arrow |
Trim Backward Many: Option+Shift+Left Arrow |
Trim Backward Many: Ctrl+Shift+Left Arrow |
Trim Forward: Option+Right Arrow |
Trim Forward: Ctrl+Right Arrow |
Trim Forward Many: Option+Shift+Right Arrow |
Trim Forward Many: Ctrl+Shift+Right Arrow |
Slide Clip Selection Left Five Frames: Option+Shift+, (comma) |
Slide Clip Selection Left Five Frames: Alt+Shift+, (comma) |
Slide Clip Selection Left One Frame: Option+, (comma) |
Slide Clip Selection Left One Frame: Alt+, (comma) |
Slide Clip Selection Right Five Frames: Option+Shift+. (period) |
Slide Clip Selection Right Five Frames: Alt+Shift+. (period) |
Slide Clip Selection Right One Frame: Option+. (period) |
Slide Clip Selection Right One Frame: Alt+. (period) |
Slip Clip Selection Left Five Frames: Command+Option+Shift+Left Arrow |
Slip Clip Selection Left Five Frames: Ctrl+Alt+Shift+Left Arrow |
Slip Clip Selection Left One Frame: Command+Option+Left Arrow |
Slip Clip Selection Left One Frame: Ctrl+Alt+Left Arrow |
Slip Clip Selection Right Five Frames: Command+Option+Shift+Right Arrow |
Slip Clip Selection Right Five Frames: Ctrl+Alt+Shift+Right Arrow |
Slip Clip Selection Right One Frame: Command+Option+Right Arrow |
Slip Clip Selection Right One Frame: Ctrl+Alt+Right Arrow |
Review questions
If you change the playback speed of a clip to 50%, what effect will this have on the clip duration?
Which tool allows you to stretch a sequence clip to change its playback speed?
What’s the difference between a slide edit and a slip edit?
What is the difference between replacing a clip and replacing footage?
Review answers
The clip will be twice as long. Reducing a clip’s speed causes the clip to become longer, unless the Speed and Duration parameters are unlinked in the Clip Speed/Duration dialog box or the clip is blocked by another clip.
The Rate Stretch tool allows you to adjust playback speed as if you were trimming. This is useful when you need to fill a small extra amount of time in a sequence, or shorten a clip just a little.
You slide a clip over adjacent clips, retaining the selected clip’s original In and Out points. You slip a clip under adjacent clips (or roll the contents like a conveyor belt), changing the selected clip’s In and Out points.
Replacing a clip replaces a single sequence clip on the Timeline with a new clip from the Project panel. Replacing footage replaces a clip in the Project panel with a new source clip. Any instance of the clip in any sequence in the project is replaced. In both cases, effects applied to the replaced clip are maintained.