Most people use Adobe Reader to view PDF documents in the Document pane. Even though you may already know how to move around a PDF document, there's much more to viewing PDFs than scrolling through pages. The new Adobe Reader 7 software offers many ways to examine, view, and access information in PDF files. This chapter helps you become familiar with nomenclature, some tool names, and sections of the Adobe Reader work environment, as well as understand all the different options you have for viewing document information.
PDF files are created for many different purposes. Specialized purposes include documents created for engineers, attorneys, technical document writers, prepress and printing workers, and many other business professionals. Setting the zoom level and selecting page layout views, such as fitting a page in the window or viewing pages in a continuous layout, are tasks you'll frequently use when viewing PDF files on a CD-ROM, on Web sites, or as documents emailed to you from other users.
Adobe Reader provides you with many tools and menu commands that will help guide you through document viewing and navigation.
To start viewing a file in Adobe Reader, click the Open tool on the File toolbar to open a file (Figure 4.1).
The Open dialog is the same familiar dialog used in most programs. You can navigate your hard drive or network server to locate folders, open folders, and subsequently select a file to open. Either choose a PDF document and click the Open button in the Open dialog or double-click a filename. The selected file opens in the Document pane.
From the File menu you can also use the Open command to open a file. Select File > Open and the same Open dialog appears on top of the Reader window.
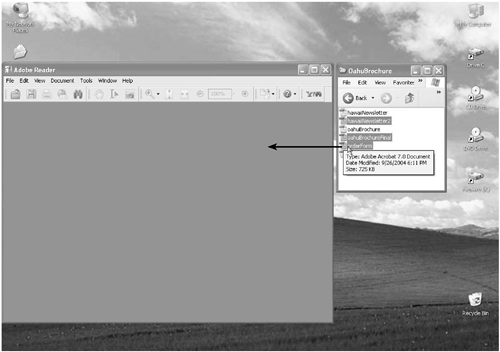
You can also open documents by dragging one or more PDF files onto the Reader application window, the application icon, an alias of the application icon, or the program icon positioned in the Status Bar (Windows) or Dock (Macintosh). Double-clicking a PDF document also opens it in the Document pane. If Reader is not currently open, all these actions will launch the Reader program and then open the file in the Document pane.
To open either a single file or multiple files using drag and drop methods:
Minimize the Adobe Reader window by clicking the Minimize tool in the top-right corner (Windows) of the Reader window. On the Macintosh, open a PDF file first, then resize the window by dragging the lower-right corner in toward the Document pane.
Open a folder containing one or more PDF documents. Select one or more files in the folder.
Drag the files to the Document pane as shown in Figure 4.2.
In Windows, you can add a folder of documents to the system Status Bar. When a folder is added to the Status Bar, it acts as a shortcut to the folder location. When you click the folder in the Status Bar, the folder opens on your desktop. Double-click a PDF file, and the action launches Reader (if it's not already open) and opens the selected file in the Document pane.
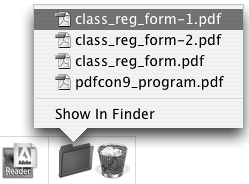
On the Macintosh, you can add folders containing documents to the Dock. If you press the Ctrl key and click a folder in the Dock, the folder contents appear in a pop-up menu as shown in Figure 4.3. Move the cursor up the menu and select the PDF document you want to open. If Reader isn't open, the action launches Reader and opens the file in the Document pane. Note that the folder is docked just to the left of the Trash icon.
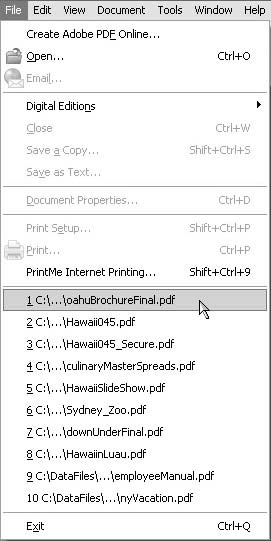
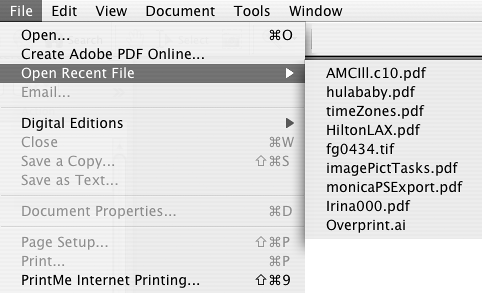
As files are opened, Adobe Reader keeps track of the most recently viewed files in the File menu. In Windows, the list appears at the bottom of the File menu; on the Macintosh it's found in a submenu called Open Recent File. By default, the number of files appearing in a recently viewed list is five. You can change that number through a preferences setting. Open the Preferences dialog (Ctrl/Command+K). Click Startup in the left pane and type a value in the text box adjacent to Maximum documents in most-recently used list. Reader accepts values from 1 to 10 in the text box. Click OK after editing the value, and the list displays the number of recently viewed files you set in the Startup preferences.
To open a recently viewed file, click File and select a filename at the bottom of the menu (Windows shown in Figure 4.4) or select Open Recent File (Macintosh shown in Figure 4.5). When you select the filename, the file opens in the Document pane.
At times you may want to read a document, quit Reader, and later come back to the file where you left off. Reader offers you a preferences option to open files on the last page viewed in your last Adobe Reader session.
To reopen all documents to the last viewed page:
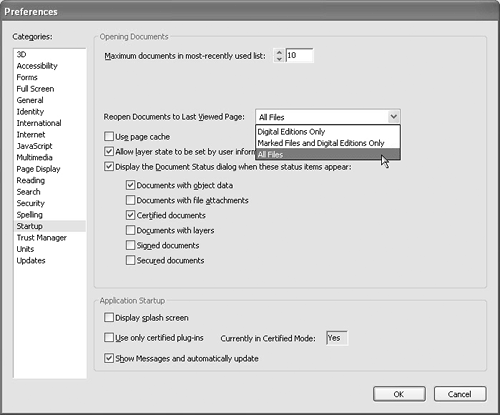
Press Ctrl/Command+K to open the Preferences dialog.
Click Startup in the left pane.
Open the pull-down menu for Reopen Documents to Last Viewed Page by clicking on the down arrow.
Select All Files from the menu commands shown in Figure 4.6.
Click OK in the Preferences dialog. All files viewed in Reader will open on the last view used before closing the file.
This feature is particularly helpful when you're reading downloaded Digital Editions (eBooks). When you start reading a book and eventually quit Reader, you can later pick up where you left off without having to navigate the document, just as if you'd left a bookmark in a physical book.
You have three options when reopening PDF files. Select All Files to reopen all files you view in Adobe Reader to the last viewed page. This option is helpful if you tend to review long documents and you want to be able to review a given document over the course of several Adobe Reader sessions. Each time you open a document, it opens on the last viewed page. Choose the option Marked Files and Digital Editions Only when you want to open only Digital Editions. Marked files are Digital Editions you subscribe to and can choose to mark as accepted or refused. Choose Digital Editions Only to apply this setting to eBooks and Digital Editions only, excluding the marked files.
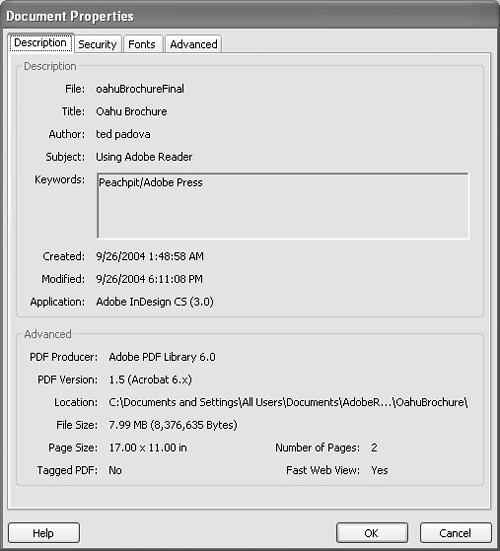
Although Adobe Reader does not permit you to change document properties, the Document Properties dialog and in particular the Description tab in Document Properties provide you with information about the active PDF document. Of special importance to you are the file size, the page size, and the original authoring program that produced the PDF document.
To open Document Properties:
Open a document in Adobe Reader. Select File > Document Properties or press Ctrl/Command+D. The Document Properties dialog opens (Figure 4.7).
The Description tab provides information related to the authoring program in which the document was created, the PDF creation date, the last known modification date, the file size, and the document description.
Click the Security tab for information about any encryption applied to the document; select the Fonts tab to find out what fonts are embedded or substituted; and click the Advanced tab for miscellaneous information on PDF Settings and Reading Options.
Click OK to exit Document Properties.
You can open several files at one time in Adobe Reader, and the files will open stacked in the Document pane. You might be reviewing several chapters of a document that spans several files and need to refer to one file as you comment on another. Hence, you open several documents in Adobe Reader and toggle views between the open files. As you do this, the foreground document hides the other open documents. At times you may want to toggle views between open files and bring background documents to the foreground, or compare documents side by side. Reader accommodates your viewing needs for both single- and multiple-document viewing.
When you have multiple files open in Adobe Reader, the files are dynamically listed by filename at the bottom of the Window menu. When you open an additional file, the filename joins the list and the document moves to the foreground. When you close a file, the name disappears from the list. You can use the listed filenames in the Window menu to bring files forward in the Document pane.
To bring a document forward, click on any filename that has no checkmark next to its name (Figure 4.8), and the file will move forward in the Document pane.

You may at times want to view several documents at once. Adobe Reader offers several document viewing options that enable you to easily toggle between views or compare files side by side.
To view multiple documents in the Document pane:
Open three documents (for purposes of this example) in Adobe Reader.
Select Window > Cascade. All open files appear stacked with the title bar visible on each file. Click on the title bar of a background file and the document moves to the foreground.
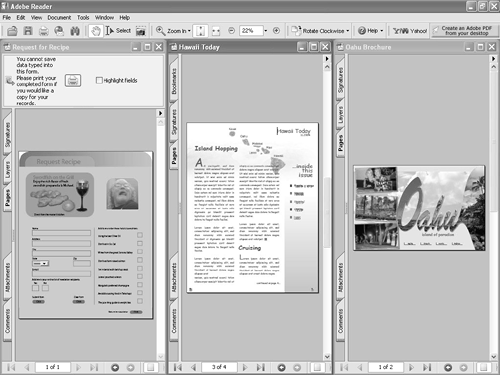
You can also tile the open documents. Select Window > Tile > Vertically. All documents appear aside each other in the Document pane as shown in Figure 4.9.
Tip
You can tile documents with the Navigation panes—such as Bookmarks, Pages, and Layers—open. Navigation panes are shown aside the Document panes for each file you choose to open a pane. For more information on using Navigation panes, see Chapter 5, “Navigating PDF Documents.”
Click a file to make that document the current active file in the Document pane.
When you first open a PDF document, the file may appear too large or too small to view in the Document pane. You may need to change the zoom level or the page layout view, or you may want to view multiple documents aside each other at a comfortable zoom level.
When you first open a PDF document, the page layout may be set in the Document Properties or determined through your own user preferences. There are four modes to choose from for page layout views. Regardless of the preferences settings saved with a PDF document, you can change the page layout view at any time: Select View > Page Layout and choose from the four different view options in a submenu. You can also select from the four icons on the far right of the Status Bar to change page layout views. Figure 4.10 shows the page layout view options.
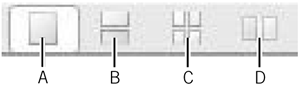
Figure 4.10. The Status Bar contains four icons for viewing pages: (A) Single Page view, (B) Continuous page view, (C) Continuous—Facing page view, and (D) Facing pages views.
To change page views:
Open a multipage PDF document in Adobe Reader. Zoom out of the document page by pressing Ctrl/Command– (minus). Press the keyboard shortcut keys several times to zoom out of the page view (see “Changing Zoom Levels” later in the chapter).
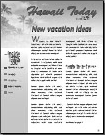
Click the Single Page tool in the Status Bar. The page is viewed in the Document pane as a single page (Figure 4.11).
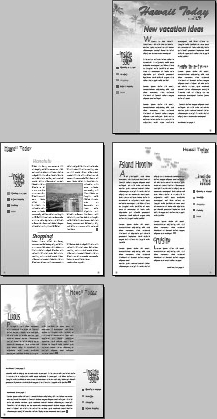
Click the Continuous tool in the Status Bar. The view displays pages in a continuous-page view (Figure 4.12).
Click the Continuous—Facing tool in the Status Bar. Pages are viewed as continuous facing pages (Figure 4.13).
Click the Facing tool in the Status Bar. The view changes to facing pages (Figure 4.14).

PDF documents can be created at sizes up to 200 inches by 200 inches. The document page sizes depend on the capabilities of the authoring application producing the PDF. If you view pages in Fit Page view and the page size is larger than a standard “US letter” page, the text in the document might be impossible to read. Changing page sizes to make it comfortable to read and examine detail in drawings is something you might do often. Fortunately, Adobe Reader provides you with many tools for changing page-viewing sizes.
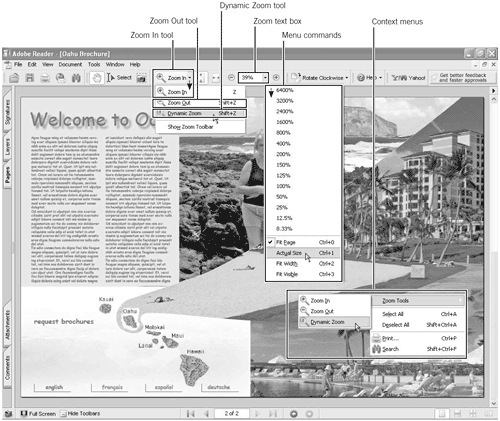
To zoom in and out of pages, you can use menu commands, context menus, and/or tools in the Zoom toolbar. Figure 4.15 shows a large page where the text is not clearly legible when the page is displayed in Fit Page view. In the Zoom toolbar, page tools adjacent to the Zoom In tool snap to Fit Page and Fit Width views. Fit Page, to the right of the Zoom In tool, zooms the page to fit within the Document pane. The Fit Width tool zooms the page to the horizontal width of a page within the Document pane. Next to the Fit Width tool is a text box where a zoom value can be typed. To the right of the text box you find a pull-down menu where a number of different zoom presets appear as menu commands.
Different zoom options include:
Zoom In tool. Click the Zoom In tool in the Toolbar Well, or press the Ctrl/Command++ (plus key), and then click in the Document pane to zoom in to a page.
Zoom Out tool. Performs the opposite action of the Zoom In tool. Click with the tool in the Document pane to zoom out, or press Ctrl/Command+– (minus key).
Dynamic Zoom tool. Click the Zoom In pull-down menu and select the Dynamic Zoom tool. Drag up or down in the Document pane to quickly zoom in or out of the page. I call this tool zoom on steroids. It's quick, easy, and allows you to zoom in fast without waiting for a screen refresh. If you're viewing large documents like engineering drawings or files with a lot of vector artwork, use this tool for zooming in and out of those pages.
Zoom text box. Type a value in the text box and press the Enter/Return key to zoom at fixed zoom levels.
Menu commands. Select View > Zoom To (or press Ctrl/Command+M), and a dialog opens where you can type in a magnification level or select from fixed zoom levels. Additional commands in the View menu also provide options for all the page zoom levels including Actual Size, Fit Page, Fit Width, and Fit Visible.
Context menus. With the Hand tool selected, open a context menu and select Zoom Tools from the menu options. The submenu displays menu options for the Zoom In, Zoom Out, and Dynamic Zoom tools. Select any one of the three zoom tools and open a context menu. The menu lists a number of fixed zoom levels and additional page zoom levels including Actual Size and Fit Visible. Actual Size displays the PDF pages at 100% view. Fit Visible zooms into the data on the page while ignoring any white space surrounding the page data. For example, if you have a document with a 2-inch white border and the text falls between the 2-inch margins, the Fit Visible zooms to the width of the data.
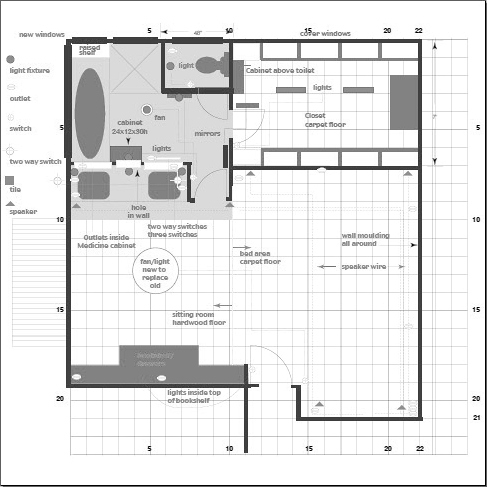
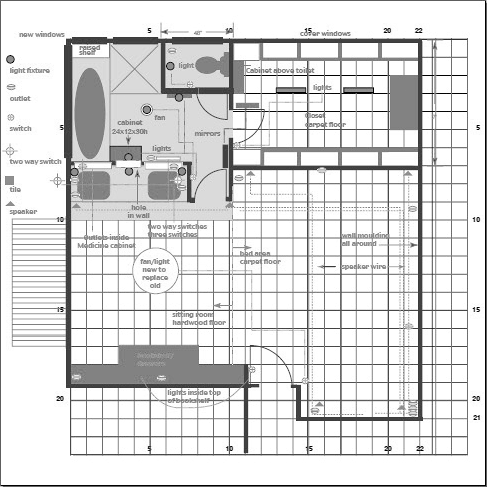
Adobe PDF documents are widely used by engineering and architectural firms for sharing files and archiving documents. Because it supports creation of files at sizes up to 200 by 200 inches, PDF is ideal for displaying large architectural and scientific drawings. The problem with zooming out on large drawings to view an entire page, however, is that the lines in the drawings disappear.
Adobe Reader solves this problem by providing you with a view that keeps all line weights at 1-point size regardless of the zoom level. When you select the Wireframe view, all lines are shown at 1-point weight.
Note
For viewing files in Wireframe view, it's best to use a line drawing. If you don't have a drawing available, use the housePlan.pdf file from the files hosted at www.peachpit.com/adobereader7.
To view documents in Wireframe view:
Open a PDF file of a diagram or drawing. To best see the results of the Wireframe view, use an oversized document at least 36 inches square.
Zoom out on the document so you can see the entire drawing in the Document pane. In Figure 4.16 the zoom level is set to 7% for a 48-inch square document.
Notice the line weights in the drawing. To display the lines at 1-point size, select View > Wireframe. The line weights appear larger, as shown in Figure 4.17.
When you view pages in the Document pane at Fit Page view, you don't see an immediate reference for the page dimensions as you could in earlier versions of Acrobat and Adobe Reader. In Adobe Reader 7, move the cursor to the lower-left corner of the Document pane. When the cursor is within 2 inches of the lower-left corner, a pop-up display shows you the page dimensions, as shown in Figure 4.18.
Object data are data assigned to individual objects in programs that support object data commenting, such as Microsoft Visio, Microsoft Project, and Autodesk AutoCAD. Object data might consist of product or material items on a drawing and the costs associated with each item. For example, a floor plan showing an interior design of an office might include illustrations of desks, file cabinets, bookcases, and so on. Each object might be defined with a cost associated with the furniture items. When you open a PDF document containing such object data, you can view the data, such as the costs, by using the Object Data tool.
Note
To view object data in a PDF document, use the officePlan.pdf file at www.peachpit.com/adobereader7.
How do I know if a PDF contains object data?
You can find object data in a PDF document in several ways. Before you search, though, you need to determine whether the document contains such data. When you open a PDF containing object data, a Document Status dialog (Figure 4.19) may open informing you that the file contains object data.
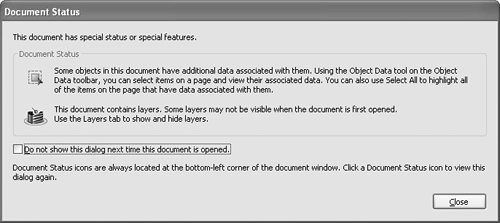
I say you may see the dialog open, because you need to have a preferences item enabled in order for the Document Status dialog to appear. Open the Preferences dialog (Ctrl/Command+K) and click Startup in the left pane. In the right pane, check the box for Display the Document Status dialog when these status items appear. Below the check box is a list of items that you can choose to show in Document Status dialogs. Check the box for Documents with object data (Figure 4.20 ). Click OK in the Preferences dialog, and the next time you open a PDF containing object data, the Document Status dialog will open informing you of that fact.
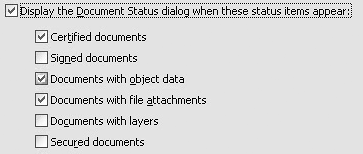
Figure 4.20. Check the Startup preferences dialog to be certain the check boxes are enabled so the Document Status dialog informs you when object data exists in a file.
If you don't enable the Startup preferences to show the Document Status dialog when object data exists, you can still assess whether a document contains object data: Glance at the lower-left corner of the Adobe Reader window; if object data exist, you'll see an Object Data icon in the lower-left corner of the Status Bar (Figure 4.21).

Figure 4.21. PDFs containing object data display an Object Data icon in the lower-left corner of the Status Bar.
Now that you've identified the PDFs that contain object data, the next step is to find which objects contain the data. One method is to first select the Object Data tool and move the cursor over objects on a page. When the cursor changes from a selection arrow to a crosshairs cursor, then you know the object contains data.
A second method is to select Edit > Select All. This selects all objects in the document. Move the cursor over a selected object with the Object Data tool selected, and click to show any data related to that object.
To view and search object data:
Open a PDF document containing object data in Adobe Reader.
Open a context menu in the Toolbar Well by right-clicking (in Windows or with a two-button mouse on Macintosh) or Control+clicking (on the Macintosh with a one-button mouse) and select Object Data from the menu options (Figure 4.22). Return to the context menu and select Dock All Toolbars to dock the toolbars in the Toolbar Well.
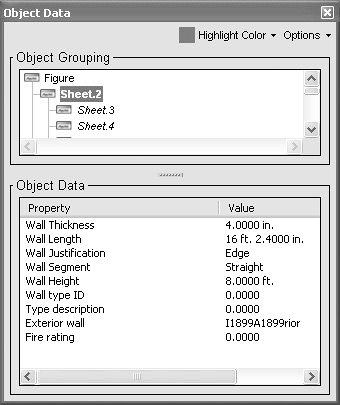
Select the Object Data tool in the Toolbar Well. Click an object in the Document pane. The Object Data dialog opens (Figure 4.23).
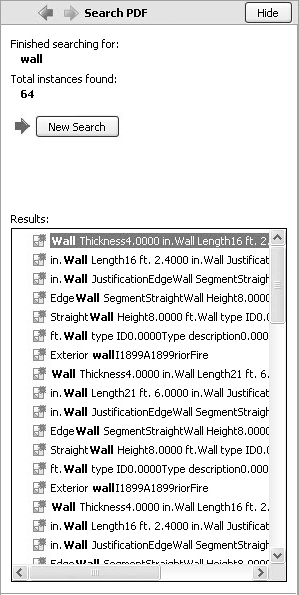
Open the Options pull-down menu by clicking on the down arrow. Select Search from the menu options. Selecting Search from this menu confines the search to reporting found instances of words found in Object Data. The Search pane opens in the How To window.
Type text in the text box to search for object properties, and click the Search button. The Search pane displays results (Figure 4.24) for all objects containing the same properties.

Using the other Options menu commands, you can also zoom to a selection, select all objects, select all the same types of objects, count the objects, and copy data to the clipboard.
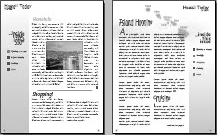
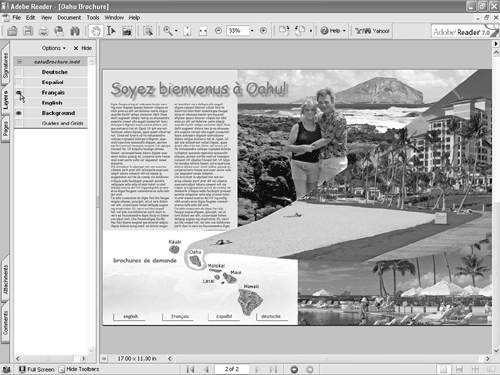
Certain applications that support the creation of multilayered documents—such as Microsoft Visio, Autodesk AutoCAD, Microsoft Project, Adobe InDesign CS, and Adobe Illustrator CS—can convert to PDF with layers intact. Layers are useful in many ways. You might view a drawing of a house plan where you want to show or hide a dimension grid, wiring diagrams, furniture, subwalls, or other data contained on separate layers. You might view a brochure or advertisement designed for multilingual purposes where the layout and design remain static as you turn on and off different layers of text created for different languages. You can view and print PDFs with some layers hidden and other layers visible.
You'll know that a document contains layers if the Layers tab automatically appears in the Navigation pane when you open the file in Adobe Reader. For more information on using tabs in the Navigation pane, see Chapter 5, “Navigating PDF Documents.”
Note
To view a PDF with Adobe PDF Layers, use the oahuBrochure.pdf file, which you can download from www.peachpit.com/adobereader7.
To view different layers in a PDF document containing Adobe PDF Layers:
Open a file containing Adobe PDF Layers. Click the Layers tab to open the Layers pane if it's not currently open.
Layers may be collapsed in the Layers pane so that the individual layers are hidden. To expand layers and make them visible, click the icon adjacent to the filename in the Layers pane. In Windows, the icon appears as a + (plus) symbol. On the Macintosh, the icon appears as a right arrow. Click the icon, and the layer names appear in the pane.
To hide a layer, click the Eye icon for that layer in the Layers pane. If an Eye icon does not appear next to a layer name, the layer is hidden in the Document pane.
To show a layer, click inside the square next to that layer name. After clicking, an Eye icon appears inside the square (Figure 4.25).
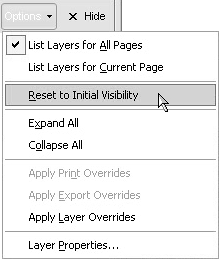
Open the Options menu by clicking the down arrow in the Layers pane. Additional menu options offer choices for listing all layers according to document or viewed page, applying overrides that result in temporarily locking the layers, and accessing information related to the layer properties. In Adobe Reader you can only view layer properties, not change them.
To return to initial layer visibility, open the Options menu and select Reset to Initial Visibility (Figure 4.26). Selecting this menu command returns you to the layer visibility that was saved with the original file.
You use Full Screen mode when viewing self-running kiosks or slide presentations. Full Screen mode utilizes all of your monitor space while hiding toolbars and menus. You can view any document in Full Screen mode, and some PDF documents you open may default to Full Screen mode when you open them. PDF authors can save documents with full screen viewing enabled when a document opens.
Since Full Screen mode hides toolbars and menus, you'll want to know how to turn this mode on and off either to eliminate toolbars and menus so you have more viewing area, or to bail out of Full Screen mode so you have access to the tools and menu commands.
Note
To view a PDF document in Full Screen mode, use the hawaiianLuau.pdf file at www.peachpit.com/adobereader7.
To use Full Screen mode:
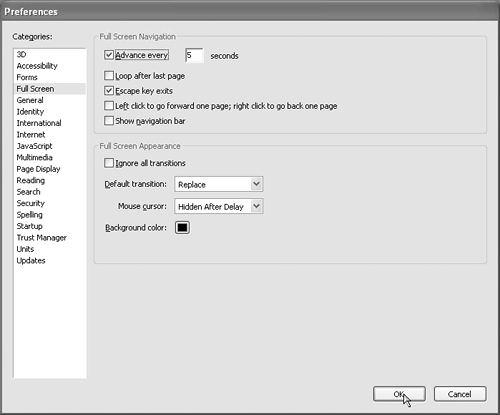
Open the Preferences dialog by pressing Ctrl/Command+K. Click Full Screen in the left pane to view the preferences options in the right pane.
For self-running kiosks that loop through pages automatically, check the box for Advance every and type a value in the text box for the interval. Check Loop after last page if you want to cycle through a presentation to have it run continuously. Be sure to leave the default check box selected for Escape key exits so you can use the Esc key to easily exit Full Screen mode. If you want to use navigation tools, check the box for Show navigation bar. If embedded transitions are part of the file and you don't want them to appear, check the box for Ignore all transitions. Click OK after making your options choices. See Figure 4.27.
Click the Full Screen tool in the Reader Status Bar (Figure 4.28) or use the keyboard shortcut (Ctrl/Command+L). Click the mouse button or press the right arrow or Page Down key to move forward. Press the left arrow or Page Up key to move backward.
To exit Full Screen mode, press the Esc key.
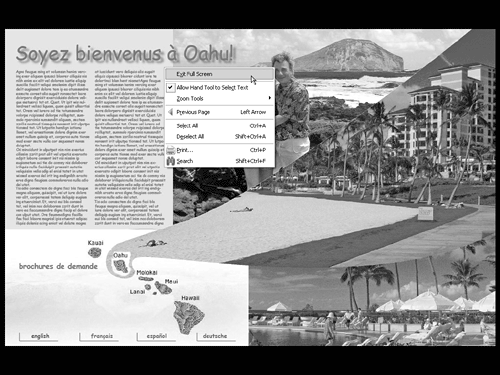
When viewing documents in Full Screen mode, you temporarily lose the menu commands and the tools. However, you can remain in Full Screen mode and still access a few menu commands from a context menu.
First, open the Preferences dialog (Ctrl/Command+K). Click Full Screen in the left pane and remove the checkmark for Left click to go forward one page; right click to go back one page. Since right-clicking the mouse button advances a page when the checkmark is enabled, you won't be able to open a context menu by right-clicking the mouse. Removing the checkmark permits you to do so.
Press Ctrl/Command+L to change the view to Full Screen mode, and open a context menu anywhere on the document page. The menu options shown in Figure 4.29 appear. Using this menu you can navigate pages, access zoom tools, select and deselect text, print a file, and use Reader's search features. When you select Search, the Search window opens in the How To pane, while the document remains in Full Screen mode. Another handy command is the Exit Full Screen item at the top of the menu. If you disabled the check box for Escape key exits in the Full Screen preferences, this command gets you back to normal viewing mode.