
Chapter 21. Access 2007 and SharePoint
IN THIS CHAPTER
- Why This Chapter Is Important
- The Access 2007 (
accdb) File Format and SharePoint - Exporting Data to a SharePoint Site
- Publishing Data to a SharePoint Site
- Opening Access Forms and Reports from a SharePoint Site
- Linking to and Importing from SharePoint Lists
- Taking SharePoint Lists Offline with Access
- Reestablishing Links When a SharePoint Site Has Been Moved
Why This Chapter Is Important?
SharePoint Server 2007 offers several benefits in managing data. These benefits include the ability to track versions of data, subscribe to alerts so that you know when another user makes changes to the data, and manage permissions for the site. By integrating SharePoint 2007 and Access 2007, you benefit from these rich collaboration features while utilizing Access’s powerful data entry and analysis features.
You can use several different techniques when integrating Access 2007 and SharePoint 2007, including the following:
- Exporting selected data to a SharePoint site
- Moving an entire database to a SharePoint site
- Opening Access forms and reports from a SharePoint site
- Creating databases from SharePoint lists
- Taking SharePoint lists offline with Access
Although this chapter covers each of these techniques in detail, the sections that follow provide an overview of each topic.
Exporting Selected Data to a SharePoint Site
When you export a table to SharePoint, you make a copy of that table and place it on the SharePoint site as a SharePoint list. Changes made to the Access table do not affect the SharePoint list, and changes made to the SharePoint list do not affect the Access table.
Moving an Entire Database to a SharePoint Site
You can use the Move to SharePoint Site Wizard to move your Access 2007 data to a SharePoint site. During this process, Access removes the tables from the Access database, places them on the SharePoint site, and creates links to the data from within Access. After the tables are on the SharePoint site, people can either work with the tables on the SharePoint site or use the linked tables within Microsoft Access. Because the data is in SharePoint, you can take advantage of the data tracking and permissions benefits of SharePoint.
Opening Access Forms and Reports from a SharePoint Site
After you publish data to a SharePoint site, users can open your Access forms, reports, and datasheets directly from the SharePoint site. The objects appear on the site along with the SharePoint views. When a user selects a given form, report, or datasheet from within SharePoint, Access starts and opens the appropriate object. The user does not have to first open Access to work with the form or report.
Creating Databases from SharePoint Lists
Just as you can create SharePoint lists from Access tables, you can also create Access databases from SharePoint lists. After you create the Access database, you can build forms and reports that you will use to view and update the SharePoint data.
When you import a SharePoint list, you are copying the SharePoint data and creating a new Access table based on the copy. If you make changes to the SharePoint data, those changes do not affect the Access data; and if you make changes to the Access data, the changes do not affect the SharePoint data. When you link to a SharePoint list, the data resides only in SharePoint. Your Access database points at the SharePoint database and reads its data. All changes that you make to the data from within Access are saved to the SharePoint list, and all changes that you make to the data from within SharePoint are reflected in Access. After you have linked to SharePoint lists, you will want to use forms and reports to view and update their data.
Taking SharePoint Lists Offline with Access
Sometimes you will want to work with your SharePoint data when you are disconnected from the network. With one click in Access, you can take your SharePoint lists offline and then synchronize them with the server when you reconnect to the network.
Summary of Benefits of Working with SharePoint
The techniques just covered provide numerous benefits to Access developers and end users. The first has to do with security. Using SharePoint lists and Access databases on SharePoint sites, you can apply security settings to groups of users who will access your data. For example, you can assign the appropriate rights to groups so that they can access only the data appropriate for their use. This means that whereas one group has read-only rights to limited items within a list, another group has full editing rights to all items in the list.
Another benefit of storing the data in SharePoint is its capability to track and manage versions of data. Using SharePoint as your data store, you can easily determine who modified data and when.
Finally, users can easily view or restore deleted rows. This functionality is available because deleted rows are not actually removed but are instead placed in the Recycle Bin.
The Access 2007 (accdb) File Format and SharePoint
It is important to understand that if you want to integrate with SharePoint data from within Access, you not only must use Access 2007 but also must have your database stored in the Access 2007 (accdb) file format. There are a few reasons for this. The first is multivalued lookup fields, new to Access 2007 and the accdb file format. Multivalued lookup fields enable you to store multiple values in a single field, creating, in effect, a many-to-many relationship within the field. An example is a SoldBy field. You can place the names of all the salespeople in a single field and use that field as a lookup for what salesperson is associated with a particular order. Because SharePoint supports multivalued fields, it makes sense for Access to support multivalued fields so that the two can share data.
Another Access 2007 feature important to SharePoint is memo field history tracking. Using memo field history tracking, you can ensure that users can only append to memos, not edit existing memo data. You can then view all those changes. Because SharePoint also enables you to track changes with its versioning feature, adding this feature to Access ensures that you can track changes when linked to data in a SharePoint list.
Exporting Data to a SharePoint Site
If your department or workgroup uses SharePoint to manage its lists, at some time you might need to export some of your Access tables to the SharePoint site. When you export an Access table to SharePoint, you are making a copy of the data. In other words, if you make changes to the data in Access, those changes will not appear in SharePoint; and if you make changes to the data in SharePoint, you will not see the data in Access.
Why Export Data to a SharePoint Site?
There are a few reasons why you might choose to export data to a SharePoint site. Probably the most common reason is that you plan to work with the data in SharePoint, but it currently resides in Access. You can export the data to a SharePoint list and then link to the list from within Access. Linking is covered in the section “Linking to and Importing from SharePoint Lists.”
A second reason you might want to export data to a SharePoint site is that you are just getting started with SharePoint and you believe that it might be simpler for your users to work with some of your data if it is stored both in Access and as SharePoint lists. This is due to the ease of use when viewing or editing SharePoint lists within a browser.
Finally, you can use queries to export important results to SharePoint. Users of the SharePoint site can then browse those results from within SharePoint without having to load Access.
How to Export Data to a SharePoint Site
Microsoft Office Access 2007 makes the process of exporting to a SharePoint site quite easy. Here are the steps involved:
- Open the database containing the table or query that you want to export to SharePoint.
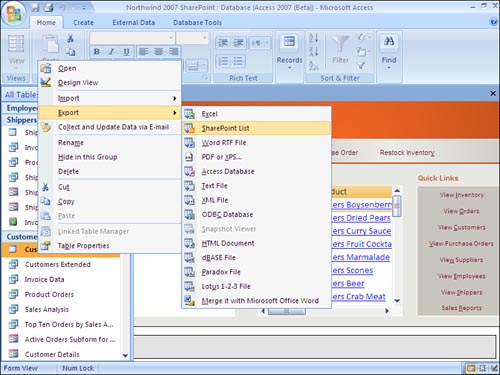
- Right-click the object that you want to export and select Export, SharePoint List (see Figure 21.1).
Figure 21.1. You can right-click an object to export it to SharePoint.
Or
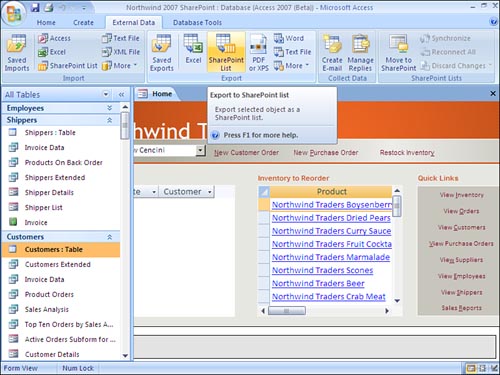
Select the object that you want to export, click to select the External Data tab, and then select SharePoint List in the Export group (see Figure 21.2).
Figure 21.2. You can use the External data tab to export an object to SharePoint.
In either case, the Export Data to SharePoint List Wizard appears (see Figure 21.3). Note that you can export only tables and query results. The fields and records of the tables and queries in Access become the columns and rows of the SharePoint list.
Figure 21.3. The Export Data to SharePoint List Wizard takes you through the process of exporting table or query data to SharePoint.

- Enter the name of the SharePoint site on which you want to place the list. The site address must appear like this:
http://sharepoint/accounting
In this example,
sharepointis the name of the server, andaccountingis the name of the specific site on the server where you want to place the list. - Ensure that you have appropriate rights to the server. Also, ensure that the name of the list is unique. Access will not allow you to overwrite a list with a list that already exists with that name. Instead, it makes a second copy of the object and adds a suffix to the name (for example,
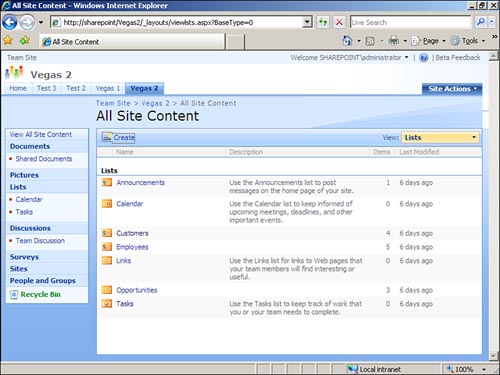
Customers_1). Click OK to export the data to SharePoint. The export process places you on the SharePoint Team Site, in the specific site that you designated during the export process. Notice in Figure 21.4 that the copy of theOrderstable appears on the SharePoint site and is viewed within a browser. You can now manipulate the data in SharePoint.Figure 21.4. The
Orderstable appears on the SharePoint site and is viewed within a browser.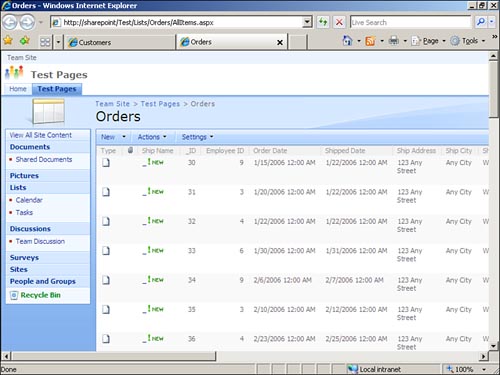
Conversion Issues
You should be aware of some conversion issues when exporting your Access tables to SharePoint:
- All fields in the table or query, including hidden fields, are exported to SharePoint.
- Filter settings are ignored during the export process (use query criteria instead).
- Because SharePoint lists support only one attachment column, you must remove all but one attachment column before you export the data to SharePoint. The workaround to this problem is to copy additional attachment columns to other Access objects and then export them to SharePoint lists.
- Access exports display values in single-valued lookup fields as drop-down menu choices in the SharePoint list.
- If the source column supports multiple values, the wizard creates a Choice field that allows multiple selections in the SharePoint list.
- A Choice field in SharePoint can consist of only a single column. If the source lookup field is based on multiple columns, the values of all the columns are combined into a single column.
- Only the results of a calculated field in a query are copied to the SharePoint list (not the underlying formula).
- When you export a calculated field, the data type selected in the export is dependent on the data type of the formula result.
- Access ignores OLE object fields when performing the export.
It is also important to understand how the Windows SharePoint Services data types map to Access data types. Access help provides you with this mapping information. For example, a Text field is converted to a single line of text. The column name, description, required setting, maximum number of characters, and default value mirror their Access counterparts. A Memo field is converted to multiple lines of text. The column name, description, and required properties mirror their Access counterparts. The number of lines to display is set to 5.
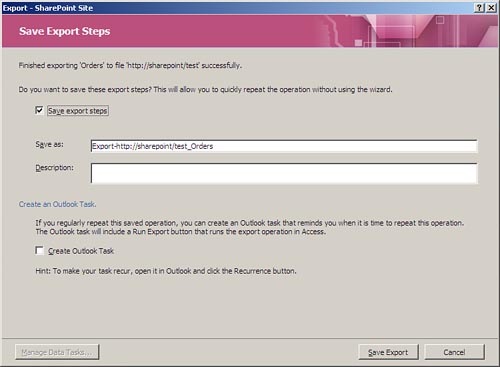
After the wizard runs, Access prompts you as to whether you want to save your export steps (see Figure 21.5). If you click Save Export Steps, the wizard prompts you for all the necessary information about the export process (see Figure 21.6). Enter the Save As location, the description, and whether you want to generate an Outlook task that will remind you to complete the operation. Click Save Export to complete the process.
Figure 21.5. After you run the wizard, Access prompts you as to whether you want to save the export steps.
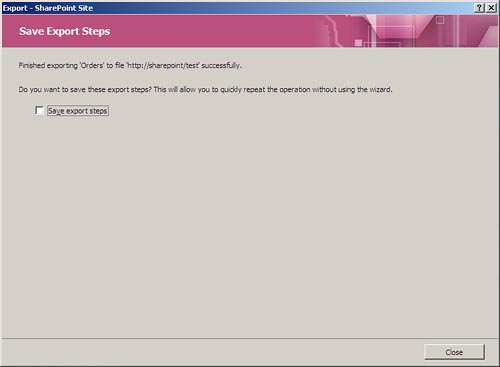
Figure 21.6. If you opt to save the export steps, Access prompts you for the appropriate information.
Publishing Data to a SharePoint Site
When you publish data to a SharePoint site, you first copy it to the site and then create links to it from within Access. You can then run your queries, forms, and reports from within Access. The Move to SharePoint Site Wizard assists you with the process of creating the lists in SharePoint, maintaining the relationships between them, and creating links to them within Access. Here’s how the wizard works:
- Click to select the External Data tab.
- Click the Move to SharePoint button within the SharePoint Lists group. The Move to SharePoint Site Wizard appears (see Figure 21.7).
Figure 21.7. The Move to SharePoint Site Wizard walks you through the process of moving Access tables to SharePoint lists.
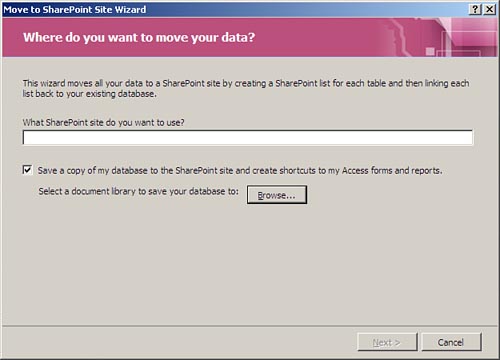
- Designate the SharePoint site that you want to use (for example,
http://sharepoint/test). - If you plan to run your forms and reports from within Access (rather than from within SharePoint), click Next. It is important to note that you either need to specify a document library (the default) or clear the Save a Copy check box. Otherwise, the Next button will not be available. The process of creating the lists in SharePoint is quite involved and will probably take some time, especially if you have a large number of tables. You can click Stop at any time to abort the process.
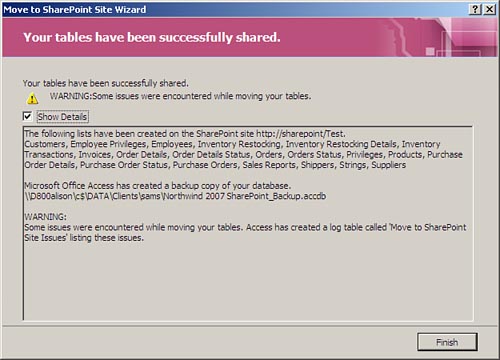
- When the process completes, the wizard should appear as in Figure 21.8. If there are warnings or errors, you should click Show Details. Your screen will then appear as in Figure 21.9. Notice that the details show you the lists the wizard created, where the backup copy of your database is located, and what table contains a log of issues encountered by the wizard.
Figure 21.8. The wizard provides you with information upon completion.
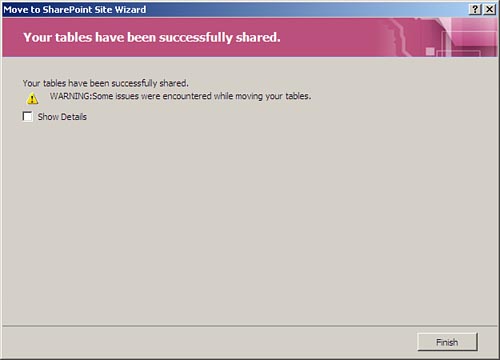
Figure 21.9. You can opt to view the details of everything that occurred during the process of creating SharePoint lists.
- Click Finish to complete the process. Notice that the Access tables appear with links to the SharePoint lists (see Figure 21.10).
Figure 21.10. When you close the wizard, you will see that the database links to all the SharePoint lists.
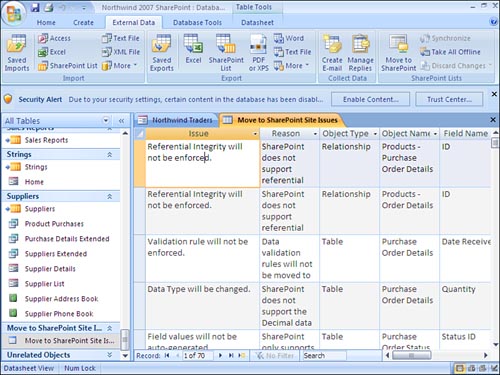
It is important that you review the Move to SharePoint Site Issues table. This table lists all issues encountered during the upsizing process. The Move to SharePoint Site Issues table appears in Figure 21.11.
Figure 21.11. It is important that you review the Move to SharePoint Site Issues table to determine everything that happened during the upsizing process.
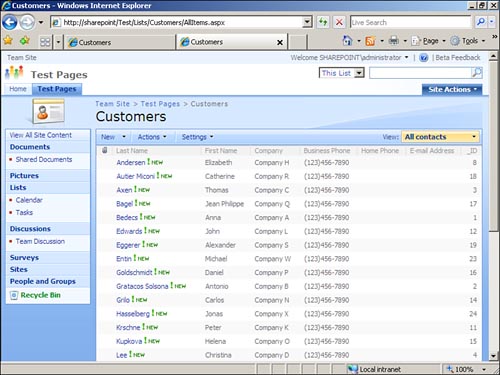
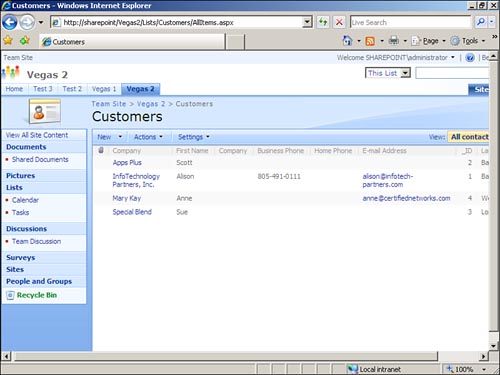
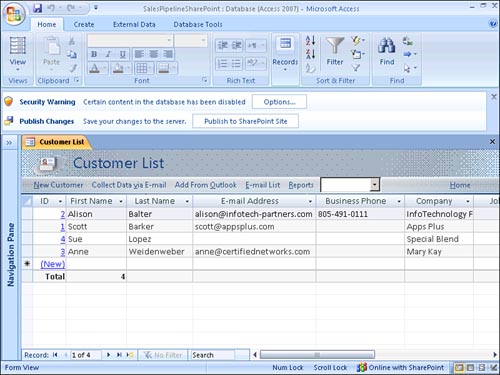
Now that the SharePoint lists are created, you can view and edit list data from within Microsoft Access (see Figure 21.12). You can also run forms and reports based on that data (see Figures 21.13 and 21.14). You can also edit data directly from the SharePoint site (see Figure 21.15). Because the lists are linked, all changes are reflected both in Access and in SharePoint.
Figure 21.12. You can view and edit list data while in Datasheet view.
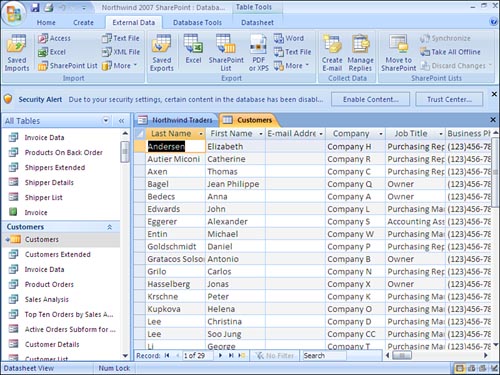
Figure 21.13. You can view and edit data using an Access form.
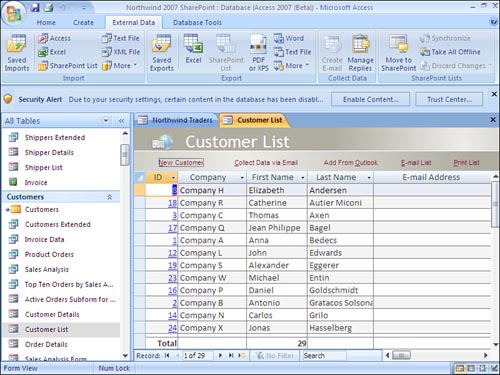
Figure 21.14. You can view list data using an Access report.
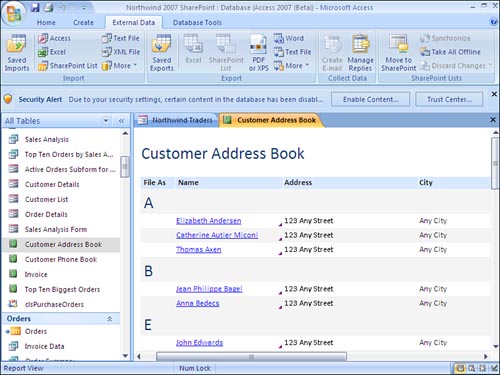
Figure 21.15. You can modify list data via the SharePoint site.
Now that the data is in SharePoint lists, you can fully manage it from the SharePoint site. This means that you can apply various levels of security, manage versions of the data, and retrieve deleted data from the Recycle Bin on the SharePoint site. You can even create alerts so that certain people know when someone has changed the data.
How the Wizard Moves Data to the SharePoint Site
When the wizard runs, it attempts to match each Access table to a template available on the SharePoint site. If it finds a template, it creates the SharePoint list based on that template. If it can’t find an appropriate template, it creates a custom list on the SharePoint site. During the process, it creates a backup of your original database and then creates links to the lists on the SharePoint site.
Opening Access Forms and Reports from a SharePoint Site
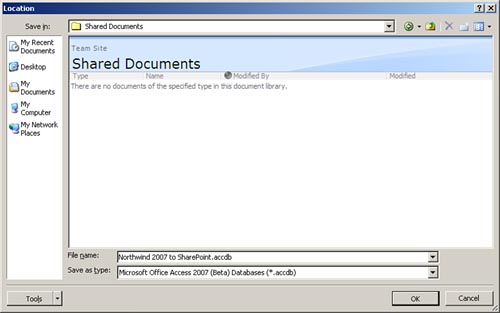
In the preceding sections, you published data to a SharePoint site. When you ran the wizard, you did not opt to save a copy of the database to the SharePoint site and create shortcuts to Access forms and reports. Instead, you ran all the queries, forms, and reports from within Microsoft Access. In this section, you tell the wizard to save a copy of the database to the SharePoint site and create shortcuts to its forms and reports (see Figure 21.16). To do this, you must select Browse and indicate the location of the document library where you want to save your database (see Figure 21.17). After you have saved your database to the document library, you can easily launch your forms and reports from the SharePoint site. Here are the steps involved:
Figure 21.16. When you publish data to a SharePoint site, you can opt to create shortcuts to Access forms and reports.
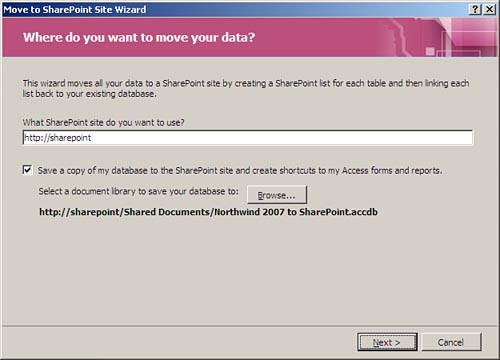
Figure 21.17. You must designate the SharePoint library within which you want to save the database.
- Navigate to the appropriate SharePoint site.
- Click to expand the lists available on that site (see Figure 21.18).
Figure 21.18. You must click to expand the lists available on the site.
- Click the link to open the list that you want to view. The screen appears as in Figure 21.19.
Figure 21.19. Click the link to open the list you want to view.
- Click to open the View drop-down. All the forms and reports associated with that list appear in the drop-down (see Figure 21.20).
Figure 21.20. The View drop-down displays all the forms and reports associated with a list.

- Click to select the form or report that you want to run. Access launches and displays the form or report (see Figure 21.21).
Figure 21.21. Access launches and displays the selected form or report.
Linking to and Importing from SharePoint Lists
You can easily create an Access database from existing SharePoint lists. The process is quite simple:
- Open the database within which you want to place the new tables.
- Click to select the External Data tab.
- Select SharePoint List from the Import group. The Get External Data dialog box appears (see Figure 21.22).
Figure 21.22. In the Get External Data dialog box, you can designate whether you want to import or link to the SharePoint data.
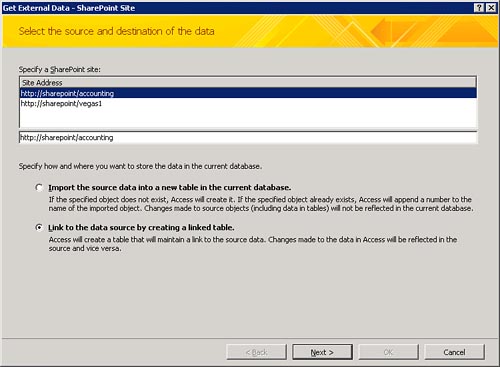
- Designate whether you want to actually import the SharePoint data into the Access database or whether you prefer to create links in the Access database to the SharePoint lists. Realize that if you select the first option, you are simply copying the SharePoint data and are placing the copy of the data within the Access database.
- Click Next. The Import data from list step of the wizard appears (see Figure 21.23).
Figure 21.23. Select the tables that you want to import or link to.
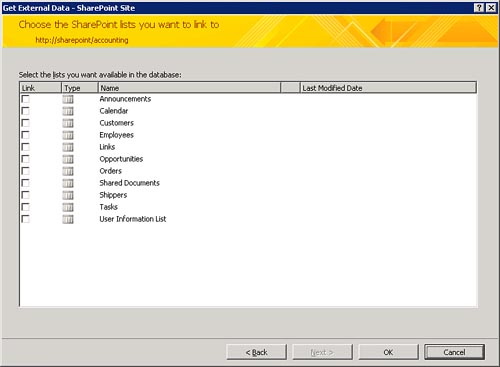
- Click to select the tables that you want to import or link to.
- Click OK to complete the process.
- Access prompts you to save the import steps (see Figure 21.24). If you opt to save the import steps, the dialog box in Figure 21.25 appears.
Figure 21.24. Access prompts you to save the import steps.

Figure 21.25. Access prompts you for information about the import process.
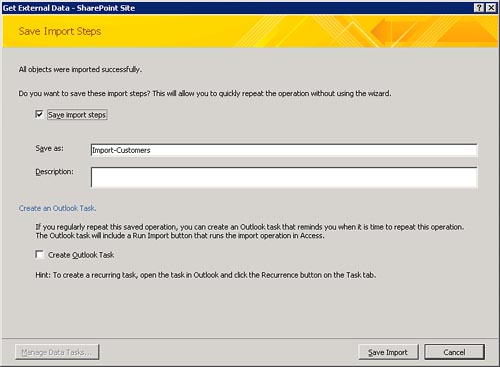
- Fill in the name for the task, add a description of the task, and designate whether you want to generate an Outlook task that will automatically run at designated times.
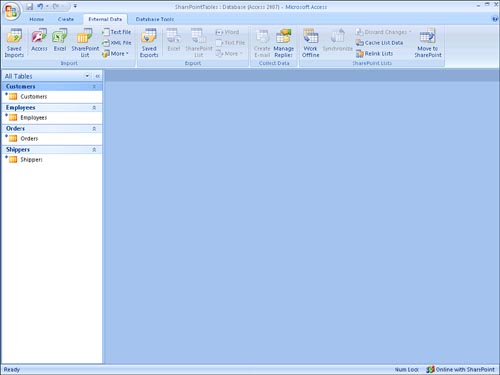
- Click Save Import to complete the process. The resulting database appears as in Figure 21.26. Notice the four tables with links to the SharePoint database.
Figure 21.26. The linked tables appear in the Access database.
Taking SharePoint Lists Offline with Access
At times, you will want to take your SharePoint lists offline and work with them while you are disconnected from the network. Fortunately, Access 2007 makes this process quite easy. It is important to note that this scenario applies only to Access databases containing links to SharePoint lists, not to imported lists. Here’s how you can work with your SharePoint lists offline:
- Open the database that you want to take offline.
- Click to select the External Data tab.
- Click to select Work Offline from the SharePoint Lists group. The icons associated with the linked tables change to appear as in Figure 21.27.
Figure 21.27. The icons change to indicate that you are working offline.
Synchronizing Your Changes with SharePoint
Because you are now working on a local copy of the data, changes that you make to the data are not immediately reflected in SharePoint, and changes made in SharePoint are not reflected in the Access database. At some point, you might want to have your changes reflected in SharePoint. You will also want to view the current SharePoint data. This process does not require taking your database back online. Here’s how it works:
- Click to select the External Data tab.
- Select Synchronize in the SharePoint Lists group. Access will indicate to you that the synchronization process is occurring.
- If any conflicts occur between the offline database and the SharePoint data, the Resolve Conflicts dialog box appears (see Figure 21.28).
Figure 21.28. The Resolve Conflicts dialog box allows you to resolve conflicts between Access and SharePoint data.
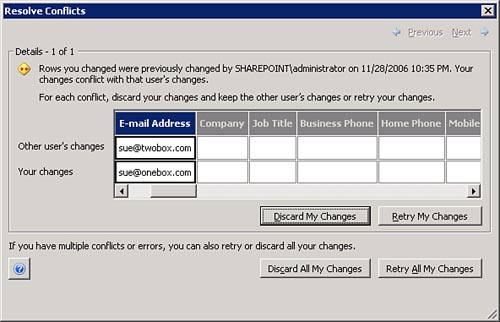
- Resolve any conflicts by opting to either discard your changes or retry your changes.
- The synchronization process completes, and all changes appear in both the Access copy and the SharePoint copy.
Working Online
At some point, you will be ready to once again work online. Notice that when you are working offline, the ribbon button reads Work Online and is available in the SharePoint Lists group. To work online, just click the Work Online button. The synchronization process completes; and if there are any conflicts, the Resolve Conflicts dialog box appears. When the process completes and all conflicts have been resolved, the link icons return to normal (see Figure 21.29).
Figure 21.29. After you take the database back online, the icons appear in their default state.
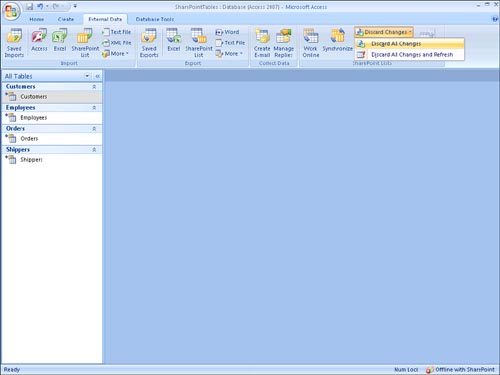
Discarding Your Changes
You might decide that you want to discard all the changes that you have made to the data in the Access database. This feature, of course, is appropriate only when you have taken the database offline. Selecting this option in essence rolls back all the changes that you have made to the database since you took it offline. Notice in Figure 21.30 that you can choose either Discard All Changes or Discard All Changes and Refresh. If you opt to discard all changes, your changes are eliminated, but you will not see the current data in SharePoint. If you opt to discard all changes and refresh, you eliminate your changes and you will see all changes made to the SharePoint database since you took the database offline.
Figure 21.30. Access gives you two choices when discarding your changes.
Reestablishing Links When a SharePoint Site Has Been Moved
You or someone else might at some time need to move a SharePoint site to a different location. When this happens, the link from Access to the SharePoint data will be lost. Fortunately, Microsoft Office Access 2007 has a built-in feature that enables you to rectify the link. Here’s how it works:
- Click to select the External Data tab within Microsoft Access 2007.
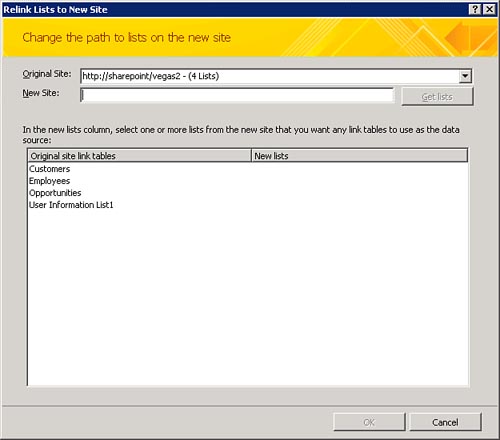
- After clicking the Work Online button on the ribbon to take the database back online, click the Relink Lists option in the SharePoint Lists group. The Relink Lists to New Site dialog box appears (see Figure 21.31).
Figure 21.31. The Relink Lists to New Site dialog box allows you to designate the new site where the lists reside.
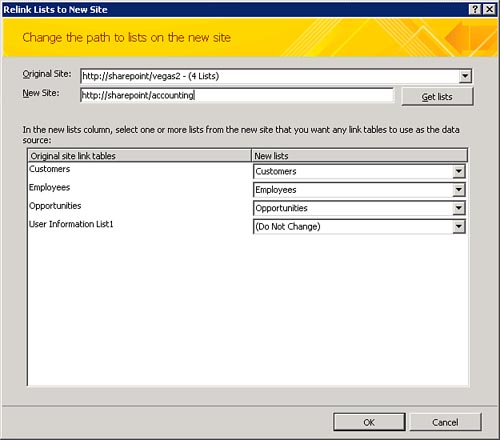
- Type in the name of the new site that contains the designated lists.
- Click Get Lists to view the lists available on the designated site. The lists appear in the New Lists column, and Access attempts to map the old list names to the new list names (see Figure 21.32).
Figure 21.32. Access attempts to map the old list names to the new list names.
- Click OK to complete the process.
Summary
Both Access and SharePoint are powerful tools. Used together, they offer the developer or end user several benefits. They accomplish this by allowing you to take advantage of the slick user interface provided by Microsoft Office Access 2007, while taking advantage of the data management provided by SharePoint.