Chapter 31. Database Security Made Easy
IN THIS CHAPTER
- Why This Chapter Is Important
- What’s New in Access 2007 Security?
- What Happened to User-Level Security?
- Trusting a Database
- Using a Database Password to Encrypt an Office Access 2007 Database
- Packaging, Signing, and Distributing an Access Database
- Using the Trust Center
- Understanding How Databases Behave When Trusted and Untrusted
- Working in Sandbox Mode
- Removing User-Level Security
- Enabling or Disabling ActiveX Controls
- Enabling or Disabling Add-Ins
- Adding a Trusted Publisher
- Practical Examples: Securing an Access 2007 Database
Why This Chapter Is Important
Security in Microsoft Office Access 2007 is significantly different from that of its predecessors. Without knowledge of how the new security paradigm works, both you and your users will be very surprised at how things have changed. In this chapter, we’ll explore all the changes to Microsoft Office Access 2007. After reading this chapter, you will be prepared to successfully deploy Access 2007 applications to your users.
What’s New in Access 2007 Security?
Microsoft has completely revamped security in Microsoft Office Access 2007. The User Security model has been completely eliminated in Access 2007, unless you keep your database in the old Access file format (.MDB or .MDE) and that database already has user-level security applied. In other words, if you open a database created in an earlier version of Access and that database already has security applied, Access 2007 will support user-level security for that database. If you convert a database created in an earlier version of Access to the Access 2007 file format, Access 2007 will strip all user-level security settings from the database, and Access 2007 security will apply. The following is an overview of the changes to security in Access 2007:
- In Microsoft Access 2003, you had to code sign and trust a database before you could view any of its data. With Microsoft Office Access 2007, you can view the data in a database without having to enable Visual Basic for Applications (VBA) code.
- With Microsoft Office Access 2007, if you place a database (new or old database format) in a trusted location, those files will open and run without displaying warning messages or asking you to enable disabled content. A trusted location is a file folder or network share that you designate as secure. Furthermore, if you open databases created in earlier versions of Access and those databases have been digitally signed, if you have chosen to trust the publisher, those files will run without making trust decisions. VBA code in the signed database will not run until you trust the publisher. If the digital signature becomes invalid, you will once again not be able to run the VBA code.
- Microsoft Office Access 2007 includes a new feature called the Trust Center. Using the Trust Center, you can set and change security options within Microsoft Access 2007.
- In Microsoft Access 2003, you had to deal with a multitude of security messages when you opened a database. Microsoft has greatly simplified this process with Microsoft Office Access 2007. When you open a Microsoft Office Access 2007 database, a message bar appears (see Figure 31.1). You simply click the Options button on the message bar. The Microsoft Office Security Options dialog appears. Click to select Enable this content and then click OK. Access enables all disabled components.
Figure 31.1. Using the message bar, you can easily enable disabled components.

- In Microsoft Access 2003, you had to apply security certificates to individual database components. In Microsoft Office Access 2007, the process of signing and distributing files is quite easy. All you need to do is to sign the database and then distribute it.
- Microsoft Office Access 2007 has a stronger algorithm for encrypting data. The encryption of a database scrambles the data in your tables. This prevents unwanted users from viewing the data in your Access databases using a tool such as a text editor.
- With Microsoft Office Access 2007 security, certain macro actions can execute without you or the user having to enable the database. In fact, all embedded macros run even if they contain macro actions that Access would ordinarily disable.
- If you open a database in a trusted location, all components of the database run without the need to explicitly trust the database.
- If you package, sign, and deploy a database from an earlier version of Access (
.MDBor.MDEfile), and the database contains a valid digital signature from a trusted publisher whose certificate you have trusted, all components will run without the need to make trust decisions. This is true whether you extract the database to a trusted or an untrusted location. When you package a database that is untrusted or one that contains an invalid digital signature, you will have to choose an option from the message bar to trust the database each time you open it, unless you deploy it to a trusted location. - You must enable databases each time you open them if they are untrusted or you place them in an untrusted location.
Note
Although Microsoft Office Access 2007 offers an improved security model, if your data requires a higher level of security than what Access provides, you should store your data on a server such as Microsoft SharePoint Services version 3 or SQL Server 2005. Your Access forms and reports can then access the data stored on the server. For more information on integrating Access 2007 with SharePoint services see Chapter 21, “Access 2007 and SharePoint.”
What Happened to User-Level Security?
As discussed in the “What’s New in Access 2007 Security?” section of this chapter, Microsoft has eliminated user-level security, unless you keep your database in the old .MDB file format. If you opt to keep your database in the old file format (.MDB), user-level security will work just as it did in Access 2003. Unfortunately, you will not be able to take advantage of most of the new features available with Access 2007. For example, you will not be able to use rich text in Memo fields. After you convert your database to the Access 2007 file format (.ACCDB), Access strips user-level security from the database, and it will no longer be available to you.
If you do keep your database in the .MDB file format, you need to be aware that, by default, Access disables all potentially unsafe code. You must first trust the database before the code in your database will run.
Trusting a Database
Whether you create your database in the .MDB or .ACCDB format, you will need to trust the database before you can run any code within it. You can opt to trust that database for the current session, or you can trust the database permanently. The text that follows shows what’s involved for each scenario.
Trusting a Database for the Current Session
One option is to trust a database while it is open. This process is quite simple. When you open the database, the message bar appears with a security warning that certain content in the database has been disabled (refer to Figure 31.1). After you click the Options button, the Microsoft Office Security Options dialog box appears (see Figure 31.2). Here, either you can opt to enable the content contained in the database, or you can have Access disable the code within the database. If you click Enable This Content, the database is fully functional as long as it is open.
Figure 31.2. The Microsoft Office Security Options dialog box allows you to trust a database for the current session.

Trusting a Database Permanently
Sometimes you know a database is safe, and you want to permanently enable its functionality. To do this, you need to create a trusted location. The steps are as follows:
- Click to open the Microsoft Access button. You don’t need to open the database that you want to trust.
- Click Access Options. The Access Options dialog box appears.
- Click to select Trust Center. The Access Options dialog box appears, as shown in Figure 31.3.
Figure 31.3. The Trust Center page of the Access Options dialog box allows you to create a trusted location.

- Click Trust Center Settings. The Trust Center dialog box appears. Select Trusted Locations on the left side of the dialog box. Your screen appears as shown in Figure 31.4.
Figure 31.4. You use the Trust Center dialog box to add a trusted location.

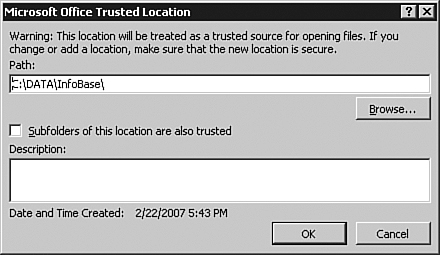
- Click the Add New Location button. The Microsoft Office Trusted Location dialog box appears (see Figure 31.5).
Figure 31.5. The Microsoft Office Trusted Location dialog box allows you to designate the specifics of the trusted location.

- Browse to select the location whose content you want to trust.
- Indicate whether you want to trust subfolders as well.
- Click OK after making your selections. The Trusted Locations dialog box appears with the new trusted location.
- To complete the process, you must move the database to the trusted location (unless it is already there). With the database open, click the Microsoft Office button.
- Select Save As, Access 2007 Database.
- Navigate to the trusted location and then click Save. When you open any databases in the trusted location, the message bar does not appear.
Using a Database Password to Encrypt an Office Access 2007 Database
The Encryption tool in Microsoft Office Access 2007 replaces two features available in Access 2003: database encryption and the database password. The following are the steps necessary to encrypt an Access 2007 database:
- Open the database in Exclusive mode. To do this, select Open Exclusive from the Open drop-down in the Open dialog box (see Figure 31.6).
Figure 31.6. To encrypt a database, you must open it with the Open Exclusive option.

- After you have opened the database, switch to the Database Tools tab.
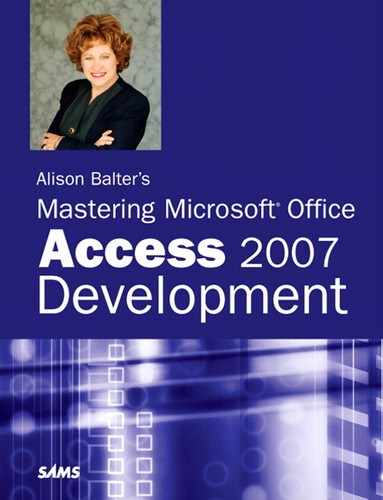
- Select Encrypt with Password in the Database Tools group. The Set Database Password dialog box appears (see Figure 31.7).
Figure 31.7. You use the Set Database Password dialog box to enter a password for the database.
- Enter and verify the desired password and then click OK. The status bar will inform you that Access is encrypting the database.
- Close and reopen the database. The Password Required dialog box appears (see Figure 31.8).
- Enter the password and click OK. The database will now function as usual.
Figure 31.8. When you open an encrypted database, Access prompts you for a password.

Removing a Password from a Database
Removing a password from a database is quite simple. Here are the steps involved:
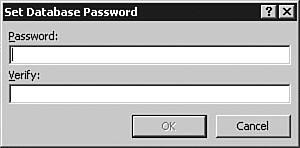
- Open the database in Exclusive mode.
- Select the Decrypt Database option in the Database Tools group of the Database Tools tab. The Unset Database Password dialog box appears (see Figure 31.9).
Figure 31.9. To remove a password from a database, you must supply the existing password.
- Enter the password for the database and click OK. Access removes the database password.
Packaging, Signing, and Distributing an Access Database
Access 2007 makes the process of packaging, signing, and distributing an Access database very simple. After you create an .ACCDB or .ACCDE file, you package the file, apply a digital signature to the database, and then distribute the signed package to other users. The process of packaging and signing a database generates an Access Deployment (.ACCDC) file and places it in a designated location. The following are some facts that you should be aware of before you begin the process of packaging, signing, and distributing an Access database:
- You can use the new Access 2007 Package-and-Sign feature only on databases stored in the Access 2007 file format (
.ACCDBor.ACCDE). - Each package can contain only one database.
- When you use the Package-and-Sign feature, Access signs all objects in the database (not just code and macros).
- The packaging process generates a compressed file that facilitates the process of downloading a package.
Now that you are aware of some of the details applicable to the process, you can take the following steps:
- Create a self-signed certificate.
- Create a signed package.
- Extract and use a signed package.
Creating a Self-Signed Certificate
As outlined in the preceding section, the first step in the process of packaging a database is to create a self-signed certificate. To do that, follow these steps:
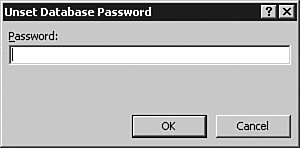
- From the Start menu, select All Programs, Microsoft Office, Microsoft Office Tools, Digital Certificate for VBA Projects. The Create Digital Certificate dialog box appears (see Figure 31.10).
Figure 31.10. You use the Create Digital Certificate dialog box to create a new certificate.
- Enter a name for the new certificate.
- Click OK. A message appears, indicating that the new certificate was created successfully (see Figure 31.11).
Figure 31.11. Access informs you when the certificate is successfully created.

- Click OK to complete the process.
Creating a Signed Package
Now that you have created a signed certificate, you are ready to create a signed package. Here’s how:
- Open the database that you want to package and sign.
- Click the Microsoft Office button and then select Publish, Package and Sign (see Figure 31.12). The Select Certificate dialog box appears (see Figure 31.13).
Figure 31.12. Select Publish, Package and Sign to create a signed package.

Figure 31.13. The Select Certificate dialog box allows you to select a digital certificate.
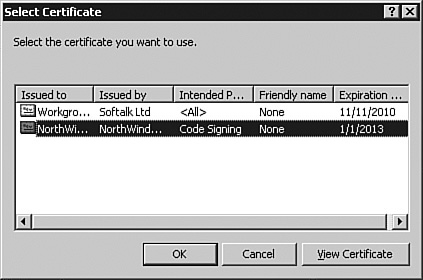
- Select a digital certificate and click OK. The Create Microsoft Office Access Signed Package dialog box appears (see Figure 31.14).
Figure 31.14. The Create Microsoft Office Access Signed Package dialog allows you to enter information about the signed package.

- Supply a name and location for the signed package and then click Create. Access creates the
.ACCDCfile and places it in the location that you designated.
Extracting and Using a Signed Package
When you are ready to use the packaged database, you extract and use the signed package. Here are the steps involved:
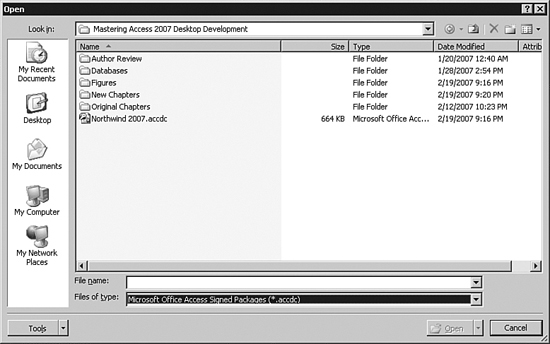
- With Access open, click the Microsoft Office button and select Open. The Open dialog box appears.
- From the Files of Type drop-down, select Microsoft Office Access Signed Packages (see Figure 31.15).
Figure 31.15. From the Files of Type drop-down, select Microsoft Office Access Signed Packages.
- Select the
.ACCDCfile that you want to extract and click Open. The Microsoft Office Access Security Notice, shown in Figure 31.16, appears.Figure 31.16. The Microsoft Office Access Security Notice allows you to designate certificate options.
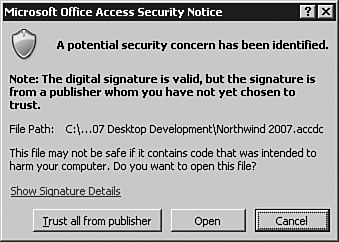
- If you want to trust all certificates from the publisher of the database, you can click the appropriate button. If you just want to trust this database, click Open. The Extract Database To dialog box appears.
- Select a name and location for the extracted database and click Open. Access extracts the database and opens it.
Using the Trust Center
You use the Trust Center to change security and privacy settings in Microsoft Access. Take the following steps to work with the Trust Center:
- Click the Microsoft Office button and select Access Options.
- Select Trust Center on the left side of the Access Options dialog box.
- Click Trust Center Settings. The Trust Center dialog box appears. Here, you can set the various security settings for Microsoft Office Access 2007.
Working with the Message Bar
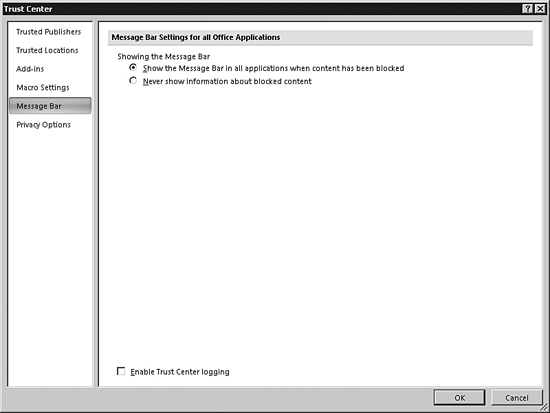
The message bar provides quite a bit of valuable information. Access displays security alerts, workflow tasks, server document information, and policy messages. The message bar appears by default whenever it is appropriate. You can use the Trust Center to control when the message bar displays (see Figure 31.17). The first option shows all appropriate security messages. The second option hides the message bar in all situations. This feature interacts with the Disable All Macros Without Notification option. If you click Disable All Macros Without Notification, you won’t get message bar alerts. If you select Never Show Information About Blocked Content, you will not receive any warnings about security issues, regardless of the other settings that you have selected in the Trust Center.
Figure 31.17. The message bar options of the Trust Center dialog box allow you to control when the message bar displays.
Using Privacy Settings
A homograph is one of two or more words that are spelled the same but have different meanings or pronunciations. An example is bass, meaning a fish or the lowest voice in a four-part chorus. In Internet terms, a homograph is a website that sounds like a well-known website but actually links you to a website that isn’t legitimate. Phishers spoof the domain names of banks, credit card issuers, and other companies to gather your personal information. Links in your application can open you and your users up to homograph attacks and phishing schemes. Fortunately, the Trust Center can help to protect you and your users from homograph attacks and phishing schemes.
By default, you get security alerts whenever you have a document open and you click to navigate to a website that has potentially been spoofed. Access also warns you when you attempt to open a file from a website with an address that has a potentially spoofed domain name.
Working with Access Macros and VBA Code
You use macros to automate frequently used tasks. Unfortunately, a hacker can place a virus in an Access database that can propagate to your machine or even your network. For this reason, Access protects you against potentially unsafe macros and VBA code. You use the Macro Settings options in the Trust Center to control how your application reacts to macros (see Figure 31.18).
Figure 31.18. The Macro Settings allow you to determine what happens when your application contains a macro or VBA code.

If you choose Disable All Macros Without Notification, no macros run. If you want to run macros in a database with this setting in place, you must place any unsigned macros in a trusted location. The Trust Center ignores databases located in a trusted location.
If you choose Disable All Macros with Notification, Access disables macros but provides you with a warning that macros are present. This is the default setting. It’s up to you as to whether you want to enable macros in each database. When you enable a macro, it is active only for the current session.
If you choose Disable All Macros Except Digitally Signed Macros, Access disables all macros, except those with a digital signature from a trusted publisher. With this option, Access notifies you that a publisher is not trusted. You are given the option of enabling the signed macros or of trusting the publisher. Access disables all unsigned macros without notification.
If you select the Enable All Macros option, you allow all macros in all databases to run without warning. This option is potentially very dangerous, and you should give some deep thought as to whether you really want to select it.
Security Tips and Tricks
There are certain situations regarding macros that you should know about. The first situation that you should know about is when a macro is not signed. You therefore cannot verify the publisher. Unless you know that the macro was from a trustworthy source, you should not enable the macros. With Microsoft Office Access 2007, you can do anything with a disabled database except run macros and VBA code.
The second situation is when the macro has been digitally signed but the signature has expired. As with the first situation, you should not run the macros contained in the database except if you know that the database is from a trustworthy source.
The next situation is when the macro signature is invalid. As with the preceding two situations, you should not run macros in a database with an invalid signature. In fact, the reason that the signature may not be valid is that someone tampered with it!
Another situation is when the macro signature is not trusted. In this case, the signature is valid, but you haven’t yet opted to trust the publisher. When this situation occurs, a security dialog box appears, allowing you to trust all macros provided from the publisher of the database that you are opening. When you select that option, you are adding the publisher to the Trusted Publishers list in the Trust Center.
Working with Trusted Locations
The Trusted Locations portion of the Trust Center appears as shown in Figure 31.19. Using trusted locations, you can eliminate the need to enable the macros in a database each time you open it. You can leave the security settings at the default value, requiring you to enable macros in each of your databases that are not in a trusted location. Macros in any databases placed in a trusted location are automatically enabled, and you won’t receive security alerts.
Figure 31.19. The Trusted Locations part of the Trust Center allows you to manage the locations of your files.

You can place your databases with macros and VBA code in a directory on your local machine or in a directory on the network. There are a couple of issues you should be aware of with each option. If you store your macros on your local machine, make sure that you use a Microsoft Windows logon password to protect your computer. This will keep people from tampering with your macros or your Access settings. Storing your databases on a network drive is less secure. The reason is that more people have access to them. Do not place your files in a public folder on a network share because they are very susceptible to tampering. Finally, if you opt to store your files on your local machine, do not place them within the Documents or My Documents folders because this will greatly increase your security risk. Instead, place them in a subfolder within the Documents or My Documents folders and make that folder the trusted location.
Creating a Trusted Location
To create a trusted location, you must first go to the Trusted Locations page of the Trust Center. Here’s the process.
- Click the Microsoft Office button and select Access Options. The Access Options dialog box appears.
- Click Trust Center on the left side of the dialog box.
- Click the Trust Center Settings command button. The Trust Center dialog box appears.
- Click Trusted Locations on the left side of the dialog box. Your dialog box appears as shown previously in Figure 31.19.
- Click Add New Location. The Microsoft Office Trusted Location dialog box appears (see Figure 31.20).
Figure 31.20. The Microsoft Office Trusted Location dialog box allows you to add trusted locations.
- Enter the path for the trusted location and indicate whether you also want to trust subfolders. Finally, you can enter a description of the location that you are adding.
- Click OK to complete the process. The location that you added appears in the list of trusted locations.
Removing a Trusted Location
Just as you can add a trusted location, you can remove one as well. Here are the steps involved:
- Click the Microsoft Office button and select Access Options. The Access Options dialog box appears.
- Click Trust Center on the left side of the dialog box.
- Click the Trust Center Settings command button. The Trust Center dialog box appears.
- Click Trusted Locations on the left side of the dialog box.
- Select the location that you want to remove.
- Click the Remove button. Access removes the location without warning.
Modifying a Trusted Location
Sometimes you will want to modify the settings associated with a Trusted Location. To do so, follow these steps:
- Click the Microsoft Office button and select Access Options. The Access Options dialog box appears.
- Click Trust Center on the left side of the dialog box.
- Click the Trust Center Settings command button. The Trust Center dialog box appears.
- Click Trusted Locations on the left side of the dialog box.
- Select the location that you want to modify.
- Click the Modify button. The Microsoft Office Trusted Location dialog box appears (the same dialog box that allowed you to add a trusted location).
- Make the desired changes and click OK to close the dialog box.
Working with Trusted Publishers
Just as you can trust a file location, you can also trust publishers of database files. The Trusted Publishers page of the Trust Center dialog box appears as shown in Figure 31.21. In the figure, you can see the list of trusted publishers. To view a certificate, click the View button. The Certificate dialog box appears. The General tab of the dialog box, pictured in Figure 31.22, shows general information about the certificate. The Details tab, pictured in Figure 31.23, shows additional information about the certificate. The Certification Path tab shows you a tree of levels of certification (see Figure 31.24). If you click one of the levels and then click View Certificate, you will see the certificate associated with another certificate in the certification path.
Figure 31.21. You use the Trust Center dialog box to view a list of trusted publishers.

Figure 31.22. You can easily view the certificate associated with a trusted publisher.

Figure 31.23. The Details tab shows additional information about a publisher.

Figure 31.24. Using the Certification Path tab, you can see publishers included in the certification process.

Understanding How Databases Behave When Trusted and Untrusted
Unless a database has a digital signature or is located in a trusted location, Access disables several features. The following is a list of differences between a trusted and untrusted database:
- All VBA code is disabled.
- All unsafe expressions (certain formulas and functions in the database) are disabled.
- Unsafe actions in all macros are disabled. Unsafe actions include any functionality that could potentially modify the database or gain access to resources outside the database.
- Action queries, data definition language (DDL) queries, and SQL pass-through queries are all disabled.
- All ActiveX controls are disabled.
Working in Sandbox Mode
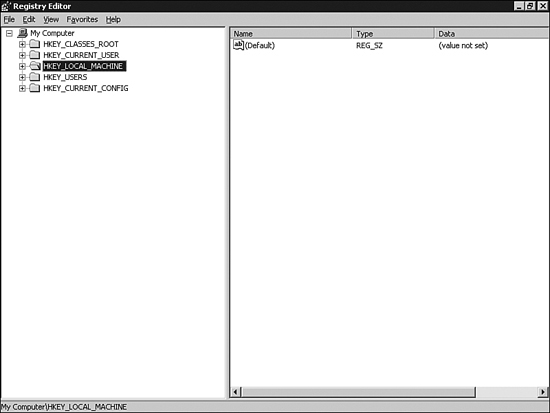
By default, when you are working in Access, you are working in Sandbox mode. With Sandbox mode enabled, Access blocks all expressions that it considers unsafe. These expressions include commands such as Kill and Shell that could be used to damage data and files on a computer. Sometimes you will want to execute such commands in a database located in a trusted location or with a valid trust signature. In those situations, you can disable Sandbox mode. Unfortunately, you can make this change only by modifying the Registry.
Caution
Modifying the Registry is a dangerous proposition. If you make a mistake when modifying the Registry, you can render your computer unusable. It is therefore important that you carefully back up all important data on your computer before you attempt to make the desired changes to the Registry.
To disable Sandbox mode in Windows Vista, follow these steps:
- Close all running instances of Microsoft Access.
- Select Start, All Programs, Accessories.
- Click Run. The Open dialog box appears.
- Type
regeditand press Enter. The Registry Editor appears. - Expand the
HKEY_LOCAL_MACHINEbranch of the Registry. - Navigate to the key
SoftwareMicrosoftOffice12.0Access Connectivity EngineEngines. - In the right pane of the Registry Editor, under Name, double-click SandboxMode. The Edit DWORD Value dialog box appears.
- Change the Value Data field from 3 to 2 and click OK.
- Close the Registry Editor.
To disable Sandbox mode in Microsoft Windows XP or Microsoft Windows Server 2003, follow these steps:
- Close all running instances of Microsoft Access.
- Select Start, Run. The Open dialog box appears.
- Type
regeditand press Enter. The Registry Editor appears (see Figure 31.25).Figure 31.25. Using the Registry Editor, you can disable Sandbox mode.
- Expand the
HKEY_LOCAL_MACHINEbranch of the Registry. - Navigate to the key
SoftwareMicrosoftOffice12.0Access Connectivity EngineEngines. - In the right pane of the Registry Editor, under Name, double-click SandboxMode. The Edit DWORD Value dialog box appears (see Figure 31.26).
Figure 31.26. Change the SandboxMode value from 3 to 2.

- Change the Value Data field from 3 to 2 and click OK.
- Close the Registry Editor.
Removing User-Level Security
The only way to remove user-level security while working with Microsoft Office Access 2007 is to convert the .MDB file to an .ACCDB file. The database that you are converting cannot be encrypted, and you must belong to the Admins group of the workgroup used to secure the database.
To convert a database to the .ACCDB file format, take the following steps:
- Click the Microsoft Office button and select Convert. The Save As dialog box appears.
- From the Save In list, select a location for the database.
- Make sure that you set the Save As type to Microsoft Office Access 2007 Database (
.ACCDB).
An alternative is to use the Save As command to save an Access database in the .ACCDB format. Here are the steps involved:
- Click the Microsoft Office button and select Save As, Access 2007 File Format. The Save As dialog box appears.
- From the Save In list, select a location for the database.
- Make sure that you set the Save As type to Microsoft Office Access 2007 Database (
.ACCDB). - Click Save to complete the process.
Enabling or Disabling ActiveX Controls
ActiveX controls are programs that do not run as standalone applications. Instead, ActiveX controls reside within a Microsoft Office file or within a browser such as Internet Explorer. ActiveX controls add rich functionality to your applications. For example, you can use an ActiveX control to add scheduling features to an Access database. ActiveX controls have full access to your computer. This makes them very powerful. For example, ActiveX controls can access the local file system and can change Registry settings of your operating system. This makes them potentially very dangerous. A hacker can use an ActiveX control to render Windows unusable!
You can take two steps to help ensure that ActiveX controls do not cause harm to your computer. First, as the developer, you can design ActiveX controls with security in mind. Second, you can use the Trust Center to check for two settings before the ActiveX control is loaded. It is important that the kill bit on the control is set in the Registry. This prevents controls that have a known exploit from being loaded. If the kill bit is set, Access will not load the control under any circumstances. Another important step is to ensure that the control is marked Safe for Initialization (SFI). The developer marks the control as SFI to verify the safety of the control. If the control is determined to be Unsafe for Initialization (UFI), the Trust Center applies additional restrictions on it. If a database contains VBA code (or macros) and ActiveX controls, the Trust Center applies even further restrictions.
If you load a database containing an ActiveX control, you will receive a Security Warning in the message bar. You must click Options and then select Enable This Content before the ActiveX control becomes usable. The exception to this scenario is if the database is either signed or placed in a trusted location. If the kill bit is set, the ActiveX control will not be enabled in either of those situations.
You can use the Trust Center to change ActiveX security settings for all your databases. Here’s the process:
- Click the Microsoft Office button and select Access Options. The Access Options dialog box appears.
- Click Trust Center on the left side of the dialog box.
- Click the Trust Center Settings command button. The Trust Center dialog box appears.
- Click ActiveX Settings. Here, you can disable all ActiveX controls without notification, you can ask to be prompted before enabling Unsafe for UFI controls with additional restrictions and SFI controls with minimal restrictions, you can ask to be prompted before enabling all controls with minimal restrictions, or you can enable all controls without restrictions and without prompting. I do not recommend the final option because it opens you up for significant damage to your computer.
Enabling or Disabling Add-Ins
An add-in increases functionality to an Access application. An example is XML schemas. An add-in extends the capabilities of Microsoft Access. As with ActiveX controls, you can determine how Access handles add-ins. Here’s how:
- Click the Microsoft Office button and select Access Options. The Access Options dialog box appears.
- Click Trust Center on the left side of the dialog box.
- Click the Trust Center Settings command button. The Trust Center dialog box appears.
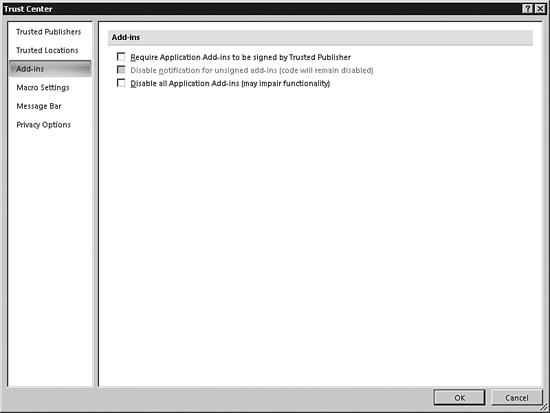
- Click Add-Ins. The screen appears as shown in Figure 31.27. The first option is Require Application Add-Ins to Be Signed by Trusted Publisher. The second option is Disable Notification for Unsigned Add-Ins. This option becomes available only when you select the first option. Finally, you can choose Disable All Application Add-Ins. It is important to note that this option may significantly impair the functionality of your application.
Figure 31.27. You can determine how Access reacts to add-ins.
Adding a Trusted Publisher
Earlier in this chapter, you learned how to view and remove Trusted Publishers. In this section, you learn how to add a Trusted Publisher. Before you add a Trusted Publisher, it is important that you understand when you should consider the developer of a database to be a Trusted Publisher. The following criteria should help you out:
- The code in the project is signed by the developer with a digital signature.
- The digital signature is considered valid.
- The digital signature is current. (It hasn’t expired.)
- The certificate associated with the digital signature was issued by a reputable certificate authority (CA).
- The developer who signed the code project is a trusted publisher.
When you open a document containing macros and the document has been signed, one of the choices is Trust All from Publisher (see Figure 31.28). This option appears only if the signature for the document is valid. Simply select Trust All from Publisher, and all future databases published by that publisher will be considered safe.
Figure 31.28. You can trust all databases created by a particular publisher.

Practical Examples: Securing an Access 2007 Database
To secure an Access 2007 database, add a database password to an Access 2007 database of your choice. Then test the database to ensure that you can open it properly. Add a digital signature to the database and place it in a trusted location. Notice that you no longer have to enable macros and VBA code. Finally, practice using the Trust Center to work with the message bar, modify privacy settings, work with trusted locations, and work with trusted publishers.
Summary
Security in Access 2007 is dramatically different from that of its predecessors. User-level security is not available with the new .ACCDB file format. Instead, you can add a password to an Access database and encrypt it so that no one can view it with a tool such as a text editor. Whereas macros and VBA code ran without restriction in Access 2003 and lower, they will not run in Access 2007 unless the database has a valid digital signature or is placed in a trusted folder. It is important that you understand the specifics of Microsoft Office Access 2007 security so that your users will be able to properly take advantage of your macros and VBA code.