
Chapter 17. Error Handling: Preparing for the Inevitable
IN THIS CHAPTER
- Why This Chapter Is Important
- Implementing Error Handling
- Using
On ErrorStatements - Using
ResumeStatements - Clearing an Error
- Examining the Cascading Error Effect
- Using the
ErrObject - Raising an Error
- Using the
ErrorsCollection - Creating a Generic Error Handler
- Preventing Your Own Error Handling from Being Invoked
- Creating a Call Stack
- Building a Custom Error Handler Class
- Working with Error Events
- Creating a List of Error Codes and Descriptions
- Practical Examples: Incorporating Error Handling
Why This Chapter Is Important
Errors happen, even in the absence of programmer error. You need to protect your programs and your data from the adverse effects of errors by practicing error handling.
Error handling (also known as error trapping) is the process of intercepting the Access Database Engine’s or Visual Basic for Applications’ (VBA’s) response to an error. It enables the developer to determine the severity of an error and to take the appropriate action in response. This chapter shows you the techniques required to successfully implement error handling within your applications.
Implementing Error Handling
Without error handling, the user of your application is forced to exit abruptly from your application code. Consider the example in Listing 17.1.
The Click event behind the command button calls the routine TestError1, passing it the values from two text boxes. TestError1 accepts those parameters and attempts to divide the first parameter by the second parameter. If the second parameter is equal to 0, a runtime error occurs. Because no error handling is in effect, the program terminates.
Listing 17.1. An Example of Code Without Error Handling

Figure 17.1 shows the error message that the user receives. As you can see, the choices are Continue, End, Debug, and Help. If users click Debug, the module window appears, and they are placed in Debug mode on the line of code causing the error. Clicking Continue (this button is not always available) tells Access to ignore the error and continue with the execution of the program. End terminates execution of the programming code. If the application is running with the runtime version of Access, it shuts down, and users are returned to Windows. If users click Help, VBA Help attempts to give them some information about the error that occurred. With error handling in effect, you can attempt to handle the error in a more appropriate way whenever possible.
Figure 17.1. The default error handling message.

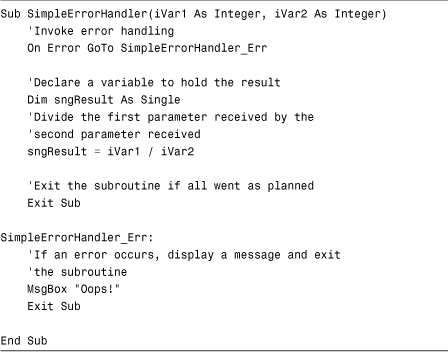
You can add error-handling code to the error event procedure of a form or report. You can also add it to any VBA subroutine, function, or event routine. You can easily modify the code in Listing 17.1 to handle the error gracefully. The code in Listing 17.2 shows a simple error-handling routine.
Listing 17.2. A Simple Error-Handling Routine
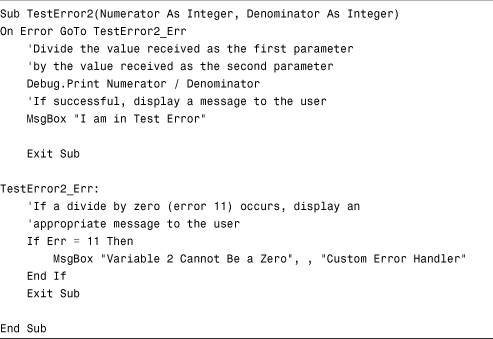
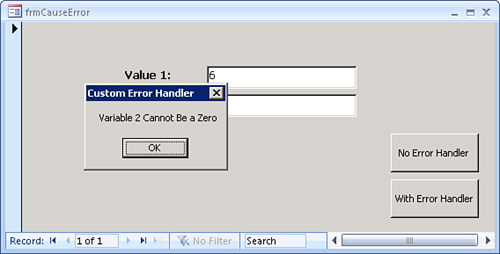
The routine now invokes error handling. If a divide-by-zero error occurs, a message box alerts the user to the problem, as Figure 17.2 shows.
Figure 17.2. A custom error handler message.
Note
This code is located in the basError module, which is in the CHAP17EX.ACCDB database on the website.
Using On Error Statements
On Error statements activate error handling. Each routine must contain its own On Error statement if you want that routine to do its own error handling. Otherwise, the VBA compiler cascades error handling up the call stack (the series of routines that executed to get you to this point in code). If the VBA compiler does not find any On Error statements in the call stack, it invokes its own error handling.
Suppose that Func1 calls Func2, and Func2 calls Func3. Only Func1 contains error handling. An error occurs in Func3. Func3 passes control up to Func2. Func2 has no error handling, so it passes control up to Func1. Func1 handles the error. Needless to say, the error handler found in Func1 is not necessarily appropriate to handle the error that occurred in Func3.
Using an On Error statement, you can cause the application to branch to error-handling code, resume code execution on the line immediately following the error, or attempt to re-execute the problematic line of code.
The On Error GoTo Statement
The statement On Error GoTo <label> tells VBA that, from this point forward in the subroutine or function, if an error occurs, it should jump to the label specified in the statement. This is the most common form of error handling.
The label specified in the On Error statement must be located in the current procedure. Listing 17.3 shows a simple example of error handling.
Listing 17.3. An Example of Error Handling Using the On Error GoTo Statement
Note
The example in Listing 17.3 differs from the code on the website and will be modified in the next section.
You can learn some important points from this simple routine. The routine receives two integer values. It then invokes the error handler. When an error occurs, execution continues at the label. Notice that this routine contains two Exit Sub statements. If you remove the first Exit Sub statement, the code falls through to the label regardless of whether an error occurred. The Exit Sub statement at the bottom gracefully exits the procedure, setting the error code back to 0.
Including the Error Number and Description in the Error Handler
The error-handling code in Listing 17.3 did not give a very descriptive message to users. The Description and Number properties of the Err object give users more meaningful error messages. The Err object is covered in detail later in this chapter in the section “Using the Err Object.” For now, take a look at the Description and Number properties to see how you can use them to enhance an error-handling routine. To display the error number and description, you must modify the error-handling code to look like this:
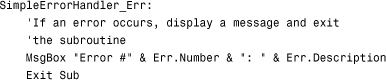
This time, instead of hard-coding the error message, you display the error number and VBA’s internal error string. Figure 17.3 shows the resulting error message. You can find the SimpleErrorHandler routine and all the following examples in the basError module of the CHAP17EX.ACCDB database.
Figure 17.3. An error message with an error number and error string.

Using On Error GoTo 0
You use On Error GoTo 0 for two purposes:
- When you want Access to return to its default error handler
- When you have other error handling in a routine but want Access to return to the calling routine when a specific condition occurs
Generally, you don’t want Access to return to its default error handler. You might do this only if you are unable to handle the error, or if you are in the testing phase and not yet ready to implement your own error handler.
The reason you want Access to return the error to a higher-level routine is much clearer. You do this if you want to centralize the error handling, meaning that one routine may call several others. Instead of placing error-handling code in each routine that is called, placing the error handling in the calling routine is appropriate in certain situations.
The On Error Resume Next Statement
On Error Resume Next continues program execution on the line immediately following the error. This construct is generally used when it is acceptable to ignore an error and continue code execution. Listing 17.4 shows an example of such a situation.
Listing 17.4. Ignoring an Error and Continuing Execution

You use the Kill statement to delete a file from disk. If the specified file is not found, an error results. You delete the file only if it exists, so you are not concerned about an error. On Error Resume Next is appropriate in this situation because resuming execution after the offending line of code does no harm. The example illustrates that, although code execution proceeds, the properties of the error object are still set.
Using Resume Statements
While you are in your error-handling code, you can use the Resume, Resume Next, and Resume <LineLabel> statements to specify how you want VBA to respond to the error. Resume attempts to re-execute the offending line of code, Resume Next resumes execution after the offending line of code, and Resume <LineLabel> continues execution at a specified line label. The following sections cover these statements in detail.
The Resume Statement
The Resume statement resumes code execution on the line of code that caused the error. You must use this statement with extreme care because it can throw the code into an unrecoverable endless loop. Listing 17.5 shows an example of an inappropriate use of the Resume statement.
Listing 17.5. Using Resume Inappropriately
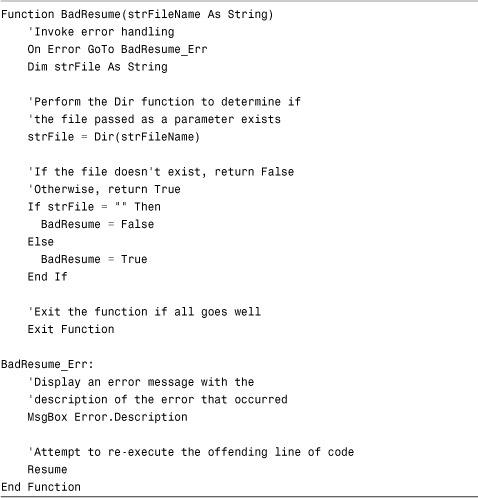
This function is passed a filename. The Dir function searches for a file with that name and returns True or False, depending on whether the specified file is found. The problem occurs when the drive requested is not available or does not exist. This code throws the computer into an endless loop. To remedy the problem, you should modify your code to look like the code in Listing 17.6.
Listing 17.6. Using Resume Conditionally Based on User Feedback

In this example, the error handler enables the user to decide whether to try again. The Resume occurs only if the user’s response is affirmative.
The Resume Next Statement
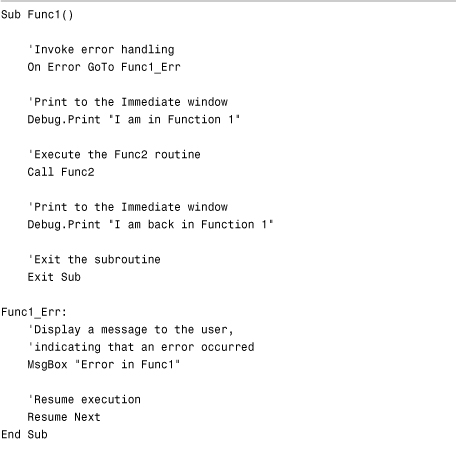
Just as you can invoke error handling using an On Error Resume Next statement, you can place a Resume Next statement in your error handler, as Listing 17.7 shows.
Listing 17.7. Placing a Resume Next Statement in Your Error Handler

In this example, the code is instructed to go to the label called TestResumeNextInError_Err when an error occurs. The TestResumeNextInError_Err label issues a Resume Next statement. This statement clears the error and causes execution to continue on the line after the line on which the error occurred. The message box therefore never displays.
Note
Note the difference between On Error Resume Next and Resume Next. You place On Error Resume Next in the body of the routine. It causes code execution to continue on the line of code following the line that caused the error. It does not reset error information.
You place Resume Next within the error handler. It also causes code execution to continue on the line of code following the line that caused the error. It does reset the error information.
The Resume <LineLabel> Statement
The Resume <LineLabel> statement enables you to specify a line of code where you want code execution to continue after an error occurs. Using this statement is a great way to eliminate the two Exit Sub or Exit Function statements required by the error-handling routines you have looked at so far. Listing 17.8 shows an example.
Listing 17.8. Using the Resume <LineLabel> Statement to Specify Where Execution Continues After an Error Occurs

Notice that this routine contains only one Exit Sub statement. If no error occurs, Access drops through the TestResumeLineLabel_Exit label to the Exit Sub statement. If an error does occur, the code in the TestResumeLineLabel_Err label executes. Notice that the last line of the error label resumes execution at the TestResumeLineLabel_Exit label.
This method of resolving an error is useful because any code required to execute as the routine is exited can be written in one place. Object variables might need to be set equal to Nothing as the routine is exited, for example. You can place these lines of code in the exit routine.
Clearing an Error
When an error occurs, the Err object remains set with the error information until one of the following clears the error:
Resume,Resume Next, orResume <LineLabel>Exit Sub,Exit Function, orExit PropertyEnd Sub,End Function, orEnd Property- Any
Gotostatement - Explicitly using the
Clearmethod on theErrobject
Until the error is somehow cleared, all the information remains set in the Err object. After the error is cleared, no information is found in the Err object.
Examining the Cascading Error Effect
As mentioned earlier in the section “Using On Error Statements,” if Access does not find error handling in a particular subroutine or function, it looks up the call stack for a previous error handler. Listing 17.9 shows an example of this process.
Listing 17.9. Looking Up the Call Stack for a Previous Error Handler

In this situation, the error occurs in Func3. Because Func3 does not have its own error handling, it refers back to Func2. Func2 does not have error handling either, so Func2 relinquishes control to Func1. VBA executes the error code in Func1. The real problem occurs because of the Resume Next statement. The application continues executing within Func1 on the Debug.Print "I am back in Function 1" statement. This type of error handling is dangerous and confusing. Therefore, it is best to develop a generic error-handling routine that is accessed throughout your application. The creation of a generic error handler is discussed in the section “Creating a Generic Error Handler.”
Using the Err Object
The Err object contains information about the most recent error that occurred. As with all Access objects, it has its own built-in properties and methods. Table 17.1 lists the properties of the Err object.
Table 17.1. Properties of the Err Object
The Err object has only two methods: Clear and Raise. The Clear method enables you to clear an error condition explicitly. This method is used primarily when you write code that uses the On Error Resume Next statement. This statement does not clear the error condition. Remember that there is no reason to issue the Clear method explicitly with any type of Resume, Exit Sub, Exit Function, Exit Property, On Error GoTo, or End Sub statement. The Clear method is implicitly issued when these constructs are used. The Raise method of the Err object is covered in the next section.
Raising an Error
You use the Raise method of the error object in these situations:
- When you want to generate an error on purpose (for example, in testing)
- When you want to generate a user-defined error
- When no code in the error routine handles the current error, and you want to allow other parts of the call stack to attempt to handle the error
- When you want to nest an error handler
Using the Raise method to generate an error on purpose and creating a user-defined error are both complicated and important enough that they require special attention. They are covered in the following sections.
Generating an Error on Purpose
Many times during testing, you want to generate an error so that you can check your own error handling. Instead of figuring out how to cause the error condition, you can use the Raise method of the Err object to accomplish this task, as Listing 17.10 shows.
Listing 17.10. Raising an Error
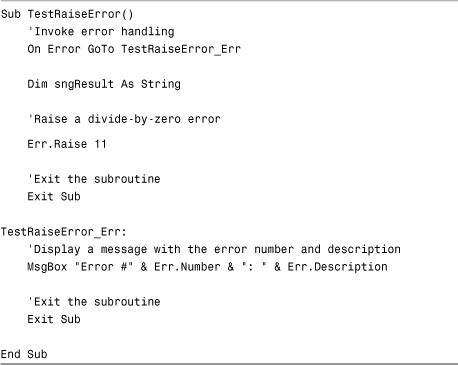
This code invokes an error 11 (divide-by-zero error).
Creating User-Defined Errors
Another important use of the Raise method of the Err object is the generation of a custom error condition. This method is useful when you want to force an error in response to something that the user did. For example, assume that the user must enter five characters into an unbound text box. Entering only two characters would not generate an Access error. Instead of handling this user-generated error in some other manner, you can raise the error and have your standard error handler respond to the error condition. Because the Raise method enables you to set all the properties of the Err object, you can create a user-defined error complete with a number, description, source, and so on, as shown in Listing 17.11.
Listing 17.11. Creating a User-Defined Error

Although this example is simple, Listing 17.11 illustrates an important use of generating user-defined errors. The code tests to see whether the value entered has fewer than five characters. If it does, the code generates a user-defined error message (number 11111). The routine drops into the normal error-handling routine. The section “Creating a Generic Error Handler,” later in this chapter, explores how to put together a generic error handler. When you pass user-defined errors through your generic error handler, all errors—user-defined or not—are handled in the same way.
Using the Errors Collection
The Errors collection is part of Access’s Database Engine. It stores the most recent set of DAO errors that have occurred. This capability is important when you are dealing with DAO (Data Access Objects) and ODBC (Open Database Connectivity), in which one operation can result in multiple errors. If you are concerned with each error generated by one operation, you need to look at the Errors collection. Each error object in the Errors collection contains information about an error that occurred. If you want to view the errors stored in the Errors collection, you must loop through it, viewing the properties of each Err object. Listing 17.12 shows the code you can use to accomplish this task.
Listing 17.12. Viewing the Errors Stored in the Errors Collection

This routine loops through each Error object in the Errors collection, printing the description of each error contained in the collection.
Creating a Generic Error Handler
A generic error handler can be called from every procedure in your application to respond to any type of error.
A generic error handler prevents you from having to write specific error handling in each of your subroutines and functions. Using such an error handler enables you to invoke error handling throughout your application in the most efficient manner possible.
You can take many approaches to create a generic error handler. It should give users information about the error, enable users to print this information, and log the information to a file. You might even want to email this information to yourself or to someone else in charge of maintaining the database.
The On Error routine (in this case, the label AnySub_Err) of every procedure that performs error handling should look like the error-handling routine contained in the subroutine in Listing 17.13.
Listing 17.13. A Generic Error Handler for All Your Functions and Subroutines
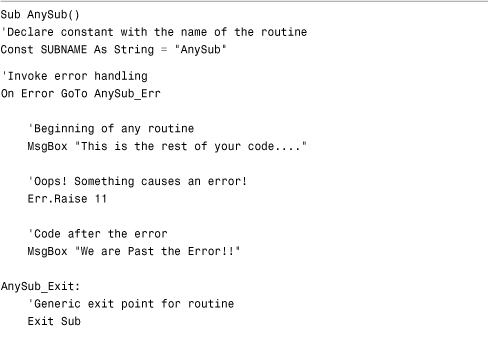

This error-handling routine in AnySub creates an Integer variable that holds the return value from the error system. The intAction variable holds an appropriate response to the error that occurred. The error routine calls the generic error-handling function ErrorHandler, passing it the error number (Err.Number), a description of the error (Err.Description), the name of the module containing the error, and the name of the subroutine or function containing the error. The name of the module is stored in a Private constant called MODULENAME. The Private constant is declared in the General section of the module and needs to be created for every module you make. The name of the subroutine or function is stored in a local constant called SUBNAME. With this approach, you create a local constant and assign it the name of the sub at the beginning of each procedure. This approach requires upkeep because procedure names can change, and you need to remember to change your string. Unfortunately, because the VBA environment does not expose the subroutine and module names to you when an error occurs, this sort of brute force is necessary if you want your error handler to track the subroutine and module. When the code returns from the ErrorHandler function, a return value is placed in the intAction variable. This return value is used to determine the fate of the routine.
Now that you have seen how to implement error handling in your procedures, look at the function that’s called when an error occurs, as shown in Listing 17.14.
Listing 17.14. A Type Structure Declaration to Be Used for Generic Error Handling

This code is placed in the General section of basHandleErrors. The type structure declared holds all the pertinent information about the error. A type structure is a special kind of variable made up of various parts, each of which stores a different piece of information. (Type structures are covered in Chapter 13, “Advanced VBA Techniques.”)
In Listing 17.14, the public variable gtypError holds all the information from the type structure. The constants are used to help determine the fate of the application after an error occurs. Listing 17.15 shows the ErrorHandler function.
Listing 17.15. Using the ErrorHandler Function


The ErrorHandler function receives the error number, error description, module name, and subroutine or function name as parameters. It then fills in the gtypError type structure with the information that it was passed, as well as the current user and date. Next, it calls a routine that logs the error into an Access table. The routine looks up the severity of the error code in an Access table called tblErrors to decide the most appropriate way to handle the error. If it does not find the error code in the error table, the code displays an error form, and it sends a return value to the calling function, indicating that application execution is to be terminated. If it finds the error code in the tblErrors table and determines it to be critical or severe, the code displays an error form before it returns control to the calling routine. In any case, the code returns a severity code for the error to the calling function. The following section discusses the details involved in each step of the process.
Logging the Error
The LogError routine is responsible for logging all the error information into an Access table. Because users often decide not to print the error form or provide you with inaccurate information about what was happening when the error occurred (or neglect to tell you about the error), it is important that you log each error so that you can review the error log at any time. You can log errors to a text file or to a data table. This section shows you both methods of logging your errors. Start with logging your errors to a table, as shown in Listing 17.16 with the LogError routine.
Listing 17.16. Using the LogError Routine

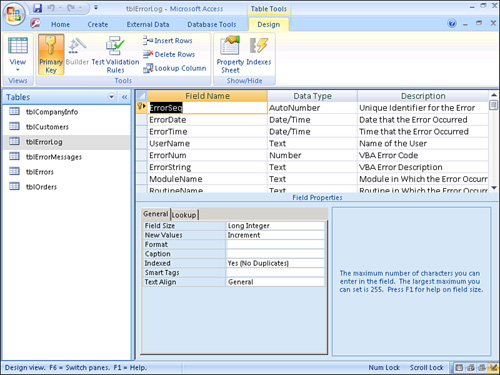
This routine uses the Execute method of the ADO Connection object to add a record to your error table. The record contains all the information from the structure called gtypError. The code logs the information to a table called tblErrorLog. Figure 17.4 shows the structure of this table.
The alternative error-logging method is to write the information to a textual error log file, as shown in Listing 17.17.
Listing 17.17. Writing Information to a Textual Error Log File

Figure 17.4. The structure of the tblErrorLog table.
This code uses low-level file functions to open and write to an ASCII text file. The code writes all the pertinent information about the error to this text file. The routine then uses the Close command to close the text file. The potential advantage of this routine is that, if the problem is with the database (for example, the network is down), the error-logging process still succeeds.
Determining the Appropriate Response to an Error
After the code logs the error, you are ready to determine the best way to respond to the error. By making your error system data-driven, you can handle each error a little differently. Figure 17.5 shows the structure of the tblErrors table. This table should contain a list of all the error numbers you want to trap. It contains three fields: ErrorNum, ErrorDescription, and Response. When an error occurs, the ErrorHandler function searches for a record with a value in the ErrorNum field that matches the number of the error that occurred.
Figure 17.5. The structure of the tblErrors table.

The ErrorHandler function, as shown in Listing 17.15, uses the code in Listing 17.18 to locate the error code in the tblErrors table.
Listing 17.18. Locating the Error Code in the tblErrors Table
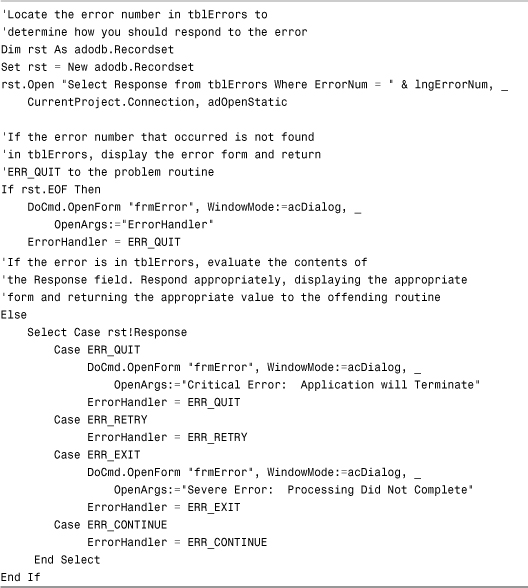
The part of the ErrorHandler function shown in Listing 17.18 creates an ADO Recordset object variable. It opens a recordset using a Select statement, which in turn searches a table called tblErrors. If a match is found, the code uses the Response column to determine the response to the error. Notice in Listing 17.18 that, if the error number is not found in tblErrors, default error handling occurs, which means that the code handles all other errors as a group. (This is my default error handling, not Access’s.) If the error number is found, the code evaluates the Response field and takes the appropriate action (via the Case statement). If it is not found, the code opens the frmError form, and the ERR_QUIT constant value is returned from the ErrorHandler function. When using this method, you need to add to the table only specific errors that you want to trap.
If the error number is found in tblErrors, the code evaluates the Response field from the recordset. If the Response field contains the constant value ERR_QUIT or ERR_EXIT, the frmError form appears before the code returns the constant value to the offending function or subroutine. If the Response field contains the constant value for ERR_RETRY or ERR_CONTINUE, the code returns the constant value without displaying the frmError form.
Note
The tblErrors table is included in CHAP17EX.ACCDB on the sample code website. To take full advantage of this table, you must add all the errors you want to trap, along with the actions you want the error handler to take when a particular error occurs.
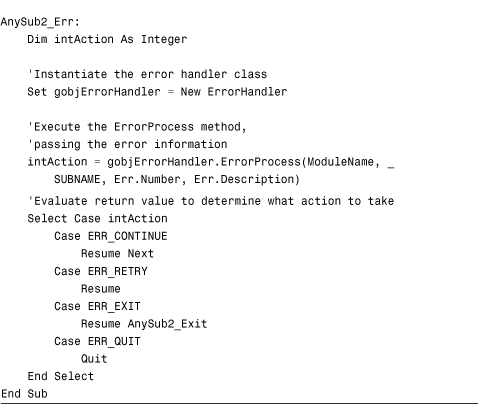
Listing 17.19 shows how the code uses the return value from the ErrorHandler function.
Listing 17.19. Using the Return Value from the ErrorHandler Function
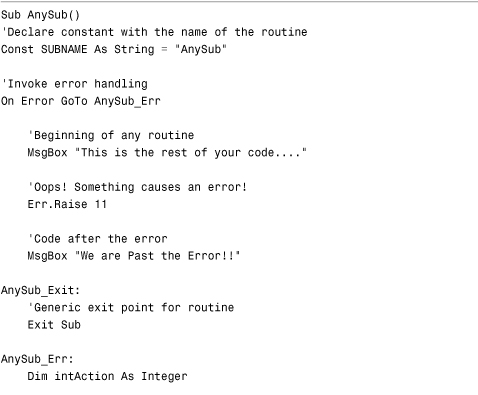

In Listing 17.19, the AnySub routine generates an error 11 (divide-by-zero error). Because tblErrors contains the number 3 in the Response column and the ERR_CONTINUE constant is equal to 3, the error form displays, and the AnySub routine exits with an Exit Sub statement.
Note
To test what happens when the error code is not found in the tblErrors table, run the SubWithUnknownError routine found in basError. To test what happens when the code returns the ERR_CONTINUE code, execute the SubWithContinue routine.
Emailing the Error
Whereas the LogError routine is responsible for logging the error to a database, the MailError routine, shown in Listing 17.20, is responsible for mailing the error information to a key system administrator.
Listing 17.20. The MailError Routine

The MailError routine receives user and error information from the calling routine. It instantiates Outlook MailItem, NameSpace, and MAPIFolder objects. It then points the NameSpace object at the namespace returned from the GetOutlook function. The GetOutlook function appears in Listing 17.21.
Listing 17.21. The GetOutlook Function

The GetOutlook function declares an Outlook NameSpace object and an Outlook Application object. It uses the GetNamespace method of the Outlook Application object to obtain a reference to a MAPI namespace. It then uses the Logon method of the namespace to log on to the namespace, using a given profile name and password. You will need to change the values of strProfile and strPassword to a valid profile name and password for this code to run properly on your machine. Finally, this code returns a reference to the namespace that it created.
After the MailError routine has a reference to a MAPI namespace, it can use that reference to point to the Outbox. The code uses the Add method of the Items collection of the Outbox to add a mail item to the Outbox. The code then sets the appropriate properties (such as To, Subject, and so on) to the appropriate pieces of the error information. Finally, the code can either save the message as a draft or else send it so that it’s immediately sent to the administrator and appears in the Sent Items folder of the sender.
Note
Listing 17.21 requires that you know the username and profile of the user sending the email. You could provide a dialog box where the user can enter this information each time an error occurs, or this could be part of the initial logon to the system. I generally recommend that this be integrated as part of the initial logon so that the user does not have to take extra steps each time an error occurs.
Creating an Error Form
The code in the error form’s Load event calls two subroutines: GetSystemInfo and GetErrorInfo, as shown here:

The first subroutine is called GetSysInfo. It performs several Windows Application Programming Interface (API) calls to fill in the system information on your form. This code is shown in Listing 17.22 and is discussed in Chapter 25, “Exploiting the Power of the Windows API.”
Listing 17.22. Getting System Information Through Code

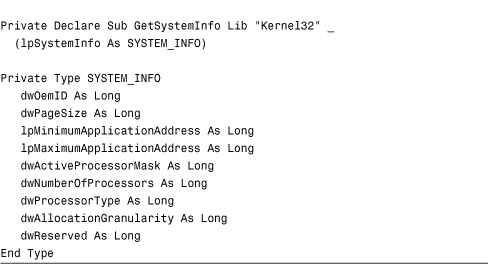
These API calls require the Declare statements and constants shown in Listing 17.23. You will find them in a module called basAPI.
Listing 17.23. Declaring Windows API Calls

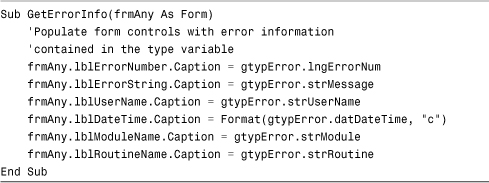
The second subroutine, GetErrorInfo, fills in the labels on the error form with all the information from your structure, as shown in Listing 17.24.
Listing 17.24. Using the GetErrorInfo Subroutine
Finally, the disposition of the error, sent as an OpenArg from the ErrorHandler function, is displayed in a label on the form. Figure 17.6 shows the error form.
Figure 17.6. The frmErrors form displays important information about the error that occurred.

Printing the Error Form
Users often are not very accurate in describing an error and the corresponding error message. It’s therefore important to give them the capability to print their error message. The code in Listing 17.25 prints your error form. You will find it behind the Click event of the Print button on the error form.
Listing 17.25. Printing an Error Form

Preventing Your Own Error Handling from Being Invoked
When you are testing your application, you do not want to trigger your own error handling. Instead, you want to activate VBA’s own error handling. The trick is in the Options dialog box of the Visual Basic Editor (VBE). Choose Tools, Options and click the General tab. Enable the option Break on All Errors located in the Error Trapping section. As long as this option is set, your error handling is ignored, and Access’s default error handling is invoked. Using this setting, you can turn error handling on and off from one central location.
Other settings for error trapping are Break in Class Module and Break on Unhandled Errors (the default). With the latter setting, handled errors do not cause the application to enter Break mode. Unhandled errors do cause the project to enter Break mode and place you, or the user, on the line of code that invoked the error handler. The Break in Class Module option causes only unhandled errors in a Class module to invoke Break mode.
Creating a Call Stack
While in the debugger, you can easily view the call stack. Unfortunately, the call stack information cannot be accessed programmatically when an error occurs. If you want to keep track of the sequence of procedures that brought you to the error condition, you must do it yourself. The code in Listing 17.26 shows three routines. Func1 calls Func2, and then Func2 calls Func3. Func3 renders an error.
Listing 17.26. Routines That Call One Another


Notice that at the beginning of each routine, the ERH_PushStack_TSB subroutine is called, pushing the error into the stack, as shown in Listing 17.27.
Listing 17.27. The ERH_PushStack_TSB Function

The code adds the name of the procedure to the gaERH Stack_TSB array. The ERH_PopStack_TSB subroutine, shown in Listing 17.28, is executed in the exit code for each procedure and removes the error from the stack.
Listing 17.28. The ERH_PopStack_TSB Function

The ERH_PopStack_TSB subroutine removes the text in the largest array element.
As the code goes in and out of routines, it adds entries to and removes entries from the array. Because the array is Public, you can review its contents at any time. Notice in Func3 in Listing 17.26 that the error handler iterates through the array, pulling out the error information.
Building a Custom Error Handler Class
Implementing error handling within an application can be tedious, especially if you attempt to place specific error-handling logic in each routine you write. Although implementing a generic error handler does not mandate the use of a Class module, using a Class module greatly facilitates the process of implementing error handling within your applications. Listing 17.29 illustrates this point.
Listing 17.29. An Example of an Access Subroutine

When an error occurs, your code instantiates the ErrorHandler class. The Initialize event of the class executes, as shown in Listing 17.30.
Listing 17.30. The Initialize Event of the ErrorHandler Class
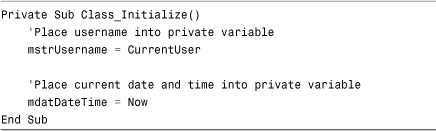
The Initialize event of the class sets the module-level variables mstrUserName and mdatDateTime equal to the CurrentUser and the current date and time, respectively. The Username and DateTime properties of the class use these variables.
The code then executes the ErrorProcess method of the ErrorHandler class, which logs the error and then takes appropriate action in response to the error. It appears in Listing 17.31.
Listing 17.31. The ErrorProcess Method of the ErrorHandler Class
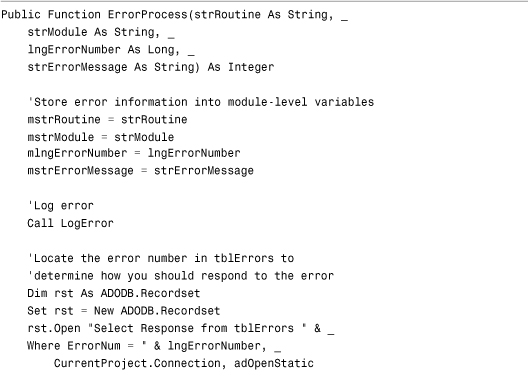

The routine first sets the ModuleName, Routine, ErrorMessage, and ErrorNumber variables within the class to the values of the parameters passed to the ErrorProcess method. The Property Get routines for the ModuleName, Routine, ErrorMessage, and ErrorNumber properties, which are responsible for manipulating error information, appear in Listing 17.32. Because you want the properties to be set via only the ErrorProcess method, no Property Let routines exist.
Listing 17.32. The Property Get Routines of the Class
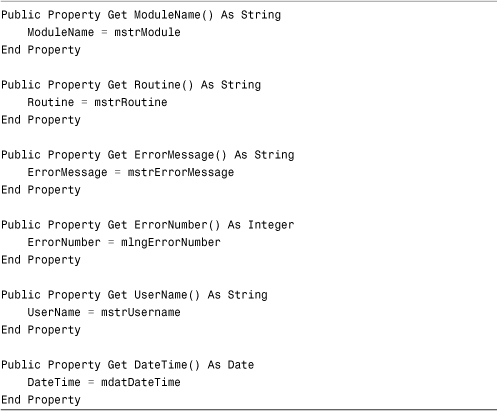
As you can see, the Property Get routines retrieve the values from their associated module-level variables.
Next, the function calls a routine that logs the error that occurred. This LogError routine is shown in Listing 17.33. The LogError routine uses ADO code to add a record to the tblErrorLog table. The record contains all the information about the error that occurred. Notice that the error information is retrieved from the module-level variables populated by the ErrorHandler class’s ErrorProcess method.
Listing 17.33. The LogError Subroutine

After the error is logged, the number of the error that occurred is looked up in the tblErrors table. If it is not found in the tblErrors table, a form is displayed, containing all the critical information about the error that occurred. The value contained in the constant ERR_QUIT is returned from the ErrorHandler function. If the error number is found in the tblErrors table, the value contained in the Response field is evaluated. If it is the value contained in the constant ERR_QUIT, the frmError form is displayed, and the value in the constant ERR_QUIT is returned from the ErrorHandler method. If the Response field contains the value of the ERR_RETRY constant, that value is returned from the method, without the frmError form being displayed. If the Response field contains the value associated with the ERR_EXIT constant, the frmError form is displayed, and the ERR_EXIT value is returned from the ErrorHandler method. Finally, if the value in the Response field is the value associated with the ERR_CONTINUE constant, no error information is displayed, and the ERR_CONTINUE value is returned from the ErrorHandler method.
All the code contained in the ErrorHandler class is similar to that contained in the basErrorHandler module. The code has been modified so that it is implemented using properties and methods of a Class object.
The other code that is changed to use classes is the code behind the error form. Listing 17.34 shows the Load event of the error form, modified to call methods of the appropriate classes.
Listing 17.34. The Form_Load Event of the Error Form
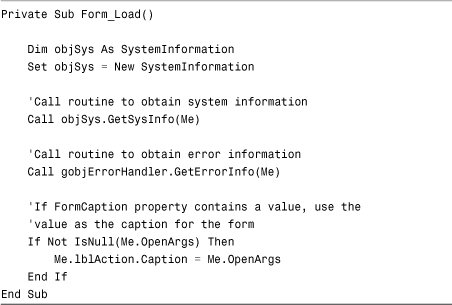
Notice that instead of calling the GetSysInfo and GetErrorInfo functions, the Load event executes the GetSysInfo method of the SystemInformation object and the GetErrorInfo method of the ErrorHandler object.
The GetSystemInfo function and associated declarations were moved to a SystemInformation class. No other changes were made to the code.
The GetErrorInfo function was moved to the ErrorHandler class and modified to retrieve properties of the class, as shown in Listing 17.35.
Listing 17.35. The GetErrorInfo Method of the ErrorHandler Class Retrieving Properties of the Class

Notice that instead of using a type structure, the code references its own properties. The Private variables associated with these properties were set by the ErrorProcess method of the class.
Working with Error Events
Every form and report contains an error event procedure. This event is triggered by any interface or Access Database Engine error. It is not triggered by a programming error made by the Access developer.
Errors often occur in the interface of a form or report, as well as in the Access Database Engine. A user might try to enter an order for a customer who doesn’t exist, for example. Instead of displaying Access’s default error message, you might want to intercept and handle the error in a particular way.
After an error occurs within a form, its error event is triggered. In Listing 17.36, you can see Sub Form_Error. It contains two parameters. The first parameter is the number of the error. The second is the way you want to respond to the error. The error number is an Access-generated number.
This code, which is located in the frmOrders form in the CHAP17EX.ACCDB database, tests to see whether a referential integrity error has occurred. If it has, a message box asks whether the user wants to add the customer. If the user answers Yes, the customer form is displayed.
Listing 17.36. Viewing Sub Form_Error from the Form frmOrders

Caution
Be aware that the code in Listing 17.36 only traps referential integrity errors. It does not handle any other error.
The Response = acDataErrContinue line is very important. It instructs Access to continue the code execution without displaying the standard error message. The other option for Response is AcDataErrDisplay. It tells Access to display the default error message.
Creating a List of Error Codes and Descriptions
Many people ask me how to create a list of error numbers and descriptions. The code in Listing 17.37 creates a table of all the errors that can occur in your VBA code, with a description of what each error number means. You can copy this code into any module and run it.
Listing 17.37. Code That Creates a Table of Errors and Descriptions

The code opens a recordset based on the tblErrorMessages table. It loops through from 1 to 10000, raising an error with each number. Each time through the loop, it appends the error number and the associated error description to the tblErrorMessages table.
Practical Examples: Incorporating Error Handling
Error-handling code should be added throughout the applications that you build. The following example shows you how to incorporate a generic error handler into your applications.
Assume that your application contains a routine called GetCompanyInfo. This routine reads all the company information from the tblCompanyInfo table. The information is read from the public class instance as needed, while the application is running. This routine, like any routine, has the potential for error. The original routine has been modified to incorporate the generic error handler, as shown in Listing 17.38.
Listing 17.38. Incorporating the Generic Error Handler into Your Code
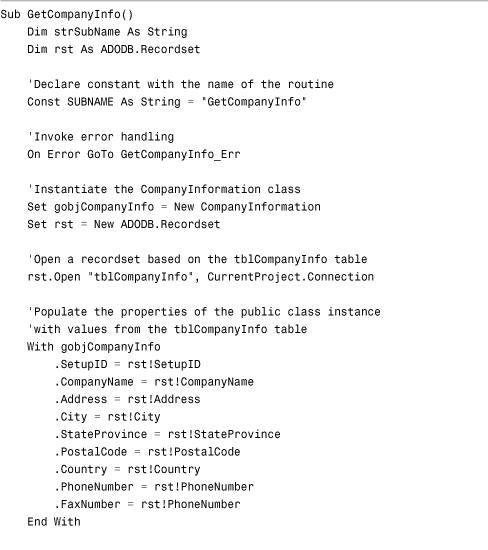

Notice the On Error GoTo statement at the beginning of the routine, and that the local constant SUBNAME is declared and set equal to GetCompanyInfo. The generic error handler uses the value in the constant to display the routine within which the error occurred. The error handler GetCompanyInfo_Err instantiates the ErrorHandler class. It executes the ErrorProcess method of the class and then evaluates its return value.
Summary
In this chapter, you learned the alternatives for handling errors in your Access applications. This chapter covered how you can use the error event to trap for application and Access Database Engine errors in forms and reports. You also learned how to use the On Error statement. Finally, you learned how to build a generic error system. Regardless of the amount of testing done on an application, errors will occur. It is important that you properly trap for those errors.