Chapter 14. Exploiting the Power of Class Modules
IN THIS CHAPTER
- Why This Chapter Is Important
- Object Orientation—An Introduction
- Creating and Using a Class Module
- Setting Values with
Property Set - Creating Multiple Class Instances
- Adding Code to the
InitializeandTerminateEvents - Working with Enumerated Types
- Building Hierarchies of Classes
- Adding a
ParentProperty to Classes - Using the
ImplementsKeyword - Working with Custom Collections
- Adding Your Own Events
- Practical Examples: Using Class Modules
Why This Chapter Is Important
Access 2007 offers two types of modules: Standard modules and Class modules. A Class module is similar to a Code module. The subroutines and functions in the Class module become the methods of the class. The Property Let and Property Get routines become the properties of the class, and the Class module’s name becomes the name of the custom object. A Class module is a great way to encapsulate related functions into a portable, self-contained object. Class modules can help you simplify the process of performing the following tasks:
- Manipulating databases and recordsets
- Calling Windows API functions
- Performing low-level, file-handling tasks
- Accessing and modifying the Registry
If you regularly open databases and recordsets and traverse those recordsets by using code, you might decide that you want to simplify these tasks. By building Class modules, you can more easily access table data.
Object Orientation—An Introduction
The world of object orientation is exciting, but it requires a new way of thinking about things. Access Office 2007 is object-based rather than object-oriented. So, what exactly is the difference? The definitions of the following terms should help you differentiate between these two concepts:
- Class—A template for an object
- Object—An instance of a class
- Instantiation—The process of creating an object based on a class
- Polymorphism—The state of being multifaced; using the same method and property names with different objects, the properties and methods of which are implemented differently for different objects
- Subclassing—Building one class based on another
- Inheritance—In object-oriented programming, the ability of newly created subclasses to take on the behavior of their parent classes
Visual Basic for Applications (VBA), and therefore Access, supports the creation of custom classes and the instantiation of objects based on those classes. Polymorphism can also be simulated by using the same property and method names within different classes. VBA does not fully support subclassing and inheritance. With the exception of a keyword called Implements, classes cannot be based on other classes and, therefore, cannot elicit the behavior of other classes. True polymorphism can exist only when child classes inherit the properties and methods of their parents. The Implements keyword gets you close but does not fully exhibit the behavior of polymorphism.
To make sure that you understand the terms, let’s use an analogy. Imagine that you are going to bake some cookies. The cookie cutter is the class, the template for a cookie object. When you use the cookie cutter to create an actual cookie, you instantiate the cookie class to create a cookie object. The cookie has some properties, such as a powdered sugar property, and some methods, such as the bake method. A ham class is a template for a ham object. The ham class also has a bake method. The “code” behind the bake method of the cookie object and the bake method of the ham object is different. This is polymorphism (being multifaced) in action. If VBA were fully object-oriented, the cookie class and the ham class would have been derived from the same parent. When you would change the code of the parent, the changes would automatically be seen in the children. Now that you are familiar with some object-oriented terms and concepts, take a look at how custom classes work in VBA.
Creating and Using a Class Module
You can insert a Class module in one of three ways:
- Click to select the Create tab of the Ribbon. Open up the Macro drop-down in the Other group and select Class Module.
- With the Visual Basic Editor active, select Insert, Class Module.
- With the Visual Basic Editor active, right-click the project within the Project Explorer window and select Insert, Class Module from the pop-up menu.
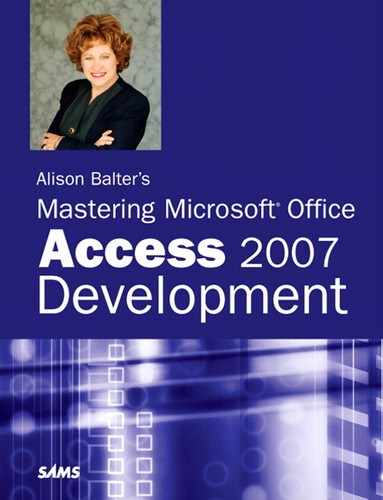
After being inserted, a Class module looks like a Standard Code module (see Figure 14.1). The differences lie in how the variables and procedures in the Class module are accessed, as well as in the behavior of the Class module.
Figure 14.1. A new Class module.
Adding Properties
The most basic way to add a property to a Class module is to use a Public variable. For example, the following code shows the declaration of two Public variables: FirstName and LastName. After you add them to a class, VBA considers them properties of the class.
Public FirstName as String
Public LastName as String
Adding Methods
A function or subroutine placed within a Class module is considered a method of the class. The Speak subroutine that follows acts as a method of the PublicPerson class. It accesses the FirstName and LastName properties of the class, displaying them in a message box.
![]()
Instantiating and Using the Class
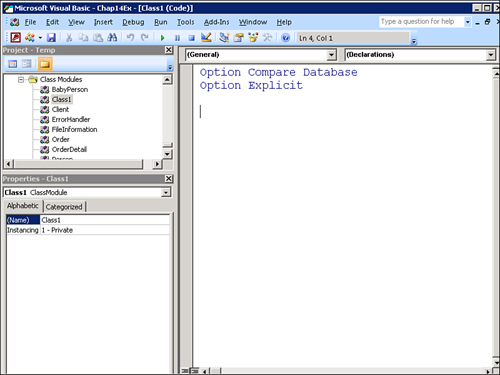
To utilize the code within a class, you must instantiate an object based on that class. To do that, you first declare an object based on the class. You then instantiate the object by using a Set statement. You can then access the properties and methods of the object. The code looks like this:
The code begins by declaring a Person object. The code uses a Set statement to create an instance of the Person object. The code then sets the FirstName and LastName properties of the instance to Alison and Balter, respectively. The code then executes the Speak method of the object. It returns the concatenated name, which is displayed in a message box.
Property Let and Get—Adding Properties the Right Way
Public variables, when used as properties, have the following major disadvantages:
- Using
Publicvariables, you cannot create properties that are read-only or write-only. - You cannot validate what goes into
Publicvariables. - You cannot manipulate the value as the
Publicvariable is set. - You cannot track changes to
Publicvariables.
For these reasons, it is prudent to use property procedures rather than Public variables. With property procedures, you can create custom runtime properties of user-defined objects. After you have defined custom properties, you can use Property Let and Get to assign values to and retrieve values from custom properties. Custom properties give you more flexibility in creating your applications; you can create reusable objects that expose properties to other objects.
Custom properties are Public by default and are placed in Class, Form, or Report modules, making them visible to other modules in the current database. They aren’t visible to other databases.
The Property Let routine defines a property procedure that assigns a value to a user-defined object’s property. Using Property Let is similar to assigning a value to a Public variable, but a Public variable can be written to from anywhere in the database, with little or no control over what’s written to it. With a Property Let routine, you can control exactly what happens when a value is assigned to the property. Here’s an example:
![]()
You might be thinking this code looks just like a subroutine, and you’re somewhat correct. It’s a special type of subroutine that executes automatically in response to the change in a custom property’s value. The example receives the value that the property is changed to as strNewValue. The code stores the uppercase version of the value in the Private variable mstrFirstName. The following line of code causes the code in the Property Let to execute:
FirstName = "Alison"
Property Let sets the value of a custom property, but Property Get defines a property procedure that retrieves a value from a user-defined object’s property. This example illustrates how Property Get is used:
![]()
The Property Get routine automatically executes whenever the code tries to retrieve the value of the property. The value stored in the Private variable mstrFirstName is returned from the Property Get procedure. This routine can be executed by retrieving the property from anywhere in the database. The following line of code causes the code in the Property Get to execute:
MsgBox FirstName
The code that follows shows the declaration of the two Private variables mstrFirstName and mstrLastName. The Property Let for FirstName and the Property Let for LastName store values into these two Private variables. The Property Get for FirstName and the Property Get for LastName retrieve the values stored in the Private variables.

Unlike with Public variables, you have significant control over a property created with Property Let and Property Get routines. To create a read-only property, include only a Property Get. To create a write-only property, include only a Property Let. If you want a read/write property, include both the Property Get and Property Let routines.
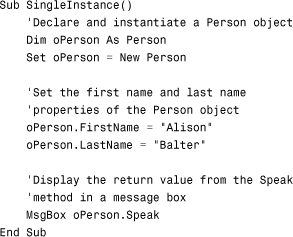
Setting Values with Property Set
Whereas a Property Let stores a value in a property, a Property Set stores a reference to an object in a property. It looks like this:
Property Set and its uses are covered in more detail in the later section “Building Hierarchies of Classes.”
Creating Multiple Class Instances
One of the advantages of Class modules is that you can create multiple instances of the class. Each instance maintains its own variables and executes its own code. This is illustrated in the following code:

The code creates two instances of the Person class. The first is referred to as oPerson1 and the second as oPerson2. The code sets the FirstName property of oPerson1 to Alison and the LastName property of oPerson1 to Balter. The code sets the FirstName property of oPerson2 to Dan and the LastName property of oPerson2 to Balter. The Speak method returns the name of the correct person, which the code displays in a message box.
Adding Code to the Initialize and Terminate Events
The Initialize and Terminate events are the two built-in events that execute for a class object. The Initialize event executes as the class is instantiated, and the Terminate event executes as the class is destroyed.
Initialize
You generally use the Initialize event to perform tasks such as establishing a connection to a database and initializing variables. The following is an example of the use of the Initialize event:
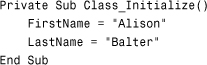
In this example, the code sets the default values of the FirstName and LastName properties of the class to Alison and Balter, respectively.
Terminate
You generally use the Terminate event to perform the class’s cleanup tasks. An example is closing a recordset used by the class. The following is an example of the use of the Terminate event:

This code closes the recordset and destroys the recordset object variable. It provides an example of cleanup code that you would place in your own application.
Working with Enumerated Types
By now, you should be quite familiar with IntelliSense and its benefits. One benefit is that when you type the name of a property or a method whose value should be set to one of a set of constants, the list of appropriate constants automatically appears. For example, when you use the OpenForm method of the DoCmd object, a list of six intrinsic constants appears for the View parameter. Using enumerated types, you can benefit from this behavior with your own custom properties and methods.
Here’s how enumerated types work: For the custom PersonType property, imagine that only four values are appropriate: Client, PersonalContact, Vendor, and Other. Using an enumerated type, you can easily set it up so that the four appropriate types appear in a list whenever you set the PersonType property of the class. Use the Enum keyword to define an enumerated type:

To use the enumerated type with the property, you must include it in the definition of the Property Get and Property Let routines:

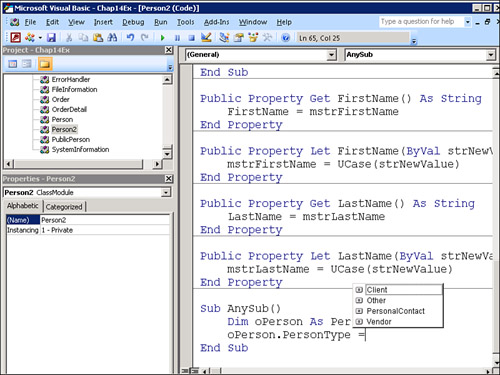
Whenever you attempt to set the value of the PersonType property of the class, the list of valid types automatically appears (see Figure 14.2).
Figure 14.2. The list of types appears after you define an enumerated type for the PersonType property of the class.
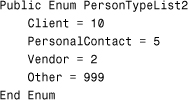
Notice that the code uses a long integer to store the person type. The reason is that VBA limits all enumerated type constants to long integer values. Furthermore, you might wonder what values are stored in the variable when you use each constant. Unless directed otherwise, VBA assigns the first item in the list the value 0 (zero). It assigns each subsequent item in the list the next value (1, 2, 3, and so on). In this example, VBA assigns 0 to the Client, 1 to the PersonalContact, 2 to the Vendor, and 3 to Other. If you wish to control the long integer value assigned to each item in the list, simply set the constant equal to a value:
One additional aspect of enumerated types is worth noting. The process of defining an enumerated type does not ensure that only valid values are used for the property or method. Although IntelliSense provides a list of the constants included in the enumerated type, any value can be entered.
Building Hierarchies of Classes
You commonly emulate real-life relationships between objects in the classes that you build. This necessitates the building of a class hierarchy. The relationships that you build between classes make up an object model. For example, you might have a Client class that has multiple Order objects associated with it. Each Order object can then have multiple Order Detail objects associated with it.
To relate one class to another, place a declaration of the child class in the General Declarations section of the parent. For example, the Order class contains the following declaration:
Public OrderDetail as OrderDetail
The Initialize event of the Order class contains the code that instantiates the OrderDetail class:
![]()
When you instantiate the Order class (the parent class), the code automatically instantiates the child class. You can then set the properties and execute the methods of the child class. Here’s an example:
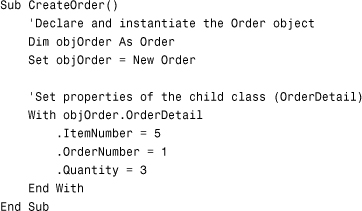
Notice that the code declares and instantiates an Order object. It then uses a With statement to point at the OrderDetail object instantiated in the Initialize event of the Order class. It sets the ItemNumber, OrderNumber, and Quantity properties of the OrderDetail object.
This example shows how to have one child associated with a parent. The section titled “Using a Collection to Manipulate Multiple Instances of the FileInformation Class” shows how to use a Custom collection to emulate a one-to-many relationship with classes.
Adding a Parent Property to Classes
Many Microsoft-generated objects have a Parent property. This property generally provides a reference back to the parent of an object in a hierarchy. You can emulate this behavior in your own classes. Place this code in the child class:
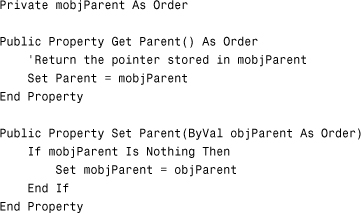
Code in the Initialize event of the parent class sets the Parent property of the child class. The code looks like this:

After the Initialize event of the Order class sets the Parent property of the OrderDetail class, the Property Set for the Parent property of the OrderDetail class executes. If the mobjParent variable is Nothing, a Set statement points the mobjParent variable at the reference to the parent class (Set OrderDetail.Parent = Me). Notice that the Set statement executes only if mobjParent is Nothing. This renders the property as write-once. The following code illustrates how the Parent property is used:

This code declares and instantiates the Order object. The Initialize event of the Order object instantiates the OrderDetail object and sends it a reference to the Order object. The code retrieves the Name property of the Parent object and displays it in a message box.
Using the Implements Keyword
Using the Implements keyword, you can share interfaces between classes. This means that one class can inherit the properties and methods of one or more other classes. The process is quite simple. All you need to do is place the following in the General Declarations section of the class that derives from another class:
Implements Person
After you place this code in the General Declarations section of the BabyPerson class, it allows you to select the Person class from the Objects drop-down. The property and method names of the Person class will then appear in the Procedure drop-down. You must write code for each property and method. In other words, the interface of the Person class is inherited, but its code is not. You can add properties and methods to the derived class (BabyPerson), just as you would in any class.
Working with Custom Collections
In addition to the collections built into the Access and other object libraries, you can create custom collections. Custom collections are similar to arrays, but they offer several advantages:
- Collections are dynamically allocated. They take up memory based only on what’s in them at a given time. This is different from arrays, whose size must be either predefined or redimensioned at runtime. When you redimension an array, Access actually makes a copy of the array in memory, taking up substantial resources. By using custom collections, you can avoid that.
- A collection always knows how many elements it has, and elements can easily be added and removed.
- Each element of a collection can contain a different type of data.
- Elements can be added into any element of a collection.
Although collections are very powerful and provide several advantages, it is important that you be aware of their disadvantages, which are as follows:
- Every item in a collection is stored as a variant.
- Although the capability to store a different type of data in each element of a collection can be an advantage, it can also be a disadvantage. If you attempt to treat each item in the collection the same (for example, by accessing the same property in each element of the collection), your code might render an error.
You might wonder why collections are covered in this section. A common use of collections is to house instances of custom objects. An example of such a use is covered in the section of this chapter titled “Using a Collection to Manipulate Multiple Instances of the FileInformation Class.”
Creating a Custom Collection
Defining a custom collection is easy: Simply use the Dim keyword to create an object of the type Collection, as shown here:
Dim colSports As New Collection
The Dim statement tells the compiler you want to declare a variable, and the As New keywords indicate that you’re creating a new instance of something. Specifically, you’re creating a new instance of a Collection object. In the following sections, look at how you can add items to and remove items from a custom collection.
Adding Items to a Custom Collection
The Add method adds a new item to a custom collection. It looks like this:
colSports.Add "Basketball"
This line of code adds the text "Basketball" to the colSports collection. The Add method has three optional arguments: Key, Before, and After. Key is a string name you can use to uniquely identify an element; the Before and After arguments enable you to specify where in the collection the new item will be placed. Here’s an example:

This code creates a new collection called colSports and adds two consecutive elements to the collection: Basketball and Skiing. It then adds Skating before Basketball. Skating becomes Element 1 and Basketball becomes Element 2. Finally, it adds Hockey after Element 2 (Basketball).
Caution
Unlike almost every other array or collection in VBA, custom collections are one-based rather than zero-based. This means that the first element is numbered one (rather than zero), the second element is numbered two, and so on. This is a big change if you’re accustomed to thinking of arrays and collections as being only zero-based.
Looping Through the Elements of a Custom Collection
Just as you can loop through built-in collections, you can also loop through a custom collection. The code looks like this:
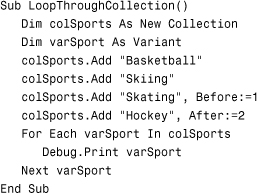
This code uses a For Each...Next loop to loop through each element of colSports. Notice that the routine declares a variant variable as the type of object in the collection. This is done so that different types of values can be stored in each object in the collection.
Referencing Items in a Custom Collection
When you add an item to a collection, you can specify a custom key for the object. This way, you can easily return to the item in the collection whenever necessary. The following code illustrates how to specify a custom key:
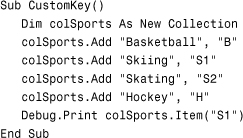
This code adds several items to the colSports collection. As the code adds each item, it assigns the item a unique key. You can easily access each item in the collection by using its unique key. You will often use the Item method when adding several instances of a form, such as a Customer form to a collection. The customer ID of each customer is added as the unique key for each form in the collection. This unique identifier enables you to readily return to a specific instance of the Customer form.
Removing Items from a Custom Collection
Removing items from a custom collection is just as easy as adding them. You use the Remove method, which looks like this:
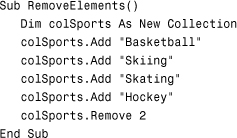
This routine removes Element 2 (Skiing) from the collection.
Adding Your Own Events
Just as you can add custom properties and methods to the classes that you build, you can also add custom events. You will often use custom events to return information back to the application code that uses them. For example, if an error occurs in the Class module, it is prudent to raise an event to the user of the class, notifying it that the error occurred. Error handling is one of the many uses of a custom event. To declare a custom event, place a Public Event statement in the General Declarations section of the Class module:
Public Event Speaking(strNameSaid As String)
This statement declares a Speaking event that passes a string up to its caller. After you have declared an event, you must then raise it in the appropriate place in the class code. You raise an event with the RaiseEvent command. Realize that custom events mean nothing to Access or to the operating system. In other words, they are not triggered by something that the operating system responds to. Instead, you generate them with the code that you write, in the places in your application where you deem appropriate. Although you can declare an event only once, you can raise it as many times as you like. The following is an example of raising the Speaking event from the Speak method of the class:

In this example, the Speak method raises the Speaking event. It passes the concatenation of the last name and first name spoken back to the caller.
After you have raised an event, you need to respond to it in some other part of your application. You can only respond to events in Class modules (form, report, or standalone). You must first create an object variable that is responsible for reporting the events of the class to your application:
Private WithEvents mobjPerson As Person2
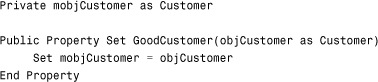
You can then select the class from the Objects drop-down and the event from the Procedures drop-down. The code that follows responds to the Speaking event, displaying what was said in a message box:
![]()
Practical Examples: Using Class Modules
If you want to best understand how to benefit from the use of Class modules, it is beneficial to see them in action. This chapter covers three examples. The first shows the use of a file information class. Each instance of the class is used to house information about a particular file. The second illustrates how the use of a customer class facilitates the process of dealing with customer data. The third is a system information class. It retrieves and then provides information about the computer system. An additional example of the use of Class modules is found in Chapter 17, “Error Handling: Preparing for the Inevitable.” It shows how a custom error class facilitates the process of implementing error handling within your application.
The FileInformation Class
A common application requirement is to be able to extract the drive, path, or short filename from a complete filename. Although you can obtain these pieces of information using a Standard Code module and functions, placing the functions in a Class module makes them easier to work with. The FileInformation class contained in the Chap14Ex sample database contains four properties: FullFileName, Drive, Path, and Name. The user of the class sets the FullFileName property. It contains the complete filename and path of the file whose parts the user wants to extract. The Drive, Path, and Name properties of the class contain the drive, path, and name of the file specified in the FullFileName property. Listing 14.1 shows the Property Let and Property Get procedures, as well as the Private variables associated with these properties.
Listing 14.1. The Property Declarations for the FileInformation Class

Notice that the Drive, Path, and Name properties have no associated Property Let routines. The reason is that these properties are read-only properties from outside the class. When the code sets the FullFileName property, it executes the GetDrive, GetPath, and GetName routines. Each of these routines populates the appropriate Private variables so that they can be retrieved in the Property Get routines. Listing 14.2 shows the GetDrive, GetPath, and GetName routines.
Listing 14.2. The GetDrive, GetPath, and GetName Routines

The GetDrive routine extracts the characters to the left of the colon, including the colon, thereby extracting the drive. The GetPath routine locates the last backslash in the filename. The string to the left of the last backslash contains the pathname. Finally, the GetName routine extracts everything to the right of the last backslash.
Note that the GetDrive, GetPath, and GetName routines are private to the Class module. This means that their code cannot be executed from outside the Class module. The code shown in Listing 14.3 illustrates how the code within the Class module is used.
Listing 14.3. Using the FileInformation Class
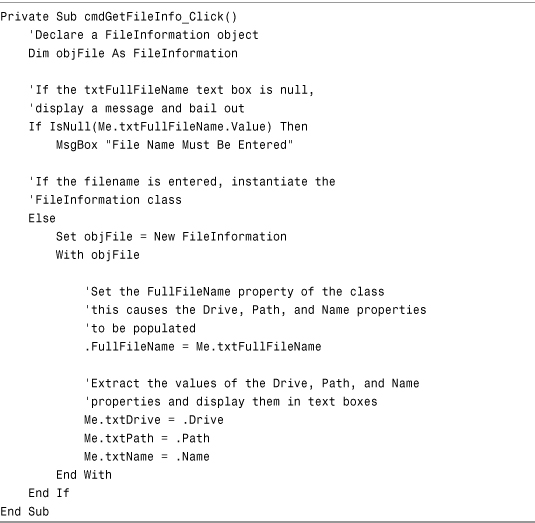
This code, found in the frmFileInformation form in CHAP14EX, declares a FileInformation variable. As long as the user has entered a filename, the code instantiates an instance of the FileInformation class. It sets the FullFileName property equal to the value contained in the txtFullFileName text box. This causes the GetDrive, GetPath, and GetName routines to execute, thereby populating the Private variables contained within the class. The code then retrieves the Drive, Path, and Name property values and places them in text boxes on the form.
Using a Collection to Manipulate Multiple Instances of the FileInformation Class
The idea of using a collection to manipulate multiple instances of a class was discussed in the “Working with Custom Collections” section of this chapter. It is illustrated in Listing 14.4.
Listing 14.4. Using a Collection to Manipulate Multiple Instances of the FileInformation Class

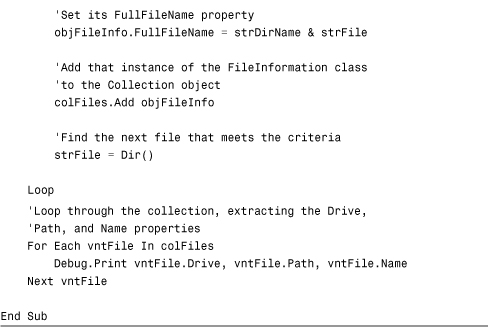
The code receives a directory path (including a trailing backslash) as a parameter. It creates and instantiates a Collection object. It then executes the Dir function, which retrieves the name of the first file in the specified directory. As long as it finds at least one file, it executes the code within the Do Until loop. The code creates an instance of the FileInformation class. The FullFileName property of the instance is then set equal to the directory name concatenated with the filename. The most important line of code in the routine is then executed, adding the instance of the FileInformation class to the collection. This enables the instance to persist. The code calls the Dir function to retrieve the name of the next file in the specified directory, and the process is repeated until no additional filenames are located.
After the code adds all the instances of the FileInformation class to the collection, it uses the For...Each loop to iterate through all items in the collection. It retrieves the Drive, Path, and Name properties of each item in the collection and prints them to the Debug window. Notice that the code uses a variant variable to iterate through the elements of the Collection object.
Note
Although this example requires the use of a variant variable, you should use variant variables only when absolutely necessary (as in this example). This is because variant variables take up more memory and process more slowly than other variable types such as String, Int, or Double.
The Data Access Class
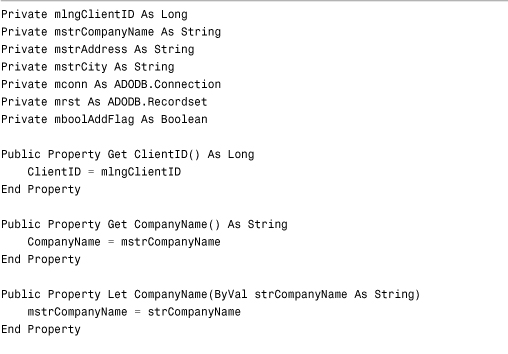
Building a data access class greatly facilitates the process of dealing with data, particularly when the data within a table is accessed from numerous forms or numerous databases. By encapsulating the data access activities into a Class module, you can better ensure that all the forms and applications treat the data consistently. Each field within the table becomes a property of the class. This is illustrated by the private declarations and Property Let and Property Get routines shown in Listing 14.5.
Listing 14.5. The Private Variables and Property Let and Property Get Routines Used by the Data Access Class

The Initialize event of the class, shown in Listing 14.6, is responsible for establishing a connection with the database and opening a recordset based on the data in the tblClients table. This example uses the ActiveX Data Object (ADO) object library. ADO is covered in detail in Chapter 15, “What Are ActiveX Data Objects, and Why Are They Important?” For now, it’s only important to understand the basics. The example sets the LockType of the recordset to adLockOptimistic and the CursorType of the recordset to adOpenDynamic. The combination of these two property settings renders the recordset’s data updateable.
Listing 14.6. The Initialize Event of the Client Class

After the code opens the recordset, the contents of the first record in the recordset must be available as properties of the class. This is necessary so that the contents of the first record can be displayed in the frmClients form. The Scatter method, shown in Listing 14.7, accomplishes this task.
Listing 14.7. The Scatter Method of the Client Class

The Scatter method simply takes the contents of the fields in the current record (in this case, the first record) and stores them in Private variables that are accessed by the Property Get and Property Let routines within the class. The variables are then used by the Form_Load event of the frmClients form, shown in Listing 14.8.
Listing 14.8. The Form_Load Routine of the frmClients Form
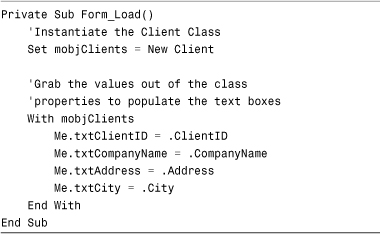
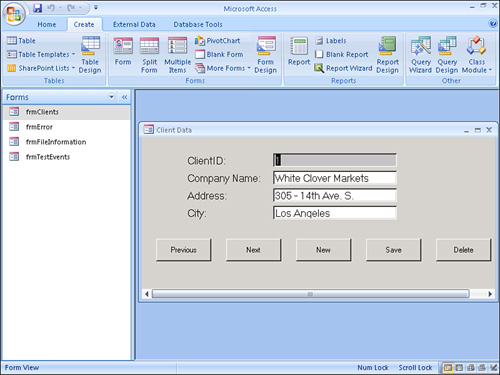
The Form_Load event instantiates the Client class, causing the Initialize event of the class to execute. The Scatter method of the class executes, and then the code populates the text boxes on the form with the contents of the ClientID, CompanyName, Address, and City properties of the class. The frmClient form, populated with data from the first record in the tblClients table, is shown in Figure 14.3.
Figure 14.3. The frmClients form is used to display and manipulate data in the tblClients table.
After the code displays the first record, the user can opt to move to the next record in the recordset. Listing 14.9 shows the Click event of the cmdNext command button on the frmClients form, which calls the MoveNext method of the class and then displays the contents of the class’s properties.
Listing 14.9. The Click Event of the cmdNext Command Button

The cmdNext Click event calls the MoveNext method of the class. The MoveNext method is responsible for moving forward from record to record within the class. It uses the module-level recordset object set in the Initialize event of the class. This method is shown in Listing 14.10.
Listing 14.10. The MoveNext Method of the Client Class

The MoveNext method first tests to see whether the end of the recordset has been reached. If not, the MoveNext method is used to move to the next record in the recordset. If the end of the recordset is encountered, the code moves back to the last record. The Scatter method is called to update the values of the module-level variables. The cmdNext Click event then retrieves these values via the Property Get routines, to update the data displayed on the form.
The cmdPrevious Click event of the frmClients form is similar to the cmdNext Click event. In Listing 14.11, it calls the MovePrevious method of the class and then displays the contents of the class’s properties.
Listing 14.11. The Click Event of the cmdPrevious Command Button

The Click event of the cmdPrevious command button first calls the MovePrevious method of the class. The MovePrevious method of the class is similar to the MoveNext method. In Listing 14.12, it moves to and displays the previous record in the recordset.
Listing 14.12. The MovePrevious Method

The MovePrevious method first tests to see whether the record pointer is before the first record in the recordset. If not, the MovePrevious method moves to the previous record in the recordset. If it encounters the beginning of the recordset, the code moves forward to the first record. The code calls the Scatter method to update the values of the module-level variables. These variables are then retrieved by the Property Get routines initiated by the Click event of the cmdPrevious command button.
The Client class enables the user to edit the data in the underlying recordset. The user simply enters data into the form’s unbound text boxes. After entering the data, the user clicks Save. The Click event of the cmdSave command button saves the form’s data to the underlying recordset, as shown in Listing 14.13.
Listing 14.13. The Click Event of the cmdSave Command Button

The code in the Click event of the cmdSave command button first sets all the properties of the class to the corresponding text box values. It then executes the Save method of the class (see Listing 14.15).
Before you look at the Save method, it is important to explore the code under the Click event of the cmdNew command button (see Listing 14.14). It’s very simple: It clears the text boxes on the form, readying them for the entry of the new data. It then sets the value of the AddFlag to True.
Listing 14.14. The Click Event of the cmdNew Command Button

In the case of either an edit or an add, the code in the Save method of the class actually writes the data from the new record to disk. This code is shown in Listing 14.15.
Listing 14.15. The Save Method of the Class
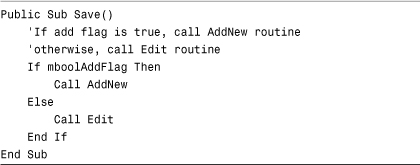
The Save method of the class first determines whether the user is adding or editing data. This is determined by evaluating the mboolAddFlag. The code sets the mboolAddFlag to True when the user clicks the Add button. When the user is editing, the value of the variable is False. If the user is adding the record, the code executes the private routine called AddNew, which appears in Listing 14.16.
Listing 14.16. The AddNew Method of the Class

The AddNew method of the class uses the AddNew method of an ADO recordset to populate a new record with the values contained in the Private variables. The Update method of the recordset object writes the new data to disk. When the Update method executes, the value of the AutoNumber field is assigned and stored in the variable called mlngClientID. This variable is retrieved in the Click event of cmdSave so that the txtClientID text box contains the appropriate value.
Whereas the AddNew method of the class adds the record in the recordset, the Edit method of the class updates the data in an existing record. This method is shown in Listing 14.17.
Listing 14.17. The Edit Method of the Class
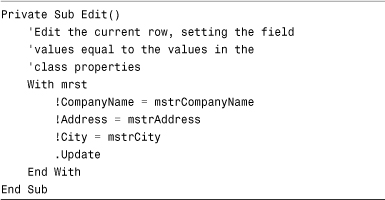
The Edit method uses the Update method of the ADO recordset to take the values in the module-level variables and write them to disk.
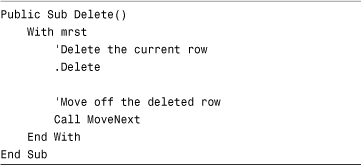
The last data task associated with the cmdClients form provides the user with the capability to delete a record from the recordset. The code behind the Click event of the cmdDelete command button appears in Listing 14.18.
Listing 14.18. The Click Event of the cmdDelete Command Button
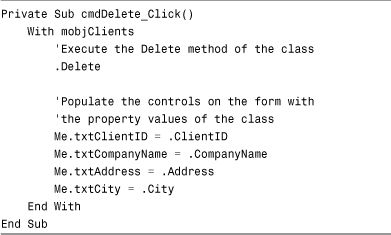
This code executes the Delete method of the class, shown in Listing 14.19. It uses the Delete method of an ADO recordset to delete the current record from the recordset. After the deletion, the record pointer is sitting on the deleted record. The MoveNext method of the class moves the record pointer to the next valid record. The Click event of the cmdDelete command button then populates the text boxes on the form with the values of the record that the MoveNext method moved to.
Listing 14.19. The Delete Method of the Class
The SystemInformation Class
The process of obtaining system information, such as the amount of free drive space, is usually a somewhat tedious and difficult process. This information is generally available only through the Windows API, covered in Chapter 25, “Exploiting the Power of the Windows API.” The execution of Windows API functions is best left to more advanced developers. So how can a junior developer access this important information? If the senior developer encapsulates the complex functionality of the Windows API calls in a Class module, the junior developer can obtain the system information as properties of the class.
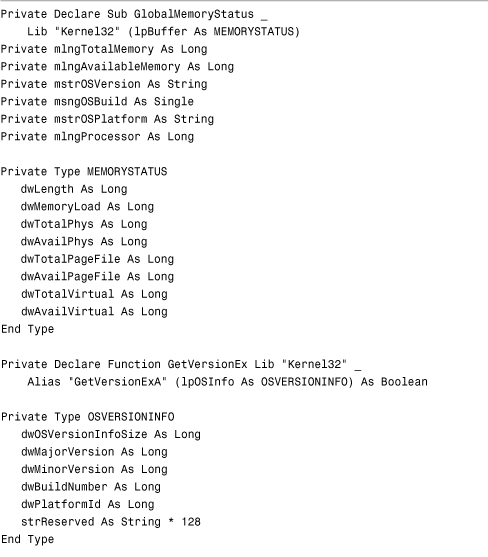
The class called SystemInformation is responsible for obtaining information about the hardware, operating system, and system resources. To obtain this information, the Declare statements, type structure declarations, and constant declarations are included in the General Declarations section of the Class module (see Listing 14.20).
Listing 14.20. The Private Variables and Type Structures Required by the SystemInformation Class

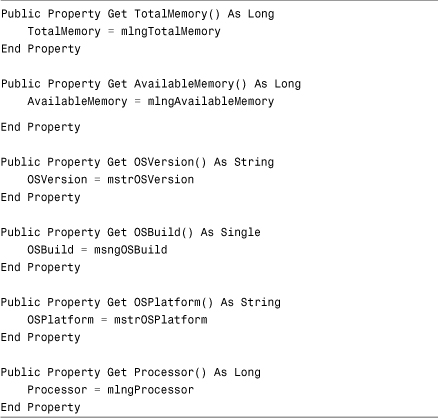
The SystemInformation class contains six read-only properties: TotalMemory, AvailableMemory, OSVersion, OSBuild, OSPlatform, and Processor. These properties are set within the class and cannot be modified from outside the class. The Property Get functions for the six properties are shown in Listing 14.21.
Listing 14.21. The Property Get Routines Required by the SystemInformation Class
All the work is done in the Initialize event of the class. When the class is instantiated, the Initialize event executes all the Windows API functions necessary to obtain the required system information. The Initialize event of the class is shown in Listing 14.22.
Listing 14.22. The Initialize Event of the SystemInformation Class

The GlobalMemoryStatus Windows API function populates the TotalMemory and AvailableMemory properties. The GetVersionEX function is used to set the OSVersion, OSBuild, and OSPlatform properties. Finally, the GetSystemInfo function populates the Processor property.
Summary
In this chapter, you learned how to implement your application’s subroutines and functions as methods of Class modules. In doing so, you discovered how complex activities can be encapsulated into Class modules, greatly simplifying the implementation of their functionality. After exploring the basics of object orientation and Class modules, you saw several practical examples of classes in action. They included a file information class, a data access class, and a system information class. The possible practical application of classes within the business environment is limited only by your imagination!