
Chapter 23. Working with and Customizing Ribbons
IN THIS CHAPTER
- Why This Chapter Is Important
- Customizing the Ribbon: An Overview
- Showing System Tables
- Enabling the Display of System Errors
- Creating the
USysRibbonsSystem Table - Adding Data to the
USysRibbonsTable - Applying the Custom Ribbon
- Hiding System Objects
- Restoring the Ribbon to Its Default Settings
- Adding Additional Groups and Controls
- Executing a Macro from the Ribbon
- Practical Examples: Securing an Access 2007 Database
Why This Chapter Is Important
New to Access 2007, the ribbon is the strip across the top of the application window that contains groups of commands. The ribbon in Microsoft Office Access 2007 replaces both menus and toolbars found in earlier versions of Access. As a developer, you might not want the default ribbon to appear in your applications. You may want to hide existing functionality or to add new functionality. You need to understand how to customize the ribbon to be able to accomplish these tasks. Unfortunately, there is no user interface to modify the ribbon. You have to pull up your sleeves and use Extensible Markup Language (XML) to customize the ribbon. This chapter shows you all the tips and tricks that you need to know to add custom ribbons to your overall application and to your forms and reports.
Customizing the Ribbon: An Overview
Using ribbon customization techniques, you can hide existing tabs, add new tabs, add new command groups, and add new commands to a command group. You accomplish all these tasks by using XML. Although there are several places that you can store the XML used to customize the ribbon, the easiest method is to store the XML in a system table in the current database. The steps are as follows:
- Create a system table named
USysRibbons. - Add your XML to the table.
- Specify whether you want the ribbon to display for the entire application or for a specific form or report.
Several steps are involved in creating and applying a custom ribbon. The following is an overview of the steps involved:
- Show system tables.
- Enable the display of system errors.
- Create the
USysRibbonstable. - Add data to the
USysRibbonstable. - Apply the custom ribbon.
- Hide system objects.
- Restore the ribbon to its default settings.
- Add additional groups and controls.
- Execute a macro from the ribbon.
The sections that follow cover each of these steps in detail.
Showing System Tables
The first step that you should take when creating a new ribbon or modifying the existing ribbon is to show system tables in your database. You accomplish this task by using the Navigation Options. Here’s how:
- Right-click the Navigation Bar at the top of the Navigation Pane and select Navigation Options. The Navigation Options dialog box appears (see Figure 23.1).
Figure 23.1. Using the Navigation Options dialog box, you can opt to show system tables.
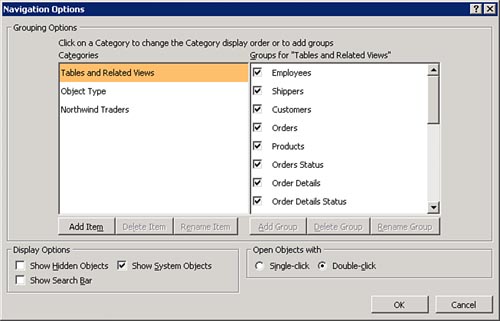
- Click to select the Show System Objects check box found under the Display Options.
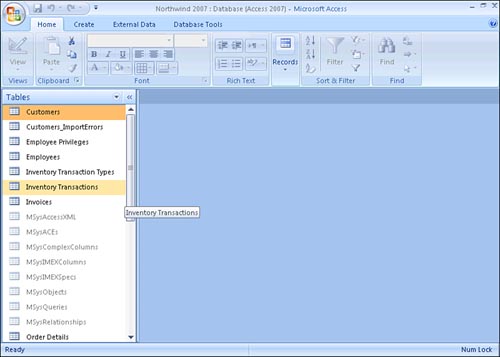
- Click OK to complete the process. The system tables now appear in the Navigation Pane (see Figure 23.2).
Figure 23.2. After you opt to show system tables, they appear in the Navigation Pane.
Enabling the Display of System Errors
The second step when customizing the ribbon is to enable the display of add-in user interface error messages. Here’s the process:
- Click the Microsoft Office button and select Access Options. The Access Options dialog box appears.
- Click Advanced.
- Scroll down until you see the General group of commands. Your screen should appear as shown in Figure 23.3.
Figure 23.3. Select Show Add-In User Interface Errors from the General group.

- Click the Show Add-In User Interface Errors check box and click OK to complete the process.
Creating the USysRibbons Table
The next step is to create the USysRibbons system table. Here are the steps involved:
- Select Table Design from the Tables group on the Create tab.
- Add an
AutoNumberfield calledIDthat has a field size of Long Integer. - Add a
Textfield calledRibbonNamethat has a field size of 255. - Add a
Memofield calledRibbonXml. The table design appears in Figure 23.4.Figure 23.4. It is important that you design the custom table exactly the same as in the example.

- You can add additional fields, but the designated fields must have the exact name, type, and size as designated in steps 2–4.
- Designate the
IDfield as the Primary Key. - Click Save on the Quick Access toolbar, and name the table
USysRibbons.
Adding Data to the USysRibbons Table
You are now ready to add data to the USysRibbons table. Here are the steps involved:
- Open the
USysRibbonstable in Datasheet view. - Add the XML shown in Listing 23.1.
- Close the
USysRibbonstable. - Close and reopen the database.
Listing 23.1. Writing the XML Necessary to Customize the Ribbon

The XML first tells Access to display the default tabs. It then designates that the Create tab will be hidden. Next, the XML creates a ribbon tab named My New Tab. It then adds a command group called My Custom Group to the tab. Finally, it adds the Copy command to the group.
Applying the Custom Ribbon
Now that you have created the ribbon code, you are ready to apply the ribbon. You can apply the ribbon to the entire database or to a specific form or report. The sections that follow explain each process in detail.
Applying a Custom Ribbon to the Entire Database
To apply the ribbon to the entire database, follow these steps:
- Click the Microsoft Office button and then select Access Options. The Access Options dialog box appears.
- Click Current Database.
- Scroll down until you see Ribbon and Toolbar Options (see Figure 23.5).
Figure 23.5. You must use the Ribbon and Toolbar Options to select your ribbon.

- Click to open the Ribbon Name drop-down and select your new menu from the list.
- Click OK to complete the process. A dialog box appears, indicating that you must close and reopen the database for the change to take effect (see Figure 23.6).
Figure 23.6. You must close and reopen the database for the change to take effect.

- Click OK to continue and then close and reopen the database. The Create tab should be hidden, and there should be a tab called My New Tab.
- Click the My New Tab tab. It should appear as shown in Figure 23.7.
Figure 23.7. The ribbon appears with all the custom features that you designated.

Applying a Custom Ribbon to a Form or Report
In the preceding example, you assigned a custom ribbon to a database. Now look at how to assign a custom ribbon to a form or report. Here are the steps involved:
- In the Navigation Pane, right-click the form or report to which you want to apply a custom ribbon. Select Design View. Access displays the form or report that you selected in Design View.
- Display the property sheet. (If it is not visible, either press F4 or select the Property Sheet icon on the Design tab.)
- Make sure that you designate Form or Report in the Property Sheet drop-down.
- Click the Other tab to select it.
- Click within the
Ribbon Nameproperty and open the drop-down to display the available ribbons (see Figure 23.8).Figure 23.8. You must select the ribbon that you want to associate with the form.

- Select the desired ribbon from the drop-down.
- Click Save to save your changes and then switch to Form view. Notice that the custom ribbon is associated with the form. After clicking to select the My New Tab tab, your screen should appear as in Figure 23.9.
Figure 23.9. The custom ribbon is associated with the designated form.

Hiding System Objects
After you have determined that your custom ribbons are working properly, you can once again hide the system objects. To do this, follow these steps:
- Right-click the Navigation Bar at the top of the Navigation Pane and select Navigation Options. The Navigation Options dialog box appears.
- Within the Display Options group, click to deselect Show System Objects.
- Click OK to complete the process.
Restoring the Ribbon to Its Default Settings
Sometimes you will want to restore the ribbon back to its default settings. The process differs depending on whether you have assigned the ribbon to the entire database or to a form or report. Let’s start with how to restore a ribbon customized for the entire application:
- Click the Microsoft Office button and then select Access Options. The Access Options dialog box appears.
- Click Current Database.
- Scroll down until you see Ribbon and Toolbar Options.
- Delete the contents of the Ribbon Name drop-down.
- Click OK to complete the process. A dialog box appears, indicating that you must close and reopen the database for the change to take effect.
You will sometimes need to return the ribbon associated with a form or report back to the default ribbon. Here’s how:
- In the Navigation Pane, right-click the form or report to which you want to apply the standard ribbon. Select Design View. Access displays the form or report that you selected in Design view.
- Display the property sheet. (If it is not visible, either press F4 or select the Property Sheet icon on the Design tab.)
- Make sure that you designate Form or Report in the Property Sheet drop-down.
- Click the Other tab to select it.
- Delete the contents of the
Ribbon Nameproperty. - Save, close, and reopen the form or report. The default ribbon should display.
Adding Additional Groups and Controls
Figure 23.10 shows the new tab further customized. Notice that it now contains two groups, and the first group contains two commands. Listing 23.2 shows in bold the XML modifications necessary to make these changes.
Listing 23.2. Adding Groups and Commands to the Ribbon

Figure 23.10. The new ribbon contains an additional group and control.

Notice that the example creates an additional control on the My New Group tab. It also adds a new group containing one control. Figure 23.10 illustrates the result of the changes.
You might be wondering where you can find the idMso value associated with a command. The idMso value determines which command Access associates with the button. Here are the steps involved:
- Click the Microsoft Office button and select Access Options.
- Click Customize. Your screen will appear as shown in Figure 23.11.
Figure 23.11. Adding a ribbon to your Access 2007 application.
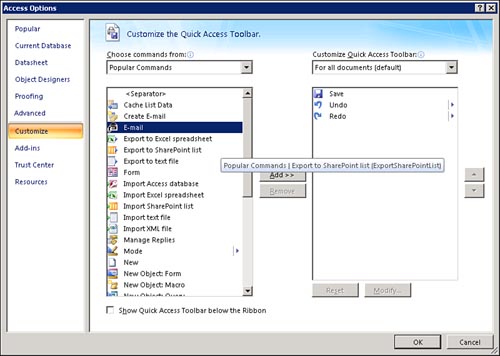
- Hover your mouse pointer over the item whose
idMsovalue you want to know. TheidMsovalue appears as a ToolTip.
Executing a Macro from the Ribbon
You may want to run a macro that you created directly from the ribbon. Listing 23.3 illustrates this simple process.
Listing 23.3. Executing a Macro from the Ribbon

The code in the example executes the macro named SayHello. The button is named RunCustomMacro, and its label is Say Hello.
Practical Examples: Securing an Access 2007 Database
Practice adding a custom ribbon to one of your databases. Apply the ribbon to the entire database. Then create a second custom ribbon and apply that ribbon to a particular form or report. Finally, add a macro to the ribbon.
Summary
Because ribbons didn’t exist in earlier versions of Access, the process of creating them is different from any process in those earlier versions. In this chapter, you learned how to create a system table that contains the XML necessary to create or modify a ribbon. You also learned how to determine when the custom ribbon displays. You learned how to restore the ribbon to its default settings, and finally how to execute macros from the ribbon. All of these techniques are necessary when creating new ribbons or modifying existing ones.