
Chapter 7. What Are Macros, and When Do You Need Them?
IN THIS CHAPTER
- Why This Chapter Is Important
- Learning the Basics of Creating and Running a Macro
- Running an Access Macro
- Modifying an Existing Macro
- Documenting Your Macro: Adding Comments
- Testing a Macro
- Determining When You Should Use Macros and When You Shouldn’t
- Converting a Macro to VBA Code
- Creating an
AutoExecMacro - Using the
DoCmdObject - Practical Examples: Adding an
AutoExecMacro to the Time and Billing Application
Why This Chapter Is Important
Although you may not prefer to use macros to develop the routines that control your applications, macros in Access 2007 play a major role in the development process. Available in Microsoft Office Access 2007 are embedded macros. Rather than appearing in the Navigation Pane as a separate object, an embedded macro is part of the object to which it is associated. When you modify an embedded macro, it does not affect any other macros or objects in the database. Because you can prevent embedded macros from performing certain potentially unsafe operations, they are trusted. In addition to their other benefits, using Access 2007 macros can often help you get started with developing applications—because these macros can be converted to VBA code. This means you can develop part of your application using macros, convert the macros to VBA code, and then continue developing your application. Although I don’t recommend this approach for serious developers, it offers a great jump-start for those new to Access or Windows development in general.
Learning the Basics of Creating and Running a Macro
To create a macro, click to select the Create tab. Then select Macro from the Other group. The Macro Design window shown in Figure 7.1 appears. In this window, you can build a program by adding macro actions, arguments, names, and conditions to the macro.
Figure 7.1. The Macro Design window, showing the macro Action, Arguments, and Comment columns.
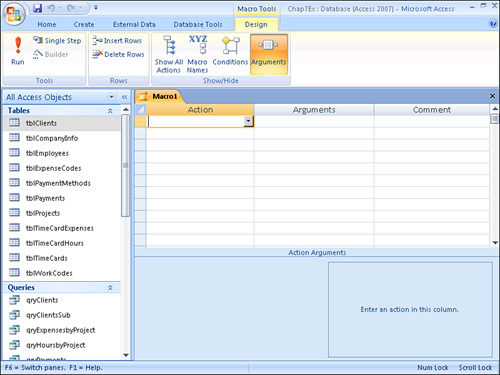
Macro actions are like programming commands or functions. They instruct Access to take a specific action, for example, to open a form. Macro arguments are like parameters to a command or function; they give Access specifics on the selected action. For example, if the macro action instructs Access to open a form, the arguments for that action tell Access which form should be opened and how it should be opened (Form, Design, or Datasheet view or Print Preview). Macro names are like subroutines, and several subroutines can be included in one Access macro. Each of these routines is identified by its macro name. Macro conditions allow you to determine when a specific macro action will execute. For example, you might want one form to open in one situation and a second form to open in another situation.
Macro Actions
As mentioned, macro actions instruct Access to perform a task. You can add a macro action to the Macro Design window in several ways. One method is to click in a cell in the Macro Action column and then click to open the drop-down list. A list of all the macro actions appears, as in Figure 7.2. Select the one you want from the list, and it’s instantly added to the macro. Use this method of selecting a macro action if you aren’t sure of the macro action’s name and want to browse the available actions.
Figure 7.2. The Macro Action drop-down list, showing all the available macro actions.

After you have been working with macros for a while, you will know which actions you want to select. Rather than open the drop-down list and scroll through the entire list of actions, you can click a cell in the Action column and then start typing the name of the macro action you want to add. Access will find the first macro action beginning with the character(s) you type.
The OpenTable, OpenQuery, OpenForm, OpenReport, and OpenModule actions are used to open a table, query, form, report, or module, respectively. You can fill in all these actions and associated arguments quite easily with a drag-and-drop technique:
- Scroll through the Navigation Pane until you see the object that you want to add to the macro.
- Click and drag the object you want to open over to the Macro Design window. The appropriate action and arguments are automatically filled in. Figure 7.3 shows the effects of dragging and dropping the
frmClientsform onto the Macro Design window.Figure 7.3. The Macro Design window after the
frmClientsform was dragged and dropped on it.
Dragging and dropping a table, query, form, report, or module onto the Macro Design window saves you time because all the macro action arguments are automatically filled in for you. Notice in Figure 7.3 that six action arguments are associated with the OpenForm action: Form Name, View, Filter Name, Where Condition, Data Mode, and Window Mode.
Three of the arguments for the OpenForm action have been filled in: the name of the form (frmClients), the view (Form), and the window mode (Normal). Macro action arguments are covered more thoroughly in the next section.
Action Arguments
As mentioned, macro action arguments are like command or function parameters; they give Access specific instructions on how to execute the selected macro action. The available arguments differ depending on what macro action has been selected. Some macro action arguments force you to select from a drop-down list of appropriate choices; others allow you to enter a valid Access expression. Macro action arguments are automatically filled in when you click and drag a Table, Query, Form, Report, or Module object to the Macro Design window. In all other situations, you must supply Access with the arguments required to properly execute a macro action. To specify a macro action argument, follow these five steps:
- Select a macro action.
- Press the F6 function key to jump down to the first macro action argument for the selected macro action.
- If the macro action argument requires selecting from a list of valid choices, click to open the drop-down list of available choices for the first macro action argument associated with the selected macro action. Figure 7.4 shows all the available choices for the
Form Nameargument associated with theOpenFormaction. Because the selected argument isForm Name, the names of all the forms included in the database are displayed in the drop-down list.Figure 7.4. Available choices for
Form Nameargument.
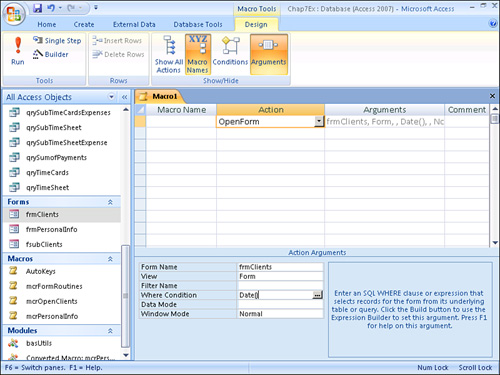
- If the macro action argument requires entering a valid expression, you can type the argument into the appropriate text box or get help from the Expression Builder. Take a look at the
Where Conditionargument of theOpenFormaction, for example. After you click in the Where Condition text box, an ellipsis appears. If you click on the ellipsis, the Expression Builder dialog box is invoked, as shown in Figure 7.5.Figure 7.5. The Expression Builder dialog box allows you to easily add complex expressions to your macros.

- To build an appropriate expression, select a database object from the list box on the left; then select a specific element from the center and right list boxes. Click Paste to paste the element into the text box. In Figure 7.5, the currently selected database object is Built-in Functions, and the currently selected elements are Date/Time and Date. Click OK to close the Expression Builder. The completed expression appears as shown in Figure 7.6.
Figure 7.6. The completed expression for the
Whereargument of theOpenFormaction.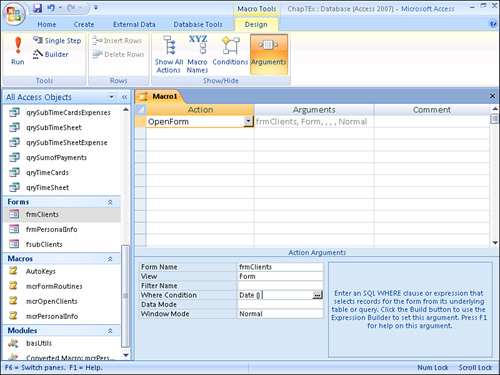
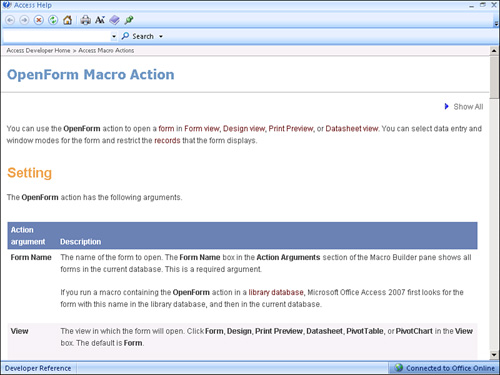
Remember that each macro action has different macro action arguments. Some of the arguments associated with a particular macro action are required, and others are optional. If you need help on a particular macro action argument, click in the argument and Access gives you a short description of that argument. If you need more help, press F1 to see Help for the macro action and all its arguments, as shown in Figure 7.7.
Figure 7.7. Help on the OpenForm action.
Macro Names
Macro names are like subroutines; they allow you to place more than one routine in a macro. This means you can create many macro routines without having to create several separate macros. You should include macros that perform related functions within one particular macro. For example, you might build a macro that contains all the routines required for form handling and another that has all the routines needed for report handling.
Only two steps are needed to add macro names to a macro:
- Click the Macro Names in the Show/Hide group on the Design tab. The Macro Name column appears, as in Figure 7.8.
Figure 7.8. The Macro Name column allows you to create subroutines within a macro.
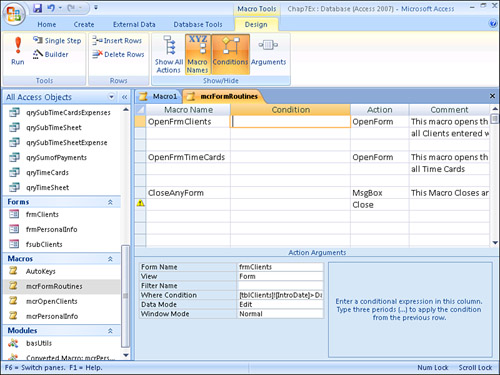
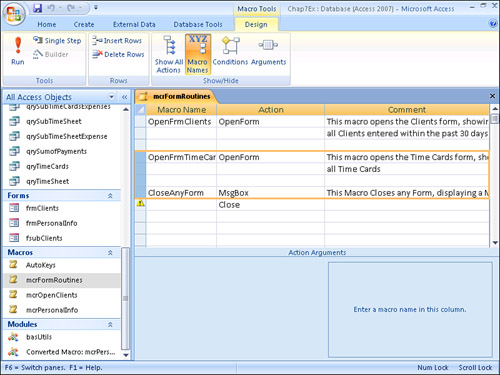
- Add macro names to each macro subroutine. Figure 7.9 shows a macro with three subroutines:
OpenFrmClients,OpenFrmTimeCards, andCloseAnyForm. TheOpenFrmClientssubroutine opens thefrmClientsform, showing all the clients added in the past 30 days. TheOpenFrmTimeCardssubroutine opens thefrmTimeCardsform, and theCloseAnyFormsubroutine displays a message to the user and then closes the active form.Figure 7.9. A macro with three subroutines.

Note
The Macro Name column is a toggle. You can hide it and show it at will, without losing the information in the column.
Macro Conditions
At times, you want a macro action to execute only when a certain condition is true. Fortunately, Access allows you to specify the conditions under which a macro action executes:
- Click the Conditions tool in the Show/Hide group of the Design tab. The Condition column appears, as in Figure 7.10.
Figure 7.10. You can designate the condition under which a macro action executes in the Condition column of a macro.
- Add the conditions you want to each macro action.
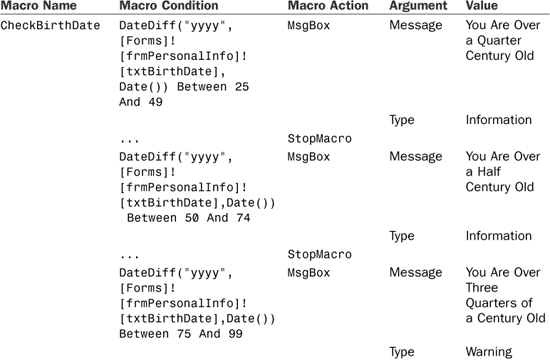
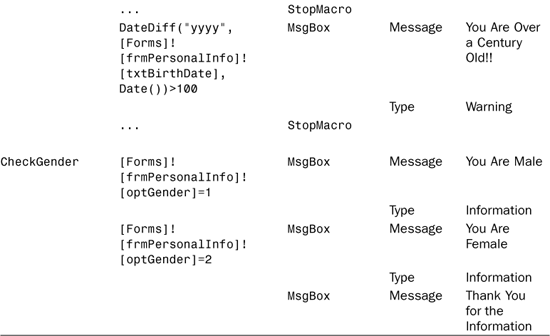
The macro pictured in Figure 7.11 evaluates information entered on a form. The CheckBirthDate subroutine evaluates the date entered in the txtBirthDate text box. Here’s the expression entered in the first condition:
DateDiff("yyyy",[Forms]![frmPersonalInfo]![txtBirthDate],Date()) Between 25 And 49
Figure 7.11. An example of a macro containing conditions.

This expression uses the DateDiff function to determine the difference between the date entered in the txtBirthDate text box and the current date. If the difference between the two dates is between 25 and 49 years, a message box is displayed indicating that the person is over a quarter century old.
The ellipsis on the second line of the CheckBirthDate subroutine indicates to Access that the macro action should be executed only if the condition entered on the previous line is true. In this case, if the condition is true, the macro is terminated.
If the first condition isn’t satisfied, the macro continues evaluating each condition in the subroutine. The CheckBirthDate subroutine displays an age-specific message for each person 25 years of age and older. If the person is younger than 25, none of the conditions is met, and no message is displayed.
The CheckGender subroutine works a little bit differently. It evaluates the value of the optGender option group. One of the first two lines of the subroutine execute, depending on whether the first or second option button is selected. The third line of the subroutine executes regardless of the Option Group value because no ellipsis is entered in the macro action’s Condition column. If no ellipsis is found on any line of the subroutine, the macro action executes unconditionally. If an ellipsis were placed before the line, the macro action would execute only if the value of OptGender was 2.
Running an Access Macro
You have learned quite a bit about macros but haven’t yet learned how to execute them. This process varies depending on what you’re trying to do. You can run a macro from the Macro Design window or by double-clicking the macro in the Macros Group of the Navigation Pane, triggered from a Form or Report event, or invoked by selecting a custom ribbon button. The first three methods are covered in the following sections, but invoking a macro from a custom ribbon is covered in Chapter 23, “Working with and Customizing Ribbons.”
Running a Macro from the Macro Design Window
A macro can be executed easily from the Macro Design window. Running a macro without subroutines is simple: Just click Run in the Tools group of the Design tab. Each line of the macro is executed unless conditions have been placed on specific macro actions. After you click the Run button of mcrOpenClients (shown in Figure 7.12), the frmClients form is opened.
Figure 7.12. Running a macro from the Macro Design window.

From Macro Design view, you can run only the first subroutine in a macro. To run a macro with subroutines, click Run from the Tools group on the Design page to execute the first subroutine in the macro. As soon as the second macro name is encountered, the macro execution terminates. The section “Triggering a Macro from a Form or Report Event,” later in this chapter, explains how to execute subroutines other than the first one in a macro.
Running a Macro from the Macros Group of the Navigation Pane
To run a macro from the Macros group of the Navigation Pane, follow these two steps:
- Scroll down to the Macros group in the Navigation Pane. If the Macros group does not appear in the Navigation Pane, you will need to select All Access Objects from the Navigation Pane drop-down and then expand the Macros group.
- Double-click on the name of the macro you want to execute, or right-click the macro and select Run.
Note
If the macro you execute contains macro names, only the macro actions with the first subroutine are executed.
Triggering a Macro from a Form or Report Event
Chapter 9, “Objects, Properties, Methods, and Events Explained,” introduces the concept of executing code in response to an event. Here, you learn how to associate a macro with a command button.
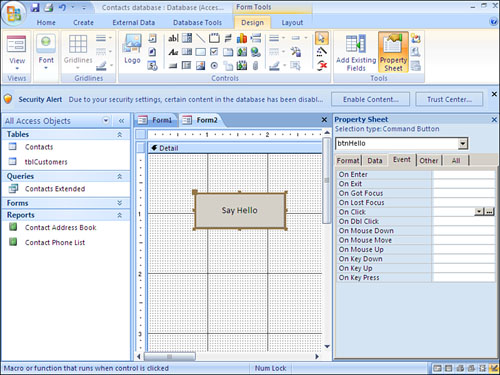
The form in Figure 7.13 illustrates how to associate a macro with the Click event of a form’s command button. Four steps are needed to associate a macro with a Form or Report event:
- Select the object you want to associate the event with. In the example, the
cmdCheckGendercommand button is selected. - Open the property sheet and click the Event tab.
- Click the event you want the macro to execute in response to. In the example, the
Clickevent of the command button is selected. - Use the drop-down list to select the name of the macro you want to execute. If the macro has macro names, make sure you select the correct macro name subroutine. In the example, the macro
mcrPersonalInfoand the macro nameCheckGenderhave been selected. Notice the period between the name of the macro and the name of the macro name subroutine. The period is used to differentiate the macro group (mcrPersonalInfo, in this case) from the macro name (CheckGender, in this example).
Figure 7.13. Associating a macro with a Form or Report event.
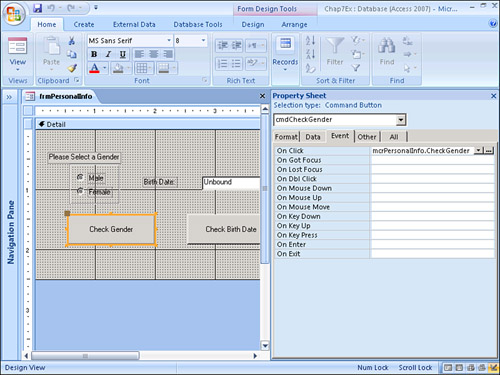
Table 7.1. The mcrPersonalInfo Macro
Modifying an Existing Macro
You have learned how to create a macro, add macro actions and their associated arguments, create macro subroutines by adding macro names, and conditionally execute the actions in the macro by adding macro conditions. However, after you have created a macro, you might want to modify it. First, you must enter Design view for the macro:
- Select the Macros group on the Navigation Pane.
- Select the macro you want to modify.
- Right-click and select Design View.
When the design of the macro appears, you’re then ready to insert new lines, delete existing lines, move the macro actions around, or copy macro actions to the macro you’re modifying or to another macro.
Inserting New Macro Actions
To insert a macro action, follow these steps:
- Click on the line above where you want the macro action to be inserted.
- Press your Insert key or click Insert Rows in the Rows group on the Design tab. A new line is inserted in the macro at the cursor.
To insert multiple macro actions, follow these steps:
- Place your cursor on the line above where you want the new macro action lines to be inserted.
- Click and drag on the Macro Action Selector (the gray box to the left of the macro’s Action column) to select the same number of Macro Action Selectors as the number of macro actions you want to insert.
- Press the Insert key or click Insert Rows in the Rows group on the Design tab. All the new macro lines are inserted above the macro actions that were selected.
Deleting Macro Actions
Follow these steps to delete a macro action:
- Click on the Macro Action Selector of the macro action you want to delete.
- Press the Delete key or click Delete Rows in the Rows group on the Design tab.
Follow these steps to delete multiple macro actions:
- Click and drag to select the Macro Action Selectors of all the macro actions you want to delete. All the macro actions should be surrounded by a box, as in Figure 7.14.
Figure 7.14. Selecting and deleting macro actions.
- Press the Delete key or click Delete Rows in the Rows group on the Design tab.
Moving Macro Actions
You can move macro actions in a few ways, including dragging and dropping and cutting and pasting. To move macro actions by dragging and dropping, follow these steps:
- Click and drag to select the macro action(s) you want to move.
- Release the mouse button.
- Place your mouse cursor over the Macro Action Selector of any of the selected macro actions.
- Click and drag. A line appears, indicating where the selected macro actions will be moved.
- Release the mouse button.
Tip
If you accidentally drag and drop the selected macro actions to an incorrect place, use the Undo button on the Quick Access toolbar to reverse your action.
To move macro actions by cutting and pasting, follow these steps:
- Click and drag to select the Macro Action Selectors of the macro actions you want to move.
- Click Cut in the Clipboard group on the Home tab or press Ctrl+X.
- Click in the line above where you want the cut macro actions to be inserted. Don’t click the Macro Action Selector.
- Click Paste in the Clipboard group on the Design tab. The macro actions you cut are inserted at the cursor.
Caution
Don’t click the Macro Action Selector of the row where you want to insert the cut macro actions unless you want to overwrite the macro action you have selected. If you don’t click to select the Macro Action Selectors, the cut lines are inserted into the macro without overwriting any other macro actions; if you click to select Macro Action Selectors, existing macro actions are overwritten.
Copying Macro Actions
Macro actions can be copied within a macro or to another macro. Follow these steps to copy macro actions within a macro:
- Click and drag to select the Macro Action Selectors of the macro actions you want to copy.
- Click Copy in the Clipboard group on the Home tab or press Ctrl+C.
- Click in the line above where you want the copied macro actions to be inserted. Don’t click on any Macro Action Selectors unless you want to overwrite existing macro actions. (See the Caution preceding this section.)
- Click Paste in the Clipboard group on the Home tab. The macro actions you copied are inserted at the cursor.
Follow these steps to copy macro actions to another macro:
- Click and drag to select the Macro Action Selectors of the macro actions you want to copy.
- Click Copy in the Clipboard group on the Home tab or press Ctrl+C.
- Open the macro that will include the copied actions.
- Click in the line above where you want the copied macro actions to be inserted.
- Click Paste. The macro actions you copied are inserted at the cursor.
Creating an Embedded Macro
Creating an embedded macro is similar to creating a standard macro. The main difference is that the macro is embedded in the object with which it is associated and does not appear in the list of macros in the Navigation Pane. Here’s how to create an embedded macro:
- In Design view, click to select the object to which you want to associate the macro (for example, a command button).
- Open the property sheet, as shown in Figure 7.15.
Figure 7.15. Use the property sheet to associate a macro with the event of an object.
- Click the Event tab of the property sheet.
- Click within the event to which you want to associate the embedded macro. In Figure 7.15, the
On Clickevent is selected. - Click the build button (the ellipse). The Choose Builder dialog box appears (see Figure 7.16).
Figure 7.16. The Choose Builder dialog box enables you to specify that you want to build a macro.

- Select Macro Builder and click OK. A Macro Design window appears, as in Figure 7.17. Notice in Figure 7.17 that the Macro tab is labeled
btnHello: On Click, indicating that the macro is associated with theOn Clickevent ofbtnHello.Figure 7.17. The macro that you create is associated with the appropriate event of the designated object.

- Enter the macro commands as you would for any macro, as shown in Figure 7.18.
Figure 7.18. Your macro commands appear just like macros in earlier versions of Access.

- Close the Macro Design window. Access prompts you to save changes to the macro and update the property, as in Figure 7.19.
Figure 7.19. If you save your changes, Access embeds the macro in the object.

- Click Yes to save your changes and close the dialog box. You have now created the embedded macro.
What New Features Are Available in Macros?
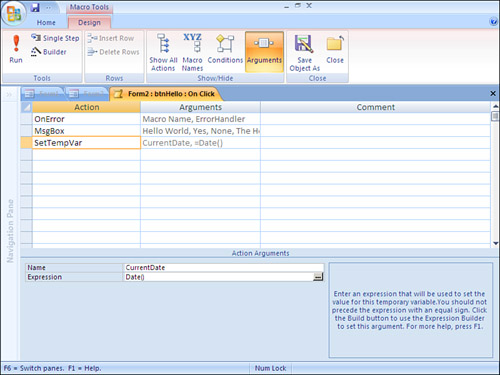
There are two main major improvements to Access 2007 macros. The first is the introduction of error handling, and the second is the introduction of variables. Notice the OnError macro action in Figure 7.20. The example branches to a macro named ErrorHandler in the case of an error. Unlike previous versions of Access, where error handling in macros was virtually nonexistent, the new OnError macro action provides similar error handling to that of VBA code.
Figure 7.20. The OnError macro action provides similar error handling to that of VBA code.

Another exciting addition to Access 2007 macros is the introduction of variables. The new SetTempVar macro action enables you to create a variable and assign it a value. Figure 7.21 provides an example. Notice in the figure that the macro uses the SetTempVar action to create a variable called CurrentDate and assign it the value returned from the built-in Date() function.
Figure 7.21. You use the SetTempVar action to create a temporary variable in a Microsoft Office Access 2007 macro.
Documenting Your Macro: Adding Comments
Just as it’s useful to document any program, it’s also useful to document what you’re trying to do in your macro. These comments can be used when you or others are trying to modify your macro later. They can also be used as documentation because they print when you print the macro.
To add a comment to a macro, click in the Comment column of the macro and begin to type. Figure 7.22 shows a macro with comments. As you can see in Figure 7.23, these comments appear in the printed macro.
Figure 7.22. Adding comments to a macro.
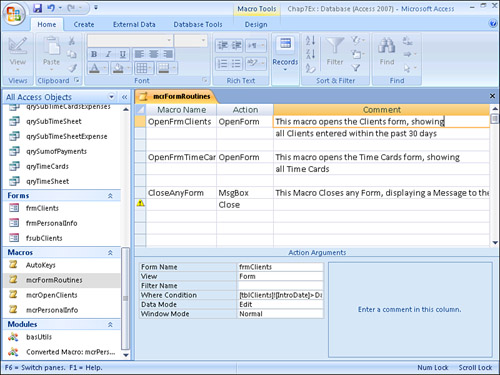
Figure 7.23. Comments included in the printed macro.

Testing a Macro
Although Access doesn’t offer very sophisticated tools for testing and debugging your macros, it does give you a method for stepping through each line of a macro:
- Open the macro in Design view.
- Click Single Step in the Tools group of the Design tab.
- To execute the macro, click Run. The first line of the macro is executed, and the Macro Single Step dialog box appears, showing you the Macro Name, Condition, Action Name, and Arguments, as in Figure 7.24. In the figure, the Macro Name is
mcrPersonalInfo, the Condition evaluates toFalse, and the Action Name isMsgBox. TheMsgBoxarguments areYou Are Over a Quarter Century Old,Yes, andInformation.Figure 7.24. In the Macro Single Step dialog box, you can view the macro name, condition, action name, and arguments for the current step of the macro.

- To continue stepping through the macro, click the Step button on the Macro Single Step dialog box. If you want to halt the execution of the macro without proceeding, click the Stop All Macros button. To continue normal execution of the macro without stepping, click the Continue button.
As you can see, although Microsoft supplies some tools to help you debug your macro, you will probably agree that they are limited compared to the tools available with the VBA debugger. (See Chapter 16, “Debugging: Your Key to Successful Development.”) That’s one reason why many developers prefer to develop applications by using VBA code.
Note
The Single Step button in the Tools group of the Design tab is a toggle. After you activate Step Mode, it’s activated for all macros in the current database and all other databases until you either turn off the toggle or exit Access. This behavior can be quite surprising if you don’t expect it. You might have invoked Step Mode in another database quite a bit earlier in the day, only to remember that you forgot to click the toggle button when some other macro unexpectedly goes into Step Mode.
Determining When You Should Use Macros and When You Shouldn’t
Macros aren’t always the best tools for creating code that controls industrial-strength applications because they’re limited in some functionality. Access macros are limited in the following ways:
- You can’t create user-defined functions by using macros.
- Access macros don’t allow you to pass parameters.
- Access macros provide no method of processing table records one at a time.
- When using Access macros, you can’t use object linking and embedding automation to communicate with other applications.
- Debugging Access macros is more difficult than debugging VBA code.
- Transaction processing can’t be done with Access macros.
- You can’t call Windows API functions by using Access macros.
- Access macros don’t allow you to create database objects at runtime.
Converting a Macro to VBA Code
Sometimes you will create a macro, later to discover that you want to convert it to VBA code. Fortunately, Access 2007 comes to the rescue. You can easily convert an Access macro to VBA code; after the macro has been converted to VBA code, the code can be modified just like any VBA module. Follow these six steps to convert an Access macro to VBA code:
- Open the macro you want to convert in Design view.
- Click the Microsoft Office Access button and select Save As, Save Object As.
- Click the As drop-down and select Module, as shown in Figure 7.25.
Figure 7.25. The macro Save As dialog box allows you to save a macro as a Visual Basic module.

- Click OK; this opens the Convert Macro dialog box, as shown in Figure 7.26.
Figure 7.26. Use the Convert Macro dialog box to indicate whether error handling and comments will be added to the Visual Basic module.

- Indicate whether you want to add error handling and comments to the generated code; then click Convert.
- After you get an indication that the conversion is finished, click OK. Access places you in the Visual Basic Editor (VBE).
- The converted macro appears under the list of modules with
Converted Macro:followed by the name of the macro. Click Design to view the results of the conversion.
Figure 7.27 shows a macro that’s been converted into distinct subroutines, one for each macro name. The macro is complete with logic, comments, and error handling. All macro conditions are converted into If...Else...End If statements, and all the macro comments are converted into VBA comments. Basic error-handling routines are automatically added to the code.
Figure 7.27. A converted macro as a module.

Caution
When you convert a macro to a Visual Basic module, the original macro remains untouched. Furthermore, all the objects in your application will still call the macro. To effectively use the macro conversion options, you must find all the places where the macro was called and replace the macro references with calls to the VBA function.
Creating an AutoExec Macro
With Access 2007, you can use either an AutoExec macro or Startup options to determine what occurs when a database is opened. Using an AutoExec macro to launch the processing of your application is certainly a viable option.
Creating an AutoExec macro is quite simple; it’s just a normal macro saved with the name AutoExec. An AutoExec macro usually performs tasks such as hiding or minimizing the Navigation Pane and opening a Startup form or switchboard. The macro shown in Figure 7.28 hides the Navigation Pane, displays a welcome message, and opens the frmClients form.
Figure 7.28. An example of an AutoExec macro.

Tip
When you’re opening your own database to make changes or additions to the application, you probably won’t want the AutoExec macro to execute. To prevent it from executing, hold down your Shift key as you open the database.
Using the DoCmd Object
Most macro commands can be performed in VBA code by using the DoCmd object. The macro action becomes a method of the DoCmd object, and the arguments associated with each macro action become the arguments of the method. For example, the following method of the DoCmd object is used to open a form:
![]()
The OpenForm method of the DoCmd object that opens the form appears as the first argument to the method. The second argument indicates the view in which the form is opened. The third and fourth arguments specify a filter and Where condition, respectively. The fifth argument of the OpenForm method specifies the Data mode for the form (Add, Edit, or Read Only). The sixth argument indicates the Window mode (Normal, Hidden, Minimized, or Dialog).
Notice the intrinsic constants used for the OpenForm arguments; they help make the code more readable. You can find them in the Help for each DoCmd method.
Practical Examples: Adding an AutoExec Macro to the Time and Billing Application
In Chapter 10, “Advanced Form Techniques,” you will learn how to add a switchboard to your application. For now, you’ll build an AutoExec macro that acts as the launching point for your application. The macro will start the application by hiding the Navigation Pane, displaying a message to the user, and opening the frmClients form.
Build the macro shown in Figure 7.28. Start by opening a new macro in Design view. Set the first action of the macro to RunCommand and then set the DatabaseCommand argument to WindowHide. This will hide the Navigation Pane when it’s run. Set the second action of the macro to MsgBox and set the message to Welcome to the Client Billing Application. Set Beep to No, the Type to Information, and the Title to Welcome. The final action of the macro opens the frmClients form. Set the action to OpenForm and set the FormName to frmClients. Leave the rest of the arguments at their default values.
Close and reopen the database. The AutoExec macro should automatically execute when the database is opened. Close the database and open it again, holding down the Shift key to prevent the macro from executing.
Summary
Many end users try to develop entire applications by using macros. Although this is possible, you will generally want to use a combination of macros and modules to build your applications.
New to Microsoft Office Access 2007 are embedded macros. You associate these macros with a specific event. Also new to Microsoft Office Access 2007 are the capability to add error handling to a macro and the capability to include variables in a macro. These three new features make macros a much more viable choice for application development.