
Chapter 27. Using Builders and Wizards
IN THIS CHAPTER
- Why This Chapter Is Important
- Using Builders
- Using Wizards
- Using Menu Add-Ins
- Practical Examples: Designing Your Own Add-Ins
Why This Chapter Is Important
Add-ins are tools that extend the functionality of Access. They enhance the Access environment by making difficult tasks easier, automating repetitive tasks, and adding enhanced functionality. You can design add-ins for yourself or for others in your organization to use. You even might want to distribute add-ins as part of your application so that your users can build their own database objects. If you are really ambitious, you might decide to build an add-in for sale in the Access third-party market.
Microsoft Access supports three types of add-ins: builders, wizards, and menu add-ins. Each has its own advantages and uses. When you begin the process of designing an add-in, you must decide whether it will be a builder, wizard, or menu add-in. This decision affects how you design the add-in as well as how you install it. This chapter defines and shows you how to design and install each type of add-in.
Using Builders
A builder is an add-in that helps users construct an expression or another data element. Builders most often are used to help users fill in a property of a database object. Builders generally consist of a single dialog box that appears after the user clicks the ellipsis to the right of the property on the property sheet. An example of a builder is the Expression Builder that appears when users are setting the control source of a text box on a form. Access supports three types of builders:
- Property builders
- Control builders
- Expression builders
Looking at Design Guidelines
When you are designing your own builder, the design should be consistent with that of the builders included in Access. You therefore must learn about the standards for an Access builder. To design builders that are consistent with the built-in builders, keep a few guidelines in mind:
- Set the
AutoCenterproperty of the Builder form toYes. - Remove record selectors and navigation buttons.
- Remove scrollbars.
- Be consistent about the placement of objects on the form. Place the OK and Cancel buttons in the same place in each builder you create, for example.
- Design the forms as dialog boxes.
Creating a Builder
Now that you are familiar with some general design guidelines for builders, you are ready to design your first builder. What a builder does is completely up to your imagination. For illustration, the following sections begin with a simple builder that prompts users to select the special effect for a text box. Three overall steps are required to create the builder:
- Write a builder function.
- Design a builder form.
- Register the builder.
The following sections go over each of these steps in detail.
Writing a Builder Function
The builder function is the function Access calls each time you launch the builder. The function launches the builder form and then returns a value to the appropriate property. Listing 27.1 is an example of a builder function. It is located in CHAP27LIB.ACCDA in the basBuilders module on the website.
Listing 27.1. Creating a Builder Function


A builder function must receive three preset arguments and must return the value that will become the value for the property being set. The three preset arguments follow:
strObject—The name of the table, query, form, report, or module on which the builder operatesstrControl—The name of the control to which the property appliesstrCurrentValue—The current property value
Although the names of the arguments are arbitrary, you cannot change their data types, positions, and content. Access automatically fills in the values for the three arguments.
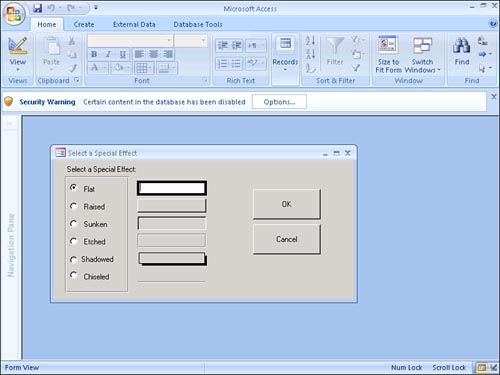
The SpecialEffect function opens the form called frmSpecialEffect in Dialog mode, passing it the current value of the property as the OpenArgs value. Figure 27.1 shows the frmSpecialEffect form.
Figure 27.1. Here, you see the Special Effect builder form.
The following code is located in the Click event of the cmdOk command button on the form:
![]()
Notice that the code sets the Visible property of the form to False. The code placed behind the cmdCancel command button looks like this:
This code closes the frmSpecialEffect form.
After the user clicks OK or Cancel, the code within the SpecialEffect function continues to execute. The function uses the SysCmd function to determine whether the frmSpecialEffect form is loaded. You also can use the user-defined IsLoaded function to accomplish this task. If the frmSpecialEffect form still is loaded, the user must have selected a special effect and clicked OK. Because the form is still open, the function can determine which option button the user selected.
The Case statement within the SpecialEffect function evaluates the value of the optSpecialEffect option group found on the frmSpecialEffect form. It sets the return value for the function equal to the appropriate string, depending on the option button that the user of the builder selects. If the user selects the second option button (with a value of 2), for example, the SpecialEffect function returns the string "Raised". After the code evaluates the option button value and sets the return value, the code no longer needs the frmSpecialEffect form, so the code then closes the form.
If the user chooses Cancel from the frmSpecialEffect form, the SysCmd function returns False, and the code sets the return value of the SpecialEffect function equal to strCurrentValue, the original property value. In this case, the code does not change the property value.
Designing a Builder Form
Although you have seen the code behind the Click event of the OK and Cancel buttons on the frmSpecialEffect form, you have not learned about the design of the form or the idea behind this builder. Ordinarily, when you set the SpecialEffect property from the Property sheet, no wizard exists to assist with the process. Although the process of setting the SpecialEffect property is quite simple, the main problem is that it is difficult to remember exactly what each special effect looks like. I designed the custom special effect builder with this potential problem in mind. It enables users of the builder to see what each special effect looks like before deciding which effect to select.
The properties of the form are quite simple. I set the Modal property of the form to Yes and removed the record selectors, navigation buttons, and scrollbars. I also set the AutoCenter property of the form to Yes and included six text boxes on the form. In addition, I set the special effect of each text box to a different style. The form includes an option group. This group has a different value, depending on which option button the user selects. The code sets the Default property of the OK command button to Yes, making the OK button the default choice. The code sets the Cancel property of the Cancel command button to Yes, ensuring that if the user presses Esc, the code behind the Cancel button executes. The preceding section showed the code behind the Click events of the OK and Cancel buttons. Listing 27.2 shows one more piece of code that enhances this builder.
Listing 27.2. Enhancing the Builder
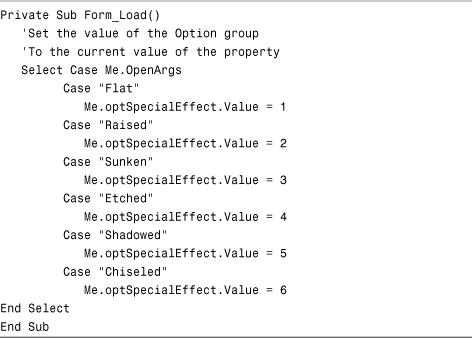
I added this subroutine to the Load event of the builder form. It sets the value of the option group to the current value of the property (passed in as an OpenArg).
Although the frmSpecialEffect form is not particularly exciting, it illustrates quite well that you can design a form of any level of complexity to facilitate the process of setting a property value. So far, though, you have not provided an entry point to the builder. If you select the SpecialEffect property, no ellipsis appears. You do not yet have access to the builder.
Registering a Builder
Before you can use a builder, you must register it in one of two ways:
- Manually add the required entries to the Windows Registry.
- Set up the library database so that the Add-in Manager can create the Windows Registry entries for you.
Manually Adding Entries to the Windows Registry
Adding the required entries to the Windows Registry involves four steps:
- If no Registry key exists for the property for which you are designing a builder, add the property as a subkey under Property Wizards.
- Add an additional subkey for the builder.
- Add four predefined Registry values for the key.
- Set the proper data value for each value name.
You must create four value names for the subkey. They are Can Edit, Description, Function, and Library. Table 27.1 describes these value names for the Registry subkey.
Table 27.1. Values for the Registry Subkey

Now that you have an overview of the steps involved in the process, you are ready to walk through the steps in detail. The following steps set up the builder called SpecialEffect, which is contained in the library database CHAP27LIB.ACCDA in the folder C:My Libraries:
- To invoke the Registry Editor, choose Start, Run from the taskbar. Type
regeditand click OK. This invokes the Registry Editor. Note that if you are using Vista, you must typeregeditin the Start Search item on the Start menu. - Locate the
HKEY_LOCAL_MACHINESOFTWAREMicrosoftOffice12.0AccessWizardsProperty Wizardskey, as shown in Figure 27.2.Figure 27.2. Use the Registry Editor to navigate to the Property Wizards Registry key.

- Determine whether a subkey exists with the name of the property for which you are creating a builder (in this case,
SpecialEffect). If so, skip to step 6. - Choose Edit, New, Key.
- Type the property name as the name for the new key (in this case,
SpecialEffect). - With the new key selected, choose Edit, New, Key again.
- Type a descriptive name for your builder (in this case,
SpecialEffectBuilder). - Choose Edit, New, DWORD Value.
- Type
Can Editas the value name. - Choose Edit, New, String Value.
- Type
Descriptionas the value name. - Choose Edit, New, String Value.
- Type
Functionas the value name. - Choose Edit, New, String Value.
- Type
Libraryas the value name. - Double-click the
Can Editvalue name. The Edit DWORD Value dialog box appears, as shown in Figure 27.3.Figure 27.3. Double-click the
Can Editvalue name to bring up the Edit DWORD Value dialog box.
- Enter
1for Value Data and click OK. - Double-click the Description value name. The Edit String dialog box appears, as shown in Figure 27.4.
Figure 27.4. The Edit String dialog box appears when you double-click the
Descriptionvalue name.
- Enter the description you want the user of the builder to see if he has more than one builder assigned to the property (in this case,
Special Effect Builder). Click OK. - Double-click the Function value name. Enter the name of the builder function (in this case,
SpecialEffect). Click OK. - Double-click the
Libraryvalue name. Enter the name and location of the library database (in this case,C:Librarieschap27lib.accda). You do not have to enter the path if the library is located in the Access folder.
Figure 27.5 shows the completed Registry entries. The builder now should be ready to use. To test the builder, you need to exit and relaunch Access. If you successfully created all the Registry entries, you can use the builder. To test the builder, open any database (other than the library database), create a new form, and add a text box. Select Special Effect from the Format tab of the Properties sheet. An ellipsis appears to the right of the Special Effect drop-down arrow, as shown in Figure 27.6. If you click the ellipsis, the builder form appears. Select a special effect and click OK. The special effect you selected now appears in the SpecialEffect property.
Figure 27.5. The completed Registry entries required to add the builder.
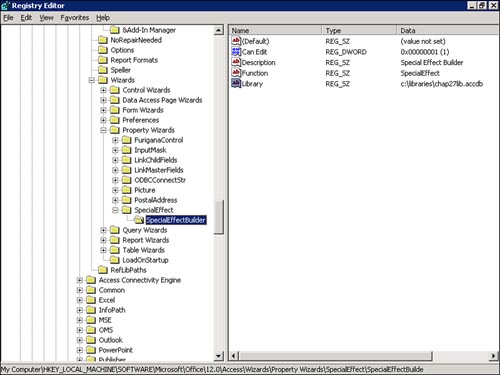
Figure 27.6. Using the custom builder.

Note
If you do not exactly follow the format for the value names, the message There Is an Invalid Add-in Entry for 'SpecialEffectBuilder' appears, as shown in Figure 27.7. You must correct the Registry entry.
Figure 27.7. This error message appears if the Registry entry is invalid.

Automating the Creation of Registry Entries
The alternative to editing the Windows Registry manually is to set up the library database so that the Add-In Manager can create the Registry entries for you. This involves adding a table to the library database. You must call the table USysRegInfo. Follow these steps:
- Show the system tables. (Access considers tables that begin with
USysorMSyssystem tables and, by default, hides them.) With the library database open, right-click the top of the Navigation Pane and select Navigation Options. The Navigation Options dialog box appears. Click Show System Objects. Click OK. Figure 27.8 shows the database with Tables selected in the Objects list. Notice that the hidden tables appear.Figure 27.8. The Tables tab shows the system objects.

- Import an existing
USysRegInfotable by right-clicking within the Navigation Pane and selecting Import, Access Database. Using the Import dialog box, move to theProgram FilesMicrosoft Office 2007Office12ACCWIZfolder and locate theACWZMAIN.ACCDEfile. This is a library file that ships with Access. Select theACWZMAIN.ACCDEfile and click Open. When you return to the Get External Data dialog box, click OK. The Import Objects dialog box appears, as shown in Figure 27.9.Figure 27.9. Using the Import Objects dialog box to add the
USysRegInfotable to your library database.
- Locate and select the
USysRegInfotable and click OK. Access adds a copy of theUSysRegInfotable to your library database. Click Close to complete the process. - Double-click to open the
USysRegInfotable in the database window. - Delete any existing entries in the table.
- Add specific entries to the
USysRegInfotable. Figure 27.10 shows these entries, and Table 27.2 explains them. Close the table.Figure 27.10. The completed table with entries for Registry.

Table 27.2. The Structure of the
USysRegInfoTable
- Open the database that references the add-in.
- Click to select the Database Tools tab and then open the Add-Ins drop-down in the Database Tools group. Select Add-In Manager. The Add-In Manager dialog box appears, as shown in Figure 27.11.
Figure 27.11. The Add-in Manager dialog box.

- Click the Add New button to launch the Open dialog box. Here, you can browse for your add-in or select it from within the default folder.
- Locate the add-in that you want to add and click Open. Access adds the add-in you select to the Add-in Manager dialog box and selects the add-in for you.
- Click Close. You now are ready to use the add-in.
Using Wizards
A wizard consists of a series of dialog boxes that provide a step-by-step interface for creating a database object. The wizard shields users from the complexities of the process. You probably are familiar with wizards such as the Form Wizard, Report Wizard, and Database Wizard. Access 12 supports the development of several types of custom wizards:
- Table wizards
- Query wizards
- Form wizards
- Report wizards
- Data Access Page wizards
- Property wizards
- Control wizards
Looking at Design Guidelines
Wizard design guidelines are almost identical to builder design guidelines. The main difference is that a wizard generally presents the user with multiple modal dialog boxes, whereas a builder generally consists of a single modal dialog box. The user must supply information to meet all the data requirements for the wizard before she can close the last dialog box.
Creating a Wizard
Note
To successfully create and run the wizard, you must select Options on the Message Bar and indicate that you want to Enable this content.
Creating a wizard is more complex than creating a builder. A wizard generally requires a multipage form and code that creates database objects. Consider a wizard that creates a simple form. The wizard comprises two modal dialog boxes, shown in Figures 27.12 and 27.13. The first dialog box asks the user for a form caption, form name, and message to appear on the new form. The second dialog box enables the user to add OK and Cancel buttons to the form. The multipage form and all the code that enables it to work are in the CHAP27LIB.ACCDA database on the website.
Figure 27.12. Step 1 of the custom Form Wizard.

Figure 27.13. Step 2 of the custom Form Wizard.

Each page of the wizard contains code to ensure that it operates successfully. I called the form frmGetFormInfo. The first page of this multipage form gives the user the opportunity to choose the next action: Cancel, Next, or Finish. The code for the Cancel button looks like this:
![]()
This code closes the wizard form. The code takes no other actions because the user is canceling the process. If the user clicks Next, this code executes:
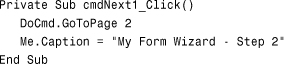
This code moves to the second page of the form and changes the caption of the form to indicate that the user is on step 2 of the wizard. The code under the Finish button looks like this:

This code calls a function called CreateCustomForm, which is responsible for building the actual form. Later in this section, I discuss the details of the CreateCustomForm function. If the function returns True, the code closes the wizard form and displays a message indicating that the process was successful. Otherwise, the code displays a message indicating that it did not successfully create the form, and the user remains in the wizard. The second page of the form contains similar subroutines. The code under the Back button looks like this:

This code moves back to the first page of the form. If the user chooses Cancel, this code executes:
![]()
This code closes the form, taking no further action. If the user clicks Finish, the Click event code of the cmdFinish2 command button executes:
![]()
This code calls the code under the Click event of the cmdFinish1 command button.
The CreateCustomForm function (located in the basWizards module of the library database), as shown in Listing 27.3, contains the code that actually builds the new form.
Listing 27.3. The CreateCustomForm Function That Builds the Form
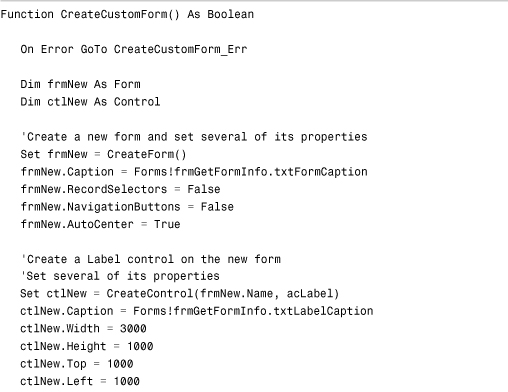
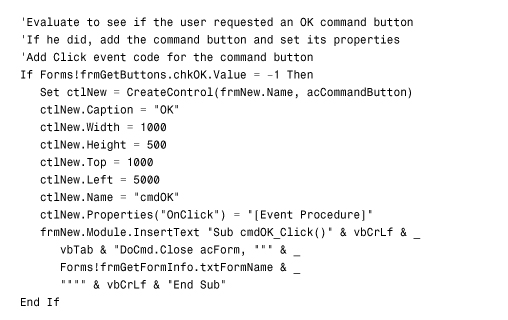

The code first creates both form and control object variables. It sets the form object variable to the return value from the CreateForm function. The CreateForm function creates a new form object. The code sets several properties of the new form object: Caption, RecordSelectors, NavigationButtons, and AutoCenter. Next, the function uses the CreateControl function to create a new label. It calls a reference to the new label ctlNew. The code sets the Caption, Width, Height, Top, and Left properties of the new label. If the user indicated that he wanted an OK button, the code creates a new command button. The code sets the Caption, Width, Height, Top, Left, Name, and Properties properties for the button. The code uses the InsertText method to insert code for the Click event of the command button. If the user requested a Cancel button, the code sets the same properties. Finally, if the user indicated a name for the new form, the code uses the Save method to save the new form object.
Note
Access provides several functions for you to create and delete forms, reports, form controls, and report controls. You can use ActiveX Data Object (ADO) code to create, modify, and delete tables and queries. Using the functions and ADO code, you can manipulate database objects any way you want. Chapter 15, “What Are ActiveX Data Objects, and Why Are They Important?” covers ADO code.
Getting the Wizard Ready to Go
As you do with a builder, you need to add a wizard to the Windows Registry before you can use it. You can do this by modifying the Registry directly or by adding entries to the USysRegInfo table. Figure 27.14 shows the completed Registry entry for the custom Form Wizard.
Figure 27.14. Registry entries for the custom Form Wizard.
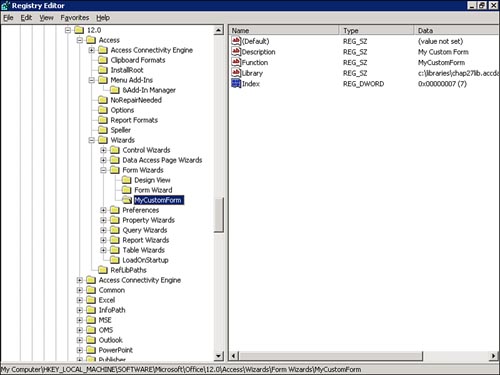
Notice that the function name is MyCustomForm. This is the entry point to the wizard. The Library key designates the name of the library add-in database containing the entry point function. The Description key specifies what appears in the New Object dialog box. Finally, the Index key designates the order in which Access displays the wizard in the list in the New Object dialog box. The MyCustomForm function, located in the basWizards module, simply calls the frmGetFormInfo form, initiating the wizard process:
![]()
Using Menu Add-Ins
A menu add-in is a general-purpose tool that enables you to perform a task that generally affects multiple objects or Access itself. The Database Splitter and Database Documenter are examples of menu add-ins. You access menu add-ins through the Add-Ins submenu of the Tools menu.
Looking at Design Guidelines
Menu add-ins are available to the user whenever the Tools menu is available. Menu add-ins are not context sensitive like wizards and builders. Therefore, they should in no way rely on what the user is doing at a particular moment.
Creating a Menu Add-In
Creating a menu add-in is just like creating a wizard. The difference is in how you install the add-in. You must register the menu add-in under HKEY_LOCAL_MACHINESOFTWAREMicrosoftOffice12.0AccessMenu Add-Ins. You can accomplish the registration process by modifying the Registry directly or by using the USysRegInfo table. Figure 27.15 shows the Registry with the correct entries to run the Form Wizard, created earlier in this chapter, as an add-in. Figure 27.16 shows how you can automate the registration process by using the USysRegInfo table. I included three entries in the USysRegInfo table. All three entries designate the proper place in the Registry tree to add the new key. The first entry contains the subkey and a type of zero. The second entry contains the value name Expression and the name of the entry point function as the value. Notice that the expression name is preceded by an equal sign (=) and is followed by parentheses. Access requires the quotation marks within the parentheses because this particular entry-point function requires an argument. The third and final entry contains the value name Library and the name of the library as the value. This is all you need to do to turn a wizard into a menu add-in.
Figure 27.15. Registry entries for the menu add-in.
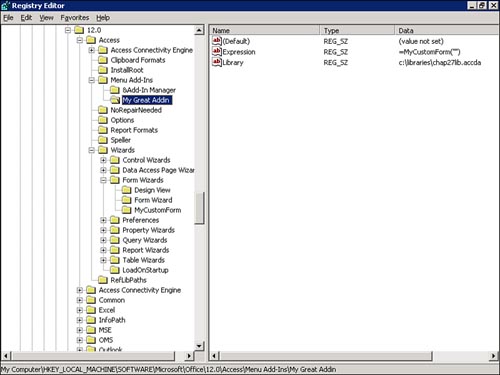
Figure 27.16. The USysRegInfo entries for the menu add-in.

Practical Examples: Designing Your Own Add-Ins
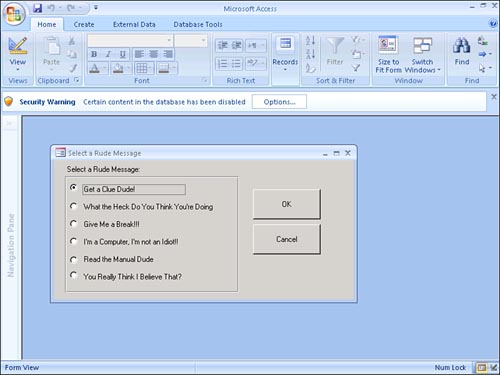
The types of builders, wizards, and menu add-ins that you create depend on your specific needs. To reinforce what you have learned, this section includes the step-by-step process for creating a builder to help you add validation text messages. When you invoke the builder, the Choose Builder dialog box shown in Figure 27.17 appears. This dialog box appears because you will design two builders: one that enables the user to select from a list of polite messages and another that enables the user to select from rude messages. If the user selects Polite Validation Text Builder, the dialog box in Figure 27.18 appears. If the user selects Rude Validation Text Builder, the dialog box in Figure 27.19 appears.
Figure 27.17. The Choose Builder dialog box.

Figure 27.18. The polite messages builder.
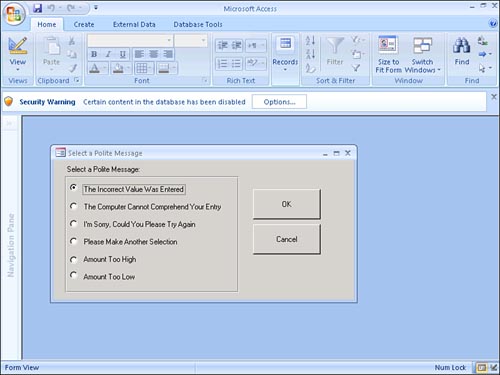
Figure 27.19. The rude messages builder.
Listing 27.4 shows the first entry-point function, located in basBuilders.
Listing 27.4. The First Entry-Point Function


The ValidTextPolite function shown in Listing 27.4 receives all the parameters required by a builder function. The function opens frmPolite modally, passing it the current ValidationText property value of the selected control as the OpenArg. If the user selects a value from the frmPolite form and clicks OK, the code evaluates the selected value and returns the appropriate text from the ValidTextPolite function. The return value becomes the validation text of the selected control. Listing 27.5 shows the Load event of frmPolite.
Listing 27.5. The Load Event of frmPolite

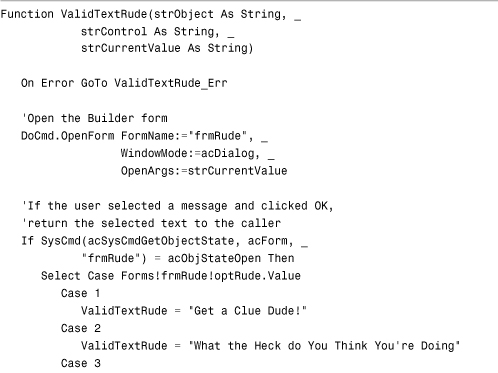
This code ensures that the value of the option button on the frmPolite form reflects the text that the user entered in the ValidationText property of the current control. The ValidTextRude entry-point function is similar to ValidTextPolite. Listing 27.6 shows the ValidTextRude entry-point text function; you can find it in basBuilders module on the website.
Listing 27.6. The ValidTextRude Entry-Point Function

The Load event of frmRude is similar to the Load event of frmPolite, as Listing 27.7 shows.
Listing 27.7. The Load Event of frmRude

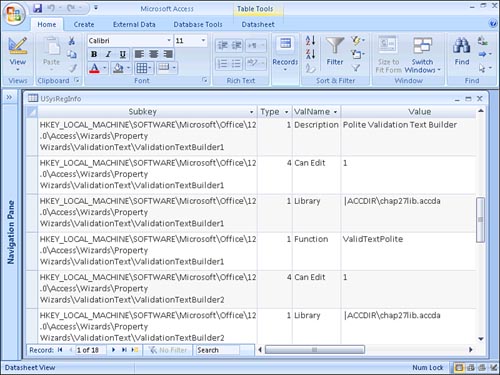
To create the builder, design both forms so that they look like the ones in Figures 27.18 and 27.19. Include code for the Load event of each form as listed previously. The code behind the OK button of each form sets the Visible property of the form to False. The code behind the Cancel button on each form closes the form. Make sure that you name the option groups optPolite and optRude so that the code runs properly for each form. You can place the two entry-point functions, ValidTextPolite and ValidTextRude, in any code module in the library database. The last step involves registering the two builders. The entries in USysRegInfo, shown in Figure 27.20, accomplish the task of registering the builder the first time that the user selects the add-in through the Add-Ins dialog box. You can find this table in the CHAP27LIB.ACCDE database.
Figure 27.20. Registry entries for the polite and rude builders.
Note
To complete the process, you must reference the add-in from the database that will use it. Steps 7 through 11, in the section of this chapter titled “Automating the Creation of Registry Entries” covers this process.
Summary
By creating builders, wizards, and add-ins, you can enhance the development environment for yourself and your users. You even can add wizards so that your users can build their own queries, forms, or reports on the fly without a full copy of Access. Your wizard simply needs to prompt the user for the appropriate information and then build the objects to his specifications. What you can do with wizards, builders, and add-ins is limited only by your imagination.