
Before you learn how to use SQLite with Android, you first need to learn the basics of how to use SQLite in general in a platform-neutral context.
Let's look at some example SQL code that could be used on an SQLite database directly, without any Java or Android classes, and then we can more easily understand what our Java code will doing later.
SQL has keywords much like Java that cause things to happen. Here is a flavor of some of the SQL keywords that we will be using soon:
- INSERT: This allows us to add data to the database
- DELETE: This allows us to remove data from the database
- SELECT: This allows us to read data from the database
- WHERE: This allows us to specify the parts of the database that match a specific criteria that we want to insert, delete, or select data from
- FROM: This is used to specify a table or column name in a database
Note
There are many more SQLite keywords than this, and for a full list of keywords, take a look at https://sqlite.org/lang_keywords.html.
In addition to keywords, SQL has types. A few examples of SQL types are as follows:
Note
There are many more SQLite types than this, and for a full list of types, take a look at https://www.sqlite.org/datatype3.html.
Let's look at how we can combine these types with the keywords to create tables and add, remove, modify, and read data using full SQLite statements.
It would be a perfectly decent question to ask why we don't create a new database first. The reason for this is that every app has access to an SQLite database by default. The database is private to that app. Here is the statement that we would use to create a table within that database. I have highlighted a few parts to make the statement clearer:
create table StudentsAndGrades
  _ID integer primary key autoincrement not null,
  name text not null,
  score int;
The previous code creates a table called StudentsAndGrades with a row id of the integer type that will be automatically increased (incremented) each time a row of data is added.
The table will also have a name column that will be of the text type and cannot be blank (not null).
It will also have a score column that will be of the int type. Also note that the statement is completed by a semicolon.
Here is how we might insert a new row of data into that database:
INSERT INTO StudentsAndGrades
  (name, score)
  VALUES
  ("Bart", 23);
The previous code added a row to the database. After the preceding statement, the database will have one entry with the 1, "Bart", and 23 values for the _ID, name, and score columns.
Here is how we might insert another new row of data into that database:
INSERT INTO StudentsAndGrades
(name, score)
VALUES
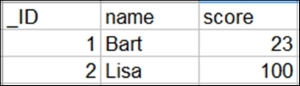
("Lisa", 100);The previous code added a new row of data with the 2, "Lisa", and 100 values for the _ID, name, and score columns.
Our spreadsheet-like structure would now look as shown in this next figure:
Here is how we would access all the rows and columns from our database:
SELECT * FROM StudentsAndGrades;
The previous code asks for every row and column. The * symbol can be read as all.
We can also be a little more selective as this code demonstrates:
SELECT score FROM StudentsAndGrades
  where name = "Lisa";
The previous code would only return 100, which, of course, is the score associated with the name Lisa.
We can even add new columns after the table has been created and data has been added. This is simple as far as the SQL is concerned but can cause some issues with regard to users' data on already published apps. We will explore this problem more in Chapter 26, Upgrading SQLite – Adding Locations and Maps. The next statement adds a new column called age that is of the int type:
ALTER TABLE StudentsAndGrades
  ADD
  age int;
There are many more data types, keywords, and the ways to use them than we have seen so far. We will see many of them in the two database-driven apps that we will build. This was just a taste. Next, let's look at the Android SQLite API, and now we will begin to see how we can use our new SQLite skills.