
Our Java code will constantly be making decisions. For example, we might need to know whether the user has new messages or whether they have a certain number of friends. We need to be able to test our variables to see whether they meet certain conditions and then execute a certain section of code depending upon whether it did or not.
In this section, as our code gets more in-depth, it helps to present it in a way that makes it more readable. Let's take a look at code indenting to make our discussion about decisions easier.
You have probably noticed that the Java code in our projects is indented. For example, the first line of code inside the MainActivity class is indented by one tab. And the first line of code is indented inside each method. Here is an annotated image as another quick example to make this clear:
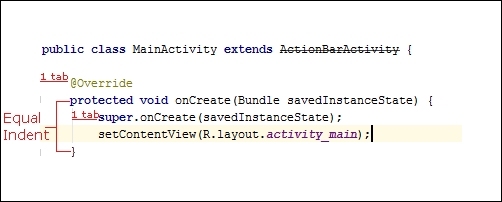
Notice also that when the indented block has ended, often with a closing curly brace }, that } is indented to the same extent as the line of code that began the block.
We do this to make the code more readable. It is not part of the Java syntax however, and the code will still compile if we don't bother to do this.
As our code gets more complicated, indenting along with comments helps to keep the meaning and structure of our code clear. I mention this now because when we start to learn the syntax for making decisions in Java, indenting becomes especially useful, and it is recommended that you indent your code the same way.
Much of this indenting is done for us by Android Studio, but not all of it.
Now that we know how to present our code more clearly, let's learn some more operators and then we can really get to work taking decisions with Java.
We can already add (+), take away (-), multiply (*), divide (/), assign (=), increment (++), and decrement (--) with operators. Let's introduce some more super-useful operators, and then we will go straight on to actually understanding how to use them in Java.
Tip
Don't worry about memorizing each of the following operators. Glance over them and their explanations, and then move quickly on to the next section. There we will put some operators to use and they will become much clearer as we see a few examples of what they allow us to do. They are presented here in a list just to make the variety and scope of operators plain from the start. The list will also be more convenient to refer back to when not intermingled with the discussion about implementation that follows it.
We use operators to create an expression that is either true or false. We wrap that expression in parentheses like this, (expression goes here):
- ==: This comparison operator tests for equality and is either true or false. An expression such as
(10 == 9), for example, isfalse.10is obviously not equal to9. - !: This is the logical NOT operator. The expression
(! (2+2 == 5))istruebecause2+2is not5. - !=: Another comparison operator. This tests whether something is not equal. For example, the expression
(10 != 9)istrue.10is not equal to9. - >: Another comparison operator; actually, there are a few more as well. This tests whether something is greater than something else. The expression
(10 > 9)istrue. - <: You guessed it. This tests for values less than. The expression
(10 < 9)isfalse. - >=: This operator tests for whether one value is greater than or equal to the other and if either is
true, the result istrue. For example, the expression(10 >= 9)istrue. The expression(10 >= 10)is alsotrue. - <=: Like the previous operator, this one tests for two conditions but this time less than or equal to. The expression
(10 <= 9)isfalse. The expression(10 <= 10)istrue. - &&: This operator is known as logical AND. It tests two or more separate parts of an expression and all parts must be
truein order for the result to betrue. Logical AND is usually used in conjunction with the other operators to build more complex tests. The expression((10 > 9) && (10 < 11))istruebecause both parts aretrueso the expression istrue. The expression((10 > 9) && (10 < 9))isfalsebecause only one part of the expression istrueand the other isfalse. - ||: This operator is called logical OR and it is just like logical AND except that only one of two or more parts of an expression need to be
truefor the expression to betrue. Let's look at the last example we used but switch the&&for||. The expression((10 > 9) || (10 < 9))is nowtruebecause one part of the expression istrue.
All these operators are virtually useless without a way of properly using them to make real decisions that affect real variables and code.
Now we have all the information we need, we can look at a hypothetical situation then actually see some code for decision-making.
As we saw, operators serve very little purpose on their own but it was probably useful to see just part of the wide and varied range available to us. Now, when we look at putting the most common operator == to use, we can start to see the powerful yet fine control that they offer us.
Let's make the previous examples less abstract. Meet the Java if keyword. We will use if and a few conditional operators along with a small story to demonstrate their use. Next follows a made up military situation that will hopefully be less abstract than the previous examples.
The captain is dying and knowing that his remaining subordinates are not very experienced, he decides to write a Java program to convey his last orders after he has died. The troops must hold one side of a bridge while awaiting reinforcements.
The first command the captain wants to make sure his troops understand is this:
If they come over the bridge, shoot them.
So, how do we simulate this situation in Java? We need a Boolean variable isComingOverBridge. The next bit of code assumes that the isComingOverBridge variable has been declared and initialized to either true or false.
We can then use if like this:
if(isComingOverBridge){

  // Shoot them

}
If the isComingOverBridge Boolean is true, the code inside the opening and closing curly braces will run. If not, the program continues after the if block and without running the code within it.
The captain also wants to tell his troops what to do (stay put) if the enemy is not coming over the bridge.
Now we introduce another Java keyword, else. When we want to explicitly do something when the if does not evaluate to true, we can use else.
For example, to tell the troops to stay put if the enemy is not coming over the bridge, we could write this code:
if(isComingOverBridge){

  // Shoot them

}else{

  // Hold position

}
The captain then realized that the problem wasn't as simple as he first thought. What if the enemy comes over the bridge, but has too many troops? His squad would be overrun. So, he came up with this code (we'll use some variables as well this time):
boolean isComingOverBridge;
int enemyTroops;
int friendlyTroops;
// Code that initializes the above variables one way or another

// Now the if
if(isComingOverBridge && friendlyTroops > enemyTroops){

  // shoot them

}else if(isComingOveBridge && friendlyTroops < enemyTroops) {

  // blow the bridge

}else{

  // Hold position

}
The previous code has three possible paths of execution. First, if the enemy is coming over the bridge and the friendly troops are greater in number:
if(isComingOverBridge && friendlyTroops > enemyTroops)
Second, if the enemy troops are coming over the bridge but outnumber the friendly troops:
else if(isComingOveBridge && friendlyTroops < enemyTroops)
Then the third and final possible outcome, which will execute if neither of the others is true, is captured by the final else without an if condition.
Tip
Readers challenge
Can you spot a flaw with the previous code? One that might leave a bunch of inexperienced troops in complete disarray? The possibility of the enemy troops and friendly troops being exactly equal in number has not been handled explicitly and would therefore be handled by the final else, which is meant for when there is no enemy troops. I guess any self-respecting captain would expect his troops to fight in this situation, and he could have changed the first if statement to accommodate this possibility:
if(isComingOverBridge && friendlyTroops >= enemyTroops)
And finally, the captain's last concern was that if the enemy came over the bridge waving the white flag of surrender and were promptly slaughtered, then his men would end up as war criminals. The Java code that was needed was obvious. Using the wavingWhiteFlag Boolean variable, he wrote this test:
if (wavingWhiteFlag){

  // Take prisoners

}
But where to put this code was less clear. In the end, the captain opted for the following nested solution and for changing the test for wavingWhiteFlag to logical NOT, like this:
if (!wavingWhiteFlag){

  // not surrendering so check everything else

  if(isComingOverTheBridge && friendlyTroops >= enemyTroops){

    // shoot them

  }else if(isComingOverTheBridge && friendlyTroops < enemyTroops) {

    // blow the bridge

  }

}else{

  // this is the else for our first if
  // Take prisoners

}

// Holding position
This demonstrates that we can nest if and else statements inside of one another to create quite deep and detailed decisions.
We could go on making more and more complicated decisions with if and else but what we have seen is more than sufficient as an introduction. It is probably worth pointing out that very often there is more than one way to arrive at a solution to a problem. The right way will usually be the way that solves the problem in the clearest and simplest manner.
Let's look at some other ways to make decisions in Java and then we can put them all together in an app.
We have seen the vast and virtually limitless possibilities of combining the Java operators with if and else statements. But sometimes a decision in Java can be better made in other ways.
When we have to make a decision based on a clear list of possibilities that doesn't involve complex combinations, then switch is usually the way to go.
We start a switch decision like this:
switch(argument){

}
In the previous example, an argument could be an expression or a variable. Within the curly braces {} we can make decisions based on the argument with case and break elements:
case x:
  // code to for case x
  break;

case y:
  // code for case y
  break;
You can see in the previous example each case states a possible result and each break denotes the end of that case, and also the point at which no further case statements should be evaluated.
The first break encountered breaks out of the switch block to proceed with the next line of code after the closing brace } of the entire switch block.
We can also use default without a value to run some code in case none of the case statements evaluate to true. Like this:
default:// Look no value
  // Do something here if no other case statements are true
  break;
Let's write a quick demo app that uses switch.
To get started, create a new Android project called Switch Demo, use a Blank Activity, and leave all the other settings at their default. Switch to the MainActivity.java file by left-clicking the MainActivity.java tab above the editor and we can start coding.
Let's pretend we are writing an old-fashioned text adventure game, the kind of game where the player types commands such as "Go East", "Go West", "Take Sword", and so on. In this case, switch could handle that situation with this code and we could use default to handle the player typing a command that is not specifically handled.
Enter the following code in the onCreate method just before the closing curly brace }:
// get input from user in a String variable called command
String command = "go east";

switch(command){

  case "go east":
    Log.i("Player: ", "Moves to the east" );
    break;

  case "go west":
    Log.i("Player: ", "Moves to the West" );
    break;

  case "go north":
    Log.i("Player: ", "Moves to the North" );
    break;

  case "go south":
    Log.i("Player: ", "Moves to the South" );
    break;

  case "take sword":
    Log.i("Player: ", "Takes the silver sword" );
    break;

  // more possible cases

  default:
    Log.i("Message: ", "Sorry I don't speak Elfish" );
    break;

}
Run the app a few times. Each time, change the initialization of command to something new. Notice that when you initialize command to something that is explicitly handled by a case statement, we get the expected output. Otherwise we get the default Sorry I don't speak Elfish.
If we had a lot of code to execute for a particular case, we could contain it all in a method, perhaps, like this next piece of code. I have highlighted the new line:
  default:
    goWest();
    break;
Of course, we would then need to write the new goWest method. Then, when command was initialized to "go west", the goWest method would be executed and execution would return to the break statement, which would cause the code to continue after the switch block.
Of course, one of the things this code seriously lacks is interaction with a UI. We have seen how we can call methods from button clicks but even that isn't enough to make this code worthwhile in a real app. We will see how we solve this problem in Chapter 10, Everything's a Class.
The other problem we have is that after the code has been executed, that's it. We need it to continually ask the player for instructions, not just once but over and over. We will look at a solution to this problem next.