
Create a new class called DataManager. We need an SQLiteDatabase object and a whole bunch of final string members for the table and column names.
All the code that we will add first to our DataManager is straightforward, but it is worth pointing out that we will actually have two tables in this database. One called wis_table_photos will have a column for each of the member variables of our Photo class.
Another called wis_table_tags will have just two columns, autoincrement _ID and a tag column.
The wis_table_photos table will have a row of data for each and every photo the user takes. The tags column will only have a row for each new/unique tag that the user enters. So, if the user has more than one photo with the "Barbados" or "2016" tag, it will only appear once in the wis_table_tags table but will appear with each and every photo that uses it in the wis_table_photos table.
This way, it will be possible to show the user a list of all the unique tags they have added, and when they tap on a tag, it will present them with a list of all the photos that have been tagged with this tag.
It would probably help clarify the usage of all the strings in the code that follow to have a spreadsheet eye view to help visualize our two tables:
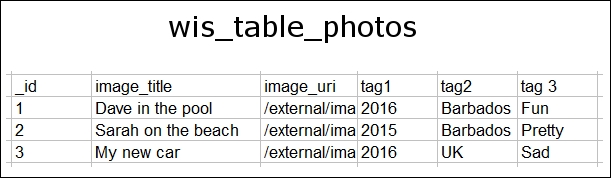
In the previous image, you can see that the wis_table_photos table has all the data that the user might enter represented for each row. If you look at the next image, (wis_table_tags) however, you can see that each tag is only stored once. How we manage to insert data to achieve this and how we manage to select data will become clear as we proceed.

Tip
Remember from the previous chapter that we declare the member public where it is useful to refer to them directly from another class. They are also static because we do not need new instances should we end up with more than one DatabaseManager instance.
You might be wondering where the MVC pattern and our separate data layer that can only be instantiated once corresponds to this DataManager class. It works because all our strings are static and are therefore the same instance across multiple instances of DataManager. When we call getWriteableDatabase, the OS will always return the same database, so it is not possible that we will ever end up with multiple out-of-sync databases, and the same database is automatically accessible from any activity of our app.
Add the member variables we have just discussed that we will use to build our database queries:
public class DataManager {

  // This is the actual database
  private SQLiteDatabase db;

  /*
    Next we have a public static final string for
    each row/table that we need to refer to both
    inside and outside this class
  */

  public static final String TABLE_ROW_ID = "_id";
  public static final String TABLE_ROW_TITLE = "image_title";
  public static final String TABLE_ROW_URI = "image_uri";

  /*
    Next we have a private static final strings for
    each row/table that we need to refer to just
    inside this class
  */

  private static final String DB_NAME = "wis_db";
  private static final int DB_VERSION = 1;
  private static final String TABLE_PHOTOS = "wis_table_photos";
  private static final String TABLE_TAGS = "wis_table_tags";
  private static final String TABLE_ROW_TAG1 = "tag1";
  private static final String TABLE_ROW_TAG2 = "tag2";
  private static final String TABLE_ROW_TAG3 = "tag3";
  public static final String TABLE_ROW_TAG = "tag";// For the tags table

}
Now, let's add the constructor for our DataManager. It simply instantiates a CustomSQLiteHelper that we will code soon and then uses it to initialize db, just as we saw in the previous chapter.
Add the constructor to the DataManager class:
public DataManager(Context context) {
  // Create an instance of our internal //CustomSQLiteOpenHelper class
  CustomSQLiteOpenHelper helper = new CustomSQLiteOpenHelper(context);

  // Get a writable database
  db = helper.getWritableDatabase();
}
We will now be introduced to our first helper method called addPhoto. It takes a Photo object parameter and then adds all the values as a new row using the getter methods of the Photo class, among an INSERT query into the wis_table_photos table.
This next code is only the first part of the addPhoto method. We will look at the second part next.
Add the addPhoto method to the DataManager class:
// Here are all our helper methods
public void addPhoto(Photo photo){

  // Add all the details to the photos table
  String query = "INSERT INTO " + TABLE_PHOTOS + " (" +
    TABLE_ROW_TITLE + ", " +
    TABLE_ROW_URI + ", " +
    TABLE_ROW_TAG1 + ", " +
    TABLE_ROW_TAG2 + ", " +
    TABLE_ROW_TAG3  +
  ") " +
  "VALUES (" +
    "'" + photo.getTitle() + "'" + ", " +
    "'" + photo.getStorageLocation() + "'" + ", " +
    "'" + photo.getTag1() + "'" + ", " +
    "'" + photo.getTag2() + "'" + ", " +
    "'" + photo.getTag3() + "'" +
  ");";

  Log.i("addPhoto()", query);

  db.execSQL(query);
Next, still in addPhoto, we execute three queries, one for each tag, and INSERT them into the wis_table_tags table, but notice the highlighted WHERE NOT EXISTS clause in the SQL that we build. This ensures that we only add a tag if it has not been added already.
Complete the addPhoto method by adding this code:
// Add any NEW tags to the tags table

  query = "INSERT INTO " + TABLE_TAGS + "(" +
    TABLE_ROW_TAG + ") " +
    "SELECT '" + photo.getTag1() + "' " +
    "WHERE NOT EXISTS ( SELECT 1 FROM " +
    TABLE_TAGS +
    " WHERE " + TABLE_ROW_TAG + " = " +
    "'" + photo.getTag1() + "');";

  db.execSQL(query);

  query = "INSERT INTO " + TABLE_TAGS + "(" +
    TABLE_ROW_TAG + ") " +
    "SELECT '" + photo.getTag2() + "' " +
    "WHERE NOT EXISTS ( SELECT 1 FROM " +
    TABLE_TAGS +
    " WHERE " + TABLE_ROW_TAG + " = " +
    "'" + photo.getTag2() + "');";

  db.execSQL(query);

  query = "INSERT INTO " + TABLE_TAGS + "(" +
    TABLE_ROW_TAG + ") " +
    "SELECT '" + photo.getTag3() + "' " +
    "WHERE NOT EXISTS ( SELECT 1 FROM " +
    TABLE_TAGS +
    " WHERE " + TABLE_ROW_TAG + " = " +
    "'" + photo.getTag3() + "');";

  db.execSQL(query);

}// End addPhoto
Now, we have a really simple query to get all the titles from the wis_table_photos table. Note that we return Cursor, which contains the data from the query.
Add the getTitles method to the DataManager class:
public Cursor getTitles() {
  Cursor c = db.rawQuery("SELECT " + TABLE_ROW_ID + ", " + TABLE_ROW_TITLE + " from " + TABLE_PHOTOS, null);
  c.moveToFirst();

  return c;
}
Now we begin to see how we will selectively filter the titles we display to the user. The getTitlesWithTag method returns Cursor with photo titles but only if they contain a specific tag that was passed in to the method.
Add the getTitlesWithTag method to the DataManager class:
public Cursor getTitlesWithTag(String tag) {
  Cursor c = db.rawQuery("SELECT " + TABLE_ROW_ID + ", " +
    TABLE_ROW_TITLE + " from " +
    TABLE_PHOTOS + " WHERE " +
    TABLE_ROW_TAG1 + " = '" + tag + "' or " +
    TABLE_ROW_TAG2 + " = '" + tag + "' or " +
    TABLE_ROW_TAG3 + " = '" + tag + "';"
    , null);

  c.moveToFirst();

  return c;
}
This method returns all the columns of a photo with a specific _id value.
Add the getPhoto method to the DataManager class:
public Cursor getPhoto(int id) {

  Cursor c = db.rawQuery("SELECT * from " +
    TABLE_PHOTOS +
    " WHERE " +
    TABLE_ROW_ID + " = " + id, null);

  c.moveToFirst();

  return c;
}
The next method returns all the tags, which is just what we will need for our TagsFragment class.
Add the getTags method to the DataManager class:
public Cursor getTags(){
  Cursor c = db.rawQuery("SELECT " + TABLE_ROW_ID + ", " + TABLE_ROW_TAG + " from " + TABLE_TAGS, null);
  c.moveToFirst();

  return c;
}
Finally, we get to our inner class, CustomSQLiteOpenHelper, which extends SQLiteOpenHelper. As in the last chapter, we have the same simple constructor, but the onCreate method builds and executes two queries to create both of our required tables.
The onUpgrade method will be left blank until Chapter 26, Upgrading SQLite – Adding Locations and Maps.
Add the CustomSQLiteOpenHelper class as an inner class of DataManager:
// This class is created when our DataManager is initialized
private class CustomSQLiteOpenHelper extends SQLiteOpenHelper {
  public CustomSQLiteOpenHelper(Context context) {
    super(context, DB_NAME, null, DB_VERSION);
  }

  // This method only runs the first time the database is created
  @Override
  public void onCreate(SQLiteDatabase db) {

    // Create a table for photos and all their details
    String newTableQueryString = "create table "
        + TABLE_PHOTOS + " ("
        + TABLE_ROW_ID
        + " integer primary key autoincrement not null,"
        + TABLE_ROW_TITLE
        + " text not null,"
        + TABLE_ROW_URI
        + " text not null,"
        + TABLE_ROW_TAG1
        + " text not null,"
        + TABLE_ROW_TAG2
        + " text not null,"
        + TABLE_ROW_TAG3
        + " text not null" + ");";

    db.execSQL(newTableQueryString);

    // Create a separate table for tags
    newTableQueryString = "create table "
        + TABLE_TAGS + " ("
        + TABLE_ROW_ID
        + " integer primary key autoincrement not null,"
        + TABLE_ROW_TAG
        + " text not null" + ");";

    db.execSQL(newTableQueryString);
  }
  // This method only runs when we increment DB_VERSION
  @Override
  public void onUpgrade(SQLiteDatabase db, int oldVersion, int newVersion) {
  }
}
Now that we have implemented our DataManager class and all its helper methods, we can put them to use and enhance the features of Where it's Snap.