
Chapter 13. Interacting with servers using the WebSocket protocol
This chapter covers
- Implementing a server data push to Angular clients
- Broadcasting data from the server to multiple clients
- Splitting ngAuction into two projects
- Implementing bidding in ngAuction
WebSocket is a low-overhead binary protocol supported by all modern web browsers (see https://en.wikipedia.org/wiki/WebSocket). It allows bidirectional message-oriented streaming of text and binary data between browsers and web servers. In contrast to HTTP, WebSocket is not a request/response-based protocol, and both server apps and client apps can initiate data push to the other party as soon as the data becomes available, in real time. This makes the WebSocket protocol a good fit for the following types of applications:
- Live trading/auctions/sports notifications
- Controlling medical equipment over the web
- Chat applications
- Multiplayer online games
- Real-time updates in social streams
- Live charts
All of these apps have one thing in common: there’s a server (or a device) that may need to send an immediate notification to the user because some important event happened elsewhere. This is different from the use case when the user decides to send a request to the server for fresh data. For example, if a stock trade happens on the stock exchange, the notification has to be immediately sent to all users.
Another example is an online auction. If user Joe is considering bidding on a certain product, and user Mary (located 1,000 miles away) decides to increase the bid on the same product, you’d better push the notification to Joe right away as opposed to waiting until Joe refreshes the window.
We’ll start this chapter with a brief comparison of HTTP and WebSocket protocols, and then we’ll show you how a Node server can push data to a plain web page and to an Angular app.
In the hands-on section, you’ll continue working on ngAuction. You’ll start by splitting ngAuction into two projects: client and server. The server app will start two servers: the HTTP server will serve data, and the WebSocket server can receive user bids and push real-time bid notifications, emulating a scenario in which multiple users can bid on auctioned products. The Angular client interacts with both servers.
13.1. Comparing HTTP and WebSockets
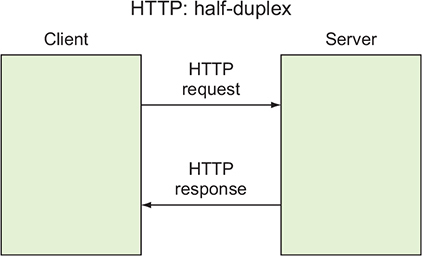
With the request-based HTTP protocol, a client sends a request over a connection and waits for a response to come back, as shown in figure 13.1. Both the request and the response use the same browser-server connection. First, the request goes out, and then the response comes back via the same “wire.” Think of a narrow bridge over a river where cars from both sides have to take turns crossing the bridge. In the web realm, this type of communications is called half-duplex.
Figure 13.1. Half-duplex communication
The WebSocket protocol allows data to travel in both directions simultaneously (full-duplex) over the same connection, as shown in figure 13.2, and any party can initiate the data exchange. It’s like a two-lane road. Another analogy is a phone conversation where two callers can speak and be heard at the same time. The WebSocket connection is kept alive, which has an additional benefit: low latency in the interaction between the server and the client.
Figure 13.2. Full-duplex communication

A typical HTTP request/response adds several hundred bytes (HTTP headers) to the application data. Say you want to write a web app that reports the latest stock prices every second. With HTTP, such an app would need to send an HTTP request (about 300 bytes) and receive a stock price that would arrive with an additional 300 bytes of an HTTP response object.
With WebSockets, the overhead is as low as a couple of bytes. Besides, there’s no need to keep sending requests for the new price quote every second—this stock may not be traded for a while. Only when the stock price changes will the server push the new value to the client. Note the following observation (see goo.gl/zjj7Es):
Reducing kilobytes of data to 2 bytes is more than “a little more byte efficient,” and reducing latency from 150 ms (TCP round trip to set up the connection plus a packet for the message) to 50 ms (just the packet for the message) is far more than marginal. In fact, these two factors alone are enough to make WebSocket seriously interesting to Google.
Ian Hickson
Note
Although most browsers support the binary protocol HTTP/2 (see https://http2.github.io)—which is more efficient than HTTP and also allows data push from the servers—it’s not a replacement for the WebSocket protocol. The WebSocket protocol offers an API that allows pushing data to the client’s app running in the browser, whereas HTTP/2 pushes static resources to the browser and is mainly for faster app delivery.
Every browser supports a WebSocket object for creating and managing a socket connection to the server (see http://mng.bz/1j4g). Initially, the browser establishes a regular HTTP connection with the server, but then your app requests a connection upgrade specifying the server’s URL that supports the WebSocket connection. After that, the communication succeeds without the need of HTTP. The URLs of the WebSocket endpoints start with ws instead of http—for instance, ws://localhost:8085.
The WebSocket protocol is based on events and callbacks. For example, when your browser app establishes a connection with the server, it receives the connection event, and your app invokes a callback to handle this event. To handle the data that the server may send over this connection, expect the message event providing the corresponding callback. If the connection is closed, the close event is dispatched so your app can react accordingly. In case of an error, the WebSocket object gets the error event.
On the server side, you’ll have to process similar events. Their names may be different depending on the WebSocket software you use on the server. Let’s write some code where a Node server will send data to the Angular app over WebSockets.
13.2. Pushing data from a Node server to a plain client
WebSockets are supported by most server-side platforms (Java, .NET, Python, and others). In chapter 12, you started working with Node servers, and you’ll continue using Node for implementing your WebSocket server. In this section, you’ll implement one particular use case: the server pushes data to a browser client as soon as the client connects to the socket. Since either party can start sending data over the WebSocket connection, you’ll see that WebSockets aren’t about request/response communication. Your simple client won’t need to send a request for data—the server will initiate the communications.
Several Node packages implement the WebSocket protocol, and you’ll use the npm package called ws (www.npmjs.com/package/ws). You can install this package and its type definitions by entering the following commands in your project directory:
npm install ws
npm install @types/ws --save-dev
The type definitions are needed so the TypeScript compiler won’t complain when you use the API from the ws package. Besides, this file is handy for seeing the APIs and types available.
Note
The code that comes with this chapter has a directory called server, which contains the file package.json that lists both ws and @types/ws as dependencies. You just need to run the npm install command. Source code can be found at https://github.com/Farata/angulartypescript and www.manning.com/books/angular-development-with-typescript-second-edition.
Your first WebSocket server will be pretty simple: it’ll push the text “This message was pushed by the WebSocket server” to an HTML/JavaScript client (no Angular) as soon as the socket connection is established. We purposely don’t want the client to send any requests to the server so we can illustrate that a socket is a two-way street and that the server can push data without any request ceremony.
Your app creates two servers. The HTTP server runs on port 8000 and is responsible for sending an HTML page to the browser. When this page is loaded, it immediately connects to the WebSocket server that runs on port 8085. This server will push the message with the greeting as soon as the connection is established. The code of this app is located in the server/simple-websocket-server.ts file and is shown in the following listing.
Listing 13.1. simple-websocket-server.ts
import * as express from "express";
import * as path from "path";
import {Server} from "ws";                                                    1

const app = express();

// HTTP Server
app.get('/', (req, res) => res.sendFile(path.join(__dirname,
                             '../simple-websocket-client.html')));            2

const httpServer = app.listen(8000, "localhost", () => {                      3
     console.log(`HTTP server is listening on localhost:8000`);
});

// WebSocket Server
const wsServer = new Server({port: 8085});                                    4
 console.log('WebSocket server is listening on localhost:8085');

wsServer.on('connection',                                                     5
          wsClient => {
             wsClient.send('This message was pushed by the WebSocket server');6

             wsClient.onerror = (error) =>                                    7
                  console.log(`The server received: ${error['code']}`);
         }
);
- 1 You’ll use Server from the ws module to instantiate a WebSocket server.
- 2 When the HTTP client connects with the root path, the HTTP server will send back this HTML file.
- 3 Starts the HTTP server on port 8000
- 4 Starts the WebSocket server on port 8085
- 5 Listens to connection event from clients
- 6 Pushes the message to the newly connected client
- 7 Handles connection errors
As soon as any client connects to your WebSocket server via port 8085, the connection event is dispatched on the server, and it’ll also receive a reference to the object that represent this particular client’s connection. Using the send() method, the server sends the greeting to this client. If another client connects to the same socket on port 8085, it’ll also receive the same greeting.
Note
As soon as the new client connects to the server, the reference to this connection is added to the wsServer.clients array so you can broadcast messages to all connected clients if needed: wsServer.clients.forEach (client => client.send('...'));.
In your app, the HTTP and WebSocket servers run on different ports, but you could reuse the same port by providing the newly created httpServer instance to the constructor of the WebSocket server, as shown in the following listing.
Listing 13.2. Reusing the same port for both servers
const httpServer = app.listen(8000, "localhost", () => {...});    1

const wsServer = new Server({server: httpServer});                2
- 1 Creates an instance of the HTTP server on port 8000
- 2 Creates an instance of the WebSocket server based on the existing HTTP server
Note
In the hands-on section, you’ll reuse port 8000 for both HTTP and WebSocket communications (see the ng-auction/server/ws-auction.ts file).
The content of the server/simple-websocket-client.html file is shown in the next listing. This is a plain HTML/JavaScript client that doesn’t use any frameworks.
Listing 13.3. simple-websocket-client.html
<!DOCTYPE html>
<html>
<head>
    <meta charset="UTF-8">
</head>
<body>
<span id="messageGoesHere"></span>

<script type="text/javascript">
    var ws = new WebSocket("ws://localhost:8085");                 1

    ws.onmessage = function(event) {                               2
         var mySpan = document.getElementById("messageGoesHere");
        mySpan.innerHTML = event.data;
    };

    ws.onerror = function(event) {                                 3
         console.log(`Error ${event}`);
    }
</script>
</body>
</html>
- 1 Establishes the socket connection
- 2 When the message arrives from the socket, displays its content in the <span> element
- 3 In case of an error, the browser logs the error message on the console.
When the browser downloads this file, its script connects to your WebSocket server at ws://localhost:8085. At this point, the server upgrades the protocol from HTTP to WebSocket. Note that the protocol is ws and not http. For a secure socket connection, use the wss protocol.
To see this sample in action, run npm install in the server directory, compile the code by running the tsc command, and then start the server as follows:
node build/simple-websocket-server
You’ll see the following messages on the console:
WebSocket server is listening on port 8085
HTTP server is listening on 8000
Open the Chrome browser and its Dev Tools at http://localhost:8000. You’ll see the message, as shown on the left in figure 13.3. Under the Network tab on the right, you see two requests made to the server at localhost. The first one loads the simple-websocket-client.html file, and the second makes a request to the WebSocket that’s open on port 8085 on your server.
Figure 13.3. Getting the message from the socket

In this example, the HTTP protocol is used only to initially load the HTML file. Then the client requests the protocol upgrade to WebSocket (status code 101), and from then on this web page won’t use HTTP. You can monitor data going over the socket using the Frames tab in Chrome Developer Tools. In this demo, you wrote a WebSocket client in JavaScript using the browser’s native WebSocket object, but how can an Angular app consume or send messages to the server over WebSockets?
13.3. Using WebSockets in Angular clients
In Angular, you usually wrap all communications with servers into injectable services. In several apps in chapter 12, you did it with HttpClient, and you’ll do it with the WebSocket object. But these two objects differ in that HttpClient is already an Angular injectable service that you’d inject into a service class of your app, whereas WebSocket is a native browser object, and you’ll create it inside a service class.
There’s another major difference between HttpClient and WebSocket. If making HTTP requests using HttpClient would return an observable with a single value, the WebSocket object offers an API that’s easy to turn into an observable stream of multiple values like changing stock prices or bids on products.
Think of a WebSocket as a data producer that can emit values, and an Observable object can relay these values to subscribers (for example, Angular components). In Angular, you can either manually create a service producing an observable stream from a WebSocket connection or use the WebSocketSubject offered by RxJS. In this chapter, you’ll see both ways of handling WebSocket messages in Angular clients.
But first, let’s see how to wrap any Observable emitting values into an Angular service.
13.3.1. Wrapping an observable stream into a service
In this section, you’ll create an observable service that emits hardcoded values without connecting to any server. In section D.5 in appendix D, we explain how to use the Observable.create() method, providing an observer as an argument. If you haven’t read appendix D yet, do it now.
The following listing creates a service with a method that takes an observer as an argument and emits the current time every second.
Listing 13.4. observable.service.ts
import {Observable} from 'rxjs';

export class ObservableService {

  createObservableService(): Observable<Date> {       1

      return new Observable(                          2
           observer => {                              3
               setInterval(() =>
                  observer.next(new Date())           4
               , 1000);
          }
      );
  }
}
- 1 Returns an observable stream of dates
- 2 Creates an observable
- 3 Provides an observer
- 4 Emits the new date every second
In this service, you create an instance of the Observable object, assuming that the subscriber will provide an Observer that knows what to do with the emitted data. Whenever the observable invokes the next(new Date()) method on the observer, the subscriber will receive the current date and time. Your data stream never throws an error and never completes.
You’ll inject the ObservableService into the AppComponent, which invokes the createObservableService() method and subscribes to its stream of values, creating an observer that knows what to do with data. The observer just assigns the received time to the currentTime variable that renders the time on the UI, as shown in the following listing.
Listing 13.5. observableservice/app.component.ts
import {Component} from "@angular/core";
import {ObservableService} from "./observable.service";

@Component({
  selector: 'app-root',
  providers: [ObservableService],
  template: `<h1>Custom observable service</h1>
       Current time: {{currentTime | date: 'mediumTime'}}       1
   `})
export class AppComponent {

  currentTime: Date;

  constructor(private observableService: ObservableService) {   2

    this.observableService.createObservableService()            3
       .subscribe(data => this.currentTime = data);             4
   }
}
- 1 Displays the time using the date pipe
- 2 Injects the service that wraps the observable
- 3 Creates the observable and starts emitting dates
- 4 Subscribes to the stream of dates
This app doesn’t use any servers, and you can see it in action here. Run it by entering the following command in the client directory (after npm install):
ng serve --app observableservice -o
In the browser window, the current time will be updated every second. You use the DatePipe here with the format 'mediumTime', which displays only hours, minutes, and seconds (all date formats are described in the Angular DatePipe documentation at http://mng.bz/78lD).
This simple example demonstrates a basic technique for creating an injectable service that wraps an observable stream so components or user services can subscribe to it. In this case, you use setInterval(), but you could replace it with any application-specific code that generates one or more values and emits them as a stream.
Don’t forget about error handling and completing the stream if need be. The following listing shows an observable that sends one element to the observer, may throw an error, and notifies the observer that streaming is complete.
Listing 13.6. Sending errors and completion events
return new Observable(
    observer => {
      try {
        observer.next('Hello from observable');       1

        // throw("Got an error");                     2
         // some other code can be here
      } catch(err) {
         observer.error(err);                         3
       } finally {
         observer.complete();                         4
       }
    }
);
- 1 Sends the text value to the observer
- 2 Emulates an error situation
- 3 Sends the error to the observer
- 4 Always let the observer know that the data streaming is over.
If you uncomment the line with throw, the preceding program will jump over “some other code” and continue in the catch section, where you invoke observer.error(). This will result in the invocation of the error handler on the subscriber, if there is one.
The data producer for your observable stream was the time generator, but it could be a WebSocket server generating some useful values. Let’s create an Angular service that communicates with a WebSocket server.
13.3.2. Angular talking to a WebSocket server
In the hands-on section, you’ll implement a real-world use case of an Angular client communicating with a server over WebSockets. This is how users of ngAuction will place bids and receive notifications of bids made by other users.
In this section, we’ll show you a very basic way to wrap a WebSocket into an Angular client. This is going to be a rather simple wrapper for the WebSocket object, but in the hands-on section, you’ll use a more robust WebSocketSubject that comes with RxJS.
Your next Angular app will include a service that interacts with the Node WebSocket server. The server-side tier can be implemented with any technology that supports WebSockets. Figure 13.4 illustrates the architecture of such an application (think of bidding messages going between the client and server over the socket connection).
Figure 13.4. Angular interacting with a server via a socket

The code in listing 13.7 wraps the browser’s WebSocket object into an observable stream. This service creates an instance of the WebSocket object that’s connected to the WebSocket server based on the provided URL, and the client instance handles messages received from the server.
Your WebSocketService also has a sendMessage() method so the client can send messages to the server as well. Prior to sending the message, the service checks whether the connection is still open (the WebSocket.readyState === 1), as shown in the following listing.
Listing 13.7. wsservice/websocket.service.ts
import {Observable } from 'rxjs';

export class WebSocketService {

  ws: WebSocket;
  socketIsOpen = 1;                                                1

  createObservableSocket(url: string): Observable<any> {           2
     this.ws = new WebSocket(url);                                 3

    return new Observable(                                         4
       observer => {

        this.ws.onmessage = (event) =>
          observer.next(event.data);                               5

        this.ws.onerror = (event) => observer.error(event);        6

        this.ws.onclose = (event) => observer.complete();          7

        return () =>
            this.ws.close(1000, "The user disconnected");          8
       }
    );
  }

  sendMessage(message: string): string {
    if (this.ws.readyState === this.socketIsOpen) {                9
       this.ws.send(message);                                      10
       return `Sent to server ${message}`;
    } else {
      return 'Message was not sent - the socket is closed';        11
     }
  }
}
- 1 The WebSocket is open.
- 2 This method emits messages received from the specified URL.
- 3 Connects to the WebSocket server
- 4 Creates an Observable object
- 5 Sends the message received from the server to the subscriber
- 6 Sends an error received from the server to the subscriber
- 7 If the server closes the socket, notifies the subscriber
- 8 Returns a callback so the caller can unsubscribe
- 9 Checks if the connection is open
- 10 Sends the message to the server
- 11 Notifies the caller that the connection was closed
Note that your observer returns a callback, so if the caller invokes the unsubscribe() method, this callback will be invoked. It’ll close the connection, sending a 1000 status code and the message explaining the reason for closing. You can see all allowed codes for closing the connection at http://mng.bz/5V07.
Now let’s write the AppComponent that subscribes to the WebSocketService, which is injected into the AppComponent shown in figure 13.4. This component, shown in the following listing, can also send messages to the server when the user clicks the Send Message to Server button.
Listing 13.8. wsservice/app.component.ts
import {Component, OnDestroy} from "@angular/core";
import {WebSocketService} from "./websocket.service";
import {Subscription} from "rxjs";

@Component({
  selector: 'app-root',
  providers: [ WebSocketService ],
  template: `<h1>Angular client for a WebSocket server</h1>
  {{messageFromServer}}<br>
  <button (click)="sendMessageToServer()">Send Message to Server</button>
  <button (click)="closeSocket()">Disconnect</button>
  <div>{{status}}</div>
  `})
export class AppComponent implements OnDestroy {

  messageFromServer: string;
  wsSubscription: Subscription;                                         1
   status;

  constructor(private wsService: WebSocketService) {                    2

    this.wsSubscription =
      this.wsService.createObservableSocket("ws://localhost:8085")      3
       .subscribe(
        data => this.messageFromServer = data,                          4
         err => console.log( 'err'),
        () =>  console.log( 'The observable stream is complete')
      );
  }

  sendMessageToServer(){
    this.status = this.wsService.sendMessage("Hello from client");      5
   }

  closeSocket(){
    this.wsSubscription.unsubscribe();                                  6
     this.status = 'The socket is closed';
  }

  ngOnDestroy() {
    this.closeSocket();
  }
}
- 1 This property will hold the reference to the subscription.
- 2 Injects the service
- 3 Connects to the server
- 4 Handles the data received from the server
- 5 Sends the message to the server
- 6 Closes the WebSocket connection
Note that you store the reference to the subscription in the wsSubscription property, and when the user clicks the Disconnect button, this component unsubscribes from the observable. That invokes the callback defined in the observer, closing the connection to the WebSocket.
The client is ready. Now we’ll show you the code for the server that will communicate with this client. The callback function that’s invoked on the connection event sends the greeting to the client and adds two more event handler functions to the object that represents this particular client.
One function handles messages received from the client, and another handles errors (you’ll log the error code). This server is implemented in the two-way-websocket-server.ts file.
Listing 13.9. server/two-way-websocket-server.ts
import {Server} from "ws";

let wsServer = new Server({port:8085});                                  1

console.log('WebSocket server is listening on port 8085');

wsServer.on('connection',                                                2
    websocket => {

     websocket.send('Hello from the two-way WebSocket server');          3

     websocket.onmessage = (message) =>                                  4
              console.log(`The server received: ${message['data']}`);

     websocket.onerror = (error) =>                                      5
          console.log(`The server received: ${error['code']}`);

     websocket.onclose = (why) =>                                        6
          console.log(`The server received: ${why.code} ${why.reason}`);
   });
- 1 Starts the WebSocket serve
- 2 A new client connected
- 3 Greets the newly connected client
- 4 Listens to the message from this client
- 5 Logs the error from this connection, if any
- 6 The client disconnected, so you log the reason.
To see this app in action, start the server by running the following command from the server directory:
node build/two-way-websocket-server
Then build and start the Angular app from the client directory as follows:
ng serve --app wsservice
To emulate a scenario where more than one client is connected to the same WebSocket server, open two browsers at http://localhost:4200. Each of the apps will receive a greeting from the server, and you’ll be able to send messages to the server by clicking the Send Message to Server button.
We took the screenshot in figure 13.5 after the button is clicked once (Chrome Developer Tools has the WS and Frames tabs opened under Network). On the right, you see the greeting message that arrived from the server and the message that the client sent to the server.
Figure 13.5. Getting the message in Angular from Node

Figure 13.6 shows the screenshot taken after the client clicks the Send Message to Server button, then Disconnect, and then Send Message to Server again.
Figure 13.6. Send, disconnect, and send again

Note
Browsers don’t enforce the same-origin policy on WebSocket connections. That’s why you’re able to exchange data between the client originating from port 4200 and the server running on port 8085. Refer to the documentation of whatever server-side technology you use to see what protection is available for WebSockets.
Imagine your server uses a messaging system; let’s use ActiveMQ as an example. Say you’d like to enable your JavaScript client to exchange data with ActiveMQ over WebSockets. If you decide to program such data exchange from scratch, you need to come up with a way to notify the server’s endpoint that the data sent by the client should be redirected into an ActiveMQ queue with a specific name. Then the server-side code needs to format the client’s message to be accepted by ActiveMQ according to its internal protocol. Also, the server-side app needs to keep track of all connected clients, and possibly implement some heartbeats to monitor the health of the socket connection. That’s a lot of coding.
The good news is that WebSockets can use subprotocols to integrate with server-side messaging systems. For example, server-side code can map the WebSocket endpoint to an existing queue in ActiveMQ. This way, when a server’s software places a message into a queue, it’s automatically pushed to the client. Similarly, when a client sends a message to a WebSocket endpoint, it’s placed in the queue on the server. Implementing heartbeats comes down to providing a configuration option.
STOMP is one of the popular subprotocols used for sending text messages over WebSockets (see http://mng.bz/PPsy). It describes a client-side message broker that communicates with its server-side peer. For client STOMP support, we use ng2-stompjs, available at http://mng.bz/KdIM.
The server-side admin should install a STOMP connector for their messaging server (ActiveMQ has native STOMP support). In such a setup, client-server communication is more robust and requires less coding on the application level.
In chapter 12, you learned how to communicate with a web server via HTTP. In this chapter, we introduced the WebSocket protocol. The next version of ngAuction will use both communication protocols, but first let’s see how the materials covered in this chapter apply to the new functionality of ngAuction that you’re about to implement.
The WebSocket protocol isn’t based on the request/response model, and the WebSocket server can initiate the communication with the client without any additional ceremony. This is a valuable feature for ngAuction, because the server knows first when any users place a bid on each auctioned product in this multi-user app. Because the server doesn’t need to wait for the client’s requests for data, it can push the newly placed bids to all users that are connected to this WebSocket server. That means the server can push the latest bids to all users in real time.
13.4. Hands-on: Node server with WebSockets support
In this section, we’ll review the refactored version of ngAuction that comes with this chapter. In real auctions, multiple users can bid on products. When the server receives a bid from a user, the bid server should broadcast the latest bid to all users who are watching selected products. This version of ngAuction accomplishes the following main tasks:
- Split ngAuction into two separate projects, client and server, and store the product data and images on the server.
- Modify the client so it’ll use the HttpClient service to make requests to the server to get products data.
- On the server side, implement HTTP and WebSocket servers. The HTTP server will serve product data.
- The WebSocket server will accept user bids on selected products, and all other users can see the latest bids pushed by the server.
Figure 13.7 shows the rendered ProductDetailComponent with the button that will allow a user to place bids in $5 increments. If a user clicks this button once, the price will change to $75 on their UI, as well as for all other users having the product-detail view open for the same product. The server will broadcast (via a WebSocket connection) the latest bid amounts to all users who are looking at this product.
Figure 13.7. The ProductDetailComponent with a bid button

To implement this functionality, you’ll add WebSocket support to the server and create a new BidService on the client. Figure 13.8 shows the main players involved in client-server communications in this version of ngAuction.
Figure 13.8. Client-server communications in ngAuction

The DI in figure 13.8 stands for dependency injection. Angular injects the HttpClient service into ProductService, which in turn is injected into three components: CategoriesComponent, SearchComponent, and ProductComponent. ProductService is responsible for all HTTP-based communications with the server.
The BidService wraps all WebSocket-based communications with the server. It’s injected into the ProductDetailComponent. When a user opens the product-detail view, the new bids (if any) will be displayed. When a user places a new bid, the BidService will push the message to the server. When the WebSocket server pushes a new bid, the BidService receives the bid, and the ProductDetailComponent renders it.
Figure 13.8 shows two more injectable values: API_BASE_URL and WS_URL. The former will contain the URL of the HTTP server, and the latter, the URL of the WebSocket server. To inject these values, you’ll use InjectionToken. Both URLs are configurable, and their values are stored in the Angular project in the environments/environment.ts and environments/environment.prod.ts files.
The environment.ts file is used in dev mode and is shown in the following listing.
Listing 13.10. environment.ts
export const environment = {
  production: false,
  apiBaseUrl: 'http://localhost:9090/api',
  wsUrl: 'ws://localhost:9090'
};
The environment.prod.ts file is used in production mode, and because the Angular app is expected to be deployed on the same server that serves data, there’s no need to specify the full URL for HTTP communications, as shown in the following listing.
Listing 13.11. environment.prod.ts
export const environment = {
  production: true,
  apiBaseUrl: '/api',
  wsUrl: 'ws://localhost:9090'
};
13.4.1. Running ngAuction in dev mode
ngAuction consists of two projects now, so you need to run npm install in each project, and then start the server and the client separately. To start the server, change to the server directory, compile all the TypeScript code into JavaScript by running tsc, and start the server as follows:
node build/main
To start the Angular app, go to the client directory and run the following command:
ng serve
You’ll see the same UI of ngAuction that you created in chapter 11, but now product data and images come from the server via the HTTP connection. Open your Chrome browser at http://localhost:4200, select a product, and click the bid button. You’ll see how the price increases by $5. Now open another browser (such as Firefox) at http://localhost:4200, select the same product, and you’ll see the latest price. Place a new bid in that second browser, and the new bid is shown in both browsers. The server pushes the new bid to all connected clients.
After reading in chapter 12 about the same-origin restriction and proxying client requests, you may be wondering how the app loaded from port 4200 can access data on the HTTP server running on port 9090 without configuring the proxy on the client. It’s because this time, you used a special CORS package on the Node server for unrestricted access from any client. You’ll see how to do this in the next section.
13.4.2. Reviewing the ngAuction server code
By now, you know how to create and start HTTP and WebSocket servers using Node.js, Express, and the ws package, and you won’t repeat that part. In this section, we’ll review the code fragments of the server that are relevant to the new functionality of ngAuction. You’ll split the server code into four TypeScript files. Figure 13.9 shows the structure of the ngAuction server directory that comes with this chapter.
Figure 13.9. ngAuction server structure

In ngAuction from chapter 11, the data folder was located in the Angular project; now, you move the data to the server. In chapter 11, the code that read products.json and the functions to get all the products or products by ID was located in the product .service.ts file, and now is located in the db-auction.ts file. The main.ts file contains the code to launch both HTTP and WebSocket servers. The ws-auction.ts file has the code supporting WebSocket communication with ngAuction clients.
Launching the HTTP and WebSocket servers
Let’s start the code review from the main.ts file that’s used to launch the servers. The code in this file is similar to simple-websocket-server.ts from section 13.2, but this time you don’t start HTTP and WebSocket servers on different ports—they both use port 9090. Another difference is that you create an instance of the HTTP server using the createServer() function, one of Node’s interfaces (see https://nodejs.org/api/http.html), as shown in the following listing.
Listing 13.12. main.ts
import * as express from 'express';
import {createServer} from 'http';
import {createBidServer} from './ws-auction';
import {router} from './rest-auction';

const app = express();
app.use('/api', router);                               1

const server = createServer(app);                      2
 createBidServer(server);                              3

server.listen(9090, "localhost", () => {               4
   const {address, port} = server.address();
  console.log(`Listening on  ${address} ${port}`);
});
- 1 Forwards requests containing /api to the Express router
- 2 Creates an instance of the http.Server object
- 3 Creates an instance of BidServer using its HTTP peer
- 4 Launches both servers
This code creates an instance of the HTTP server with Node’s createServer(), and you pass Express as a callback function to handle all HTTP requests. To start your WebSocket server, you invoke the createBidServer() function from ws-auction.ts. But first, let’s review your RESTful HTTP server.
The HTTP server
In chapter 12, section 12.2.2, you created a simple Node/Express server that handles requests for products. In this section, you’ll see a more advanced version of such a server. Here, you’ll use the Express Router to route HTTP requests. You’ll also use the CORS module to allow requests from all browsers to ignore the same-origin restriction. That’s why you can start the client using ng serve without the need to configure a proxy.
Finally, the product data won’t be hardcoded—you moved the data-handling part into the db-auction.ts script. Your HTTP REST server is implemented in the rest-auction.ts file, shown in the following listing.
Listing 13.13. rest-auction.ts
import * as cors from 'cors';                                     1
 import * as express from 'express';
import {
  getAllCategories,
  getProducts,
  getProductById,
  getProductsByCategory
} from './db-auction';                                            2

export const router = express.Router();                           3

router.use(cors());                                               4

router.get('/products',
  async (req: express.Request, res: express.Response) => {        5
   res.json(await getProducts(req.query));                        6
 });

router.get('/products/:productId', async (req: express.Request,
res: express.Response) => {
  const productId = parseInt(req.params.productId, 10) || -1;
  res.json(await getProductById(productId));
});

router.get('/categories', async (_, res: express.Response) => {
  res.json(await getAllCategories());
});

router.get('/categories/:category', async (req: express.Request,
res: express.Response) => {
  res.json(await getProductsByCategory(req.params.category));
});
res: express.Response) => {
const productId = parseInt(req.params.productId, 10) || -1;
res.json(await getProductById(productId));
});
router.get('/categories', async (_, res: express.Response) => {
res.json(await getAllCategories());
});
router.get('/categories/:category', async (req: express.Request,
res: express.Response) => {
res.json(await getProductsByCategory(req.params.category));
});
- 1 Imports the CORS module
- 2 Imports the data-handling functions
- 3 Creates and exports the Express Router instance
- 4 Uses CORS to allow requests from all clients
- 5 Uses the async keyword to mark the function as asynchronous
- 6 Uses the await keyword to avoid nesting code in then() callbacks
In section 13.4.1, we stated that the dev server on the client will run on port 4200, and the REST server will run on port 9090. To overcome the same-origin restriction, you use the Express package CORS to enable access from all origins (see http://mng.bz/aNxM). If you open package.json in the server directory, you’ll find the dependency "cors": "^2.8.4" there.
In this server, you create an instance of the Express Router object and use it to route HTTP GET requests based on the provided path.
Note the use of the async and await keywords. You didn’t use them for product retrieval in chapter 12, section 12.2.2, because product data was stored in an array, and functions like getProducts() were synchronous there. Now you use the data-handling functions from db-auction.ts, and they read data from a file, which is an asynchronous operation.
Using the async and await keywords makes the async code look as if it’s synchronous (see section A.12.4 in appendix A for more details).
The data-handling script
Your HTTP server uses the db-auction.ts script for all data-handling operations. This script has methods to read products from the products.json file as well as search products based on provided search criteria. We won’t be reviewing the entire code of the db-auction.ts script, but we will discuss the code changes compared to product.service.ts from the version of ngAuction included with chapter 11, as shown in the following listing.
Listing 13.14. db-auction.ts (partial listing)
import * as fs from 'fs';
import * as util from 'util';

type DB = Product[];                                                  1

const readFile = util.promisify(fs.readFile);                         2
 const db$: Promise<DB> =                                             3
    readFile('./data/products.json', 'utf8')                          4
   .then(JSON.parse, console.error);

export async function getAllCategories(): Promise<string[]> {
  const allCategories = (await db$)                                   5
    .map(p => p.categories)
    .reduce((all, current) => all.concat(current), []);

  return [...new Set(allCategories)];                                 6
 }
...

export async function updateProductBidAmount(productId: number,       7
                                       price: number): Promise<any> {
  const products = await db$;
  const product = products.find(p => p.id === productId);
  if (product) {
    product.price = price;
  }
}
- 1 Defines a new type to store an array of products
- 2 Makes fs.readFile to return a promise
- 3 Declares a promise for reading products.json
- 4 Reads products.json
- 5 This function gets category names for each product.
- 6 Gets rid of duplicate categories
- 7 This function updates the product price based on the latest bid.
In chapter 11, the products.json file was located on the client side, and ProductService read this file using the HttpClient service, as follows:
http.get<Product[]>('/data/products.json');
Now this file is located on the server, and you read it using Node’s fs module, which includes functions for working with the filesystem (see https://nodejs.org/api/fs.html). You also use another Node module, util, that includes a number of useful utilities, and you use util.promisify() to read the file returning the data as a promise (see http://mng.bz/Z009) instead of providing a callback to fs.readFile.
In several places in db-auction.ts, you see await db$, which means “execute the db$ promise and wait until it resolves or rejects.” The db$ promise knows how to read the products.json file.
Now that we’ve discussed how your RESTful server works, let’s get familiar with the code of the WebSocket server.
The WebSocket server
The ws-auction.ts script implements your WebSocket server that can receive bids from users and notify users about new bids. A bid is represented by a BidMessage type containing the product ID and the bid amount (price), as shown in the following listing.
Listing 13.15. BidMessage from ws-auction.ts
interface BidMessage {
  productId: number;
  price: number;
}
The createBidServer() function creates an instance of the class BidServer, using the provided instance of http.Server, as shown in the next listing.
Listing 13.16. createBidServer() from ws-auction.ts
export function createBidServer(httpServer: http.Server): BidServer {
  return new BidServer(httpServer);
}
The BidServer class contains the standard WebSocket callbacks onConnection(), onMessage(), onClose(), and onError(). The constructor of this class creates an instance of ws.Server (you use the ws package there) and defines the onConnection() callback method to the WebSocket connection event. The outline of the BidServer class is shown in the following listing.
Listing 13.17. The structure of BidServer
export class BidServer {
  private readonly wsServer: ws.Server;

  constructor(server: http.Server) {}

  private onConnection(ws: ws): void {...}           1

  private onMessage(message: string): void {...}     2

  private onClose(): void {...}                      3

  private onError(error: Error): void {...}          4
 }
- 1 Handler for the WebSocket connection event
- 2 Handler for the message event
- 3 Handler for the close event
- 4 Handler for the error event
Now let’s review the implementation of each method, starting with constructor()
Listing 13.18. The constructor
constructor(server: http.Server) {
  this.wsServer = new ws.Server({ server });                 1
   this.wsServer.on('connection',                            2
      (userSocket: ws) => this.onConnection(userSocket));
}
- 1 Instantiates the WebSocket server using the HTTP server instance
- 2 Defines the handler of the connection event
When your ngAuction client connects to BidServer, the onConnection() callback is invoked. The argument of this callback is the WebSocket object representing a single client’s connection. When the client makes the initial request to switch the protocol from HTTP to WebSocket, it’ll invoke the onConnection() callback, shown in the following listing.
Listing 13.19. Handling the connection event
private onConnection(ws: ws): void {
  ws.on('message', (message: string) => this.onMessage(message));      1
   ws.on('error', (error: Error) => this.onError(error));              2
   ws.on('close', () => this.onClose());                               3

  console.log(`Connections count: ${this.wsServer.clients.size}`);     4
 }
- 1 Listens to message events
- 2 Listens to error events
- 3 Listens to close events
- 4 Reports the number of connected clients
The onConnection() method assigns the callback methods for the WebSocket events message, close, and error. When the ws module creates an instance of the WebSocket server, it stores the references to connected clients in the wsServer.clients property. On every connection, you print on the console the number of connected clients. The next listing reviews the callback methods one by one, starting from onMessage().
Listing 13.20. Handling the client messages
import { updateProductBidAmount} from './db-auction';
...
  private onMessage(message: string): void {
    const bid: BidMessage = JSON.parse(message);                           1
     updateProductBidAmount(bid.productId, bid.price);                     2

    // Broadcast the new bid
    this.wsServer.clients.forEach(ws => ws.send(JSON.stringify(bid)));     3

    console.log(`Bid ${bid.price} is placed on product ${bid.productId}`);
  }
- 1 Parses the client’s BidMessage
- 2 Updates the bid amount in your in-memory database
- 3 Sends new product bid information to all subscribers
The onMessage() callback gets the user’s bid on the product and updates the amount in your simple in-memory database implemented in the db-auction.ts script. If a user opens the product-detail view, they become a subscriber to notifications about all users bids, so you push the new bid over the socket to each subscriber.
Next, we’ll review the callback for the close event. When a user closes the product-detail view, the WebSocket connection is closed as well. In this case, the closed connection is removed from wsServer.clients, so no bid notifications will be sent to a nonexistent connection, as shown in the following listing.
Listing 13.21. Handling closed connections
private onClose(): void {
  console.log(`Connections count: ${this.wsServer.clients.size}`);
}
In the onError() callback, you extract the error message from the provided Error object and log the error on the console.
Listing 13.22. Handling WebSocket errors
private onError(error: Error): void {
    console.error(`WebSocket error: "${error.message}"`);
  }
}
Figure 13.10 shows the same product-detail view open in Chrome and Firefox browsers. The latest bid is synchronized in both views as soon as the user clicks the bid button in any of the browsers.
Figure 13.10. Synchronized bids in two browsers

Your ngAuction isn’t a production-grade auction, and you may find some edge cases that aren’t properly handled. We’ll describe one of them in case you want to improve this app.
Imagine that the current bid of the product is $70, and Joe clicks the bid button to make a $75 bid. At the same time, Mary, who was also shown $70 as the latest product bid, also clicks the bid button. There could be a situation when Joe’s request will change the bid to $75 on the server, and some milliseconds later, Mary’s $75 bid arrives to the server. Currently, the BidServer will just replace Joe’s $75 with Mary’s $75, and each of them will assume that he or she placed a $75 bid.
To prevent this from happening, modify the code in the BidServer to reject the bid unless the bid amount is greater than the existing one. In such scenarios, send the losing user a message containing the new minimum bid amount.
We’ve covered the server-side code of ngAuction; let’s see what changed on the client side compared to the version in chapter 11.
13.4.3. What changed in the ngAuction client code
As stated in the previous section, the main change in the Angular code of ngAuction is that you moved to the server the file with product data and images, and the code that reads these files. Accordingly, you added the code to ProductService to interact with the HTTP server using the HttpClient service covered in chapter 12.
Remember that the ProductComponent is responsible for rendering the product view that includes ProductDetailComponent and ProductSuggestionComponent with the grid of suggested products, and you modified the code of both components.
Also, you added the bid.service.ts file to communicate with the WebSocket service and modified the code in product-detail.component.ts so the user can place bids on a product and see other user bids. Let’s review the changes related to the product view.
Two observables in the ProductComponent
First, the product view would change if the user looks at the details of one product and then selects another one from the suggested products grid. The route doesn’t change (the user is still looking at the product view), and ProductComponent subscribes to an observable from ActivatedRoute that emits the newly selected productId and retrieves the corresponding product details, as shown in the following listing.
Listing 13.23. Handling changed parameters from ActivatedRoute
this.product$ = this.route.paramMap
  .pipe(
    map(params => parseInt(params.get('productId') || '', 10)),        1
     filter(productId => Boolean(productId)),                          2
     switchMap(productId => this.productService.getById(productId))    3
   );
- 1 Gets the new productId
- 2 Handles the possibly invalid productId.
- 3 Retrieves the selected product details
In listing 13.23, you retrieve productId from ActivatedRoute and pass it over to the ProductService, using the switchMap operator. The filter operator is just a precaution to weed out the falsy product IDs. For example, a user can manually enter an erroneous URL like http://localhost:4200/products/A23, and you don’t want to request the details for a nonexistent product.
The template of the product component includes the <nga-product-detail> component, which gets a selected product via its input property product, as shown in the following listing.
Listing 13.24. Passing a selected product to ProductDetailComponent
<nga-product-detail
    fxFlex="auto"
    fxFlex.>-md="65%"
    *ngIf="product$ | async as product"         1
     [product]="product">                       2
 </nga-product-detail>
- 1 Extracts the Product object with async pipe
- 2 Passes the selected Product to the ProductDetailComponent
You place the code that unwraps product data inside the *ngIf directive because the product data is retrieved asynchronously, and you want to make sure that the product$ observable emitted the data that you bind to the input property of the ProductDetailComponent. Let’s see how the ProductDetailComponent handles the received product.
Placing and monitoring bids in ProductDetailComponent
The UI of the ProductDetailComponent is shown in figure 13.10. This component gets the product to display via its input property product. If a user clicks the bid button, the new bid ($5 more than the current one) is sent over the WebSocket connection using BidService, which implements all communications with the BidServer. If another user connected to the BidServer bids on the same product, the bid amount on the product-detail view will be immediately updated.
The ProductDetailComponent class has the private RxJS subject productChange$ and the observable latestBids$, which merges the data of two observables:
- productChange$ handles the case when a user opens the product-detail view and then selects another product from the list “More items to consider.” When the binding to the input parameter product changes, the lifecycle hook ngOnChanges() intercepts the change, and productChange$ emits the product data.
- latestBids$ emits the new value when either productChange$ or BidService pushes the new bid received from the server.
You have two data sources that can emit values, and on any emission you need to update the view. That’s why you combine two observables with the RxJS operator combineLatest. The code of the product-detail.component.ts file is shown in the following listing.
Listing 13.25. product-detail.component.ts
// imports are omitted for brevity
@Component({
  selector: 'nga-product-detail',
  styleUrls: [ './product-detail.component.scss' ],
  templateUrl: './product-detail.component.html',
  changeDetection: ChangeDetectionStrategy.OnPush
})
export class ProductDetailComponent implements OnInit, OnChanges {
  private readonly productChange$ = new Subject<Product>();
  latestBids$: Observable<number>;
  @Input() product: Product;

  constructor(private bidService: BidService) {}                              1

  ngOnInit() {
    this.latestBids$ = combineLatest(                                         2
       this.productChange$.pipe(startWith(this.product)),                     3
       this.bidService.priceUpdates$.pipe(startWith<BidMessage | null>(null)),4
       (product, bid) =>  bid && bid.productId === product.id ?               5
                          bid.price: product.price                            6
     );
  }

  ngOnChanges({ product }: { product: SimpleChange }) {
    this.productChange$.next(product.currentValue);                           7
   }

  placeBid(price: number) {
    this.bidService.placeBid(this.product.id, price);                         8
   }
}
- 1 Injects the BidService
- 2 Combines the values of two observables
- 3 The first observable starts emission with the currently displayed product.
- 4 The second observable emits bids.
- 5 Checks whether the arrived bid was made on the current product
- 6 If new bid was placed, uses its value; otherwise, uses the product price
- 7 Emits the newly selected product
- 8 Places the bid on this product
The RxJS operator combineLatest (see http://mng.bz/Y28Y) subscribes to the values emitted by two observables and invokes the merge function when either of the observables emits the value. In this case, it’s either the value emitted by productChange$ or by bidService.priceUpdates$ (the BidService code is included in the next section). Here’s your merge function:
(product, bid) =>  bid && bid.productId === product.id ?
                         bid.price: product.price
The values emitted by these two observables are represented as the arguments (product, bid), and this function returns either product.price or bid.price, depending on which observable emitted the value. This value will be used for rendering on the product-detail view.
Because the combineLatest operator requires both observables to emit a value to initially invoke the merge function, you apply the startWith operator (see http://mng.bz/OL9z) to ensure that there’s an initial emission of the provided value before the observable will start making its regular emissions. For the initial values, you use the product for one observable, and either BidMessage or null for the other. When the ProductDetailComponent is initially rendered, the observable bidService .priceUpdates$ emits null.
Your combined observable is declared in the ngOnInit() lifecycle hook, and its values are rendered in the template using the async pipe. You do it inside the *ngIf directive so the falsy values aren’t rendered:
*ngIf="latestBids$ | async as price"
When the user clicks the bid button, you invoke bidService.placeBid(), which internally checks whether the connection to BidServer has to be opened or is already opened. The next listing from product-detail.component.html shows how the bid button is implemented in the template.
Listing 13.26. The bid button in the template
<button class="info__bid-button"
         mat-raised-button
         color="accent"
         (click)="placeBid(price + 5)">                           1
    PLACE BID {{ (price + 5) | currency:'USD':'symbol':'.0' }}    2
  </button>
- 1 Places the bid that’s $5 higher than the latest bid/price
- 2 Shows the next bid amount on the button
Now let’s see how the BidService class communicates with the server, using the WebSocket protocol.
Using RxJS to communicate with the WebSocket server
In section 13.3.2, we showed a very basic way of writing the client code communicating with a WebSocket server. In ngAuction, you’ll use a more robust WebSocket service included with RxJS, which means you can use it in any Angular project.
RxJS offers an implementation of the WebSocket service based on the Subject explained in section D.6 in appendix D. The RxJS Subject is both an observer and observable. In other words, it can receive and emit data, which makes it a good fit for handling WebSocket data streams. The RxJS WebSocketSubject is a wrapper around the standard browser WebSocket object and is located in the rxjs/websocket file.
Tip
Prior to RxJS 6, the WebSocketSubject class was located in the rxjs/observable/dom/WebSocketSubject file.
In its simplest form, WebSocketSubject can accept a string with the URL of the WebSocket endpoint or an instance of the WebSocketSubjectConfig object, where you can provide additional configuration. When your code subscribes to WebSocketSubject, it either uses the existing connection or creates a new one. Unsubscribing from WebSocketSubject closes the connection if there are no other subscribers listening to the same WebSocket endpoint.
When the server pushes data to the socket, WebSocketSubject emits the data as an observable value. In case of an error, WebSocketSubject emits the error like any other observable. If the server pushes data but there are no subscribers, the values will be buffered and emitted as soon as a new client subscribes.
Note
There’s a difference in handling messages by a regular RxJS Subject and the WebSocketSubject, though. If you call next() on Subject, it emits data to all subscribers, but if you call next() on WebSocketSubject, it won’t. Remember that there’s a server between an observable and subscribers, and it’s up to the server to decide when to emit values.
The ngAuction client that comes with this chapter includes the file shared/services/bid.service.ts, which uses WebSocketSubject. BidService is a singleton that’s used only by ProductDetailComponent, which subscribes to it using the async pipe. When a user closes the product-detail view, the component gets destroyed, and the async pipe unsubscribes, closing the WebSocket connection. Let’s review the code of script bid.service.ts.
Listing 13.27. bid.service.ts
import { WebSocketSubject } from 'rxjs/websocket';
...

export interface BidMessage {
  productId: number;
  price: number;
}

@Injectable()
export class BidService {
  private _wsSubject: WebSocketSubject<any>;
  private get wsSubject(): WebSocketSubject<any> {                   1

    const closed = !this._wsSubject || this._wsSubject.closed;       2
     if (closed) {
      this._wsSubject = new WebSocketSubject(this.wsUrl);            3
     }
    return this._wsSubject;
  }

  get priceUpdates$(): Observable<BidMessage> {
    return this.wsSubject.asObservable();                            4
   }

  constructor(@Inject(WS_URL) private readonly wsUrl: string) {}     5

  placeBid(productId: number, price: number): void {
    this.wsSubject.next(JSON.stringify({ productId, price }));       6
   }
}
- 1 A getter for the private property _wsSubject
- 2 The WebSocket-Subject was never created or is already disconnected.
- 3 Connects to BidServer
- 4 Gets a reference to the subject’s observable
- 5 Injects the URL of the WebSocket server
- 6 Pushes the new bid to BidServer
The BidService singleton includes the priceUpdates$ getter, which returns the observable. ProductDetailComponent uses this getter in ngOnInit(). That means priceUpdates$ opens a WebSocket connection (through this.wsSubject getter) as soon as ProductDetailComponent is rendered, and the async pipe is a subscriber in the template of this component.
BidService also has a private property, _wsSubject, and the getter wsSubject, used internally. When the getter is accessed the very first time from priceUpdates$, the _wsSubject variable doesn’t exist, and a new instance of WebSocketSubject is created, establishing a connection with the WebSocket server.
If a user navigates away from the product-detail view, the connection is closed. Because BidService is a singleton, if a user closes and reopens the product-detail view, the instance of BidService won’t be re-created, but because the connection status is closed (_wsSubject.closed), it will be reestablished.
The URL of the WebSocket server (WS_URL) is stored in environment.ts for the dev environment and in environment.prod.ts for production. This value is injected into the wsUrl variable using the @Inject directive.
This concludes the code review of the ngAuction updates that implement communication between the Angular client and two servers. Run ngAuction as described in section 13.4.1, and ngAuction becomes operational.
Summary
- The WebSocket protocol offers unique features that aren’t available with HTTP, which makes it a better choice for certain use cases. Both the client and the server can initiate communication.
- The WebSocket protocol doesn’t use the request/response model.
- You can create an Angular service that turns WebSocket events into an observable stream.
- The RxJS library includes a Subject-based implementation of WebSocket support in the WebSocketSubject class, and you can use it in any Angular app.