Chapter 14. Testing Angular applications
This chapter covers
- Using the Jasmine framework for unit testing
- Identifying the main artifacts from the Angular testing library
- Testing services, components, and the router
- Running unit tests against web browsers with the Karma test runner
- End-to-end testing with the Protractor framework
To ensure that your software has no bugs, you need to test it. Even if your application has no bugs today, it may have them tomorrow, after you modify the existing code or introduce new code. Even if you don’t change the code in a particular module, it may stop working properly as a result of changes in another module or in the runtime environment. Your application code has to be retested regularly, and that process should be automated. You should prepare test scripts and start running them as early as possible in your development cycle.
This chapter covers two main types of testing for the frontend of web apps:
- Unit testing— Asserts that a small unit of code accepts the expected input data and returns the expected result. Unit testing is about testing isolated pieces of code, especially public interfaces.
- End-to-end testing— Asserts that the entire application works as end users expect and that all application parts properly interact with each other.
Unit tests are for testing the business logic of small, isolated units of code. They run reasonably fast, and you’ll be running unit tests a lot more often than end-to-end tests. End-to-end (e2e) testing simulates user actions (such as button clicks) and checks that the application behaves as expected. During end-to-end testing, you shouldn’t run unit-testing scripts.
Note
There are also integration tests that check that more that one app member can communicate. Whereas unit tests mock dependencies (for example, HTTP responses), integration tests use the real ones. To turn a unit test into an integration test, don’t use mocks.
We’ll start by covering the basics of unit testing with Jasmine, and then we’ll show you how the Angular testing library is used with Jasmine. After that, you’ll see how to use Protractor, the library for e2e tests. Toward the end of the chapter, we’ll show you how to write and run e2e scripts to test the product-search workflow of ngAuction.
14.1. Unit testing
The authors of this book work as consultants on large projects for various clients. Pretty often these projects were written without unit tests in place. We’re going to describe a typical situation that we’ve run into on multiple occasions.
A large app evolves over several years. Some of the developers who started writing the app are gone. A new developer joins the project and has to quickly learn the code and get up to speed.
A new business requirement comes in, and the new team member starts working on it. They implement this requirement in the existing function doSomething(), but the QA team opens another issue, reporting that the app is broken in a seemingly unrelated area. After additional research, it becomes obvious that the app is broken because of the code change made in doSomething(). The new developer doesn’t know about a certain business condition and can’t account for it.
This wouldn’t have happened if unit (or e2e) tests were written with the original version of doSomething() and run as a part of each build. Besides, the original unit test would serve as documentation for doSomething(). Although writing unit tests seems like an additional, time-consuming task, it may save you a lot more time in the long run.
We like the definition given by Google engineer Elliotte Rusty Harold during one of his presentations—that a unit test should verify that a known, fixed input produces a known, fixed output. If you provide a fixed input for a function that internally uses other dependencies, those dependencies should be mocked out, so a single unit test script tests an isolated unit of code.
Several frameworks have been created specifically for writing unit tests, and Angular documentation recommends Jasmine for this purpose (see the Angular documentation at http://mng.bz/0nv3). We’ll start with a brief overview of Jasmine.
14.1.1. Getting to know Jasmine
Jasmine (https://jasmine.github.io/) enables you to implement a behavior-driven development (BDD) process, which suggests that tests of any unit of software should be specified in terms of the desired behavior of the unit. With BDD, you use natural language constructs to describe what you think your code should be doing. You write unit test specifications (specs) in the form of short sentences, such as “StarsComponent emits the rating change event.”
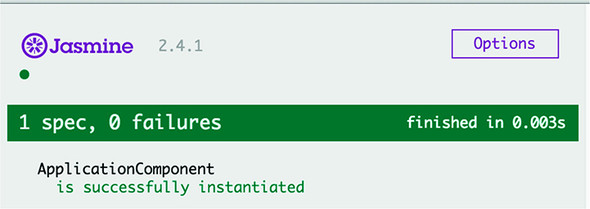
Because it’s so easy to understand the meaning of tests, they can serve as your program documentation. If other developers need to become familiar with your code, they can start by reading the code for the unit tests to understand your intentions. Using natural language to describe tests has another advantage: it’s easy to reason about the test results, as shown in figure 14.1.
Figure 14.1. Running tests using Jasmine’s test runner
Tip
Even though Jasmine comes with its own browser-based test runner, you’ll be using a command-line-based test runner called Karma that can be easily integrated into the automated build process of your apps.
In BDD frameworks, a test is called a spec, and a combination of one or more specs is called a suite. A test suite is defined with the describe() function—this is where you describe what you’re testing. Each spec in a suite is programmed as an it() function, which defines the expected behavior of the code under test and how to test it. The following listing shows an example.
Listing 14.1. A simple Jasmine test suite
describe('MyCalculator', () => {                        1
   it('should know how to multiply', () => {            2
     // The code that tests multiplication goes here
  });
  it('should not divide by zero', () => {               3
     // The code that tests division by zero goes here
  });

});
- 1 A suite description and a function implementing the suite
- 2 A spec to test multiplication
- 3 A spec to test division
Testing frameworks have the notion of an assertion, which is a way of questioning whether an expression under test is true or false. If the assertion returns false, the framework throws an error. In Jasmine, assertions are specified using the expect() function, followed by matchers:toBe(), toEqual(), and so on. It’s as if you’re writing a sentence, “I expect 2 plus 2 to equal 4”:
expect(2 + 2).toEqual(4);
Matchers implement a Boolean comparison between the actual and expected values. If the matcher returns true, the spec passes. If you expect a test result not to have a certain value, just add the keyword not before the matcher:
expect(2 + 2).not.toEqual(5);
Note
You can find the complete list of matchers in the type definition file @types/jasmine/index.d.ts, located in the directory node_modules. The Angular testing library adds more matchers, listed at http://mng.bz/hx5u.
In Angular, test suites have the same names as the files under test, adding the suffix .spec to the name. For example, the file application.spec.ts contains the test script for application.ts. Figure 14.2 shows a minimalistic test suite that can be located in the app.component.spec.ts file; it makes an assertion that the variable app is an instance of AppComponent. An assertion is the expectation plus the matcher.
Figure 14.2. A minimalistic test suite
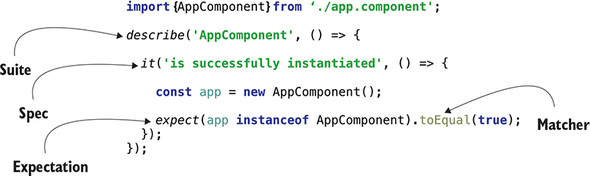
Figure 14.2 shows a test suite containing a single spec. If you extract the texts from describe() and it() and put them together, you’ll get a sentence that clearly indicates what you’re testing here: “ApplicationComponent is successfully instantiated.” If other developers need to know what your spec tests, they can read the texts in describe() and it(). Each test should be self-descriptive so it can serve as program documentation.
Tip
Although the test shown in figure 14.2 was generated by Angular CLI, it’s pretty useless because the chances that the AppComponent won’t be successfully instantiated are close to zero.
The code in figure 14.2 instantiates AppComponent and expects the expression app instanceof AppComponent to evaluate to true. From the import statement, you can guess that this test script is located in the same directory as AppComponent.
Note
In Angular applications, you keep each test script in the same directory as the component (or service) under test, so if you need to reuse a component in another app, all related files are located together. If you use Angular CLI for generating a component or service, the boilerplate code for tests (the .spec.ts file) will be generated in the same directory.
If you want some code to be executed before each test (such as to prepare test dependencies), you can specify it in the setup functions beforeAll() and beforeEach(), which will run before the suite or each spec, respectively. If you want to execute some code right after the suite or each spec is finished, use the teardown functions afterAll() and afterEach().
Let’s see how to apply Jasmine API while unit-testing a TypeScript class.
14.1.2. Writing test scripts for a class
Imagine you have a Counter class with one counter property and two methods that allow incrementing or decrementing the value of this property.
Listing 14.2. counter.ts
export class Counter {

  counter = 0;              1

  increment() {             2
     this.counter++;
  }

  decrement() {             3
     this.counter--;
  }
}
- 1 A class property
- 2 A method to increment the value
- 3 A method to decrement the value
What do you want to unit-test here? You want to make sure that the increment() method increments the value of counter by one, and that the decrement() method decrements this value by one. Applying Jasmine terminology, you want to write a test suite with two specs.
Remember that a spec should test an isolated piece of functionality, so each spec should create an instance of the Counter class and invoke only one of its methods. The first version of the counter.spec.ts file is shown in the following listing.
Listing 14.3. counter.spec.ts
import {Counter} from './counter';
describe("Counter", ()=> {                             1
   it("should increment the counter by 1", () => {     2
        let cnt = new Counter();                       3
        cnt.increment();                               4
        expect(cnt.counter).toBe(1);                   5
     });

  it("should decrement the counter by 1", () => {
      let cnt = new Counter();
      cnt.decrement();
      expect(cnt.counter).toBe(-1);
    });
});
- 1 The test suite declaration states that you’ll test the Counter.
- 2 The first spec tests if increment works.
- 3 The setup phase creates a new instance of the Counter.
- 4 Invokes the function under test
- 5 Declares the expectation, assertion, and matcher
Each of your specs has similar functionality. The setup phase creates a fresh instance of the Counter class, then it invokes the method to be tested, and finally it declares the expectation with the expect() method. In one spec, you expect the counter to be 1, and in another -1.
This suite of tests will work, but you have some code duplication here: each of the specs repeats the instantiation of Counter. In the refactored version of your test script, you’ll remove the Counter instantiation from the specs and do it before the specs. Take a look at the new test version in the following listing. Is it correct?
Listing 14.4. Refactored counter.spec.ts
import {Counter} from './counter';

describe("Counter", () => {

  let cnt = new Counter();                         1

  it("should increment the counter by 1", () => {
       cnt.increment();
       expect(cnt.counter).toBe(1);
    }
  );

  it("should decrement the counter by 1", () => {
      cnt.decrement();
      expect(cnt.counter).toBe(-1);
    }
  );
});
This test is not correct. Your test suite will create an instance of Counter, and the first spec will increase the counter value to 1 as expected. But when the second spec decrements the counter, its value becomes 0, though the matcher expects it to be -1.
The final version of your test script, shown in the nest listing, fixes this mistake by creating the instance of Counter inside Jasmine’s beforeEach() function.
Listing 14.5. The final version of counter.spec.ts
import {Counter} from './counter';

describe("Counter", () => {

  let cnt: Counter;??

  beforeEach(() => cnt = new Counter())?;         1

  it("should increment the counter by 1", () => {
       cnt.increment();
       expect(cnt.counter).toBe(1);
    }
  );

  it("should decrement the counter by 1", () => {
      cnt.decrement();
      expect(cnt.counter).toBe(-1);
    }
  );
});
- 1 Instantiates Counter inside beforeEach()
Now this script properly instructs Jasmine to create a new instance of Counter before running each spec of your suite. Let’s see how to run it.
14.2. Running Jasmine scripts with Karma
For projects that don’t use Angular CLI, you need to do lots of manual configurations to run Jasmine tests. Without Angular CLI, you start with installing Jasmine and its type definition files as follows:
npm install jasmine-core @types/jasmine --save-dev
Then you need to create a test.html file that includes script tags to load Jasmine and your specs (the TypeScript code needs to be precompiled into JavaScript). Finally, you need to manually load test.html in each browser you care about and watch whether your tests fail or pass.
But running unit tests from the command line is a better option, because that way you can integrate tests into the project build process. This is one of the main reasons for using a command-line test runner called Karma (see https://karma-runner.github.io). Along with that benefit, Karma has multiple useful plugins and can be used with many JavaScript testing libraries for testing against all major browsers.
Karma is used for testing JavaScript code written with or without frameworks. Karma can run tests to check whether your application works properly in multiple browsers (Chrome, Firefox, Internet Explorer, and so on). In non-Angular CLI projects, you can install Karma and the plugins for Jasmine, Chrome, and Firefox, as shown in the following listing.
Listing 14.6. Installing Karma
npm install karma karma-jasmine --save-dev           1
npm install karma-chrome-launcher --save-dev         2
npm install karma-firefox-launcher --save-dev        3
- 1 Installs Karma and its Jasmine plugin
- 2 Installs the plugin to test in Chrome
- 3 Installs the plugin to test in Firefox
Then you need to prepare a configuration file, karma.conf.js, for your project—but you’re spoiled by Angular CLI, which installs and configures everything you need for testing Angular apps, including Jasmine and Karma. We’ve generated a new project with Angular CLI and added the code described in the previous section to test the Counter class there. You’ll find this project in the hello-jasmine directory. Figure 14.3 shows the structure of this project, marking all test-related files and directories.
Figure 14.3. The hello-jasmine project

At the very top, you see the e2e directory, and at the bottom, the protractor.conf.js file, which were generated for end-to-end testing, described in section 14.4.
The counter.spec.ts file is the manually written test script described in the previous section. The app.component.spec.ts file was generated by Angular CLI for testing the AppComponent, and you’ll see its content in section 14.3.1.
The generated file test.ts is the main testing script that loads all test scripts. The karma.conf.js file is used by the Karma runner as soon as you run the ng test command, which compiles and runs unit tests. After the tests are compiled, ng test uses the compiled script test.js to load the Angular testing library and all the .spec.ts files, and start the Karma runner. Figure 14.4. shows the output of the ng test command that in the hello-jasmine project.
Figure 14.4. Running ng test in the hello-jasmine project

To run the tests, Karma starts the Chrome browser (the only one configured by Angular CLI) and runs five tests that end successfully. Why five? You wrote only two tests in the counter.spec.ts file, right? Angular CLI also generates the app.component .spec.ts file, which includes the test suite with three it() functions defined. Karma executes all files that have an extension .spec.ts.
Note
Angular CLI projects include the karma-jasmine-html-reporter package, and if you want to see the test results in the browser, open the URL http://localhost:9876.
You don’t want to run tests from app.component.spec.ts at this point, so let’s turn them off. If you want the test runner to skip some tests, rename their spec function from it() to xit(). Here, x is for exclude. If you want to skip the entire test suite, rename describe() to xdescribe().
If you exclude the test suite in app.component.spec.ts, the tests will be automatically rerun, reporting that two tests ran successfully (those that you wrote for Counter), and three specs were skipped (those that were generated by Angular CLI):
Chrome 63.0.3239 (Mac OS X 10.11.6): Executed 2 of 5 (skipped 3)
 SUCCESS (0.03 secs / 0.002 secs)
As the number of specs grows, you may want to execute just some of them to see the results faster. Renaming a spec function from it() to fit() (f is for force) will execute only these tests while skipping the rest.
Let’s say you know how to test the methods of your Counter class, but you still may have a million-dollar question: Why test such simple functions like increment() and decrement()? Isn’t it obvious that they’ll always work fine? In the real world, things change, and what used to be simple becomes not so simple anymore.
Say the business logic for the decrement() function changes, and the new requirement is not to allow counter to be less than 2. The developer changes the decrement() code to look like this the following.
decrement(){
    this.counter >2 ? this.counter--: this.counter;
  }
Suddenly, you have two possible execution paths:
- The current counter value is greater than 2.
- The current counter value is equal to 2.
If you had the unit test for decrement(), the next time you run ng test it would fail, as follows:
Chrome 63.0.3239 (Mac OS X 10.11.6)
    Counter should decrement the counter by 1
 FAILED                                              1
 Expected 0 to be -1.                                2
     at Object.<anonymous> chapter14/hello-jasmine/
    src/app/counter/counter.spec.ts:18:27)
    ...
Counter should decrement the counter by 1
FAILED 1
Expected 0 to be -1. 2
at Object.<anonymous> chapter14/hello-jasmine/
src/app/counter/counter.spec.ts:18:27)
...
- 1 The text describes the spec that failed.
- 2 The assertion failed because the code under test didn’t decrement the counter that was equal to zero.
The fact that your unit test failed is a good thing, because it tells you that something changed in the application logic—in decrement(). Now the developer should see what changed and add another spec to the test suite so you have two it() blocks testing both execution paths of decrement() to ensure that it always works properly.
In the real world, business requirements change pretty often, and if developers implement them without providing unit tests for the new functionality, your app can become unreliable and will keep you (or production support engineers) awake at night.
Tip
The output of the failed test may not be easy to read because it can include multiple lines of error stack trace. Consider using the continuous testing tool called Wallaby (see https://wallabyjs.com/docs), which shows you a short error message in your IDE right next to the code of the spec that failed.
Note
In chapter 12, section 12.3.6, we explained how to automate the build process by running a sequence of npm scripts. If you add ng test to your build command, the build will be aborted if any of the unit tests fail. For example, the build script can look like this: "build": "ng test && ng build".
It’s great that Angular CLI generates a Karma config file that works, but sometimes you may want to modify it based on your project needs.
14.2.1. Karma configuration file
When Angular CLI generates a new project, it includes karma.conf.js preconfigured to run Jasmine unit tests in the Chrome browser. You can read about all available configuration options at http://mng.bz/82cQ, but we’ll just highlight some of them that you may want to modify in your projects. The generated karma.conf.js file is shown in the following listing.
Listing 14.7. Angular CLI-generated karma.conf.js file
module.exports = function (config) {
  config.set({
    basePath: '',
    frameworks: ['jasmine', '@angular/cli'],
    plugins: [
      require('karma-jasmine'),
      require('karma-chrome-launcher')                 1
       require('karma-jasmine-html-reporter'),
      require('karma-coverage-istanbul-reporter'),     2
       require('@angular/cli/plugins/karma')           3
     ],
    client:{
      clearContext: false // leave Jasmine Spec Runner
                          // output visible in browser
    },
    coverageIstanbulReporter: {
      reports: [ 'html', 'lcovonly' ],
      fixWebpackSourcePaths: true
    },
    angularCli: {
      environment: 'dev'
    },
    reporters: ['progress',                            4
                 'kjhtml'],                            5
     port: 9876,                                       6
     colors: true,
    logLevel: config.LOG_INFO,
    autoWatch: true,
    browsers: ['Chrome'],                              7
     singleRun: false                                  8
   });
};
- 1 Includes the plugin for testing in Chrome
- 2 Includes the code coverage reporter
- 3 Includes the Angular CLI plugin for Karma
- 4 Reports test progress on the console
- 5 Uses karma-jasmine-html-reporter
- 6 Runs the HTML reporter on this port
- 7 Lists the browsers to be used in tests
- 8 Runs in a watch mode
Note
If you want Karma to print a message about each completed spec on the console, add karma-mocha-reporter as devDependency in package.json, add the line require('karma-mocha-reporter') to karma.conf.js, and replace the progress reporter with mocha. If you run tests in continuous integration (CI) servers, use the karma-junit-reporter that can write test results into a file in JUnit XML format.
This configuration file uses only the Chrome plugin, but in real-world apps, you want to run tests in several browsers. The next section shows you how to add Firefox to the list of browsers to be used in tests.
Karma can report how well your code is covered with tests using the Istanbul reporter, and you can run the following command to generate the coverage report:
ng test --code-coverage
This will create a directory called coverage that will include an index.html file that loads the coverage report. For example, your hello-jasmine project includes one AppComponent and the Counter class, which are completely covered with unit tests. The generated report is shown in figure 14.5.
Figure 14.5. Test coverage report for the hello-jasmine project

Note
Some organizations impose strict rules for code coverage, such as that at least 90% of the code must be covered with unit tests or the build must fail. To enforce such coverage, install the npm package karma-istanbul-threshold and add the istanbulThresholdReporter section to karma.conf.js. For more details, see http://mng.bz/544u.
14.2.2. Testing in multiple browsers
Typically, a developer doesn’t manually test each and every code change in multiple browsers. Chrome is a preferred browser for dev mode, and you may be unpleasantly surprised when the tester reports that your app works well in Chrome, but produces errors in Safari, Firefox, or Internet Explorer. To eliminate these surprises, you should run unit tests in all browsers that matter to your users.
Luckily, that’s pretty easy to set up with Karma. Let’s say you want Karma to run tests not only in Chrome, but in Firefox as well (you have to have Firefox installed on your computer). First, install the karma-firefox-launcher plugin:
npm i karma-firefox-launcher --save-dev
Then, add the following line in the plugins section of karma.conf.js:
require('karma-firefox-launcher'),
Finally, add Firefox to the browsers list in karma.conf.js, so that it looks as follows:
browsers: ['Chrome', 'Firefox'],
Tip
If you need to set up a CI environment on a Linux server, you can either install Xvfb (a virtual display server) or use a headless browser (a browser without a UI). For example, you can specify ChromeHeadless to use the headless Chrome browser.
Now if you run the ng test command, it’ll run the tests in both Chrome and Firefox. Install Karma plugins for each browser you care about, and this will eliminate surprises like “But it worked fine in Chrome!”
We’ve gone over the basics of writing and running unit tests. Let’s see how to unit-test Angular components, services, and the router.
14.3. Using the Angular testing library
Angular comes with a testing library that includes the wrappers for some Jasmine functions and adds such functions as inject(), async(), fakeAsync(), and others.
To test Angular artifacts, you need to create and configure an Angular module for the class under test using the configureTestingModule() method of the TestBed utility, which allows you to declare modules, components, providers, and so on. For example, the syntax for configuring a testing module looks similar to configuring @NgModule(), as you can see in the following listing.
Listing 14.8. Configuring the testing module for your app
beforeEach(async(() => {                    1
   TestBed.configureTestingModule({         2
     declarations: [
      AppComponent                          3
     ],
  }).compileComponents();                   4
 }));
- 1 Runs this code asynchronously before each spec
- 2 Configures the testing module
- 3 Lists components under test
- 4 Compiles components
The beforeEach() function is used in test suites during the setup phase. With it you can specify the required modules, components, and providers that may be needed by each test. The async() function runs in the Zone and may be used with asynchronous code. The async() function doesn’t complete until all of its asynchronous operations have been completed or the specified timeout has passed.
In an Angular app, the components are “magically” created and services are injected, but in test scripts, you’ll need to explicitly instantiate components and invoke the inject() function or the TestBed.get() function to inject services. If a function under test invokes asynchronous functions, you should wrap such it into async() or fakeAsync().
async() will run the function(s) under test in the Zone. If your test code uses time-outs, observables, or promises, wrap it into async() to ensure that the expect() function is invoked after all the asynchronous functions are complete. If you don’t do this, expect() may be executed before the results of async functions are in, and the test will fail. The async() function waits for async code to be finished, which is a good thing. On the other hand, such a wait may slow down the tests, and the fakeAsync() function allows you to eliminate the wait.
fakeAsync() identifies the timers in the code under test and replaces the code inside setTimeout(), setInterval(), or the debounceTime() with immediately executed functions as if they’re synchronous, and executes them in order. It also gives you more-precise time control with the tick() and flush() functions, which allow you to fast-forward the time.
You can optionally provide the time value in milliseconds for fast-forwarding, so there’s no need to wait, even if the async function uses setTimeout() or Observable.interval(). For example, if you have an input field that uses the RxJS operator myInputField.valueChanges.debounceTime(500).subscribe(), you can write tick (499) to fast-forward the time by 499 milliseconds and then assert that the subscriber didn’t get the data entered in the input field.
You can use the tick() function only inside fakeAsync(). Calling tick() without the argument means that you want the code that follows to be executed after all pending asynchronous activities finish.
To see the tests from this section in action, open the unit-testing-samples project that comes with this chapter, run npm install, and then run ng test.
Let’s see some of the APIs of the Angular testing library, starting with reviewing the code of the app.component.spec.ts file generated by Angular CLI.
14.3.1. Testing components
Components are classes with templates. If a component’s class contains methods implementing some application logic, you can test them as you would any other function. But more often, you’ll be testing the UI to see that the bindings work properly and that the component template displays expected data.
Under the hood, an Angular component consists of two parts: an instance of the class and the DOM element. Technically, when you write a unit test for a component, it’s more of an integration test, because it has to check that the instance of the component class and the DOM object work in sync.
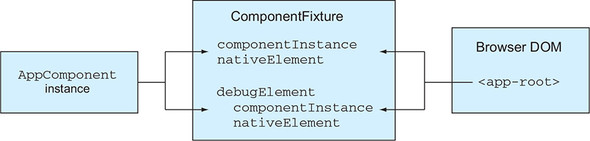
The Angular testing library offers the TestBed.createComponent() method, which returns a ComponentFixture object that gives you access to both the component and the native DOM object of the rendered template.
To access the component instance, you can use the ComponentFixture.componentInstance property, and to access the DOM element, use ComponentFixture.nativeElement. If you want to get access to the fixture’s API (for example, to access the component’s injector, run CSS query selectors, find styles or child nodes, or trigger an event handler), use its DebugElement, as in ComponentFixture.debugElement.componentInstance and ComponentFixture.debugElement.nativeElement, respectively. Figure 14.6 illustrates some of the properties of the ComponentFixture object, which also exist in debugElement.
Figure 14.6. Properties of ComponentFixture
To update the bindings, you can trigger the change detection cycle on the component by invoking the detectChanges() method on the fixture. After change detection has updated the UI, you can run the expect() function to check the rendered values.
After configuring the test module, you usually perform the following steps to test a component:
1. Invoke TestBed.createComponent() to create a component.
2. Use a reference to componentInstance to invoke the component’s methods.
3. Invoke ComponentFixture.detectChanges() to trigger change detection.
4. Use a reference to nativeElement to access the DOM object and check whether it has the expected value.
Note
If you want change detection to be triggered automatically, you can configure the testing module with the provider for the ComponentFixtureAutoDetect service. Although this seems to be a better choice than manually invoking detectChanges(), this service only notices the asynchronous activities and won’t react to synchronous updates of component properties.
Let’s examine the code of the generated app.component.spec.ts file and see how it performs these steps. This Angular CLI–generated script declares a test suite containing three specs:
1. Check that the component instance is created.
2. Check that this component has a title property with the value app.
3. Check that the UI has an <h1> element with the text “Welcome to app!”
The code is shown in the following listing.
Listing 14.9. app.component.spec.ts
import { TestBed, async } from '@angular/core/testing';          1
import { AppComponent } from './app.component';

describe('AppComponent', () => {
  beforeEach(async(() => {                                       2
     TestBed.configureTestingModule({                            3
       declarations: [
        AppComponent
      ],
    }).compileComponents();                                      4
   }));
  it('should create the app', async(() => {
    const fixture = TestBed.createComponent(AppComponent);       5
     const app = fixture.debugElement.componentInstance;         6
     expect(app).toBeTruthy();                                   7
   }));
  it(`should have as title 'app'`, async(() => {
    const fixture = TestBed.createComponent(AppComponent);
    const app = fixture.debugElement.componentInstance;
    expect(app.title).toEqual('app');
  }));
  it('should render title in a h1 tag', async(() => {
    const fixture = TestBed.createComponent(AppComponent);
    fixture.detectChanges();                                     8
     const compiled = fixture.debugElement.nativeElement;        9
     expect(compiled.querySelector('h1').textContent)
                       .toContain('Welcome to app!');            10
   }));
});
- 1 Imports the required modules from the Angular testing library
- 2 Wraps component compilation into async()
- 3 In setup phase, configures the testing module asynchronously in the Zone
- 4 Compiles component(s) to inline styles and templates
- 5 Instantiates the AppComponent
- 6 Gets a reference to the component’s instance
- 7 Checks that the coercion of the app to a Boolean yields true
- 8 Triggers change detection to update the component’s DOM object
- 9 Gets a reference to the DOM object
- 10 Checks that the DOM object has the <h1> element containing this text
Note that the functions that instantiate the component are wrapped into async(). That’s because a component can have a template and styles in separate files, and reading files is an asynchronous operation.
Invoking detectChanges() triggers change detection that updates the bindings on the DOM elements. After this is done, you can query the content of the DOM elements to assure that the UI shows the expected values.
Note
Currently, Angular CLI generates the test with repeating createComponent() invocations. A better solution would be to write another beforeEach() function and create the fixture there.
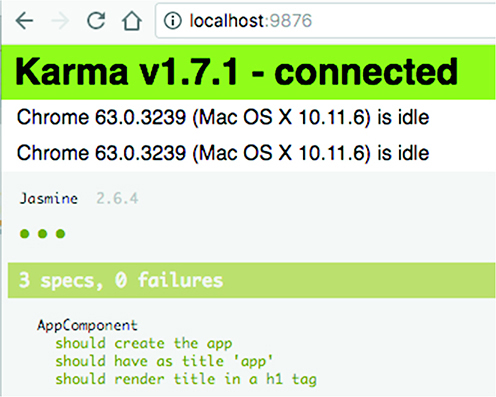
Running ng test in a newly generated project will report that all tests passed. The browser opens at http://localhost:9876, and you’ll see the testing report shown in figure 14.7.
Figure 14.7. A successful run of ng test
Let’s see what happens if you change the value of the title property in the AppComponent from app to my app. Because ng test runs in watch mode, the tests will automatically rerun, you’ll see the messages about two failed specs on the console, and the list of specs will look like figure 14.8 (the failed specs are shown in red if you have the e-book).
Figure 14.8. Spec list with failures
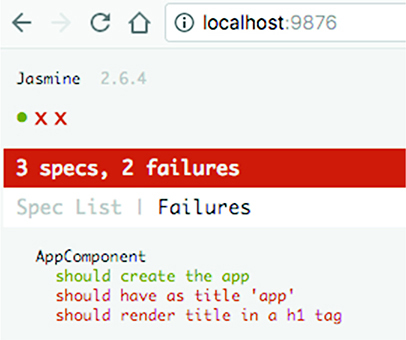
The first failed spec message reads “AppComponent should have as title ‘app’,” and the second message is “AppComponent should render title in a h1 tag.” These are the messages provided in the it() functions. Clicking any of the failed specs will open another page, providing more details and the stack trace.
Tip
Keep in mind that if your component uses lifecycle hooks, they won’t be called automatically. You need to call them explicitly, as in app .ngOnInit().
Let’s add another spec in the next listing to ensure that if the title property changes in the AppComponent class, it’ll be properly rendered in the UI.
Listing 14.10. A spec for the title update
it('should render updated title', async(() => {
  const fixture = TestBed.createComponent(AppComponent);
  const app = fixture.debugElement.componentInstance;
  app.title = 'updated app!';                                1
   fixture.detectChanges();                                  2
   const compiled = fixture.debugElement.nativeElement;
  expect(compiled.querySelector('h1').textContent)
          .toContain('Welcome to updated app!');             3
 }));
- 1 Updates the title property
- 2 Forces change detection
- 3 Checks that the UI reflects the updated title
Now ng test will run this extra spec and will report that it successfully finished. In this section, you used the generated test for AppComponent, but you’ll see another script that tests a component in the hands-on section.
A typical component uses services for data manipulation, and you create mock services that return hardcoded (and the same) values to concentrate on testing the component’s functionality. The specs for components should test only components; services should be tested separately.
14.3.2. Testing services
A service is a class with one or more methods, and you unit-test only the public ones, which in turn may invoke private methods. In Angular apps, you specify providers for services in @Component or @NgModule, so Angular can properly instantiate and inject them. In test scripts, you also declare providers for services under test, but you do this inside TestBed.configureTestingModule() in the setup phase.
Also, if in Angular apps you can use the provider’s token in the class constructor to inject a service, in tests, the injection is done differently. For example, you can explicitly invoke the inject() function. The other option to instantiate and inject a service is to use the TestBed.get() method, which uses the root injector, as shown in figure 14.9. This will work if the service provider is specified in the root testing module.
Figure 14.9. Injecting a service into the test script

Component-level injectors can be used as follows:
fixture.debugElement.injector.get(ProductService);
Let’s generate a product service by running the following Angular CLI command:
ng g s product
This command will generate the files product.service.ts and product.service.spec.ts. The latter will contain the boilerplate code shown in the following listing.
Listing 14.11. product.service.spec.ts
import { TestBed, inject } from '@angular/core/testing';
import { ProductService } from './product.service';

describe('ProductService', () => {
  beforeEach(() => {
    TestBed.configureTestingModule({
      providers: [ProductService]                  1
     });
  });

  it('should be created',
     inject([ProductService],                      2
             (service: ProductService) => {
               expect(service).toBeTruthy();}      3
      )
  );
});
- 1 Configures the provider
- 2 Injects the service
- 3 Implements the testing logic
If you needed to inject more than one service, the inject() function would list an array of DI tokens followed by the function with the argument list corresponding to the names of tokens:
inject([ProductService, OtherService],
    (prodService: ProductService, otherService: OtherService) => {...})
As you add methods to the ProductService class, you could test them similarly to testing methods in the Counter class, as you did earlier, but you need to consider a special case when a service relies on another service, such as on HttpClient. Making HTTP requests to a server during unit tests would slow them down. Besides, you don’t want your unit tests to fail if the server’s down. Remember, unit tests are for testing isolated pieces of code.
The code that comes with this chapter includes the unit-testing-samples project and the app called readfile. It includes ProductService, which uses HttpClient to read the data/products.json file, as shown in the following listing.
Listing 14.12. Reading data/products.json in a service
export class ProductService {

  constructor(private httpClient: HttpClient ) {}                      1

  getProducts(): Observable<Product[]> {                               2
     return this.httpClient.get<Product[]>('/data/products.json');
  }
}
- 1 Injects HttpClient
- 2 Reads the file
Let’s write a unit test for the getProducts() method. You don’t want your test to fail if someone removes the data/products.json file, because that wouldn’t mean there’s an issue in getProducts(). You’ll mock the HttpClient with the help of HttpTestingController from HttpClientTestingModule. HttpTestingController doesn’t make an HTTP request but allows you to emulate it using hardcoded data.
To add the hardcoded data to the response body, you’ll use the HttpTestingController.flush() method, and to emulate an error, you’ll use HttpTestingController.error(), as shown in the following listing.
Listing 14.13. product.service.spec.ts
import {TestBed, async} from '@angular/core/testing';
import {HttpClientTestingModule, HttpTestingController }
from '@angular/common/http/testing';
import {ProductService} from './product.service';
import {Product} from './product';

describe('ProductService', () => {
  let productService: ProductService;
  let httpMock: HttpTestingController;

  beforeEach(() => {
    TestBed.configureTestingModule({
      imports: [HttpClientTestingModule],                                 1
       providers: [ProductService]
    });

    productService = TestBed.get(ProductService);                         2
     httpMock = TestBed.get(HttpTestingController);                       3
   });

  it('should successfully get products', async(() => {
    const productData: Product[] =
         [{ "id": "0", "title": "First Product", "price": 24.99 }];       4
     productService.getProducts()
           .subscribe(res => expect(res).toEqual(productData));           5

    let productsRequest = httpMock.expectOne('/data/products.json');
    productsRequest.flush(productData);                                   6
   }));

  it('should return error if request for products failed', async( () => {
    const errorType = 'CANNOT_LOAD_PRODUCTS' ;                            7
     productService.getProducts()
      .subscribe(() => {},                                                8
           errorResponse =>
                expect(errorResponse.error.type).toEqual(errorType));     9

    let productsRequest = httpMock.expectOne('/data/products.json');

    productsRequest.error(new ErrorEvent (errorType));                    10
   }));

  afterEach(() => httpMock.verify());                                     11
 });
- 1 Includes HttpClientTestingModule to the testing module
- 2 Injects ProductService
- 3 Injects HttpTestingController
- 4 Prepares hardcoded product data
- 5 Subscribes to the response and asserts the result
- 6 Sends the product data to the client
- 7 Prepares the error message
- 8 Doesn’t handle product data
- 9 Asserts that the expected error was received
- 10 Sends the error to the client
- 11 Asserts that there are no outstanding requests
In the first spec, you hardcode the data for one product and then invoke getProducts() and subscribe to the response.
Note
Jasmine offers a spyOn() function that could intercept the specified function (for example, getProducts()), where you could just return a stub object with the expected data. But using such a spy wouldn’t make an HTTP request. Because you use HttpTestingController, the HTTP request is made and will be intercepted by HttpTestingController, which won’t be making a real HTTP request to read products.json but will take the hardcoded product data and send it through the HTTP machinery.
You expect the getProducts() method to make a single request to /data/products .json and return its mock, and this is what expectOne() is for. If no such request has been made, or if more than one such request has been made, the spec will fail.
With the real HttpClient service, invoking the subscribe() method would result in receiving either the data or an error, but with HttpTestingController, the subscriber won’t get any data until you invoke flush() or error(). Here, you provide hardcoded data in the response body.
When Karma opens the browser with the test results, you can open Chrome Dev Tools in the Sources tab, find the source code for your spec file, and add breakpoints to debug your test code just as you’d do with any TypeScript code. In particular, if you place a breakpoint in the line that invokes flush() in listing 14.13, you’ll see that it’s invoked before the code in subscribe().
The verify() method tested all HTTP requests, and there are no outstanding ones. You assert this in the teardown phase after running each spec.
Note that the code in each spec is wrapped into the async() function. This ensures that your expect() calls will be made after all asynchronous calls from the spec are complete.
Tip
You can read about other techniques for replacing real services with mocks, stubs, and spies in the Angular testing documentation at https://angular.io/guide/testing.
Now let’s see how to test the router.
14.3.3. Testing components that use routing
If a component includes routing, you may want to test different navigation functionality. For example, you may want to test that the router properly navigates where it’s supposed to, that parameters are properly passed to the destination component, and that the guards don’t let unauthorized users visit certain routes.
To test router-related functionality, Angular offers the RouterTestingModule, which intercepts navigation but doesn’t load the destination component. For the test, you need the router configuration; you can either use the same one that’s used in the application or create a separate configuration just for testing. The latter could be a better option if your route configuration includes many components.
A user can navigate the app either by interacting with the application or by entering a URL directly in the browser’s address bar. The Router object is responsible for navigation implemented in your app code, and the Location object represents the URL in the address bar. These two objects work in sync.
To test if the router properly navigates your app, invoke navigate() and navigateByUrl() in your specs, and pass parameters, if needed. The navigate() method takes an array of routes and parameters as an argument, whereas navigateByUrl() takes a string representing the segment of the URL you want to navigate to.
If you use navigate(), you specify the configured path and route params, if any. If the router is properly configured, it should update the URL in the address bar of the browser. To illustrate this, you’ll reuse the code of one of the apps from chapter 3, but you’ll add the spec file. In that app, the router configuration for the AppComponent includes the path /product/:id, as shown in the following listing.
Listing 14.14. A fragment from app.routing.ts
export const routes: Routes = [
  {path: '',            component: HomeComponent},                1
   {path: 'product/:id', component: ProductDetailComponent}       2
 ];
- 1 A default route
- 2 A route with a parameter
When the user clicks the Product Details link, the app navigates to the ProductDetailComponent, as shown in the following listing.
Listing 14.15. app.component.ts
@Component({
  selector: 'app-root',
  template: `
        <a [routerLink]="['/']">Home</a>
        <a id="product" [routerLink]="['/product', productId]">   1
            Product Detail</a>
        <router-outlet></router-outlet>
    `
})
export class AppComponent {
  productId = 1234;                                               2
 }
- 1 A link to navigate to the product-detail view
- 2 The value to be passed to the product-detail view
In the app.component.spec.ts file, you’ll test that when the user clicks the Product Details link, the URL includes the segment /product/1234. The Router and Location objects will be injected by using the TestBed.get() API. To emulate the click on the Product Details link, you need to get access to the corresponding DOM object, which you do by using the By.css() API. The utility class By has the css() method, which matches elements using the provided CSS selector. Because your app component has two links, you assign id=product to the product-details link so you can get ahold of it by invoking By.css('#product').
To emulate the click on the link, you use the triggerEventHandler() method with two arguments. The first argument has the value click that represents the click event. The second argument has the value {button: 0} that represents the event object. The RouterLink directive expects the value to include the property button with the number that represents the mouse button, and zero is for the left mouse button, as shown in the following listing.
Listing 14.16. app.component.spec.ts
// imports omitted for brevity
describe('AppComponent', () => {
  let fixture;
  let router: Router;
  let location: Location;

    beforeEach(async(() => {
      TestBed.configureTestingModule({
        imports: [RouterTestingModule.withRoutes(routes)],                1
         declarations: [
          AppComponent, ProductDetailComponent, HomeComponent
        ]}).compileComponents();
    }));

  beforeEach(fakeAsync(() => {
    router = TestBed.get(Router);                                         2
     location = TestBed.get(Location);                                    3
     fixture = TestBed.createComponent(AppComponent);
    router.navigateByUrl('/');
    tick();
    fixture.detectChanges();                                              4
   }));

  it('can navigate and pass params to the product detail view',
   fakeAsync(() => {
    const productLink = fixture.debugElement.query(By.css('#product'));   5
     productLink.triggerEventHandler('click', {button: 0});               6
     tick();
    fixture.detectChanges();
    expect(location.path()).toEqual('/product/1234');                     7
   }));
});
- 1 Loads the routes configuration
- 2 Injects the Router object
- 3 Injects the Location object
- 4 Triggers change detection
- 5 Get access to the product-details link
- 6 Clicks the link
- 7 Checks the assertion
The fakeAsync() function wraps the navigation code (the asynchronous operation), and the tick() function ensures that the asynchronous navigation finishes before you run the assertion.
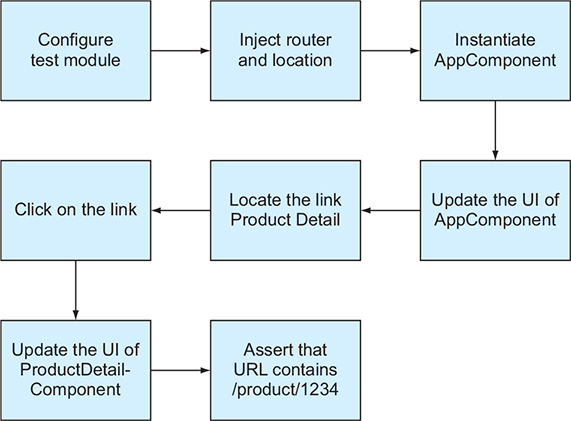
Figure 14.10 shows the sequence of actions performed by the preceding script.
Figure 14.10. Steps in testing navigation
The ng test command will run all unit tests in the unit-testing-samples project, which has three apps. All eight specs should successfully complete. The eighth spec will report “AppComponent can navigate and pass params to the product detail view.”
Note
To make unit testing a part of your automated build process, integrate the ng test command into the build process by adding && ng test to the npm build script described in section 12.3.6 in chapter 12.
Unit testing the functionality implemented in the route guards is another practical use case. In chapter 4, we covered such guards as CanActivate, CanDeactivate, and Resolve. Because guards are services, you can test them separately, as explained in the preceding section.
This concludes our coverage of unit-testing basics. Unit tests assert that each artifact of your Angular app works as expected in isolation. But how can you ensure that several components, services, and other artifacts play well together without the need to manually test each workflow?
14.4. End-to-end testing with Protractor
End-to-end (E2E) testing is for testing the entire app workflow by simulating user interaction with the app. For example, the process of placing an order may use multiple components and services. You can create an E2E test to ensure that this workflow behaves as expected. Also, if in unit tests you’re mocking dependencies, E2E tests will use the real ones.
To manually test a specific workflow like the login functionality, a QA engineer prepares an ID/password that works, opens the login page, enters the ID/password, and clicks the Login button. After that, QA wants to assert that the landing page of your app is successfully rendered. The tester can also run another test to ensure that if the wrong ID/password is entered, the landing page won’t be rendered. This is a manual way of E2E testing of the login workflow.
Protractor is a testing library that allows you to test app workflows simulating user actions without the need to perform them manually. You still need to prepare test data and script the test logic, but the tests will run without human interaction.
By default, Protractor uses the Jasmine syntax for tests, unless you manually configure another supported framework (see http://mng.bz/d64d). So your E2E test scripts will use already familiar describe() and it() blocks plus an additional API.
14.4.1. Protractor basics
While manually testing app workflows, a user “drives” the web browser by entering data, selecting options, and clicking buttons. Protractor is based on Selenium WebDriver (see http://www.seleniumhq.org/docs/03_webdriver.jsp) that can automatically drive the browser, based on the provided scripts. Protractor also includes an Angular-specific API for locating UI elements.
In your setup, Protractor will run the web browser and tests on the same machine, so you need Selenium WebDriver for the browser(s) you want to run the tests in. The other option would be to set up a separate machine for testing and run Selenium Server there. Selenium offers implementations of WebDriver for different programming languages, and Protractor uses the one called WebDriverJS.
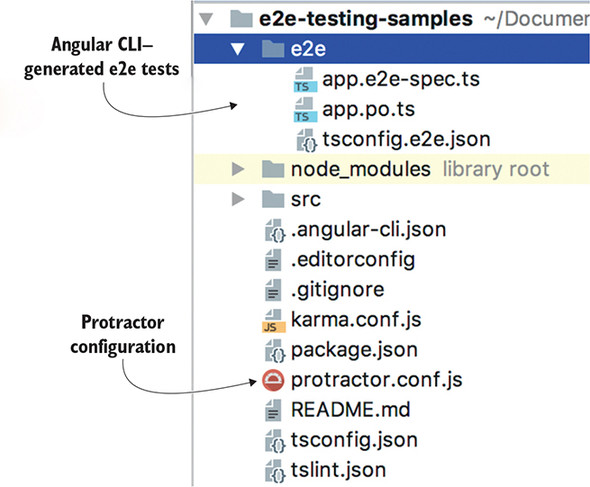
When you generate a new project with Angular CLI, it includes Protractor and its configuration files as well as the e2e directory with sample test scripts. Prior to Angular 6, the e2e directory included three files, as shown in figure 14.11. Starting from Angular 6, the generated e2e directory includes the configuration file protractor .conf.js.
Figure 14.11. Angular CLI-generated E2E code
Tip
Starting from Angular CLI 6, when you generate a new project, it includes two apps: one is a project for your app, and another app contains the basic E2E tests.
You run the E2E tests by entering the ng e2e command, which loads the test scripts based on the configuration in the protractor.conf.js file. That file by default assumes that all E2E test scripts are located in the e2e directory, and the app has to be launched in Chrome.
Listing 14.17. A fragment from protractor.conf.js
specs: [
  './e2e/**/*.e2e-spec.ts'       1
 ],
capabilities: {
  'browserName': 'chrome'        2
 },
directConnect: true              3
- 1 Where the test scripts are
- 2 Which browser to run your app in
- 3 Connects to the browser directly without the server
The ng e2e command builds the app bundles, starts the Node instance, and loads the test scripts, Protractor, and Selenium WebDriver. Protractor launches your app in the browser(s), and your test scripts communicate with the browser using the API of Protractor and WebDriverJS. Figure 14.12 shows the E2E test players used in this chapter’s examples.
Figure 14.12. Angular CLI–generated E2E code

Prior to running your test scripts, Protractor unzips the browser-specific driver (for example, ChromeDriver) into the node_modules/webdriver-manager/selenium folder so Selenium WebDriver can properly communicate with the browser. During the tests, Protractor will launch the browser, and after the tests finish, Protractor will close it.
Protractor can use scripts created in different unit-testing frameworks (Jasmine is a default one), and each of them may have a different API for locating and representing page elements. To spare you from changing E2E scripts if you decide to switch to another unit-testing framework, Protractor comes with an API (see www.protractortest.org/#/api) that works with all supported frameworks:
- browser provides an API to control the browser, for example getCurrentUrl(), wait(), and so on.
- by is a locator for finding elements in Angular applications by ID, CSS, button or link text, and so forth.
- element offers an API for finding and working with a single element on a web page.
- element.all is used for finding and working with collections of elements, for example, iterating over the elements of an HTML list or table.
Tip
$("selector") is an alias for element(by.css("selector")), and $$("selector") is an alias for element.all(by.css("selector")).
Although in Angular apps you can use the structural directive *ngFor for rendering a collection of UI elements, in tests you should use element.all for referring to and finding elements in a collection.
Tip
Though Protractor defines its own API, it also exposes the WebDriver API, as in browser.takeScreenshot().
The E2E tests load the real app in the browser, locate elements on the page, and can programmatically click buttons and links, fill out forms with data, submit them to the server, and then again locate the elements on the resulting page to ensure that they have the expected content. You can write an E2E test using one of the following approaches:
- In the same script, locate DOM elements by using their IDs or CSS classes and assert that the application logic works correctly. The IDs or CSS classes may change over time, so if you have several scripts testing the same page, you need to update each script accordingly.
- Implement the Page Object design pattern (see https://martinfowler.com/bliki/PageObject.html) by writing the expectations and assertions in one file, and in another, write the code that interacts with the UI elements and invokes the app’s API. The page object can implement UI interaction with either the entire page or its part (for example, the toolbar), and can be reused by multiple tests. Should the CSS of the HTML elements change, you’ll need to modify a single page object script.
Tests written using the first approach are difficult to read because they don’t provide an easy way of understanding which workflows are implemented on the page. You’ll use the second approach, where all UI interactions are implemented in the page objects (.po.ts files), and the specs with assertions are in the scripts (.e2e-spec.ts files). This approach reduces code duplication because you don’t need to copy-paste the element locators if multiple specs need to access the same HTML element. A page object can serve as a single place for simulating user activity for important workflows, such as login() or getProducts(), rather than having these activities scattered throughout the tests.
Let’s look at the E2E test generated by Angular CLI for the new projects.
14.4.2. Angular CLI–generated tests
When you generate a new project with Angular CLI, it creates a directory, e2e, that contains three files:
- app.po.ts— The page object for AppComponent
- app.e2e-spec.ts— The E2E test for the generated AppComponent
- tsconfig.e2e.json— The TypeScript compiler options
The app.po.ts file contains a simple AppPage class with just two methods, as shown in listing 14.18. The first one contains the code to navigate to the root page of the component, and the second has code to locate the HTML element by CSS and get its text. This page object is the only place that contains code locating elements by CSS.
Listing 14.18. The generated app.po.ts file
import {browser, by, element} from 'protractor';
export class AppPage {
  navigateTo() {
    return browser.get('/');                            1
   }

  getParagraphText() {
    return element(by.css('app-root h1')).getText();    2
   }
}
- 1 Navigates to the default route
- 2 Gets the text from the <h1> element
The code for the app.e2e-spec.ts file is shown in listing 14.19. This test looks very similar to the unit tests shown in the last section. Note that this file doesn’t include the code that directly interacts with the HTML page; it uses the API of the page object instead.
Listing 14.19. The generated app.e2e-spec.ts file
import {AppPage} from './app.po';

describe('e2e-testing-samples App', () => {
  let page: AppPage;

  beforeEach(() => {
    page = new AppPage();                                            1
   });

  it('should display welcome message', () => {
    page.navigateTo();                                               2
     expect(page.getParagraphText()).toEqual('Welcome to app!');     3
   });
});
- 1 Creates an instance of the page
- 2 Navigates to the default route
- 3 Asserts that the text returned by getParagraphText() is correct
Because app.e2e-spec.ts doesn’t contain any element locators, it’s easy to follow the test logic: you navigate to the landing page and retrieve the content of a paragraph. You can run the preceding E2E test using the command ng e2e.
Note
E2E tests run slower that unit tests, and you don’t want to run them each time you save a file, as you did with ng test in the last section. Besides, instead of creating E2E tests for each and every workflow, you may want to identify the most important ones and run tests just for them.
Now that you’ve seen how generated tests work, you can write your own E2E test.
14.4.3. Testing a login page
The E2E test from the preceding section didn’t include a workflow that would require data entry and navigation. In this section, you’ll write a test for an app that uses a form and routing. The code that comes with this chapter includes a project called e2e-testing-samples with a simple app that has a login page and a home page. The routes in this app are configured in the following listing.
Listing 14.20. Route configurations
[{path: '', redirectTo: 'login', pathMatch: 'full'},      1
  {path: 'login', component: LoginComponent},             2
  {path: 'home', component: HomeComponent}]               3
- 1 Redirects the base URL to the login page
- 2 Renders the login component
- 3 Renders the home component
The template of the HomeComponent has just one line:
<h1>Home Component</h1>
The login component in the following listing has a Login button and a form with two fields for entering ID and password. If a user enters Joe as the ID and password as the password, your app navigates to the home page; otherwise, it stays on the login page and shows the message “Invalid ID or password.”
Listing 14.21. login.component.ts
@Component({
  selector: 'app-home',
  template: `<h1 class="home">Login Component</h1>
  <form #f="ngForm" (ngSubmit)="login(f.value)">                    1
     ID: <input name="id" ngModel/><br>
    PWD: <input type="password" name="pwd" ngModel=""/><br>
    <button type="submit">Login</button>
    <span id="errMessage"
          *ngIf="wrongCredentials">Invalid ID or password</span>    2
   </form>
  `
})
export class LoginComponent {
  wrongCredentials = false;
  constructor(private router: Router) {}                            3

  login(formValue) {
    if ('Joe' === formValue.id && 'password' === formValue.pwd) {
      this.router.navigate(['/home']);                              4
       this.wrongCredentials = false;
    } else {
      this.router.navigate(['/login']);                             5
       this.wrongCredentials = true;
    }
  }
}
- 1 A login form
- 2 The invalid login message
- 3 Router injection
- 4 Navigation to the home page
- 5 Navigation to the login page
Your tests are located in the e2e directory and include two page objects, login.po.ts and home.po.ts, and one spec, login.e2e-spec.ts. The page object for the home page contains a method to return the header’s text. The following listing shows home.po.ts.
Listing 14.22. home.po.ts
import {by, element} from 'protractor';
export class HomePage {
  getHeaderText() {
    return element(by.css('h1')).getText();
  }
}
The login page object uses locators to get references to the form fields and the button. The login() method simulates user actions: entering the ID and password and clicking the Login button. The navigateToLogin() method instructs the browser to visit the URL configured to the login component—for example, http://localhost:4200/login. The getErrorMessage() method returns the login error message that may or may not be present on the page. login.po.ts is shown in the following listing.
Listing 14.23. login.po.ts
import {browser, by, element, $} from 'protractor';

export class LoginPage {

  id = $('input[name="id"]');                    1
   pwd = $('input[name="pwd"]');                 1
   submit = element(by.buttonText('Login'));     1
   errMessage = element(by.id('errMessage'));    1

  login(id: string, password: string): void {
    this.id.sendKeys(id);                        2
     this.pwd.sendKeys(password);                2
     this.submit.click();                        3
   }

  navigateToLogin() {
    return browser.get('/login');                4
   }

  getErrorMessage() {
    return this.errMessage;                      5
   }
}
- 1 Locates the page elements using $ as an alias for element(by.css())
- 2 Enters the provided ID and password
- 3 Clicks the Login button
- 4 Navigates to the login page
- 5 Returns the login error message
This page object makes the login procedure easy to understand. The sendKey() method is used for simulating data entry, and click() simulates a button click.
Now let’s review the test suite for the login workflow. It instantiates the login page object and includes two specs: one for testing a successful login and another for a failed one.
The first spec instructs Protractor to navigate to the login page and log in the user with the hardcoded data Joe and password. If the login was successful, the app navigates to the home page, and you assert this by checking that the URL in the browser contains /home. You also assert that the rendered page contains the header “Home Component.”
The spec for the failed login asserts that the app stays on the login page and the error message is displayed. Note in the following listing that this script has no code directly interacting with the UI.
Listing 14.24. login.e2e-spec.ts
import {LoginPage} from './login.po';
import {HomePage} from './home.po';
import {browser} from 'protractor';

describe('Login page', () => {
  let loginPage: LoginPage;
  let homePage: HomePage;

  beforeEach(() => {
    loginPage = new LoginPage();                                     1
   });

  it('should navigate to login page and log in', () => {             2
     loginPage.navigateToLogin();                                    3
     loginPage.login('Joe', 'password');                             4

    const url = browser.getCurrentUrl();                             5
     expect(url).toContain('/home');                                 6

    homePage = new HomePage();                                       7
     expect(homePage.getHeaderText()).toEqual('Home Component');     8
   });

  it('should stay on login page if wrong credentials entered',
   () => {                                                           9
     loginPage.navigateToLogin();
    loginPage.login('Joe', 'wrongpassword');                         10

    const url = browser.getCurrentUrl();
    expect(url).toContain('/login');                                 11
     expect(loginPage.getErrorMessage().isPresent()).toBe(true);     12
   });
});
- 1 Instantiates the login page object
- 2 A spec for a successful login
- 3 Navigates to the login page
- 4 Logs in with proper credentials
- 5 Gets the browser’s URL
- 6 Asserts that the URL contains /home
- 7 Instantiates the home page object
- 8 Asserts that the page header is correct
- 9 A spec for a failed login
- 10 Executes the failed login
- 11 Asserts that the app still shows the login page
- 12 Asserts that the error message is shown
The LoginComponent uses the *ngIf structural directive to conditionally show or hide the login error message, and your failed login spec asserts that the error message is present on the page.
Sometimes you need to wait for certain operations to complete before making assertions. For example, the login() method in your page object ends with the button click, and the spec for the successful login contains the assertion that the URL contains /home.
This assertion will always be true because your login process completes in no time as it doesn’t connect to an authentication server to check user credentials. In the real world, the authentication could take a couple of seconds, and the assertion for /home could run sooner than the URL changes to /home, causing the test to fail.
In such cases, you can invoke the browser.wait() command, where you can specify the condition to wait for. In the hands-on section, you’ll write a test that clicks the Search button that makes an HTTP request for products, which needs some time to finish. There, you’ll use a helper function that waits for the URL to change before making assertions.
Run this test with the ng e2e command, and you’ll see how Protractor opens the Chrome browser for a short time, fills out the form, and clicks the Login button. The Terminal window shows the output, which you can see in figure 14.13.
Figure 14.13. Running E2E tests for the login app
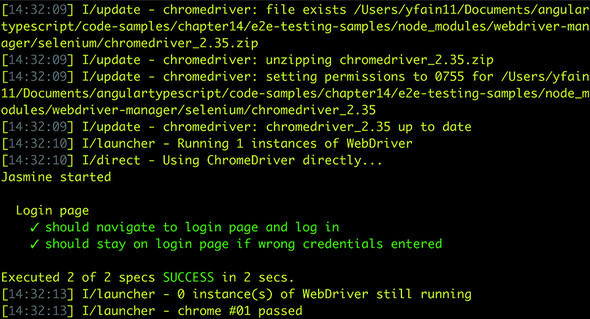
Both specs from your E2E test passed. If you want to see the tests fail, remove the <h1> tags in the template of the HomeComponent or modify the valid credentials to anything other than Joe and password in the LoginComponent. Changing the names of the form fields in the template of LoginComponent will also cause the test to fail because the WebDriver locators won’t find these elements on the login page.
This chapter has enough material to get you started with unit and E2E testing of Angular apps. Both Jasmine and (especially) Protractor offer more APIs that can be used in tests. For more detailed coverage, check out the book Testing Angular Applications (Jesse Palmer et al., Manning, 2018), with details at www.manning.com/books/testing-angular-applications.
Protractor uses WebDriverJS. Its API is entirely asynchronous, and its functions return promises. All asynchronous operations (for example, sendKey() and click()) are placed in the queue of pending promises called control-flow queue using the WebDriver promise manager to ensure that assertions (such as expect() functions) run after asynchronous operations.
Because the WebDriver promise manager doesn’t execute async functions right away but places them in a queue instead, it’s hard to debug this code. That’s why WebDriver’s promise manager is being deprecated, and you can use the async and await keywords to ensure that flow is properly synchronized (see http://mng.bz/f72u for details).
For example, the following code declares a login() method.
async login(id: string, password: string) {    1
   await this.id.sendKeys(id);                 2
   await this.pwd.sendKeys(password);          2
   await this.submit.click();                  2
 }
- 1 Declares that the function returns a promise
- 2 Waits for the promise to be resolved or rejected
You can’t use the async/await keywords with WebDriver’s promise manager, so you need to turn if off by adding the following option in protractor.conf.js:
SELENIUM_PROMISE_MANAGER: false
If after getting familiar with the combination of Protractor and the Selenium ecosystem you’d like to find a simpler solution for E2E testing of your apps, take a look at the Cypress framework available at https://www.cypress.io. It’s a new but very promising kid on the block. Meanwhile, let’s add some Protractor E2E tests to ngAuction.
14.5. Hands-on: Adding an E2E test to ngAuction
The goal of this exercise is to add one E2E test to the ngAuction app, which you can find in the ng-auction folder in the source code that comes with this chapter. We took the ngAuction project from chapter 13 and added to it the E2E test for the product-search workflow. This test will use the price range from $10 to $100 to assert that matching products are retrieved from the server and rendered in the browser.
Note
Source code for this chapter can be found at https://github.com/Farata/angulartypescript and www.manning.com/books/angular-development-with-typescript-second-edition.
Prior to running this E2E test, you need to run npm install in the server directory, compile the code with the tsc command, and start the server by running the following command:
node build/main
Now you’re ready to review and run the tests located in the client directory of ngAuction.
14.5.1. E2E testing of the product-search workflow
To perform product search, a real user would need to fulfill the following steps:
1. Open the landing page of ngAuction.
2. Click the Search button in the top-left corner so the search panel will show up.
3. Enter search criteria for products.
4. Click the Search button to see the search results.
5. Browse the products that meet the search criteria.
Your E2E test will consist of two files located in the e2e directory: the page object in the search.po.ts file and the test suite in search.e2e-spec.ts. All assertions will be programmed in the search.e2e-spec.ts file, but the page object will implement the following logical steps:
1. Find the Search button and click it.
2. Fill out the search form with data.
3. Click the Search button.
4. Wait until the server returns and renders products in the browser.
5. Check to see that the browser rendered products.
To ensure that your search will return some products, your test will use a wide range of prices from $10 to $100 as the search criteria.
In several cases, you’ll be checking that the browser URL is what you expect it to be, so we’ll remind you how the routes are configured in the home.module.ts in ngAuction, as shown in the following listing.
Listing 14.25. Routes configuration from the home module
[
  {path: '', pathMatch: 'full', redirectTo: 'categories'},
  {path: 'search', component: SearchComponent},
  {path: 'categories',
    children: [
      { path: '', pathMatch: 'full', redirectTo: 'all'},
      { path: ':category', component: CategoriesComponent},
    ]
  }
]
Let’s start by identifying the HTML elements that will participate in our test. The file app.component.html includes the markup in the following listing for the Search button.
Listing 14.26. The Search button on the toolbar
<button mat-icon-button
        id="search"                      1
         class="toolbar__icon-button"
        (click)="sidenav.toggle()">
  <mat-icon>search</mat-icon>
</button>
- 1 The added ID simplifies the code for locating this button.
Your page object will contain the lines in the following listing to locate the button and click it.
Listing 14.27. The beginning of the SearchPage class
export class SearchPage {
  performSearch(minimalPrice: number, maximumPrice: number) {     1
     const searchOnToolbar = element(by.id('search'));            2
     searchOnToolbar.click();                                     3
    ...
  }
}
- 1 A method for searching products by price range
- 2 Locating the Search button
- 3 The button click to display the search form
After the button is clicked, the search form is displayed, and you locate the fields for the minimum and maximum prices and fill them with the provided prices, as shown in the following listing.
Listing 14.28. Entering the search criteria
const minPrice = $('input[formControlName="minPrice"]');   1
 const maxPrice = $('input[formControlName="maxPrice"]');  1
 minPrice.sendKeys(minimalPrice);                          2
 maxPrice.sendKeys(maximumPrice);                          2
- 1 Locates the form fields for prices
- 2 Fills out some of the form fields
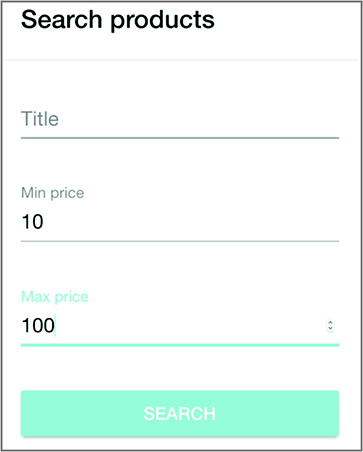
If the user did this manually, the search form would look like figure 14.14.
Figure 14.14. The form with search criteria
Now that the search criteria is entered, you need to locate and click the form’s Search button to perform the product search. If you run ngAuction and enter the min and max prices as $10 and $100, and then click the Search button, the resulting view will show the products, and the browser URL will look like this: http://localhost:4200/search?minPrice=10&maxPrice=100.
But it’ll take a second before the HTTP request is complete and the URL changes. The real user would be patiently waiting until the search results appeared. But in your test script, if you try to assert that the URL contains the search segment right after the button click, the assertion may or may not be true depending on how fast your server responds.
You didn’t need to worry about delays in login.po.ts from section 14.4.3, because no server requests were made there, and the URL changed instantaneously. This time, you want to wait until the URL changes before returning from the method performSearch().
You’ll use the ExpectedConditions class, where you can define the condition to wait for. Then, by invoking browser.wait(), you can wait for the expected condition to become true—otherwise, the test has to fail by timeout. The following code listing locates and clicks the Search button and then waits until the URL changes to contain the /search segment.
Listing 14.29. Clicking the form’s Search button
const searchOnForm = element(by.buttonText('SEARCH'));     1
 searchOnForm.click();                                     2
 const EC = protractor.ExpectedConditions;                 3
 const urlChanged = EC.urlContains('/search');             4
 browser.wait(urlChanged, 5000,                            5
              'The URL should contain /search');           6
- 1 Locates the Search button
- 2 Clicks the Search button
- 3 Declares the constant for the expected condition
- 4 Uses the urlContains() API to check the expected condition
- 5 Waits for the expected condition for up to 5 seconds or fails
- 6 The message to display in case of timeout
This code waits for up to 5 seconds, and if the URL doesn’t change, it fails, printing the message shown in figure 14.15. You may need to increase the timeout value depending on how fast the product search is performed on your computer.
Figure 14.15. The test fails on timeout.

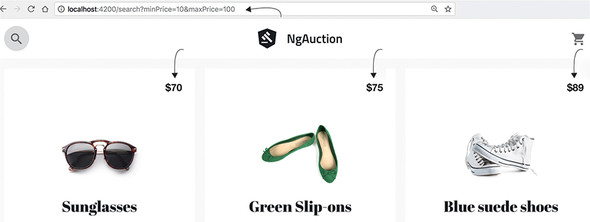
If the user manually searched for products in the price range between $10 and $100, the resulting view could look like figure 14.16.
Figure 14.16. The search-result view
If the search operation initiated by the test script returns products, you extract the price of the first product, so later on (in the spec) you can assert that the product price meets the search criteria. Because the search may return a collection of products, you’ll access them using the alias $$ for the element.all API.
Each of the products has the tile__price-tag style, as shown in figure 14.17, taken from the Element tab in the Chrome Dev Tools panel while the products grid was shown. You’ll use the tile__price-tag style to locate products.
Figure 14.17. CSS selector for the price

When the product price is extracted, you need to convert it to a number. In ngAuction, the product price is rendered as a string with the dollar sign, such as “$70” in figure 14.17. But you need its numeric representation so the spec can assert that the price falls within the specified range. The getFirstProductPrice() method includes the code that removes the dollar sign from the string and converts it to an integer value, as you can see in the next listing.
Listing 14.30. Getting the price of the first product
getFirstProductPrice() {
  return $$('span[class="tile__price-tag"]')               1
     .first().getText()                                    2
     .then((value) => {                                    3
         return parseInt(value.replace('$', ''), 10);      4
     });
}
- 1 Uses element.all for finding products
- 2 Gets the text of the first product
- 3 Protractor’s API returns promises, so applies then()
- 4 Converts the product price to a number and returns it
The complete code of your page object is shown in the following listing.
Listing 14.31. search.po.ts
import {protractor, browser, by, element, $, $$} from 'protractor';

export class SearchPage {

  performSearch(minimalPrice: number, maximumPrice: number) {
     const searchOnToolbar = element(by.id('search'));
     searchOnToolbar.click();                                              1

     const minPrice = $('input[formControlName="minPrice"]');
     const maxPrice = $('input[formControlName="maxPrice"]');
     minPrice.sendKeys(minimalPrice);                                      2
     maxPrice.sendKeys(maximumPrice);                                      2

     const searchOnForm = element(by.buttonText('SEARCH'));
     searchOnForm.click();                                                 3
     const EC = protractor.ExpectedConditions;
     const urlChanged = EC.urlContains('/search');                         4
      browser.wait(urlChanged, 5000, 'The URL should contain "/search"');  5
   }

   navigateToLandingPage() {                                               6
     return browser.get('/');
  }

  getFirstProductPrice() {
    return $$('span[class="tile__price-tag"]')                             7
       .first().getText()                                                  8
       .then((value) => {return parseInt(value.replace('$', ''), 10);});   9
   }
}
- 1 Clicks the Search icon in the toolbar
- 2 Fills out min and max prices on the search form
- 3 Clicks the Search button on the form
- 4 Declares an expected condition
- 5 Waits for the expected condition for up to 5 seconds
- 6 Declares a method for navigating to the landing page
- 7 Locates all price elements
- 8 Singles out the first product price
- 9 Converts the price into a number
Now let’s review the code of the test suite located in the search.e2e-spec.ts file.
The test suite for the search workflow contains one spec, which uses the page object and adds assertions to each step of the workflow. The spec starts by navigating to the landing page of ngAuction and then asserts that the URL of the page contains the segment /categories/all.
Then the spec performs the test by invoking the performSearch() method on the page object, passing 10 and 100 as a price range for the search. After this method completes, it performs three assertions to check that the URL of the resulting page contains the segment /search?minPrice=10&maxPrice=100 and the price of the first product is greater than $10 and less than $100. The code of this test suite is shown in the following listing.
Listing 14.32. search.e2e-spec.ts
import {SearchPage} from './search.po';
import {browser} from 'protractor';

describe('ngAuction search', () => {
  let searchPage: SearchPage;

  beforeEach(() => {
    searchPage = new SearchPage();                                      1
   });

  it('should perform the search for products that cost from $10 to $100',  ()
      => {
    searchPage.navigateToLandingPage();
    let url =  browser.getCurrentUrl();
    expect(url).toContain('/categories/all');                           2

    searchPage.performSearch(10, 100);                                  3
     url =  browser.getCurrentUrl();
    expect(url).toContain('/search?minPrice=10&maxPrice=100');          4

    const firstProductPrice = searchPage.getFirstProductPrice();        5
     expect(firstProductPrice).toBeGreaterThan(10);                     6
     expect(firstProductPrice).toBeLessThan(100);                       7
   });
});
- 1 Instantiates the page object
- 2 Asserts the URL of the landing page
- 3 Searches for products
- 4 Asserts the URL of the page with the search results
- 5 Gets the price of the first product
- 6 Asserts that the price is greater than 10
- 7 Asserts that the price is less than 100
In the Terminal window, switch to the client directory, run npm install, and run the test with the ng e2e command. The test will successfully complete, and you’ll see the message shown in figure 14.18.
Figure 14.18. The product-search test succeeded.

To make the test fail, modify the spec to test the case when no products are returned by using a price range between $1 and $5,000,000. Your ngAuction isn’t created for Sotheby’s, and you don’t carry expensive items.
Summary
- Unit tests run quickly, but most application business logic should be tested with E2E tests.
- While you’re writing tests, make them fail to see that their failure report is easy to understand.
- Running unit tests should be part of your automated build process, but E2E tests shouldn’t.