Chapter 1. Introducing Angular
This chapter covers
- A high-level overview of the Angular framework
- Generating a new project with Angular CLI
- Getting started with Angular modules and components
- Introducing the sample application ngAuction
Angular is an open source JavaScript framework maintained by Google. It’s a complete rewrite of its popular predecessor, AngularJS. The first version of Angular was released in September 2016 under the name Angular 2. Shortly after, the digit 2 was removed from the name, and now it’s just Angular. Twice a year, the Angular team make major releases of this framework. Future releases will include new features, perform better, and generate smaller code bundles, but the architecture of the framework most likely will remain the same.
Angular applications can be developed in JavaScript (using the syntax of ECMAScript 5 or later versions) or TypeScript. In this book, we use TypeScript; we explain our reasons for this in appendix B.
Note
In this book, we expect you to know the syntax of JavaScript and HTML and to understand what web applications consist of. We also assume that you know what CSS is. If you’re not familiar with the syntax of TypeScript and the latest versions of ECMAScript, we suggest you read appendixes A and B first, and then continue reading from this chapter on. If you’re new to developing using Node.js tooling, read appendix C.
Note
All code samples in this book are tested with Angular 6 and should work with Angular 7 without any changes. You can download the code samples from https://github.com/Farata/angulartypescript. We provide instructions on how to run each code sample starting in chapter 2.
This chapter begins with a brief overview of the Angular framework. Then we’ll start coding—we’ll generate our first project using the Angular CLI tool. Finally, we’ll introduce the sample application ngAuction that you’ll build while reading this book.
1.1. Why select Angular for web development?
Web developers use different JavaScript frameworks and libraries, and the most popular are Angular, React, and Vue.js. You can find lots of articles and blog posts comparing them, but such comparisons aren’t justified, because React and Vue.js are libraries that don’t offer a full solution for developing and deploying a complete web application, whereas Angular does offer that full solution.
If you pick React or Vue.js for your project, you’ll also need to select other products that support routing, dependency injection, forms, bundling and deploying the app, and more. In the end, your app will consist of multiple libraries and tools picked by a senior developer or an architect. If this developer decides to leave the project, finding a replacement won’t be easy because the new hire may not be familiar with all the libraries and tools used in the project.
The Angular framework is a platform that includes all you need for developing and deploying a web app, batteries included. Replacing one Angular developer with another is easy, as long as the new person knows Angular.
From a technical perspective, we like Angular because it’s a feature-complete framework that you can use to do the following right out of the box:
- Generate a new single-page web app in seconds using Angular CLI
- Create a web app that consists of a set of components that can communicate with each other in a loosely coupled manner
- Arrange the client-side navigation using the powerful router
- Inject and easily replace services, classes where you implement data communication or other business logic
- Arrange state management via injectable singleton services
- Cleanly separate the UI and business logic
- Modularize your app so only the core functionality is loaded on app startup, and other modules are loaded on demand
- Creating modern-looking UIs using the Angular Material library
- Implement reactive programming where your app components don’t pull data that may not be ready yet, but subscribe to a data source and get notifications when data is available
Having said that, we need to admit that there is one advantage that React and Vue.js have over Angular. Although Angular is a good fit for creating single-page apps, where the entire app is developed in this framework, the code written in React and Vue.js can be included into any web app, regardless of what other frameworks were used for development of any single-page or multipage web app.
This advantage will disappear when the Angular team releases a new module currently known as @angular/elements (see https://github.com/angular/angular/tree/master/packages/elements). Then you’ll be able to package your Angular components as custom elements (see https://developer.mozilla.org/en-US/docs/Web/Web_Components/Custom_Elements) that can be embedded into any existing web app written in JavaScript, with or without any other libraries.
1.2. Why develop in TypeScript and not in JavaScript?
You may be wondering, why not develop in JavaScript? Why do we need to use another programming language if JavaScript is already a language? You wouldn’t find articles about additional languages for developing Java or C# applications, would you?
The reason is that developing in JavaScript isn’t overly productive. Say a function expects a string value as an argument, but the developer mistakenly invokes it by passing a numeric value. With JavaScript, this error can be caught only at runtime. Java or C# compilers won’t even compile code that has mismatching types, but JavaScript is a dynamically typed language and the type of a variable can be changed during runtime.
Although JavaScript engines do a decent job of guessing the types of variables by their values, development tools have a limited ability to help you without knowing the types. In mid- and large-size applications, this JavaScript shortcoming lowers the productivity of software developers.
On larger projects, good IDE context-sensitive help and support for refactoring are important. Renaming all occurrences of a variable or function name in statically typed languages is done by IDEs in a split second, but this isn’t the case in JavaScript, which doesn’t support types. If you make a mistake in a function or a variable name, it’s displayed in red. If you pass the wrong number of parameters (or wrong types) to a function, again, the errors are displayed in red. IDEs also offer great context-sensitive help. TypeScript code can be refactored by IDEs.
TypeScript follows the latest ECMAScript specifications and adds to them types, interfaces, decorators, class member variables (fields), generics, enums, the keywords public, protected, and private, and more. Check the TypeScript roadmap on GitHub at https://github.com/Microsoft/TypeScript/wiki/Roadmap to see what’s coming in future releases of TypeScript.
TypeScript interfaces allow you to declare custom types. Interfaces help prevent compile-time errors caused by using objects of the wrong type in your application.
The generated JavaScript code is easy to read and looks like hand-written code. The Angular framework itself is written in TypeScript, and most of the code samples in the Angular documentation (see https://angular.io), articles, and blogs are use TypeScript. In 2018, a Stack Overflow developer survey (https://insights.stackoverflow.com/survey/2018) showed TypeScript as the fourth-most-loved language. If you prefer to see more scientific proof that TypeScript is more productive compared to JavaScript, read the study “To Type or Not to Type: Quantifying Detectable Bugs in JavaScript,” (Zheng Gao et al., ICSE 2017) available at http://earlbarr.com/publications/typestudy.pdf.
We work for a company, Farata Systems, that over the years developed pretty complex software using the Adobe Flex (currently Apache Flex) framework. Flex is a productive framework built on top of the strongly typed, compiled ActionScript language, and the applications are deployed in the Flash Player browser plugin (a virtual machine).
When the web community started moving away from using browser plugins, we spent two years trying to find a replacement for the Flex framework. We experimented with different JavaScript-based frameworks, but the productivity of our developers seriously suffered. Finally, we saw a light at the end of the tunnel with a combination of the TypeScript language, the Angular framework, and the Angular Material UI library.
1.3. Overview of Angular
Angular is a component-based framework, and any Angular app is a tree of components (think views). Each view is represented by instances of component classes. An Angular app has one root component, which may have child components. Each child component may have its own children, and so on.
Imagine you need to rewrite the Twitter app in Angular. You could take a prototype from your web designer and start by splitting it into components, as shown in figure 1.1. The top-level component with the thick border encompasses multiple child components. In the middle, you can see a New Tweet component above two instances of the Tweet component, which in turn has child components for reply, retweet, like, and direct messaging.
Figure 1.1. Splitting a prototype into components

A parent component can pass data to its child by binding the values to the child’s component property. A child component has no knowledge of where the data came from. A child component can pass data to its parent (without knowing who the parent is) by emitting events. This architecture makes components self-contained and reusable.
When writing in TypeScript, a component is a class annotated with a decorator, @Component(), where you specify the component’s UI (we explain decorators in section B.10, “Decorators,” in appendix B).
@Component({
    ...
}
export class AppComponent {
    ...
})
Most of the business logic of your app is implemented in services, which are classes without a UI. Angular will create instances of your service classes and will inject them into your components. Your component may depend on services, and your services may depend on other services. A service is a class that implements some business logic. Angular injects services into your components or other services using the dependency injection (DI) mechanism we talk about in chapter 5.
Components are grouped into Angular modules. A module is a class decorated with @NgModule(). A typical Angular module is a small class that has an empty body, unless you want to write code that manually bootstraps the application—for example, if an app includes a legacy AngularJS app. The @NgModule() decorator lists all components and other artifacts (services, directives, and so on) that should be included in this module. The following listing shows an example.
Listing 1.1. A module with one component
@NgModule({
  declarations: [
    AppComponent               1
   ],
  imports: [
    BrowserModule
  ],
  bootstrap: [AppComponent]    2
 })
export class AppModule { }
- 1 Declares that AppComponent belongs to this module
- 2 Declares that AppComponent is a root component
To write a minimalistic Angular app, you can create one AppComponent and list it in the declarations and bootstrap properties of @NgModule(). A typical module lists several components, and the root component is specified in the bootstrap property of the module. Listing 1.1 also lists BrowserModule, which is a must for apps that run in a browser.
Components are the centerpiece of the Angular architecture. Figure 1.2 shows a high-level diagram of a sample Angular application that consists of four components and two services, all packaged inside a module. Angular injects its HttpClient service into your app’s Service1, which in turn is injected into the GrandChild1 component.
Figure 1.2. Sample architecture of an Angular app

The HTML template of each component is inlined either inside the component (the template property of @Component()) or in the file referenced from the component using the templateUrl property. The latter option offers a clean separation between the code and the UI. The same applies to styling components. You can either inline the styles using the styles property, or provide the location of your CSS file(s) in styleURLs. The following listing shows the structure of some search component.
Listing 1.2. Structure of a sample component
@Component({
  selector: 'app-search',                       1
   templateUrl: './search.component.html',      2
   styleUrls: ['./search.component.css']        3
 })
export class SearchComponent {
  // Component's properties and methods go here
}
- 1 Other components’ templates can use the tag <app-search>.
- 2 The template’s code is in this file.
- 3 The component’s styles are in this file (there could be more than one).
The value in the selector property defines the name of the tag that can be used in the other component’s template. For example, the root app component can include a child search component, as in the following listing.
Listing 1.3. Using the search component in the app component
@Component({
  selector: 'app-root',
  template: `<div>
             <app-search></app-search>         1
            </div>`,
  styleUrls: ['./app.component.css'],
})
export class AppComponent {
    ...
}
- 1 The UI of the AppComponent includes the UI of the SearchComponent.
Listing 1.3 uses an inline template. Note the use of the backtick symbols instead of quotes for a multiline template (see section A.3 in appendix A).
The Angular framework is a great fit for developing single-page applications (SPAs), where the entire browser’s page is not being refreshed and only a certain portion of the page (view) may be replacing another as the user navigates through your app. Such client-side navigation is arranged with the help of the Angular router. If you want to allocate an area within a component’s UI for rendering its child components, you use a special tag, <router-outlet>. For example, on app start, you may display the home component in this outlet, and if the user clicks the Products link, the outlet content will be replaced by the product component.
To arrange navigation within a child component, you can allocate the <router-outlet> area in the child as well. Chapters 3 and 4 explain how the router works.
The Angular team has released a library of UI components called Angular Material (see https://material.angular.io). At the time of this writing, it has more than 30 well-designed UI components based on the Material Design guidelines (see https://material.io/guidelines). We recommend using Angular Material components in your projects, and if you need more components in addition to Angular Material, use one of the third-party libraries like PrimeNG, Kendo UI, DevExtreme, or others. You can also use the popular Bootstrap library with Angular applications, and we show how to do this in the ngAuction example in chapter 2. Starting in chapter 7, you’ll rewrite ngAuction, replacing Bootstrap components with Angular Material components.
Angular’s rendering engine is a separate module, which allows third-party vendors to create their own rendering engine that targets non-browser-based platforms. The TypeScript portion of the components remains the same, but the content of the template property of the @Component decorator may contain XML or another language for rendering native components.
For example, you can write a component’s template using XML tags from the Native-Script framework, which serves as a bridge between JavaScript and native iOS and Android UI components. Another custom UI renderer allows you to use Angular with React Native, which is an alternative way of creating native (not hybrid) UIs for iOS and Android.
We stated earlier that a new Angular app can be generated in seconds. Let’s see how the Angular CLI tool does it.
1.4. Introducing Angular CLI
Angular CLI is a tool for managing Angular projects throughout the entire life-cycle of an application. It serves as a code generator that greatly simplifies the process of new-project creation as well as the process of generating new components, services, and routes in an existing app. You can also use Angular CLI for building code bundles for development and production deployment. Angular CLI will not only generate a boilerplate project for you, it will also install Angular framework and all its dependencies.
Angular CLI has become a de facto way of starting new Angular projects. You’ll install Angular CLI using the package manager npm. If you’re not familiar with package managers, read appendix C. To install Angular CLI globally on your computer so it can be used for multiple projects, run the following command in the Terminal window:
npm install @angular/cli -g
After the installation is complete, Angular CLI is ready to generate a new Angular project.
1.4.1. Generating a new Angular project
CLI stands for command-line interface, and after installing Angular CLI, you can run the ng command from the Terminal window. Angular CLI understands many command-line options, and you can see all of them by running the ng help command. You’ll start by generating a new Angular project with the ng new command. Create a new project called hello-cli:
ng new hello-cli
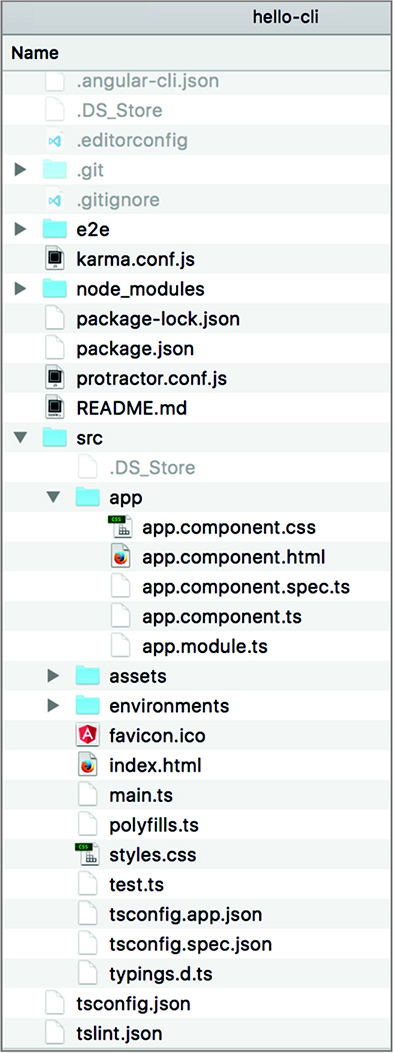
This command will create a directory, hello-cli, and will generate a project with one module, one component, and all required configuration files including the package.json file, which includes all project dependencies (see appendix C for details). After generating these files, Angular CLI will start npm to install all dependencies specified in package.json. When this command completes, you’ll see a new directory, hello-cli, as shown in figure 1.3.
Tip
Say you have an Angular 5 project and want to switch to the latest version of Angular. You don’t need to modify dependencies in the package.json file manually. Run the ng update command, and all dependencies in package.json will be updated, assuming you have the latest version of Angular CLI installed. The process of updating your apps from one Angular version to another is described at https://update.angular.io.
Figure 1.3. A newly generated Angular project
We’ll review the content of the hello-cli directory in chapter 2, but let’s build and run this project. In the Terminal window, change to the hello-cli directory and run the following command:
ng serve
Angular CLI will spend about 10–15 seconds to compile TypeScript into JavaScript and build the application bundles. Then Angular CLI will start its dev server, ready to serve this app on port 4200. Your terminal output may look like figure 1.4.
Figure 1.4. Building the bundles with ng serve

Now, point your Web browser at http://localhost:4200, and you’ll see the landing page of your app, as shown in figure 1.5.
Figure 1.5. Running the app in the browser

Congratulations! You created, configured, built, and ran your first Angular app without writing a single line of code!
The ng serve command builds the bundles in memory without generating files. While working on the project, you run ng serve once, and then keep working on your code. Every time you modify and save a file, Angular CLI will rebuild the bundles in memory (it takes a couple of seconds), and you’ll see the results of your code modifications right away. The following JavaScript bundles were generated:
- inline.bundle.js is a file used by the Webpack loader to load other files.
- main.bundle.js includes your own code (components, services, and so on).
- polyfills.bundle.js includes polyfills needed by Angular so it can run in older browsers.
- styles.bundle.js includes CSS styles from your app.
- vendor.bundle.js includes the code of the Angular framework and its dependencies.
For each bundle, Angular CLI generates a source map file to allow debugging the original TypeScript, even though the browser will run the generated JavaScript. Don’t be scared by the large size of vendor.bundle.js—it’s a dev build, and the size will be substantially reduced when you build the production bundles.
Currently, Angular CLI uses Webpack (see http://webpack.js.org) to build the bundles and webpack-dev-server to serve the app. When you run ng serve, Angular CLI runs webpack-dev-server. Starting with Angular 7, Angular CLI offers an option to use Bazel for bundling. After the initial project build, if a developer continues working on the project, Bazel can rebuild the bundles a lot faster than Webpack.
When you generate a new project with the ng new command, you can specify an option that can change what’s being generated. If you don’t want to generate a separate CSS file for the application component styles, specify the inline-style option:
ng new hello-cli --inline-style
If you don’t want to generate a separate HTML file for the application component template, use the inline-template option:
ng new hello-cli --inline-template
If you don’t want to generate a file for unit tests, use the skip-tests option:
ng new hello-cli --skip-tests
If you’re planning to implement navigation in your app, use the routing option to generate an additional module where you’ll configure routes:
ng new hello-cli --routing
For the complete list of available options, run the ng help new command or read the Angular CLI Wiki page at https://github.com/angular/angular-cli/wiki.
1.4.2. Development and production builds
The ng serve command bundled the app in memory but didn’t generate files and didn’t optimize your Hello CLI application. You’ll use the ng build command for file generation, but now let’s start discussing bundle-size optimization and two modes of compilation.
Open the Network tab in the dev tools of your browser and you’ll see that the browser had to load several megabytes of code to render this simple app. In dev mode, the size of the app is not a concern, because you run the server locally, and it takes the browser a little more than a second to load this app, as shown in figure 1.6.
Figure 1.6. Running the non-optimized app

Now visualize a user with a mobile device browsing the internet over a regular 3G connection. It’ll take 20 seconds to load the same Hello CLI app. Many people can’t tolerate waiting 20 seconds for any app except Facebook (30% of the earth’s population lives on Facebook). You need to reduce the size of the bundles before going live.
Applying the --prod option while building the bundles will produce much smaller bundles (as shown in figure 1.6) by optimizing your code. It’ll rename your variables as single letters, remove comments and empty lines, and remove the majority of the unused code. Another piece of code that can be removed from app bundles is the Angular compiler. Yes, the ng serve command included the compiler into the vendor .bundle.js. But how are you going to remove the Angular compiler from your deployed app when you build it for production?
1.5. JIT vs. AOT compilation
Let’s revisit the code of app.component.html. For the most part, it consists of standard HTML tags, but there’s one line that browsers won’t understand:
Welcome to {{title}}!
These double curly braces represent binding a value into a string in Angular, but this line has to be compiled by the Angular compiler (it’s called ngc) to replace the binding with something that browsers understand. A component template can include other Angular-specific syntax (for example, structural directives *ngIf and *ngFor) that needs to be compiled before asking the browser to render the template.
When you run the ng serve command, the template compilation is performed inside the browser. After the browser loads your app bundles, the Angular compiler (packaged inside vendor.bundle.js) performs the compilation of the templates from main.bundle.js. This is called just-in-time (JIT) compilation. This term means that the compilation happens when the bundles arrive at the browser.
The drawbacks of JIT compilation include the following:
- There’s an interval of time between loading bundles and rendering the UI. This time is spent on JIT compilation. For a small app like Hello CLI, this time is minimal, but in real-world apps, JIT compilation can take a couple of seconds, so the user needs to wait longer before seeing your app.
- The Angular compiler has to be included in vendor.bundle.js, which adds to the size of your app.
Using JIT compilation in production is discouraged, and you want templates to be precompiled into JavaScript before the bundles are created. This is what ahead-of-time (AOT) compilation is about.
The advantages of AOT compilation are as follows:
- The browser can render the UI as soon as your app is loaded. There’s no need to wait for code compilation.
- The ngc compiler isn’t included in vendor.bundle.js, and the resulting size of your app might be smaller.
Why use the word might and not will? Removing the ngc compiler from the bundles should always result in smaller app size, right? Not always. The compiled templates are larger than those that use a concise Angular syntax. The size of Hello CLI will definitely be smaller, as there’s only one line to compile. But in larger apps with lots of views, the compiled templates may increase the size of your app so that it’s even larger than the JIT-compiled app with ngc included in the bundle. You should use the AOT mode anyway, because the user will see the initial landing page of your app sooner.
Note
You may be surprised by seeing ngc compiler errors in an app that was compiling fine with tsc. The reason is that AOT requires your code to be statically analyzable. For example, you can’t use the keyword private with properties that are used in the template, and no default exports are allowed. Fix the errors reported by the ngc compiler and enjoy the benefits of AOT compilation.
No matter whether you choose JIT or AOT compilation, at some point you’ll decide to do an optimized production build. How do you do this?
1.5.1. Creating bundles with the --prod option
When you build bundles with the --prod option, Angular CLI performs code optimization and AOT compilation. See it in action by running the following command in your Hello CLI project:
ng serve --prod
Open the app in your browser and check the Network tab, as shown in figure 1.7. Now the size of the same app is only 108 KB gzipped.
Figure 1.7. Running the optimized app with AOT

Expand the column with the bundle sizes—the dev server even did the gzip compression for you. The filenames of the bundles include a hash code of each bundle. Angular CLI calculates a new hash code on each production build to prevent browsers from using the cached version if a new app version is deployed in prod.
Shouldn’t you always use AOT? Ideally, you should unless you use some third-party JavaScript libraries that produce errors during AOT compilation. If you run into this problem, turn AOT compilation off by building the bundles with the following command:
ng serve --prod --aot false
Figure 1.8 shows that both the size and the load time increased compared to the AOT-compiled app in figure 1.7.
Figure 1.8. Running the optimized app without AOT

1.5.2. Generating bundles on the disk
You were using the ng serve command, which was building the bundles in memory. When you’re ready to generate production files, use the ng build command instead. The ng build command generates files in the dist directory (by default), but the bundle sizes won’t be optimized.
With ng build --prod, the generated files will be optimized but not compressed, so you’d need to apply the gzip compression to the bundles afterward. We’ll go over the process of building production bundles and deploying the app on the Node.js server in section 12.5.3 of chapter 12.
After the files are built in the dist directory, you can copy them to whatever web server you use. Read the product documentation for your web server, and if you know where to deploy an index.html file in your server, this would be the place for the Angular app bundles as well.
The goal of this section was to get you started with Angular CLI, and we’ll continue its coverage in chapter 2. The first generated app is rather simple and doesn’t illustrate all the features of Angular; the next section will give you some ideas of how things are done in Angular.
1.6. Introducing the sample ngAuction app
To make this book more practical, we start every chapter by showing you small applications that illustrate Angular syntax or techniques, and at the end of most of the chapters you’ll use the new concepts in a working application. You’ll see how components and services are combined into a working application.
Imagine an online auction (let’s call it ngAuction) where people can browse and search for products. When the results are displayed, the user can select a product and bid on it. The information on the latest bids will be pushed by the server to all users subscribed to such notifications.
The functionality of browsing, searching, and placing bids will be implemented by making requests to the RESTful endpoints, implemented in the server developed with Node.js. The server will use WebSockets to push notifications about the user’s bid and about the bids placed by other users. Figure 1.9 depicts sample workflows for ngAuction.
Figure 1.9. The ngAuction workflows

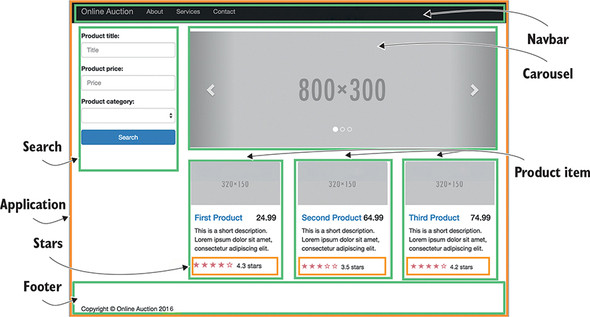
Figure 1.10 shows how the first version of the ngAuction home page will be rendered on desktop computers. Initially, you’ll use gray placeholders instead of product images.
Figure 1.10. The ngAuction home page with highlighted components
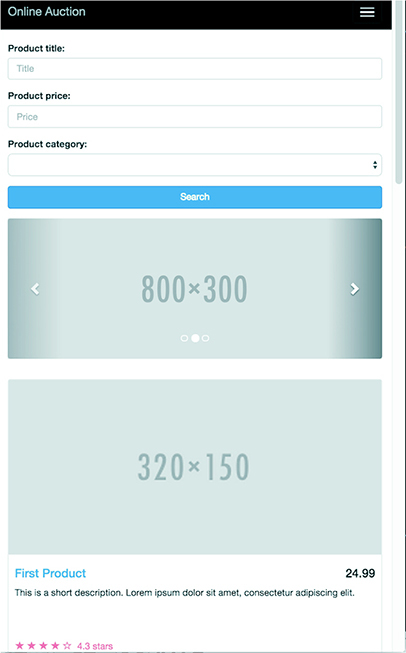
You’ll use responsive UI components offered by the Bootstrap library (see http://getbootstrap.com), so on mobile devices the home page may be rendered as in figure 1.11.
Figure 1.11. The online auction home page on smartphones
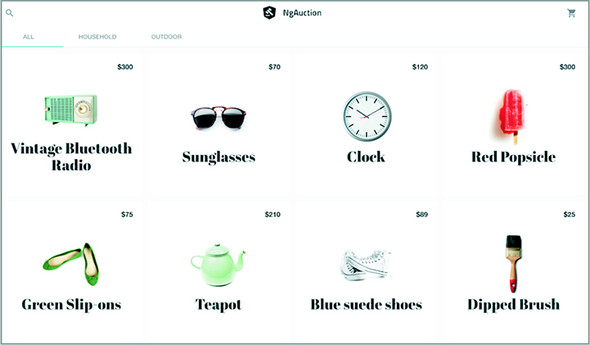
Starting in chapter 7, you’ll redesign ngAuction to completely remove the Bootstrap framework, replacing it with the Angular Material and Flex Layout libraries. The home page of the refactored version of ngAuction will look like figure 1.12.
Figure 1.12. The redesigned ngAuction
The development of an Angular application comes down to creating and composing components. In chapter 2 you’ll generate this project and its components and services using Angular CLI, and in chapter 7, you’ll refactor its code. Figure 1.13 shows the project structure for the ngAuction app.
Figure 1.13. The project structure for the online auction app

In chapter 2, you’ll start by creating an initial version of the landing page of ngAuction, and in subsequent chapters, you’ll keep adding functionality that illustrates various Angular features and techniques
Note
We recommend that you develop Angular applications using an IDE like WebStorm (inexpensive) or Visual Studio Code (free). They offer the autocomplete feature, provide convenient search, and have integrated Terminal windows so you can do all your work inside the IDE.
Summary
- Angular applications can be developed in TypeScript or JavaScript.
- Angular is a component-based framework.
- The TypeScript source code has to be transpiled into JavaScript before deployment.
- Angular CLI is a great tool that helps in jump-starting your project. It supports bundling and serving your apps in development and preparing production builds.