
Appendix A. An overview of ECMAScript
ECMAScript is a standard for scripting languages. ECMAScript syntax is implemented in several languages, the most popular implementation being JavaScript. The first edition of the ECMAScript specification was released in 1997, and the sixth edition was finalized in 2015. This edition is known as ES6 or ES2015. Lots of new features were introduced in ES6 compared to its predecessor ES5, and most of the syntax covered in this appendix is about the ES6 syntax. ES7 was finalized in 2016, and ES8 in 2017. ES7 and ES8 didn’t introduce many new syntax elements, but we’ll cover the async/await syntax from ES8 at the end of this appendix.
At the time of writing, most web browsers fully support the ES6 specification, which introduced the most significant syntax additions. You can visit the ECMAScript compatibility site at http://mng.bz/ao59 to see the current state of ES6 support. Even if the users of your app have older browsers, you can develop in ES6/7/8 today and use transpilers like Traceur, Babel, or TypeScript to turn code that uses the latest syntax into its ES5 version.
We assume you’re familiar with the ES5 syntax and APIs, and we’ll cover only selected new features introduced in the newer editions of ECMAScript. In this appendix, we’ll often compare the code snippets in ES5 with their ES6 equivalents, but ES6 doesn’t deprecate any old syntax, so you’ll be able to safely run legacy ES5 code in future web browsers or standalone JavaScript engines.
A.1. How to run the code samples
The code samples for this appendix come as JavaScript files with the .js extension. Typically, the code samples produce some output on the console, so you need to open the browser console to see the output. You can create a simple HTML file and include a particular .js file there using the <script> tag.
The other option is to use CodePen (see https://codepen.io). This site allows you to quickly write, test, and share apps that use HTML, CSS, and JavaScript. To save you some typing, we’ll provide CodePen links to most of the code samples so you can just follow the link, see the selected code sample in action, and modify it if you choose to do so. If a code sample produces output on the console, just click Console at the bottom of the CodePen window to see it.
Let’s review some of the relatively new features of ECMAScript as they’re implemented in JavaScript.
A.2. Scope of variables and this
The scoping mechanism in ES5 is rather confusing. Regardless of where we declare a variable with the var keyword, the declaration is moved to the top of the execution context (for example, a function). This is called hoisting (see more on hoisting at http://mng.bz/3x9w). The use of the this keyword is also not as straightforward as it is in languages like Java or C#.
ES6 eliminates this hoisting confusion (discussed in the next section) by introducing the let keyword, and the this confusion is cured by using arrow functions. Let’s look closer at the hoisting and this problems.
A.2.1. Hoisting of variable declarations
In JavaScript, all variable declarations that use the var keyword are moved to the top of the execution context even if a variable is declared inside the code block. Look at the following simple example that declares the variable i inside the for loop but uses it outside as well:
function foo() {

   for (var i=0; i<10; i++) {

   }

  console.log("i=" + i);
}

foo();
Running this code will print i=10. The variable i is still available outside the loop, even though it seems like it was meant to be used only inside the loop. JavaScript automatically hoists the variable declaration to the top.
In the preceding example, hoisting didn’t cause any harm, because there was only one variable named i. If two variables with the same name are declared inside and outside the function, however, this may result in confusing behavior. Consider listing A.1, which declares the variable customer on the global scope. A bit later, we’ll introduce another customer variable in the local scope, but for now let’s keep it commented out.
Listing A.1. Hoisting a variable declaration
var customer = "Joe";
(function () {
    console.log("The name of the customer inside the function is "  +
    customer);
   /*  if (true) {
         var customer = "Mary";
     } */
})();
console.log("The name of the customer outside the function is "  + customer);
The global variable customer is visible inside and outside the function, and running this code will print the following:
The name of the customer inside the function is Joe
The name of the customer outside the function is Joe
Uncomment the if statement that declares and initializes the customer variable inside the curly braces. Now we have two variables with the same name—one on the global scope and another on the function scope. The console output is different now:
The name of the customer inside the function is undefined
The name of the customer outside the function is Joe
The reason is that in ES5, variable declarations are hoisted to the top of the scope (the expression within the topmost parentheses), but variable initializations with values aren’t. When a variable is created, its initial value is undefined. The declaration of the second undefined customer variable was hoisted to the top of the expression, and console.log() printed the value of the variable declared inside the function, which has shadowed the value of the global variable customer.[1] Function declarations are hoisted as well, so we can invoke a function before it’s declared:
See it on CodePen: http://mng.bz/cK9y.
doSomething();

function doSomething() {
   console.log("I'm doing something");
}
On the other hand, function expressions are considered variable initializations, so they aren’t hoisted. The following code snippet will produce undefined for the doSomething variable:
doSomething();

var doSomething = function() {
   console.log("I'm doing something");
}
Let’s see how ES6 can help us with scoping.
A.2.2. Block scoping with let and const
Declaring variables with the ES6 let keyword instead of var allows variables to have block scoping. The next listing shows an example.
Listing A.2. Variables with block scoping
let customer = "Joe";
  (function () {
      console.log("The name of the customer inside the function is "  +
customer);
      if (true) {
       let customer = "Mary";
        console.log("The name of the customer inside the block is "  +
customer);
      }
  })();

console.log("The name of the customer in the global scope is "  + customer);
customer);
if (true) {
let customer = "Mary";
console.log("The name of the customer inside the block is " +
customer);
}
})();
console.log("The name of the customer in the global scope is " + customer);
Now two customer variables have different scopes and values, and this program will print the following:
The name of the customer inside the function is Joe
The name of the customer inside the block is Mary
The name of the customer in the global scope is Joe
To put it simply, if we’re developing a new application, we don’t use var. We use let instead. The let keyword allows us to assign and reassign a value to a variable as many times as we want. The only exception to this rule is a for loop. Using let to declare a loop variable may cause performance issues.
If we want to declare a variable that doesn’t change its value after its initialization, we declare it with the const keyword for constants. Constants also support block scope.
The only difference between let and const is that the latter won’t allow the assigned value to be changed. The best practice is to start declaring variables with const; if we see that this value needs to change, we replace const with let. Listing A.2 should use const instead of let, because we never reassigned the values for both customer variables.[2]
See it on CodePen: http://mng.bz/fkJd
A.3. Template literals
ES6 introduces a new syntax for working with string literals, which can contain embedded expressions. This feature is known as string interpolation.
In ES5 we’d use concatenation to create a string that contains string literals combined with the values of variables:
const customerName = "John Smith";
console.log("Hello" + customerName);
In ES6, template literals are surrounded with backtick symbols, and we can embed expressions right inside a literal by placing them between the curly braces, prefixed with a dollar sign. In the next code snippet, the value of the variable customerName is embedded in the string literal:
const customerName = "John Smith";
console.log(`Hello ${customerName}`);

function getCustomer() {
  return "Allan Lou";
}
console.log(`Hello ${getCustomer()}`);
The output of this code is shown here:[3]
See it in CodePen at http://mng.bz/Ey30
Hello John Smith
Hello Allan Lou
In the preceding example, we embed the value of the variable customerName into the template literal, and then embed the value returned by the getCustomer() function. We can use any valid JavaScript expression between the curly braces.
A.3.1. Multiline strings
Strings can span multiple lines in our code. Using backticks, we can write multiline strings without the need to concatenate them or use the backslash character:
const message = `Please enter a password that
               has at least 8 characters and
               includes a capital letter`;

console.log(message);
The resulting string will treat all spaces as part of the string, so the output will look like this:[4]
See it in CodePen: http://mng.bz/1SSP.
Please enter a password that
               has at least 8 characters and
               includes a capital letter
A.4. Optional parameters and default values
In ES6, we can specify default values for function parameters (arguments) that will be used if no value is provided during function invocation. Say we’re writing a function to calculate tax, that takes two arguments: the annual income and the state where the person lives. If the state value isn’t provided, we want to use Florida as a default.
In ES5, we’d need to start the function body by checking whether the state value was provided; otherwise, we’d use Florida:
function calcTaxES5(income, state) {

    state = state || "Florida";

    console.log("ES5. Calculating tax for the resident of " + state +
                                      " with the income " + income);
}

calcTaxES5(50000);
"ES5. Calculating tax for the resident of Florida with the income 50000"
In ES6, we can specify the default value right in the function signature:
function calcTaxES6(income, state = "Florida") {

  console.log("ES6. Calculating tax for the resident of " + state +
                                  " with the income " + income);
}

calcTaxES6(50000);
The output looks similar:[5]
See it in CodePen: http://mng.bz/U51z.
"ES6. Calculating tax for the resident of Florida with the income 50000"
Rather than providing a hardcoded value for an optional parameter, we can invoke a function that returns one:
function calcTaxES6(income, state = getDefaultState()) {
console.log("ES6. Calculating tax for the resident of " + state +
            " with the income " + income);
};

function getDefaultState() {
return "Florida";
}

calcTaxES6(50000);
Just keep in mind that the getDefaultState() function will be invoked each time we invoke calcTaxES6(), which may have performance consequences. This new syntax for optional parameters means we write less code and the code is easier to understand.
A.5. Arrow function expressions, this, and that
ES6 introduced arrow function expressions, which provide a shorter notation for anonymous functions and add lexical scope for the this variable. In some other programming languages (such as C# and Java) a similar syntax is called lambda expressions.
The syntax of arrow function expressions consists of arguments, the fat-arrow sign (=>), and the function body. If the function body is just one expression, we don’t even need curly braces. If a single-expression function returns a value, there’s no need to write the return statement—the result is returned implicitly:
let sum = (arg1, arg2) => arg1 + arg2;
The body of a multiline arrow function expression should be enclosed in curly braces and use the explicit return statement:
(arg1, arg2) => {
  // do something
  return someResult;
}
If an arrow function doesn’t have any arguments, use empty parentheses:
() => {
  // do something
  return someResult;
}
If the function has just one argument, parentheses aren’t mandatory:
arg1 => {
  // do something
}
In the following code snippet, we pass arrow function expressions as arguments to an array’s reduce() method to calculate a sum, and filter() to print even numbers:
const myArray = [1, 2, 3, 4, 5];

console.log( "The sum of myArray elements is " +
                 myArray.reduce((a,b) => a+b));  // prints 15

console.log( "The even numbers in myArray are " +
                 myArray.filter( value => value % 2 === 0)); // prints 2 4
Now that you’re familiar with the syntax of arrow functions, let’s see how they streamline working with the this object reference.
In ES5, figuring out which object is referred to by the this keyword isn’t always a simple task. Search online for “JavaScript this and that,” and you’ll find multiple posts where people complain about this pointing to the “wrong” object. The this reference can have different values depending on how the function is invoked and whether strict mode was used (see the documentation for strict mode on the Mozilla Developer Network at http://mng.bz/VNVL). We’ll illustrate the problem first, and then we’ll show you the solution offered by ES6.
Consider the code in the following listing that invokes the anonymous function every second. The function prints randomly generated prices for the stock symbol provided to the StockQuoteGenerator () constructor function.
Listing A.3. this and that
function StockQuoteGenerator(symbol) {
    // this.symbol = symbol;
     const that = this;
     that.symbol = symbol;

     setInterval( function () {
         console.log("The price of " + that.symbol
                 + " is " + Math.random());
     }, 1000);
 }
 const stockQuoteGenerator = new StockQuoteGenerator("IBM");
The line that’s commented out in listing A.3 illustrates the wrong way of using this when a value is needed in the anonymous function that seemingly has the same this reference but doesn’t. If we hadn’t saved the value of this in that, and used this.symbol inside the anonymous function, it would print undefined instead of IBM. You’ll see the same behavior not only if a function is invoked inside setInterval (), but if a function is invoked in any callback. Inside the callback, this would point at the global object, which is not the same as this defined by the StockQuoteGenerator() constructor function.[6] The other solution for ensuring that a function runs in a particular this object is to use the JavaScript call(), apply(), or bind() functions.
See it in CodePen: http://mng.bz/cK70.
Note
If you’re not familiar with the this problem in JavaScript, check out Richard Bovell’s article, “Understand JavaScript’s ‘this’ with Clarity, and Master It” at http://mng.bz/ZQfz.
The following listing illustrates an arrow function solution that eliminates the need to store this in that.
Listing A.4. Fat-arrow function
function StockQuoteGenerator(symbol) {
      this.symbol = symbol;
      setInterval( () => {
                 console.log("The price of " + this.symbol
                         + " is " + Math.random());
              }, 1000);
}

const stockQuoteGenerator = new StockQuoteGenerator("IBM");
Listing A.4 will properly resolve the this reference. An arrow function that’s given as an argument to setInterval () uses the this value of the enclosing context, so it will recognize IBM as the value of this.symbol.
A.6. The rest operator
In ES5, writing a function with a variable number of parameters required using a special arguments object. This object is similar to an array, and it contains values corresponding to the arguments passed to a function. The implicit arguments variable could be treated as a local variable in any function.
The rest operator represents a variable number of arguments in a function, and it has to be the last one in the argument list. If the name of the function argument starts with the three dots, the function will get the rest of the arguments in an array. The ES6 rest operator is represented by three dots (...).
For example, we can pass multiple customers to a function using a single variable name with a rest operator:
function processCustomers(...customers) {
  // implementation of the function goes here
}
Inside this function, we can handle the customers data the same way we’d handle any array. Imagine that we need to write a function to calculate taxes that must be invoked with the first argument, income, followed by any number of arguments representing the names of the customers. Listing A.5 shows how we could process a variable number of arguments using first ES5 and then ES6 syntax. The calcTaxES5() function uses the object named arguments, and the calcTaxES6() function uses the ES6 rest operator.
Listing A.5. Rest operator
// ES5 and arguments object
  function calcTaxES5() {

      console.log("ES5. Calculating tax for customers with the income ",
                             arguments[0]);   // income is the first element

      // extract an array starting from 2nd element
      var customers = [].slice.call(arguments, 1);

      customers.forEach(function (customer) {
          console.log("Processing ", customer);
      });
  }

  calcTaxES5(50000, "Smith", "Johnson", "McDonald");
  calcTaxES5(750000, "Olson", "Clinton");

// ES6 and rest operator
  function calcTaxES6(income, ...customers) {
      console.log(`ES6. Calculating tax for customers with the income ${income}`);

      customers.forEach( (customer) => console.log(`Processing ${customer}`));
  }

  calcTaxES6(50000, "Smith", "Johnson", "McDonald");
  calcTaxES6(750000, "Olson", "Clinton");
Both functions, calcTaxES5() and calcTaxES6(), produce the same results:[7]
See it on CodePen: http://mng.bz/I2zq.
ES5. Calculating tax for customers with the income 50000
Processing Smith
Processing Johnson
Processing McDonald
ES5. Calculating tax for customers with the income 750000
Processing Olson
Processing Clinton
ES6. Calculating tax for customers with the income 50000
Processing Smith
Processing Johnson
Processing McDonald
ES6. Calculating tax for customers with the income 750000
Processing Olson
Processing Clinton
There’s a difference in handling customers, though. Because the arguments object isn’t a real array, we had to create an array in the ES5 version by using the slice() and call() methods to extract the names of customers starting from the second element in arguments. The ES6 version doesn’t require us to use these tricks because the rest operator gives us a regular array of customers. Using the rest arguments made the code simpler and more readable.
A.7. The spread operator
The ES6 spread operator is also represented by three dots (...), like the rest operator, but whereas the rest operator can turn a variable number of parameters into an array, the spread operator can do the opposite: turn an array into a list of values or function parameters.
Tip
If you see three dots on the right side of the equals sign, it’s a spread operator. Three dots on the left of the equals sign represent the rest operator.
Say we have two arrays and we need to add the elements of the second array to the end of the first one. With the spread operator, it’s one line of code:
let array1= [...array2];
Here, the spread operator extracts each element of myArray and adds to the new array (here, the square brackets mean “create a new array”). We can also create a copy of an array as follows:
array1.push(...array2);
Finding a maximum value in the array is also easy with the spread operator:
const maxValue = Math.max(...myArray);
In some cases, we want to clone an object. For example, suppose we have an object that stores the state of our app and want to create a new object when one of the state properties changes. We don’t want to mutate the original object but want to clone it with modification of one or more properties. One way to implement immutable objects is by using the Object.assign() function. The following listing creates a clone of the object first and then creates another clone, changing the lastName at the same time.
Listing A.6. Cloning with assign()
// Clone with Object.assign()
const myObject = {name: "Mary" , lastName: "Smith"};
const clone = Object.assign({}, myObject);
console.log(clone);

// Clone with modifying the `lastName` property
const cloneModified = Object.assign({}, myObject, {lastName: "Lee"});
console.log(cloneModified);
The spread operator offers a more concise syntax for achieving the same goals, as you can see in the following listing.
Listing A.7. Cloning with spread
// Clone with spread
const myObject = { name: "Mary" , lastName: "Smith"};
const cloneSpread = {...myObject};
console.log(cloneSpread);

// Clone with modifying the `lastName`
const cloneSpreadModified = {...myObject, lastName: "Lee"};
console.log(cloneSpreadModified);
Our myObject has two properties: name and lastName. The line that clones myObject with modification of the lastName will still work even if we or someone else adds more properties to myObject.[8]
See it in CodePen: http://mng.bz/X2pL.
In chapter 15, we show you how to work with immutable state objects. There, we use the spread operator to clone the state object.
A.8. Generator functions
When a browser executes a JavaScript function, it runs without interrupting its own flow to the end. But the execution of a generator function can be paused and resumed multiple times. A generator function can yield control to the calling script, which runs on the same thread.
As soon as the code in a generator function reaches the yield keyword, it gets suspended, and the calling script can resume the function’s execution by calling next () on the generator. To turn a regular function into a generator, we need to place an asterisk between the function keyword and the function name. Here’s an example:
function* doSomething() {

  console.log("Started processing");

  yield;

  console.log("Resumed processing");
}
When we invoke this function, it doesn’t immediately execute the function code but returns a special Generator object, which serves as an iterator. The following line won’t print anything:
var iterator = doSomething();
To start executing the body of the function, we need to call the next() method on the generator:
iterator.next();
After the preceding line, the doSomething() function will print “Started processing” and will be suspended because of the yield operator. Calling next() again will print “Resumed processing.”
Generator functions are useful when we need to write a function to produce a stream of data, but we want to control when to handle the next stream value. Imagine that we need a function to retrieve and produce stock prices for a specified stock symbol (such as IBM). If a stock price falls below a specified value (the limit price), we want to purchase this stock.
The generator function in the next listing, getStockPrice(), emulates this scenario by generating random prices with Math.random().
Listing A.8. getStockPrice()
function* getStockPrice(symbol) {

  while (true) {
    yield Math.random()*100;

    console.log(`resuming for ${symbol}`);
  }
}
If there’s a value after yield, it’s returned to the caller, but the function isn’t completed yet. Even though the getStockPrice() function has an infinite loop, it will yield (return) the price only if the script that invoked getStockPrice() calls next() on this generator, as in the following listing.
Listing A.9. Invoking getStockPrice ()
function* getStockPrice(symbol) {

  while (true) {
    yield Math.random()*100;

    console.log(`resuming for ${symbol}`);
  }
}

const priceGenerator = getStockPrice("IBM");              1

const limitPrice = 15;                                    2
 let price = 100;

while (price > limitPrice) {                              3

   price = priceGenerator.next().value;                   4
    console.log (`The generator returned ${price}`);
}

console.log(`buying at ${price} !!!`);                    5
- 1 Creates the Generator object but doesn’t execute the body of the getStockPrice() function
- 2 Sets the limit price to 15 and the initial price to 100 dollars
- 3 Keeps requesting stock prices until they fall below 15 dollars
- 4 Requests the next price and prints it to the console
- 5 If the price falls below 15 dollars, the loop is over and the program prints a message about buying the stock and its price.
Running listing A.9 will print something like this:
The generator returned 61.63144460879266
resuming for IBM
The generator returned 96.60782956052572
resuming for IBM
The generator returned 31.163037824444473
resuming for IBM
The generator returned 18.416578718461096
resuming for IBM
The generator returned 55.80756475683302
resuming for IBM
The generator returned 14.203652134165168
buying at 14.203652134165168 !!!
Note the order of the messages. When we call the next() method on the priceGenerator, the execution of the suspended getStockPrice() method resumes at the line below yield, which prints "resuming for IBM". Even though the control flow went outside the function and then came back, getStockPrice() remembers that the value of symbol was IBM. When the yield operator returns control to the outside script, it creates a snapshot of the stack so it can remember all the values of the local variables. When execution of the generator function is resumed, these values haven’t been lost.[9]
See it on CodePen: http://mng.bz/4d40.
With generators, you can separate the implementation of certain operations (such as getting a price quote) and the consumption of the data produced by these operations. The consumer of the data lazily evaluates the results and decides if requesting more data is necessary.
A.9. Destructuring
Creating instances of objects means constructing them in memory. The term destructuring means taking objects apart. In ES5, we could deconstruct any object or a collection by writing a function to do it. ES6 introduces the destructuring assignment syntax that allows us to extract data from an object’s properties or an array in a simple expression by specifying a matching pattern. It’s easier to explain by example, which we’ll do next.
A.9.1. Destructuring objects
Let’s say that a getStock() function returns a Stock object that has the attributes symbol and price. In ES5, if we wanted to assign the values of these attributes to separate variables, we’d need to create a variable to store the Stock object first, and then write two statements assigning the object attributes to corresponding variables:
var stock = getStock();
var symbol = stock.symbol;
var price = stock.price;
Starting in ES6, we just need to write a matching pattern on the left and assign the Stock object to it:
let {symbol, price} = getStock();
It’s a little unusual to see curly braces on the left of the equals sign, but this is part of the syntax of a matching expression. When we see curly braces on the left side, we think of them as a block of code and not the object literal. The following listing demonstrates getting the Stock object from the getStock() function and destructuring it into two variables.
Listing A.10. Destructuring an object
function getStock() {

    return {
        symbol: "IBM",
        price: 100.00
    };
}

let {symbol, price} = getStock();

console.log(`The price of ${symbol} is ${price}`);
Running that script will print the following:
The price of IBM is 100
In other words, we bind a set of data (object properties, in this case) to a set of variables (symbol and price) in one assignment expression. Even if the Stock object had more than two properties, the preceding destructuring expression would still work because symbol and price would have matched the pattern. The matching expression lists only the variables for the object attributes we’re interested in.[10]
See in CodePen: http://mng.bz/CI47.
Listing A.10 works because the names of the variables are the same as the names of the Stock attributes. Let’s change symbol to sym:
let {sym, price} = getStock();
Now we’ll get an error “symbol is not defined” because JavaScript doesn’t know that the object’s symbol attribute should be assigned to the variable sym. This is an example of a wrong matching pattern. If we really want to map the variable named sym to the symbol attribute, we introduce an alias name for symbol:
let {sym: symbol, price} = getStock();
If we provide more variables on the left than the number of attributes the object has, the extra variables will get the value undefined. If we add a stockExchange variable on the left, it will be initialized with undefined, because there’s no such attribute in the object returned by getStock():
let {symbol, price, stockExchange} = getStock();
console.log(`The price of ${symbol} is ${price} ${stockExchange}`);
If we apply the preceding destructuring assignment to the same Stock object, the console output will look like this:
The price of IBM is 100 undefined
If we want the stockExchange variable to have a default value, such as "NASDAQ", we could rewrite the destructuring expression like this:
let {symbol, price, stockExchange = "NASDAQ"} = getStock();
We can also destructure nested objects. Listing A.11 creates a nested object that represents Microsoft stock and passes it to the printStockInfo() function, which pulls the stock symbol and name of the stock exchange from this object.
Listing A.11. Destructuring a nested object
let msft = {
     symbol: "MSFT",
     lastPrice: 50.00,
     exchange: {                                              1
          name: "NASDAQ",
         tradingHours: "9:30am-4pm"
     }
 };

 function printStockInfo(stock) {
     let {symbol, exchange: {name}} = stock;                  2
      console.log(`The ${symbol} stock is traded at ${name}`);
 }

 printStockInfo(msft);
Running the preceding script will print the following:[11]
See it in CodePen: http://mng.bz/Xauq.
The MSFT stock is traded at NASDAQ
Say we’re writing a function to handle a browser DOM event. In the HTML part, we invoke this function, passing the event object as an argument. The event object has multiple properties, but our handler function only needs the target property to identify the component that dispatched this event. The destructuring syntax makes it easy:
<button id="myButton">Click me</button>
...
document
  .getElementById("myButton")
  .addEventListener("click", ({target}) =>
                            console.log(target));
Note the destructuring syntax {target} in the function argument.[12]
See it on CodePen: http://mng.bz/Dj24.
A.9.2. Destructuring arrays
Array destructuring works much like object destructuring, but instead of curly brackets, we need to use square ones. Whereas in destructuring objects we need to specify variables that match object properties, with arrays, we specify variables that match arrays’ indexes. The following code extracts the values of two array elements into two variables:
let [name1, name2] = ["Smith", "Clinton"];
console.log(`name1 = ${name1}, name2 = ${name2}`);
The output will look like this:
name1 = Smith, name2 = Clinton
If we wanted to extract the second element of this array, the matching pattern would look like this:
let [, name2] = ["Smith", "Clinton"];
If a function returns an array, the destructuring syntax turns it into a function with a multiple-value return, as shown in the getCustomers() function:
function getCustomers() {
    return ["Smith", , , "Gonzales"];
}

let [firstCustomer, , , lastCustomer] = getCustomers();
console.log(`The first customer is ${firstCustomer} and the last one is ${las
     tCustomer}`);
Now let’s combine array destructuring with rest parameters. Let’s say we have an array of multiple customers, but we want to process only the first two. The following code snippet shows how to do it:
let customers = ["Smith", "Clinton", "Lou", "Gonzales"];
let [firstCust, secondCust, ...otherCust] = customers;

console.log(`The first customer is ${firstCust} and the second one is ${secon
     dCust}`);
console.log(`Other customers are ${otherCust}`);
Here’s the console output produced by that code:
The first customer is Smith and the second one is Clinton
Other customers are Lou, Gonzales
On a similar note, we can pass the matching pattern with a rest parameter to a function:
var customers = ["Smith", "Clinton", "Lou", "Gonzales"];

function processFirstTwoCustomers([firstCust, secondCust, ...otherCust]) {

  console.log(`The first customer is ${firstCust} and the second one is ${sec
     ondCust}`);
  console.log(`Other customers are ${otherCust}`);

}

processFirstTwoCustomers(customers);
The output will be the same:
The first customer is Smith and the second one is Clinton
Other customers are Lou,Gonzales
To summarize, the benefit of destructuring is that we can write less code when we need to initialize some variables with data that’s located in object properties or arrays.
A.10. Iterating with forEach(), for-in, and for-of
We can loop through a collection of objects using different JavaScript keywords and APIs. In this section, we’ll show you how to use the for-of loop. We’ll compare it with for-in loops and the forEach() function.
A.10.1. Using the forEach() method
Consider the following code, which iterates through an array of four numbers. This array also has an additional description property, which is ignored by forEach():
var numbersArray = [1, 2, 3, 4];
numbersArray.description = "four numbers";

numbersArray.forEach((n) => console.log(n));
The output of the script looks like this:
1
2
3
4
The forEach() method takes a function as an argument and properly prints four numbers from the array, ignoring the description property. Another limitation of forEach() is that it doesn’t allow us to break the loop prematurely. We’d need to use the every() method instead of forEach() or come up with some other hack to do that. Let’s see how the for-in loop can help.
A.10.2. Using the for-in loop
The for-in loop iterates over the property names of objects and data collections. In JavaScript, any object is a collection of key-value pairs, where a key is a property name and a value is the property value. The array has five properties: four for the numbers, and description. Let’s iterate through the properties of this array:
var numbersArray = [1, 2, 3, 4];
numbersArray.description = "four numbers";

for (let n in numbersArray) {
  console.log(n);
}
The output of the preceding code looks like this:
0
1
2
3
description
Running this code through a debugger shows that each of these properties is a string. To see the actual values of the properties, print the array elements using the numbersArray[n] notation:
var numbersArray = [1, 2, 3, 4];
numbersArray.description = "four numbers";

for (let n in numbersArray) {
    console.log(numbersArray[n]);
}
Now the output looks like this:
1
2
3
4
four numbers
As you can see, the for-in loop iterated through all the properties, not only the data, which may not be what you need. Let’s try the new for-of syntax.
A.10.3. Using for-of
ES6 introduced the for-of loop, which allows us to iterate over data regardless of what other properties the data collection has. We can break out of this loop if need be by using the break keyword:
var numbersArray = [1, 2, 3, 4];
numbersArray.description = "four numbers";

console.log("Running for-of for the entire array");
for (let n of numbersArray) {
  console.log(n);
}

console.log("Running for-of with a break");
for (let n of numbersArray) {
  if (n > 2) break;

  console.log(n);
}
This script produces the following output:[13]
See it in CodePen: http://mng.bz/53DO.
Running for-of for the entire array
1
2
3
4
Running for-of with a break
1
2
The for-of loop works with any iterable object, including Array, Map, Set, and others. Strings are iterable as well. The following code prints the content of the string "John", one character at a time:
for (let char of "John") {
  console.log(char);
}
A.11. Classes and inheritance
Although ES5 supports object-oriented programming and inheritance, with ES6 classes, the code is easier to read and write.
In ES5, objects can be created either from scratch or by inheriting from other objects. By default, all JavaScript objects are inherited from Object. This object inheritance is implemented via a special property called prototype, which points at this object’s ancestor. This is called prototypal inheritance. For example, to create an NJTax object that inherits from the object Tax, we can write something like this:
function Tax() {
  // The code of the tax object goes here
}

function NJTax() {
  // The code of New Jersey tax object goes here
}

NJTax.prototype = new Tax();       1

var njTax = new NJTax();
- 1 Inherits NJTax from Tax
ES6 introduced the keywords class and extends to bring the syntax in line with other object-oriented languages such as Java and C#. The ES6 equivalent of the preceding code is shown next:
class Tax {
  // The code of the tax class goes here
}

class NJTax extends Tax {
  // The code of New Jersey tax object goes here
}

let njTax = new NJTax();
The Tax class is an ancestor or superclass, and NJTax is a descendant or subclass. We can also say that the NJTax class has the “is-a” relation with the class Tax. In other words, NJTax is a Tax. You can implement additional functionality in NJTax, but NJTax still “is a” or “is a kind of” Tax. Similarly, if we create an Employee class that inherits from Person, we can say that Employee is a Person.
We can create one or more instances of the objects like this:
var tax1 = new Tax();          1
 var tax2 = new Tax();         2
Note
Class declarations aren’t hoisted. You need to declare the class first and then work with it.
Each of these objects will have properties and methods that exist in the Tax class, but they will have different state; for example, the first instance could be created for a customer with an annual income of $50,000, and the second for a customer who earns $75,000. Each instance would share the same copy of the methods declared in the Tax class, so there’s no duplication of code.
In ES5, we can also avoid code duplication by declaring methods, not inside the objects, but on their prototypes:
function Tax() {
  // The code of the tax object goes here
}

Tax.prototype = {
  calcTax: function() {
    // code to calculate tax goes here
  }
}
JavaScript remains a language with prototypal inheritance, but ES6 allows us to write more elegant code:
class Tax() {
  calcTax() {
    // code to calculate tax goes here
  }
}
The ES6 syntax doesn’t allow you to declare class member variables, as you can in Java, C#, or TypeScript. The following syntax is not supported:
   class Tax {
     var income;
}
A.11.1. Constructors
During instantiation, classes execute the code placed in special methods called constructors. In languages like Java and C#, the name of the constructor must be the same as the name of the class; but in ES6, we specify the class’s constructor by using the constructor keyword:
class Tax {

  constructor(income) {
    this.income = income;
  }
}

var myTax = new Tax(50000);
A constructor is a special method that’s executed only once: when the object is created. The Tax class doesn’t declare a separate class-level income variable, but creates it dynamically on the this object, initializing this.income with the values of the constructor argument. The this variable points at the instance of the current object.
The next example shows how we can create an instance of an NJTax subclass, providing the income of 50,000 to its constructor:
class Tax {
    constructor(income) {
       this.income = income;
    }
}

class NJTax extends Tax {
    // The code specific to New Jersey tax goes here
}

let njTax = new NJTax(50000);

console.log(`The income in njTax instance is ${njTax.income}`);
The output of this code snippet is as follows:
The income in njTax instance is 50000
Because the NJTax subclass doesn’t define its own constructor, the one from the Tax superclass is automatically invoked during the instantiation of NJTax. This wouldn’t be the case if a subclass defined its own constructor. You’ll see such an example in the next section.
A.11.2. The super keyword and the super function
The super() function allows a subclass (descendant) to invoke a constructor from a superclass (ancestor). The super keyword is used to call a method defined in a superclass. Listing A.12 illustrates both super() and super. The Tax class has a calculateFederalTax() method, and its NJTax subclass adds the calculateStateTax() method. Both of these classes have their own versions of the calcMinTax() method.
Listing A.12. super() and super
 class Tax {
     constructor(income) {
        this.income = income;
     }

     calculateFederalTax() {
         console.log(`Calculating federal tax for income ${this.income}`);
     }

     calcMinTax() {
         console.log("In Tax. Calculating min tax");
         return 123;
     }
 }

 class NJTax extends Tax {
    constructor(income, stateTaxPercent) {
        super(income);
        this.stateTaxPercent=stateTaxPercent;
    }

    calculateStateTax() {
        console.log(`Calculating state tax for income ${this.income}`);
    }

     calcMinTax() {
         let minTax = super.calcMinTax();
         console.log(`In NJTax. Will adjust min tax of ${minTax}`);
     }
 }

 const theTax = new NJTax(50000, 6);

 theTax.calculateFederalTax();
 theTax.calculateStateTax();

 theTax.calcMinTax();
Running this code produces the following output:[14]
See it in CodePen: http://mng.bz/6e9S.
Calculating federal tax for income 50000
Calculating state tax for income 50000
In Tax. Calculating min tax
In NJTax. Will adjust min tax of 123
The NJTax class has its own explicitly defined constructor with two arguments, income and stateTaxPercent, which we provide while instantiating NJTax. To make sure the constructor of Tax is invoked (it sets the income attribute on the object), we explicitly call it from the subclass’s constructor: super(income). Without this line, running listing A.12 would report an error; we must call the constructor of a superclass from the derived constructor by calling the function super().
The other way of invoking code in superclasses is by using the super keyword. Both Tax and NJTax have the calcMinTax() methods. The one in the Tax superclass calculates the base minimum amount according to federal tax laws, whereas the subclass’s version of this method uses the base value and adjusts it. Both methods have the same signature, so we have a case for method overriding.
By calling super.calcMinTax(), we ensure that the base federal tax is taken into account for calculating state tax. If we didn’t call super.calcMinTax(), the subclass’s version of the calcMinTax() method would apply. Method overriding is often used to replace the functionality of the method in the superclass without changing its code.
ES6 classes are just syntactic sugar that increases code readability. Under the hood, JavaScript still uses prototypal inheritance, which allows you to replace the ancestor dynamically at runtime, whereas a class can have only one ancestor. Try to avoid creating deep inheritance hierarchies, because they reduce the flexibility of your code and complicate refactoring if it’s needed.
Although using the super keyword lets you invoke code in the ancestor, you should try to avoid using it to avoid tight coupling between the descendant and ancestor objects. The less the descendant knows about its ancestor, the better.
A.11.3. Static variables
If we need a class property that’s shared by multiple class instances, we need to create it outside of the class declaration. In listing A.13, the static variable counter is visible from both instances of the object A by invoking the printCounter() method. But if we try to access the variable counter on the instance level, it’ll be undefined.
Listing A.13. Sharing a class property
class A {
  printCounter(){
    console.log("static counter=" + A.counter);
  };
}

A.counter = 25;

let a1 = new A();
a1.printCounter();
console.log("In the a1 instance counter=" + a1.counter);

let a2 = new A();
a2.printCounter();
console.log("In the a2 instance counter=" + a2.counter);
That code produces this output:[15]
See it in CodePen: http://mng.bz/lCXD.
static counter=25
In the a1 instance counter=undefined
static counter=25"
In the a2 instance counter=undefined
A.11.4. Getters, setters, and method definitions
The syntax for the object’s getter and setter methods isn’t new in ES6, but let’s review it before going on to the new syntax for defining methods. Setters and getters bind functions to object properties. Consider the declaration and the use of the object literal Tax:
const Tax = {
  taxableIncome: 0,
  get income() {return this.taxableIncome;},
  set income(value) { this.taxableIncome = value}
};

Tax.income=50000;
console.log("Income: " + Tax.income); // prints Income: 50000
Note
Note that you assign and retrieve the value of income using dot notation, as if it were a declared property of the Tax object.
In ES5, we’d need to use the function keyword, such as calculateTax = function(){...}. With ES6, we can skip the function keyword in any method definition:
const Tax = {
    taxableIncome: 0,
    get income() {return this.taxableIncome;},
    set income(value) {this.taxableIncome = value},
    calculateTax() {return this.taxableIncome*0.13}
};

Tax.income = 50000;
console.log(`For the income ${Tax.income} your tax is ${Tax.calculateTax()}`);
The output of that code comes next:[16]
See it in CodePen: http://mng.bz/5729.
For the income 50000 your tax is 6500
Getters and setters offer a convenient syntax for working with properties. For example, if we decide to add some validation code to the income getter, the scripts using the Tax.income notation won’t need to be changed. The bad part is that ES6 doesn’t support private variables in classes, so nothing stops programmers from accessing the variable used in a getter or setter (such as taxableIncome) directly. We’ll talk about hiding (encapsulating) variables in section A.13.
A.12. Asynchronous processing
To arrange asynchronous processing in previous implementations of ECMAScript, we had to use callbacks, functions that are given as arguments to another function for invocation. Callbacks can be called synchronously or asynchronously.
Earlier, we passed a callback to the forEach() method for synchronous invocation. In making AJAX requests to the server, we pass a callback function to be invoked asynchronously when the result arrives from the server.
A.12.1. A callback hell
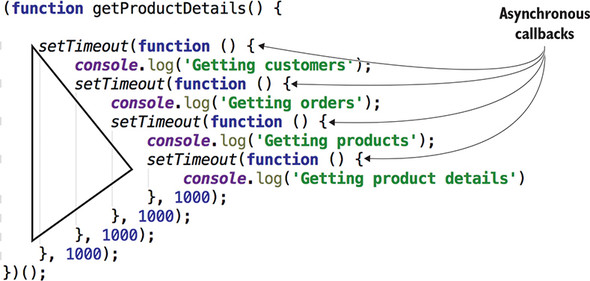
Let’s consider an example of getting data about some ordered products from the server. It starts with an asynchronous call to the server to get the information about the customers, and then for each customer we’ll need to make another call to get the orders. For each order, we need to get products, and the final call will get the product details.
In asynchronous processing, we don’t know when each of these operations will complete, so we need to write callback functions that are invoked when the previous one is complete. Let’s use the setTimeout() function to emulate delays, as if each operation requires one second to complete. Figure A.1 shows what this code may look like.
Figure A.1. Callback hell or pyramid of doom
Note
Using callbacks is considered an anti-pattern, also known as Pyramid of Doom, as seen in figure A.1 on the left. In our code sample we had four callbacks, and this level of nesting makes the code hard to read. In real-world apps, the pyramid may quickly grow, making the code very hard to read and debug.
Running the code in figure A.1 will print the following messages with one-second delays:[17]
See it in CodePen: http://mng.bz/DAX5.
Getting customers
Getting orders
Getting products
Getting product details
A.12.2. ES6 promises
When you press the button on your coffee machine, you don’t get a cup of coffee that very second. You get a promise that you’ll get a cup of coffee sometime later. If you didn’t forget to provide the water and the ground coffee, the promise will be resolved, and you can enjoy the coffee in a minute or so. If your coffee machine is out of water or coffee, the promise will be rejected. The entire process is asynchronous, and you can do other things while your coffee is being brewed.
JavaScript promises allow us to avoid nested calls and make the async code more readable. The Promise object represents an eventual completion or failure of an async operation. After the Promise object is created, it waits and listens for the result of an asynchronous operation and lets us know if it succeeded or failed so we can proceed with the next steps accordingly. The Promise object represents the future result of an operation, and it can be in one of these states:
- Fulfilled— The operation successfully completed.
- Rejected— The operation failed and returned an error.
- Pending— The operation is in progress, neither fulfilled nor rejected.
We can instantiate a Promise object by providing two functions to its constructor: the function to call if the operation is fulfilled, and the function to call if the operation is rejected. Consider a script with a getCustomers() function, shown in the following listing.
Listing A.14. Using a promise
function getCustomers() {

  return new Promise(
     function (resolve, reject) {

      console.log("Getting customers");
        // Emulate an async server call here
      setTimeout(function() {
        var success = true;
        if (success) {
          resolve("John Smith");                              1
         } else {
          reject("Can't get customers");                      2
         }
      }, 1000);

     }
  );
}

getCustomers()
  .then((cust) => console.log(cust))                          3
   .catch((err) => console.log(err));                         4
 console.log("Invoked getCustomers. Waiting for results");
- 1 Gets the customer
- 2 Invoked if an error occurs
- 3 Invoked when the promise is fulfilled
- 4 Invoked if the promise is rejected
The getCustomers() function returns a Promise object, which is instantiated with a function that has resolve and reject as the constructor’s arguments. In the code, we invoke resolve() if we receive the customer information. For simplicity, setTimeout() emulates an asynchronous call that lasts one second. We also hardcode the success flag to be true. In a real-world scenario, we could make a request with the XMLHttpRequest object and invoke resolve() if the result was successfully retrieved or reject() if an error occurred.
At the bottom of listing A.14, we attach then() and catch() methods to the Promise() instance. Only one of these two will be invoked. When we call resolve ("John Smith") from inside the function, it results in the invocation of the then() that received "John Smith" as its argument. If we changed the value of success to false, the catch() method would be called with the argument containing "Can't get customers":
Getting customers
Invoked getCustomers. Waiting for results
John Smith
Note that the message "Invoked getCustomers. Waiting for results" is printed before "John Smith". This proves that the getCustomers() function worked asynchronously.[18]
See it in CodePen: http://mng.bz/5rf3.
Each promise represents one asynchronous operation, and we can chain them to guarantee a particular order of execution. Let’s add a getOrders() function in the following listing that can find the orders for a provided customer, and chain getOrders() with getCustomers().
Listing A.15. Chaining promises
function getCustomers() {

  return new Promise(
     function (resolve, reject) {

      console.log("Getting customers");
        // Emulate an async server call here
      setTimeout(function() {
        const success = true;
        if (success){
          resolve("John Smith");                           1
         }else{
          reject("Can't get customers");
        }
      }, 1000);

     }
  );
  return promise;
}

function getOrders(customer) {

  return new Promise(
     function (resolve, reject) {

        // Emulate an async server call here
      setTimeout(function() {
        const success = true;
        if (success) {
          resolve(`Found the order 123 for ${customer}`);  2
         } else {
          reject("Can't get orders");
        }
      }, 1000);

     }
  );
}
getCustomers()
  .then((cust) => {
           console.log(cust);
           return cust;
        })
  .then((cust) => getOrders(cust))                         3
   .then((order) => console.log(order))
  .catch((err) => console.error(err));                     4
 console.log("Chained getCustomers and getOrders. Waiting for results");
- 1 Invoked when the customer is successfully obtained
- 2 Invoked when the order for a customer is successful
- 3 Chains with getOrders()
- 4 Handles errors
This code not only declares and chains two functions but also demonstrates how we can print intermediate results on the console. The output of listing A.15 follows (note that the customer returned from getCustomers() was properly passed to getOrders()):[19]
See it in CodePen: http://mng.bz/6z5k.
Getting customers
Chained getCustomers and getOrders. Waiting for results
John Smith
Found the order 123 for John Smith
We can chain multiple function calls using then() and have just one error-handling script for all chained invocations. If an error occurs, it will be propagated through the entire chain of thens until it finds an error handler. No thens will be invoked after the error.
Changing the value of the success variable to false in listing A.15 will result in printing the message "Can't get customers", and the getOrders() method won’t be called. If we remove these console prints, the code that retrieves customers and orders looks clean and is easy to understand:
getCustomers()
  .then((cust) => getOrders(cust))
  .catch((err) => console.error(err));
Adding more thens doesn’t make this code less readable (compare it with the pyramid of doom shown in figure A.1).
A.12.3. Resolving several promises at once
Another case to consider is asynchronous functions that don’t depend on each other. Say we need to invoke two functions in no particular order, but we need to perform some action only after both of them are complete. The Promise object has an all() method that takes an iterable collection of promises and executes (resolves) all of them. Because the all() method returns a Promise object, we can add then() or catch() (or both) to the result.
Imagine a web portal that needs to make several asynchronous calls to get the weather, stock market news, and traffic information. If we want to display the portal page only after all of these calls have completed, Promise.all() is what we need:
Promise.all([getWeather(),
             getStockMarketNews(),
             getTraffic()])
.then( (results) => { /* render the portal GUI here */ })
.catch(err => console.error(err)) ;
Keep in mind that Promise.all() resolves only after all of the promises resolve. If one of them rejects, the control goes to the catch() handler.
Compared to callback functions, promises make our code more linear and easier to read, and they represent multiple states of an application. On the negative side, promises can’t be canceled. Imagine an impatient user who clicks a button several times to get some data from the server. Each click creates a promise and initiates an HTTP request. There’s no way to keep only the last request and cancel the uncompleted ones.
The next step in the evolution of a Promise object is an Observable object, which should be introduced in future ECMAScript specifications; in chapter 5, we explain how to use it today.
The JavaScript code with promises is easier to read, but if you look at the then() function carefully, you’ll see that you still have to provide a callback function that will be called sometime later. The keywords async and await are the next step in the evolution of the JavaScript syntax for asynchronous programming.
A.12.4. async and await
The keywords async and await were introduced in ES8 (a.k.a. ES2017). They allow us to treat functions returning promises as if they’re synchronous. The next line of code is executed only when the previous one completes. It’s important to note that the waiting for the asynchronous code to complete happens in the background and doesn’t block the execution of other parts of the program:
- async is a keyword that marks a function that returns a promise.
- await is a keyword that we place right before the invocation of the async function. This instructs the JavaScript engine to not proceed to the next line until the asynchronous function either returns the result or throws an error. The JavaScript engine will internally wrap the expression on the right of the await keyword into a promise and the rest of the method into a then() callback.
To illustrate the use of async and await keywords, the following listing reuses the functions getCustomers() and getOrders() that use promises inside to emulate asynchronous processing.
Listing A.16. Declaring two functions that use promises
function getCustomers() {

    return new Promise(
        function (resolve, reject) {

            console.log("Getting customers");
            // Emulate an async call that takes 1 second to complete
            setTimeout(function() {
                const success = true;
                if (success){
                    resolve("John Smith");
                } else {
                    reject("Can't get customers");
                }
            }, 1000);
        }
    );
}

function getOrders(customer) {

    return new Promise(
        function (resolve, reject) {

            // Emulate an async call that takes 1 second
            setTimeout(function() {
                const success = true;   // change it to false

                if (success){
                    resolve( `Found the order 123 for ${customer}`);
                } else {
                    reject(`getOrders() has thrown an error for ${customer}`);
                }
            }, 1000);
        }
    );
}
We want to chain these function calls, but this time we won’t be using the then() calls as we did with promises. We’ll create a new function, getCustomersOrders(), that internally invokes getCustomers(), and when it completes, getOrders().
We’ll use the await keyword in the lines where we invoke getCustomers() and getOrders() so the code will wait for each of these functions to complete before continuing execution. We’ll mark the getCustomersOrders() function with the async keyword because it’ll use await inside. The following listing declares and invokes the function getCustomersOrders().
Listing A.17. Declaring and invoking an async function
(async function getCustomersOrders() {                   1
   try {
      const customer = await getCustomers();             2
       console.log(`Got customer ${customer}`);
      const orders = await getOrders(customer);          3
       console.log(orders);
  } catch(err) {                                         4
       console.log(err);
  }
})();

console.log("This is the last line in the app.
  Chained getCustomers() and getOrders() are still
  running without blocking the rest of the app.");       5
- 1 Declares the function with the async keyword
- 2 Invokes the asynchronous function getCustomers() with await so the code below won’t be executed until the function completes
- 3 Invokes the asynchronous function getOrders() with await so the code below won’t be executed until the function completes
- 4 Handles errors
- 5 This code runs outside of the async function.
As you see, this code looks as if it’s synchronous. It has no callbacks and is executed line by line. Error processing is done in a standard way using the try/catch block.
Running this code will produce the following output:
Getting customers
This is the last line in the app.
  Chained getCustomers() and getOrders() are still
  running without blocking the rest of the app.
Got customer John Smith
Found the order 123 for John Smith
Note that the message about the last line of code is printed before the name of the customer and the order number. Even though these values are retrieved asynchronously a bit later, the execution of this small app wasn’t blocked, and the script reached the last line before the async functions getCustomers() and getOrders() finished their execution.[20]
See it in CodePen: http://mng.bz/pSV8.
A.13. ES6 modules
In any programming language, splitting code into modules helps organize the application into logical and possibly reusable units. Modularized applications allow programming tasks to be split between software developers more efficiently. Developers get to decide which API should be exposed by the module for external use and which should be used internally.
ES5 doesn’t have language constructs for creating modules, so we have to resort to one of these options:
- Manually implement a module design pattern as an immediately initialized function.
- Use third-party implementations of the AMD (http://mng.bz/JKVc) or CommonJS (http://mng.bz/7Lld) standard.
CommonJS was created for modularizing JavaScript applications that run outside the web browser (such as those written in Node.js and deployed under Google’s V8 engine). AMD is primarily used for applications that run in a web browser.
You should split your app into modules to make your code more maintainable. Besides that, you should minimize the amount of JavaScript code loaded to the client on app startup. Imagine a typical online store. Do you need to load the code for processing payments when users open the application’s home page? What if they never click the Place Order button? It would be nice to modularize the application so the code is loaded on an as-needed basis. RequireJS is probably the most popular third-party library that implements the AMD standard; it lets you define dependencies between modules and load them on the browser on demand.
Starting with ES6, modules have become part of the language, which means developers will stop using third-party libraries to implement various standards. A script becomes a module if it uses import and/or export keywords.
Note
ES6 modules allow you to avoid polluting the global scope and restrict the visibility of the script and its members (classes, functions, variables, and constants) to those modules that import them.
Say we have a multifile project, and one of the files has the following content:
class Person {}
Because we didn’t export anything from this file, it’s not an ES6 module, and the instance of the Person class would be created in the global scope. If you already have another script in the same project that also declares the Person class, the Type-Script compiler will give you an error in the preceding code stating that you’re trying to declare a duplicate of what already exists.
Adding the export statement to the preceding code changes the situation, and this script becomes a module:
export class Person {}
Now objects of type Person won’t be created on the global scope, and their scope will be limited to only those scripts (other ES6 modules) that import Person. In chapters 1 and 2, we introduce Angular modules that (in contrast to ES6 modules) serve as registries of Angular artifacts that belong together.
A.13.1. import and export
A module is just a JavaScript file that implements certain functionality and exports (or imports) a public API so other JavaScript programs can use it. There’s no special keyword to declare that the code in a particular file is a module. Just by using the keywords import and export, you turn a script into an ES6 module.
The import keyword enables one script to declare that it needs to use exported members from another script. Similarly, the export keyword lets you declare variables, functions, and classes that the module should be exposed to other scripts. Using the export keyword, you can make selected APIs available to other modules. A module’s functions, variables, and classes that aren’t explicitly exported remain private to the module.
ES6 offers two types of export usage: named and default. With named exports, you can use the export keyword in front of multiple members of the module (such as classes, functions, and variables). The code in the following file (tax.js) exports the taxCode variable and the functions calcTaxes() and fileTaxes(), but the doSomethingElse() function remains hidden to external scripts:
export let taxCode = 1;

export function calcTaxes() { }

function doSomethingElse() { }

export function fileTaxes() { }
When a script imports named, exported module members, their names must be placed in curly braces. The main.js file illustrates this:
import {taxCode, calcTaxes} from 'tax';

if (taxCode === 1) { // do something }

calcTaxes();
Here, tax refers to the filename of the module, minus the file extension. The curly braces represent destructuring. The module from tax.js exports three members, but we’re interested in importing only taxCode and calcTaxes.
One of the exported module members can be marked as default, which means this is an anonymous export, and another module can give it any name in its import statement. The my_module.js file that exports a function may look like this:
export default function() { // do something }      1

export let taxCode;
- 1 No semicolon
The main.js file imports both named and default exports while assigning the name coolFunction to the default one:
import coolFunction, {taxCode} from 'my_module';
coolFunction();
Note that you don’t use curly braces around coolFunction (default export) but you do around taxCode (named export). A script that imports a class, variable, or function that was exported with the default keyword can give them new names without using any special keywords:
import aVeryCoolFunction, {taxCode} from 'my_module';

aVeryCoolFunction();
But to give an alias name to a named export, we need to write something like this:
import coolFunction, {taxCode as taxCode2016} from 'my_module';
import module statements don’t result in copying the exported code. Imports serve as references. A script that imports modules or members can’t modify them, and if the values in imported modules change, the new values are immediately reflected in all places where they were imported. We use the import statement in each chapter of this book, so you’ll have a chance to get a good feeling for how to use ES6 modules.
Tip
Don’t use default exports in Angular apps because you’ll get errors during ahead-of-time (AoT) compilation.