
Chapter 9. Change detection and component lifecycle
This chapter covers
- How Angular knows that a UI update is needed
- Reviewing the milestones in the life of a component
- Writing code in component lifecycle hooks
All the apps you’ve developed so far have been properly updating the UI when the user or program updates the properties of your components. How does Angular know when to update the UI? In this chapter, we’ll discuss the change detection (CD) mechanism that monitors the asynchronous events of your app and decides whether the UI should be updated or not.
We’ll also discuss the lifecycle of an Angular component and the callback method hooks you can use to provide application-specific code that intercepts important events during a component’s creation, lifespan, and destruction.
Finally, we’ll continue working on ngAuction. This time, you’ll add the view that displays product details.
9.1. A high-level overview of change detection
As the user works with your app, things change and the values of component properties (the model) get modified. Most of the changes happen asynchronously—for example, the user clicks a button, data is received from a server, an observable starts emitting values, a script invokes the setTimeout() function, and so on. Angular needs to know when the result of an asynchronous operation becomes available, to update the UI accordingly.
For automatic CD, Angular uses the library zone.js (the Zone). Angular subscribes to Zone events to trigger CD, which keeps the component’s model and UI in sync. The CD cycle is initiated by any asynchronous event that happens in the browser. The change detector keeps track of all async calls made in components, services, and so forth; and when they complete, it makes a single pass from top to bottom of the component tree to see whether the UI of any component has to be updated.
Note
The CD mechanism applies changes in the component’s properties to its UI. CD never changes the value of the component’s property.
The zone.js library is one of the dependencies in your Angular project. It spares you from manually writing code to update UI, but starting with Angular 5, using the Zone is optional. To illustrate the role of zone.js, let’s do an experiment: you’ll create a simple project managed by the Zone first, and then you’ll turn the Zone off. This project includes the AppComponent shown in the following listing.
Listing 9.1. The Zone is on
@Component({
  selector: 'app-root',
  template: `<h1>Welcome to {{title}}!</h1>`
})
export class AppComponent {

  title = 'app';

  constructor() {
    setTimeout(() => {this.title = 'Angular 5'}, 5000);     1
   }
}
- 1 Invokes the code asynchronously so the Zone will update the UI in five seconds
Running this app renders “Welcome to app!” Five seconds later, the message changes to “Welcome to Angular 5!” Let’s change the app bootstrap code in the main.ts file to use the empty Zone object noop, introduced in Angular 5:
platformBrowserDynamic().bootstrapModule(AppModule, {ngZone: 'noop'});
Now running the same app will render “Welcome to app!” and this message will never change. You just turned off the Zone, and the app didn’t update the UI.
Note
You can still initiate CD by injecting the ApplicationRef servicer in the app constructor and invoking its tick() method after updating the value of the title property.
An Angular application is structured as a tree of views (components), with the root component at the top of the tree. When Angular compiles component templates, each component gets its own change detector. When CD is initiated by the Zone, it makes a single pass, starting from the root down to the leaf components, checking to see whether the UI of each component needs to be updated (see the sidebar “Lifecycle hooks, change detection, and production mode” at the end of section 9.2 about CD in dev versus production). Is there a way to instruct the change detector not to visit each and every component upon every async property change?
9.1.1. Change detection strategies
For UI updates, Angular offers two CD strategies: Default and OnPush. If all components use the Default strategy, the Zone checks the entire component tree, regardless of where the change happened.
If a particular component declares the OnPush strategy, the Zone checks this component and its children only if the bindings to the component’s input properties have changed, or if the component uses AsyncPipe, and the corresponding observable started emitting values.
If a component that has the OnPush strategy changes a value of one of its properties bound to its template, the change detection cycle won’t be initiated. To declare the OnPush strategy, add the following line to the @Component() decorator:
changeDetection: ChangeDetectionStrategy.OnPush
Figure 9.1 illustrates the effect of the OnPush strategy using three components: the parent, a child, and a grandchild. Let’s say a property of the parent was modified. CD will begin checking the component and all of its descendants.
Figure 9.1. Change detection strategies

The left side of figure 9.1 illustrates the default CD strategy: all three components are checked for changes. The right side of figure 9.1 illustrates what happens when the child component has the OnPush CD strategy. CD starts from the top, but it sees that the child component has declared the OnPush strategy. If no bindings to the input properties have changed and no observable with AsyncPipe emits values (for example, via the ActivatedRoute parameters), CD doesn’t check either the child or the grandchild.
Figure 9.1 shows a small application with only three components, but real-world apps can have hundreds of components. With the OnPush strategy, you can opt out of CD for specific branches of the tree.
Figure 9.2 shows a CD cycle caused by an event in the GrandChild1 component. Even though this event happened in the bottom-left leaf component, the CD cycle starts from the top; it’s performed on each branch except the branches that originate from a component with the OnPush CD strategy and have no changes in the bindings to this component’s input properties. Components excluded from this CD cycle are shown on a white background.
Figure 9.2. Excluding a branch from a CD cycle

This has been a brief overview of the CD mechanism. You should learn about CD in depth if you need to work on performance tuning of a UI-intensive application, such as a data grid containing hundreds of cells with constantly changing values. For in-depth coverage of change detection, see the article “Everything you need to know about change detection in Angular” by Maxim Koretskyi at http://mng.bz/0YqE.
In general, it’s a good idea to make OnPush a default CD strategy for each component. If you see that the UI of a component doesn’t get updated as expected, review the code and either switch back to the Default change detection strategy or manually initiate the CD pass by injecting the ChangeDetectorRef object and using its API (see https://angular.io/api/core/ChangeDetectorRef).
What if you have a slow-running component with lots of changing template elements? Could multiple passes of the change detector contribute to this slowness?
9.1.2. Profiling change detection
Listing 9.2 shows you how to profile change detection by enabling Angular debug tools. Change the app bootstrap code in main.ts to look like the following.
Listing 9.2. Enabling Angular debug tools
import {platformBrowserDynamic} from '@angular/platform-browser-dynamic';
import {AppModule} from './app/app.module';
import {ApplicationRef} from '@angular/core';
import {enableDebugTools} from '@angular/platform-browser';

platformBrowserDynamic().bootstrapModule(AppModule).then((module) => {
  const applicationRef = module.injector.get(ApplicationRef);            1
   const appComponent = applicationRef.components[0];                    2
   enableDebugTools(appComponent);                                       3
 });
- 1 Gets a reference to the bootstrapped app
- 2 Gets a reference to the app’s top-level component
- 3 Enables Angular debug tools
Launch your app, and in the browser console, enter the following command:
ng.profiler.timeChangeDetection({record: true})
Now your app will start reporting the time spent on each CD cycle, as shown in figure 9.3.
Figure 9.3. Profiling change detection

We’ve covered change detection, so now let’s get familiar with the private life of a component.
9.2. Component lifecycle
Various events happen during the lifecycle of an Angular component: it gets created, reacts to different events, and gets destroyed. As explained in the last section, when a component is created, the CD mechanism begins monitoring it. The component is initialized, added to the DOM, and rendered by the browser. After that, the state of the component (the values of its properties) may change, causing rerendering of the UI, and, finally, the component is destroyed.
Figure 9.4 shows the lifecycle hooks (methods) where you can add custom code to intercept the lifecycle event and add your code there. If Angular sees any of these methods implemented in your app, it’ll invoke them.
Figure 9.4. A component’s lifecycle hooks
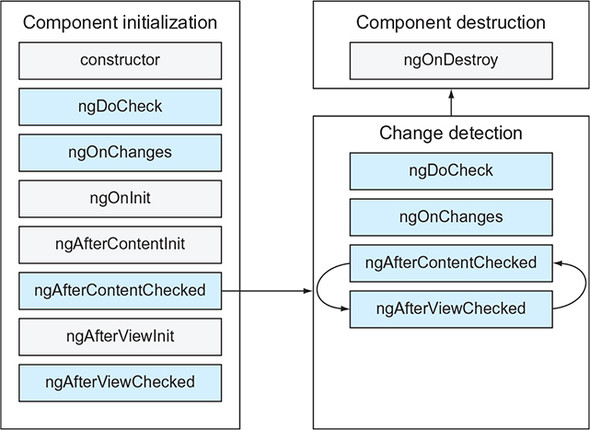
The callbacks shown on the light-gray background will be invoked only once, and those on the darker background can be invoked multiple times during the component life span. The user sees the component after the initialization phase is complete. Then the change detection mechanism ensures that the component’s properties stay in sync with its UI. If the component is removed from the DOM tree as a result of the router’s navigation or a structural directive (such as *ngIf), Angular initiates the destroy phase.
The constructor is invoked first when the instance of the component is being created, but the component’s properties aren’t initialized yet in the constructor. After the constructor’s code is complete, Angular will invoke the following callbacks if you implemented them:
- ngOnChanges()— Called when a parent component modifies (or initializes) the values bound to the input properties of a child. If the component has no input properties, ngOnChanges() isn’t invoked.
- ngOnInit()— Invoked after the first invocation of ngOnChanges(), if any. Although you might initialize some component variables in the constructor, the properties of the component aren’t ready yet. By the time ngOnInit() is invoked, the component properties will have been initialized, which is why this method is mainly used for the initial data fetch.
- ngDoCheck()— Called on each pass of the change detector. If you want to implement a custom change detection algorithm or add some debug code, write it in ngDoCheck(). But keep in mind that placing any code in the ngDoCheck() method can affect the performance of your app because this method is invoked on each and every pass of the change detection cycle.
- ngAfterContentInit()— Invoked when the child component’s state is initialized and the projection completes. This method is called only if you used <ng-content> in your component’s template.
- ngAfterContentChecked()— During the change detection cycle, this method is invoked on the component that has <ng-content> after it gets the updated content from the parent if the bindings used in the projected content change.
- ngAfterViewInit()— Invoked after a component’s view has been fully initialized. We used it in section 8.4 in chapter 8.
- ngAfterViewChecked()— Invoked when the change detection mechanism checks whether there are any changes in the component template’s bindings. This callback may be called more than once as the result of modifications in this or other components.
- ngOnDestroy()— Invoked when the component is being destroyed. Use this callback to clean unneeded resources, for example, to unsubscribe from explicitly created subscriptions or remove timers.
Each lifecycle callback is declared in the interface with a name that matches the name of the callback without the prefix ng. For example, if you’re planning to implement functionality in the ngOnChanges() callback, add implements OnChanges to your class declaration.
Let’s consider some code samples illustrating the use of lifecycle hooks. The following code listing illustrates the use of ngOnInit().
Listing 9.3. Fetching data in ngOnInit()
@Input() productId: number;                                              1

constructor(private productService: ProductService) { }                  2

ngOnInit() {

   this.product = this.productService.getProductById(this.productId);    3
   }
- 1 Declares an input property
- 2 Injects a service, but doesn’t use it in the constructor
- 3 Uses the service in ngOnInit() to ensure that the productId is already initialized
This code uses the value of the input property productId as an argument of the getProductById() method. If you’d invoked getProductById() in the constructor, the productId property wouldn’t be initialized yet. By the time ngOnInit() is invoked, productId is initialized, and you can safely invoke getProductById().
The ngOnDestroy() hook is invoked when a component gets destroyed. For example, when you use the router to navigate from component A to component B, component A gets destroyed, and component B is created. If you created an explicit subscription in component A, don’t forget to unsubscribe in ngOnDestroy(). This hook is also supported by Angular services.
9.2.1. Catching changes in the ngOnChanges hook
Now let’s write a small app that uses ngOnChanges() and illustrates the different effects of bindings on primitive values versus object values. This app will include parent and child components, and the latter will have two input properties: greeting and user. The first property is a string, and the second is an Object with one property: name. To understand why the ngOnChanges() callback may or may not be invoked, you need to become familiar with the concept of mutable versus immutable values.
JavaScript strings are primitives, which are immutable—when a string value is created at a certain location in memory, you can’t change it there. Consider the following code snippet:
let greeting = "Hello";
greeting = "Hello Mary";
The first line creates the value Hello in memory. The second line doesn’t change the value at that address but creates the new string Hello Mary at a different memory location. Now you have two strings in memory, and each of them is immutable.
If the greeting variable was bound to an input property of a component, then its binding changed, because the value of this variable was initially at one memory location, and then the address changed.
JavaScript objects (as well as functions and arrays) are mutable and are stored in heap memory, and only references to objects are stored on the stack. After the object instance is created at a certain memory location, the reference to this object on the stack doesn’t change when the values of the object’s properties change in the heap memory. Consider the following code:
var user = {name: "John"};
user.name = "Mary";
After the first line, the object is created, and the reference to the instance of the user object is stored in stack memory and points at a certain memory location. The string "John" has been created at another memory location, and the user.name variable knows where it’s located in memory.
After the second line of the preceding code snippet is executed, the new string "Mary" is created at another location. But the reference variable user is still stored in the same location on the stack. In other words, you mutated the content of the object but didn’t change the value of the reference variable that points at this object. To make an object immutable, you need to create a new instance of the object whenever any of its properties changes.
Tip
You can read more about JavaScript data types and data structures at http://mng.bz/bzL4.
Let’s add the ngOnChanges() hook to the child component to demonstrate how it intercepts modifications of the input properties. This application has parent and child components. The child has two input properties (greeting and user). The parent component has two input fields, and the user can modify their values, which are bound to the input properties of the child. Let’s see if ngOnChanges() will be invoked and which values it’s going to get. The code of the parent component is shown in the following listing.
Listing 9.4. app.component.ts
@Component({
  selector: 'app-root',
  styles: ['.parent {background: deeppink}'],
  template: `
     <div class="parent">
       <h2>Parent</h2>
       <div>Greeting: <input type="text" [(ngModel)]="myGreeting">        1
        </div>
       <div>User name: <input type="text" [(ngModel)]="myUser.name">      2
        </div>
       <child [greeting]="myGreeting"                                     3
              [user]="myUser">                                            4
        </child>
    </div>
  `
})
export class AppComponent {
  myGreeting = 'Hello';
  myUser: {name: string} = {name: 'John'};
}
- 1 Uses two-way binding to synchronize entered greeting and myGreeting
- 2 Uses two-way binding to synchronize entered username and myUser.name
- 3 Binds myGreeting to child’s input property greeting
- 4 Binds myUser to child’s input property user
The child component receives the values from the parent component via its input variables. This component implements the OnChanges interface. In the ngOnChanges() method, you print the received data as soon as the binding to any of the input variable changes, as shown in the following listing.
Listing 9.5. child.component.ts
@Component({
  selector: 'child',
  styles: ['.child {background: lightgreen}'],
  template: `
    <div class="child">
      <h2>Child</h2>
      <div>Greeting: {{greeting}}</div>
      <div>User name: {{user.name}}</div>
    </div>
  `
})
export class ChildComponent implements OnChanges {         1
   @Input() greeting: string;
  @Input() user: {name: string};

  ngOnChanges(changes: {[key: string]: SimpleChange}) {    2

    console.log(JSON.stringify(changes, null, 2));
  }
}
- 1 Implements the OnChanges interface
- 2 Angular invokes ngOnChanges() when the bindings to input properties change.
When Angular invokes ngOnChanges(), it provides a SimpleChange object containing the old and new values of the modified input property and the flag indicating whether this is the first binding change. You use JSON.stringify() to pretty-print the received values.
Let’s see if changing greeting and user.name in the UI results in the invocation of ngOnChanges() on the child component. We ran this app, deleted the last letter in the word Hello, and changed the name of the user from John to John Smith, as shown in figure 9.5.
Figure 9.5. ngOnChanges() is invoked after the greeting change

Initially, ngOnChanges() was invoked for both properties. Note the "firstChange": true—this was the very first change in bindings. After we deleted the letter o in the greeting Hello, ngOnChanges() was invoked again, and the firstChange flag became false. But changing the username from John to John Smith didn’t invoke ngOnChanges(), because the binding of the mutable object myUser didn’t change.
To see this app in action, run npm install in the project lifecycle, and then run the following command:
ng serve --app lifecycle -o
Angular doesn’t update bindings to input properties if only the object properties change, and that’s why the ngOnChanges() on the child wasn’t invoked. But the change detection mechanism still catches the change. That’s why "John Smith", the new value of the property user.name, has been rendered in the child component.
Tip
Add changeDetection: ChangeDetectionStrategy.OnPush to the template of ChildComponent, and its UI won’t reflect changes in the parent’s username. The binding to the child’s user property doesn’t change; hence, the change detector won’t even visit the child for UI updates.
You probably appreciate the change detector for properly updating the UI, but what if you still need to programmatically catch the moment when the username changes and implement some code that handles this change?
9.2.2. Catching changes in the ngDoCheck hook
Suppose you want to catch the moment when a JavaScript object gets mutated. Let’s rewrite the child component from the preceding section to use the ngDoCheck() callback instead of ngOnChanges(). The goals are as follows:
- Catch the moment when the object bound to an Input() property mutates.
- Find out which property of the bound object changed.
- Get the previous value of the changed property.
- Get the new value of this property.
To achieve these goals, you’ll implement the DoCheck interface and use Angular’s KeyValueDiffers, KeyValueChangeRecord, and KeyValueDiffer. You want to monitor the user object and its properties.
First, you’ll inject the KeyValueDiffers service, which implements diffing strategies for various Angular artifacts. Second, you need to create an object of type KeyValueDiffer that will specifically monitor user object changes. When a change happens, you’ll get an object of type KeyValueChangeRecord containing the properties key, previousValue, and currentValue. The code of the new child component is shown in the following listing.
Listing 9.6. child.component-docheck.ts
import {
  DoCheck, Input, SimpleChange, Component, KeyValueDiffers,
  KeyValueChangeRecord, KeyValueDiffer} from "@angular/core";

@Component({
  selector: 'child',
  styles: ['.child {background: lightgreen}'],
  template: `
    <div class="child">
      <h2>Child</h2>
      <div>Greeting: {{greeting}}</div>
      <div>User name: {{user.name}}</div>
    </div>
  `
})
export class ChildComponent implements DoCheck {
  @Input() greeting: string;
  @Input() user: {name: string};

  differ: KeyValueDiffer<string, string>;                                  1

  constructor(private _differs: KeyValueDiffers) { }                       2

  ngOnInit() {
   this.differ = this._differs.find(this.user).create();                   3
   }

  ngDoCheck() {                                                            4

    if (this.user && this.differ) {

      const changes = this.differ.diff(this.user);                         5

      if (changes) {
        changes.forEachChangedItem(                                        6
           (record: KeyValueChangeRecord<string, string>) =>
            console.log(`Got changes in property ${record.key}             7
                before: ${record.previousValue} after: ${record.currentValue}
     `));
      }
    }
  }
}
KeyValueChangeRecord, KeyValueDiffer} from "@angular/core";
@Component({
selector: 'child',
styles: ['.child {background: lightgreen}'],
template: `
<div class="child">
<h2>Child</h2>
<div>Greeting: {{greeting}}</div>
<div>User name: {{user.name}}</div>
</div>
`
})
export class ChildComponent implements DoCheck {
@Input() greeting: string;
@Input() user: {name: string};
differ: KeyValueDiffer<string, string>; 1
constructor(private _differs: KeyValueDiffers) { } 2
ngOnInit() {
this.differ = this._differs.find(this.user).create(); 3
}
ngDoCheck() { 4
if (this.user && this.differ) {
const changes = this.differ.diff(this.user); 5
if (changes) {
changes.forEachChangedItem( 6
(record: KeyValueChangeRecord<string, string>) =>
console.log(`Got changes in property ${record.key} 7
before: ${record.previousValue} after: ${record.currentValue}
`));
}
}
}
}
- 1 Declares a variable for storing differences
- 2 Injects the service for monitoring changes
- 3 Initializes the differ variable for storing differences in the user object
- 4 Implements the callback ngDoCheck()
- 5 Checks whether the properties of the user object changed
- 6 Gets the record of changes for each user property
- 7 Prints the changes on the console
The diff() method returns a KeyValueChanges object that includes the record about the change and offers such methods as forEachAddedItem(), forEachChangedItem(), forEachRemovedItem(), and more. In your component, you’re interested only in catching changes, so you use forEachChangedItem(), which returns the KeyValueChangeRecord for each changed property.
The KeyValueChangeRecord interface defines the properties key, currentValue, and previousValue, which you print on the console. Figure 9.6 shows what happens after you delete the letter n in the User name input field, which was John originally.
Figure 9.6. ngDoCheck() is invoked after each pass of the change detector.

Catching the username changes doesn’t seem to be a practical use case, but some applications do need to invoke specific business logic whenever the value of a property changes. For example, financial applications may need to log each of a trader’s steps. If a trader places a buy order at $101 and then immediately changes the price to $100, that must be tracked in a log file. This may be a good use case for catching such a change and adding logging in the DoCheck() callback.
To see this app in action, in the lifecycle/app.module.ts file, modify the import statement for the child component to import {ChildComponent} from "./child. component-docheck"; and run the following command:
ng serve --app lifecycle -o
Caution
We want to warn you once again: use ngDoCheck() only if you can’t find another way of intercepting data changes, because it may affect the performance of your app.
At the beginning of the chapter, we stated that the change detector makes one pass from top to bottom of the components tree to see if the component’s UI should be updated. This is correct if your app runs in production mode, but in development mode (default), change detector makes two passes.
If you open the browser’s console while running most of the apps from this book, you’ll see a message stating that Angular is running in development mode, which performs assertions and other checks within the framework. One such assertion verifies that a change detection pass doesn’t result in additional changes to any bindings (for example, your code doesn’t modify the UI in the component lifecycle callbacks during the CD cycle). If your code tries to change the UI from one of the lifecycle callbacks, Angular will throw an exception.
When you’re ready to make a production build, turn on production mode so the change detector will make only one pass and won’t perform the additional bindings check. To enable production mode, invoke enableProdMode() in your app before invoking the bootstrap() method. Enabling production mode will also result in better app performance.
Now that we’ve covered all the important parts of the component’s life, let’s continue working on ngAuction.
9.3. Hands-on: Adding the product view to ngAuction
In chapter 7, you created the home page of ngAuction. In this section, you’ll create the product view, which will be rendered when the user clicks one of the product tiles in the home view. Figure 9.7 shows how the product view will look if the user selects Vintage Bluetooth Radio.
Figure 9.7. The product view

Besides information about the radio on the right, on the left are other suggested products that you want the user to consider. Amazon uses the same marketing technique while showing a product description. You’ve probably seen “More items to consider” or “Frequently bought together” sections on Amazon’s product pages. Depending on the viewport size, suggested products can be rendered either on the left or at the bottom of the product view.
The view shown in figure 9.7 will be implemented as ProductComponent, which will include two child components: ProductDetailComponent and ProductSuggestionComponent. In the product view, you’ll use the Flex Layout library so that the UI layout will adjust to the available width of the viewport on the user’s device.
One more thing: your product view will be implemented as a lazy-loaded feature module, explained in section 4.3 in chapter 4. Let’s begin.
Note
If you created this version of ngAuction by following the explanations and instructions from the hands-on section in chapter 7, you can continue working on this app. You’ll find the completed version of ngAuction with the implemented product view in the folder chapter9/ng-auction.
9.3.1. Creating product components and the module
You’ll start with generating a ProductModule feature module by running the following command:
ng g m product
The command will create the product folder with the product.module.ts file. Because you’ll use the Flex Layout library on the product view, add FlexLayoutModule to the imports property of the @NgModule() decorator, as shown in the following listing.
Listing 9.7. product.module.ts
import {NgModule} from '@angular/core';
import {CommonModule} from '@angular/common';
import {FlexLayoutModule} from '@angular/flex-layout';

@NgModule({
  imports: [
    CommonModule,
    FlexLayoutModule
  ],
  declarations: []
})
export class ProductModule { }
This feature module will contain three components: ProductComponent, ProductDetailComponent, and ProductSuggestionComponent. The latter two will be subcomponents, and you want them to be located in separate subfolder under the product folder. You generate these components with the following commands:
ng g c product
ng g c product/product-detail
ng g c product/product-suggestion
These commands will generate three components and will add their names to the declarations property of the product module. You’re going to lazy load the ProductModule when the user clicks a particular product tile in the home component. To do that, you’ll configure an additional route for the products/:productId path, so the app.component.ts file will look like the following listing.
Listing 9.8. app.routing.ts
import {Route} from '@angular/router';
export const routes: Route[] = [
  {
    path: '',
    loadChildren: './home/home.module#HomeModule'
  },
  {
    path: 'products/:productId',
    loadChildren: './product/product.module#ProductModule'
  }
];
Now you can proceed with implementing the components supporting the product view.
9.3.2. Implementing the product component
Your ProductComponent will serve as a wrapper for two child components: ProductDetailComponent and ProductSuggestionComponent. The product component implements the following functionality:
- It should be a default route of the product module.
- It should receive the product ID passed from the home component.
- It should get a reference to the ProductService object to receive product details.
- It should manage the layout of its children based on the viewport width.
To render the ProductComponent when the user navigates to the product view, you need to add the following listing to the ProductModule.
Listing 9.9. product.module.ts
...
import {RouterModule} from '@angular/router';

@NgModule({
  imports: [
   ...
    RouterModule.forChild([
      {path: '', component: ProductComponent}
    ])
  ],
  ...
})
export class ProductModule {}
In the preceding section, you configured the route for the path 'products/:productId' in the root module, which means ProductComponent has to receive the requested product ID. You also need to inject ProductService in the constructor of ProductComponent, as shown in the following listing.
Listing 9.10. product.component.ts
import { filter, map, switchMap} from 'rxjs/operators';
import { Component } from '@angular/core';
import { ActivatedRoute } from '@angular/router';
import { Observable } from 'rxjs';
import { Product, ProductService } from '../shared/services';

@Component({
  selector: 'nga-product',
  styleUrls: [ './product.component.scss' ],
  templateUrl: './product.component.html'
})
export class ProductComponent {
  product$: Observable<Product>;
  suggestedProducts$: Observable<Product[]>;

  constructor(
    private route: ActivatedRoute,
    private productService: ProductService
  ) {
    this.product$ = this.route.paramMap
      .pipe(
        map(params => parseInt(params.get('productId') || '', 10)),      1
        filter(productId => !!productId),                                2
        switchMap(productId => this.productService.getById(productId))   3
      );

    this.suggestedProducts$ = this.productService.getAll();              4
  }
}
- 1 Gets the product ID
- 2 Ensures that product ID is a valid number
- 3 Switches to the observable that retrieves details for the specified product
- 4 Initializes the observable for populating the suggested products
This component receives the product ID from the ActivatedRoute object. In section 6.6 of chapter 6, you saw the code that directly subscribes to the paramMap. In this case, you don’t explicitly invoke the subscribe() method but will use the async pipe in the template. That’s why you convert the given parameter from a string to a number with parseInt() in the map operator.
What if the user enters alpha characters in the URL instead of the product ID, such as http://localhost:4200/products/abc? In this case, parseInt() returns NaN, which you’ll catch in the filter operator using double-bang syntax: !!productId. Non-alpha characters won’t get through the filter operator.
The numeric product IDs will be given to the switchMap operator that switches over to the observable returned by the getById() method. To get the suggested products, you invoke the getAll() method.
Note
Earlier, we stated that ngOnInit() is the right place for fetching data, but in this code sample, you do it in the constructor. Would it cause problems? Not in this case, because neither getById() nor getAll() uses component properties that would be initialized in the constructor.
The code for ProductComponent could use a couple of improvements, and we want you to implement them on your own.
Your product component invokes productService.getAll() to retrieve suggested products. This isn’t exactly right. Say you select sunglasses. The product-detail component will show the description of the sunglasses, and the sunglasses will be also included as a suggested product. See if you can modify the implementation of the product component so it won’t suggest the product that is already selected by the user.
If you enter an invalid product ID in the browser (such as http://localhost:4200/products/abc) on the product page, you won’t see any errors because the filter() operator will ignore this request, but the page will render only suggested products. To handle this scenario in a user-friendly manner, create a resolve guard, which will cancel the navigation if the service doesn’t find the product with the provided ID and notify the user about it. For example, you can use the Angular Material snack-bar component for notifications (see http://mng.bz/1hx1).
The template of the product component will be implemented in the product .component.html file. It’ll host <nga-product-detail> and <nga-product-suggestion> components and pass them the product(s) data to render, as shown in the following listing.
Listing 9.11. product.component.html
<div class="wrapper"
     fxLayout="column"
     fxLayout.>-md="row-reverse">                      1

  <nga-product-detail
      fxFlex="auto"                                    2
       fxFlex.>-md="65%"
      *ngIf="product$ | async as product"              3
       [product]="product">                            4
   </nga-product-detail>

  <nga-product-suggestion
      fxFlex="auto"
      fxFlex.>-md="35%"
      *ngIf="suggestedProducts$ | async as products"   5
       [products]="products">                          6
   </nga-product-suggestion>
</div>
- 1 On larger than medium viewports, shows product detail on the right and suggested products on the left
- 2 Takes enough space to render this component but not more
- 3 If product$ emitted a value, puts it in the local template variable product
- 4 Passes the product object to <nga-product-detail> for rendering
- 5 If suggestedProducts$ emitted a value, puts it in the local template variable products
- 6 Passes products to <nga-product-suggestion> for rendering.
Listing 9.11 uses the async as syntax for subscription. async as product means “define the local template variable product, and store the emitted value there.” This syntax is useful when you need to reference the emitted object multiple times. Without the async as syntax, it could be written like this:
*ngIf = "product$ | async"
[product] = "product$ | async"
That would create two subscriptions instead of one, which you want to avoid, especially if a subscription triggers side effects like an HTTP request or some additional processing like filtering or sorting a large set of data.
Note
From now on, to save space in this book, we won’t include the content of the .scss files that contain styles of the ngAuction components. Please refer to the code samples that come with the book, found at https://github.com/Farata/angulartypescript and www.manning.com/books/angular-development-with-typescript-second-edition.
9.3.3. Implementing the product-detail component
The ProductDetailComponent is a presentation component that contains no business logic and renders the product provided via its input property. It’s a child of the ProductComponent, as shown in the following listing.
Listing 9.12. product-detail.component.ts
@Component({
  selector: 'nga-product-detail',
  styleUrls: ['./product-detail.component.scss'],
  templateUrl: './product-detail.component.html'
})
export class ProductDetailComponent {
  @Input() product: Product;
}
The template of this component is shown in the next listing. It supports responsive web design (RWD) using the directives from the Flex Layout library.
Listing 9.13. product-detail.component.html
<div class="wrapper"
     ngClass.lt-md="wrapper--lt-md"
     ngClass.>-md="wrapper-->-md"
     fxLayout="row"
     fxLayoutAlign="center"
     fxLayout.xs="column"
     fxLayoutAlign.xs="center center">                                       1

  <div fxFlex="50%">                                                         2
     <img class="thumbnail"
         [attr.alt]="product.title"
         [attr.src]="product.imageUrl">
  </div>

  <div fxFlex="50%">                                                         3
     <div class="info">
      <h1 class="info__title">{{product?.title}}</h1>
      <div class="info__description">{{product?.description}}</div>
      <div class="info__bid">
        <span>
          <span class="info__bid-value"                                      4
                 ngClass.lt-md="info__bid-value--lt-md">
                {{product?.price | currency: 'USD': 'symbol': '.0'}}</span>
          <span class="info__bid-value-decimal"
                ngClass.lt-md="info__bid-value-decimal--lt-md">.00</span>
        </span>
        <span class="info__bid-label">LAST BID</span>
      </div>

      <button class="info__bid-button"
              mat-raised-button                                              5
               color="accent">
        PLACE BID {{(product?.price + 5) | currency: 'USD': 'symbol': '.0'}} 6
       </button>
    </div>
  </div>
</div>
- 1 Centers the content of the children both horizontally and vertically
- 2 Half of the viewport is given to the product image.
- 3 Half of the viewport is given to the title, description, and bidding controls.
- 4 The last bid amount
- 5 Uses the button from Angular Material
- 6 The user can place bids in $5 increments.
In this version of the auction, you don’t implement the bidding functionality. You’ll do that in the hands-on section in chapter 13.
Because you use mat-raised-button from the Angular Material library, add the MatButtonModule to the product module
Listing 9.14. product.module.ts
....
import {MatButtonModule} from '@angular/material/button';
@NgModule({
  imports: [
    ...
    MatButtonModule
  ]
  ...
})
export class ProductModule {}
9.3.4. Implementing the product-suggestion component
In real-world online stores or auctions, the product-suggestion component shows similar products from the same category that the user may consider buying. In this version of ngAuction, you’ll show all your products (you have only a dozen of them) under the caption “More items to consider,” as you saw on the left in figure 9.7.
ProductSuggestionComponent is the second child of ProductComponent, and the content of the product-suggestion.component.ts file is shown in the following listing.
Listing 9.15. product-suggestion.component.ts
import { map, startWith } from 'rxjs/operators';
import { Component, Input } from '@angular/core';
import { ObservableMedia } from '@angular/flex-layout';
import { Observable } from 'rxjs';
import { Product } from '../../shared/services';

@Component({
  selector: 'nga-product-suggestion',
  styleUrls: [ './product-suggestion.component.scss' ],
  templateUrl: './product-suggestion.component.html'
})
export class ProductSuggestionComponent {
  @Input() products: Product[];
  readonly columns$: Observable<number>;
  readonly breakpointsToColumnsNumber = new Map([                          1
    [ 'xs', 2 ],
    [ 'sm', 3 ],
    [ 'md', 5 ],
    [ 'lg', 2 ],
    [ 'xl', 3 ],
  ]);

  constructor(private media: ObservableMedia) {                            2
     this.columns$ = this.media.asObservable()
      .pipe(
        map(mc => <number>this.breakpointsToColumnsNumber.get(mc.mqAlias)),
        startWith(3) // bug workaround                                     3
      );
  }
}
- 1 Sets the number of grid columns for different viewport sizes
- 2 Injects the ObservableMedia service from the Flex Layout library
- 3 Gets the number of grid columns based on the media query alias
The code for ProductSuggestionComponent is similar to the code for the HomeComponent developed for ngAuction in the hands-on section in chapter 7. In this case, you use different numbers of grid columns based on the viewport size, taking into account that a large portion of the screen will be occupied by the ProductDetailComponent. The template of the product suggestions component is shown in the following listing.
Listing 9.16. product-suggestion.component.html
<div class="info__title" fxLayout="row">
   More items to consider:
</div>

<mat-grid-list [cols]="columns$ | async" gutterSize="16px">        1

  <mat-grid-tile class="tile" *ngFor="let product of products">    2
     <a class="tile__content"
       fxLayout
       fxLayoutAlign="center center"

       [routerLink]="['/products', product.id]">                   3

      <div class="tile__thumbnail"
           [ngStyle]="{'background-image':
'url(' + product.imageUrl + ')'}"></div>
    </a>
  </mat-grid-tile>
</mat-grid-list>
- 1 Subscribes to columns$ using the async pipe
- 2 For each product, renders a tile that wraps product info in the anchor tag
- 3 Shows another product info if the user clicks the tile
Because you use <mat-grid-list> from the Angular Material library, add the MatGridListModule to the product module.
Listing 9.17. product.module.ts
....
import { MatGridListModule } from '@angular/material/grid-list';
@NgModule({
  imports: [
    ...
    MatGridListModule
  ]
  ...
})
export class ProductModule {}
To run this version of ngAuction that implements routing and the product view, use the following command:
ng serve -o
Open the Network tab in Chrome Dev Tools and click one of the products. You’ll see that the code and resources of the product module were lazy loaded.
In the hands-on section of chapter 11, you’ll add search functionality and category tabs for easily filtering products by category.
Summary
- The change detection mechanism automatically monitors changes to components’ properties and updates the UI accordingly.
- You can mark selected branches of your app component tree to be excluded from the change detection process.
- Writing the application code in the component lifecycle hook ensures that this code is executed in sync with UI updates.