Appendix B. TypeScript essentials
TypeScript was released in 2012 by Microsoft, and its core developer was Anders Hejlsberg. He’s also one of the authors of Turbo Pascal and Delphi, and is a lead architect of C#. In this appendix, we’ll cover main elements of the TypeScript syntax.
We’ll also show you how to turn TypeScript code into JavaScript (ES5) so it can be executed by any web browser or a standalone JavaScript engine. This appendix doesn’t offer a complete coverage of TypeScript. Refer to the TypeScript documentation at www.typescriptlang.org/docs/home.html for complete coverage. Also, TypeScript supports all syntax constructs described in appendix A, so we don’t repeat those here.
B.1. The role of transpilers
Web browsers don’t understand any language but JavaScript. If the source code is written in TypeScript, it has to be transpiled into JavaScript before you can run it in a JavaScript engine, whether browser or standalone.
Transpiling means converting the source code of a program in one language into source code in another language. Many developers prefer to use the word compiling, so phrases like “TypeScript compiler” and “compile TypeScript into JavaScript” are also valid.
Figure B.1 shows TypeScript code on the left and its equivalent in an ES5 version of JavaScript generated by the TypeScript transpiler on the right. In TypeScript, we declared a variable foo of type string, but the transpiled version doesn’t have the type information. In TypeScript, we declared a class Bar, which was transpiled in a class-like pattern in the ES5 syntax.
Figure B.1. Transpiling TypeScript into ES5

You can try it for yourself by visiting the TypeScript playground at www.typescriptlang.org/play. If we had specified ES6 as a target for transpiling, the generated JavaScript code would look different; you’d see the let and class keywords on the right side as well.
A combination of Angular with statically typed TypeScript simplifies the development of web applications. Good tooling and a static type analyzer substantially decrease the number of runtime errors and shorten the time to market. When complete, your Angular application will have lots of JavaScript code; and although developing in TypeScript may require you to write a little more code, you’ll reap benefits by saving time on testing and refactoring and minimizing the number of runtime errors.
B.2. Getting started with TypeScript
Microsoft has open sourced TypeScript and hosts the TypeScript repository on GitHub at https://github.com/Microsoft/TypeScript/wiki/Roadmap. You can install the TypeScript compiler using npm. The TypeScript site www.typescriptlang.org has the language documentation and has a web-hosted TypeScript compiler (under the Playground menu), where you can enter TypeScript code and compile it to JavaScript interactively, as shown in figure B.1. Enter TypeScript code on the left, and its JavaScript version (ES5) is displayed on the right. Click the Run button to execute the transpiled code (open the browser console to see the output produced by your code, if any).
Such interactive tools will suffice for learning the language syntax, but for real-world development, you’ll need better tooling to be productive. You may decide to use an IDE or a text editor, but having the TypeScript compiler installed locally is a must for development. We’ll show you how to install the TypeScript compiler and run code samples in this appendix, using the Node JavaScript engine.
We assume that you have Node.js and npm installed on your computer. If you don’t have them yet, refer to appendix C.
B.2.1. Installing and using the TypeScript compiler
We’ll use Node.js’s npm package manager to install the TypeScript compiler. To install it globally, run the following npm command in the Terminal window:
npm install -g typescript
The -g option installs the TypeScript compiler globally on your computer, so it’s available from the Terminal window in all your projects. To check the version of your TypeScript compiler, run the following command:
tsc
 --version
As mentioned earlier, code written in TypeScript has to be transpiled into JavaScript so web browsers can execute it. TypeScript code is saved in files with the .ts extension. Say you write a script and save it in the main.ts file. The following command will transpile main.ts into main.js:
tsc main.ts
You can also generate source map files that map lines in the TypeScript program to corresponding lines in the generated JavaScript. With source maps, you can place breakpoints in your TypeScript code while running it in the browser, even though it executes JavaScript. To compile main.ts into main.js while also generating the source map file main.js.map, run the following command:
tsc --sourcemap main.ts
If a browser has the Developer Tools panel open, it loads the source map file along with the JavaScript file, and you can debug your TypeScript code there as if the browser runs TypeScript.
During compilation, TypeScript’s compiler removes from the generated code all TypeScript types, interfaces, and keywords not supported by JavaScript. By providing compiler options, you can generate JavaScript compliant with ES3, ES5, ES6, or newer syntax.
Here’s how to transpile the code to ES5-compatible syntax (the --t option specifies the target syntax):
tsc --t ES5 main.ts
You can start your TypeScript compiler in watch mode by providing the -w option. In this mode, whenever you modify and save your code, it’s automatically transpiled into corresponding JavaScript files. To compile and watch all .ts files from the current directory, run the following command:
tsc -w *.ts
The compiler will compile all the TypeScript files, print error messages (if any) on the console, and continue watching the files for changes. As soon as a file changes, tsc will immediately recompile it.
Note
Typically, we turn off TypeScript autocompilation in the IDE. With Angular apps, we use Angular CLI to compile and bundle the entire project. The IDEs use the TypeScript code analyzer to highlight errors even without compilation.
tsc offers dozens of compilation options described at http://mng.bz/rf14. You can preconfigure the process of compilation (specifying the source and destination directories, source map generation, and so on). The presence of the tsconfig.json file in the project directory means you can enter tsc on the command line, and the compiler will read all the options from tsconfig.json. A sample tsconfig.json file from one of the Angular projects is shown in the following listing.
Listing B.1. tsconfig.json
{
    "compilerOptions": {
        "baseUrl": "src",                 1
         "outDir": "./dist",              2
         "sourceMap": true,               3
         "moduleResolution": "node",      4
         "noEmitOnError": true,           5
         "target": "es5",                 6
         "experimentalDecorators": true   7
     }
}
- 1 Transpiles .ts files located in the src directory
- 2 Saves the generated .js files in the dist directory
- 3 Generates sourcemaps
- 4 Looks for modules according to the structure of Node-based projects
- 5 If any of the files has compilation errors, doesn’t generate JavaScript files
- 6 Transpiles the .ts file into ES5 syntax
- 7 Required to support decorators
Every Angular/TypeScript app uses decorators with classes or class members (such as @Component() and @Input()). We’ll discuss decorators later in this appendix.
If you want to exclude some of your project files from compilation, add the exclude property to tsconfig.json. This is how you can exclude the entire content of the node_modules directory:
"exclude": [
    "node_modules"
  ]
B.2.2. TypeScript as a superset of JavaScript
TypeScript supports ES5, ES6, and newer ECMAScript syntax. Just change the name extension of a file with JavaScript code from .js to .ts, and it’ll become valid TypeScript code. Being a superset of JavaScript, TypeScript adds a number of useful features to JavaScript. We’ll review them next.
B.3. How to run the code samples
To run the code samples from this appendix locally on your computer, perform the following steps:
1. Install Node.js from https://nodejs.org/en/download/ (use the current version).
2. Clone or download the https://github.com/Farata/angulartypescript repository into any directory.
3. In the command window, change into this directory, and then go to the code-samples/appendixB subdirectory.
4. Install the project dependencies (the TypeScript compiler) locally by running npm install.
5. Use the locally installed TypeScript compiler to compile all code samples into the dist directory by running npm run tsc, which will transpile all code samples from the src directory into the dist directory.
6. To run a particular code sample (such as fatArrow.js) use the following command: node dist/fatArrow.
B.4. Optional types
You can declare variables and provide types for all or some of them. The following two lines are valid TypeScript syntax:
let name1 = 'John Smith';

let name2: string = 'John Smith';
Tip
In the second line, specifying the type string is unnecessary. Since the variable is initialized with the string, TypeScript will guess (infer) that the type of name2 is string.
If you use types, TypeScript’s transpiler can detect mismatched types during development, and IDEs will offer code completion and refactoring support. This will increase your productivity on any decent-sized project. Even if you don’t use types in declarations, TypeScript will guess the type based on the assigned value and will still do type checking afterward. This is called type inference.
The following fragment of TypeScript code shows that you can’t assign a numeric value to a name1 variable that was meant to be a string, even though it was initially declared without a type (JavaScript syntax). After initializing this variable with a string value, the inferred typing won’t let you assign the numeric value to name1:
let name1 = 'John Smith';
name1 = 123;                 1
- 1 Assigning a value of a different type to a variable is valid in JavaScript but invalid in TypeScript because of the inferred type.
In TypeScript, you can declare typed variables, function parameters, and return values. There are four keywords for declaring basic types: number, boolean, string, and void. The last one indicates the absence of a return value in a function declaration. A variable can have a value of type null or undefined, similar to JavaScript.
Here are some examples of variables declared with explicit types:
let salary: number;
let isValid: boolean;
let customerName: string = null;
Note
Starting from TypeScript 2.7, you need to either initialize variables during declaration or initialize (member variables) in the constructor.
All of these types are subtypes of the any type. You may as well explicitly declare a variable, specifying any as its type. In this case, inferred typing isn’t applied. Both of these declarations are valid:
let name2: any = 'John Smith';
name2 = 123;
If variables are declared with explicit types, the compiler will check their values to ensure that they match the declarations. TypeScript includes other types that are used in interactions with the web browser, such as HTMLElement and Document. If you define a class or an interface, it can be used as a custom type in variable declarations. We’ll introduce classes and interfaces later, but first let’s get familiar with TypeScript functions, which are the most-used constructs in JavaScript.
B.5. Functions
TypeScript functions and function expressions are similar to JavaScript functions, but you can explicitly declare parameter types and return values. Let’s write a JavaScript function that calculates tax. It’ll have three parameters and will calculate tax based on the state, income, and number of dependents. For each dependent, the person is entitled to a $500 or $300 tax deduction, depending on the state the person lives in. The function is shown in the following listing.
Listing B.2. Calculating tax in JavaScript
function calcTax(state, income, dependents) {
    if (state === 'NY') {
        return income * 0.06 - dependents * 500;
    } else if (state === 'NJ') {
        return income * 0.05 - dependents * 300;
    }
}
Say a person with an income of $50,000 lives in the state of New Jersey and has two dependents. Let’s invoke calcTax():
let tax = calcTax('NJ', 50000, 2);
The tax variable gets the value of 1,900, which is correct. Even though calcTax() doesn’t declare any types for the function parameters, you can guess them based on the parameter names. Now let’s invoke it the wrong way, passing a string value for a number of dependents:
var tax = calcTax('NJ', 50000, 'two');
You won’t know there’s a problem until you invoke this function. The tax variable will have a NaN value (not a number). A bug sneaked in just because you didn’t have a chance to explicitly specify the types of the parameters. The next listing rewrites this function in TypeScript, declaring types for parameters and the return value.
Listing B.3. Calculating tax in TypeScript
function calcTax(state: string, income: number, dependents: number): number {

    if (state === 'NY'){
        return income * 0.06 - dependents * 500;
    } else if (state ==='NJ'){
        return income * 0.05 - dependents * 300;
    }
}
Now there’s no way to make the same mistake and pass a string value for the number of dependents:
let tax: number = calcTax('NJ', 50000, 'two');
The TypeScript compiler will display an error saying, “Argument of type string is not assignable to parameter of type number.” Moreover, the return value of the function is declared as number, which stops you from making another mistake and assigning the result of the tax calculations to a non-numeric variable:
let tax: string = calcTax('NJ', 50000, 'two');
The compiler will catch this, producing the error “The type ‘number’ is not assignable to type ‘string’: var tax: string.” This kind of type checking during compilation can save you a lot of time on any project.
B.5.1. Default parameters
While declaring a function, you can specify default parameter values. For example:
function calcTax(income: number, dependents: number, state: string = 'NY'): n
     umber{
    // the code goes here
}
There’s no need to change even one line of code in the body of calcTax(). You now have the freedom to invoke it with either two or three parameters:
let tax: number = calcTax(50000, 2);
// or
let tax: number = calcTax(50000, 2, 'NY');
The results of both invocations will be the same.
B.5.2. Optional parameters
In TypeScript, you can easily mark function parameters as optional by appending a question mark to the parameter name. The only restriction is that optional parameters must come last in the function declaration. When you write code for functions with optional parameters, you need to provide application logic that handles the cases when the optional parameters aren’t provided.
Let’s modify the tax-calculation function in the following listing: if no dependents are specified, it won’t apply any deduction to the calculated tax.
Listing B.4. Calculating tax in TypeScript, modified
function calcTax(income: number, state: string = 'NY', dependents?: number):
     number{

    let deduction: number;

    if (dependents) {
        deduction = dependents * 500;
    }else {
      deduction = 0;
    }

    if (state === 'NY') {
        return income * 0.06 - deduction;
    } else if (state === 'NJ') {
        return income * 0.05  - deduction;
    }
}

let tax: number = calcTax(50000, 'NJ', 3);
console.log(`Your tax is ${tax}`);

tax = calcTax(50000);
console.log(`Your tax is ${tax}`);
Note the question mark in dependents?: number. Now the function checks whether the value for dependents was provided. If it wasn’t, you assign 0 to the deduction variable; otherwise, you deduct 500 for each dependent.
Running the preceding script will produce the following output:
Your tax is 1000
Your tax is 3000
Note
TypeScript supports the syntax of fat-arrow expressions described in section A.5 in appendix A.
JavaScript doesn’t support function overloading, so having several functions with the same name but different lists of arguments isn’t possible. TypeScript supports function overloading, but because the code has to be transpiled into a single JavaScript function, the syntax for overloading isn’t elegant.
You can declare several signatures of a function with one and only one body, where you need to check the number and types of the arguments and execute the appropriate portion of the code:
function attr(name: string): string;
function attr(name: string, value: string): void;
function attr(map: any): void;
function attr(nameOrMap: any, value?: string): any {
  if (nameOrMap && typeof nameOrMap === "string") {
      // handle string case
  } else {
      // handle map case
  }
  // handle value here
}
B.6. Classes
If you have Java or C# experience, you’ll be familiar with the concepts of classes and inheritance in their classical form. In those languages, the definition of a class is loaded in memory as a separate entity (like a blueprint) and is shared by all instances of this class. If a class is inherited from another one, the object is instantiated using the combined blueprint of both classes.
TypeScript is a superset of JavaScript, which only supports prototypal inheritance, where you can create an inheritance hierarchy by attaching one object to the prototype property of another. In this case, an inheritance (or rather, a linkage) of objects is created dynamically.
In TypeScript, the class keyword is syntactic sugar to simplify coding. In the end, your classes will be transpiled into JavaScript objects with prototypal inheritance. In JavaScript, you can declare a constructor function and instantiate it with the new keyword. In TypeScript, you can also declare a class and instantiate it with the new operator.
A class can include a constructor, fields (properties), and methods. Declared properties and methods are often referred to as class members. We’ll illustrate the syntax of TypeScript classes by showing you a series of code samples and comparing them with the equivalent ES5 syntax.
Let’s create a simple Person class that contains four properties to store the first and last name, age, and Social Security number (a unique identifier assigned to citizens and residents of the United States). At left in figure B.2, you can see the TypeScript code that declares and instantiates the Person class; on the right is a JavaScript closure generated by the tsc compiler. By creating a closure for the Person function, the TypeScript compiler enables the mechanism for exposing and hiding the elements of the Person object.
Figure B.2. Transpiling a TypeScript class into a JavaScript closure

TypeScript also supports class constructors that allow you to initialize object variables while instantiating the object. A class constructor is invoked only once during object creation. The left side of figure B.2 shows the Person class, which uses the constructor keyword that initializes the fields of the class with the values given to the constructor.
B.6.1. Access modifiers
JavaScript doesn’t have a way to declare a variable or a method as private (hidden from external code). To hide a property (or a method) in an object, you need to create a closure that neither attaches this property to the this variable nor returns it in the closure’s return statement.
TypeScript provides public, protected, and private keywords to help you control access to object members during the development phase. By default, all class members have public access, and they’re visible from outside the class. If a member is declared with the protected modifier, it’s visible in the class and its subclasses. Class members declared as private are visible only in the class.
Let’s use the private keyword to hide the value of the _ssn property so it can’t be directly accessed from outside of the Person object. We’ll show you two versions of declaring a class with properties that use access modifiers. The longer version of the class looks like the following listing.
Listing B.5. Using a private property
class Person {
    public firstName: string;
    public lastName: string;
    public age: number;
    private _ssn: string;

    constructor(firstName: string, lastName: string, age: number, ssn: string
     ) {
        this.firstName = firstName;
        this.lastName = lastName;
        this.age = age;
        this._ssn = ssn;
    }
}

const p = new Person("John", "Smith", 29, "123-90-4567");
console.log("Last name: " + p.lastName + " SSN: " + p._ssn);
Note that the name of the private variable starts with an underscore: _ssn. This is a naming convention for private properties.
The last line of listing B.5 attempts to access the _ssn private property from outside, so the TypeScript code analyzer will give you a compilation error: “Property ‘_ssn’ is private and is only accessible in class ‘Person’.” But unless you use the --noEmitOnError compiler option, the erroneous code will still be transpiled into JavaScript:
const Person = (function () {
    function Person(firstName, lastName, age, _ssn) {
        this.firstName = firstName;
        this.lastName = lastName;
        this.age = age;
        this._ssn = _ssn;
    }
    return Person;
})();

const p = new Person("John", "Smith", 29, "123-90-4567");
console.log("Last name: " + p.lastName + " SSN: " + p._ssn);
The private keyword only makes it private in the TypeScript code, but the generated JavaScript code will treat all properties and methods of the class as public anyway.
TypeScript also allows you to provide access modifiers with constructor arguments, as shown in the short version of the Person class in the following listing.
Listing B.6. Using access modifiers
class Person {

    constructor(public firstName: string,
        public lastName: string, public age: number,  private _ssn: string) {
    }
}

const p = new Person("John", "Smith", 29, "123-90-4567");
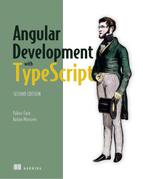
When you use a constructor with access modifiers, the TypeScript compiler takes it as an instruction to create and retain class properties matching the constructor arguments. You don’t need to explicitly declare and initialize them. Both the short and long versions of the Person class generate the same JavaScript, but we recommend using the shorter syntax as shown in figure B.3.
Figure B.3. Transpiling a TypeScript class with constructor
B.6.2. Methods
When a function is declared in a class, it’s called a method. In JavaScript, you need to declare methods on the prototype of an object, but with a class, you declare a method by specifying a name followed by parentheses and curly braces, as you would in other object-oriented languages.
The next code listing shows how you can declare and use a MyClass class with a doSomething() method that has one argument and no return value.
Listing B.7. Creating a method
class MyClass {

   doSomething(howManyTimes: number): void {
      // do something here
   }
}

const mc = new MyClass();
mc.doSomething(5);
The code in listing B 7, as well as the class shown in figure B.2, creates an instance of the class first and then accesses its members using a reference variable that points at this instance:
mc.doSomething(5);
If a class property or method were declared with the static keyword, its values would be shared between all instances of the class, and you wouldn’t need to create an instance to access static members. Instead of using a reference variable (such as mc), you’d use the name of the class:
class MyClass{

   static doSomething(howManyTimes: number): void {
      // do something here
   }
}

MyClass.doSomething(5);
If you instantiate a class and need to invoke a class method from within another method declared in the same class, don’t use the this keyword (as in, this.doSomething(5)), but still use the class name, as in MyClass.doSomething(10);.
B.6.3. Inheritance
JavaScript supports prototypal object-based inheritance, where one object can assign another object as its prototype, and this happens during runtime. TypeScript has the extends keyword for inheritance of classes, like ES6 and other object-oriented languages. But during transpiling to JavaScript, the generated code uses the syntax of prototypal inheritance.
Figure B.4 shows how to create an Employee class (line 9) that extends the Person class. On the right, you can see the transpiled JavaScript version, which uses prototypal inheritance. The TypeScript version of the code is more concise and easier to read.
Figure B.4. Class inheritance in TypeScript

Let’s add a constructor and a department property to the Employee class in the next listing.
Listing B.8. Using inheritance
class Employee extends Person {
    department: string;                                          1

    constructor(firstName: string, lastName: string,             2
            age: number, _ssn: string, department: string) {

        super(firstName, lastName, age, _ssn);                   3

        this.department = department;
    }
}
- 1 Declares a property department
- 2 Creates a constructor that has an additional department argument
- 3 A subclass that declares a constructor must invoke the constructor of the superclass using super().
If you invoke a method declared in a superclass on the object of the subclass type, you can use the name of this method as if it were declared in the subclass. But sometimes you want to specifically call the method of the superclass, and that’s when you should use the super keyword.
The super keyword can be used two ways. In the constructor of a derived class, you invoke it as a method. You can also use the super keyword to specifically call a method of the superclass. It’s typically used with method overriding. For example, if both a superclass and its descendant have a doSomething() method, the descendant can reuse the functionality programmed in the superclass and add other functionality as well:
doSomething() {
    super.doSomething();

    // Add more functionality here
}
B.7. Interfaces
JavaScript doesn’t support interfaces, which, in other object-oriented languages, are used to introduce a code contract that an API has to abide by. An example of a contract can be class X declaring that it implements interface Y. If class X won’t include an implementation of the methods declared in interface Y, it’s considered a violation of the contract and won’t compile.
TypeScript includes the keywords interface and implements to support interfaces, but interfaces aren’t transpiled into JavaScript code. They just help you avoid using the wrong types during development.
In TypeScript, we use interfaces for two reasons:
- Declare an interface that defines a custom type containing a number of properties. Then declare a method that has an argument of such a type. The compiler will check that the object given as an argument includes all the properties declared in the interface.
- Declare an interface that includes abstract (non-implemented) methods. When a class declares that it implements this interface, the class must provide an implementation for all the abstract methods.
Let’s apply these two patterns by example.
B.7.1. Declaring custom types with interfaces
When you use JavaScript frameworks, you may run into an API that requires some sort of configuration object as a function parameter. To figure out which properties must be provided in this object, either open the documentation for the API or read the source code of the framework. In TypeScript, you can declare an interface that includes all the properties, and their types, that must be present in a configuration object.
Let’s see how to do this in the Person class, which contains a constructor with four arguments: firstName, lastName, age, and ssn. This time, in the following listing, you’ll declare an IPerson interface that contains the four members, and you’ll modify the constructor of the Person class to use an object of this custom type as an argument.
Listing B.9. Declaring an interface
interface IPerson {
    firstName: string;
    lastName: string;
    age: number;
    ssn?: string;                                       1
 }

class Person  {
    constructor(public config: IPerson) {}              2
 }

let aPerson: IPerson = {                                3
     firstName: "John",
    lastName: "Smith",
    age: 29
}

let p = new Person(aPerson);                            4
 console.log("Last name: " + p.config.lastName );
- 1 Declares an IPerson interface with ssn as an optional member (note the question mark)
- 2 The Person class has a constructor with one argument of type IPerson.
- 3 creates an aPerson object literal with members compatible with IPerson
- 4 Instantiates the Person object, providing an object of type IPerson as an argument
TypeScript has a structural type system, which means that if two different types include the same members, the types are considered compatible. In listing B.9, even if you didn’t specify the type of the aPerson variable, it still would be considered compatible with IPerson and could be used as a constructor argument while instantiating the Person object. If you change the name or type of one of the members of IPerson, the TypeScript compiler will report an error.
The IPerson interface didn’t define any methods, but TypeScript interfaces can include method signatures without implementations.
B.7.2. Using the implements keyword
The implements keyword can be used with a class declaration to announce that the class will implement a particular interface. Say you have an IPayable interface declared as follows:
interface IPayable {
  increase_cap: number;

  increasePay(percent: number): boolean
}
Now the Employee class can declare that it implements IPayable:
class Employee implements IPayable {
    // The implementation goes here
}
Before going into details, let’s answer this question: why not just write all required code in the class rather than separating a portion of the code into an interface? Let’s say you need to write an application that allows increasing salaries for the employees of your organization.
You can create an Employee class (that extends Person) and include the increaseSalary() method there. Then the business analysts may ask you to add the ability to increase pay to contractors who work for your firm. But contractors are represented by their company names and IDs; they have no notion of salary and are paid on an hourly basis.
You can create another class, Contractor (not inherited from Person), that includes some properties and an increaseHourlyRate() method. Now you have two different APIs: one for increasing the salary of employees, and another for increasing the pay for contractors. A better solution is to create a common IPayable interface and have Employee and Contractor classes provide different implementations of IPayable for these classes, as illustrated in the following listing.
Listing B.10. Using multiple interface implementations
interface IPayable {                                                      1

  increasePay(percent: number): boolean
}

class Person {                                                            2
     // properties are omitted for brevity
}

class Employee extends Person implements IPayable {                       3

    increasePay(percent: number): boolean {                               4

        console.log(`Increasing salary by ${percent}`);
        return true;
    }
}

class Contractor implements IPayable {
    increaseCap:number = 20;                                              5

    increasePay(percent: number): boolean {                               6
         if (percent < this.increaseCap) {
            console.log(`Increasing hourly rate by ${percent}`);
            return true;
        } else {
            console.log(`Sorry, the increase cap for contractors is
                     ${this.increaseCap}`);
            return false;
        }
    }
}

const workers: IPayable[] = [];                                          7
 workers[0] = new Employee();
workers[1] = new Contractor();

workers.forEach(worker => worker.increasePay(30));                       8
- 1 The IPayable interface includes the signature of the increasePay() method that will be implemented by the Employee and Contractor classes.
- 2 The Person class serves as a base class for Employee.
- 3 The Employee class inherits from Person and implements the IPayable interface. A class can implement multiple interfaces.
- 4 The Employee class implements the increasePay() method. The salary of an employee can be increased by any amount, so the method prints the message on the console and returns true (allowing the increase).
- 5 The Contractor class includes a property that places a cap of 20% on pay increases.
- 6 The implementation of increasePay() in the Contractor class is different, invoking increasePay() with an argument that’s more than 20 results in the “Sorry” message and a return value of false.
- 7 Declaring an array of type IPayable lets you place any objects that implement the IPayable type there.
- 8 Now you can invoke the increasePay() method on any object in the workers array. Note that you don’t use parentheses with the fat-arrow expression that has a single worker argument.
Running the preceding script produces the following output on the browser console:
Increasing salary by 30
Sorry, the increase cap for contractors is 20
If you remove implements Payable from the declaration of either Employee or Contractor, the code will still work, and the compiler won’t complain about lines that add these objects to the workers array. The compiler is smart enough to see that even if the class doesn’t explicitly declare implements IPayable, it implements increasePay() properly.
But if you remove implements IPayable and try to change the signature of the increasePay() method from any of the classes, you won’t be able to place such an object into the workers array, because that object would no longer be of the IPayable type. Also, without the implements keyword, IDE support (such as for refactoring) will be broken.
B.8. Generics
TypeScript supports parameterized types, also known as generics, which can be used in a variety of scenarios. For example, you can create a function that can take values of any type; but during its invocation, in a particular context, you can explicitly specify a concrete type.
Take another example: an array can hold objects of any type, but you can specify which particular object types (for example, instances of Person) are allowed in an array. If you were to try to add an object of a different type, the TypeScript compiler would generate an error.
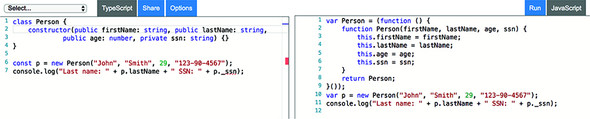
The following code listing declares a Person class and its descendant, Employee, and an Animal class. Then it instantiates each class and tries to store them in the workers array declared with the generic type. Generic types are denoted by placing them in angle brackets (as in <Person>).
Listing B.11. Using a generic type
class Person {
    name: string;
}

class Employee extends Person {
    department: number;
}

class Animal {
    breed: string;
}

let workers: Array<Person> = [];

workers[0] = new Person();
workers[1] = new Employee();
workers[2] = new Animal();  // compile-time error
By declaring the workers array with the generic type <Person>, you announce your plan to store only instances of the Person class or its descendants. An attempt to store an instance of Animal in the same array will result in a compile-time error.
If you’re familiar with generics in Java or C#, you may get a feeling that you already understand this syntax. There’s a caveat, though. Though Java and C# use a nominal type system, TypeScript uses a structural one. In a nominal system, types are checked against their names, but in a structural system, by their structure.
With a nominal type system, the following line would result in an error:
let person: Person = new Animal();
With a structural type system, as long as the structures of the type are similar, you may get away with assigning an object of one type to a variable of another. Let’s illustrate it by adding the name property to the Animal class.
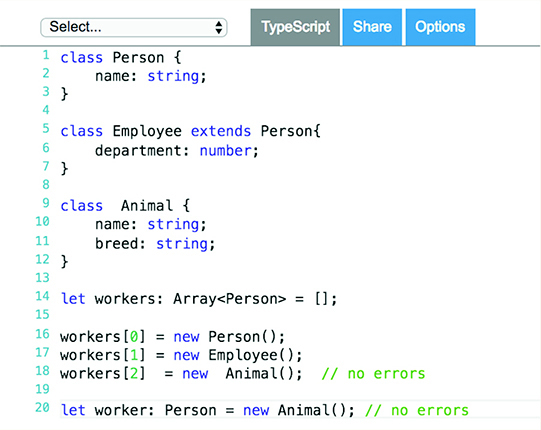
Structural type system in action
Now the TypeScript compiler doesn’t complain about assigning an Animal object to a variable of type Person. The variable of type Person expects an object that has a name property, and the Animal object has it. This is not to say that Person and Animal represent the same types, but these types are compatible. On the other hand, trying to assign the Person object to a variable of type Animal will result in the compilation error “Property breed is missing in type Person”:
let worker: Animal = new Person(); // compilation error
Can you use generic types with any object or function? No. The creator of the object or function has to allow this feature. If you open TypeScript’s type definition file (lib.d.ts) on GitHub at http://mng.bz/I3V7 and search for “interface Array,” you’ll see the declaration of the Array, as shown in figure B.5. Type definition files are explained later in this appendix.
Figure B.5. The fragment of lib.d.ts describing the Array API

The <T> in line 1008 serves as a placeholder for the actual type. It means TypeScript allows you to declare a type parameter with Array, and the compiler will check for the specific type provided in your program. Earlier in this section, we specified a generic <T> parameter as <Person> in let workers: Array<Person>. But because generics aren’t supported in JavaScript, you won’t see them in the code generated by the transpiler. It’s just an additional safety net for developers at compile time.
You can see another T in line 1022 in figure B.5. When generic types are specified with function arguments, no angle brackets are needed. But there’s no T type in TypeScript. The T here means the push method lets you push objects of a specific type into an array, as in the following example:
workers.push(new Person());
You can create your own classes and functions that support generics, as well. The next listing defines a Comparator<T> interface that declares a compareTo() method, expecting the concrete type to be provided during method invocation.
Listing B.12. Creating an interface that uses generics
interface Comparator<T> {                                                 1
     compareTo(value: T): number;
}

class Rectangle implements Comparator<Rectangle> {                        2

    constructor(private width: number, private height: number) {};

    compareTo(value: Rectangle): number {                                 3
         if (this.width * this.height >= value.width * value.height) {
            return 1;
        } else  {
            return -1;
        }
    }
}

let rect1: Rectangle = new Rectangle(2,5);
let rect2: Rectangle = new Rectangle(2,3);

rect1.compareTo(rect2) === 1? console.log("rect1 is bigger"):
                            console.log("rect1 is smaller");              4

class Programmer implements Comparator<Programmer> {                      5

    constructor(public name: string, private salary: number) {};

    compareTo(value: Programmer): number {                                6
         if (this.salary >= value.salary) {
            return 1;
        } else  {
            return -1;
        }
    }
}

let prog1: Programmer = new Programmer("John",20000);
let prog2: Programmer = new Programmer("Alex",30000);

prog1.compareTo(prog2)===1? console.log(`${prog1.name} is richer`):
                           console.log(`${prog1.name} is poorer`) ;       7
- 1 Declares a Comparator interface with a generic type
- 2 Creates a class that implements Comparator, specifying the concrete type Rectangle
- 3 Implements the method for comparing rectangles
- 4 Compares rectangles (the type T is erased and replaced with Rectangle)
- 5 Creates a class that implements Comparator, specifying the concrete type Programmer
- 6 Implements the method for comparing programmers
- 7 Compares programmers (the type T is erased and replaced with Programmer)
B.9. The readonly modifier
ES6 introduced the const keyword that you can apply to variables, but not to properties of a class or interface. You can’t write this:
class Person {
    const name: = "Mary";  // compiler error
}

const p = new Person();  // no errors
TypeScript adds a readonly keyword that can be applied to class properties:
class Person {
    readonly name = "Mary";  // no errors
}
You can initialize a readonly property only during its declaration or in the class constructor. Now if you’ll try to write the code that modifies the value of the name property, the TypeScript compiler (or static analyzer) will report an error:
class Person {
    readonly name = "Mary";

    changeName() {
        this.name = "John";  // compiler error
    }
}
But creating an immutable object is a more interesting use case for applying the readonly modifier. In some cases, especially in Angular apps, you may want to ensure that an object is immutable, and you can’t mutate the object by mistake. Let’s try to apply readonly to an object property:
class Person {

    readonly bestFriend: { name: string } = {name: "Mary"};

    changeFriend() {
        this.bestFriend = { name: "John" }; // compiler error
    }

    changeFriendName() {
        this.bestFriend.name = "John";      // no errors
    }
}
An attempt to assign another object to the bestFriend variable results in a compilation error, because bestFriend is marked as readonly. But changing the internal property of the object represented by bestFriend is still allowed. To prohibit this, use the readonly modifier with each property of the object:
class Person {

    readonly bestFriend: { readonly name: string } = {name: "Mary"};

    changeFriend() {
        this.bestFriend = { name: "John" }; // compiler error
    }

    changeFriendName(newName: string) {
        this.bestFriend.name = "John";      // compiler error
    }
}
In Angular apps, you may want to store application state in an immutable object bound to the input property of a component. To enforce the creation of a new object instance whenever its properties change, write a function that creates a copy of the object with modification of the properties (see code samples in section A.7 in appendix A).
If an object has multiple properties, adding the readonly modifier to each of them is a tedious job, and you can use a read-only mapped type instead. The following example uses the type keyword to define a new type and generics to provide a concrete object to the Readonly class:
type Friend = Readonly<{ name: string, lastName: string }>;

class Person {

     bestFriend: Friend = {name: "Mary", lastName: "Smith"};

    changeFriend() {
        this.bestFriend = { name: "John" }; // compiler error
    }

    changeFriendName() {
        this.bestFriend.name = "John";     // compiler error
        this.bestFriend.lastName = "Lou";  // compiler error
    }
}
B.10. Decorators
There are different definitions of the term metadata. The popular definition is that metadata is data about data. We think of metadata as data that describes and enhances code. Internally, TypeScript decorators are special functions that add metadata enhancing the functionality of a class, property, method, or parameter. TypeScript decorators start with an @ sign.
Decorators exist in Typescript, and they are proposed in ECMAScript. To properly transpile them, turn on experimental features in the Typescript transpiler by adding the following line in the tsconfig.json file:
"experimentalDecorators": true
In this section, we’ll show you how to create a simple decorator that will print the information about the class it’s attached to.
Imagine that you want to create a decorator, UIComponent(), that can accept an HTML fragment as a parameter. The decorator should be able to print the received HTML and understand the properties of the attached artifact—for example, a class. The following listing does this.
Listing B.13. A custom UIComponent decorator
function UIComponent (html: string) {
    console.log(`The decorator received ${html}
`);

    return function(target) {
        console.log(`Creating a UI component from
 ${target} ` );
    }
}

@UIComponent('<h1>Hello Shopper!</h1>')
class Shopper {

    constructor(private name: string) {}
}
The UIComponent() function has one string parameter and returns another function that prints the content of the implicit variable target, which knows the artifact the decorator is attached to. If you compile this code into ES5 syntax and run it, the output on your console will look as follows:
The decorator received <h1>Hello Shopper!</h1>

Creating a UI component from
 function Shopper(name) {
        this.name = name;
    }
If you compile the same code into ES6, the output will be different, because ES6 supports classes:
The decorator received <h1>Hello Shopper!</h1>

Creating a UI component from
 class Shopper {
    constructor(name) {
        this.name = name;
    }
}
Under the hood, TypeScript uses the reflect-metadata library to query the structure of the artifact the decorator is attached to. This simple decorator knows what HTML you want to render and that your class has a member variable name. If you’re a developer of a framework that needs to render UI, the code of this decorator can come in handy. The process of creating custom decorators is described in the TypeScript documentation at http://mng.bz/gz6R.
To turn a TypeScript class into an Angular component, you need to decorate it with the @Component() decorator. Angular will internally parse your annotations and generate code that adds the requested behavior to the TypeScript class. To turn a class variable into a component property that can receive values, you use the @Input() decorator:
@Component({
  selector: 'order-processor',
  template: `
    Buying {{quantity}} shares}
  `
})
export class OrderComponent {

  @Input() quantity: number;

}
In this example, the @Component() decorator defines the selector and a template (UI) for the OrderComponent class. The @Input() decorator enables the quantity property to receive values from the parent component via binding. When you use decorators, there should be a decorator processor that can parse the decorator content and turn it into code that the runtime (the browser’s JavaScript engine) understands. Angular includes the ngc compiler that performs the duties of a decorator processor.
To use Angular decorators, import their implementation in your application code. For example, import the @Component() decorator as follows:
import { Component } from '@angular/core';
Angular comes with a set of decorators, but TypeScript allows you to create your own decorators regardless of whether you use Angular or not.
B.11. The union type
In TypeScript, you can declare a new type based on two or more existing types. For example, you can declare a variable that can accept either a string value or a number:
let padding: string | number;
Although TypeScript supports the any type, the preceding declaration provides some benefits compared to the declaration let padding: any. In the following listing, we’ll review the code of one of the code samples from the TypeScript documentation at http://mng.bz/5742. This function can add left padding to the provided string. The padding can be specified either as a string that has to prepend the provided argument or the number of spaces that should prepend the string.
Listing B.14. union.ts with any type
function padLeft(value: string, padding: any ) {                       1
     if (typeof padding === "number") {                                2
         return Array(padding + 1).join(" ") + value;
    }
    if (typeof padding === "string") {                                 3
         return padding + value;
    }
    throw new Error(`Expected string or number, got '${padding}'.`);   4
 }
- 1 Provides the string and the padding of type any
- 2 For a numeric argument, generates spaces
- 3 For a string, uses concatenation
- 4 If the second argument is neither a string nor a number, throws an error
The following are examples of invoking padLeft():
console.log( padLeft("Hello world", 4));         // returns "    Hello world"
console.log( padLeft("Hello world", "John says "));// returns "John says Hell
     o world"

console.log( padLeft("Hello world", true)); // runtime error
But if you change the type of the padding to the union of a string or a number, the compiler will report an error if you try to invoke padLeft() providing anything other than a string or a number. This will also eliminate the need to throw an exception. The new version of the padLeft() function is more bulletproof, as you can see in the following listing.
Listing B.15. union.ts with a union type
function padLeft(value: string, padding: string | number ) {      1
     if (typeof padding === "number") {
        return Array(padding + 1).join(" ") + value;
    }
    if (typeof padding === "string") {
        return padding + value;
    }
}
- 1 Allows only a string or a number as a second argument
Now invoking padLeft() with the wrong type (for example, true) of the second argument returns a compilation error:
console.log( padLeft("Hello world", true)); // compilation error
Another benefit of using a union type is that IDEs have an autocomplete feature that will prompt you with allowed argument types, so you won’t even have a chance to make such a mistake. In section 15.2.3 in chapter 15, there’s another practical example of using a union type.
B.12. Using type definition files
The purpose of type definition files is to describe an API of a JavaScript library (or a script) providing types offered by this API. Say you want to use the popular JavaScript library Lodash in your Typescript code. If you have a Lodash type definition file in your project, the TypeScript static analyzer will know what types are expected by Lodash functions, and if you provide wrong types, you’ll get a compile-time error. Also, an IDE will offer autocomplete for the Lodash API.
Initially, a TypeScript community created a repository of TypeScript definition files called DefinitelyTyped at http://definitelytyped.org. In 2016, Microsoft created an organization, @types, at npmjs.org, and this is what we use now. This organization has more than 5,000 type definition files for various JavaScript libraries.
The suffix of any type definition filename is d.ts, and you install type definition files using npm. For example, to install type definition files for Lodash, run the following command:
npm i @types/lodash --save-dev
This will download the Lodash definitions in the node_modules/@types directory of your project and will also update the package.json file, so you won’t need to run this command again.
When you install Angular, you’re getting the definition files in Angular modules in the subfolders of the node_modules/@angular folder after running npm install, as explained in chapter 1. All required d.ts files are bundled with Angular npm packages, and there’s no need to install them separately. The presence of definition files in your project will allow the TypeScript compiler to ensure that your code uses the correct types while invoking the Angular API.
For example, Angular applications are launched by invoking the bootstrapModule() method, giving it the root module for your application as an argument. The application_ref.d.ts file includes the following definition for this function:
abstract bootstrapModule<M>(moduleType: Type<M>,
compilerOptions?: CompilerOptions | CompilerOptions[]): Promise<NgModuleRef<M>>;
By reading this definition, you (and the tsc compiler) know that this function can be invoked with one mandatory module parameter of type Type<M> and an optional array of compiler options. If application_ref.d.ts wasn’t a part of your project, TypeScript’s compiler would let you invoke the bootstrapModule function with a wrong parameter type, or without any parameters at all, which would result in a runtime error. But application_ref.d.ts is present, so TypeScript would generate a compile-time error reading “Supplied parameters do not match any signature of call target.” Type definition files also allow IDEs to show context-sensitive help when you’re writing code that invokes Angular functions or assigns values to object properties.
To explicitly specify the type definition files located in the node_modules/@types directory, add the required files to the types section of tsconfig.json. Here’s an example:
"compilerOptions": {
   ...
  "types": ["es6-shim", "jasmine"],
}
In the past, we used special type definition managers tsd and Typings to install type definition files, but these managers are no longer needed. If your application uses other third-party JavaScript libraries, install their type definition files with npm to get compiler help and autocomplete in your IDE.
B.13. Controlling code style with TSLint
Linters help to ensure that code complies with the accepted coding style. With TSLint, you can enforce specified rules and coding styles for TypeScript. For example, you can configure TSLint to check that the TypeScript code in your project is properly aligned and indented, that the names of all interfaces start with a capital I, that class names use CamelCase notation, and so on.
You can install TSLint globally using the following command:
npm install tslint -g
To install the TSLint node module in your project directory, run the following command:
npm install tslint
The rules you want to apply to your code are specified in a tslint.json configuration file, which is generated by running tslint init:
{
 "defaultSeverity": "error",
 "extends": [
     "tslint: recommended"
 ],
 "jsRules": {},
 "rules": {},
 "rulesDirectory": []
}
A file with recommended rules comes with TSLint, but you can use custom rules of your preference. You can check the recommended rules in the node_modules/tslint/lib/configs/recommended.js file. The core TSLint rules are documented at http://mng.bz/xx6B. Your IDE may support linting with TSLint out of the box. If you generated your project with Angular CLI, it already includes TSLint.