
Chapter 6. Reactive programming in Angular
This chapter covers
- Handling events as observables
- Using observables with Angular Router and forms
- Using observables in HTTP requests
- Minimizing network load by discarding unwanted HTTP responses
The goal of the first five chapters was to jump-start your application development with Angular. In those chapters, we discussed how to generate a new project from scratch, covering modules, routing, and dependency injection. In this chapter, we’ll show you how Angular supports a reactive style of programming, in which your app reacts on changes either initiated by the user or by asynchronous events like data arriving from a router, form, or server. You’ll learn which Angular APIs support data push and allow you to subscribe to RxJS-based observable data streams.
Note
If you’re not familiar with RxJS library concepts such as observables, observers, operators, and subscriptions, read appendix D before proceeding with this chapter.
Angular offers ready-to-use observables for implementing various scenarios: handling events, subscribing to the route’s parameters, checking the status of a form, handling HTTP requests, and more. You’ll see some examples of using Angular observables, but each of the following chapters contains reactive code as well.
You may say that any JavaScript app can use event listeners and provide callbacks to handle events, but we’ll show you how to treat events as data streams that push values to the observers over time. You’ll be writing code that subscribes to observable event streams and handles them in the observer objects. You’ll be able to apply one or more operators to handle an event as it moves to the observer, which isn’t possible with the regular event listeners.
Note
Source code for this chapter can be found at https://github.com/Farata/angulartypescriptand www.manning.com/books/angular-development-with-typescript-second-edition. You can find the code samples used in this section in the directory named observables. Open this directory in your IDE and run npm install to install Angular and its dependencies. We provide instructions on how to run code samples when it’s required.
Let’s start by discussing how to handle events with and without observables.
6.1. Handling events without observables
Each DOM event is represented by the object containing properties describing the event. Angular applications can handle standard DOM events and can emit custom events as well. A handler function for a UI event can be declared with an optional $event parameter. With standard DOM events, you can use any functions or properties of the browser’s Event object (see “Event” in the Mozilla Developer Network documentation, http://mzl.la/1EAG6iw).
In some cases, you won’t be interested in reading the event object’s properties, such as when the only button on a page is clicked and this is all that matters. In other cases, you may want to know specific information, like what character was entered in the <input> field when the keyup event was dispatched. The following code listing shows how to handle a DOM keyup event and print the value from the input field that emitted this event.
Listing 6.1. Handling the keyup event
template:`<input id="stock" (keyup)="onKey($event)">`        1
 ...

onKey(event:any) {
  console.log("You have entered " + event.target.value);     2
 }
- 1 Binds to the keyup event
- 2 Event handler method
In this code snippet, you care only about one property of the Event object: the target. By applying object destructuring (see section A.9.1 in appendix A), the onKey() handler can get the reference to the target property on the fly by using curly braces with the function argument:
onKey({target}) {
  console.log("You have entered " + target.value);
}
If your code dispatches a custom event, it can carry application-specific data, and the event object can be strongly typed (not be any type). You’ll see how to specify the type of a custom event in listing 8.4 in chapter 8.
A traditional JavaScript application treats a dispatched event as a one-time deal; for example, one click results in one function invocation. Angular offers another approach where you can consider any event as an observable stream of data happening over time. For example, if the user enters several characters in the <input> field, each of the characters can be treated as an emission of the observable stream.
You can subscribe to observable events and specify the code to be invoked when each new value is emitted and, optionally, the code for error processing and stream completion. Often you’ll specify a number of chained RxJS operators and then invoke the subscribe() method.
Why do we even need to apply RxJS operators to events coming from the UI? Let’s consider an example that uses event binding to handle multiple keyup events as the user types a stock symbol to get its price:
<input type='text' (keyup) = "getStockPrice($event)">
Isn’t this technique good enough for handling multiple events dispatched as the user types? Imagine that the preceding code is used to get a price quote for AAPL stock. After the user types the first A, the getStockPrice() function will make a request to the server, which will return the price of A, if there is such a stock. Then the user enters the second A, which results in another server request for the AA price quote. The process repeats for AAP and AAPL.
This isn’t what you want. To defer the invocation of getStockPrice(), you can place it inside the setTimeout() function with, say, a 500-millisecond delay to give the user enough time to type several letters:
const stock = document.getElementById("stock");

  stock.addEventListener("keyup", function(event) {
    setTimeout(function() {
      getStockPrice(event);
    }, 500);
  }, false);
Don’t forget to call clearTimeout() and start another timer should the user continue typing in the input field.
How about composing several functions that should preprocess the event before invoking getStockPrice()? There’s no elegant solution to this. What if the user types slowly, and during the 500-millisecond interval manages only to enter AAP? The first request for AAP goes to the server, and 500 milliseconds later the second request for AAPL is sent. A program can’t discard the results of the first HTTP request if the client returns a Promise object, and may overload the network with unwanted HTTP responses.
Handling events with RxJS offers you a convenient operator named debounceTime that makes the observable emit the next value only if a specified time passes (such as 500 milliseconds) and the data producer (the <input> field in our case) doesn’t produce new values during this interval. There’s no need to clear and re-create the timer. Also, the switchMap operator allows easy cancellation of the observable waiting for a pending request (for example, getStockPrice()) if the observable emits new values (for example, the user keep typing). What can Angular offer to handle events from an input field with subscribers?
6.2. Turning DOM events into observables
In Angular applications, you can get direct access to any DOM element using a special class, ElementRef, and we’ll use this feature to illustrate how you can subscribe to events of an arbitrary HTML element. You’ll create an app that will subscribe to the <input> element where the user inputs the stock symbol to get its price, as discussed in the previous section.
To turn a DOM event into an observable stream, you need to do the following:
1. Get a reference to the DOM object.
2. Create an observable using Observable.fromEvent(), providing the reference to the DOM object and the event you want to subscribe to.
3. Subscribe to this observable and handle the events.
In a regular JavaScript app, to get a reference to the DOM element, you use a DOM selector API, document.querySelector(). In Angular, you can use the @ViewChild() decorator to get a reference to an element from a component template.
To uniquely identify the template elements, you’ll use local template variables that start with the hash symbol. The following code snippet uses the local template variable #stockSymbol as an ID of the <input> element:
<input type="text" #stockSymbol placeholder="Enter stock">
If you need to get a reference to the preceding element inside the TypeScript class, you can use the @ViewChild('stockSymbol') decorator, and the application in the following listing illustrates how to do that. Note that you import only those RxJS members that you actually use.
Listing 6.2. fromevent/app.component.ts
import {AfterViewInit, Component, ElementRef, ViewChild} from '@angular/core';
import {Observable} from "rxjs";
import {debounceTime, map} from 'rxjs/operators';

@Component({
  selector: "app-root",
  template: `
    <h2>Observable events</h2>
    <input type="text" #stockSymbol placeholder="Enter stock" >
  `
})
export class AppComponent implements AfterViewInit {

  @ViewChild('stockSymbol') myInputField: ElementRef;                       1

  ngAfterViewInit() {                                                       2

    let keyup$: =
          Observable.fromEvent(this.myInputField.nativeElement, 'keyup');   3

        let keyupValue$ = keyup$
      .pipe(
         debounceTime(500),                                                 4
          map(event => event['target'].value))                              5
       .subscribe(stock => this.getStockQuoteFromServer(stock));            6
   }

    getStockQuoteFromServer(stock: string) {

      console.log(`The price of ${stock} is
 ${(100 * Math.random()).toFixed(4)}`);                                   7
   }
}
${(100 * Math.random()).toFixed(4)}`); 7
}
}
- 1 Declares the property myInputField that holds a reference to the <input> field
- 2 Places the code in the ngAfterViewInit() component lifecycle method
- 3 Creates an observable from the keyup event
- 4 Waits for a 500 ms pause in the observable’s emissions
- 5 Converts the DOM event into the target.value property, which has the stock symbol entered by the user
- 6 Invokes the getStockQuoteFromServer() method for each value emitted by the observable
- 7 Prints the generated random stock price
Tip
Starting from Angular 6, instead of Observable.fromEvent(), just write fromEvent().
Note
In listing 6.2, the code to subscribe to events is placed in the ngAfterViewInit() component lifecycle method, which Angular invokes when the component’s UI is initialized. You’ll learn about component lifecycle methods in section 9.2 in chapter 9.
You can see this code sample in action by running the following command:
ng serve --app fromevent -o
Open the browser’s console and start entering the stock symbol. Depending on the speed of your typing, you’ll see one or more messages in the console reporting stock price(s).
It’s great that you can turn any DOM event into an observable, but directly accessing the DOM by using ElementRef is discouraged, because it may present some security vulnerabilities (see https://angular.io/api/core/ElementRef for details). What’s a better way to subscribe to value changes in a DOM object?
6.3. Handling observable events with the Forms API
The Angular Forms API (covered in chapters 10 and 11) offers ready-to-use observables that push notifications about important events that are happening with the entire form or with form control. Here are two examples:
- valueChanges— This property is an observable that emits data when the value of the form control is changing.
- statusChanges— This property is an observable that emits the validity status of the form control or the entire form. The status changes from valid to invalid or vice versa.
In this section, we’ll show you how to use the valueChanges property with the HTML <input> element.
The FormControl class, one of the fundamental blocks of forms processing, represents a form control. By default, whenever the value of the form control changes, the underlying FormControl object emits an event through its valueChanges property of type Observable, and you can subscribe to it.
Let’s rewrite the app from the previous section by using the Forms API to subscribe to the input event of the <input> field and generate stock quotes. The form elements can be bound to component properties via the formControl directive, and you’ll use it instead of accessing the DOM object directly.
The following listing applies the RxJS debounceTime operator prior to invoking subscribe(), instructing the this.searchInput.valueChanges observable to emit the data if the user isn’t typing anything during 500 milliseconds.
Listing 6.3. formcontrol/app.component.ts
import {Component} from '@angular/core';
import {FormControl} from '@angular/forms';
import {debounceTime} from 'rxjs/operators;

@Component({
  selector: 'app-root',
  template: `
       <h2>Observable events from formcontrol</h2>
      <input type="text" placeholder="Enter stock"
             [formControl]="searchInput">                          1
     `
})
export class AppComponent {

  searchInput = new FormControl('');

  constructor() {
    this.searchInput.valueChanges                                  2
       pipe(debounceTime(500))                                     3
       .subscribe(stock => this.getStockQuoteFromServer(stock));   4
   }

  getStockQuoteFromServer(stock: string) {
    console.log(`The price of ${stock} is ${(100 * Math.random()).toFixed(4)}
     `);
  }
}
- 1 Links this <input> element to the component property searchInput
- 2 The valueChanges property is an observable.
- 3 Waits for 500 ms of quiet time before emitting the content of the <input> element
- 4 Subscribes to the observable
Your subscribe() method provides the Observer with one method (no error or stream-completion handlers). Each value from the stream generated by the searchInput control is given to the getStockQuoteFromServer() method. In a real-world scenario, this method would issue a request to the server (and you’ll see such an app in section 6.4), but your method just generates and prints a random stock price.
If you didn’t use the debounceTime operator, valueChanges would be emitting values after each character typed by the user. Figure 6.1 shows what happens after you start this application and enter AAPL in the input field.
Figure 6.1. Getting the price for AAPL

To see this app in action, run the following command in the Terminal:
ng serve --app formcontrol -o
Note
You may argue that you could implement this example in listing 6.3 and figure 6.1 by simply binding to the change event, which would be dispatched when the user finished entering the stock symbol and moved the focus out of the input field. This is true, but in many scenarios you’ll want an immediate response from the server, such as retrieving and filtering a data collection as the user types.
In listing 6.3, you don’t make any network requests to the server for price quotes—you generate random numbers on the user’s computer. Even if the user enters a wrong stock symbol, this code sample will invoke Math.random(), which has a negligible effect on the application’s performance. In a real-world application, the user’s typos may generate network requests that introduce delays while returning quotes for mistakenly entered stock symbols. How would you go about discarding the results of unwanted requests?
6.4. Discarding results of unwanted HTTP requests with switchMap
One of the advantages of observables over promises is that observables can be cancelled. In the previous section, we offered one scenario in which a typo might result in a server request that returns unwanted results. Implementing master-detail views is another use case for a request cancellation. Say a user clicks a row in a list of products to see the product details that must be retrieved from the server. Then they change their mind and click another row, which issues another server request; in that case, the results of the pending request should ideally be discarded.
In Angular, HTTP requests return observables. Let’s look at how to discard the results of pending HTTP requests by creating an application that issues HTTP requests as the user types in the input field. We’ll use two observable streams:
- The observable stream produced by the search <input> field
- The observable stream produced by the HTTP requests issued while the user is typing in the search field
For this example, you’ll use the free weather service at http://openweathermap.org, which provides an API for making weather requests for cities around the world. To use this service, go to OpenWeatherMap and receive an application ID (appid). This service returns the weather information as a JSON-formatted string. For example, to get the current temperature in London in Fahrenheit (units=imperial), the URL could look like this: http://api.openweathermap.org/data/2.5/find?q=London&units=imperial&appid=12345.
You’ll construct the request URL by concatenating the base URL with the entered city name and the application ID. As the user enters the letters of the city name, the code subscribes to the event stream and issues HTTP requests. If a new request is issued before the response from the previous one comes back, the switchMap operator (explained in section D.8 in appendix D) cancels and discards the previous inner observable (so the results of the previous HTTP request never reach the browser) and sends the new one to this weather service. This example, shown in the following listing, also uses the FormControl directive to generate an observable stream from the input field where the user enters the name of the city.
Listing 6.4. weather/app.component
@Component({
  selector: "app-root",
  template: `
    <h2>Observable weather</h2>
    <input type="text" placeholder="Enter city" [formControl]="searchInput">
    <h3>{{weather}}</h3>
  `
})
export class AppComponent implements OnInit{
  private baseWeatherURL = 'http://api.openweathermap.org/data/2.5/weather?q=';
  private urlSuffix: = "&units=imperial&appid=12345";

  searchInput = new FormControl();
  weather: string;

  constructor(private http: HttpClient) {}

  ngOnInit() {                                                            1

    this.searchInput.valueChanges
      .pipe(switchMap(city => this.getWeather(city)))                     2
       .subscribe(
        res => {
          this.weather =                                                  3
             `Current temperature is  ${res['main'].temp}F, ` +
            `humidity: ${res['main'].humidity}%`;
        },
        err => console.log(`Can't get weather. Error code: %s, URL: %s`,
                             err.message, err.url)
      );
  }

  getWeather(city: string): Observable<any> {                             4
     return this.http.get(this.baseWeatherURL + city + this.urlSuffix)
      .pipe(catchError( err => {                                          5
         if (err.status === 404){
          console.log(`City ${city} not found`);
          return Observable.empty()}                                      6
         })
      );
  }
}
- 1 Creates the subscription in ngOnInit(), which is invoked after component properties are initialized
- 2 The switchMap operator takes the entered value from the input field (the first observable) and passes it to the getWeather() method, which issues the HTTP request to the weather service.
- 3 Initializes the weather variable with the info on temperature and humidity
- 4 The getWeather() method constructs the URL and defines the HTTP GET request.
- 5 Intercepts errors if the user enters a city that doesn’t exist
- 6 To keep the app running, returns an empty observable in case of 404
Tip
Starting from TypeScript 2.7, you need to initialize the class variables either during declaration or in the constructor: for example, weather = ''. If you don’t want to do this, set the TypeScript compiler’s strictPropertyInitialization option to false.
Note two observables in listing 6.4:
- The FormControl directive creates an observable from the input field events (this.searchInput.valueChanges).
- getWeather() also returns an observable.
We often use the switchMap operator when the data generated by the outer observable (the FormControl, in this case) is given to the inner observable (the getWeather() function): Observable1 - > switchMap(function) - > Observable2 - > subscribe().
If Observable1 pushes the new value, but the inner Observable2 hasn’t finished yet, Observable2 gets cancelled. We’re switching over from the current inner observable to the new one, and the switchMap operator unsubscribes from the pending Observable2 and resubscribes again to handle the new value produced by Observable1.
In listing 6.4, if the observable stream from the UI pushes the next value before the observable returned by getWeather() has emitted a value, switchMap kills the observable from getWeather(), gets the new value for the city from the UI, and invokes getWeather() again. Cancelling getWeather() results in HttpClient discarding the results of the pending HTTP request that was slow and didn’t complete in time.
The subscribe() method has only a callback for handling data coming from the server, where you extract the temperature and humidity from the returned JSON. If the user makes a request to a nonexistent city, the API offered by this weather service returns 404. You intercept and handle this error in the catchError operator. Imagine a slow typer who enters Lo while trying to find the weather in London. The HTTP request for Lo goes out, a 404 is returned, and you create an empty observable so the subscribe() method will get an empty result, which is not an error.
To run this app, you need to first obtain your own key (it takes one minute) at http://api.openweathermap.org and replace 12345 in the code in listing 6.4 with your own key. Then you can run this app with the following command:
ng serve --app weather -o
The browser will open the app at http://localhost:4200, rendering a window with a single input field where you can enter the city name. Figure 6.2 shows the network traffic as you type the word London on a computer with a fast 200 Mbps internet connection.
Figure 6.2. Getting weather without throttling
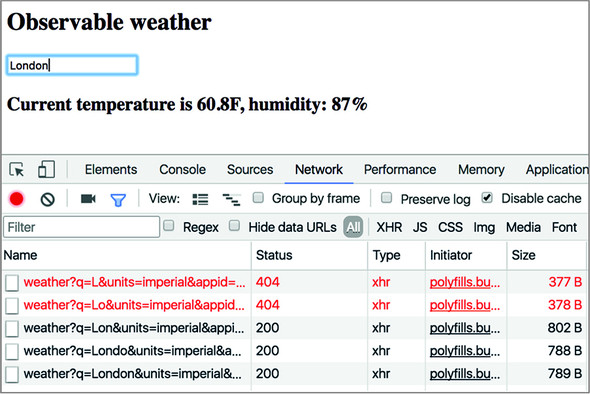
In this case, six HTTP requests were made and returned the HTTP responses. Read the queries in the first two. The requests for the cities L and Lo came back with 404. But requests for Lon, Lond, Londo, and London completed successfully, sending back hundreds of bytes each, unnecessarily congesting the network. Add these bytes up—you’ll get 3,134 bytes in total, but users on a fast network wouldn’t even notice this.
Now let’s emulate a slow network and verify that discarding unwanted results works. On a slow internet connection, each HTTP request takes more than 200 ms to complete, but the user keeps typing, and the responses of the pending HTTP requests should be discarded.
The Network tab of Chrome Developer Tools has a dropdown with selected option Online, which means use the full connection speed. Now, let’s emulate a slow connection by selecting the Slow 3G option instead. Retyping the word London results in multiple HTTP requests, but the connection is slow now, and the results of pending requests are discarded and never reach the browser, as shown in figure 6.3. Note that this time you get 789 bytes back, which is much better than 3,134.
Figure 6.3. Getting weather with throttling

With very little programming, you save bandwidth by eliminating the need for the browser to handle four HTTP responses for cities you’re not interested in and that may not even exist. Just by adding one line with switchMap, you accomplish a lot. Indeed, with good frameworks or libraries, you write less code. Angular pipes also allow you to achieve more with less manual coding, and in the next section you’ll learn about AsyncPipe, which will eliminate the need to make the subscribe() call.
6.5. Using AsyncPipe
Section 2.5 in chapter 2 introduced you to pipes, which are used in a component template and can convert the data right inside the template. For example, a DatePipe could convert and display a date in the specified format. A pipe is placed in the template after the vertical bar, for example:
<p> Birthday: {{birthday | date: 'medium'}}</p>
In this code snippet, birthday is a component property of type Date. Angular offers an AsyncPipe that can take a component property of type Observable, autosubscribe to it, and render the result in the template.
The next listing declares a numbers variable of type Observable<number> and initializes it with an observable that emits a sequential number with an interval of 1 second. The take(10) operator will limit the emission to the first 10 numbers.
Listing 6.5. asyncpipe/app.component.ts
import {Component} from '@angular/core';
import 'rxjs/add/observable/interval';
import {take} from 'rxjs/operators';
import {Observable} from "rxjs";

@Component({
  selector: "app-root",
  template: `{{numbers$ | async}}`         1
 })
export class AppComponent {

  numbers$: Observable<number> =
             Observable.interval(1000)     2
                .pipe(take(10));           3
 }
- 1 Autosubscribes to observable numbers
- 2 Emits sequential numbers every second
- 3 Takes only 10 numbers from 0 to 9
Tip
Starting in Angular 6, instead of Observable.interval(), just write interval().
As explained in appendix D, to start getting data from an observable, we need to invoke the subscribe() method. In listing 6.5, there’s no explicit invocation of subscribe(), but note the async pipe in the template. The async pipe autosubscribes to the numbers observable and displays the numbers from 0 to 9 as they’re being pushed by the observable. To see this example in action, run the following command:
ng serve --app asyncpipe -o
This was a pretty simple example that never throws any errors. In real-world applications, things happen, and you should add error handling to the observable with the catch operator, as you did in the previous section in the weather example.
Now let’s consider one more app that uses the async pipe. This time, you’ll invoke a function that returns an observable array of products, and you’ll use the async pipe to render its values. This app will use the ProductService injectable, whose getProducts() method returns an observable array of the Product objects, as shown in the following listing.
Listing 6.6. asyncpipe-products/product.service.ts
import {Injectable} from '@angular/core';
import {Observable} from "rxjs";
import 'rxjs/add/observable/of';

export interface Product {                          1
    id: number;
   title: string;
   price: number
}

@Injectable()
export class ProductService {

  products: Product[] = [                           2
     {id: 0, title: "First Product", price: 24.99},
    {id: 1, title:"Second Product", price: 64.99},
    {id: 2, title:"Third Product", price: 74.99}
  ];

  getProducts(): Observable<Product[]> {

    return Observable.of(this.products);            3
   }
}
- 1 Defines the Product type
- 2 Populates the products array
- 3 Turns the products array into an observable
Tip
Starting from Angular 6, instead of Observable.of() just write of().
The next listing shows an app component that gets the ProductService injected and invokes getProducts(), which returns an observable. Note that there’s no explicit invocation of subscribe() there—you use the async pipe in the template. In this component, you use Angular’s structural directive *ngFor to iterate through products and for each product render the <li> element with the product title and price, as you can see in the following listing.
Listing 6.7. asyncpipe-products/app.component.ts
import {Component} from '@angular/core';
import {Product, ProductService} from "./product.service";
import {Observable} from "rxjs";

@Component({
  selector: "app-root",
  template: `
       <ul>
         <li *ngFor="let product of products$ | async">     1
            {{product.title}} {{product.price}}             2
          </li>
       </ul>
    `
})
export class AppComponent {

  products$: Observable<Product[]>;                         3

  constructor(private productService: ProductService) {}

  ngOnInit() {

    this.products$ = this.productService.getProducts();     4
   }
}
- 1 Iterates through products and pipes them to async for subscription
- 2 Renders the product title and price
- 3 Declares the observable products$ using generics syntax for type checking
- 4 Assigns the value to products$
It’s important to understand that the getProducts() function returns an empty observable that hasn’t emitted anything yet, and you assign it to the products$ variable. No data is pushed to this component until you subscribe to products$, and the async pipe does it in the template.
To see this application in action, run the following command:
ng serve --app asyncpipe-products -o
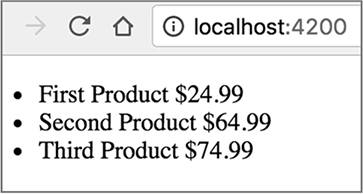
Figure 6.4 shows how the browser will render products.
Figure 6.4. Rendering observable products

Since we’re talking about pipes, let’s apply the Angular built-in currency pipe to show the price in US dollars. All it takes is adding the currency pipe right after product.price:
{{product.title}} {{product.price | currency : "USD"}}
You can read more about the currency pipe and its parameters at https://angular.io/api/common/CurrencyPipe. Figure 6.5 shows how the browser will render products after applying the currency pipe for US dollars.
Figure 6.5. Rendering observable products
With async pipes, you can use the special syntax async as to avoid creating multiple subscriptions in templates. Consider the following code, which creates two subscriptions in a template, assuming that there’s an observable product$:
<div>
  <h4>{{ (product$ | async).price}}</h4>            1
   <p>{{ (product$ | async).description }}</p>      2
 </div>
- 1 First subscription
- 2 Second subscription
The following code rewrites the previous by creating a local template variable, product, which would store the reference to a single subscription and then reuse it in multiple places in the same template:
<div *ngIf="product$ | async as product">      1
   <h4>{{ product.price}}</h4>                 2
   <p>{{ prod                                  2
- 1 Creates a subscription and stores it in the product variable
- 2 Uses the subscription called product
Now let’s see where observables can be used during navigation with the router.
6.6. Observables and the router
Angular Router offers you observable properties in various classes. Is there an easy way to find them? The fastest way is to open the type definition file (see appendix B) for the class you’re interested in. Usually, IDEs offer you an option on the context (right-click) menu to go to the declaration of the selected class. Let’s use the ActivatedRoute class as an example and take a look at its declaration. It’s located in the router_state.d.ts file (we removed some content for brevity), as shown in the following listing.
Listing 6.8. A fragment from ActivatedRoute
export declare class ActivatedRoute {
    url: Observable<UrlSegment[]>;
    queryParams: Observable<Params>;
    fragment: Observable<string>;
    data: Observable<Data>;
    snapshot: ActivatedRouteSnapshot;
    ...
    readonly paramMap: Observable<ParamMap>;
    readonly queryParamMap: Observable<ParamMap>;
}
In section 3.4 in chapter 3, you injected ActivatedRoute into the ProductDetailComponent so it could receive the route parameters during navigation. Back then, you used the snapshot property of ActivatedRoute to get the value from the parent route. This technique works fine if you need to get parameters that never change. But if the parameters in the parent route change over time, you need to subscribe to an observable such as paramMap.
Why would the value of the parent’s parameter change? Imagine a component that shows a list of products, and when the user selects a product, the app navigates to the route that shows product details. Often, these use cases are called master-detail communications.
When the user clicks the product for the first time, the router performs the following steps:
1. Instantiates ProductDetailComponent
2. Attaches ProductDetailComponent to the DOM object
3. Renders ProductDetailComponent in the router outlet
4. Passes the parameter (for example, product ID) to ProductDetailComponent
If the user selects another product in the parent’s component, the first three steps won’t be performed, because ProductDetailComponent is already instantiated, attached to the DOM, and rendered by the browser. The router will just pass a newly selected product ID to ProductDetailComponent, and that’s why subscribing to paramMap is the way to go. The following listing implements this scenario, starting from AppComponent.
Listing 6.9. master-detail/app.component.ts
interface Product {                                                   1
   id: number;
  description: string;
}

@Component({
  selector: 'app-root',
  template: `
        <ul style="width: 100px;">
           <li *ngFor="let product of products"
            [class.selected]="product === selectedProduct"
            (click) = onSelect(product)>                              2
               <span>{{product.id}} {{product.description}} </span>
           </li>
       </ul>

        <router-outlet></router-outlet>
    `,
  styles:[`.selected {background-color: cornflowerblue}`]
})
export class AppComponent {

  selectedProduct: Product;

  products: Product[] = [
    {id: 1, description: "iPhone 7"},
    {id: 2, description: "Samsung 7"},
    {id: 3, description: "MS Lumina"}
  ];

  constructor(private _router: Router) {}                             3

  onSelect(prod: Product): void {
    this.selectedProduct = prod;
    this._router.navigate(["/productDetail", prod.id]);               4
   }
}
- 1 Defines the Product type
- 2 When the user selects an item, invokes the onSelect() handler
- 3 Injects the router so you can use its navigate() method
- 4 Navigates to the productDetail route
The routes for this app are configured as follows:
[
 {path: 'productDetail/:id', component: ProductDetailComponent}
]
The ProductDetailComponent’s code that subscribes to paramMap is shown in the following listing.
Listing 6.10. master-detail/product.detail.component.ts
@Component({
  selector: 'product',
  template: `<h3 class="product">Details for product id {{productId}}</h3>`,1
   styles: ['.product {background: cyan; width: 200px;} ']
})
export class ProductDetailComponent {

  productId: string;

  constructor(private route: ActivatedRoute) {

    this.route.paramMap
      .subscribe(                                                           2
         params => this.productId = params.get('id'));                      3
   }
}
- 1 Embeds the value of productId into the header
- 2 Subscribes to the paramMap observable
- 3 Extracts the current product id and assigns it to the productId property for displaying in the UI
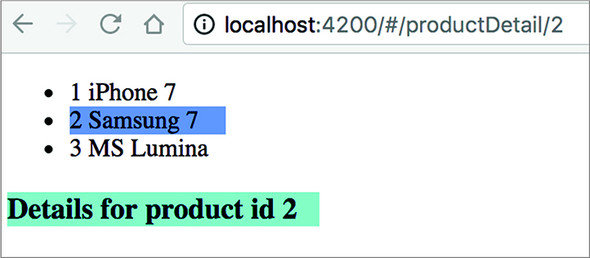
Now ProductDetailComponent will render the text identifying the current product according to user selections. Figure 6.6 shows how the UI looks after the user selects the second product in the list. To see this app in action, run the following command:
ng serve --app master-detail -o
Figure 6.6. Implementing a master-detail scenario
In chapter 7, you’ll rewrite ngAuction, and you’ll see how the ObservableMedia class from the Flex Layout library will notify you about changes in the screen size (for example, the user reduces the width of the window). This observable is also quite handy in changing the UI layout based on the viewport width of smaller devices like smartphones and tablets.
Summary
- Using observable data streams simplifies asynchronous programming. You can subscribe to and unsubscribe from a stream as you need.
- Using the async pipe is a preferable way to subscribe to observables.
- The async pipe automatically unsubscribes from the observable.
- Using the switchMap operator combined with HttpClient allows you to easily discard unwanted results of pending HTTP requests.