
Chapter 4. Router advanced
- Guarding routes
- Creating components that have multiple router outlets
- Lazy-loading modules
This chapter covers some advanced router features. You’ll learn how to use router guards that allow you to restrict access to certain routes, warn the user about unsaved changes, and ensure that important data is retrieved before allowing the user to navigate to a route.
We’ll then show you how to create components that have more than one router outlet. Finally, you’ll see how to load modules lazily—meaning only when the user decides to navigate to certain routes.
This chapter doesn’t include the hands-on section for ngAuction. If you’re eager to switch from dealing with routing to learning other Angular features, you can skip this chapter and come back to it at a later time.
4.1. Guarding routes
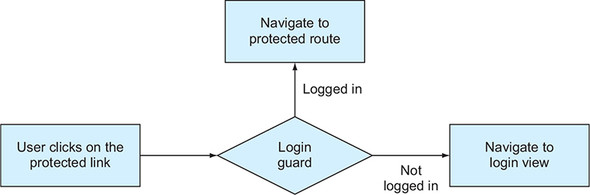
Angular offers several guard interfaces that give you a way to mediate navigation to and from a route. Let’s say you have a route that only authenticated users can visit. In other words, you want to guard (protect) the route. Figure 4.1 shows a workflow illustrating how a login guard can protect a route that can be visited only by authenticated users. If the user isn’t logged in, the app will render a login view.
Figure 4.1. A sample login workflow with a guard
Here are some other scenarios where guards can help:
- Open the route only if the user is authenticated and authorized to do so.
- Display a multipart form that consists of several components, and the user is allowed to navigate to the next section of the form only if the data entered in the current section is valid.
- Remind the user about unsaved changes if they try to navigate from the route.
- Allow navigation to the route only after a certain data structure is populated.
These are the guard interfaces:
- CanActivate allows or disallows navigation to a route.
- CanActivateChild mediates navigation to a child route.
- CanDeactivate allows or disallows navigating away from the current route.
- Resolve ensures that the required data is retrieved before navigating to a route.
- CanLoad allows or disallows lazy-loading modules.
Section 3.3 of chapter 3 mentions that the Routes type is an array of items that conforms to the Route interface. So far, you’ve used such properties as path and component in configuring routes. Now, you’ll see how to mediate navigation to or from a route and ensure that certain data is retrieved before navigating to the route. Let’s start with adding a guard that’ll work when the user wants to navigate to a route.
4.1.1. Implementing the CanActivate guard
Imagine a component with a link that only logged-in users can navigate to. To guard this route, you need to create a new class (for example, LoginGuard) that implements the CanActivate interface, which declares one method, canActivate(). In this method, you implement the validating logic that will return either true or false. If canActivate() of the guard returns true, the user can navigate to the route. You need to assign this guard to the property canActivate, as in the following listing.
Listing 4.1. Configuring a route with a canActivate guard
const routes: Routes = [
    ...
    {path: 'product',
     component: ProductDetailComponent,
     canActivate: [LoginGuard]}              1
 ];
- 1 The LoginGuard will mediate navigation to the ProductDetailComponent.
Because canActivate properties of Route accept an array as a value, you can assign multiple guards if you need to check more than one condition to allow or forbid the navigation.
Let’s create a simple app to illustrate how you can protect the product route from users who aren’t logged in. To keep the example simple, you won’t use an authentication service but will generate the login status randomly. The following class implements the CanActivate interface. The canActivate() function will contain code that returns true or false. If the function returns false (the user isn’t logged in), the application won’t navigate to the route, will show a warning, and will navigate the user to the login view.
Listing 4.2. login.guard.ts
@Injectable()
export class LoginGuard implements CanActivate {

    constructor(private router: Router) {}                                     1

    canActivate() {
        // A call to the actual login service would go here
        // For now we'll just randomly return true or false

        let loggedIn = Math.random() < 0.5;                                    2

        if (!loggedIn) {                                                       3
             alert("You're not logged in and will be redirected to Login page");
            this.router.navigate(["/login"]);                                  4
         }

        return loggedIn;
    }
}
- 1 Injects the Router object
- 2 Randomly generates the login status
- 3 Conditionally displays a “not logged in” message
- 4 Redirects to the login page
This implementation of the canActivate() function will randomly return true or false, emulating the user’s logged-in status.
The next step is to use this guard in the router configuration. The following listing shows how the routes could be configured for an app that has home and product-detail routes. The latter is protected by LoginGuard.
Listing 4.3. Configure one of the routes with a guard
export const routes: Routes = [
    {path: '',        component: HomeComponent},
    {path: 'login',   component: LoginComponent},
    {path: 'product', component: ProductDetailComponent,
                      canActivate: [LoginGuard]}            1
];
- 1 Adding a guard to the product route
Your LoginComponent will be pretty simple—it will show the text “Please login here,” as shown in the following listing.
Listing 4.4. login.component.ts
@Component({
  selector: 'home',
  template: '<h1 class="home">Please login here</h1>',
  styles: ['.home {background: greenyellow}']
})
export class LoginComponent {}
Angular will instantiate the LoginGuard class using its DI mechanism, but you have to mention this class in the list of providers that are needed for injection to work. Add the name LoginGuard to the list of providers in @NgModule().
Listing 4.5. Adding the guard to the module’s providers
@NgModule({
    imports:      [BrowserModule, RouterModule.forRoot(routes)],
    declarations: [AppComponent, HomeComponent,
                   ProductDetailComponent, LoginComponent],
    providers:    [LoginGuard]                                 1
     bootstrap:    [AppComponent]
})
- 1 Adds the guard class to the provider’s list so Angular can instantiate and inject it
The template of your root component will look like the following listing.
Listing 4.6. The AppComponent’s template
template: `
        <a [routerLink]="['/']">Home</a>
        <a [routerLink]="['/product']">Product Detail</a>
        <a [routerLink]="['/login']">Login</a>                1
         <router-outlet></router-outlet>
    `
To see this app in action, run the following command:
ng serve --app guards -o
Figure 4.2 shows what happens after the user clicks the Product Detail link, but the LoginGuard decides the user isn’t logged in.
Figure 4.2. Clicking the Product Detail link is guarded

Clicking OK closes the pop-up window with the warning and navigates to the /login route. In figure 4.2, you implement the canActivate() method without providing any arguments to it. But this method can be used with optional parameters:
canActivate(destination: ActivatedRouteSnapshot, state: RouterStateSnapshot)
The values of ActivatedRouteSnapshot and RouterStateSnapshot will be injected by Angular automatically, and this may be quite handy if you want to analyze the current state of the router. For example, if you’d like to know the name of the route the user tried to navigate to, this is how you can do it:
canActivate(destination: ActivatedRouteSnapshot, state: RouterStateSnapshot) {
      console.log(destination.component.name);
   ...
}
The CanActivate guard controls who gets in, but how you can control whether a user should be allowed to navigate from the route? Why do you even need this?
4.1.2. Implementing the CanDeactivate guard
The CanDeactivate interface mediates the process of navigating from a route. This guard is quite handy in cases when you want to warn the user that there are some unsaved changes in the view. To illustrate this, you’ll update the app from the previous section and add an input field to the ProductDetailComponent. If the user enters something in this field and then tries to navigate from this route, your CanDeactivate guard will show the “Do you want to save changes” warning, as shown in the following listing.
Listing 4.7. The ProductDetailComponent with an input field
@Component({
  selector: 'product',
  template: `<h1 class="product">Product Detail Component</h1>
             <input placeholder="Enter your name" type="text"
             [formControl]="name">`,                           1
   styles: ['.product {background: cyan}']
})
export class ProductDetailComponent {
   name: FormControl = new FormControl();                      2
 }
- 1 Binding the variable name to a directive from Forms API
- 2 Creating an instance of FormControl from Forms API
Listing 4.7 uses the Forms API, which is covered in chapters 10 and 11. At this point, it suffices to know that you create an instance of the FormControl class and bind it to the <input> element. In your guard, you’ll use the FormControl.dirty property to know if the user entered anything in the input field. The following listing creates a UnsavedChangesGuard class that implements the CanDeactivate interface.
Listing 4.8. UnsavedChangesGuard implements CanDeactivate
@Injectable()
export class UnsavedChangesGuard
                  implements CanDeactivate<ProductDetailComponent> {       1

  canDeactivate(component: ProductDetailComponent) {                       2

    if (component.name.dirty) {                                            3
       return window.confirm("You have unsaved changes. Still want to leave?"
     );
    } else {
      return true;
    }
  }
}
- 1 Implementing the CanDeactivate guard for the ProductDetailComponent
- 2 Implementing canDeactivate() required by the CanDeactivate guard
- 3 Checking whether the content of the input control has been changed
The CanDeactivate interface uses a parameterized type, which you specified using TypeScript generics syntax: <ProductDetailComponent>. The method canDeactivate() can be used with several arguments (see https://angular.io/api/router/CanDeactivate), but you’ll just use one: the component to guard.
If the user entered any value in the input field—if (component.name.dirty)—you’ll show a pop-up window with a warning. You need to make a couple more additions to the app from the previous section. First, add the CanDeactivate guard to the routes configuration.
Listing 4.9. Adding CanDeactivate and CanDeactivate guards to a route
const routes: Routes = [
    {path: '',        component: HomeComponent},
    {path: 'login',   component: LoginComponent},
    {path: 'product', component: ProductDetailComponent,
        canActivate: [LoginGuard],                           1
         canDeactivate: [UnsavedChangesGuard]}               2
 ];
- 1 Adding the LoginGuard to the product route
- 2 Adding the UnsavedChangesGuard to the product route
The next listing includes the new guard in the providers list in the module.
Listing 4.10. Specifying providers for guards
@NgModule({
    ...
    providers: [LoginGuard,               1
                UnsavedChangesGuard]      2
 })
- 1 Adding the LoginGuard provider
- 2 Adding the UnsavedChangesGuard provider
Run this app (ng serve --app guards -o), visit the /product route, and enter something in the input field. Then, try to click another link in the app or the browser’s back button. You’ll see the message shown in figure 4.3.
Figure 4.3. Unsaved changes guard in action

Now you know how to control the navigation to and from a route. The next thing is to ensure that the user doesn’t navigate to a route too soon, when the data required by the route isn’t ready yet.
4.1.3. Implementing the Resolve guard
Let’s say you navigate to a product-detail component that makes an HTTP request to retrieve data. The connection is slow, and it takes two seconds to retrieve the data. This means that the user will look at the empty component for two seconds, and then the data will be displayed. That’s not a good user experience. What if the server request returns an error? The user will look at the empty component to see the error message after that. That’s why it may be a good idea to not even render the component until the required data arrives.
If you want to make sure that by the time the user navigates to a route some data structures are populated, create a Resolve guard that allows getting the data before the route is activated. A resolver is a class that implements the Resolve interface. The code in its resolve() method loads the required data, and only after the data arrives does the router navigate to the route.
Let’s review an app that will have two links: Home and Data. When the user clicks the Data link, it has to render the DataComponent, which requires a large chunk of data to be loaded before the user sees this view. To preload the data (a 48 MB JSON file), you’ll create a DataResolver class that implements the Resolve interface. The routes are configured in the following listing.
Listing 4.11. Routes with the resolver
const routes: Routes = [
  {path: '',        component: HomeComponent},
  {path: 'mydata', component: DataComponent,
    resolve:{                                   1
       loadedJsonData: DataResolver             2
     }
  }
];
- 1 Configures the resolve guard for the mydata route
- 2 Specifies the class that will preload the data
Note that the HomeComponent has no guards. You’ve configured the DataResolver only for the route that renders DataComponent. Angular will invoke its resolve() method every time the user navigates to the mydata route. Because you named the property of the resolve object loadedJsonData, you’ll be able to access preloaded data in the DataComponent using the ActivatedRoute object, as follows:
activatedRoute.snapshot.data['loadedJsonData'];
The code of your resolver is shown next. In this code, you use some of the syntax elements that haven’t been covered yet, such as @Injectable() (explained in chapter 5), HttpClient (chapter 12), and Observable (appendix D and chapter 6), but we still want to review this code sample because it’s about the router.
Listing 4.12. data.resolver.ts
@Injectable()                                                  1
 export class DataResolver implements Resolve<string[]>{

    constructor ( private httpClient: HttpClient){}            2

    resolve(): Observable<string[]>{                           3

      return this.httpClient
                 .get<string[]>("./assets/48MB_DATA.json");    4
     }
}
- 1 Marks this service as injectable
- 2 Injects the HttpClient service to read the data
- 3 Implements the resolve() method
- 4 Reads the data from the file
Your resolver class is an injectable service that implements the Resolve interface, which requires implementing a single resolve() method that can return an Observable, a Promise, or any arbitrary object.
Tip
Because a resolver is a service, you need to declare its provider (covered in section 5.2 of chapter 5) in the @NgModule() decorator.
Here, you use the HttpClient service to read the file that contains an array of 360,000 records of random data. The HttpClient.get() method returns an Observable, and so does your resolve() method. Angular generates the code for resolvers that autosubscribes to the observable and stores the emitted data in the ActivatedRoute object.
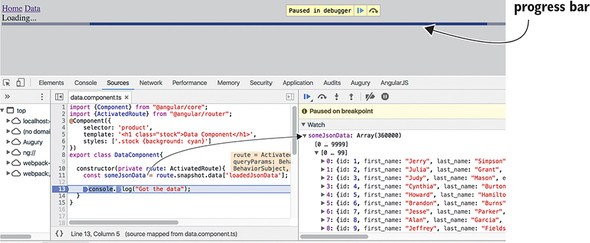
In the constructor of the DataComponent, you extract the data loaded by the resolver and store it in the variable. In this case, you don’t display or process the data, because your goal is to show that the resolver loads the data before DataComponent is rendered. Figure 4.4 shows the debugger at the breakpoint in the constructor. Note that the data was loaded and is available in the constructor of the DataComponent. The UI will be rendered after the code in your constructor completes.
Figure 4.4. The data is loaded.
The source code of this app is located in the directory resolver, and you can see it in action by running ng serve --app resolver -o.
Every time you navigate to the mydata route, the file will be reloaded and the user will see a progress bar (mat-progress-bar) from the Angular Material library of UI components. You’ll be introduced to this library in section 5.6 of chapter 5.
The progress bar is used in the template of the AppComponent, but how does AppComponent know when to start showing the progress bar and when to remove it from the UI? The router triggers events during navigation, such as NavigationStart, NavigationEnd, and some others. Your AppComponent subscribes to these events, and when NavigationStart is triggered, the progress bar is displayed, and on NavigationEnd it’s removed, as shown in the following listing.
Listing 4.13. app.component.ts
@Component({
  selector: 'app-root',
  template: `
    <a [routerLink]="['/']">Home</a>
    <a [routerLink]="['mydata']">Data</a>
    <router-outlet></router-outlet>
    <div *ngIf="isNavigating">                      1
       Loading...
      <mat-progress-bar mode="indeterminate"></mat-progress-bar>
    </div>
    `
})
export class AppComponent {

  isNavigating = false;                             2

  constructor (private router: Router){             3
     this.router.events.subscribe(                  4
       (event) => {
        if (event instanceof NavigationStart){
          this.isNavigating=true;                   5
         }

        if (event instanceof NavigationEnd) {
          this.isNavigating=false;                  6
         }
      }
    );
  }
}
- 1 Conditionally shows/hides the progress bar based on the isNavigating flag
- 2 Initially the flag isNavigating is false.
- 3 Injects the Router object
- 4 Subscribes to Router events
- 5 Sets the flag to true if NavigationStart is triggered
- 6 Sets the flag to false if NavigationEnd is triggered
Tip
To avoid reading such a large file over and over again, you can cache the data in memory after the first read. If you’re interested in seeing how to do this, review the code of another version of the resolver located in the data.resolver2.ts file. That resolver uses an injectable service from data.service.ts, so on subsequent clicks, instead of the file being read, the data is retrieved from the memory cache. Since the data service is a singleton, it’ll survive creations and destructions of the DataComponent and cached data remains available.
You can reload the route that’s already active and rerun its guards and resolvers using the configuration runGuardsAndResolvers and onSameUrlNavigation options.
Say the user visits the mydata route and after some time wants to reload the data in the same route by clicking the Data link again. The routes configuration in the following listing does this by reapplying the guards and resolvers:
const routes: Routes = [
  {path: '',        component: HomeComponent},
  {path: 'mydata', component: DataComponent,
    resolve: {
      mydata: DataResolver
    },
    runGuardsAndResolvers: 'always'                     1
   }
];

export const routing = RouterModule.forRoot(routes,
  {onSameUrlNavigation: "reload"}                       2
- 1 Runs guards and resolvers always
- 2 Reloads the component when the user navigates to the same route
You can read about the other guards in the product documentation at https://angular.io/guide/router#milestone-5-route-guards.
Now, we’ll move on to covering another subject: how to create a view that has more than one <router-outlet>.
4.2. Developing an SPA with multiple router outlets
The directory ngAuction contains the code of ngAuction that implements the functionality described in chapter 3’s hands-on section.
So far, in all routing code samples you’ve used components that have a single tag, <router-outlet>, where Angular renders views based on the configured routes. Now, you’ll see how to configure and render views in sibling routes located in the same component. Let’s consider a couple of use cases for multi-outlet views:
- Imagine a dashboard-like SPA that has several dedicated areas (outlets), and each area can render more than one component (one at a time). Outlet A can display your stock portfolio, either as a table or as a chart, while outlet B shows either the latest news or an advertisement.
- Say you want to add a chat area to an SPA so the user can communicate with a customer service representative while keeping the current route active as well. You want to add an independent chat route allowing the user to use both routes at the same time and be able to switch from one route to another.
In Angular, you can implement either of those scenarios by having not only a primary outlet, but also named secondary outlets, which are displayed at the same time as the primary one.
To separate the rendering of components for primary and secondary outlets, you’ll need to add yet another <router-outlet> tag, but this outlet must have a name. For example, the following code snippet defines primary and chat outlets:
<router-outlet></router-outlet>                      1
 <router-outlet name="chat"></router-outlet>         2
- 1 The primary outlet
- 2 The secondary (named) outlet
Figure 4.5 shows an app with two routes opened at the same time after the user clicks the Home link and then the Open Chat link. The left side shows the rendering of HomeComponent in the primary outlet, and the right side shows ChatComponent rendered in a named outlet. Clicking the Close Chat link will remove the content of the named outlet (you add an HTML <input> field to HomeComponent and a <textarea> to ChatComponent so it’s easier to see which component has focus when the user switches between the home and chat routes).
Figure 4.5. Rendering a chat view with a secondary route
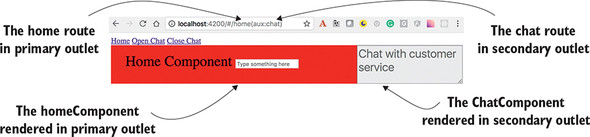
Note the parentheses in the URL of the auxiliary route, http://localhost:4200/#home(aux:chat). Whereas a child route is separated from the parent using the forward slash, an auxiliary route is represented as a URL segment in parentheses. This URL tells you that home and chat are sibling routes.
The configuration for the chat route specifies the name of the outlet where the ChatComponent has to be rendered, shown in the following listing.
Listing 4.14. Configuring routes for two outlets
export const routes: Routes = [
  {path: '',  redirectTo: 'home', pathMatch: 'full'},          1
   {path: 'home', component: HomeComponent},                   2
   {path: 'chat', component: ChatComponent, outlet: "aux"}     3
 ];
- 1 Redirects an empty path to the home route
- 2 If the URL includes home, renders the HomeComponent in the primary outlet
- 3 If the URL includes chat, renders the ChatComponent in the outlet named aux
In this configuration, we wanted to introduce you to the redirectTo property. The HomeComponent will be rendered in two cases: either by default at the base URL, or if the URL has only the /home segment, as in http://localhost:4200/home. The pathMatch: 'full' means that the client’s portion URL must be exactly /, so if you entered the URL http://localhost:4200/product/home, it wouldn’t redirect to home.
The template of the app component can look like the following listing.
Listing 4.15. A template of a component that has two outlets
template: `
      <a [routerLink]="['']">Home</a>                                    1
       <a [routerLink]="['', {outlets: { aux: 'chat'}}]">Open Chat</a>   2
       <a [routerLink]="[{outlets: { aux: null }}]">Close Chat</a>       3
       <br/>
      <router-outlet></router-outlet>                                    4
       <router-outlet name="aux"></router-outlet>                        5
   `
- 1 A link to navigate to a default route in the primary outlet
- 2 A link to navigate to the chat route in the outlet named aux
- 3 A link to remove the outlet named aux from the UI
- 4 This area is allocated for the primary outlet.
- 5 This area is allocated for the secondary outlet named aux.
Note that you have two outlets here: one primary (unnamed) and one secondary (named). When the user clicks the Open Chat link, you instruct Angular to render the component configured for chat in the outlet named aux. To close a secondary outlet, assign null instead of a route name.
If you want to navigate to (or close) the named outlets programmatically, use the Router.navigate() method:
navigate([{outlets: {aux: 'chat'}}]);
To see this app with two router outlets in action, run the following command in the router-samples project:
ng serve --app outlets -o
There’s one more problem the router can help you with. To make the app more responsive, you want to minimize the amount of code that the browser loads to display the landing page of your app. Do you really need to load all the code for each route on application startup?
4.2.1. Lazy-loading modules
Some time ago, one of your authors was working on a website for a European car manufacturer. There was a menu item called “European Delivery” for US citizens, who could fly to the car factory in Europe, pick up their new car there, and spend two weeks driving their own car and enjoying everything that Europe has to offer. After that, the car would be shipped to the United States. Such a trip would cost several thousand dollars, and as you can imagine, not many website visitors would be interested in exploring this option. Then why include the code supporting the menu European Delivery into the landing page of this site, increasing the initial page size?
A better solution would be to create a separate European Delivery module that would be downloaded only if the user clicked the menu item, right? In general, the landing page of a web app should include only the minimal core functionality that must be present when a user visits the site.
Any mid-size or large app should be split into several modules, where each module implements certain functionality (billing, shipping, and so on) and is lazy-loaded on demand. In chapter 2, section 2.5.1, you saw an app split into two modules, but both modules were loaded on application startup. In this section, we’ll show you how a module can be lazy loaded.
Let’s create an app with three links: Home, Product Details, and Luxury Items. Imagine that luxury items have to be processed differently than regular products, and you want to separate this functionality into a feature module called LuxuryModule, which will have one component named LuxuryComponent. Most users of the app have modest incomes and will rarely click the Luxury Items link, so there’s no reason to load the code of the luxury module on application startup. You’ll load it lazily—only if the user clicks the Luxury Items link. This way of doing things is especially important for mobile apps when they’re used in a poor connection area—the code of the root module has to contain only the core functionality. The code of LuxuryModule is shown in the following listing.
Listing 4.16. luxury.module.ts
@NgModule({
    imports: [CommonModule,                        1
         RouterModule.forChild([                   2
         {path: '', component: LuxuryComponent}    3
     ])],
    declarations: [LuxuryComponent]
})

export class LuxuryModule {}
- 1 Imports CommonModule as required for feature modules
- 2 Configures the default route for this feature module using the forChild() method
- 3 By default, renders its only component, LuxuryComponent
In the next listing, the code of LuxuryComponent just displays the text “Luxury Component” on a yellow (suggesting gold) background.
Listing 4.17. luxury.component.ts
@Component({
    selector: 'luxury',
    template: `<h1 class="gold">Luxury Component</h1>`,      1
     styles: ['.gold {background: yellow}']                  2
 })
export class LuxuryComponent {}
- 1 Applying the CSS selector gold
- 2 Declaring the CSS selector gold
The code of the root module is shown in the following listing.
Listing 4.18. app.module.ts
@NgModule({
  imports: [BrowserModule,
    RouterModule.forRoot([                                              1
       {path: '',        component: HomeComponent},
      {path: 'product', component: ProductDetailComponent},
      {path: 'luxury', loadChildren: './luxury.module#LuxuryModule'}    2
     ])
  ],
  declarations: [AppComponent, HomeComponent, ProductDetailComponent],
  providers:[{provide: LocationStrategy, useClass: HashLocationStrategy}],
  bootstrap: [AppComponent]
})
export class AppModule {}
- 1 Configures routes for the root module
- 2 Instead of the property component, uses the loadChildren component for lazy loading
Note that the imports section only includes BrowserModule and RouterModule. The feature module LuxuryModule isn’t listed here. Also, the root module doesn’t mention LuxuryComponent in its declarations section, because this component isn’t a part of the root module. When the router parses the routes configuration from both root and feature modules, it’ll properly map the luxury path to the LuxuryComponent that’s declared in the LuxuryModule.
Instead of mapping the path to a component, you use the loadChildren property, providing the path and the name of the module to be loaded. Note that the value of loadChildren isn’t a typed module name, but a string. The root module doesn’t know about the LuxuryModule type; but when the user clicks the Luxury Items link, the loader module will parse this string and load LuxuryModule from the luxury .module.ts file shown earlier.
To ensure that the code supporting LuxuryModule isn’t loaded on app startup, Angular CLI places its code in a separate bundle. In your project router-samples, this app is configured under the name lazy in .angular-cli.json. You can build the bundles by running the following command:
ng serve --app lazy -o
The Terminal window will print the information about the bundles, as shown in the following listing.
Listing 4.19. The bundles built by ng serve
chunk {inline} inline.bundle.js (inline)
chunk {luxury.module} luxury.module.chunk.js ()     1
 chunk {main} main.bundle.js (main) 33.3 kB
chunk {polyfills} polyfills.bundle.js (polyfills)
chunk {styles} styles.bundle.js (styles)
chunk {vendor} vendor.bundle.js (vendor)
- 1 A separate bundle was built for a lazy-loaded bundle.
The second line shows that your luxury module was placed in a separate bundle named luxury.module.chunk.js.
Note
When you run ng build --prod, the names of the bundles for lazy modules are numbers, not names. In the code sample, the default name of the bundle for the luxury module would be zero followed by a generated hash code, something like 0.0797fe80dbf6edcb363f.chunk.js. If your app had two lazy modules, they would be placed in the bundles with the names starting with 0 and 1, respectively.
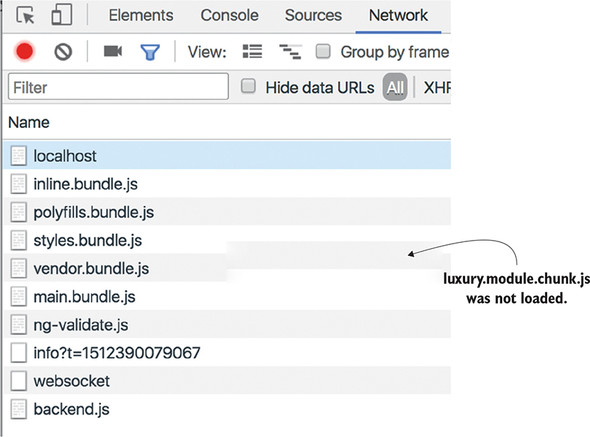
If you open the browser at localhost:4200 and check the network tab in dev tools, you won’t see this module there. See figure 4.6.
Figure 4.6. Luxury module is not loaded
Click the Luxury Items link, and you’ll see that the browser made an additional request and downloaded the code of the LuxuryModule, as seen at the bottom of figure 4.7. The luxury module has been loaded, and the LuxuryComponent has been rendered in the router outlet.
Figure 4.7. Luxury module is loaded after the button click

This simple example didn’t substantially reduce the size of the initial download. But architecting large applications using lazy-loading techniques can lower the initial size of the downloadable code by hundreds of kilobytes or more, improving the perceived performance of your application. Perceived performance is what the user thinks of the performance of your application, and improving it is important, especially when the app is being loaded from a mobile device on a slow network.
On one of our past projects, the manager stated that the landing page of the newly developed web app had to load blazingly fast. We asked, “How fast?” He sent us a link to some app: “As fast as this one.” We followed the link and found a nicely styled web page with a menu presented as four large squares. This page did load blazingly fast. After clicking any of the squares, it took more than 10 seconds for the selected module to be lazy loaded. This is perceived performance in action.
Tip
Make the root module of your app as small as possible. Split the rest of your app into lazy-loaded modules, and users will praise the performance of your app.
4.2.2. Preloaders
Let’s say that after implementing lazy loading, you saved one second on the initial app startup. But when the user clicks the Luxury Items link, they still need to wait this second for the browser to load your luxury module. It would be nice if the user didn’t need to wait for that second. With Angular preloaders, you can kill two birds with one stone: reduce the initial download time and get immediate response while working with lazy-loaded routes.
With Angular preloaders, you can do the following:
- Preload all lazy modules in the background while the user is interacting with your app
- Specify the preloading strategy in the routes configuration
- Implement a custom preloading strategy by creating a class that implements the PreloadingStrategy interface
Angular offers a preloading strategy called PreloadAllModules, which means that right after your app is loaded, Angular loads all bundles with lazy modules in the background. This doesn’t block the application, and the user can continue working with the app without any delays. Adding this preloading strategy as a second argument of forRoot() is all it takes, as shown in the following listing.
Listing 4.20. Adding a preloading strategy
RouterModule.forRoot([
   {path: '',        component: HomeComponent},
   {path: 'product', component: ProductDetailComponent},
   {path: 'luxury', loadChildren: './luxury.module#LuxuryModule' }
 ],
   {
     preloadingStrategy: PreloadAllModules       1
    })
- 1 Adding the PreloadAllModules preloading strategy
After this code change, the network tab will show that luxury.module.chunk.js was also loaded. Large apps may consist of dozens of lazy modules, and you may want to come up with some custom strategy defining which lazy modules should be preloaded and which shouldn’t.
Say you have two lazy modules, LuxuryModule and SuperLuxuryModule, and you want to preload only the first. You can add some Boolean variable (for example, preloadme: true) to the configuration of the luxury path:
{path: 'luxury', loadChildren: './luxury.module#LuxuryModule', data:
{preloadme: true} }
{path: 'luxury', loadChildren: './superluxury.module#SuperLuxuryModule' }
{preloadme: true} }
{path: 'luxury', loadChildren: './superluxury.module#SuperLuxuryModule' }
Your custom preloader may look like the following listing.
Listing 4.21. A sample custom preloader class
@Injectable()
export class CustomPreloadingStrategy implements PreloadingStrategy {  1

  preload(route: Route,
          load: () => Observable<any>): Observable<any> {              2
     return (route.data && route.data['preloadme']) ?                  3
       load(): empty();                                                4
   }
}
- 1 Creates a class implementing the PreloadingStrategy interface
- 2 Passes to the preload() method a callback function that returns an Observable
- 3 Checks the value of the preloadme property on the data object for each route configuration. If it exists and its value is preloadme: true, then invokes the load() callback.
- 4 No need to preload—returns an empty Observable
Because CustomPreloadingStrategy is an injectable service, you need to add it to the providers property of the root module in the @NgModule decorator. Don’t forget to specify the name of your custom preloader as an argument in the forRoot() method.
Summary
- Mediate client-side navigation using guards.
- Create more than one <router-outlet> tag in the same component if need be.
- Minimize the initial size of your app by implementing lazy-loading techniques.