Chapter 8. Implementing component communications
This chapter covers
- Creating loosely coupled components
- How a parent component should pass data to its child, and vice versa
- Implementing the Mediator design pattern for component communication
An Angular application is a tree of views represented by components. While designing components, you need to ensure that they’re self-contained and at the same time have some means of communicating with each other. In this chapter, we’ll focus on how components can pass data to each other in a loosely coupled manner.
First, we’ll show you how a parent component can pass data to its children by binding to their input properties. Then, you’ll see how a child component can send data to its parent by emitting events via its output properties.
We’ll continue with an example that applies the Mediator design pattern to arrange data exchange between components that don’t have parent-child relationships. Mediator is probably the most important design pattern in any component-based framework.
8.1. Intercomponent communication
Figure 8.1 shows a view that consists of components that are numbered and have different shapes for easier reference. Some of the components contain other components (let’s call the outer ones containers), and others are peers. To abstract this from any particular UI framework, we’ve avoided using HTML elements like input fields, drop-downs, and buttons, but you can extrapolate this into a view of your real-world application.
Figure 8.1. A view consists of components.

When you design a view that consists of multiple components, the less they know about each other, the better. Say a user clicks the button in component 4, which has to initiate some actions in component 5. Is it possible to implement this scenario without component 4 knowing that component 5 exists? Yes, it is.
You’ve seen already examples of loosely coupling components by using dependency injection. Now we’ll show you a different technique for achieving the same goal by using bindings and events.
8.2. Input and output properties
Think of an Angular component as a black box with outlets. Some of them are marked as @Input(), and others are marked as @Output(). You can create a component with as many inputs and outputs as you want.
If an Angular component needs to receive values from the outside world, you can bind the producers of these values to the corresponding inputs of the component. Who are they received from? The component doesn’t have to know. The component just needs to know what to do with these values when they’re provided.
If a component needs to communicate values to the outside world, it can emit events through its output properties. Whom are they emitted to? The component doesn’t have to know. Whoever is interested can subscribe to the events that a component emits.
Let’s implement these loosely coupled principles. First, you’ll create an OrderProcessorComponent that can receive order requests from its parent component.
8.2.1. Input properties
The input properties of a component annotated with the @Input() decorator are used to get data from the parent component. Imagine that you want to create a UI component for placing orders to buy stocks. It will know how to connect to the stock exchange, but that’s irrelevant in the context of this discussion of input properties. You want to ensure that OrderProcessorComponent receives data from other components via its properties marked with @Input() decorators. Your OrderProcessorComponent will look like the following listing.
Listing 8.1. order.component.ts
@Component({
    selector: 'order-processor',
    template: `
    <span *ngIf="!!stockSymbol">                        1
        Buying {{quantity}} shares of {{stockSymbol}}
    </span>
  `,
    styles:[`:host {background: cyan;}`]
})
export class OrderProcessorComponent {
    @Input() stockSymbol: string;                       2
     @Input() quantity: number;                         3
 }
- 1 Doesn’t show the text unless the stockSymbol is truthy
- 2 Declares the input property to receive the stock symbol
- 3 Declares the input property to receive the quantity
The OrderProcessorComponent doesn’t know who will provide the values for these properties, which makes this component completely reusable.
Next, we’ll look at the AppComponent, which in your app is the parent of OrderComponent. AppComponent allows users to enter a stock symbol in the input field, and the entered value is passed to the OrderProcessorComponent via property binding. The following listing shows the code of the AppComponent.
Listing 8.2. input/app.component.ts
@Component({
  selector: 'app-root',
  template: `
    <input type="text" placeholder="Enter stock (e.g. AAPL)"
            (change)="onChangeEvent($event)">                 1


    <order-processor [stockSymbol]="stock"                    2
                      [quantity]="numberOfShares">            3
     </order-processor>
  `
})

export class AppComponent {
  stock: string;
  readonly numberOfShares = 100;                              4

  onChangeEvent({target}): void {                             5
     this.stock = target.value;                               6
   }
}
- 1 When the user moves the focus from the input field (change event), invokes the event handler passing the event object to it
- 2 Binds the input property stockSymbol of the child component to the value of the property stock
- 3 Binds the value of the property quantity of the child component to the value of the property numberOfShares
- 4 You can’t use the keyword const with class properties; use readonly.
- 5 Extracts the value of the property target from the event object given as an argument
- 6 Assigns the value entered in the input field to the property stock
Both properties of the <order-processor> component are surrounded with square brackets to denote property binding. If you change the value of stockSymbol or quantity inside the OrderProcessorComponent, the change won’t affect the property values of the parent component. Property binding is unidirectional: from parent to child.
To see this app in action, run npm install in the chapter8/inter-component folder, and run the following command:
ng serve --app input -o
Though we praised TypeScript for allowing specification of variable types, we didn’t declare the type for the numberOfShares property. Because we initialized it with a numeric value, TypeScript compiler will use type inference to guess the type of NumberOfShares when it gets initialized. Explicitly declare types in a public API, for example, public class properties, function parameters and return types, and so on.
Figure 8.2 shows the browser window after the user types IBM in the input field. The OrderProcessorComponent received the input values 100 and IBM.
Figure 8.2. The OrderProcessorComponent receives values.
![]()
How can a component intercept the moment when the value of the input property stockSymbol changes to perform some additional processing? A simple way is to turn stockSymbol into a setter. If you want to use stockSymbol in the template of the component, create a getter as well, as shown in the following listing.
Listing 8.3. Adding the setter and getter
...
private _stockSymbol: string;                    1

@Input() set stockSymbol(value: string)          2

  if (value !== undefined) {
    this._stockSymbol = value;
    console.log(`Buying ${this.quantity} shares of ${value}`);
  }
}

get stockSymbol(): string {                      3
   return this._stockSymbol;
}
- 1 This private variable isn’t accessible from the template.
- 2 Defines an input property as a setter
- 3 Defines a getter so stockSymbol is accessible from the template
When this application starts, the change detection mechanism qualifies the initialization as a change of the bound variable stockSymbol. The setter is invoked, and, to avoid sending an order for the undefined stockSymbol, you check its value in the setter.
Note
In section 9.2.1 in chapter 9, we’ll show you how to intercept the changes in input properties without using setters.
8.2.2. Output properties and custom events
Angular components can dispatch custom events using the EventEmitter object. These events are to be consumed by the component’s parent. EventEmitter is a subclass of Subject (explained in appendix D) that can serve as both observable and observer, but typically you use EventEmitter just for emitting custom events that are handled in the template of the parent component.
If you need to have an object that’s both an observable and an observer, use the RxJS BehaviorSubject. You’ll see how to do that in section 8.3.2. In future releases, the internal implementation of EventEmitter may change, so it’s better to use it only for emitting custom events.
Let’s say you need to write a UI component that’s connected to a stock exchange and displays changing stock prices. In addition to displaying prices, the component should also send events with the latest prices so its parent component can handle it and apply business logic to the changing prices. Let’s create a PriceQuoterComponent that implements such functionality. In this component, you won’t connect to any financial servers but will rather emulate the changing prices using a random number generator.
Displaying changing prices inside PriceQuoterComponent is pretty straightforward—you’ll bind the stockSymbol and lastPrice properties to the component’s template.
You’ll notify the parent about the latest prices by emitting custom events via the @Output property of the component. Not only will you fire an event as soon as the price changes, but this event will also carry a payload: an object with the stock symbol and its latest price. The type of the payload will be defined as PriceQuote interface, as shown in the following listing.
Listing 8.4. iprice.quote.ts
export interface PriceQuote {
  stockSymbol: string;
  lastPrice: number;
}
The PriceQuoterComponent will generate random quotes and will emit them every two seconds.
Listing 8.5. price.quoter.component.ts
@Component({
  selector: 'price-quoter',
  template: `<strong>Inside PriceQuoterComponent:
                  {{priceQuote?.stockSymbol}}                             1
                   {{priceQuote?.lastPrice | currency: 'USD'}}</strong>`,
  styles: [`:host {background: pink;}`]
})
export class PriceQuoterComponent {
  @Output() lastPrice = new EventEmitter<PriceQuote>();                   2

  priceQuote : PriceQuote;

  constructor() {
    Observable.interval(2000)                                             3
       .subscribe(data =>{
        this.priceQuote = {
          stockSymbol: "IBM",
          lastPrice: 100 * Math.random()
        };

        this.lastPrice.emit(this.priceQuote);}                            4
       )
  }
}
- 1 The question mark represents the safe navigation operator.
- 2 The output property lastPrice is represented by the EventEmitter object, which emits lastPrice events to the parent.
- 3 Emulates changing prices by invoking a function that generates a random number every two seconds and populates the priceQuote object
- 4 Emits new price via the output property; the lastPrice event carries the PriceQuote object as a payload
The safe navigation operator in priceQuote? ensures that if the priceQuote object isn’t available yet, the code in the template won’t try to access properties of an uninitialized priceQuote.
Tip
We used the Observable.interval() instead of setInterval() because the latter is the browser-only API. Starting from Angular 6, use interval() instead of Observable.interval().
The next listing shows how the parent component will receive and handle the lastPrice from the <price-quoter> component.
Listing 8.6. app.component.ts
@Component({
  selector: 'app-root',
  template: `
    AppComponent received: {{priceQuote?.stockSymbol}}
                           {{priceQuote?.lastPrice | currency:'USD'}}
   <price-quoter (lastPrice)="priceQuoteHandler($event)">             1
</price-quoter>
     `
})
export class AppComponent {
  priceQuote : IPriceQuote;

  priceQuoteHandler(event: IPriceQuote) {                             2
     this.priceQuote = event;
  }
}
</price-quoter>
`
})
export class AppComponent {
priceQuote : IPriceQuote;
priceQuoteHandler(event: IPriceQuote) { 2
this.priceQuote = event;
}
}
- 1 The AppComponent receives the lastPrice event and invokes the priceQuoteHandler, passing the received object as an argument.
- 2 Receives the IPriceQuote object and uses its properties to populate the respective properties of the AppComponent
Run this example, and you’ll see the prices update every two seconds in both PriceQuoterComponent (on a pink background) as well as in AppComponent (white background), as shown in figure 8.3.
Figure 8.3. Running the output properties example
![]()
To see this app in action, run the following command:
ng serve --app output -o
Angular doesn’t offer an API to support event bubbling. If you try to listen to the lastPrice event not on the <price-quoter> element but on its parent, the event won’t bubble up there. In the following code snippet, the lastPrice event won’t reach the <div>, because it’s the parent of <price-quoter>:
<div (lastPrice)="priceQuoteHandler($event)">
  <price-quoter></price-quoter>
</div>
If event bubbling is important to your app, don’t use EventEmitter; use native DOM events instead. The following code snippet shows how the PriceQuoterComponent uses a CustomEvent (from Web API) that supports bubbling:
@Component(...)
class PriceQuoterComponent {
  stockSymbol = "IBM";
  price;

  constructor(element: ElementRef) {
    setInterval(() => {
       let priceQuote: IPriceQuote = {
        stockSymbol: this.stockSymbol,
        lastPrice: 100 * Math.random()
      };

      this.price = priceQuote.lastPrice;

      element.nativeElement
          .dispatchEvent(new CustomEvent('lastPrice', {
            detail: priceQuote,
            bubbles: true
          }));
    }, 1000);
  }
}
Angular injects an ElementRef object, which has a reference to the DOM element that represents <price-quoter>, and then a CustomEvent is dispatched by invoking element.nativeElement.dispatchEvent(). Event bubbling will work here, but using ElementRef works only in browser-based apps and won’t work with non-HTML renderers.
The AppComponent shown next handles the lastPrice event in the <div>, which is a parent of the <price-quoter> component. Note that the type of the argument of the priceQuoteHandler() is CustomEvent, and you can access its payload via the detail property:
@Component({
  selector: 'app',
  template: `
    <div (lastPrice)="priceQuoteHandler($event)">
      <price-quoter></price-quoter>
    </div>
    <br>
    AppComponent received: {{stockSymbol}}
                           {{price | currency: 'USD'}}
  `
})
class AppComponent {

  stockSymbol: string;
  price: number;

  priceQuoteHandler(event: CustomEvent) {
    this.stockSymbol = event.detail.stockSymbol;
    this.price = event.detail.lastPrice;
  }}
We established that each UI component should be self-contained and shouldn’t rely on the existence of other UI components, and using @Input() and @Output() decorators allows you to create reusable components. But how do you arrange communication between two components if they don’t know about each other?
8.3. Implementing the Mediator design pattern
Communication between loosely coupled components can be implemented using the Mediator design pattern, which, according to Wikipedia, “defines how a set of objects interact” (https://en.wikipedia.org/wiki/Mediator_pattern). We’ll explain what this means by analogy with interconnecting toy bricks.
Imagine a child playing with building bricks (think components) that “don’t know” about each other. Today this child (the mediator) can use some blocks to build a house, and tomorrow they’ll construct a boat from the same components.
Note
The role of the mediator is to ensure that components properly fit together according to the task at hand while remaining loosely coupled.
Coming back to the web UI realm, we’ll consider two cases:
- Arranging communication when components have a common parent
- Arranging communication when components don’t have a common parent
8.3.1. Using a common parent as a mediator
Let’s revisit the first figure of this chapter, shown again in figure 8.4. Each component except 1 has a parent (a container) that can play the role of mediator. The top-level mediator is container 1, which is responsible for making sure its direct children 2, 3, and 6 can communicate if need be. On the other hand, component 2 is a mediator for 4 and 5. Component 3 is a mediator for 7 and 8.
Figure 8.4. A view consists of components.

The mediator needs to receive data from one component and pass it to another. Let’s go back to examples of monitoring stock prices.
Imagine a trader monitoring the prices of several stocks. At some point, the trader clicks the Buy button next to a stock symbol to place a purchase order with the stock exchange. You can easily add a Buy button to the PriceQuoterComponent from the previous section, but this component doesn’t know how to place orders to buy stocks. PriceQuoterComponent will notify the mediator (AppComponent) that the trader wants to purchase a particular stock at that moment.
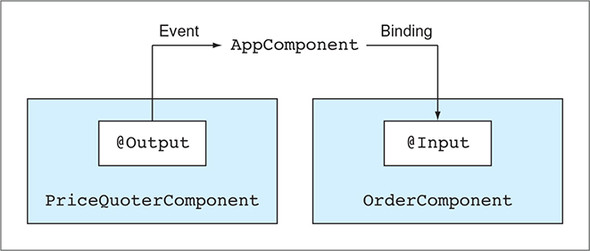
The mediator should know which component can place purchase orders and how to pass the stock symbol and quantity to it. Figure 8.5 shows how an AppComponent can mediate the communication between PriceQuoterComponent and OrderComponent.
Note
Emitting events works like broadcasting. PriceQuoterComponent emits events via the @Output() property without knowing who will receive them. OrderComponent waits for the value of its @Input() property to change as a signal for placing an order.
Figure 8.5. Mediating communications
To demonstrate the Mediator pattern in action, let’s write a small app that consists of the two components shown in figure 8.5. You can find this application in the mediator-parent directory, which has the following files:
- istock.ts— The Stock interface defining a value object that represents a stock
- price.quoter.component.ts— PriceQuoterComponent
- order.component.ts— OrderComponent
- app.component.ts— A parent component (the mediator) that contains <price-quoter> and <order-processor> in its template
- app.module.ts— The AppModule class
You’ll use the Stock interface in two scenarios:
- To represent the payload of the event emitted by the PriceQuoterComponent
- To represent the data given to the OrderComponent via binding
The content of the istock.ts file is shown in the following listing.
Listing 8.7. istock.ts
export interface Stock {
  stockSymbol: string;
  bidPrice: number;
}
The PriceQuoterComponent, shown in the next listing, has a Buy button and the buy output property. It emits the buy event only when the user clicks the Buy button.
Listing 8.8. price.quoter.component.ts
@Component({
  selector: 'price-quoter',
  template: `<strong>
               <button (click)="buyStocks()">Buy</button>
               {{stockSymbol}} {{lastPrice | currency: "USD"}}
             </strong>
            `,
  styles:[`:host {background: pink; padding: 5px 15px 15px 15px;}`]
})
export class PriceQuoterComponent {
  @Output() buy: EventEmitter<Stock> = new EventEmitter();    1

  stockSymbol = "IBM";
  lastPrice: number;

  constructor() {
    Observable.interval(2000)
      .subscribe(data =>
      this.lastPrice = 100 * Math.random());
  }

  buyStocks(): void {

    let stockToBuy: Stock = {
      stockSymbol: this.stockSymbol,
      bidPrice: this.lastPrice
    };

    this.buy.emit(stockToBuy);                                2
   }
}
- 1 The buy output property will be used as a custom buy event.
- 2 Emits the custom buy event
When the mediator (AppComponent) receives the buy event from <price-quoter>, it extracts the payload from this event and assigns it to the stock variable, which is bound to the input parameter of <order-processor>, as shown in the following listing.
Listing 8.9. app.component.ts
@Component({
  selector: 'app-root',
  template: `
    <price-quoter (buy) = "priceQuoteHandler($event)">    1
     </price-quoter>

    <order-processor
           [stock] = "receivedStock">                     2
     </order-processor>
  `
})
export class AppComponent {
  receivedStock: Stock;

  priceQuoteHandler(event: Stock) {
    this.receivedStock = event;
  }
}
- 1 When the mediator receives the buy event, it invokes the event handler.
- 2 The stock received from <price-quoter> is passed to <order-processor>.
When the value of the buy input property on OrderComponent changes, its setter displays the message “Placed order ...,” showing the stockSymbol and the bidPrice.
Listing 8.10. order.component.ts
@Component({
  selector: 'order-processor',
  template: `{{message}}`,
  styles:[`:host {background: cyan;}`]
})
export class OrderComponent {

  message = "Waiting for orders...";

  @Input() set stock(value: Stock) {                    1
     if (value && value.bidPrice != undefined) {
      this.message = `Placed order to buy 100 shares    2
                        of ${value.stockSymbol} at
                       $${value.bidPrice.toFixed(2)}`;
    }
  }
}
- 1 Receives the stock object through this setter
- 2 Prepares a message to be displayed in the template
Figure 8.6 shows what happens after the user clicked the Buy button when the price of the IBM stock was $36.53. PriceQuoterComponent is rendered on the left, and OrderComponent is on the right. They’re self-contained, loosely coupled, and still can communicate with each other via the AppComponent mediator.
Figure 8.6. Running the mediator example

To see this app in action, run the following command:
ng serve --app mediator-parent -o
The Mediator design pattern is a good fit for ngAuction as well. Imagine the last minutes of a bidding war for a hot product. Users monitor frequently updated bids and click a button to increase their bids.
8.3.2. Using an injectable service as a mediator
In the last section, you saw how sibling components use their parent as a mediator. If components don’t have the same parent or aren’t displayed at the same time (the router may not display the required component at the moment), you can use an injectable service as a mediator. Whenever the component is created, the mediator service is injected, and the component can subscribe to events emitted by the service (as opposed to using @Input() parameters like OrderComponent did).
You can find many UIs that consist of multiple components in real-world web apps. We’ll show you a UI taken from the publicly available site www.forex.com that offers a web platform for trading currencies. A trader can monitor the prices of multiple currency pairs (for example, US dollars and euros) in real time and place orders to buy the currencies when the price is right.
Here’s a snapshot of a trader’s screen that you can find at http://mng.bz/M9Af.

A sample trader’s screen from forex.com
We don’t know which JavaScript framework (if any) was used for creating this UI, but we can clearly see that it consists of multiple components. If we needed to develop such an app in Angular, we’d create, say, a CurrencyPairComponent and would place four of its instances at the top. Below, we’d use other components, such as PopularMarketComponent, WatchListComponent, and so on.
Within the CurrencyPairComponent, we’d create two child components: SellComponent and BuyComponent. Their Sell and Buy buttons would emit a custom event that would be received by the parent CurrencyPairComponent, which in turn would need to communicate with an OrderComponent to place a sell or buy order. But what if CurrencyPairComponent and OrderComponent don’t have a common parent? Who will mediate their communications?
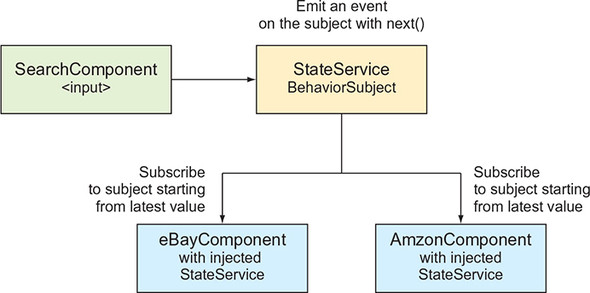
Figure 8.7 shows a diagram representing a scenario when component 5 needs to send data to components 6 and 8. As you see, they don’t have a common parent, so you use an injectable service as a mediator.
Figure 8.7. Injectable service as mediator
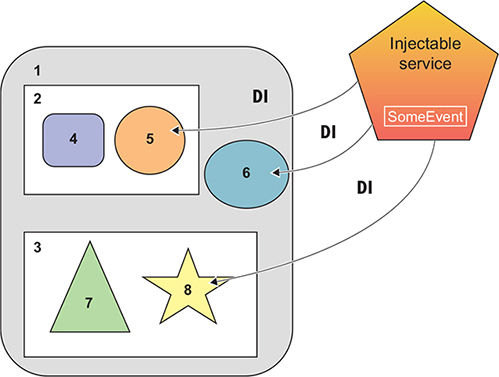
The same instance of the service will be injected into components 5, 6, and 8. Component 5 can use the API of the service to provide some data, and components 6 and 8 will subscribe to the data as soon as they’re instantiated. By creating a subscription in the constructors of components 6 and 8, you ensure that no matter when these components are created, they’ll start getting data from the service right away.
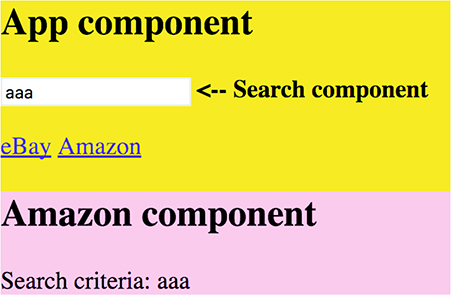
Let’s consider a practical example to illustrate how this works. Imagine you have a UI with which you can search for products by typing a product name in an input box of a component. You want to offer searching for products either on eBay or Amazon. Initially, you’ll render the eBay component, but if users aren’t satisfied with the deal offered on eBay, they’ll try to find the same product on Amazon. Figure 8.8 shows the UI of this app after the user enters aaa as a product name in the search field. Initially, the eBay component is rendered and receives aaa as a product to search for.
Figure 8.8. Searching for product aaa on eBay

Say eBay provides details and pricing for aaa, but the user isn’t happy and clicks the link to find the same product on Amazon. Your UI has two links, one for eBay and another for Amazon. When the user clicks the Amazon link, the router destroys the eBay component and creates the Amazon one. You want to maintain the application state so the user doesn’t need to reenter the product name, and the Amazon component has to be rendered showing aaa—the saved search criteria, as shown in figure 8.9.
Figure 8.9. Searching for product aaa on Amazon
If the user changes their mind and decides to search for a different product on Amazon, and then returns back to eBay, the new search criteria has to be shown in the eBay component.
So you need to implement two features:
- Communication between the search, eBay, and Amazon components.
- State management so the latest search criteria is preserved while the user navigates between eBay and Amazon.
The code for this app is located in the mediator-service-subject folder and contains the following files:
- app.component.ts— The top-level component AppComponent
- app.module.ts— The AppModule that includes routes configuration
- state.service.ts— The injectable service that also stores the app state
- search.component.ts— The SearchComponent with an <input> field
- amazon.component.ts— The AmazonComponent
- ebay.component.ts— The EbayComponent
AppComponent serves as a parent for SearchComponent, provides two links to eBay and Amazon components, and includes <router-outlet>, as shown in the following listing.
Listing 8.11. app.component.ts
@Component({
  selector: 'app-root',
  template: ` <div class="main">
               <h2>App component</h2>

               <search></search>  <b><-- Search component</b>   1
                <p>

               <a [routerLink]="['/']">eBay</a>                 2
                <a [routerLink]="['/amazon']">Amazon</a>        2
                <router-outlet></router-outlet>                 3
               </div>`,
  styles: ['.main {background: yellow}']
})

export class AppComponent {}
- 1 The user enters the product name here.
- 2 A link used for navigation
- 3 The eBay or Amazon component is rendered under the links.
AppModule loads the routes configuration as follows:
RouterModule.forRoot([
    {path: '',        component: EbayComponent},
    {path: 'amazon', component: AmazonComponent}])
]
You want to create an injectable StateService that would accept the search criteria from the SearchComponent and emit it to its subscribers (eBay or Amazon components). In appendix D, we explain how the RxJS Subject works. It contains both observable and observer and would fit your needs except it wouldn’t remember the emitted value (the search criteria). You could create a separate variable to store the value provided by the SearchComponent, but there’s a better solution.
The RxJS library includes BehaviorSubject, which supports the functionality of Subject—plus it reemits the latest emitted value. Let’s see how it’ll work in your app:
1. The user enters aaa, and the SearchComponent invokes the API on the StateService to emit aaa to the subscriber, which is initially an eBay component. The BehaviorSubject emits aaa and remembers it (stores the app state).
2. The user navigates to the Amazon component, which immediately subscribes to the same BehaviorSubject, which reemits aaa.
The code of the StateService is shown in the next listing.
Listing 8.12. state.service.ts
@Injectable()
export class StateService {

  private stateSubject: BehaviorSubject<string> = new BehaviorSubject(''); 1

  set searchCriteria(value: string) {                                      2

    this.stateSubject.next(value);                                         3
   }

  getState(): Observable<string> {                                         4
     return this.stateSubject.asObservable();
  }
}
- 1 Creates an instance of BehaviorSubject to reemit the last emitted value to new subscribers
- 2 SearchComponent will invoke this method.
- 3 Emits the search criteria to subscriber(s)
- 4 Returns the reference to Observable of the Subject
The getState() method returns the observable portion of BehaviorSubject so the eBay or Amazon components can subscribe to it. Technically, these components could subscribe to the subject directly, but if they had a reference to your BehaviorSubject, they could use the next() API to emit data on the subject’s observers. You want to allow eBay or Amazon components to only use the subscribe() API—that’s why you’ll give them only the reference to the observable property from the BehaviorSubject.
Note
We used the Injectable() decorator, but it’s optional here because we don’t inject other services into StateService. If we injected into this service the HttpClient or any other service, using Injectable() would be required.
The code of the SearchComponent is shown next. You use the Forms API to subscribe to the valueChanges observable, as explained in chapter 6. Note that you inject the StateService into this component, and as the user types in the input field, you assign the values to the searchCriteria property on the StateService. The searchCriteria property is implemented as a setter, which emits the values entered by the user to the subscriber(s) of the stateSubject, as shown in the following listing.
Listing 8.13. search.component.ts
@Component({
  selector: "search",
  template: `
      <input type="text" placeholder="Enter product"
             [formControl]="searchInput">
    `
})
export class SearchComponent {

  searchInput: FormControl;

  constructor(private state: StateService) {

    this.searchInput = new FormControl('');

    this.searchInput.valueChanges                                  1
       .pipe(debounceTime(300))
      .subscribe(searchValue =>
                    this.state.searchCriteria = searchValue);      2
   }
}
- 1 An observable that emits the content of the input field
- 2 Passes the entered value to StateService
The following listing shows the code of EbayComponent, which gets StateService injected and subscribes to the observable of stateSubject.
Listing 8.14. ebay.component.ts
@Component({
  selector: 'product',
  template: `<div class="ebay">
                <h2>eBay component</h2>
               Search criteria: {{searchFor$ | async}}    1
                </div>`,
  styles: ['.ebay {background: cyan}']
})
export class EbayComponent {

  searchFor$: Observable<string>;

  constructor(private state: StateService){               2

      this.searchFor$ = state.getState();                 3
   }
}
- 1 The async pipe autosubscribes to the observable searchFor$.
- 2 Injects the StateService
- 3 Stores the observable in the class variable
Note
The code in the AmazonComponent should be identical, but in the source code that comes with this chapter, we keep a more verbose version that uses subscribe() and unsubscribe so you can compare and appreciate the benefits of the async pipe.
When the eBay (or Amazon) component is created, it gets the existing state of the stateSubject and displays it. Figure 8.10 shows how the components of the sample app communicate.
Note
This sample app not only illustrates how you can arrange intercomponent communication using an injectable service as a mediator, it also shows how you can keep track of the app state in small and mid-size applications. If your application is large, consider implementing app state using the NgRx library, as explained in chapter 15.
Figure 8.10. The application’s workflows
To see this application in action, run the following command:
ng serve --app mediator-service -o
You can also watch a short video that explains how this app works at http://mng.bz/oE0s.
Tip
Don’t start implementing the UI components of your application until you’ve identified your mediators, the reusable components, and the means of communication between them.
Now you know that a parent component can pass data to other components without knowing either their content or existence. But what if a parent component knows that it has a child that implements a certain API; can the parent invoke this API on the child directly?
8.4. Exposing a child component’s API
You’ve learned how a parent component can pass data to its child using bindings to input properties. But there are other cases when the parent just needs to use the API exposed by the child. We’ll show you an example that illustrates how a parent component can invoke the child’s API from both the template and the TypeScript code of the parent.
Let’s create a simple application in which a child component has a greet() method that will be invoked by the parent. In particular, the parent component includes the following lines in its template:
<child name= "John" #child1></child>
<button (click) = "child1.greet()">Invoke greet() on child 1</button>
Local template variables are meant to be used within the template. In the preceding code, the parent’s template invokes the greet() method on the child component, #child1.
You can also invoke the child’s API from TypeScript. Let’s create two instances of the same child component to illustrate how to do this:
<child name= "John" #child1></child>
<child name= "Mary" #child2></child>
The DOM references to these instances will be stored in template variables #child1 and #child2, respectively. Now you can declare a property in your TypeScript class, decorated with @ViewChild() so you can use these objects from your TypeScript code. The @ViewChild() decorator is handy when you need a reference to a child component.
Here’s how you can pass a reference to the child component from the template variable #child1 to the TypeScript variable firstChild:
@ViewChild('child1')
firstChild: ChildComponent;
...
this.firstChild.greet();
The @ViewChildren() decorator would give you references to several children of the same type. Let’s write a small app that will illustrate the use of these decorators. The code of the child component is located in the childapi/child.component.ts file and is shown in the following listing.
Listing 8.15. child.component.ts
@Component({
  selector: 'child',
  template: `<h3>Child {{name}}</h3>`

})
export class ChildComponent {

  @Input() name: string;

  greet() {
    console.log(`Hello from ${this.name}`);
  }
}
The parent will include two instances of the child and will use both @ViewChild() and @ViewChildren() decorators. The full code of the parent component that uses both decorators is shown in the following listing.
Listing 8.16. app.component.ts
@Component({
  selector: 'app-root',
  template: `
    <h1>Parent</h1>
    <child name = "John" #child1></child>
    <child name = "Mary" #child2></child>

    <button (click) = "child2.greet()">
            Invoke greet() on child 2
    </button>
    <button (click) = "greetAllChildren()">
            Invoke greet() on both children
    </button>
  `
})
export class AppComponent implements AfterViewInit {
  @ViewChild('child1')
  firstChild: ChildComponent;                                  1

  @ViewChildren(ChildComponent)
  allChildren: QueryList<ChildComponent>;                      2

  ngAfterViewInit() {                                          3
     this.firstChild.greet();                                  4
   }

  greetAllChildren() {
     this.allChildren.forEach(child => child.greet());         5
   }
}
- 1 Obtains the reference to the first child instance
- 2 Obtains the references to both children (returns a list of children)
- 3 Uses the lifecycle hook ngAfterViewInit()
- 4 Invokes the greet() method on the first child
- 5 Invokes the greet() method on both children
Note
In this class, you use the component lifecycle hook ngAfterViewInit() to ensure that you use the child’s API after the child is rendered. See section 9.2 in chapter 9 for more details.
If you run this app, the browser renders the window shown in figure 8.11.
Figure 8.11. Accessing the children API
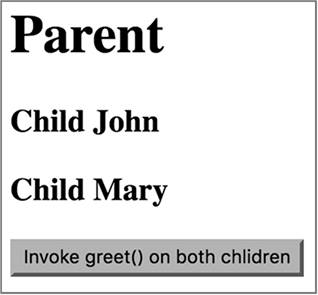
You’ll also see following line on the browser console:
Hello from John
On app startup, John is greeted, but to be fair, both children should be greeted. Clicking the button will use the reference to the entire list of children and produce the following output:
Hello from John
Hello from Mary
To see this app in action, run the following command:
ng serve --app childapi -o
You used different techniques for component communications to send data or invoke the API, but can you send an HTML fragment from one component to be used in another?
8.5. Projecting templates at runtime with ngContent
In some cases, a parent component needs to render arbitrary markup within a child at runtime, and you can do that in Angular using projection. You can project a fragment of the parent component’s template onto its child’s template by using the ngContent directive. This is a two-step process:
1. In the child component’s template, include the tags <ng-content></ng-content> (the insertion point).
2. In the parent component, include the HTML fragment that you want to project into the child’s insertion point between tags representing the child component (for example, <my-child>):
template: `
...
<my-child>
<div>Passing this div to the child</div>
</my-child>
...
In this example, the parent component won’t render the content placed between <my-child> and </my-child>. Listings 8.17 and 8.18 illustrate this technique. Notice that both components declare a CSS style selector with the same name, .wrapper, but each of them defines a different background color. This illustrates what Angular has to offer in terms of style encapsulation, described in the next section.
Consider an example with two components—parent and child. The parent component will pass an HTML fragment to the child for rendering. The code of the child component is shown in the following listing.
Listing 8.17. child.component.ts
import {Component, ViewEncapsulation} from "@angular/core";
@Component({
  selector: 'child',
  styles: ['.wrapper {background: lightgreen;}'],        1
   template: `
    <div class="wrapper">
     <h2>Child</h2>
      <div>This content is defined in child</div>
      <p>
      <ng-content></ng-content>                          2
     </div>
  `,
  encapsulation: ViewEncapsulation.Native                3
 })
export class ChildComponent {}
- 1 The class selector to render the UI on the light green background
- 2 The content that comes from the parent is displayed here.
- 3 For styles, use the ViewEncapsulation.Native mode (we explain view encapsulation modes in the next section).
The parent component is shown in the next listing.
Listing 8.18. app.component.ts
@Component({
  selector: 'app-root',
  styles: ['.wrapper {background: deeppink;}'],                 1
   template: `
    <div class="wrapper">
     <h2>Parent</h2>
      <div>This div is defined in the Parent's template</div>
      <child>
        <div ><i>Child got this line from parent </i></div>     2
       </child>
    </div>
  `,
  encapsulation:ViewEncapsulation.Native
})
export class AppComponent {}
- 1 The class selector to render the UI on the light green background
- 2 The content will be projected onto the child’s template.
Run this app with the following command in the Chrome browser:
ng serve --app projection1 -o
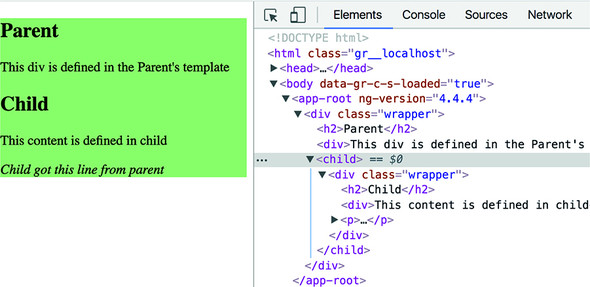
The Chrome browser will render the UI shown in figure 8.12.
Figure 8.12. Running the projection1 app with ViewEncapsulation.Native
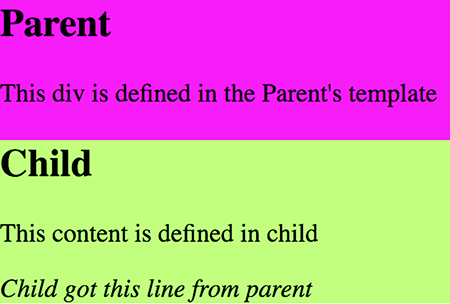
The text “Child got this line from parent” was projected from the AppComponent onto the Child-Component. You may ask why you would want to run this app in the Chrome browser: because you specified ViewEncapsulation.Native, assuming that the browser supports Shadow DOM, and Chrome supports this feature. The next section provides more details.
Note
ViewEncapsulation modes aren’t related to projection and can be used in any component, but we wanted to use the app that has a differently styled parent and child components to introduce this feature.
8.5.1. View encapsulation modes
JavaScript modules allow you to introduce scope to your scripts so they don’t pollute the global space in the browser or any other execution environment. What about CSS? Imagine a parent and child components that coincidentally declare a style with the same CSS class selector name, but define different background colors. Will the browser render components using different backgrounds or will both of them have the same background?
In short, Shadow DOM introduces scopes for CSS styles and encapsulation of DOM nodes in the browser. Shadow DOM allows you to hide the internals of a selected component from the global DOM tree. Shadow DOM is well explained in the article “Shadow DOM v1: Self-Contained Web Components” by Eric Bidelman, available at http://mng.bz/6VV6.
We’ll use the app from the previous section to illustrate how Shadow DOM and Angular’s ViewEncapsulation mode works. The encapsulation property of the @Component() decorator can have one of three values:
- ViewEncapsulation.Native— This can be used with browsers that support Shadow DOM.
- ViewEncapsulation.Emulated— By default, Angular emulates Shadow DOM support.
- ViewEncapsulation.None— If the styles have the same selectors, the last one wins.
Tip
Read about CSS specificity at https://css-tricks.com/specifics-on-css-specificity.
As mentioned earlier, both parent and child components use the .wrapper style. In a regular HTML page, this would mean that the CSS rules of the child’s .wrapper would override the parent’s. Let’s see if you can encapsulate styles in child components so they don’t clash with parent styles, even if their names are the same.
Figure 8.13 shows the running application in ViewEncapsulation.Native mode with the Developer Tools panel open. The browser creates #shadow-root nodes for parent and child (see the two #shadow-root nodes on the right). If you’re reading this book in color (the e-book), you’ll see that the .wrapper style paints the background of the <app-root> a deep pink color. The fact that the child also has the .wrapper style that uses a light green color doesn’t affect the parent. Styles are encapsulated. The child’s #shadow-root acts like a wall preventing the child’s styles from overriding the parent’s styles. You can use ViewEncapsulation.Native only if you’re sure that the users of your app will use browsers that support Shadow DOM.
Figure 8.13. Browser creating two #shadow-root nodes

Figure 8.13 shows what happens after changing the value of the encapsulation property to ViewEncapsulation.Emulated. Angular uses this mode by default, so the effect is the same as if you didn’t add the encapsulation property to the @Component() decorator. The DOM doesn’t have any #shadow-root nodes inside the <app-root> element, but Angular generates additional attributes for the parent and child elements to differentiate styles in parent and child. Angular modifies all CSS selectors in component styles to incorporate generated attributes:
<div _ngcontent-c0="" class="wrapper">       1
 ...
<div _ngcontent-c1="" class="wrapper">       2
- 1 The styles in the <app-root> component
- 2 The styles in the <child> component
The UI is rendered the same way, using different background colors for these components as in figure 8.14, but the underlying code is not the same compared to figure 8.13.
Figure 8.14. Running the projection1 app with ViewEncapsulation.Emulated
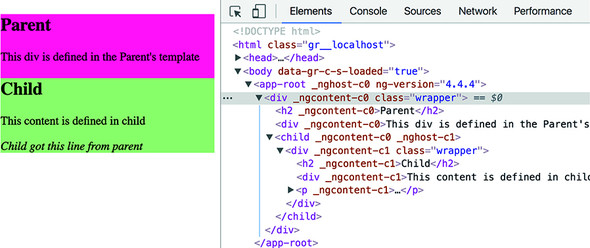
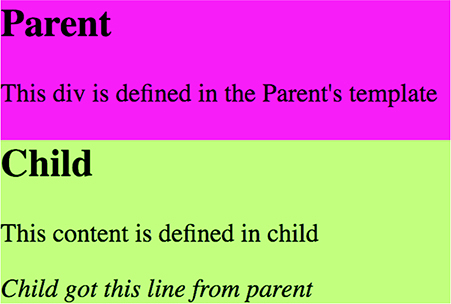
Figure 8.15 shows the same example running with encapsulation set to ViewEncapsulation.None. In this case, the child’s wrapper wins, and the entire window is shown with the child’s light green background.
Figure 8.15. Running the projection1 app with ViewEncapsulation.None
Now that you understand encapsulation modes and basic projection, you may be wondering whether it’s possible to project content into multiple areas of the component template.
8.5.2. Projecting onto multiple areas
A component can have more than one <ng-content> tag in its template. Let’s consider an example where a child component’s template is split into three areas: header, content, and footer, as in figure 8.16. The HTML markup for the header and footer could be projected by the parent component, and the content area could be defined in the child component. To implement this, the child component needs to include two separate pairs of <ng-content></ng-content>s populated by the parent (header and footer).
Figure 8.16. Running the projection2 app
To ensure that the header and footer content will be rendered in the proper <ng-content> areas, you’ll use the select attribute, which can be any valid CSS selector (a CSS class, tag name, and so on). The child’s template could look like this:
<ng-content select=".header"></ng-content>
<div>This content is defined in child</div>
<ng-content select=".footer"></ng-content>
The content that arrives from the parent will be matched by the selector and rendered in the corresponding area. We created a separate app in the folder projection2 to illustrate projection onto multiple areas. The following listing shows the child component.
Listing 8.19. child.component.ts
@Component({
  selector: 'child',
  styles: ['.wrapper {background: lightgreen;}'],
  template: `
    <div class="wrapper">
     <h2>Child</h2>
      <ng-content select=".header"></ng-content><p>

      <div>This content is defined in child</div><p>

      <ng-content select=".footer"></ng-content>
    </div>
  `
})
export class ChildComponent {}
Note that you have two <ng-content> slots now—one with the selector .header and another with .footer. The parent component will project different content into each slot. To make this example more dynamic, you use binding to display today’s date in the header, as shown in the following listing.
Listing 8.20. app.component.ts
@Component({
  selector: 'app-root',
  styles: ['.wrapper {background: deeppink;}'],
  template: `
  <div class="wrapper">
    <h2>Parent</h2>
    <div>This div is defined in the Parent's template</div>
    <child>

      <div class="header">                                           1
         <i>Child got this header from parent {{todaysDate}}</i>     2
       </div>

      <div class="footer">                                           3
          <i>Child got this footer from parent</i>
      </div>
    </child>
  </div>
`
})
export class AppComponent {
  todaysDate = new Date().toLocaleDateString();
}
- 1 Projects this div onto the child’s element with the header selector
- 2 Binds the current date to the projected content
- 3 Projects this div onto the child’s element with the footer selector
Note
The projected HTML can only bind the properties visible in the parent’s scope, so you can’t use the child’s properties in the parent’s binding expression.
To see this example in action, run the following command:
ng serve --app projection2 -o
Running this app will render the page shown earlier in figure 8.16.
Using <ng-content> with the select attribute allows you to create a universal component with a view divided into several areas that get their markup from the parent.
Alternatively, you can programmatically change the HTML content of a component by binding a component to innerHTML:
<p [innerHTML]="myComponentProperty"></p>
But using <ng-content> is preferable to binding to innerHTML for these reasons:
- innerHTML is a browser-specific API, whereas <ng-content> is platform independent.
- With <ng-content>, you can define multiple slots where the HTML fragments will be inserted.
- <ng-content> allows you to bind the parent component’s properties into projected HTML.
Summary
- Parent and child components should avoid direct access to each other’s internals but should communicate via input and output properties.
- A component can emit custom events via its output properties, and these events can carry an application-specific payload.
- Communications between unrelated components should be arranged using the Mediator design pattern. Either a common parent component or an injectable service can serve as a mediator.