
Build Better On-Screen Controls
In Chapter 8, Using the Scene Editor to Add Physics, you created a simple 8-way D-pad controller and an Attack button. While those controls work okay (except for the z-position problem, where newly spawned monsters show up on top of the controls), you’re about to make them much better by giving the player the ability to move and fire with a full 360° of rotation.
Prepping for the New Controls
In the Project Navigator, select the GameScene.sks file to open it up in the Scene Editor.
From the Scene Graph View, select and delete both the controller and the attackButton reference nodes.
To keep your project free of clutter, remove the two corresponding SKS files: Controller.sks and AttackButton.sks. When prompted, move both of these files to the trash.
The next step is to add the resources for the new controls.
Adding and Updating Controller Resources
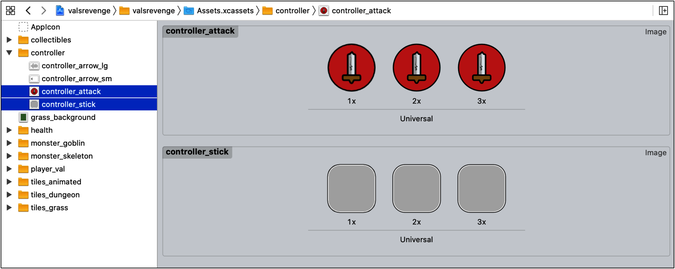
Back in the Project Navigator, select the Assets.xcassets asset catalog, and in the controller sprite atlas, find and delete the button_attack and controller_stop image sets. Again, you want to keep your project free of unnecessary clutter. You won’t be using these resources, so there’s no need to keep them around; you will, however, need to add the new resources.
Open Finder, then navigate to the resources folder for this chapter. Inside that folder you’ll find six image files and a Controller.sks file.
Drag the six image files into the controller sprite atlas to create two new image sets, controller_attack and controller_stick:
While you’re still in Finder, drag the new Controller.sks file into the Reference Nodes group in the Project Navigator. Don’t forget to verify that the Copy items if needed and Add to targets options are both checked. Also make sure that the option to Create groups is selected.
This new controller file replaces the old one you deleted earlier. Let’s take a minute to review what’s new.
Touring Your New Controller File
In the Project Navigator, select the new Controller.sks file and you’ll see your new scene archive in the Scene Editor, like so:
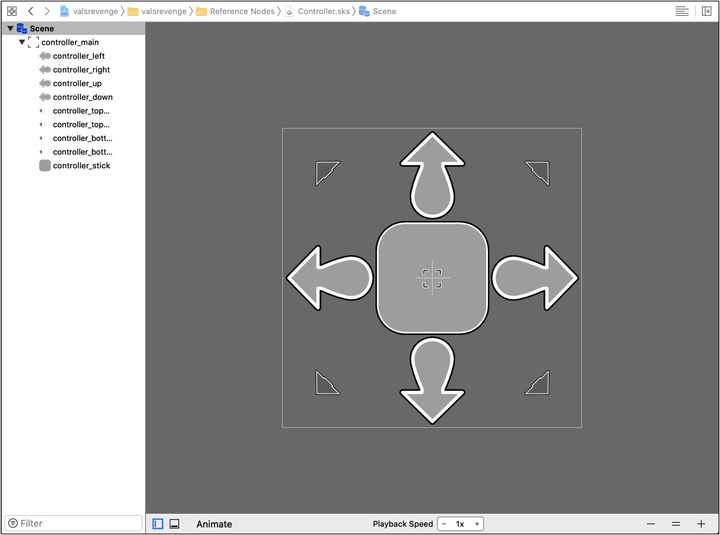
There are two notable differences between this new scene and the old one:
-
The image on the controller stick is blank. Because you’ll be using this file for both the attack controller and the movement controller, you’ll need a way to let the player know which one does what. You’ll make this distinction by adding a sprite node on top of the blank stick node: one to represent movement, and one to represent attack.
-
The anchor point is set to center the content. Having the anchor point set to the center makes it easier to place the controller on either the left or right side of the scene.
Your next task is to write (and update) the code to support your new controller file.
Creating the Controller Class
In the Project Navigator, select the Reference Nodes group and create a new file (⌘N) using the iOS Swift File template. Name the new file Controller.swift and replace its contents with the following code:
| | import SpriteKit |
| | |
| | class Controller: SKReferenceNode { |
| | |
| | |
| | } |
This code is the start of your new Controller class.
For this new controller to work as both a movement controller and an attack controller, you need to set up a few properties. Add the following code to your new class:
| | private var isMovement: Bool! |
| | |
| | private var attachedNode: SKNode! |
| | private var nodeSpeed: CGFloat! |
| | |
| | private var base: SKNode! |
| | private var joystick: SKSpriteNode! |
| | private var range: CGFloat! |
| | |
| | private var isTracking: Bool = false |
You’ll use these properties to help set up and operate your controller.
The next step is to add the initializers for your new class. Below the properties you just added, add the following code:
| | // MARK: - Controller init |
| | |
| | convenience init(stickImage: SKSpriteNode?, |
| | attachedNode: SKNode, nodeSpeed: CGFloat = 0.0, |
| | isMovement: Bool = true, |
| | range: CGFloat = 55.0, color: SKColor = .darkGray) { |
| | |
| | self.init(fileNamed: "Controller") |
| | |
| | // TODO: Add set up code here |
| | } |
| | |
| | override init(fileNamed fileName: String?) { |
| | super.init(fileNamed: fileName) |
| | } |
| | |
| | required init?(coder aDecoder: NSCoder) { |
| | fatalError("init(coder:) has not been implemented") |
| | } |
Here, you’re setting up a convenience initializer and two other initialization methods: one that overrides the superclass initializer, and one that handles the required init(code:) method. Overriding the superclass initializer is necessary, otherwise you’ll get the following error:
| | Convenience initializer for 'Controller' must delegate (with 'self.init') |
| | rather than chaining to a superclass initializer (with 'super.init') |
With the initializers in place, it’s time to add the code to set up the controller and its main properties, starting with the joystick. As you add this code, I won’t provide much explanation until the end.
In the convenience initialization method, replace the line of code that reads:
| | // TODO: Add set up code here |
with the following code:
| | // Set up joystick |
| | joystick = childNode(withName: "//controller_stick") as? SKSpriteNode |
| | joystick.zPosition += 1 |
| | if let stickImage = stickImage { |
| | joystick.addChild(stickImage) |
| | } |
After that, add the code that sets up the inner base of the joystick.
Set up the inner base:
| | // Set up inner base shape |
| | base = joystick.childNode(withName: "//controller_main") |
| | |
| | let innerBase = SKShapeNode(circleOfRadius: range * 2) |
| | innerBase.strokeColor = .black |
| | innerBase.fillColor = color |
| | base.addChild(innerBase) |
Then, set up the constraints for the joystick:
| | // Lock joystick to base |
| | let rangeX = SKRange(lowerLimit: -range, upperLimit: range) |
| | let rangeY = SKRange(lowerLimit: -range, upperLimit: range) |
| | let lockToBase = SKConstraint.positionX(rangeX, y: rangeY) |
| | joystick.constraints = [lockToBase] |
Finally, add the code that sets the remaining properties:
| | // Set the other properties |
| | self.range = range |
| | |
| | self.attachedNode = attachedNode |
| | self.nodeSpeed = nodeSpeed |
| | |
| | self.isMovement = isMovement |
Take a moment to get familiar with the code you just added. Notice that you’re using some of the arguments in the initialization method to set up the joystick; for example, you’re using the object in the stickImage argument to add a new sprite node on top of the joystick. You’re also using the values stored in the range and color arguments to set up the base of the joystick. The range value establishes the radius, or range the player will have when moving the joystick.
Also, because you’re adding the base node after adding the other nodes, you increase the joystick node’s zPosition property by +1, ensuring that it shows above (on top of) the base node.
You’re almost done with the set up. There’s just one more thing to do: create the methods responsible for setting the controller for the left or right side of the view.
Below the initialization methods, add the following code:
| | func anchorRight() { |
| | scene?.anchorPoint = CGPoint(x: 1, y: 0) |
| | base.position = CGPoint(x: -175.0, y: 175.0) |
| | } |
| | |
| | func anchorLeft() { |
| | scene?.anchorPoint = CGPoint(x: 0, y: 0) |
| | base.position = CGPoint(x: 175.0, y: 175.0) |
| | } |
With this code, you modify the anchorPoint property and set the position property of the base node according to which side the controller will appear.
If you’re not a fan of showing the arrows on your controllers, you can add methods to hide them.
Add the following method to hide the large arrows:
| | func hideLargeArrows() { |
| | if let node = childNode(withName: "//controller_left") |
| | as? SKSpriteNode { |
| | node.isHidden = true |
| | } |
| | |
| | if let node = childNode(withName: "//controller_right") |
| | as? SKSpriteNode { |
| | node.isHidden = true |
| | } |
| | |
| | if let node = childNode(withName: "//controller_up") |
| | as? SKSpriteNode { |
| | node.isHidden = true |
| | } |
| | |
| | if let node = childNode(withName: "//controller_down") |
| | as? SKSpriteNode { |
| | node.isHidden = true |
| | } |
| | } |
And then add the following method to hide the small arrows:
| | func hideSmallArrows() { |
| | if let node = childNode(withName: "//controller_topLeft") |
| | as? SKSpriteNode { |
| | node.isHidden = true |
| | } |
| | |
| | if let node = childNode(withName: "//controller_topRight") |
| | as? SKSpriteNode { |
| | node.isHidden = true |
| | } |
| | |
| | if let node = childNode(withName: "//controller_bottomLeft") |
| | as? SKSpriteNode { |
| | node.isHidden = true |
| | } |
| | |
| | if let node = childNode(withName: "//controller_bottomRight") |
| | as? SKSpriteNode { |
| | node.isHidden = true |
| | } |
| | } |
These two methods give you just a bit more flexibility with these controls.
All right, with that set up out of the way, you’re ready to add your new controllers to the main game scene.
Adding New Controllers to the Scene
To keep track of your new controller nodes, you’ll set up two new properties. Switch to the GameScene.swift file and add a new property for the movement controller, placing it just above the sceneDidLoad() method:
| | lazy var controllerMovement: Controller? = { |
| | guard let player = player else { |
| | return nil |
| | } |
| | |
| | let stickImage = SKSpriteNode(imageNamed: "player-val-head_0") |
| | stickImage.setScale(0.75) |
| | |
| | let controller = Controller(stickImage: stickImage, attachedNode: player, |
| | nodeSpeed: 4, isMovement: true, |
| | range: 55.0, |
| | color: SKColor(red: 59.0/255.0, |
| | green: 111.0/255.0, |
| | blue: 141.0/255.0, |
| | alpha: 0.75)) |
| | controller.setScale(0.65) |
| | controller.zPosition += 1 |
| | |
| | controller.anchorLeft() |
| | controller.hideLargeArrows() |
| | controller.hideSmallArrows() |
| | |
| | return controller |
| | }() |
Below the controllerMovement property, add another new property, this time for the attack controller:
| | lazy var controllerAttack: Controller? = { |
| | guard let player = player else { |
| | return nil |
| | } |
| | |
| | let stickImage = SKSpriteNode(imageNamed: "controller_attack") |
| | let controller = Controller(stickImage: stickImage, attachedNode: player, |
| | nodeSpeed: 25, isMovement: false, |
| | range: 55.0, |
| | color: SKColor(red: 160.0/255.0, |
| | green: 65.0/255.0, |
| | blue: 65.0/255.0, |
| | alpha: 0.75)) |
| | controller.setScale(0.65) |
| | controller.zPosition += 1 |
| | |
| | controller.anchorRight() |
| | controller.hideLargeArrows() |
| | controller.hideSmallArrows() |
| | |
| | return controller |
| | }() |
The two controller properties you just added are nearly identical, with a few slight differences. Take a closer look to see if you can spot the differences. Here’s a couple of hints: visually, they’re a little different, and each one is anchored to a different side.
Also, notice that you’re setting each of the controller’s zPosition property to +1. The default value is zero, so, naturally, the result is a zPosition value of 1. This value ensures that your controllers will stay on top of the other content, including the monsters your generators are making.
Alternatively, you can modify the view’s ignoresSiblingOrder property from false to true. If you go that route, you’ll need to also set up an enum to control the scene’s rendering order. For a refresher on rendering order and z-Position, please refer to the asidehere.
Okay, you’re ready to add the new controllers to the scene. In the setupPlayer() method, add the following code at the end:
| | if let controllerMovement = controllerMovement { |
| | addChild(controllerMovement) |
| | } |
| | |
| | if let controllerAttack = controllerAttack { |
| | addChild(controllerAttack) |
| | } |
Finally, modify the updateControllerLocation() method to match this:
| | func updateControllerLocation() { |
| | controllerMovement?.position = |
| | CGPoint(x: (viewLeft + margin + insets.left), |
| | y: (viewBottom + margin + insets.bottom)) |
| | |
| | controllerAttack?.position = |
| | CGPoint(x: (viewRight - margin - insets.right), |
| | y: (viewBottom + margin + insets.bottom)) |
| | } |
Build and run the project.
Make sure the controllers show up in the correct location, but don’t touch either one—you’re just checking for placement; if you touch any part of the controller, the game will crash because you haven’t finished writing the code for your new Controller class. But before you can finish that class, you first need to update the Player class and remove the old movement code (which is now partially responsible for causing the crash).
Updating the Player Class
Switch to the Player.swift file. First, remove the Direction enum and the currentDirection property. Also, remove the move(_:), stop(), and attack() methods.
With a decluttered Player class, you’re ready to refactor it. Start by adding the following new properties, placing them above the hud property:
| | var movementSpeed: CGFloat = 5 |
| | |
| | var maxProjectiles: Int = 1 |
| | var numProjectiles: Int = 0 |
| | |
| | var projectileSpeed: CGFloat = 25 |
| | var projectileRange: TimeInterval = 1 |
| | |
| | let attackDelay = SKAction.wait(forDuration: 0.25) |
You’ll use these properties to control the player’s movement speed and attack power. Speaking of the player’s attack power, you need a new attack method that can handle the full 360° of rotation.
At the bottom of the Player class, add this new attack method:
| | func attack(direction: CGVector) { |
| | |
| | // Verify the direction isn't zero and that the player hasn't |
| | // shot more projectiles than the max allowed at one time |
| | if direction != .zero && numProjectiles < maxProjectiles { |
| | |
| | // Increase the number of "current" projectiles |
| | numProjectiles += 1 |
| | |
| | // Set up the projectile |
| | let projectile = SKSpriteNode(imageNamed: "knife") |
| | projectile.position = CGPoint(x: 0.0, y: 0.0) |
| | projectile.zPosition += 1 |
| | addChild(projectile) |
| | |
| | // Set up the physics for the projectile |
| | let physicsBody = SKPhysicsBody(rectangleOf: projectile.size) |
| | |
| | physicsBody.affectedByGravity = false |
| | physicsBody.allowsRotation = true |
| | physicsBody.isDynamic = true |
| | |
| | physicsBody.categoryBitMask = PhysicsBody.projectile.categoryBitMask |
| | physicsBody.contactTestBitMask = PhysicsBody.projectile.contactTestBitMask |
| | physicsBody.collisionBitMask = PhysicsBody.projectile.collisionBitMask |
| | |
| | projectile.physicsBody = physicsBody |
| | |
| | // Set the throw direction |
| | let throwDirection = CGVector(dx: direction.dx * projectileSpeed, |
| | dy: direction.dy * projectileSpeed) |
| | |
| | // Create and run the actions to attack |
| | let wait = SKAction.wait(forDuration: projectileRange) |
| | let removeFromScene = SKAction.removeFromParent() |
| | |
| | let spin = SKAction.applyTorque(0.25, duration: projectileRange) |
| | let toss = SKAction.move(by: throwDirection, duration: projectileRange) |
| | |
| | let actionTTL = SKAction.sequence([wait, removeFromScene]) |
| | let actionThrow = SKAction.group([spin, toss]) |
| | |
| | let actionAttack = SKAction.group([actionTTL, actionThrow]) |
| | projectile.run(actionAttack) |
| | |
| | // Set up attack governor (attack speed limiter) |
| | let reduceCount = SKAction.run({self.numProjectiles -= 1}) |
| | let reduceSequence = SKAction.sequence([attackDelay, reduceCount]) |
| | run(reduceSequence) |
| | } |
| | } |
Look through the code you just added. For the most part, it should make sense. You’re first making sure the player’s attack is possible by checking both the direction and the number of projectiles allowed at once. If everything passes the test, you go through the rest of the method, launching the attack and resetting the numProjectiles property once it’s complete.
That’s it for the Player class. Next, you need to update the Controller class to handle the player’s movement—or more accurately, the node that’s “attached” to the controller.
Adding Movement Methods to the Controller
Before you add the methods for the new Controller class, you’re going to create a new extension to help with some CGFloat operations that will help you clamp the numbers to a minimum and maximum value.
In the Project Navigator, select the Extensions group and create a new file (⌘N) using the iOS Swift File template. Name the new file CGFloat+Extensions.swift and replace the contents of the file with the following code:
| | import CoreGraphics |
| | |
| | extension CGFloat { |
| | func clamped(v1: CGFloat, v2: CGFloat) -> CGFloat { |
| | let min = v1 < v2 ? v1 : v2 |
| | let max = v1 > v2 ? v1 : v2 |
| | |
| | return self < min ? min : (self > max ? max : self) |
| | } |
| | |
| | func clamped(to r: ClosedRange<CGFloat>) -> CGFloat { |
| | let min = r.lowerBound, max = r.upperBound |
| | return self < min ? min : (self > max ? max : self) |
| | } |
| | } |
You’ll use this new extension and its methods in the Controller class to help clamp the range between two values so that the controller’s movement is restricted to the specified range of values.
(Note: I’ve included two variations of essentially the same method; one uses two arguments, and one uses a ClosedRange argument. You may include either one or both.)
Now, switch to the Controller.swift file and add the following code at the bottom of the class (don’t worry about the error you’re about to get, you’ll fix that in a moment):
| | // MARK: - Controller Methods |
| | |
| | func beginTracking() { |
| | isTracking = true |
| | } |
| | |
| | func endTracking() { |
| | isTracking = false |
| | joystick.position = .zero |
| | moveAttachedNode(direction: .zero) |
| | } |
Here, you’ve added the beginTracking() and endTracking() methods, where you set the isTracking property value according to whether or not the player is using the controller. In the endTracking() method, you also reset the positions to zero.
Next, add the method stubs for the main controller functions (which clears the error):
| | func moveJoystick(pos: CGPoint) { |
| | |
| | } |
| | |
| | func moveAttachedNode(direction: CGVector) { |
| | |
| | } |
| | |
| | func otherAction(direction: CGVector) { |
| | |
| | } |
Perfect, you’re ready to populate those methods.
In the moveJoystick(pos:) method, add the following code:
| | // Store the location |
| | var location = pos |
| | |
| | // Verify the player is using the on-screen controls |
| | if isTracking == true { |
| | location = base.convert(pos, from: self.scene!) |
| | } |
| | |
| | // Move the joystick node |
| | let xAxis = CGFloat(location.x.clamped(to: -range...range)) |
| | let yAxis = CGFloat(location.y.clamped(v1: -range, v2: range)) |
| | joystick.position = CGPoint(x: location.x, y: location.y) |
| | |
| | // Call the appropriate method based on the controller type |
| | if isMovement { |
| | moveAttachedNode(direction: CGVector(dx: xAxis, dy: yAxis)) |
| | } else { |
| | otherAction(direction: CGVector(dx: xAxis, dy: yAxis)) |
| | } |
This code is responsible for moving the joystick node.
Next, you need to add the code that moves the player node (the attached node). In the moveAttachedNode(direction:) method, add the following code:
| | attachedNode?.physicsBody?.velocity = |
| | CGVector(dx: CGFloat(direction.dx * nodeSpeed), |
| | dy: CGFloat(direction.dy * nodeSpeed)) |
Finally, add the following code in the otherAction(direction:) method:
| | // If the player exists, launch its attack |
| | guard let player = attachedNode as? Player else { |
| | return |
| | } |
| | |
| | player.attack(direction: direction) |
You’re almost done. But, because the Direction enum no longer exists, the GameScene.swift file is bursting with errors. Time to fix that.
Cleaning up the Game Scene Errors
Switch to the GameScene.swift file. The first error shows up in the setupPlayer() method. Go ahead and remove the line causing the error:
| | player.move(.stop) |
Next, remove all of the code in the touchDown(atPoint:) method except the following line:
| | mainGameStateMachine.enter(PlayingState.self) |
Likewise, remove all of the code inside of the touchMoved(toPoint:) and touchUp(atPoint:) methods.
When you’re done, you’ll end up with the following touch-related code (and no errors):
| | func touchDown(atPoint pos : CGPoint) { |
| | mainGameStateMachine.enter(PlayingState.self) |
| | } |
| | |
| | func touchMoved(toPoint pos : CGPoint) { |
| | |
| | } |
| | |
| | func touchUp(atPoint pos : CGPoint) { |
| | |
| | } |
With the errors cleared, you’re ready for the next step: connecting the controllers.
Connecting the Controllers
Still inside the GameScene class, find and update the two controller properties so that they use the new Player movement and speed properties.
Here’s the updated controllerMovement initialization:
| | let controller = Controller(stickImage: stickImage, attachedNode: player, |
| » | nodeSpeed: player.movementSpeed, |
| | isMovement: true, range: 55.0, color: .darkGray) |
And here’s the updated controllerAttack initialization:
| | let controller = Controller(stickImage: stickImage, attachedNode: player, |
| » | nodeSpeed: player.projectileSpeed, |
| | isMovement: false, range: 55.0, color: .gray) |
The highlighted code shows the changes.
You’re almost done, but there’s still the matter of tracking touches and knowing which controller the player is using.
To help with this tracking, you’ll set up two new properties in the GameScene class.
Place the following new properties above the controllerMovement property:
| | private var leftTouch: UITouch? |
| | private var rightTouch: UITouch? |
Now that you have a way to store the player’s touch, you can use this information to determine which controller’s methods to call. But first, you need to update the touch methods.
(Note: You’re going to get some errors while you add the next bit of code, but you can ignore them because they’ll all go away once your done.)
Locate and update the touchDown(atPoint:) method so that it matches the following:
| | func touchDown(atPoint pos : CGPoint, touch: UITouch) { |
| | mainGameStateMachine.enter(PlayingState.self) |
| | |
| | let nodeAtPoint = atPoint(pos) |
| | |
| | if let controllerMovement = controllerMovement { |
| | if controllerMovement.contains(nodeAtPoint) { |
| | leftTouch = touch |
| | controllerMovement.beginTracking() |
| | } |
| | } |
| | |
| | if let controllerAttack = controllerAttack { |
| | if controllerAttack.contains(nodeAtPoint) { |
| | rightTouch = touch |
| | controllerAttack.beginTracking() |
| | } |
| | } |
| | } |
Here, you’re updating more than just the code inside of the method; you’re also updating its signature so that you can capture the touch object, saving that object to either the leftTouch or rightTouch property.
Next, update the touchMoved(toPoint:) method to match this:
| | func touchMoved(toPoint pos : CGPoint, touch: UITouch) { |
| | switch touch { |
| | case leftTouch: |
| | if let controllerMovement = controllerMovement { |
| | controllerMovement.moveJoystick(pos: pos) |
| | } |
| | case rightTouch: |
| | if let controllerAttack = controllerAttack { |
| | controllerAttack.moveJoystick(pos: pos) |
| | } |
| | default: |
| | break |
| | } |
| | } |
Again, you’re updating the code and the method signature to capture the touch object. And becauase you now know which touch object made the call, you know which controller to move.
Finally, update the touchUp(atPoint:) method to match this:
| | func touchUp(atPoint pos : CGPoint, touch: UITouch) { |
| | switch touch { |
| | case leftTouch: |
| | if let controllerMovement = controllerMovement { |
| | controllerMovement.endTracking() |
| | leftTouch = touch |
| | } |
| | case rightTouch: |
| | if let controllerAttack = controllerAttack { |
| | controllerAttack.endTracking() |
| | rightTouch = touch |
| | } |
| | default: |
| | break |
| | } |
| | } |
All right, time to update the override touch methods so that they account for the new arguments in the methods they each call. Modify them to match the following:
| | override func touchesBegan(_ touches: Set<UITouch>, with event: UIEvent?) { |
| | for t in touches {self.touchDown(atPoint: t.location(in: self), touch: t)} |
| | } |
| | |
| | override func touchesMoved(_ touches: Set<UITouch>, with event: UIEvent?) { |
| | for t in touches {self.touchMoved(toPoint: t.location(in: self), touch: t)} |
| | } |
| | |
| | override func touchesEnded(_ touches: Set<UITouch>, with event: UIEvent?) { |
| | for t in touches {self.touchUp(atPoint: t.location(in: self), touch: t)} |
| | } |
| | |
| | override func touchesCancelled(_ touches: Set<UITouch>, with event: UIEvent?) { |
| | for t in touches {self.touchUp(atPoint: t.location(in: self), touch: t)} |
| | } |
Whew, that was a lot of work, but you’re ready for the big reveal.
Build and run the project. If you have a physical device, this is a great time to build your project to that instead of the simulator.
Start the game, then move Val around using the left stick while also moving the right stick to throw knives—all the while moving and attacking using 360° of rotation.
Pretty nice, right?
Not only do these updated controls improve your game, but should you decide to support external controllers, you will be in a better place (code-wise) to do so.
Supporting External Game Controllers | |
|---|---|
|
|
This chapter’s resources include some external game controller code in the extras folder. Sadly, there wasn’t enough room in this book to cover this topic directly, but I wanted to supply the code for you should you decide to include this type of support. To help get you started, that folder also includes a readme.md file. |