
Configure the Shop Scene
In the Project Navigator, select the ShopScene.swift file; this file is the brains behind the shop scene. Take a moment to look around and when you’re ready to get into the thick of it, keep reading.
Viewing the Store Messages
Notice the static properties in the custom ShopMessages struct:
| | struct ShopMessages { |
| | static let welcome = "Welcome to the Shop!" |
| | static let success = "Thank you! Enjoy your purchase." |
| | static let restored = "Excellent! Your purchases have been restored." |
| | static let restoredComplete = "Restoration complete." |
| | static let makingPurchase = "Standby, attempting to make purchase." |
| | static let restoringPurchases = "Standby, attempting to restore purchases." |
| | } |
These are the messages players will see as they interact with the store. You’re welcome to update these messages as you see fit.
This file also contains the ShopScene class. This custom class is what operates the shop scene behind the scenes (no pun intended). At the moment, though, it shows the following compile error:

You probably already know why you’re getting this error and how to fix it, but just in case, let’s take care of that next.
Adding the New Layer Enum
Open the SpriteKitHelper.swift file, and in the Layer enum, add a new case for shop, like so:
| | enum Layer: CGFloat { |
| | case background |
| | case foreground |
| | case player |
| | case collectible |
| | case ui |
| » | case shop |
| | } |
Save the file and return to the ShopScene.swift file. The error should now be resolved; if not, build the project (but don’t run it), and the error will clear.
With the error gone, it’s time to set up the shop.
Setting up the Shop
Working your way through the ShopScene.swift file, you’ll see a beginInteraction() method and an endInteraction() method. These are the methods the GameScene calls when the player opens and closes the shop; they don’t do anything fancy, but they are necessary to set up the scene:
| | func beginInteraction() { |
| | updateMessageText(with: ShopMessages.welcome) // reset message text |
| | updateUI() // reset UI |
| | |
| | let scale = SKAction.scale(to: 1.0, duration: 0.15) |
| | let fade = SKAction.fadeIn(withDuration: 0.15) |
| | let group = SKAction.group([fade, scale]) |
| | run(group, completion: {}) |
| | } |
| | |
| | |
| | |
| | func endInteraction() { |
| | let scale = SKAction.scale(to: 0.25, duration: 0.15) |
| | let fade = SKAction.fadeOut(withDuration: 0.15) |
| | let group = SKAction.group([fade, scale]) |
| | run(group, completion: {}) |
| | } |
Further down the file, you’ll see the two methods that handle purchasing products and restoring purchases:
| | func purchaseProduct(node: SKNode) { |
| | let productIdentifier = node.userData?.value(forKey: "productId") as? String |
| | |
| | if let product = StoreManager.shared.availableProducts.first(where: |
| | { $0.productIdentifier == productIdentifier }) { |
| | updateMessageText(with: ShopMessages.makingPurchase) |
| | StoreManager.shared.buyProduct(product: product, qty: 1) |
| | } |
| | } |
| | |
| | func restorePurchases() { |
| | updateMessageText(with: ShopMessages.restoringPurchases) |
| | StoreManager.shared.restoreProducts() |
| | } |
You will also see the updateMessageText(with:) method, which updates the message text:
| | func updateMessageText(with message: String?) { |
| | if let shopMessage = childNode(withName: "//shop.message") as? SKLabelNode { |
| | shopMessage.text = message |
| | } |
| | } |
The next group of methods deals with notifications. You’ll observe and use six notifications to handle the various in-app purchase delegate methods. You’ll learn more about these delegate methods in Using the StoreKit Delegate Methods.
Finally, you’ll see a group of methods responsible for setting up and customizing the shop. There’s a lot going on with these methods, but as you look through the code, you should start to see how it all works. Let’s have a closer look.
The first notable method is setupShop(), which looks like this:
| | func setupShop() { |
| | for product in StoreManager.shared.availableProducts { |
| | setupProduct(product) |
| | } |
| | } |
With this method, you’re looping through the StoreManager.shared.availableProducts array, and with each object, you’re calling setupProduct(_:). Don’t worry, you’ll learn more about the StoreManager class in Interface with StoreKit Using the Store Manager. For now, know that the StoreManager class is where most of the magic happens.
Next up is the setupProduct(_:) method. This method first grabs the product ID; it then uses that ID to set up the product information within the scene.
To get a better idea of how the setupProduct(_:) method works, look at the following image:
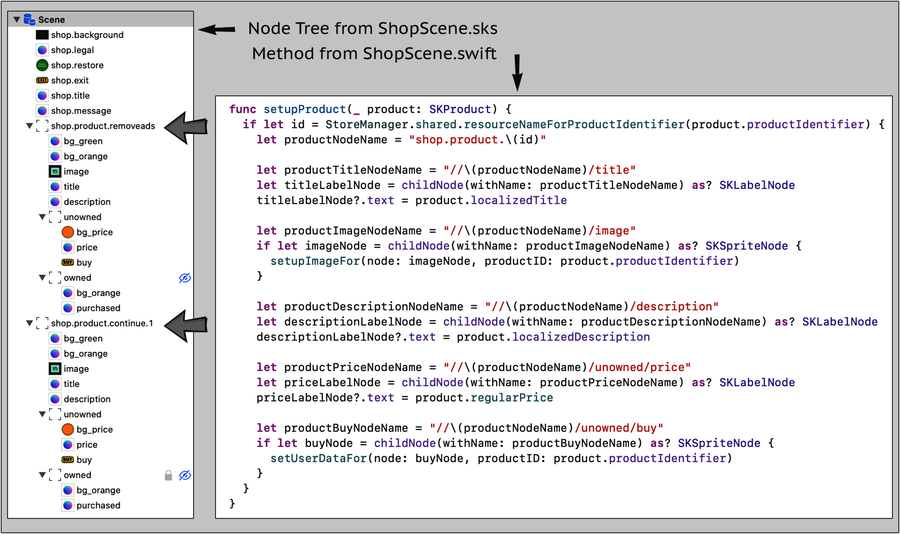
In this case, only two products are being sold, so the interface is rather simple. The two nodes, shop.product.removeads and shop.product.continue.1, are both part of the node tree.
Notice the call to the StoreManager.shared.resourceNameForProductIdentifier() method, which looks like this:
| | func resourceNameForProductIdentifier(_ productIdentifier: String) |
| | -> String? { |
| | let product = StoreProducts.Product(productID: productIdentifier) |
| | return product.id.replacingOccurrences(of: StoreProducts.prefixID, with: "") |
| | } |
This method returns the product ID after it removes the prefix. For example, net.justwritecode.gloopdrop.removeads is shortened to removeads, and net.justwritecode.gloopdrop.continue.1 is shortened to continue.1.
You then use the return string to build the node name:
| | let productNodeName = "shop.product.(id)" |
The result of which is shop.product.removeads and shop.product.continue.1.
With these two node names, you can build out each part of the product; this includes the title, image, description, price, and buy button.
Furthermore, to set the proper image, the setupProduct(_:) method makes a call to setupImageFor(node:productID:), which looks like this:
| | func setupImageFor(node: SKSpriteNode, productID: String) { |
| | let product = |
| | StoreManager.shared.resourceInformationForProductIdentifier(productID) |
| | let resourceName = |
| | StoreManager.shared.resourceNameForProductIdentifier(productID) ?? "" |
| | |
| | var imageName = resourceName.replacingOccurrences(of: ".", with: "-") |
| | |
| | let textureAtlas = SKTextureAtlas(named: "shop_iaps") |
| | if textureAtlas.textureNames.contains(imageName) == false { |
| | imageName = |
| | imageName.replacingOccurrences(of: "-(product.quantity)", with: "") |
| | if textureAtlas.textureNames.contains(imageName) == false { |
| | node.texture = SKTexture(imageNamed: "none") |
| | } |
| | } |
| | |
| | node.texture = SKTexture(imageNamed: imageName) |
| | } |
There’s also a call to another method, setUserDataFor(node:productID:), which sets up the node’s userData, storing the value of product.id and product.quantity:
| | func setUserDataFor(node: SKNode, productID: String) { |
| | let product = |
| | StoreManager.shared.resourceInformationForProductIdentifier(productID) |
| | node.userData = NSMutableDictionary() |
| | node.userData?.setValue(product.id, forKey: "productId") |
| | node.userData?.setValue(product.quantity, forKey: "quantity") |
| | } |
The final method in this file is UpdateUI(). At the moment, it’s empty (except for a TODO comment). You’ll update this later in Buying Products and Restoring Purchases.
Now that you have the shop set up and you’re a little more familiar with the methods inside, you need to add the shop scene to the main game scene.