
6
Implementing Machine Learning for Medical Devices and Radiology Images
Visualizing the human body using imaging studies is a vital part of a patient’s care journey. The generation, storage, and interpretation of these images are widely known as medical imaging. There are multiple types of medical images that address different diagnostic needs of patients. Some of the common types include X-ray, ultrasound, computerized tomography (CT), and magnetic resonance imaging (MRI). Each of these types of imaging studies needs specific equipment, lab setup, and trained professionals who can operate the equipment. Radiologists are medical professionals who specialize in diagnosing medical conditions using medical images. A radiologist also performs imaging studies using specialized equipment and is able to generate and interpret radiology reports. The rate of growth in imaging studies has continued to rise since the early 2000s. However, since these studies are costly, it is important to exercise caution when prescribing them and they should only be performed when really necessary. Moreover, ordering unnecessary imaging studies will add to individuals’ workloads, and may cause radiologists to get burned out.
ML can help radiologists become more efficient in the interpretation of medical images. Computer vision models can interpret the information in medical images and support radiologists by helping them make clinical decisions faster and more accurately. In addition, radiology equipment such as MRI machines and CT scanners are also getting smarter through the use of ML. Models embedded directly onto these devices allow them to perform better and triage image quality locally even before a radiologist looks at it. This pattern is common in a large category of medical devices, such as glucometers and electrocardiogram (ECG), that utilize the Internet of Things (IoT) to run ML-based inference either locally or on data aggregated from these devices in a central data store.
In this chapter, we will get an understanding of medical devices and how smart connected devices are revolutionizing healthcare. We will then dive into the details of the medical imaging system components. We will look at the different components in the workflow and understand the role that each of those components plays in the overall workflow. We will also look at how ML can optimize medical device workflows. Finally, we will use Amazon SageMaker to build a medical image classification model. These topics are shown in the following sections:
- Introducing medical devices
- Introducing radiology imaging system components
- Applying ML to medical devices and radiology imaging
- Introducing SageMaker training
- Building a medical image classification model using SageMaker
Technical requirements
The following are the technical requirements that you need to complete before building the example implementation at the end of this chapter:
- Complete the steps to set up the prerequisites for Amazon SageMaker as described here: https://docs.aws.amazon.com/sagemaker/latest/dg/gs-set-up.html.
- Create a SageMaker notebook instance by following the steps in the following guide: https://docs.aws.amazon.com/sagemaker/latest/dg/howitworks-create-ws.html.
Note
At the step where you need to choose the notebook instance type, please select ml.p2.xlarge.
- Create an S3 bucket, as described in Chapter 4, in the Building a smart medical transcription application on AWS section, under Create an S3 bucket. If you already have an S3 bucket, you can use that instead of creating a new bucket.
- Open the Jupyter notebook interface of the Sagemaker notebook instance by clicking on Open Jupyter link on the Notebook Instances screen.
- On the top right corner of the Jupyter notebook, click on New and then Terminal.
- Type the following commands on the terminal screen:
$cd Sagemaker
$git clone https://github.com/PacktPublishing/Applied-Machine-Learning-for-Healthcare-and-Life-Sciences-using-AWS.git
You should now see a folder named Applied-Machine-Learning-for-Healthcare-and-Life-Sciences-using-AWS.
Note
If you have already cloned the repository in a previous exercise, you should already have this folder. You do not need to do step 6 again.
Once you have completed these steps, you should be all set to execute the steps in the example implementation in the last section of this chapter.
Introducing medical devices
The medical device industry comprises a wide range of organizations that do research, development manufacturing, and distribute devices and associated technologies that help prevent, diagnose, and treat medical conditions. It’s important to note that the term medical device has wide applicability. It includes things you normally get over the counter, such as a Band-Aid or a testing kit, but it also includes highly specialized instruments, such as CT scanners and respirators. The key differentiator for a medical device is that it achieves its purpose due to its physical structure instead of a chemical reaction.
The US medical devices industry accounts for billions of dollars in exports, which has continued to rise over the years. In the US, the Food and Drug Administration (FDA) Center for Medical Devices and Radiological Health (CDRH) is the federal regulating agency that authorizes the use of medical devices. It also monitors adverse events associated with medical device use and alerts consumers and medical professionals as needed. The process of regulating a medical device depends on its classification. Let’s look at the different classes of medical devices as defined by the FDA.
Classes of medical devices
Due to the wide applicability of the term, medical devices are categorized into different classes based on the risk they pose. There are three classes for a medical device:
- Class 1 medical device: This is the lowest-risk medical device and is generally safe for consumer use, provided a set of safety protocols and guidelines are followed. Examples of class 1 devices include surgical masks, bandages, and latex gloves.
- Class 2 medical device: A class 2 medical device is known to have an intermediate risk and users need to follow special guidelines and controls. These include premarket review and clearance by the FDA after an elaborate review of the guidelines. Examples of class 2 medical devices include pregnancy test kits, blood transfusion kits, and syringes.
- Class 3 medical device: Class 3 medical devices are high-risk devices that support life or may be implanted into one’s body. This class is highly regulated by the FDA and must follow the FDA’s class 3 regulations, which include the most rigorous review process. Examples of class 3 medical devices include pacemakers, defibrillators, and different types of implants (such as breast implants or prosthetic implants).
All medical devices must be registered and listed with the FDA. To make it easy for consumers to find the appropriate classification of a medical device, the FDA provides a classification database (https://www.accessdata.fda.gov/scripts/cdrh/cfdocs/cfpcd/classification.cfm) to search using the part number or the name of the device. To learn more about the classification of a medical device, visit the following link: https://www.fda.gov/medical-devices/overview-device-regulation/classify-your-medical-device.
In the US, the CDRH determines the approval process for the medical device, depending on the classification it belongs to. The process may include steps such as the submission of premarket approval and clinical evidence via a clinical trial that has evidence that the device is safe to be used on humans.
Let us now look at a special category of medical devices that involve computer software, also known as software as a medical device (SaMD).
Understanding SaMD
Software forms an integral part of a modern medical device. The software could be a part of the medical device. It may also be related to the support, maintenance, or manufacturing of the medical device itself. A third category of software related to medical devices is known as SaMD. SaMD is a type of software intended to be used for medical purposes without being part of the hardware of the medical device. It provides a wide-range of applications for medical technology, from off-the-self solutions to custom-built solutions for specific scenarios.
The FDA has been working over the last few years to develop or modernize regulatory standards and the approval process to cater to the needs of the digital health market enabled via the use of SaMD. In 2017, the FDA released new guidelines for evaluating SaMD applications that propose an accelerated review of digital health products. The revised framework for the approval of SaMD proposes a regulatory development kit (RDK) containing tools to clarify the requirements at each stage of the approval process and provide templates and guidance for frequently asked questions. It also proposes a precertification program to accelerate the approval of SaMD for organizations that meet certain criteria of excellence. To learn more about the clinical evaluation of SaMDs, visit the following link: https://www.fda.gov/regulatory-information/search-fda-guidance-documents/software-medical-device-samd-clinical-evaluation.
In this section, we were introduced to medical devices and how they are regulated for use. One of the common uses of medical devices is in the radiology department. This department is responsible for generating, storing, and interpreting different modalities of radiology images. Let’s understand the different components of a radiology imaging system and the role they play in the imaging workflow.
Introducing radiology imaging system components
The need for medical imaging in a patient’s care journey depends on the specialty that is treating them. For example, a cardiology department may need a medical image-driven diagnosis at a different point in time in patient care from the gastroenterology department. This makes standardizing the medical imaging workflow really difficult. However, there are some standard components that are common across all medical imaging systems. These components work in sync with each other to create a workflow specific to the specialty in question. Let us look at these components in more detail:
- Image acquisition: Medical images are generated from specialized equipment located in clinical facilities. The equipment and the facility where it is located depend on the type of medical image it generates. The format and size of images are also dependent on the type. The most commonly used standard for storing and sharing medical images is Digital Imaging and Communications in Medicine (DICOM). DICOM provides an interoperability standard for medical imaging equipment so the different pieces of equipment can communicate with each other. The DICOM standard provides a file format and communications protocol for exchanging medical images. To learn more about the DICOM format, check out the following link: https://dicom.nema.org/medical/dicom/current/output/html/part01.html.
- Image data storage and management: Once the medical images are acquired from this equipment, they need to be centrally managed and stored in a storage system. This storage and management system for medical images is known as a picture archiving and communications system (PACS). PACS is at the heart of a medical imaging workflow. Not only does it provide a central location for the storage of images and metadata, but it also provides capabilities to authenticate users and manage access to the medical images. It integrates with downstream systems to provide analysis and visualization capabilities. You can search through the medical image repository in a PACS using DICOM metadata and tags to retrieve historical imaging records for a particular patient.
- Medical image visualization and analysis: To interpret the details in medical images, radiologists need to visualize them using medical image visualization tools. There are multiple visualization tools available on the market. Some of them come integrated with PACS, so radiologists can go from storing and interpreting seamlessly. The visualization tools come inbuilt with capabilities to render two-dimensional and three-dimensional medical image modalities stored in standard formats such as DICOM. They also provide radiologists with tools to annotate the medical images by highlighting a certain area of the image or attaching a label to the image for downstream analysis. For example, these analysis steps could include the creation of aggregated views for a patient’s imaging studies over a period of time or searching through the image repository for images with certain clinical conditions.
Now that we understand the key components of the medical imaging system and the various associated medical devices, let us dive into how ML can be applied to such workflows.
Applying ML to medical devices and radiology imaging
Unlike traditional software, ML models evolve over time and improve as they interact with real-world data. Also, due to the probabilistic nature of the models, it is likely that the output of these models will change as the statistics behind the data shift. This poses a challenge in applying these models for regulated medical workflows because the medical decision-making process needs to be consistent and supported by the same evidence over and over again. Moreover, the results of an ML model aiding in a clinical decision-making process need to be explainable. In other words, we cannot treat the model as a “black box”; we need to understand its inner workings and explain its behavior in specific scenarios.
In spite of these challenges, the FDA recognizes that AI/ML has the potential to transform healthcare due to its ability to derive insights from vast amounts of data generated in healthcare practice every day. In 2019, the FDA published a discussion paper (https://www.fda.gov/media/122535/download) that proposes a regulatory framework for modifications to AI/ML-based SaMD. This is a welcome initiative as it recognizes the need for modernization in medical devices and associated software. Let us now look at a few examples of how ML can be applied to medical devices and radiology imaging:
- Detecting failures and operational continuity: ML models can work on recognizing trends in the operational metrics or telemetry data gathered from medical devices. These data points can have hidden indicators of device failures or malfunctions that can cause disruption in the devices’ operations. Using data gathered from sensors mounted on the device that continuously stream data to ML models using IoT gateways, the models can recognize trends in the data and alert users about upcoming unwanted events so timely corrective actions can be taken to prevent such events. This ensures the operational continuity of the device.
- Real-time decision-making: Another application of ML on streaming data from medical devices is to alert patients and medical professionals about trends in a patient’s vital signs, such as heart rate, glucose, or blood pressure. The data is gathered at regular intervals from these devices mounted on patients and is used to infer the condition of the patient in real time. The models can also act as a notification system to alert emergency responders in case of emergencies such as falls or heart failure.
- Aggregated data analysis: While real-time decision-making is critical, it is also important to analyze aggregated data collected from medical devices to understand trends in clinical data and make business decisions. The data collected from medical devices is typically streamed to central aggregation servers. These servers can run ML models for a variety of tasks, from risk stratification of patients and forecasting long-term adverse events to applying search algorithms to index and tag clinical documents.
- Radiology image classification, segmentation, and search: Medical image-based diagnosis can be augmented by computer vision algorithms that are trained to identify clinical conditions from visual biomarkers. Radiology image classification algorithms can categorize radiology images into disease categories or identify anomalous versus normal images. Radiology image segmentation models or object detection models can identify the regions on a medical image that may be of interest to the radiologist. For example, these models can highlight a tumor in a brain CT image to direct the attention of the radiologist. It can also identify specific regions of an image to aid in understanding the anatomy of the patient. Search algorithms can help catalog and identify similar images that demonstrate the same clinical conditions to help compare the patient to past patients and their care plans.
Now that we have an understanding of the medical device industry, its workflows, and the different components of a radiology imaging system, let us now use SageMaker training to train an image classification model for diagnosing pneumonia. Before we do that, we will revise the basics of SageMaker training so we can better understand the implementation steps.
Introducing Amazon SageMaker training
In Chapter 5, you learned about SageMaker Studio and how to process data and train a model using SageMaker Data Wrangler and SageMaker Studio notebooks, respectively. Studio notebooks are great for experimentation on smaller datasets and testing your training scripts locally before running them on the full dataset. While SageMaker Studio notebooks provide a choice of GPU-powered accelerated computing, it is sometimes more cost effective to run the training as a job outside the notebook. It is also an architectural best practice to decouple the development environment from the training environment so they can scale independently from each other. This is where SageMaker training comes in. Let us now understand the basics of SageMaker training.
Understanding the SageMaker training architecture
SageMaker provides options to scale your training job in a managed environment decoupled from your development environment (such as SageMaker Studio notebooks). This is done using a container-based architecture and involves orchestrating batch jobs in containers on SageMaker ML compute instances. Let us look at a diagram to understand how training jobs are run on SageMaker:

Figure 6.1 – SageMaker training architecture
As shown in Figure 6.1, SageMaker training is a container-enabled environment that allows you to run training in a managed training environment. The user provides training data that is stored on S3. In addition, depending on the way you run training (covered in the next section), you may need to provide a Docker URI from the container registry and a training script. The user also provides the SageMaker ML instance type and the count of instances where this training should be run. Once you provide these attributes, SageMaker training downloads the training container image and the code along with the training data on the SageMaker ML instance of choice. It then executes the training following the training script provided. You can monitor the execution of the training job using the status of the training job. During execution, SageMaker outputs the logs from the training job on CloudWatch Logs. Once the model is trained, it is stored on S3 at a predefined path. It can then be downloaded for deployment on your own environment or using SageMaker inference.
Let us now look at various ways in which you can run training on SageMaker.
Understanding training options with SageMaker training
SageMaker provides multiple options when it comes to running training jobs. Here is a summary of the options:
- Run training using SageMaker-provided algorithms: SageMaker provides a variety of training algorithms prepackaged into containers. This approach requires you to provide training data to the algorithm in the expected format and the choice of instance you want to run it on. The algorithms are maintained in a Docker container accessible via a Docker URI. SageMaker runs the training using the algorithm and data provided and stores the trained model artifact on S3. For a full list of available SageMaker algorithms, refer to the following link: https://docs.aws.amazon.com/sagemaker/latest/dg/algos.html.
- Run training using a SageMaker framework container with a custom script: SageMaker provides prebuilt containers for common frameworks such as TensorFlow, MXNet, PyTorch, scikit-learn, and XGBoost. The framework containers are open source so you can look at what libraries and versions they support. They are also accessible via a Docker URI. You can provide additional libraries or dependencies as a requirements.txt file that can be installed during training using pip. In addition to the requirements in the previous approach, this approach requires you to provide a training script that SageMaker can execute in your training framework container of choice. You can find the list of framework containers that SageMaker supports at the following link: https://docs.aws.amazon.com/sagemaker/latest/dg/frameworks.html.
Once the training is over, the trained model is stored on S3.
- Run training on your own container or extend one of the deep learning containers: This option provides you with the flexibility to run a training job on SageMaker by providing an existing container image or extending one of the prebuilt SageMaker container images. SageMaker deep learning container images are open source and available at the following link: https://github.com/aws/deep-learning-containers/blob/master/available_images.md.
This option is ideal for highly specialized training jobs that may need you to modify the underlying environment or install specialized libraries. You have control over how you build your container and the format of the input and output. At this point, SageMaker is acting as an orchestrator for your job that you can execute on an instance of your choice.
- Run training using SageMaker marketplace algorithms: SageMaker provides a marketplace for third-party providers to register their own algorithms and models. The algorithms address a wide range of problem types involving tabular, text, or image data in areas such as computer vision, natural language processing, and forecasting. You can browse and choose your algorithm of choice and subscribe to it. SageMaker then allows you to train on the subscribed model just as you would train using other options. You can find more details about SageMaker marketplace algorithms at the following link: https://docs.aws.amazon.com/sagemaker/latest/dg/sagemaker-mkt-find-subscribe.html.
Now that you have a good understanding of SageMaker training, let us use it to train a computer vision model for medical image classification.
Building a medical image classification model using SageMaker
One common application of ML in medical imaging is for classifying images into different categories. These categories can consist of different types of diseases determined by visual biomarkers. It can also recognize anomalies in a broad group of images and flag the ones that need further investigation by a radiologist. Having a classifier automate the task of prescreening the images reduces the burden on radiologists, who can concentrate on more complex and nuanced cases requiring expert intervention. In this exercise, we will train a model on SageMaker to recognize signs of pneumonia in a chest X-ray. Let us begin by acquiring the dataset.
Acquiring the dataset and code
The Chest X-Ray Images (Pneumonia) dataset is available on the Kaggle website here: https://www.kaggle.com/datasets/paultimothymooney/chest-xray-pneumonia?resource=download.
The dataset consists of 5,863 chest X-ray images in JPEG format organized into three subfolders (train, test, and val). The images are organized into folders named NORMAL and PNEUMONIA:
- Download the dataset from the preceding Kaggle download link. The dataset is around 2 GB in size, so make sure you have a reliable internet connection and adequate space on your computer.
- Unzip the downloaded file. You should see the images organized into three folders: train, test, and val. Organize the data into the following folder structure on your local computer:
data/
test/
NORMAL/
PNEUMONIA/
train/
NORMAL/
PNEUMONIA/
val/
NORMAL/
PNEUMONIA/
- Go to the data folder and create a ZIP file called chest_xray_train.zip by including the train and val images. If you are using the Linux command line, you can type the following:
zip -r chest_xray_train.zip train val
- Upload the chest_xray_train.zip file to the S3 bucket you created as part of the prerequisites. Once uploaded, you can delete the ZIP file from your local hard drive.
- Open the Jupyter Notebook interface of the SageMaker notebook instance by clicking on the Open Jupyter link on the Notebook Instances screen. Make sure your instance type is ml.p2.xlarge.
- Once in the notebook instance, navigate to Applied-Machine-Learning-for-Healthcare-and-Life-Sciences-using-AWS/chapter-6/
- Create a directory named data and upload the test folder with NORMAL and PNEUMONIA subfolders inside the data folder on your notebook instance.
After this step, you should have the following directory structure on your notebook instance:
medical_image_classification.ipynb
scripts
      ag_model.py
data
      test
            NORMAL
            PNEUMONIA
You are now ready to begin training a medical image classification model on Amazon SageMaker.
Building, training, and evaluating the model
To train the image classification model, we will be using the AutoGluon framework on SageMaker. AutoGluon is an AutoML framework that is easy to use and extend. It provides the ability to train models using tabular, imaging, and text data. To learn more about AutoGluon, refer to the guide here: https://auto.gluon.ai/stable/index.html.
We will be using a prebuilt AutoGluon container to run training on SageMaker. We will then download the trained model to the notebook instance and run predictions on the model using a test dataset. This demonstrates the portability that SageMaker provides by allowing you to train on AWS but run inference locally.
Open the medical_image_classification.ipynb notebook and follow the steps in the notebook to complete the exercise.
At the end of the exercise, you will be able to see the confusion matrix shown in Figure 6.2:
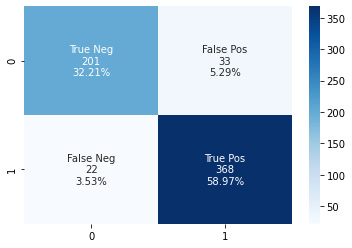
Figure 6.2 – Sample confusion matrix for the medical image classifier
You will also see a ROC curve, as shown in Figure 6.3:

Figure 6.3 – Sample ROC curve for the medical image classifier
This concludes our exercise. Please make sure you stop or delete your SageMaker resources to avoid incurring charges as described at the following link: https://sagemaker-workshop.com/cleanup/sagemaker.html.
Summary
In this chapter, we gained an understanding of the medical device industry and the regulatory aspects of the industry designed to ensure the safe usage of these devices among patients. We also looked at the radiology image workflow and the various components involved in the system to make it work. We saw how ML models, when applied to medical devices, can improve the overall health of the population and prevent serious medical events. In the final sections of the chapter, we got an introduction to SageMaker training and went through an implementation exercise to train an ML model to identify a normal chest X-ray compared to one displaying pneumonia.
In Chapter 7, Applying Machine Learning to Genomics, we will look at how ML technology is transforming the world of clinical research. We will understand the role of genomic sequencing in precision medicine and look at examples that demonstrate why it’s important to consider genomic data in clinical diagnosis.