
In this chapter I focus on using blocks to assign content and what are called "widgets" (which include the user login form, latest blog posts, a list of who is currently logged into your site, the current weather conditions, and the like) to specific positions on a page. I will cover standard blocks that ship with Drupal 7, blocks that come with contributed modules, and information on how to build a custom block from scratch. At the end of the chapter you will have the ability to construct a page with some pretty exciting features.
A block is a generic term that is applied to any self-contained piece of content, menu, or code. There are standard pre-built blocks that come with Drupal 7: the login block, the search block, the "who's online" block, the "who's new" block, the latest blog postings block, and more. There are also blocks that come with contributed modules, such as blocks that share the latest weather report, your recent Twitter posts, or your current Facebook status. As a site administrator you can construct your own custom blocks, such as a list of upcoming events.
In Chapter 6 I covered the structure of themes and how themes define "regions" on a page. Figure 6-1 showed how the theme was divided into left, center, right, and footer regions. I'll now show you how to assign anywhere from one to dozens of blocks to the various regions on your theme, and explain how doing so increases visitor interest in your site by providing interesting and high-value features.
Figure 7-1 is an example of blocks that are assigned to various regions on a page. There are seven blocks that appear on this page.
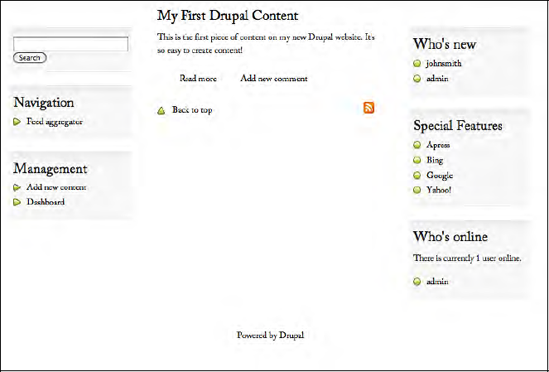
In this example are blocks that are menus (Navigation, Management, Special Features) as well as interactive blocks (Search), and informational blocks ("Who's new," "Who's online," and "Powered by Drupal").
Let's take a look at the blocks that come with Drupal 7 and assign a few of those blocks to regions on your site. We'll then install a module or two that provide cool blocks that you can add to your site, and then we'll create a custom block from scratch.
To find the list of blocks that are available for you to use on your new web site, click on the Structure link at the top of the page. This takes you to the Structure page. On the Structure page, click on the Blocks link to reveal the Blocks page, which lists all the defined blocks on your system, including those that are already assigned to regions and those that are not assigned to a region. See Figure 7-2.

As you see in Figure 7-2, there are a number of disabled blocks. Enable a few by first picking the region where you want them to show up (click the drop-down that says "<none>") and, after assigning the blocks to regions, click on the "Save blocks" button. If you return to your site's homepage, you'll now see the blocks that you enabled in the regions where you assigned them.
It is likely that, at some point in time, you're going to want to re-order how blocks appear on a page. In the previous example, we may want to have the "Who's new" block appear above the "Who's online" block. To re-order the blocks, navigate to the Blocks page by clicking on the Structure link at the top of the page. On the Structure page, click on the Blocks link. Once on the Blocks page, simply click and hold the plus sign (+) next to the block that you want to move, and drag that block to the position where you want it in the list of blocks for that region. When you release the mouse button, you'll see that Drupal re-ordered the items (temporarily). You'll see a message stating that the changes have not yet been saved. Scroll to the bottom of the page and click Save. Drupal will save the changes and display a message stating that the changes were made. You can now close the Blocks page by clicking on the X in the right-hand corner of the Blocks page. Click your browser's refresh button to update the homepage, which should now display the blocks in the new order that you just defined.
Drupal also provides the mechanisms for moving a block to a different region and deactivating a block that is already visible on a page. To see this in action, let's deactivate the "Who's new" block and move the "Who's online" block to the Left Sidebar at the bottom of the blocks that already appear in that region. To make the changes, navigate to the Blocks page by clicking on the Structure link at the top of the page and, on the Structure page, click the Blocks link.
On the Blocks page, click on the Region drop-down list for the "Who's new" block and select the <none> option. Immediately upon selecting <none>, that item will disappear from the Right Sidebar section of the Blocks page. Next, click on the Region drop-down for "Who's online" and select the Left Sidebar option. Immediately after selecting the new location, the "Who's online" block will move to the Left Sidebar area of the block listing, and it will appear at the top of the list.
Our task was to move the "Who's online" block to the Left Sidebar at the bottom of the list of blocks, so we need to click and hold the plus sign (+) next to the "Who's online" block and drag the block to the bottom of the list of blocks in the Left Sidebar region. After dropping the block at the bottom of the list, scroll to the bottom of the page and click Save, which commits the changes to the Drupal database. Revisit the home page of your web site, and you will see the changes that you just made.
You can select various configuration setting for blocks on the Blocks Administration page. The configuration options include overriding the title of the block and setting the visibility of the block based on several optional parameters. As an example of how you might use these features in the future, let's change the "Who's online" block so that it only appears on the homepage of your site, and only when the visitor is a user who has logged into the system with a user ID and password. To make these changes, navigate to the Blocks page by clicking on Structure and then clicking on the Blocks link. On the Blocks page, locate the "Who's online" block and click on its configure link. This reveals the block's configuration page. See Figure 7-3.
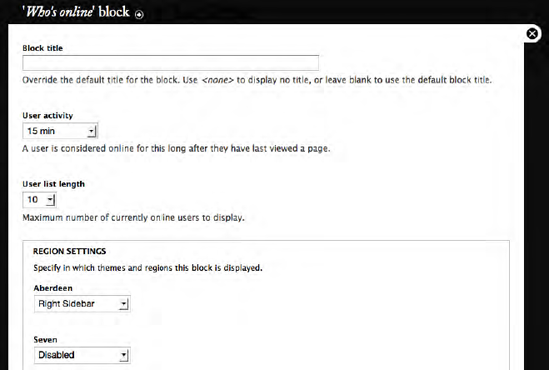
On this form, you can override the default title by entering a value into the "Block title" field. In the "User activity" drop-down you can define the list of users who appear in the "Who's online" block. You do this by selecting the amount of time the person has been logged in for before they appear on the list. In the example, users who have not been logged in for at least 15 minutes will not appear on the list. The next field defines who many people will appear in the list. If you have a site with a significant number of online user and its important to show the names of who is online, then you'll want to increase the user list length to the appropriate value (for example, if you have a social networking site where users interact with each other, you'll want to allow for more names to show).
You can also set the region where the block appears based on the active theme. This is important for sites where different themes are used for example – when a visitor is looking at the site from a device like a PDA instead of a full web browser. You can set a different region for each of the themes on your site.
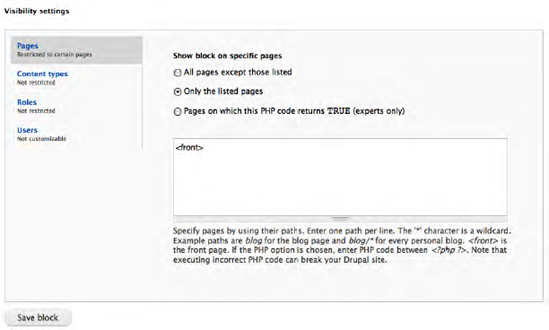
You will likely want to specify on which pages a block appears. For example, you may want the "Who's online" block to only appear on the homepage of your site. At the bottom of the Block configuration page (see Figure 7-4), you will the Pages tab. To set the block to only appear on the homepage, click on the "Only the listed pages" radio button and enter <front> in the text box (<front> is the special term used to represent the homepage of your site). You could also specify other pages by entering the URL of that page in the text box (for example, /content/). With this option, you can also exclude pages as well as write PHP code to define when the block should appear.
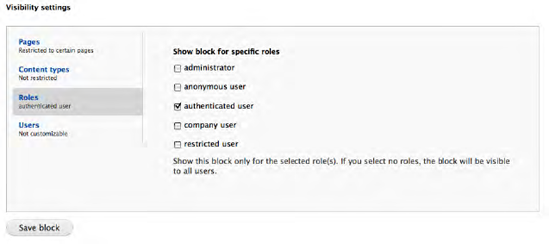
It is also possible to set a block so that it only appears for specific types of users based on their assigned roles. Click on the Roles vertical tab to examine and set the visibility by user roles options. As an example, let's set the block to only appear when the person visiting the site is logged in.
Let's also limit the visibility of this block to visitors who are logged onto our site. See Figure 7-5.
Once you have clicked the check box, you can now click on the "Save block" button at the bottom of the page and return to the homepage of your site. .
To test your changes, navigate to a page other than the homepage. If you are using the Garland theme, you will see a menu on the right-hand side of your page that lists your user name and a Logout link next to your username. Click on your username. You will be taken to your User Account page. Because you are no longer on your homepage, you will see that the "Who's online" block is no longer displayed, which tells you that your changes were made.
There are literally thousands of contributed modules available for Drupal. Many of them generate blocks as their primary means of displaying information to visitors. Examples of modules that generate blocks include the U.S. Weather Bureau's current weather conditions block, which we'll now install as an example of using a contributed modules blocks.
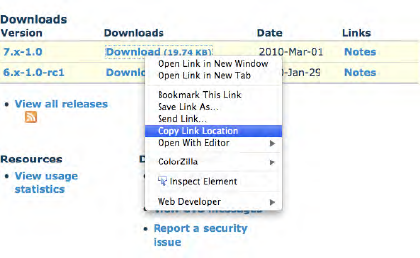
The first step is to locate the module. You can find the weather service module at http://drupal.org/project/nws_weather. Visit the modules project page and right-click on the Download link for the Drupal 7 version, selecting the appropriate copy command for your browser (in this case, Copy Link Location, as shown in Figure 7-6).
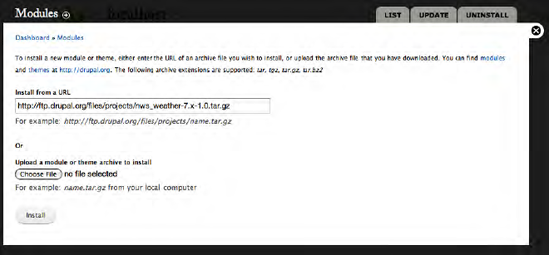
The next step is to install the module. Click on the Modules link on the administrator's menu at the top of any page. Drupal will display the modules page. On that page, click on the link for installing a new module. You will see the "Install from a URL" text box, which is where you paste the URL you copied in the previous step (see Figure 7-7).
After pasting the URL, click on the Install button. Drupal downloads the module from the URL you specified and prepares the module for use.
The next step is to enable the module (although the module exists on your site after downloading, Drupal does not automatically enable it as an active module). Click on the List tab at the top of the Modules panel and scroll down until you find the Weather module. When you find it, you'll note that the Enabled check box is unchecked. Click on the check box and then scroll to the bottom of the page and click on the "Save configuration" button. Drupal refreshes the modules page and displays a "The configuration options have been saved" message.
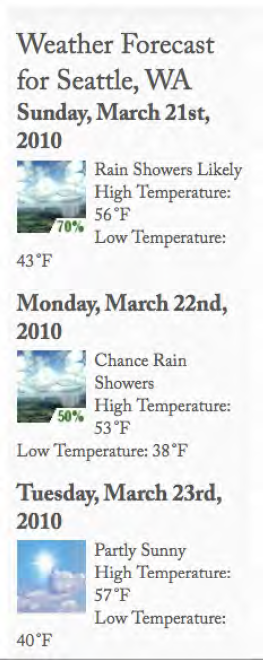
The final step in the process is to assign the module's "Multi Day Forecast" block to a region on your page. Follow the steps from the previous section and assign the block to a region. Remember to click the "Save blocks" button at the bottom of the page. Visit the homepage of your site and you will see the results of your efforts (shown in Figure 7-8): an extended forecast for Seattle Washington (to change the forecast to your home town click on the NWS Weather link in the administrator's menu and follow the directions).
There are hundreds of modules that generate blocks. Visit www.drupal.org/project/modules and browse through the list.
There may be cases where you need a block and, even after looking through the list of contributed modules, you can't find anything that meets your specific requirements. In that case, you have the opportunity to create a custom block yourself. Custom blocks can contain any combination of static HTML and PHP code. If you're interested in creating a custom block that requires PHP code, check out Pro Drupal Development, published by Apress. It's an excellent reference for developing custom PHP code in a Drupal environment.
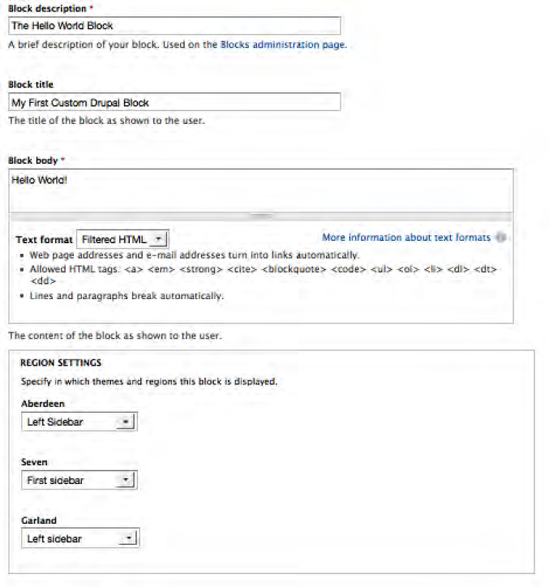
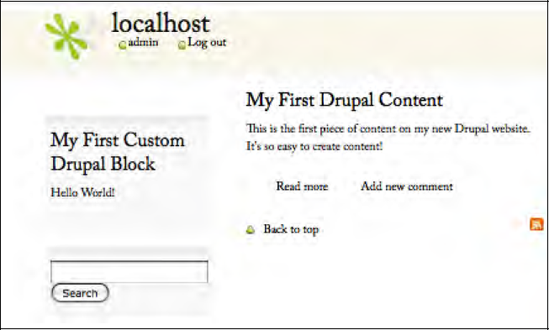
To demonstrate creating a custom block, we'll create one that displays static HTML text in the form of "Hello World!" Although it may not be exciting, it does demonstrate the process for creating a new block. The first step is to launch the block creation form, which is accessible from the following URL http://localhost/admin/structure/block/add (replace localhost with the appropriate domain name if you are not running Drupal your desktop or laptop). On this form, enter a description of the block in the "Block description field," enter the title you want to appear at the top of the block in the "Block title" field, the text you want to display in the "Block body," and select the region where you want your block to appear in for each of the themes you have enabled on your site. When complete, click on the "Save block" button at the bottom of the page. See Figure 7-9.
After saving the block, return to the homepage of your site where you'll see the block you created in the region you specified (see Figure 7-10).
Now let's take your block to the next level by adding a relatively simple block of PHP code that displays the current date, making your block dynamic. To change the block, click on the Structure link in the administrator's menu at the top of the page. On the Structure page, click on the Block's link. On the blocks page, scroll down until you find the block you just created and click on the configure link. Clicking on the link opens the Block edit form where we'll enter the PHP code that displays the current date. Update the Block body by entering the following block of PHP code, immediately following the Hello World! text that you entered previously.
<?php
 echo "Today is: ";
 echo date('m/d/Y'),
?>
After entering the code, change the Text format select list from Filtered HTML to PHP code, directing Drupal to interpret the PHP code you entered, and click the Save block button. Return to the homepage to see the impact of your change.
Blocks are powerful mechanisms for creating and displaying dynamic content and interactive features on your site. In this chapter we discovered blocks that ship with Drupal 7, how to install a module that provides a weather forecast for your local area, and how to create a custom block from scratch. We will continue to expand on the use of blocks as I cover Views, Panels, and installing additional modules in upcoming chapters.