
Now that your site is up and running, you have a couple of decisions to make. First, will you have any administrators on the site other than yourself? Second, will your site be open to everyone, or will users need to log in to view content and other features? In this chapter, I cover the how Drupal treats visitors to your site, and how you as a site administrator can configure Drupal's user account features to restrict the capabilities of those who have user accounts on your system.
Controlling who has the ability to do what on your website is performed through Drupal's security features. Drupal's security features provide the ability to define who has the ability to view, create, update, delete, and participate through a combination of individual user accounts, user roles, and permissions.
Users (or site visitors) in Drupal 7 are divided into two general categories: anonymous users and authenticated users. Anonymous users are individuals who visit your website and do not log in using a user ID and password. If you visit www.cnn.com and don't log in, you're classified as an anonymous user. With Drupal, you have the ability to support anonymous users, and you also have the ability to restrict what an anonymous user can do on your site. Authenticated users are visitors to your site who log in using a unique user ID and password. I'll cover how user IDs and passwords are created shortly, but understanding the difference between the two categories of users is important.
Roles are a Drupal mechanism that allows you, the site administrator, to define categories of authenticated users of your website. You may define roles on your website that are department specific (e.g., a role for human resources, purchasing, sales, marketing, and customer service), roles that are functionally oriented (e.g., content authors, content reviewers, content authors), roles that are associated with a specific section of your website (e.g., products, support, sales, homepage), or any other definition that you can dream up. Roles are simply a way of putting authenticated users into categories, where categories are associated with specific permissions. Any authenticated user of your website may be assigned to none, one, or more than one role (e.g., you may have a user who is assigned roles of sales department, content author, and products).
Permissions in Drupal are a mechanism for controlling what a user assigned to a specific role can do. There are dozens of permissions that you can enable or revoke for each user role you have defined. Examples of permissions that you might set for a specific role include: the ability to create a new page, the ability to create a new article, the ability to edit any article regardless of who authored it, the ability to search content on the website, and the ability to add a new user account. The combination of permissions that you set for each role define the capabilities that a user assigned to that role can do on your website.
When you combine user roles with permissions and individual user accounts, you end up with a highly configurable solution for securing access to key features and content on your website.
All Drupal websites have at least one user account: the system administrator. This account is created automatically during the installation process, and is the account that you will use to administer your site. For sites where the site owner is the only one who creates content and administers the site, having just the site administrators account is all that is required. If you anticipate having others who will administer or create content, then you'll need to decide which Drupal mechanism will be used to create user accounts. Drupal provides three alternatives for you to pick from:
Users can create their own accounts without an administrator approving their account.
Users can request a new account, but an administrator has to approve the account before it is activated.
Only Administrators create user accounts.
The approach you take is dependent on how you anticipate visitors using your website. If your site is informational in nature and visitors don't need to log in to see content or participate in site features (e.g., posting comments), then option 3 is the best approach, as it doesn't confuse visitors to the site by making them think that you have to log in to your site to see content. If your site has content or features that are considered "not for public consumption" and require a user account, then you will want to pick an approach that works for you depending on whether you want users to be able to create their own accounts without verifying their credentials (option 1), or you want an administrator to perform some form of verification before the users account is activated (option 2).
Setting the approach that you wish to use is part of the process of setting up the various settings for user accounts on your system.
Before creating your first user account, it is advisable that you visit the user account settings page and review or modify the general user account configuration settings. To access the settings page, click the Configuration link in the menu at the top of the page (assuming you are logged in as the administrator), and, on the Configuration page, scroll down until you see the section titled "People and Permissions." Click the Account Settings link, which will take you to the page that you will use to set various configuration options for user accounts.
The options that you can set on this page are:
What term you will use to identify anonymous users. In most cases, leaving the default value is appropriate.
What role do you want to associate with administrator capabilities (I will cover creating roles later in this chapter). The role selected will become the default role assigned as the administrator of new modules that you install on the system. Using the default value "administrator" is an appropriate action.
The next set of options, "Registration and Cancellation," define how user accounts are set up on your system. The first set of options define how new user accounts are handled.
If only administrators can create accounts, select the first option "Administrators Only."
If any visitor to your website can create their own account, select the "Visitors" option.
If visitors can request an account but an administrator must approve that request before the account is active, then select the third option, "Visitors, but administrator approval is required."
For demonstration purposes I'll select the first option, so that only administrators may create user accounts.
The next option, "Require e-mail verification," is a good option to leave checked. This option requires that the user responds to a Drupal-generated e-mail that asks them to confirm their account. This helps to avoid "bot" created user accounts, as most bots do not have the intelligence or capabilities to respond to user account verification e-mails.
The next set of options allows you to define what happens to content on your site that was created by this user when you disable that person's account in the future. In most cases the default option, "Disable the account and keep all content," meets the needs of a majority of websites. You may, however, decide that one of the other options is more appropriate for your site.
The next set of options defines whether users can add pictures and signatures to their profiles. I will leave the default values for our test site; however, you may wish to enable or disable these options depending on whether you wish to provide those capabilities to users.
The remaining options at the bottom of the page define how e-mails generated by the system that inform users of their new account are formatted, and the content that is included in each of the emails that are generated by the system. You may modify the content of the e-mails to address your individual preferences. Simply click through each of the tabs in the vertical menu to view each of the e-mails that are generated by the system and sent to users.
You may also define what fields are included in a user's profile. You may wish to capture additional user details beyond Drupal's out-of-the-box profile (username and e-mail address) with details such as the user's address and phone number. Click on the Manage Fields tab at the top of the screen to see these fields.
You can add other fields to your user's profile by simply entering a new label for the field, defining an internal name for the field, and selecting the type of field you want to present to the user (such as a text box). In Figure 3-1, I've created a new field for capturing the "location" of the user. In this example, I used Location as the label, user_location as the field name, Text as the type of information to store, and "Text field" as the type of field to use to collect the location from the user.
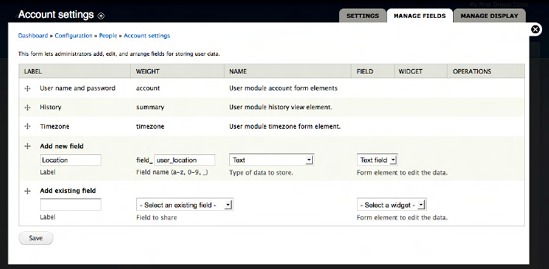
Clicking the Save button walks you through additional configuration screens where you can further refine the details of this field. For this demonstration, and for a typical field, selecting the defaults on these other screens is appropriate.
You now have the definition of user accounts completed and you are now ready to define roles and set permissions.
User roles are a mechanism for categorizing groups of users with similar responsibilities and capabilities on your website. If your website is for an elementary school, you might have roles for teachers, students, and staff. If your website is a community website you might have roles for content authors, content reviewers, publishers, and forum administrators.
The hardest part about creating user roles is deciding what roles you'll need for your site. In general terms, it is easier to administer a site that has fewer roles than one that has lots of roles, as you must set the permissions for each individual role. However, fewer roles means less flexibility, so it is a balancing act, and often one that you have to adjust over time as you become more familiar with the types of users on your site. Unfortunately, there isn't a formula you can use to determine how many roles you'll need, but fortunately there isn't a right or wrong answer as to how many you will need. For our example, we'll create two general-purpose roles:
A role for users who are part of our organization and who will have responsibility for authoring, publishing, and managing content and menus on our site.
A role for site visitors who are provided access to "non-public" content that is intended only for authenticated users (visitors who have been assigned a user ID and password). These users can view content and add comments to content, but cannot author, edit, or delete content.
To create a new user role, assuming you are logged in with the administrator account, click the People link in menu at the top of the page. On the People page, click the Permissions tab. On the Permissions page, click the Roles link to navigate to the page where you view, create, edit, and delete roles. On this page there is a blank text box in the Name column, which is where you will enter the name of our new group. For demonstration purposes, enter "company user" as the name of the new role (see Figure 3-2).
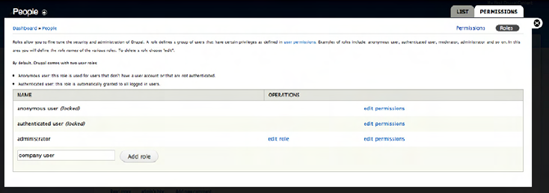
Click the "Add role" button. This results in the creation of the company user role and a new blank text box for creating another new role. For our second example user role, enter "restricted user." A restricted user is any user who has an account on the website and who can view restricted content and post comments to that content, but cannot create, edit, or delete content or perform any administration functions on our website. Once you've entered "restricted user" in the text box, click the "Add role" button to continue.
With both of your new roles defined, you're ready to assign permissions to the roles that you have created.
Permissions provide a mechanism for controlling what users assigned to specific roles on the website can and cannot do. Drupal core and each contributed module provide a set of predefined permissions that you must either enable or disable on a role-by-role basis.
To assign permissions to a role, click the People link at the top of the page (assuming you are logged in as the site administrator). On the People page, click the Permission tab, which reveals the page that you will use to set permissions for each of the roles that you have defined (see Figure 3-3).

This page lists all of the permissions available for your site and the roles that you have defined. You can scroll down the page and check those permissions that you wish to enable for that role, and you can uncheck permissions that you would like to remove from this role.
For demonstration purposes, scroll down the page until you find a section titled Node, and in that section check the following boxes for the Company user role:
Create new Article content
Create new Basic page content
Edit own Article content
Edit own Basic page content
Delete own Article content
Delete own Basic page content
For the Restricted User role, scroll up to the Comments section and check the following permissions:
View comments
Post comments without approval
Edit own comments
At this point, you have created roles and assigned permissions to those roles. You are now ready to create user accounts.
You now have user roles defined, appropriate permissions set, and are ready to create user accounts. The process for creating a new user account is accomplished by first clicking the People link in the menu at the top of the page. Clicking this link reveals the page shown in Figure 3-4.
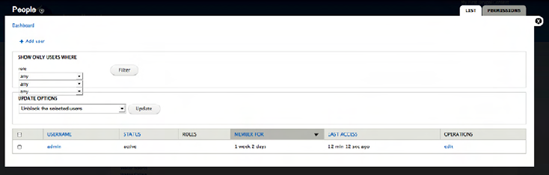
This screen lists all existing user accounts. At this point, the only account that is listed is the admin account, which was created when we performed the installation process. To add a new user, click the "Add user" link at the top left of this page. Clicking the link reveals the "Add user" form (see Figure 3-5).
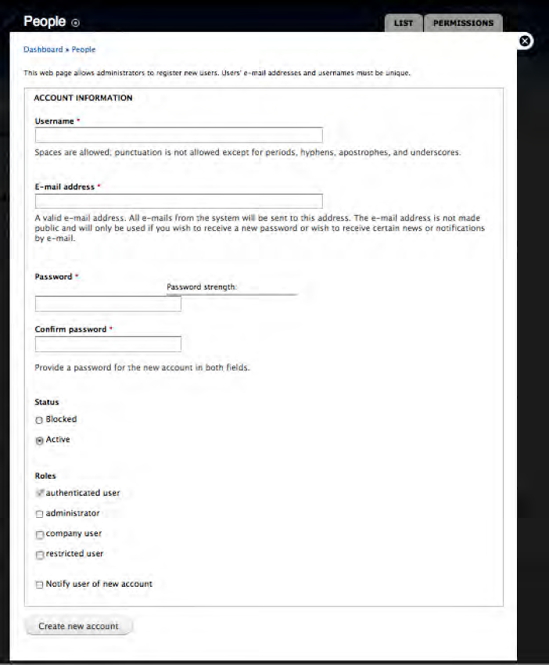
For demonstration purposes, we will create a new user account by entering the following values:
In the username field enter: johnsmith.
In the password field enter: [email protected].
In the password field enter: 12johnsmith34.
For status make sure that active is selected.
For roles check the company user box.
Check the notify user of new account box (clicking this option causes Drupal to send an e-mail to the user notifying them of their new account).
Click the Create New Account button to save the account.
Click the List tab at the top of the screen to see the complete list of user accounts on your site (see Figure 3-6), including the account that you just created.
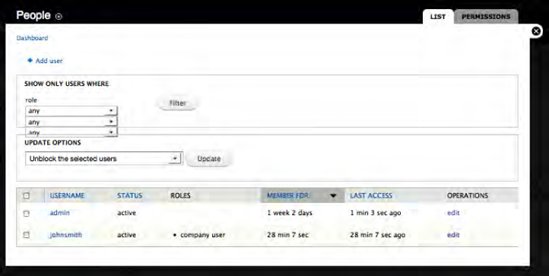
John Smith can now log onto your site and perform all the tasks associated with the company user role.
There may be instances where you need to update a user account. For example, resetting a user's password, changing his or her e-mail address, updating his or her assigned roles, or disabling the account. You can perform all of these actions by clicking the Edit link associated with the users account on the People page.
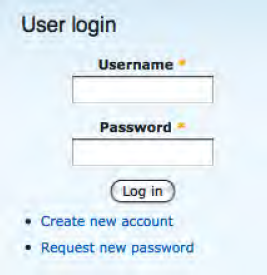
If you configured your site so that users can create their own accounts, requiring that a site administrator review and approve their account, the process is slightly different than that of an administrator creating the users account. If you selected the user account option where a visitor can create their account but requires administrator approval, or the option where visitors can create their account without an administrator approving their account, the login form has an additional option under the Login button: "Create new account." See Figure 3-7.
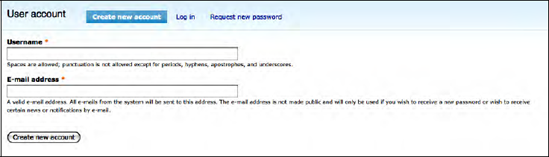
Clicking this link (while not logged into the site) brings you to a screen where a visitor can enter their requested username and their e-mail address (see Figure 8). For this example, enter a username and an e-mail address for the new account and click "Create new account" (note: Drupal only allows you to use an e-mail address once across your entire site. Attempting to reuse an e-mail address that is already assigned to an account on your system will result in an error message).
As soon as the account is created Drupal sends an email to the e-mail address entered by the user and displays a success message displayed on the screen:
"Thank you for applying for an account. Your account is currently pending approval by the site administrator. In the meantime, a welcome message with further instructions has been sent to your e-mail address."
If you configured your system to allow users to create an account but an administrator must manually approve that account, you'll need to visit the People page and edit that users account, changing the users status from Blocked to Active. Until the user's status has been changed, they will be unable to log onto your site with their user ID and password. If you selected the option where users can create an account and the account does not require administrator approval, the user will be able to log onto your site immediately.
One of Drupal's features that saves site administrators hours of work a year is the ability for users to reset their passwords without having to e-mail a site administrator asking someone to reset their password for them. If you log out of your site (clicking the logout link at the top right of the page), you'll note that in the right column, under the Login button, there is a link for requesting a new password (refer to Figure 3-7).
Clicking on this link reveals a page where the visitor can enter either their user ID or their email address.
Entering either a valid username or a valid e-mail address (where "valid" means that it exists as either a valid user ID on your site or a valid e-mail address associated with a user account on your site) results in Drupal generating an e-mail that is sent to the user with a "one-time login" link that allows them to reset their password.
In this chapter, I covered the process for configuring how Drupal handles user accounts and the approach for creating user roles and assigning permissions to those roles. I discussed the decisions that you as the site owner must make when setting up your site, including whether you will be the only person who has the ability to administer the site and create content, or whether you will have others who will be responsible for those areas.
If there will be others assigned to tasks of creating content or managing the site, then you'll want to configure the base settings for user accounts, create roles for those who will be performing activities on your site, and set the appropriate permissions. You'll also want to define whether users can create their own accounts without an administrator approving their accounts, or users can create an account but an administrator must approve it, or only administrators can create accounts. Once you've made those decisions and set the parameters discussed in this chapter you're ready to start adding users to your site. You can have all the users you can handle, but they probably won't stick around long if they can't find the content they're interested in on your site. That's where taxonomy comes in, which is what we'll talk about next.