
If you are hosting your Drupal site on a commercial web-hosting provider, it is likely that it has a tool that installs Drupal for you. If that's the case, you can bypass this chapter and follow the directions provided to you by your web-hosting provider. But if you need to install Drupal on your laptop, desktop, or server, then this appendix is for you.
In the sections that follow, I will walk you through the step-by-step process of installing foundational components such as PHP, MySQL, and Apache, as well as the steps for downloading and installing Drupal 7. At the end of this appendix, you will have installed Drupal and will be ready to work through the main body of the book.
Before installing Drupal, you must have access to a server, which must have several pieces of software installed and configured. The type of server you choose is purely a matter of personal preference. You can install and configure Drupal on a Windows, Macintosh, or Linux-based server. Those servers can be either a local machine (your desktop or laptop) or a hosted server (shared or dedicated, hosted by an organization such as Hostmonster).
You will need to have the following components loaded, configured, and running on your server before you begin the Drupal installation process:
A web server (either Apache or Microsoft's Internet Information Server): For the purposes of this book, I will focus on an Apache-based solution, because Apache runs on all of the platforms that Drupal supports. For information on installing and configuring IIS, please consult
www.microsoft.com.PHP: PHP the programming language used by Drupal.
A relational database server (either MySQL or PostgreSQL): For the purposes of simplifying the installation process, I will focus on MySQL. For details on installing and configuring PostgreSQL please consult
www.postgresql.org.FTP (File Transfer Protocol): FTP is used for uploading files to the server.
Various libraries for image handling, secure connections, and mail routing.
If your intent is to run your new Drupal site in a hosted environment, the work of setting up the foundational components has already been done for you by the hosting company. If you are using a hosting company, you can skip to the section on installing Drupal. If your intention is to develop your site on your desktop or laptop and then deploy your site to a server, you will need to install and configure the components required to support Drupal.
Before you install Drupal, you need three basic components in place: the server, the web server, and the database. If you are hosting your site with a commercial hosting company, you can skip to the installing Drupal section, as everything you need is already installed.
Depending on the operating system on your computer, you may already have a few of the required components already installed (for example, OSX comes with Apache and PHP already installed). However, getting all of the components to work together may be more of a challenge than most people want to undertake. Fortunately, a group of very talented people at apachefriends.org created an "all-in-one" software package called XAMPP (XAMPP stands for Apache, MySQL, PHP, and Python) that is very simple for even the least technical person to install and configure. There is an XAMPP distribution for Windows, Macintosh (OSX), Linux, and Solaris.
The components included in XAMPP that are critical for Drupal are:
Apache: The web server software package that handles requests for content residing on your server and returning the results of that request back to the person who made it.
MySQL: The relational database where Drupal stores all of its content.
PHP & PEAR: The programming language used by the developers who create and maintain Drupal.
phpMyAdmin: An invaluable tool for creating and managing databases, tables, and data stored in your MySQL database.
There are detailed instructions for installing XAMPP on each of the supported platforms on the
apachefriends.org.
Now that you have the underlying server components installed, you are ready to install Drupal. There are five basic steps associated with installing Drupal on your server, regardless of whether you are running your Drupal site on a Windows, OSX, Linux, or shared-hosting-based server.
Downloading Drupal is a simple matter of visiting www.drupal.org and picking the latest version and language (such as English or French) of Drupal to download from the homepage. Drupal version numbers change over time, but it is safe to pick the latest version listed on the homepage as the version to download, install, and configure.
To download Drupal, simply click on the homepage link for the latest version, which will take you to the main Drupal download page. On the main download page, click on the link associated with the latest version (for example, 7.0). The compressed file (tar.gz) will automatically download to your computer into the folder you have configured for receiving downloads from the Internet.
The file downloaded from Drupal.org is a compressed file that has all of the directories and files required to set up and run Drupal on your server. You will need to decompress the tar.gz file into its individual elements, either by double-clicking on the file (this works on OSX and Linux) or by opening the file in a decompression utility (for example, on Windows use a free utility like 7zip). Double-clicking on the file will result in a folder being created on your computer with all of the directories and files expanded to their original pre-compressed state.
Note
Depending on your operating system and your setting for your operating systems file manager, you may or may not see the .htaccess file, as it is classified as a "hidden" file in Linux and OSX. This is a critical file and must be moved in the next step. If you do not see the .htaccess file, please update your file browser's settings to allow you to see hidden files before proceeding to the next step.
The next step is to move the contents of the Drupal folder that you just decompressed in the previous step, to the "root" directory of your web server. If you are using XAMPP, the "root" directory is the folder marked as "htdocs" in the directory where XAMPP is installed. If you are installing Drupal on a hosted platform, the root directory will be that specified by your hosting company (for example, the hosting company that I use names the root directory "public_html"). You should check with your hosting company if you are unsure where to put your Drupal files).
With all of the files in place, you're ready to take the next step of creating the database.
Drupal uses a file named settings.php to store configuration parameters for your site, such as the name of the database and the userID and password used to access that database. Drupal ships with a default settings.php file that we will use as the starting point for our site's settings.php file. Navigate to the sites/default directory in the location where you copied the Drupal directories and files to in the previous step. In that directory you will find a default.settings.php file. Copy that file and rename the copied version to settings.php.
Next, set the permissions on the settings.php so that anyone can read and update the file. Drupal must have the ability to update this file during the update process. Check your operating systems directions for setting permissions if you're unsure on how to do this.
Creating the database is a relatively simple process. If you are using XAMPP or a hosting provider, you should have access to the phpmyadmin administrators tool. To access the admin tool, visit http://localhost/xampp page. In the Tools section, you will see a link to "phpmyadmin." Please click on that link to launch the phpmyadmin administrator's page.
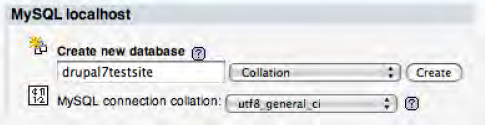
On this page, locate the text box that is right below the "Create new database" label. In this text box, type in a name that is easy for you to remember and is representative of what your web site is about (using this approach makes it easier in the future to figure out which database goes with which web site, especially when you have multiple Drupal sites running on your server). MySQL is extremely flexible, and you can name your databases anything that you wish; however, there are generally accepted standards that you may wish to follow:
Only use lowercase characters.
Separate words with underscores.
Keep the database name shorter than 64 characters (a MySQL restriction).
For demonstration purposes, I have created a new database named "drupal7testsite." After entering the database name, click on the Create button. See Figure A-1.
The next screen that appears shows that the database was created. We don't have to create any tables, which is what this screen can be used for, because Drupal will create the tables for us as part of the installation script.
The next step is to create a MySQL user who will be associated with the database that we just created. You can use the "root" account that is created automatically when MySQL is installed. However, for security purposes, it is a better practice to create a user account that can only access this database. To access the user account creation screens, simply click on the Privileges tab. This screen lists all existing user accounts. Click on the "Add a New User" link at the bottom of the page.
There are four fields on this screen that we need to fill to create our new user account (see Figure A-2):
User ID: This is the unique value that represents our database user and will be used by Drupal to log onto the database. For our example enter drupal7.
Host: This field provides the ability to restrict which system the user can log in from. For security purposes, we want to set this value to "localhost" by selecting the Local option from the drop-down list. Localhost is your web server; we don't want that user to have the ability to log in from any system other than the server.
Password: Create a password and enter that same password in the "Re-type" field.
Database for User: Here, leave the default option, which is to grant all privileges on the database that we just created, and then press the Go button at the bottom of the form.

One you press the Go button, phpMyAdmin creates your user account and grants the user the required privileges to use your new database. You are now ready to start the Drupal configuration process.
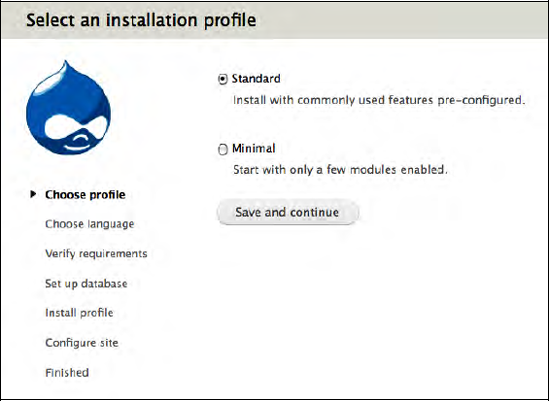
To start the configuration process, simply open a web browser and type http://localhost in the address bar. The first page lists two installation profile options (see Figure A-3). The Standard option installs the complete version of Drupal with all of the core modules that I describe and use throughout the book. The Minimal profile installs a bare bones version of Drupal, without many of the core modules that I describe elsewhere in this book (for example, it does not install forums, blogs, and polls). For a vast majority of Drupal site owners, the Standard version is the correct one to select. If you're developing a custom platform (your own distribution profile with specific modules) you may wish to start with the Minimal profile. For our case select the Standard option and click Save and continue.
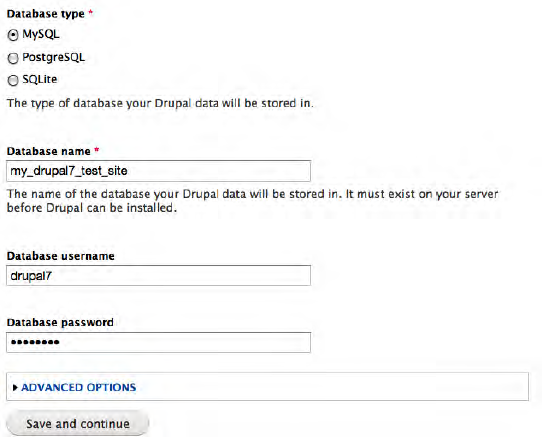
The next screen in the process asks for the details of the database that you created in the create database process. On this screen (shown in Figure A-4) enter:
Database name: Enter the name you used when you created the database.
Database username: Enter the user ID you used when you created the new user.
Database password: Enter the password you used when you created the new user.
If you've forgotten what you used for any of the above values, you can look them up through phpmyadmin.
If you entered the correct values, Drupal will run the installation scripts. After Drupal creates the database tables required to support your new site, we're ready to set a few simple configuration parameters (see Figure A-5).
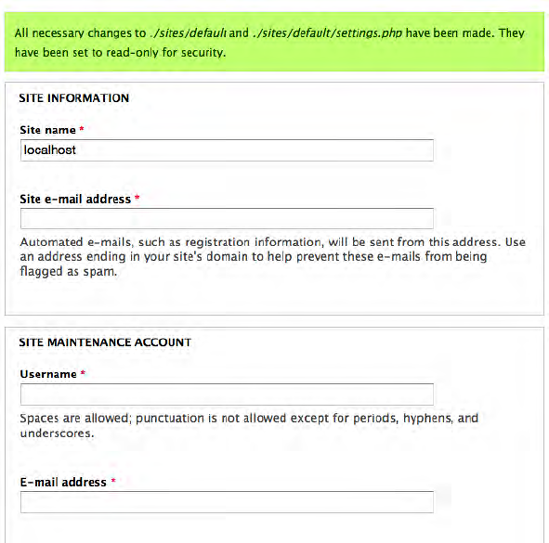
On this form enter the following values:
Site Information
Site name: The name or title of your site.
Site e-mail address: This is the default e-mail address that will be used by Drupal for any outbound e-mails generated by the system.
Site Maintenance Account
Username: This is the username of the administrators account for your new web site. Use something that is easy for you to remember.
E-mail address: the e-mail address where administrator related emails will be sent
Password: Enter the password for the administrator's account.
Confirm password: Re-enter the password you entered in the password field.
Server Settings
Default country: The country where you reside (or leave the no default country value if you do not want to specify the default country; this is an optional field).
Default time zone: Select the appropriate time zone for your web site.
Update Notifications
Check for updates automatically: If checked, this feature looks for updates to Drupal core and any contributed modules you have installed and highlights cases where a new version or a security patch has been released. It's a good idea to check this, as it makes the task of tracking updates to modules much easier than having to manually check each module's status.
Receive e-mail notifications: If checked, this directs Drupal to send an e-mail to the administrator when new versions of modules are detected.
Once you've updated the values, simply click on the "Save and continue" button. The result of clicking that button should be a screen that indicates that you have successfully installed Drupal!
Click on the "Visit your new site" link at the bottom of the page to see the homepage of your new Drupal web site.