
If you have followed along in the previous chapters, you now have enough knowledge to build a Drupal 7-based website. Building your website and releasing it to the world is an exciting experience, and one that often brings with it great pride a joy. Whether your site has two or three pages or hundreds, deploying a website and seeing traffic on it is a rewarding and enriching experience. Deploying your website is just a step along the journey; it is by no means the end. As the proud owner of a website, you must monitor it, nurture it, expand it, and support it, all of which are involved in administering your website.
Administering a Drupal website can be a relatively simple task, depending on the size of your site, the number of users, the number of users who have the ability to author content, and the number of modules that you've installed. Over the past several years, I've created a number of personal "pet" project websites that are up and running, and I rarely do anything other than go out and glimpse at the site logs. There are other sites that I have built that require more attention, and the amount of attention really depends on the criteria I just mentioned.
Typical site administration tasks that you will want to consider performing on a periodic basis include:
Backing up the site so you can restore it should anything disastrous happen.
Checking the logs to see if there are any errors that you need to address.
Checking to see if there are any security patches to modules you have installed.
Checking to see if there are any module upgrades that make sense to deploy on your site.
Checking to see if there were any Drupal core updates that you need to deploy.
Approving requests for new user accounts.
In this chapter, I'll describe in detail each of these administrative tasks.
If you don't do anything else on this list of administrative tasks, at least make sure that your data is safe and recoverable in the case of an unexpected disaster. It's easy to put off backing up your site, as it's likely that you'll rarely need to go back and restore your site from a backup. But speaking from experience, the first time you need to restore your site and you don't have a backup is the last time you won't have backups in place from the start. Take it from the voice of experience: the few minutes it takes to set up backups are well spent.
There are two paths to take to address backups on your new site: you can use utilities that your hosting provider gives to you to backup your database and directories, or you can use a Drupal module called "Backup and Migrate" to automatically back up your site on a defined schedule, and, just as important, to easily restore your site from a previous backup. Both approaches work equally as well, and the "Backup and Migrate" module is a perfect solution for those who are less inclined to use operating-system-level commands to schedule backups and to create the scripts necessary to back up your Drupal site.
You will need to install the module, because it is not part of Drupal core. You can find details for this module at www.drupal.org/project/backup_migrate. To install the module, follow the steps covered in Chapter 8.
To access the "Backup and Migrate" configuration page, go to http://localhost/admin/content/backup_migrate (note: replace "localhost" with the appropriate domain name if your site is not running on your local PC). After clicking Enter, you will see the configuration panel for the "Backup and Migrate" module.
The first step in configuring the "Backup and Migrate" module is to define where backup files will be stored on the server. Click on the Destinations tab at the top of the page, revealing the page shown in Figure 14-1. There are two settings for where files will be stored: one for manual backups, where the site administrator clicks on a "Backup now" link to perform the backup, and the automatic backup. I'll explain how to set up automatic backups in a minute. You can also set the database that you want backed up. By default, the module automatically detects the database that your site is running on and sets the parameter. You may choose to override the default directories and database that are set during the process of installing the module, or you may, as I do, leave the defaults.

The next step is to set the schedule for automatic backups. To do so, click on the Schedules tab at the top of the page, revealing the configuration options shown in Figure 14-2. If you haven't set a schedule previously, the page will simply display an "Add schedule" link. Click on that link to view the parameters that you can set for scheduling backups. First, enter a name for the Schedule. We are going to set the backups to be performed on a daily basis, so enter "Daily backups" as the name. Next, set the "Backup every" field to 1 Day(s). Finally, set the "Number of backup files to keep" to 14, meaning Drupal will retain 14 days' of backups before deleting the oldest backup file and storing the newest file. This helps protect you from consuming massive amounts of disk space for old backup files. Set this value carefully. You may have legal requirements in your industry that require that you keep backup files for a certain number of days, weeks, months, or years. Finally, click the "Save schedule" button.

Drupal will now automatically back up the site on a daily basis. The last step is to perform a manual backup of your site. To do so, click on the Backup tab (see Figure 14-3). On the resulting page, select the Default Database as the database to back up, set the "to" option to the Manual Backups Directory (you can also select Download, which will download the backup to your local computer), and set the "using" option to Default Settings. Finally, click the "Backup now" button.
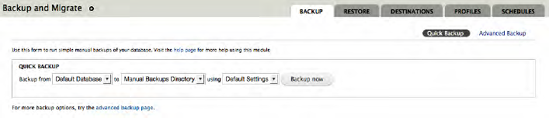
When the backup is completed, Drupal will redisplay the screen with information including the name of the backup file that was generated, the directory where it was stored, and how long the backup took to execute.
If, for some reason, you needed to restore your system to a previously backed up state, you can return to the "Backup and Migrate" administration page (http://localhost/admin/content/backup_migrate) and select the backup file to restore. Click on the Destinations tab, revealing the list of destination directories where backups are stored. See Figure 14-4.
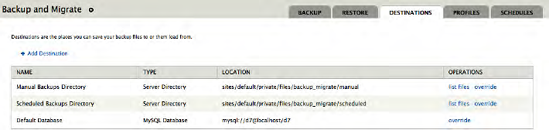
Because we backed up our system using the manual backup process, click on the "List files" link for "Manual Backups Directory," revealing the page shown in Figure 14-5.

In this example, we could restore our system to the state it was in at the time we did the manual backup by simply clicking on the Restore link for that backup file. If you have scheduled backups enabled and have not manually backed up your system, the process described would be identical, with the exception of selecting the "List files" link for the scheduled backups directory. Clicking that link would reveal a list of backup files that were automatically created based on the schedule that you set in the previous steps.
The "Backup and Migrate" module only backs up the contents of your Drupal database. The Drupal installation itself, meaning Drupal core, all of the contributed modules you have installed, all of the themes you have installed, any customizations you have made to modules, and any files that users have uploaded will not be saved by the "Backup and Migrate" module.
There are several options for backing up the file system, starting with simply copying the entire Drupal directory to another destination (for example, downloading the site to your local PC if you are running on a hosted server), copying the Drupal directory to a USB/CD/DVD if you are running on your local desktop/laptop, or, in the case of a hosted environment, working with your provider to ensure that your Drupal directory is being backed up often enough to ensure minimal disruption in the case of a disaster. Whichever scenario you choose, you should back up the file system on a frequent basis if users are uploading and attaching files to content (even daily, just as you do with your "Backup and Migrate" schedule), and in a case where you do not allow file attachments and uploads, it is still a good idea to back up your file system on at least a weekly basis (due to module updates).
With backups in place, the next administrative task is to periodically check the log files to see if there are errors in the system that need to be corrected (for example, "page not found" errors). To view the log files, click on the Reports link in the top menu, revealing a list of reports that are available to help you administer your new Drupal site. See Figure 14-6.
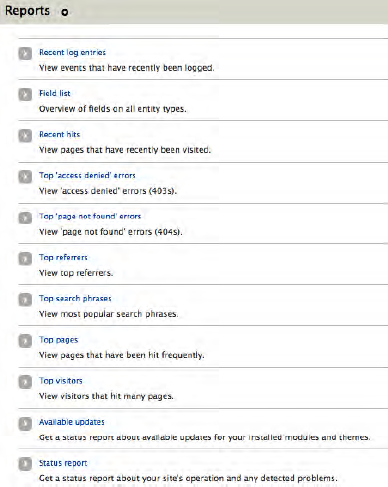
There are three reports that I will focus on in this chapter (you can easily view the other reports by simply clicking on the links). I will focus on the Recent log entries, Top 'page not found' errors, and the Status report (I'll cover available updates later in this chapter).
Drupal provides a rich framework for recording events in the system that may be of interest to someone who is administering a Drupal site. Module developers and Drupal core maintainers leverage this capability to log any events that they feel are important enough to warrant an entry in the log file. If you click on the "Recent log entries" link, you will see a report that looks similar to Figure 14-7.

Your entries will be different from those shown in Figure 14-7, because the actions you have performed will have been different. This list of entries includes both errors and successful events (for example, a user logging in to the system results in a log entry that shows the date and time of when they logged in). Simply click on the message to see whatever details the module or Drupal core developer deemed appropriate to share with a site administrator. In Figure 14-7, we see that there are a number of "page not found" errors in for the "Backup and Migrate" module. To address these errors, you may have to download a newer version of the "Backup and Migrate" module, or you may need to visit that module's homepage on Drupal.org to see if there is a workaround. Discussing all of the errors and how to resolve them is beyond the scope of this chapter, because of the breadth of errors that can occur on a Drupal site. The best resource for resolving errors that you may see are the Drupal.org website and the specific module's issue queue that is generating the errors. If you do not find answers on the module's homepage, the next step is to consult the forums on the Drupal.org website. It is highly unlikely that you're the first one to encounter the error, and if you are, posting a request for help in the forum will typically result in a rapid response from someone who knows how to solve the issue.
Returning to the Reports main page and clicking on the "Top page not found" errors reveals a list of "404" errors, or "page not found," errors. See Figure 14-8.

It is important to check this report periodically to see if site visitors are clicking on links that are "broken." In Figure 14-8 you can see that the "Backup and Migrate" module is looking for two files that do not exist in the proper directories, and in the case of the third item, someone attempted to navigate to admin/backup_migrate, which is a destination that does not exist on the site. Resolving the errors listed on this page may take some investigation and analysis on your part. You'll want to focus on errors that have a high count, as they are likely impacting site visitors (in this case, there is a bug in the "Backup and Migrate" module, which isn't a feature that is visible to site visitors, so resolving that issue may be a lower priority).
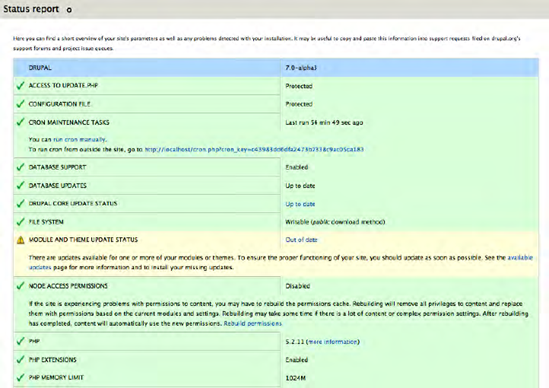
A general "health" report for your site can be accessed on the list of Reports page by clicking on the Status report link. Clicking this link reveals a page that highlights key areas of your Drupal installation that are of relatively high importance. Items that are checked when you run this report include whether critical configuration files are protected from unauthorized changes and whether the database is up to date. In Drupal 7, with the revised approach for installing modules, it's unlikely that the database will become out of date. If it is reported as out of date, run the http://localhost/update.php script to synchronize the database with the current state of your modules.
You are most likely to see issues regarding the status of Drupal core, contributed modules, and themes. If there is an updated version of Drupal or a contributed module or theme has been updated on Drupal.org, these items will appear as yellow. See Figure 13-9.
If the status report shows that there are module or theme updates, you'll want to check to see which types of updates are available. There are three general categories of updates that you will want to pay attention to as you develop your new site and once the site is in production:
In most cases you will want to address security updates as soon as possible, while module updates and Drupal core updates may be something that you address on a monthly, quarterly, or even less frequent basis. Updates typically address bugs that were found in modules and/or new features that were added to the module or Drupal core. As the site administrator, you will need to determine, by looking at the release notes for the each update, whether the update is something you should do immediately (for example, fixing a bug that you have struggled with on your site) or can delay.
To check to see if there are any security patches or updates, click on the "Out of date" link on the status report next to the modules and themes item. The "Out of date" report lists all modules and themes that you have installed on your site that have available updates on Drupal.org. It's a good idea to visit each module's page on Drupal.org to see if there are any critical bugs reported for the new version of the module before you decided to download and install it. I have experienced cases where a new version of a contributed module that I have installed on one of my sites introduced new bugs that I didn't have on the site prior to the upgrade. It's a good idea to check before upgrading.
To install the updates for a theme or module, simply check the box for that module or theme and then click on "Download the updates." Drupal will automatically download, install, and enable the updates. See Figure 14-10.

In a case where Drupal core is updated, the process is slightly more complex. To update Drupal core:
Make sure you backup your database!
Make sure you backup your entire Drupal directory!
Click on the download link for the version that you wish to use, which results in the Drupal .tar file for that version being downloaded to your local PC.
Unpackage/expand the Drupal distribution (for Windows users, you may need to download 7zip, a free utility that unpackages tar files on Windows computers).
Open the folder that is created when you expand the Drupal distribution (see Figure 4-11).
If you have Drupal installed on your local computer, delete all of the files except the sites directory. It's critical that you keep the sites directory, as it contains all of the files that you've uploaded, all of the backups of your site, and the configuration information for connecting to the database. Next, copy all of the files and directories to your htdocs directory (see Appendix A for a refresher on where you will find this directory for your specific operating system).
If you have Drupal installed on a hosted server, use the same mechanism described in Appendix A for transferring the files to that server in the root directory of your hosting account (assuming you installed Drupal in that root directory) after deleting all the files in your root directory except the sites directory.
Once all of the files have been loaded, enter
http://localhost/update.php(note: replace "localhost" with the appropriate domain name if you are hosting this site and not running Drupal on your local PC).Test your site.

Drupal lets you, the site administrator, determine how user accounts are created on your website. You can:
Allow site visitors to create their own accounts without approval by a site administrator.
Allow site visitors to request an account, but require that a site administrator approve it before allowing the visitor to use the account.
Restrict account creation to only the site administrator.
The approach you use is completely dependent on whether you allow visitors to have their own accounts. There is no reason to provide this feature if you don't provide interactive features on your site. If you provide limited capabilities for authenticated users (for example, if you don't enable permissions for any administrative features to the generic "authenticated users" category) and you don't want to be bothered with enabling user accounts, then allowing visitors to create accounts without approval is appropriate. If you want control over who has an account, then you will want to configure you site so visitors can request an account, but you must approve their requests before their accounts become active.
To set how your site handles user accounts, click on the Configuration link in the top menu, revealing the main configuration page for your site. On this page, you will see a category of options for "People and Permissions." Within this category you will see a link for Account Settings.
Click on the link to reveal the account settings configuration form, shown in Figure 4-11.
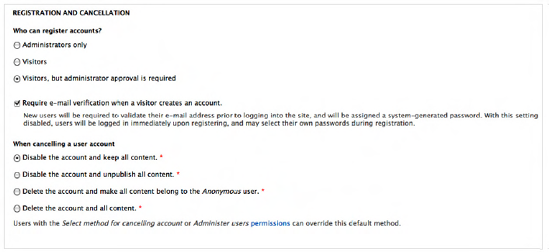
On this page, you will find a section titled Registration and Cancellation. In Figure 14-11, the option is set where visitors can request a user account, but administrator approval is required is set.
To see how this feature works, click the "Log out" link at the top right-hand corner of the page, which will return you to your site's homepage as an anonymous user (not logged into the site).
In the left column, you can see that, under the login form, there is a link for "Create new account." Click on that link to see the form where a new user can request a new account.
The visitor needs to provide a username and a valid e-mail address to create a new account. Once these values have been entered and the visitor has clicked "Create new account," Drupal redisplays your site's homepage with a message that their account is pending approval by the site administrator.
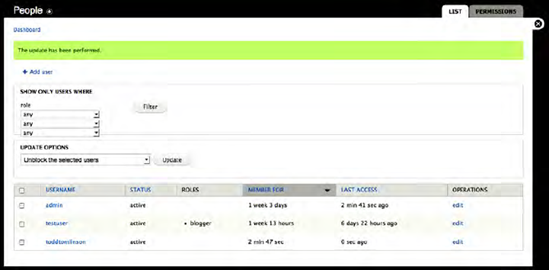
You, as the site administrator, must now enable their account. To do so, click on the People link at the top of the page to see the list of users on your site. See Figure 14-13.

In Figure 14-12, you can see that a user account was just created for toddtomlinson, and that the user's status is set to "blocked," meaning they are blocked from logging onto the site.
If your site has several user accounts you may wish to filter the list to find only those user accounts that are blocked and hence need to be activated. To filter the list, select the last of the three drop-down menus in the "Show only users where" section, and select "blocked" from the list of options.
Next, click on the Filter button to limit the list of users shown on the page to only those that need to be activated. Click the check box next to each of the users that you wish to activate and make sure that the Update Options select list is set to "Unblock the selected users." When all users have been checked and the appropriate option selected, click on the Update button.
Once the updates have completed, click the Reset button in the "Show only users where" section to redisplay all users. Which shows that our new user, toddtomlinson, is now active. See Figure 14-14.
One of the options that you can set on the Account settings page is whether users receive e-mail notifications when their accounts are created. If you have that option enabled, when you enable an account the user is automatically notified via e-mail that their account is now ready for them to log in to the website.
In this chapter, I covered the basics of administering a Drupal website. I explained the key administrative tasks associated with running your new site.
Depending on the complexity of your site and the features you have deployed, there may be other administrative tasks that are specific to those additional features. This list will get you started down the path to ensuring that your site is backed up, error free, and up to date. For additional Drupal administrative topics, visit the Drupal.org website.
Wow, we've covered a lot of information up to this point. You now have the knowledge necessary to build simple to complex websites on Drupal, and you now know how to administer your new site. That a lot of information to digest, and you may be wondering where to start when setting up a new site. That's the focus on the next and last chapter of the book, helping you navigate through the process of creating a successful Drupal website.