
As the owner of your new Drupal site, one of the questions you should be asking yourself is, how are you going to engage site visitors so that they come back frequently? One of the most effective ways of ensuring visitor loyalty is to engage them with interactive features such as blogs, discussion forums, polls, and webforms. Site visitors are more likely to return if they posted a question or comment in a discussion forum on your site, or if they posted a comment to one of your blogs and want to see what others had to say about their comments.
In this chapter I will show you how to enable and configure the three most popular interactive modules that ship with Drupal 7 core, laying the foundation for hooking your site visitors and keeping them coming back for more!
Blogging is one of the most prevalent interactive features on the Internet. Blogging is the simple act of recording and publishing your thoughts and ideas about a topic or group of related topics. Many think of blogging as a personal journal or diary, where the "personal" part refers to your thoughts and ideas, not to the visibility of the blog. Blogs are typically open to the general public.
There are websites that are completely dedicated to a specific blog and topic (such as http://buytaert.net, the website of the creator of Drupal), and there are websites where blogs represent a small portion of the content (such as whitehouse.gov). Drupal provides the capabilities to do either.
Drupal 7 includes a blog module that makes it easy for users with the proper permissions to author and publish blog entries on your website. To demonstrate how easy it is to set up blogging on your site, let's enable the Blog module and set blogging up so that users assigned to a role of "blogger" have the ability to blog on your new website.
The first step is to enable the Blog module. Click on the Module link in the menu at the top of the page to see the list of modules that are available and enabled on your site. Near the top of the list of Core modules you will see the Blog module. If you have not yet enabled that module, you can do so by clicking on the check box and scrolling to the bottom of the screen, where you will click on "Save configuration."
Clicking on "Save configuration" installs the Blog module and makes all of the capabilities associated with blogging available to those Drupal users on your site who are assigned to a role with the permissions that provides access to Drupal's blogging features.
The next step is to create a "blogger" user role. To create the role, click on the People link in the menu at the top of the page. Once on the People configuration page, click on the Permissions tab. On the Permissions configuration page, click on the Roles link at the top right-hand corner. On the Roles configuration page, enter "blogger" in the blank text box in the Name column and click on "Add role."
Now that you have the role created, the next step is to set the permissions so that a user assigned to the blogger role will have the ability to create and edit blog entries. On the Roles page, click on the "Edit permissions" link for the blogger role to view the Permissions configuration page. On the Permissions page, scroll down and check the boxes for the following permissions:
Create new Blog entry content.
Edit own Blog entry content.
Delete own Blog entry content.
Once these are checked, click on "Save permissions." Next, create a test user account and assign that account to the blogger role. To create the account, click on the People link in the menu at the top of the page. On the People configuration page, click on "Add user." On the Account Information page, enter "testuser" as the username, "[email protected]" as the e-mail address, and "test123" as the password. Then check the blogger role in the list of assigned roles. Finally, click "Create new account" at the bottom of the page.
The next step is to log out of your site (you're currently logged in as the administrator) and log in as the test user that you just created. Click on "Log out" at the top of the page and then log back in using the new "testuser" account. Once logged in, click on "Add new content."
Note
Because the testuser account is set up to only create blog postings, clicking on "Add new content" immediately brings up the "Create a blog entry" form. If the testuser account was assigned to roles that allowed that user to create other content types, clicking on "Add new content" link would have brought up a list of content types that the user could create.
Clicking "Add new content" reveals the Create Blog entry page. On this page, you'll find a text field for entering the title of your blog posting and a text area for authoring your blog posting. Create a blog posting that describes how much you enjoy using Drupal. When finished writing, click the Save button at the bottom of the page. Congratulations! You just blogged on your new Drupal website. The sample blog posting that I created is shown in Figure 9-1.
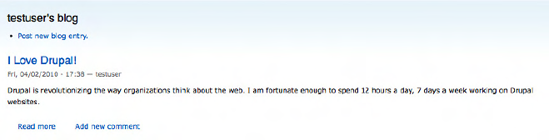
Look at the structure of the post. You'll see that Drupal automatically displays the date and time of the posting, along with the name of the user who wrote it. The blog posting is displayed in Teaser mode, as indicated by the "Read more" link at the bottom. If you wish to adjust the length of the blog-posting teaser, please refer to Chapter 10. Finally, a blog posting permits site visitors to post comments in response—a good way of hooking users to your site by making it interactive.
Drupal uses a specific URL structure for displaying blog entries. For example, http://localhost/blog/1. In this URL the keyword "blog" tells Drupal that you wish to render a list of blog entries, while the "1" represents the user ID (UID) of the person who wrote the blog entries. In the example, "1" is the admin user. You can find the UID of any user by simply clicking on the People link in the top menu bar and hovering over the Edit link for that specific user. As you hover over the Edit link, look in the browser's status bar at the bottom of the page, where you will see a URL such as http://localhost/user/2/edit. The value after the "/user/" represents the UID of that user, and the value that you would insert in the URL for viewing that person's blog postings (for example, http://localhost/blog/2). Locate the UID of the testuser account and view the blog-listing page of that user.
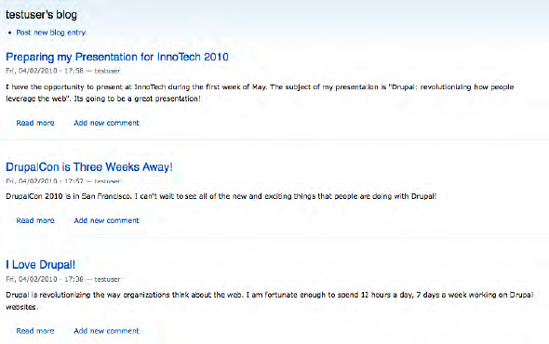
Drupal automatically sorts blog postings by the date they were created, with the newest item posted at the top of the list and the oldest item at the bottom. To demonstrate this feature and to see a more complete example of the blogging feature, add two additional blog postings following the steps outlined previously. When complete, visit the blog-listing page for your testuser account. Figure 9-2 shows my blog postings.
Unless your site is purely focused on a blog, you'll likely want to provide site visitors with a mechanism for viewing recent blog posts. The Blog module provides a block that you can place on a page to automatically list the most recent blog postings made on your site. To assign that block to a region on your theme, click the Structure link at the top of the page, followed by the Blocks link on the Structure page.
On the Blocks page, scroll down and locate the "Recent blog posts" block. Change the region from <none> to "Right sidebar" (for demonstration purposes) and click "Save blocks" at the bottom of the page. Return to the homepage of your website (close the blocks page by clicking on the X) and refresh the page. You should then see a new block in the right column that shows your most recent blog posts (see Figure 9-3).
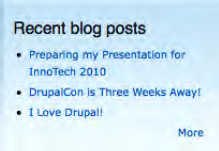
Visitors can then click on an individual blog posting to read it, or they can click on More to visit a page that shows all of the recent blog entries on your site.
Forums, or discussion groups, are commonly thought of as one of the earliest forms of interacting on the Web. The Forums module, which is part of Drupal 7 core, provides the features and functions required to support forums on your site. An example of a site that uses Drupal's forums capability is Drupal.org, shown in Figure 9-4.
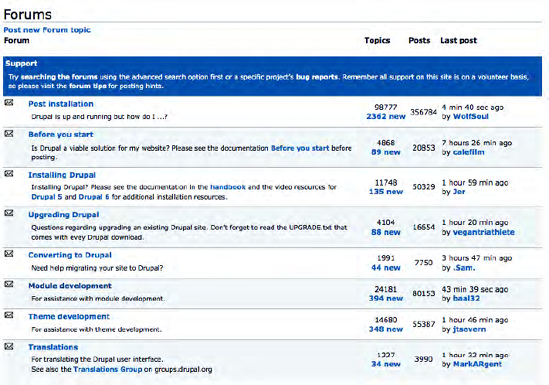
As you can see in Figure 9-4, a forum is made up of one to many topics (e.g., Support in the example above), where site visitors post responses to existing topics or create new sub-topics (e.g., the Post Installation topic above has tens of thousands of sub-topics and posts).
To enable the Forums module, click on the Modules link in the top menu and scroll down the page until you see the Forum module. Check the box associated with the module and click the Save configuration button at the bottom of the page. Drupal will install the Forums module.
The next step in the process is to set permissions for forums. Here are the permissions that you can set:
Administer forums
Create new forum topic content
Edit own forum topic content
Edit any forum topic content
Delete own forum topic content
Delete any forum topic content
Only site administrators should be assigned the ability to "Administer forums," "Edit any forum topic content," and "Delete any forum topic content." If you want users, including anonymous users, to have the ability to post content to your forums, you will need to enable "Create new forum topic content," "Edit own forum topic content," and "Delete own forum topic content" for anonymous users, registered users, or any specific user roles you have defined. For our example site, check the boxes for authenticated users for the Create, Edit, and Delete own forum topics.
Creating forums is a simple two-step process: creating the container that will house your forum topics, and then creating the forum topics that site visitors can respond to.
To create the container, simply click on the Structure link on the top menu. On the Structure page, click on the Forum link. Drupal then displays the Forums administration page. On this page, you have the ability to create new containers and new forum topics. Containers hold topics, and your site can have multiple containers if the need arises. For demonstration purposes, we will create a new container titled "Our Experience with Drupal 7" by clicking on Add container."
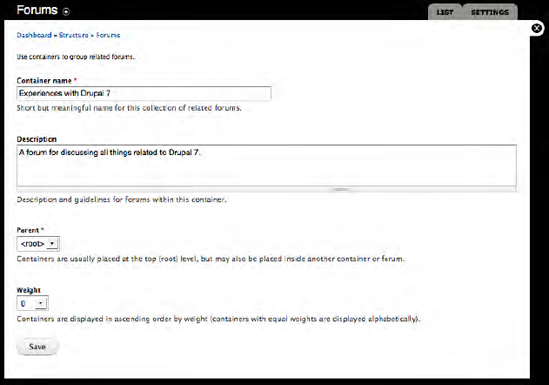
As shown in Figure 9-5, on the "Add container" form we only need to enter the title of our container and a brief description of the purpose and content of the forum that we're about to create.
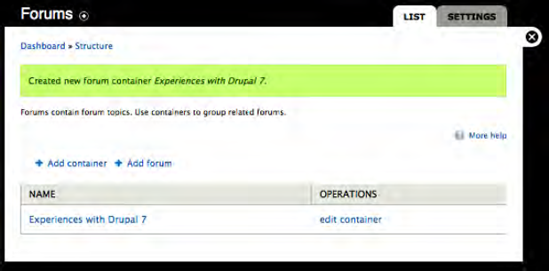
After entering the title and the description, click the Save button to create the container. Drupal then redisplays the main Forum configuration page with our new container listed (see Figure 9-6).
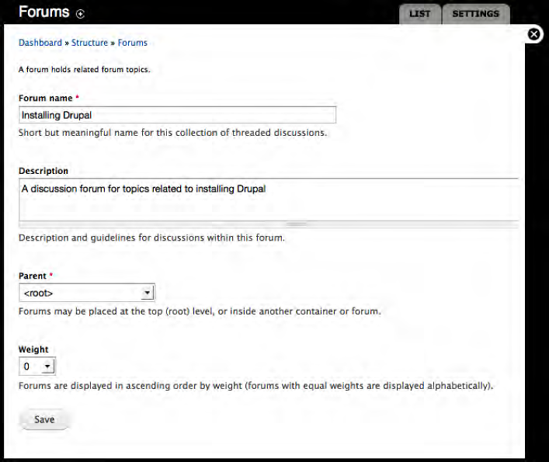
With our container in place, we can now add forums to which the site visitors can post questions and responses. Click on "Add forum," which reveals the Forums page. On this page, we specify the name of our forum, provide a brief description of what the purpose of the forum is, and select the container where the forum should reside. See Figure 9-7. After entering the forum name and description, look in the Parent drop-down list for the container that you created in the previous step. When you have selected it, click Save.
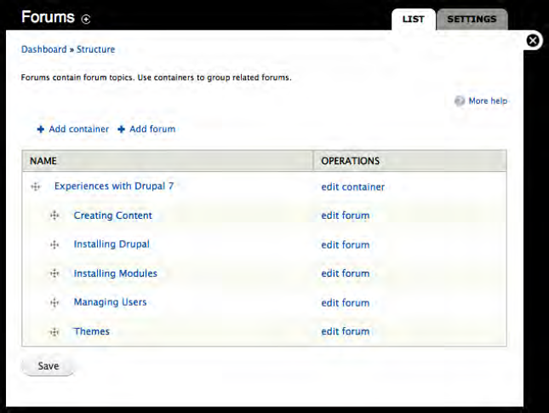
Based on the subject area of our container, Drupal 7, there are likely a number of forums that we could create to facilitate online discussions. Continue to add various forums until you feel that you have a broad enough selection to address the common topics that will arise on your forum. Figure 9-8 shows a number of additional forums added to our container, all of which are topics that are appropriate for the general topic of our forums.
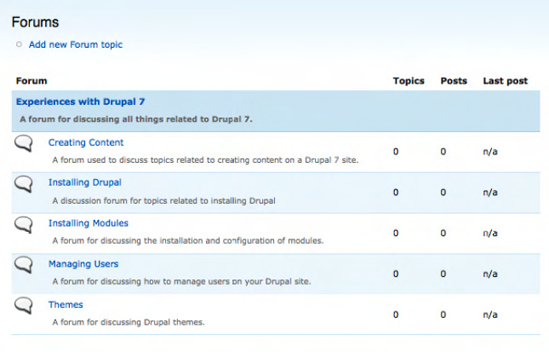
With all of the forums set up, you can visit the Forum page of your website by going to http://localhost/forum. You'll see something like Figure 9-9.
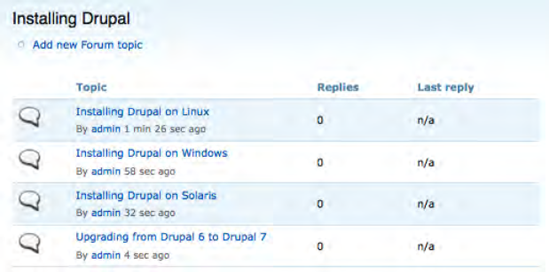
Site visitors who are interested in a specific forum, such as the one on installing Drupal, would click on the forum title, revealing all of the related discussion topics. Figure 9-10 demonstrates what the Installing Drupal forum would look like populated with a number of relevant topics.
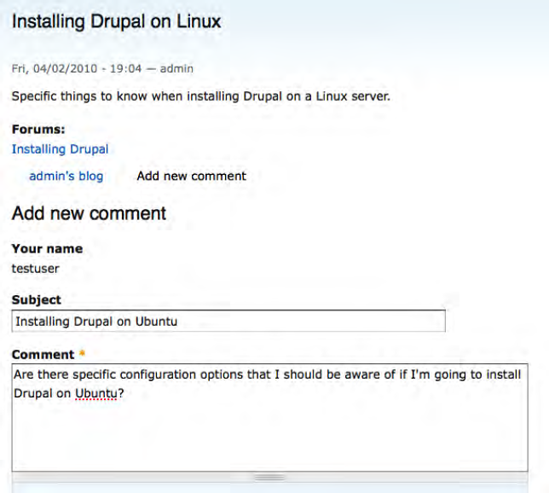
A site visitor with the proper permissions who had something to discuss (like a question about installing Drupal on Ubuntu) could respond to an existing forum topic by clicking on the related topic (Installing Drupal on Linux), revealing a basic form where they can enter the subject and the comment they want to post (see Figure 9-11).
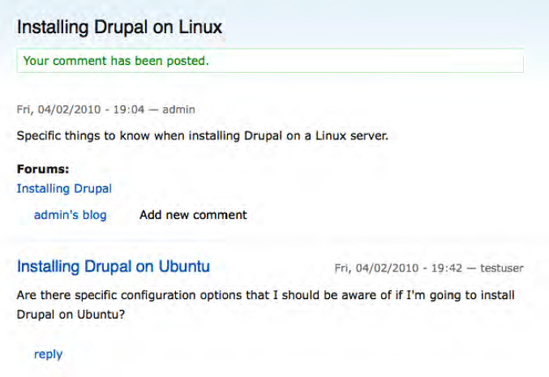
After entering the values and clicking Save, navigate back to the forum for installing Drupal by clicking on the link for Installing Drupal. You can now see in Figure 9-12 that our forum topic has a new comment that visitors can read and post comments to.
Drupal core's forum module has a rather limited feature set. A contributed module called "advanced forum" (http://drupal.org/project/advanced_forum) provides a number of enhanced features, such as "mark all topics in a single forum or all forums as read," forum statistics including number of topics, posts, users, latest user, and currently online users, shows number of new posts in addition to core's number of new topics, and numerous other features.
Another common interactive feature is online polls. Polls are used to collect votes from site visitors on a specific subject, such as "should college football adopt a similar playoff structure as the National Football League to determine the national champion?"
To install the Poll module, click on the Modules link in the top of the page menu, revealing the list of all the modules on your site. Scroll down until you find the Poll module and check the check box to enable the module.
Next, click the Save button at the bottom of the page. Clicking "Save configuration" results in Drupal installing the Poll module, making its capabilities immediately available for us to use.
The next step is to set permissions so that visitors can vote on polls. There are two groups of permissions associated with polls: the first group deals with authoring and creating polls, and the second deals with who can vote on polls. For demonstration purposes, we'll leave the first group set to the default values: only the administrator can create and edit polls. Those values include:
The second group of options should be set so that site visitors can vote on polls. For our example site, set the values so that both anonymous and authenticated users can perform the following three actions:
Vote on polls.
Cancel and change own votes.
View voting results.
Next, click the "Save permissions" button at the bottom of the page.
To create a poll, click the "Add content" link on your site, which reveals the list of content types that you have enabled on your Drupal installation. On that list, you will now see a content type titled poll (see Figure 9-13).
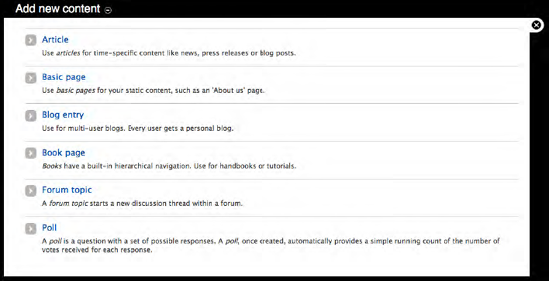
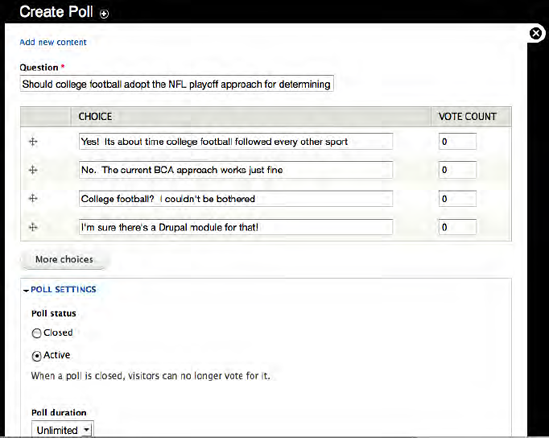
Click on the Poll link, revealing the form that you will use to create the poll. As an example, create a new poll that asks site visitors to vote on whether U.S. college football should adopt a playoff structure like the National Football league. Follow the example in Figure 9-14 and create the poll by entering the question and the answers from which you want visitors to select. Hopefully the fourth answer receives the most votes!
Two key options are also shown in Figure 9-14:
The status of the poll: Whether it is active or closed. Visitors can still vote if the poll is active, whereas closed polls only display the votes that were tallied while the poll was open.
The poll's duration: By selecting a value other than Unlimited, Drupal will automatically close the poll when the duration has expired.
For demonstration purposes, you can leave the status as Active and the duration as Unlimited. Click the Save button and voila, you have an online poll!
Drupal displays your new online poll, ready for visitors to place their votes (see Figure 9-15).
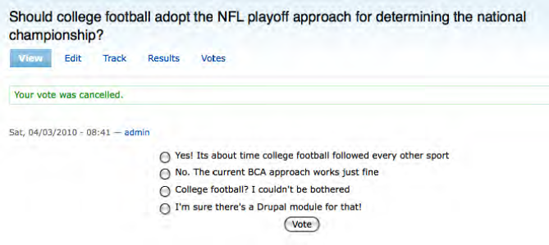
You'll notice in Figure 9-15 that there are several links at the top of your poll that allow you the site administrator to manage and monitor the poll. You can do the following:
View the total number of votes by question by clicking on the View link.
Edit the poll and change the question and answers.
Track the poll.
Click on the Votes link to see who voted for which option.
The Tracker module is a Drupal 7 core module that provides information about the referring site that directed the user to the poll, the user ID of the user if they're logged in on the site, and the date/time they placed their vote. Tracker can be a useful tool if you're trying to analyze what visitors are doing on your site and where they came from. To enable Tracker follow the instructions outlined in Chapter 8.
Select one of the options and click on the Vote button. Drupal displays the total number of votes for each of the options and allows you to cancel your vote if you change your mind. Click through the various links at the top of the page to see the reports that the poll module provides you.
To make your poll visible to site visitors, you could provide a menu link to the poll by using the techniques I described earlier in this book (for example, adding a menu item), or you could use another feature of the polls module, which is a block that lists the latest poll. To enable this feature, click on the Structure link on the top menu, and on the Structure page click on the Blocks link. On the Blocks configuration page, scroll down until you see the "Most recent poll" item, and change the region to either the left or right sidebar. Once you have selected the region, click Save and navigate to the homepage of your website. Your poll is now displayed in the right (or left) sidebar of your website, available for visitors to place their votes.
Collecting information from site visitors through online forms is another key interactive feature that is easy to enable and use on your new site. Using the Webform contributed module, you can create simple forms (such as a form that is used to submit a question) or complex questionnaires using the features enabled through the Webform module. To demonstrate how easy it is, I will walk you through the process of creating an online "suggestion box" where site visitors can enter and submit suggestions to you through a form on your website.
The first step is to install the Webform contributed module. Following the steps outlined in Chapter 8, install and enable the Webform module (http://drupal.org/project/webform). After enabling the module, set the permissions for it so that the administrator of the site can access, edit, and delete all of the features listed for the module. You may also wish to enable "Edit own Webform submissions" for anonymous and authenticated users if you want to allow users to update or correct information they previously submitted.
The example that we are using is an online forms-based suggestion box. On this form, we will allow site visitors to enter a suggestion, pick from a list of categories that fit their suggestion, indicate whether they would like us to follow up on their suggestion, and require that they provide us with their e-mail address so that we can contact them.
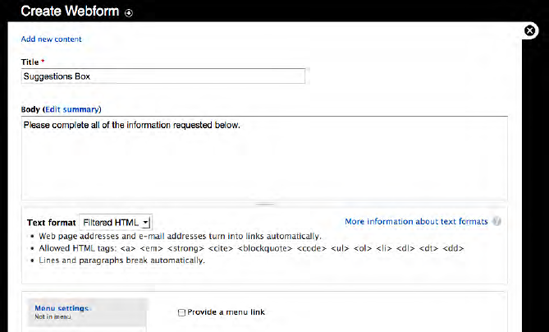
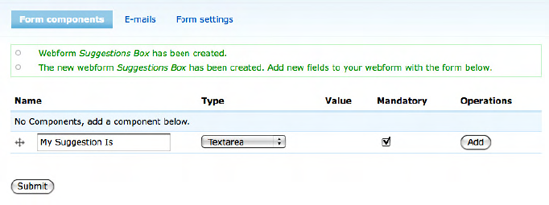
The first step in the creation process is to click on the Content link in the menu at the top of every page, revealing the Content administration page. On this page, click "Add new content." Click on the Webform content type listed on the "Add new content" page's list of content types, bringing you to the first page of the Webform creation process (see Figure 9-16). On this page, enter the title of your Webform, as well as an introduction to what you are asking the user to fill out. For the example, enter Suggestions Box as the title and write a simple introductory statement in the Body field. Then click Save.
The next page you see is for creating the form components or fields (see Figure 9-17). There are three attributes to set for each field: the label that will appear with the field, the type of field you want to display, and an indicator that specifies whether the field is mandatory. The first field that we will create in our example is the text area, where the visitor will enter their suggestion. Enter My Suggestion Is in the text box provided for the label, select Textarea as the type of field we want to use, and set the field to mandatory by checking the box. Then click Add.
Next you'll see a page that lists options you can set for the new field. On this page you can set the following:
Label for the field: The module displays what you entered on the previous screen. You may update it here if you wish to change it.
Field key: This is the internal name used by the module to identify this field in the Drupal database. The module automatically creates the name for you. You may override the name is you wish.
Default value: You may want to provide a default value for this field.
Description: The text you enter in this field will be displayed immediately below the form component. Use this field to provide additional instructions to the visitors on what you're asking them to enter or select.
Validation: You can select whether the field is a mandatory one by checking the box.
Display width and height: Depending on the type of component you selected (textbox or textarea), you may see options that allow you to set how wide and how tall a form component will be on the screen.
Resizable: Check the box if you want to allow the visitor to resize the form component (only applicable to textfields and textareas).
Disabled: You can set the field so the user cannot change the value.
For our example, enter this in the Description field: "Please enter your suggestion in the box above. Be as descriptive as possible." After entering the description, click Submit.
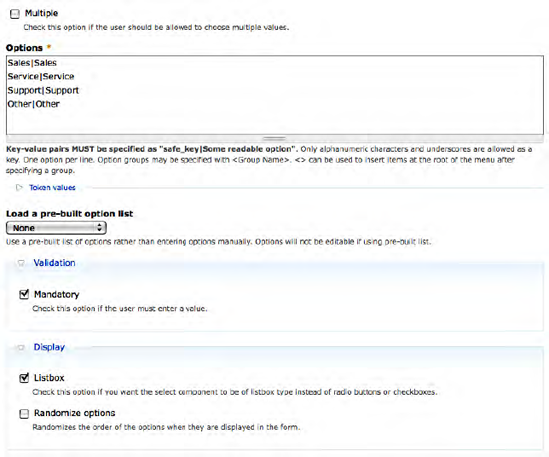
After clicking Submit, the module redisplays the Form components page. Using the steps outlined previously, create a "Select options" field that allows the visitor to specify what their suggestion is related to. Enter My Suggestion Is Related To in the label field, pick the Select options value in the Type field, check the Mandatory box, and click the Add button. The page that is displayed after clicking Add has the same elements listed above with the exception of a new field where we enter the options that the visitor can select from (see Figure 9-18) and three configuration options for setting whether you want the Select options component to allow visitors to select multiple items from the list, whether the component should be displayed as a Listbox, and whether the options should be displayed in a random order. For our example, we will leave the Multiple check box unchecked, we'll enter the options as shown in Figure 9-18, and we will check the Listbox checkbox. After updating the values, click Submit.
Next, create is a field for entering the visitors' e-mail addresses. Follow the steps outlined above using My Email Address as the label for the field, pick the Textfield value from the list of Types, check the Mandatory check box, and click the Add button. Follow the steps outlined previously on the second screen.
You should now have all of the fields defined for your form. The next step is to set the value for where e-mails should be sent when visitors submit information through your form. Click on the E-mails link near the top of the Webform configuration page, revealing a form where you can define who receives the e-mailed results of a visitor submitting the form. In the Address field, enter your e-mail address as the default recipient of the information. You can also click on the Add button to enable sending the information to more than one person.
The final step in the process is to click on the Form settings link at the top of the Webform configuration page. On this page, you can enter a message that will be displayed on the screen after the visitor submits their form. For our example, enter "Thank you for submitting your suggestion." You may also enter a Redirect URL. Entering a value in this field directs the module to display the page associated with the URL after the users submits the form. You may also set how many forms a visitor may submit, reducing the likelihood of malicious users submitting hundreds of suggestions to your site. When complete, click the "Save configuration" button.
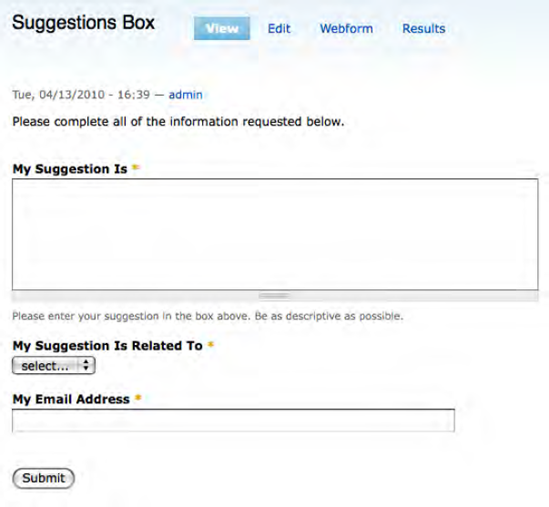
Your form is now ready to be used on your site. You can view the form by clicking on the View link at the top of the Webform configuration page. If you followed the example your form should look something like Figure 9-19.
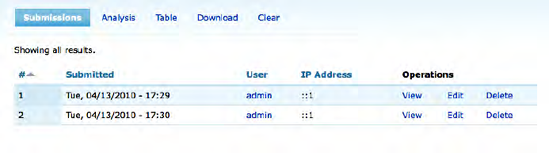
Give your form a test drive. Enter at least two suggestions, then click on the Results link near the top of the form.
The page that is displayed (see Figure 9-20) provides several tools that you can use to manage the data submitted by visitors. Click through the links (Submissions, Analysis, Table, Download, and Clear) to see what the module has to offer.
Interactivity is key to attracting and retaining website visitors. By following the steps in this chapter you've moved your site out of the world of "brochureware" sites into the realm of interactive and social networking. Brochureware sites are great if all you are trying to do is communicate information about your organization or products, but hooking and retaining visitors often takes something beyond just displaying text to keep them coming back.
In this chapter you entered into the interactive website world by adding blogs, forums, polls, and webforms. While those are the top four interactive capabilities on the web, there are hundreds of others that you can choose from. Other examples that you may wish to explore and implement on your site include:
Five Star: A module that provides the ability to rate content on the bases of one to five stars.
Add to Any: A module that allows visitors to post links to your content on social networking sites such as Facebook.
Now that we're interactive, we're going to go through the process of creating custom content types. We've used the basic page and the article in previous chapters.
We will now look at creating your own custom content types for capturing information like an event.