
Drupal is an amazing product in its off-the-shelf state. The features and functionality provided in Drupal 7 core is often more than adequate to meet the needs of many who build their websites with Drupal. But there are times when you need a feature that isn't possible with Drupal core alone, and in those cases you need look no further than the thousands of contributed modules that have been written to address just about anything you could think of doing on a Drupal based website.
In this chapter you will learn how to find, install, enable, and configure contributed modules. You will go through the process of installing, enabling, and configuring one of the most popular and powerful modules for Drupal: the Views module.
A Drupal-contributed module is essentially a program or set of programs that expands Drupal's capabilities beyond what is available in Drupal core. Contributed modules are designed, developed, and provided to the Drupal community free of charge by one or more of the thousands of developers who actively participate in the Drupal community. Modules can be downloaded from Drupal.org and enabled through the Module administration pages. I will cover the process for adding modules in detail in a few moments.
A contributed module can be as simple as providing a mechanism to automatically create the title of an article or as complex as a fully featured eCommerce storefront with product management, inventory management, order management, shipment management, credit card processing, customer management, and returns management. There are thousands modules of every shape and size, covering a wide variety of topics. To find a contributed module, visit www.drupal.org/project/modules and browse through the categories of modules. Example categories include (note: the number after the category represents the number of modules that are available for that category).
As you can see from these examples, there are thousands of modules that span a wide variety of categories. The general titles of the categories listed here often do not do justice to the rich features that are available in the modules that are buried beneath the titles. It often takes research and patience to scan through the hundreds of modules to find the one that provides the functionality that you need. Complex requirements may also take more than one module to provide the functionally you need to address a larger problem. Understanding which modules do what, which modules work well together, and which modules do not work together is often the hardest challenge of building a complex Drupal website.
A recommended exercise is to visit www.durpal.org/project/modules and click on the Release Date link (clicking the link once sorts in date ascending order, clicking the link again sorts the list in date-descending order where the newest module is listed first). Visit the site every day or two and read through the description of the newest modules that were added or updated on the site. It only takes a couple of minutes a day to quickly build up your understanding of the modules and types of solutions that are available through Drupal's contributed modules.
A great third-party website that helps solve the issue of finding the right modules is www.drupalmodules.com. This site provides a search feature that makes it easier look for and find the right module for the right job.
The first step in installing a module is finding the right module to use. As described earlier, there are thousands of modules to pick from; finding the right one is often the biggest challenge. For demonstration purposes, let's pick one of the most popular, powerful, and useful modules: the Views module.
A new feature of Drupal 7 is an administrator's page, which allows you to download and install a module by simply entering the URL of the install file and clicking a button. Drupal handles the task of downloading the modules install file, expanding the install file, moving the files to the correct directory, and installing the module. To access the Modules page, where you can download and install a new Drupal module, simply click on the Modules link in the top menu. Drupal will display the modules configuration page, which at this point shows all of the modules that are shipped as part of Drupal core (see Figure 8-1).
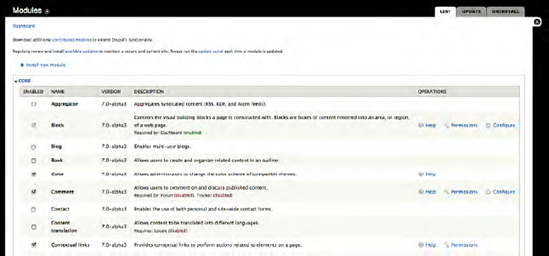
To begin the installation process, click on the "Install new module" link near the top of the page. Clicking on the link reveals the module installation page, shown in Figure 8-2.
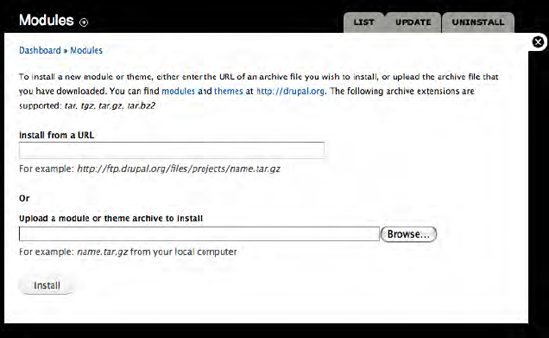
On this page, we need to provide either the URL for the module's installation file (from Drupal.org) or, in the case where you downloaded the module to your computer, uploading the file from your computer to the server using the Upload a module or theme feature. To simplify the process, we'll use the first text box to specify the URL of the file that we are going to install. To find the URL of the file visit www.drupal.org/project and find the module that you wish to install. In our case the module is the Views module, located at www.drupal.org/project/views (each module has its own page on Drupal.org; the URL for each module begins with www.drupal.org/project/, followed by the name of the module). Open a new tab in your browser or a new browser window and navigate to the Views page (www.drupal.org/project/views). On the Views page, near the bottom, you will find a list of the current versions of the Views module, as shown in Figure 8-3. You should, in most cases, select the current release for the module that you are installing. The current release should be highlighted with a green background. In some cases, you may need to use a module that is still in development because a stable production version is not yet available. Development versions (development, alpha, or beta) are typically highlighted with a yellow background and have a version number that ends in -dev, -alpha, or -beta. You should use pre-production (dev, alpha, beta) versions with caution, as those modules are not yet fully developed and have not been thoroughly tested. In our case, we want the current Drupal 7 version of the module, so locate the 7.x version of the module on the list of available releases.

To capture the URL of the installation file, right click on the Download link for the version you wish to install, and select the appropriate copy link location option from the browser's options menu. Return to the Blocks administration page and paste the URL for the file in the top text box.
You are now ready to install the module. To begin the installation process, click on the Install button. Drupal will download the installation file from Drupal.org, expand the compressed file, move all of the files and directories associated with the module to the appropriate directories on your server, and then run the installation script associated with your module.
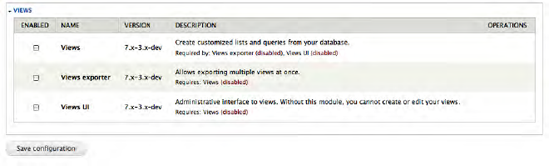
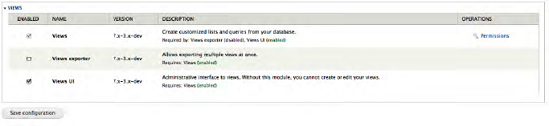
The module is now installed but not yet enabled. To use the module, you must enable it by checking the Enabled boxes on the module configuration page and clicking on the "Save configuration" button at the bottom of the page (see Figure 8-4). For Views, you will want to enable Views and Views UI.
At this point the Views module is installed, enabled, and ready to use. You may now follow the same process to install any contributed module you wish to add to your site.
Some, although not all modules provide some level of customization and configuration. In the case of the Views module that we just installed, the only configuration tasks are to set the permissions of who can use those modules.
To configure the permissions for the Views click on the Permissions link under the Operations column as shown in Figure 8-5.
Permissions for Views, by default, is automatically set to allow Administrators full access to each of the capabilities associated with the module. As you can see from the list in Figure 8-6, the Views module developer defined two types of permissions for this module: the ability to restrict which user roles can administer views and roles that have the ability to bypass access control when accessing views. The default settings meet the requirements for most sites, and we will leave those permissions in their current state.

As you install and enable other modules remember to review and set the permissions for that module.
Some modules provide the ability to set configuration parameters, such as the Search module (part of Drupal core). When viewing the Module configuration page, you'll notice a Configure link under the Operations column, indicating the module developer provided the ability to set parameters. In Figure 8-7 you can see a few of the Search module's configuration options.

It is a good idea to review the configuration options for all of your installed and enabled modules to ensure that they are set properly.
You may "inherit" an existing Drupal site, or you may wish to enable other Drupal modules that already exist on your site (e.g., modules that are part of Drupal core, but not automatically enabled by the Drupal installation process). To see the list of modules that are available on your site simply click on the Modules link at the top of the page, revealing the Modules administration page shown in Figure 8-8.
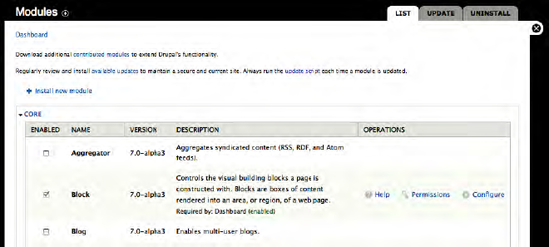
Drupal's module administration page is divided into sections, with each section focused on a particular module or group of modules. The modules that are delivered as part of Drupal core can be found in the Core section of the listing. For demonstration purposes, we are going to enable a core module that by default is not enabled by the Drupal install process: the Blog module. As you can see from Figure 8-8, the Blog module is not checked as Enabled. To enable the Blog module, check the Enabled box and scroll to the bottom of the page. Click on the Save button to enable the Blog module so that it can be used on your new site.
After clicking the Save button, Drupal will then redisplay the Module administration page with the successful configuration message at the top of the page. The blog module is now ready for use.
There may be cases where a module that you have installed is no longer needed. To disable a module, you simply "uncheck" the enabled check box for that module and click Save at the bottom of the Module administration page. To demonstrate this feature, disable the Blog module that you enabled in a previous step. To disable a module, launch the Module administration page by clicking on the Modules link in the top menu bar and scrolling down to the module that you wish to disable. Uncheck the Enabled check box by clicking on the box, scroll to the bottom, and click the Save button. Drupal will then redisplay the list of modules with a success message at the top.
Drupal modules are often updated with fixes to bugs and new additional features. Drupal 7, fortunately, tells you when a new version of a module has been released, and provides a mechanism for automatically updating that module to the latest version. To view all of the available updates, simply click on the Update tab at the top of the Module configuration page (see Figure 8-9).
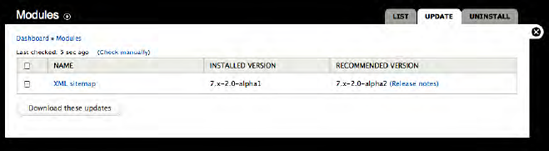
To upgrade a module, click on the check box next to the module's name and the "Download these updates" button.
Note
There may be cases where you don't want to upgrade a module; for example, a case where an upgrade to one module breaks another related module. I suggest that you review the forums on Drupal.org to check to see if anyone has report problems prior to doing the update.
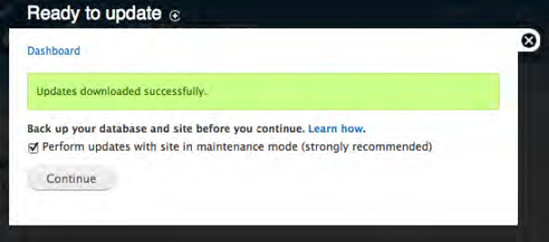
After the update has been downloaded, Drupal directs you to run the update script. Follow the suggestions and backup your site before running the update (see Figure 8-10). Although it's uncommon to have problems due to a module update, there is the possibility that an update causes unforeseen problems with other modules or customizations that you've made on your site. After the update has completed, close the update window and return to your site.
There may be cases where you install a module and it's just not what you thought it would be, or it causes problems on your site. On the Module administration page you will find an Uninstall tab at the top of the page. Clicking on that tab reveals a list of modules that have the capability to automatically uninstall themselves.
Note
Not all modules have the ability to automatically perform an uninstall. It is up to the module developer to create this capability and not all module developers are kind enough to provide this feature.
In the case where automatic un-installation is not available, the process for removing a module is:
Disable the module from the Module administration page.
Navigate to the Sites

Highlight the folder containing the module and delete the folder.
You should use caution when uninstalling a module, as there are often module dependencies, meaning one module depends on another module to function properly. If you are unsure as to whether a module has dependencies, visit that module's page on Drupal.org and look through the module's description. Modules with dependencies will list those dependencies in the body of their description.
There are a few modules that seem to make it to everyone's "favorites" list. For those of us who eat, breathe, drink, and live Drupal, these modules represent our standard "tool belt" that we use on nearly every Drupal project.
CCK prior to Drupal 7 was an add-on module that every serious Drupal developer relied on as one of their "killer modules" for Drupal. CCK provides the ability to create custom content types. If you think back in earlier chapters where we created content for our website, we selected from one of two content types that shipped with Drupal 7, the Page and the Article content types. The primary difference between the Page and Article content types was that the Article has an additional field for attaching a picture. CCK provides you the developer with the ability to define new content types with virtually any field that you can think of. You might decide that you really need an Event content type, where an event has a start date, start time, end date, end time, venue, a picture, a seating chart, and a description. You could use the Page content type to create an event, but you would have to rely on the content author to remember to enter into the body field all of the information I just listed. An easier solution is to use CCK to define a custom content type for events and to define each of the fields mentioned as text fields (or radio buttons, check boxes, pop-up calendars for date selection, select lists, and text areas). As of Drupal 7, parts of CCK were moved into core, but not all of CCK made it. There are still additional CCK features that you will likely want to check out, download, and install. We'll describe in detail how to use CCK in Chapter 10.
Views is either the first or second module that comes to mind when you ask experienced Drupal developers what their most favorite module is. The Views module is like a Swiss army knife for selecting and rendering content on your site. Let's say you created 50 pieces of content, each item describing a news event that occurred in the past. Let's say that you want to create a list of those 50 items sorted by the date that each story was published. Views can do that for you. Let's say you want the list of news articles to be listed in tabular format, like an Excel spreadsheet. Views can do that for you. Let's say you want visitors to the page that lists the news article as a table to have the ability to sort the articles by clicking on one of the titles in the table view of articles. Views can do that for you. Let's say you want to provide a filtering mechanism so visitors can pick a subject, person, or location associated with all of your news stories and only see those articles that meet the selected criteria. Views can do that for you. Let's say you want to provide an RSS feed of the news articles to visitors who use feed aggregators. Views can do that for you. Views is an amazingly easy to use module that is extremely powerful and a "must have" on nearly everyone's list. I'll describe how to use Views in Chapter 11.
A close third to CCK and Views is the Panels module. As we constructed our demonstration site in previous chapters, you saw that we were limited to putting "things" into the left sidebar, right sidebar, or the general content area on a page (beyond the header and footer regions). What if we wanted to divide our page even further into multiple rows and columns, and we wanted a simple to use mechanism for assigning content to each of the columns and rows? The Panels module comes to the rescue. For advanced page layouts, there isn't a tool that is easier to use and more powerful than the Panels module. I will describe how to use Panels in Chapter 12.
This module is another one of those "must haves" that simplifies the process of managing photographs on your website. One of the biggest issues with using pictures is that people take photos with their 12-megapixel cameras. The resulting image is massive, both in dimension and in file size. If you allowed people to upload pictures without scaling the image to the proper dimensions and shrinking the file size to something that doesn't take minutes to download, people would quickly stop visiting your website. Fortunately Imagecache takes care of the issues associated with uploading pictures by automatically scaling a picture to a predefined height and width and downsizing the file size to something that is web friendly. Imagecache also provides the ability to automatically crop pictures, as well as other advanced image manipulation techniques. Imagecache is a lifesaver and a must have for any site that uses photographs.
Drupal's out-of-the-box menu features provide an easy to use mechanism for creating horizontal and vertical menus, where those menus are restricted to a single level. In many cases you'll want to have the ability to create menus that have drop-downs (for horizontal menus) or fly-outs (for vertical menus). Drupal's menuing system provides the ability to assign menu items in a hierarchical fashion; however, it is up to us, the Drupal developer, to format menus so that items drop down or fly out when a user hovers over a menu item. Fortunately, we have the Nicemenus module that automatically handles the rendering of drop-downs and fly-outs.
One of the challenges of building a website is to make it easy for content authors to create content and to have that content show up in the right position on the right page. You could give them access to the admin screens for Panels, where they could manually assign each node to a specific position on a page, or you can implement Nodequeues, which provides a simple mechanism for content authors to pick a "queue" where they want their content to appear. You the developer create individual nodequeues, and you assign those nodequeues to a region on a specific page. Content authors just pick the queue where they want their content to show up and click on the assign to queue link. I will touch on the use of nodequeues in the chapter on that describes the use of Panels.
Drupal provides a plain text box where authors enter content. Most content authors demand that the site provides some form of "what-you-see-is-what-you-get" (WYSIWYG) editors (such as Microsoft Word-like text editors where what you see on the screen is what you see printed on a piece of paper). The WYSIWYG module provides a simple to use mechanism for installing and configuring one or more of the fully featured editors available for Drupal (e.g., TinyMCE or CKEditor).
One of the key elements of successful search engine optimization is providing URLs on your site that are meaningful. By default, Drupal 7 out-of-the-box URLs look something like http://localhost/node/1. To a search engine, they have no idea what "node/1" means, nor what the content associated with that page may be about just by looking at the URL. Humans visiting the site may also have a difficult time navigating around to pages that are not linked or accessible by a menu, as http://localhost/node/2487 is not very intuitive. Fortunately, we have the Pathauto module, which creates an "Alias URL" to the node being created, and the alias URL takes the form of the title of the node with hyphens used to separate words, and all words are made lowercase. An example might be http://localhost/node/2487. If that node has a title of "Special deals of the month," the URL as generated by Pathauto would be http://localhost/special-deals-month (pathauto removes common words like "the" and "of" from titles when generating URLs). The alias URL becomes the primary path used by Drupal when that page is rendered, and is significantly more user- and SEO-friendly than the http://localhost/node/2487 version.
The Webform module provides a simple to use interface for creating online forms. You can use online forms to capture virtually any type of information you can think of that would come from a form that a site visitor might fill out. Examples of forms could be an employment application, an information request form, or an event registration form. There are virtually no limits as to what types of forms you can create using the Webform module. The module extends beyond its ability to create and render forms by providing a mechanism for emailing a predefined person the results when someone enters information on a form, a tool for generating reports against the information that is captured on forms, and a tool for exporting information entered in forms to an Excel spreadsheet.
The backup and migrate module automates the task of backing up the information that is stored in your Drupal database based on a schedule that you define (every 12 hours, every 24 hours, and so on). Backup and migrate also provides the ability to manually back up the database (in real time) by simply clicking on a button. You can also restore a backup by selecting a previous back and by clicking on a restore button. Many Drupal administrators sleep better at night knowing that their site is being backed up automatically.
The reason this is not a top-ten module list is I just had to mention Ubercart. It's a bit more specialized, but if you need e-commerce capabilities for your website, Ubercart is the module for you. It provides all of the features and functions required to run an online store, including the ability to sell physical as well as virtual (downloadable) products and collect credit card payments.
As I mentioned before, please take a few minutes a day to visit www.drupal.org/project/modules and browse through the pages and pages of modules that are available for free!
In this chapter you learned how to significantly enhance the functionality of your Drupal website through the use of contributed modules. There are literally thousands of free modules to select from, meaning that if there's something you want to do with your Drupal site, there is likely a module that provides the functionality that you need. Coming up next, making your site interactive! The next chapter details how to set up interactive features like blogging, forums, and polls.