
If you want to sell something on the web, Drupal may be the platform for you. If you are selling tangible goods (like books), virtual goods (like downloadable music), event registrations, or subscriptions that allow visitors to view pages on your site, then Drupal and either Ubercart or the e-Commerce contributed modules are a perfect combination. Get your cash register ready: at the end of this appendix you'll have the information necessary to sell items on your Drupal site.
Warning
Ubercart has not been ported to Drupal 7 yet, but is expected to be available soon after Drupal 7 is released. This appendix was written using the Drupal 6 version of Ubercart. There may be differences in the Drupal 7 version.
There are two general options for adding e-commerce capabilities to your Drupal website: the Ubercart or e-Commerce contributed modules. The e-Commerce module was the first major solution for e-commerce for Drupal. Ubercart came along at a later date when a group of developers decided to improve upon the e-Commerce module. Both platforms offer similar features and functionality, and selecting one over the other is often a matter of picking the platform with the features that best meet your unique requirements. There are several comparison charts that compare and contrast the features and functions of both platforms. One good chart can be found at http://drupal.org/node/208067.
Another important consideration when selecting modules is to look at usage statistics. Every module on Drupal.org includes a report of the number of Drupal sites that report that they are using any given module. The current statistics for Ubercart lists approximately 20,000 sites, whereas the e-Commerce module has approximately 950. More users typically means more features that address the needs of a larger audience and a higher likelihood that new features and functions will be added.
In this appendix, I'll focus on Ubercart, as it is the module that I use for all of my client sites that require e-commerce capabilities.
Ubercart is a full feature web storefront offering key features that make it easy to list and sell physical goods, virtual goods, subscriptions, and event registrations. Ubercart provides a simple-to-use interface for creating product categories, product catalogs, and product listings. Ubercart manages the inventory of the items you are selling, the orders that customers place on your site, the payments customers make, and the shipment process when physical items are shipped from your organization to fulfill a customers order.
Key features provided by Ubercart include:
Configurable product catalog This includes catalog pages and a block to display product categories. Visitors who click on a product category listed in the block are taken to the catalog page that lists the items in that category.
Flexible product creation system Ubercart ships with a standard product content type. Using CCK, you can add new attributes to the product content type to address the specific needs of your organization.
Flexible product attributes system Ubercart provides the ability to define selectable attributes for your products that update the base price, SKU/model, and/or weight of items as the customer selects and adds items to their cart. You can set default attribute/option sets for each product class to easily create similar products.
Single page checkout All checkout information is entered by the buyer on a single screen. Ubercart provides the ability to configure the checkout page. You can extend and customize the capabilities of the checkout process by implementing third-party-contributed modules.
Automatic account generation (anonymous checkout). Ubercart automatically creates user accounts for customers at checkout. Accounts are automatically generated using the users email address. For return customers, previously used addresses will be listed on the checkout page for easy access.
Simple order processing Order processing screens are configurable and extensible, offering the ability to modify the base screens to accommodate your specific requirements.
Simple order creation and editing. Ubercart provides an easy-to-use interface for manually creating orders for customers, including adding products, updating shipping process, adding fees, discounts, and coupons.
Integrated payment system Ubercart provides the ability to collect payments from customers through several methods (check, credit card, COD, and so on) and payment gateways (Cyber Source,
Authorize.net, PayPal, and the like). The payment process is configurable and provides an easy to use online credit card terminal.Activity logging Ubercart tracks all changes made to an order, including payment processing.
XML import/export Ubercart provides an interface that allows administrators to import products, attributes, orders, and customers from your old store. Ubercart also provides the ability to export products, attributes, orders, and customers from your Ubercart store.
The Ubercart team provides an online demonstration of Ubercart's capabilities at http://demo.ubercart.org. I would suggest that you check it out before installing Ubercart on your own website.
The process for installing Ubercart is identical to installing any other module on Drupal. You can find the Ubercart module at http://drupal.org/project/ubercart. When installing Ubercart you will also need to install a number of modules that Ubercart depends on. Those modules are:
Token
CCK
FileField
ImageAPI
ImageCache
ImageField
Thickbox
Google Analytics
Views
Install Ubercart and the required modules following the steps outlined Chapter 8.
After installing Ubercart you must enable the Ubercart modules that you will need to operate your storefront. For demonstration purposes I am going to enable all of the Ubercart modules. As you become familiar with the platform, you may find that you do not need some of the features offered by some of the modules. You can disable modules as you deem appropriate.
The first step in setting up your storefront is to create a role that will be assigned to users who will be administering your site. Follow the directions covered in Chapter 3 if you need a refresher on creating roles. I'll create a role named Store Administrator. After creating it, I'll set the permissions for that role. There are several permissions to set, all starting with uc_. For my site, I'll enable all permissions for the Store Administrator role.
The next step in the process is to set the configuration options for various aspects of your site. I'll start with the store settings, which can be found by clicking on the Store Administration link at the top of the page. The Store Administration page provides links to all of the configuration and management options for Ubercart (see Figure D-1).
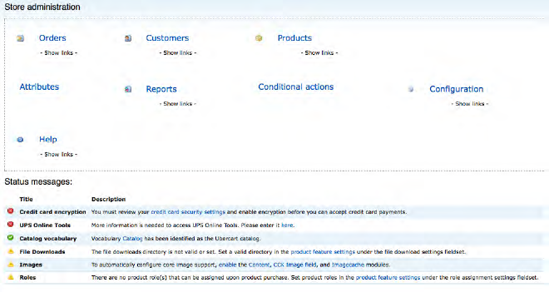
On the Store Administration page, click on the Configuration link. On the Configuration page, scroll down to the Store settings and click on the link. On the Store settings page you will find three areas to set configuration options: Contact settings, Display settings, and Format settings.
Click on the Contact settings and enter the details for your storefront. Fields on this form include the store name, the owners name, the store's e-mail address, phone number, fax number, and address. After entering the values, click on the "Save configuration" button.
Click on the Display settings link and update the display settings based on your requirements. For my storefront I'll use the default values.
Click on the Format settings link and update the settings based on the requirements for your site. There are display settings for attributes such as currency, weight, length, and dates. I'll use the default settings.
Next, set the shipping quote options by returning to the Store Administration page and clicking on the Configuration link. On the Configuration page, scroll down until you find the "Shipping quote" link. Click on the link to set the Quote settings and the Quote methods.
On the Quote settings page, enter the default pickup address. Ubercart needs to know where the products are being shipped from in order to accurately calculate shipping costs.
On the Quote methods page, you'll need to select the shipping methods that you intend to use (UPS, U.S. Postal Service, and so on) and the type of packaging you'll use (Parcel or Envelope). If you select UPS, you'll need to click on the UPS link to enter your UPS Online Tools XML access key, UPS Shipper number,
UPS.comUser ID, and your password. You'll also need to enter UPS shipping methods you provide, as well as a few other configuration options. Clicking on the USPS link shows the configuration options required for shipping product via the US Postal service. You can also enter a flat rate shipping quote by clicking on the "Flat rate" link and creating a flat rate shipping method and cost.
Next, set the payments options for your site by returning to the Store Administration page (Figure D-1) and clicking on the Configuration link. On the Configuration page, scroll down until you find the Payment options link. Click on the Payment options link to view configuration pages.
Click on the "Payment methods" link to display the list of payment options that are available to use on your site. Options include PayPal, COD, Check, Google Checkout, Credit Card, 2Checkout, and Other. You may enable or disable any of the payment options listed on the form. PayPal, Google Checkout, Credit card, and 2Checkout require that you have credentials for those processing methods and a SSL certificate for your site. For demonstration purposes I'll accept COD and Checks, as those options do not require that I set up a merchant account with any of the other options.
If you are using PayPal, Google, Credit cards, or 2Checkout, you will also need to click on the "Payment gateways" link and enter the appropriate credentials information for the services that you are using.
The last configuration option that I will cover is tax rates. If your store operates in a state that requires that you collect sales tax, you can use Ubercart's "Tax rates and settings" configuration option to set the tax rates associated with buying. To set tax rates and options for your site by return to the Store Administration page and click on the Configuration link. On the Configuration page, scroll down until you find the "Tax rates and options" link. Click on the link to view configuration pages.
To set a tax rate, click on the "Add a tax rate" link and enter the appropriate values for the options listed on the form (for example, should the tax be applied to shippable product, virtual products, shipping, and son on).
With the basic configuration options set, I'm now ready to start setting up the products on my site.
Ubercart's default Product content type doesn't ship with an image field, and the requirements for my site call for an image for each product. Adding an image is a simple process of editing the Product content type and adding an image field (see Chapter 10 for details on how to add a field to a content type). After adding the image field, I'll set the display options for the teaser and full node views of the product, selecting the product_list image linked to node option for the teaser view and product_full image linked to node option for the full node view. After creating the image field, I'll return to the main configuration page for the "Product content" type and will select the field I just created in the Ubercart product settings configuration section in the Product Image field option.
While modifying the "Product content" type there are a two other options that I want to change. First I don't want visitors to have the ability to post comments against my products, so I'll disable comments. I also don't want the user name and date/time listed on the page when visitors are looking at products. So I'll click on the Display settings tab and will uncheck the Display author and date information option.
With the general storefront parameters set, I'm ready to set up the products on my site. For my site I am going to sell Drupal 7 coffee mugs and t-shirts. The first step in setting up products is to define the product categories that you intend to use on your site. Ubercart uses Drupal's taxonomy system to categorize products, and automatically creates a vocabulary named Catalog. Following the steps outlined in Chapter 4, I'll add the new terms for coffee cups and t-shirts. When creating the new terms, you'll notice that Ubercart provides the ability to upload an image for taxonomy terms in this vocabulary. It's a good idea to upload images and Ubercart will use those images on various parts of your site when it is referring to product categories.
The next step is to create the products you want to list on your site. I'll create two products, a Drupal 7 coffee cup and a Drupal 7 t-shirt. To create a product use the Create content link and select the Product option. On the Product page enter the appropriate attributes for your products.
For my coffee cup product I'll enter the following information:
Name: Drupal 7 Rocks Coffee Cup
Picture: I'll upload a picture of the coffee cups I want to sell on the site
Description: A high quality ceramic coffee mug with the Drupal logo and Drupal 7 Rocks
Catalog: Coffee Cups
SKU: 100000 (you can enter any value you deem appropriate, it must be unique across your storefront)
List price: 12.99
Cost: 4.99
Sell price: 9.99
Product and its derivates are shippable: checked
Weight: 1 pound
Package quantity: 1
Default quantity to add to cart: 1
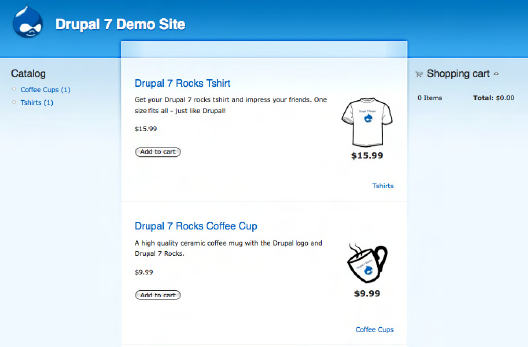
I'll leave the default publishing options of publishing the new items to the homepage of my site. If you don't want the items to show up on the homepage uncheck the promote items to the homepage option. After saving, the coffee cup the product is now displayed on the homepage of my site. See Figure D-2.

To demonstrate Ubercart's product category features, I'll create a second product, a Drupal 7 t-shirt. I'll follow the same steps listed previously for the coffee cup, using the appropriate values for my t-shirt. After saving the t-shirt item and returning to the home page, I now see both products listed on the homepage.
Ubercart provides the ability to manage the quantities you have for each of the products you sell. If you enabled the Stock module when you installed and enabled Ubercart, the feature is ready to use. The first step is to determine whether you want Ubercart to send e-mails to someone in your organization when items fall below a specified stock level. It's a great feature and simple to enable. On the Store Administration page, click on the Configuration link. On the Configuration page, click on the Stock settings link. On the Stock settings page, check the "Send e-mail notification when stock level reaches its threshold" box and enter the e-mail addresses of the people who should receive the alerts in the Notify recipients text box. You can optionally modify the content of the messages in the Subject and Message text fields, or leave the default values.
To set the starting stock levels, edit the product nodes that you created as part of your store setup process and click on the Stock link. On the Stock page, check the Active text box, enter the Stock level (quantity of the items you have in stock) and the Threshold level that will trigger the e-mail notifying the people responsible for that product (as set in the previous step) that its time to order new stock. Ubercart will now decrement inventory every time an order is placed. When a new shipment is received someone will need to add the quantity received to the previous inventory level.
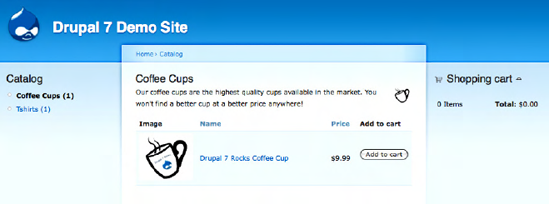
There are two standard Ubercart blocks that I'll enable for my site: the Catalog and the Shopping cart blocks. The Catalog block lists the product categories that I created on my site (coffee cups and t-shirts), and lists the number of items found in each of those categories. The Shopping cart block lists the number of items a shopper has in their cart and the total cost of the items in their cart. I'll follow the steps outlined in Chapter 7 to assign those blocks to the appropriate regions on my theme. After assigning the blocks and returning to my homepage I now have categories, products, and shopping cart summary information displayed on the homepage of my site (see figure D-3).
By enabling the Catalog block, I now have the ability to display all of the products that are associated with a specific category. If a user clicks on the Coffee Cups or T-shirts link, Drupal now renders a list of just those products assigned to those categories, along with the title, description, and image associated with that category. Clicking on the Coffee Cups link displays all of the products associated with the coffee cup category (see figure D-4).
When a shopper finds an item they want to purchase from your site, they simply click on the "Add to cart" button. Clicking on that button updates the information displayed in the Shopping cart block and takes the shopper to their shopping cart page. Figure D-5 demonstrates the results of clicking on the "Add to cart" button for a coffee cup.
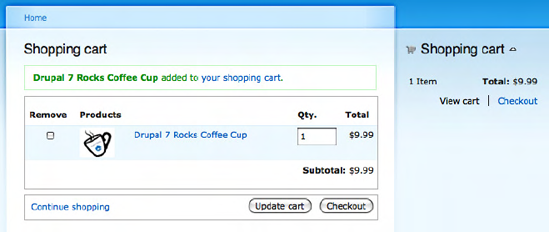
At this point the shopper can continue shopping, update the cart (either by removing an item or changing the quantity ordered), or check out.
When the shopper is ready to check out all they have to do is click on the Checkout link in the Shopping cart block, or the Checkout link on the Shopping cart page. Both links take the user to a page that asks for delivery information (name of the person the item is being shipped to, their shipping address, and phone number), billing information (name of the person the item is being billed to, their billing address, and phone number), their credit card information (or optionally check or money order). Depending on the shipping options you have enabled the user can select a shipping method.
After entering the details the user clicks the Review order button. Ubercart displays an order confirmation page with all the information they entered. If the values are correct the user clicks the Submit order button that completes the order process.
With your store operational its time to start managing orders. On the Store administrators page click on the Orders link. The Orders page displays a list of all orders on your site with the ability to filter orders by status (see Illustration D-4).
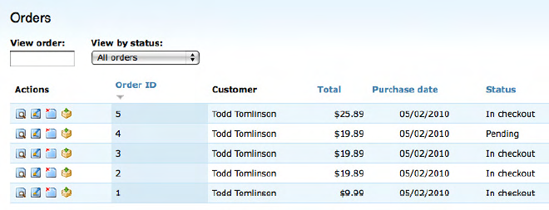
Standard Ubercart order statuses are:
Cancelled. The user cancelled the order.
In Google Checkout. The user is in the process of paying via Google Checkout.
Pending. The order is pending payment approval. If you have enabled pay by check or COD the order will remain in this state until you apply the check or payment to the order.
Chargeable. The customer has completed the order and payment may be charged to the selected payment method.
Payment Received. The customer successfully paid for their order using one of the electronic payment methods.
Complete. The order has been shipped and is complete.
As you manage your store, you will need to process orders that are in Pending and Payment received states, if the customer ordered a physical good that requires you to ship it. For my test store, order #4 is in a pending state. The customer selected to pay by check, so I'll need to update the order status manually when I receive the check.
To apply payment to a order where the user did not pay by Google Checkout, PayPal, or Credit card (those methods automatically set the order to payment received), click on the Edit icon. On the Order page, click on the payment method and select the method the customer used to pay for the merchandise (e.g., check) and enter the amount paid. Click Enter to apply the payment to the order.
With the payment applied, I am now ready ship the products. To ship an order, click on the packages link and click on the Create packages link. You have the option of creating a single package, in the case where all the items fit into one container, or create multiple packages. Once you have the items associated with packages you are ready to ship the order. Click on the Shipments link and click on the Make a new shipment link. Check the packages you want to ship and select the shipment method (e.g., ship manually). Click on the Ship packages button and on the Ship packages page enter the shipping details. When complete click on the Save shipment button.
Congratulations you processed an order on your new Ubercart base storefront!
Note
Ubercart is a rich and powerful e-commerce platform. For more information on configuring and managing an Ubercart storefront visit www.ubercart.org/docs. You'll find detailed information on how to set up payment processing and shipping, as well as details on managing your storefront.
Ubercart ships with a number of highly valuable reports, including details about Customers, Products, Sales, Stock. For detailed description of standard reports visit www.ubercart.org/docs/user/323/viewing_reports.
In this appendix I touched on the process of setting up and operating an e-commerce site on Drupal using Ubercart. In the matter of a few minutes you could be up and selling products on the web by following the directions outlined in this chapter. There are many more features and additional capabilities in Ubercart. For more information visit the Ubercart project's homepage at www.ubercart.org.