
Chapter 5
XML Schemas
WHAT YOU WILL LEARN IN THIS CHAPTER:
- The benefits of XML Schemas
- How to create and use XML Schemas
- How to document your XML Schemas
Like DTDs, XML Schemas are used for defining XML vocabularies. They describe the structure and content of XML documents in more detail than DTDs, and hence allow more precise validation.
Today, XML Schemas are a mature technology used in a variety of XML applications. Apart from their use in validation, aspects of XML Schemas are used in various other XML technologies such as XQuery and SOAP, which are covered in later chapters.
The XML Schema 1.0 specifications were first published by the W3C in 2001 and then revised to a Second Edition in 2004. The 2004 documents are currently the primary reference for XML Schema, although a 1.1 version is under development. At the time of this writing, these documents are at Candidate Recommendation status. The main ideas of the 1.1 specification are the same as the 1.0 version and this newer version is clearer and a little easier to read, so generally speaking it makes a better reference (a handful of changes and additions are covered at the end of this chapter). All the relevant specifications are available at www.w3.org/XML/Schema.
BENEFITS OF XML SCHEMAS
At this point you have already invested time in learning DTDs. You know the syntax and can create complex, even modular, definitions for your vocabulary. XML Schemas look a lot different from DTDs (and in many ways are!), but they use the same underlying principles in specifying a vocabulary and grammar for your XML documents. Before jumping in to the details, it’s worth looking at the benefits of XML Schemas:
- XML Schemas are created using basic XML, whereas DTDs utilize a separate syntax.
- XML Schemas fully support the Namespace Recommendation.
- XML Schemas enable you to validate text element content based on built-in and user-defined data types.
- XML Schemas enable you to more easily create complex and reusable content models.
- XML Schemas enable the modeling of programming concepts such as object inheritance and type substitution.
The following sections look at some of these benefits in more detail.
XML Schemas Use XML Syntax
In the previous chapter, you spent most of your time learning the DTD syntax. When creating an XML Schema, the syntax is entirely in XML. But as with DTDs you are defining rules for XML documents, so there are similarities. For example, in the previous chapter you saw rules for elements that looked like this:
<!ELEMENT first (#PCDATA)>
The same rule (approximately) is expressed in XML Schema as:
<element name=”first” type=”string”/>
A big advantage of XML Schemas (written in XML) is that you can use generic XML tools for writing and processing them.
XML Schema Namespace Support
Because XML Schemas were finalized after the Namespace Recommendation, unlike DTDs, they support namespaces (which were covered in Chapter 3). With XML Schemas you can define vocabularies that use namespace declarations and mix namespaces in XML documents with more flexibility. For example, when designing an XML Schema, it is not necessary to specify namespace prefixes as you must in DTDs. Instead, the XML Schema (in line with the XML namespaces spec) leaves this decision to the user of the document.
XML Schema Data Types
When you develop DTDs, you can specify that an element has mixed content, element content, or empty content. Unfortunately, when your elements contain only text, you can’t add any constraints on the format of the text. Attribute declarations give you some control, but even then the data types you can use in attribute declarations are very limited.
XML Schemas divide data types into two broad categories: complex and simple. Elements that may contain attributes or other elements are declared using complex types. Attribute values and text content within elements are declared using simple types.
For example, by utilizing these types you could specify that an element may contain only date values, only positive numbers, or only numbers within a certain range. Many commonly-used simple types are built into XML Schemas. This is, perhaps, the single most important feature within XML Schemas. By enabling you to specify the allowable type of data within an element or attribute, you can exercise more rigid control over documents. This enables you to easily create documents that are intended to represent databases, programming languages, and objects within programming languages. Simple types and complex types are exemplified later in this chapter.
XML Schema Content Models
To reuse a content model within a DTD, you have to utilize parameter entities. Using multiple parameter entities can lead to complex declarations within the DTD. XML Schemas provide several mechanisms for reusing content models. In addition to the simple models that you create in DTDs, XML Schema declarations can use object inheritance and content model inheritance. The advanced features of XML Schemas enable you to build content models upon content models, modifying the definition in each step.
XML Schema Specifications
The specification for XML Schemas (version 1.0) is provided in three documents available from www.w3.org/XML/Schema. These specification documents are as follows:
- Part 0: Primer: A (comparatively) easy-to-read overview of XML Schema.
- Part 1: Structures: This describes the concepts behind XML Schema and defines its component parts, how they are used to describe document structure, and how XML Schema is used for validation.
- Part 2: Datatypes: This defines the different kinds of data types XML Schema can support, including simple built-in types (such as decimal numbers). It additionally describes the system by which complex data types can be built up from simpler components (for example, a list of 10 negative integers).
Given the size and complexity of these specifications, XML Schemas cannot be covered completely in one chapter. But many tools don’t support the advanced features properly; in fact, experts often recommend against many that don’t. So this chapter covers the basic features — those that are most useful.
XML SCHEMAS IN PRACTICE
Most XML Schemas are stored within a separate document in a similar fashion to external DTDs; that is, an XML document contains a reference to the XML Schema that defines its vocabulary. An XML document that adheres to a particular XML Schema vocabulary is called an XML Schema instance document.
Like DTDs, XML Schemas can be used for a variety of purposes, including, for example, assisting in the authoring of documents. But their most common use is to validate XML documents.
As shown in the previous chapter, validating a document against its vocabulary requires the use of a special parser. The XML Schema Recommendation calls these parsers schema validators. Not only do schema validators render a verdict on the document’s schema validity, but many also provide type information to the application. This set of type information is called the Post Schema Validation Infoset (PSVI). You may never need to use this notion in practice, but you are most likely to encounter the phrase in documentation. For example, PSVI output is used by XQuery and XPath2. The XML Infoset (defined at http://www.w3.org/TR/xml-infoset/) is an abstract view of the data contained in XML documents. It may not be made explicit anywhere, but if you are working with XML in an object-oriented programming language, this is the basic model you’re dealing with. When using XML Schema, there’s even more information to work with. The PSVI contains all of the information in the XML document plus a basic summary of everything declared in the schema.
You have learned some of the benefits of XML Schemas, but it helps if you see an entire XML Schema before you look at each part in detail. To illustrate how the XML Schema works, in the following activity you will modify the name example from the previous chapter that used a DTD to define a vocabulary for documents providing contact information. Here you will use XML Schema to define a similar vocabulary, and use it to validate documents.
 <?xml version=”1.0”?>
<schema xmlns=”http://www.w3.org/2001/XMLSchema”
xmlns:target=”http://www.example.com/name”
targetNamespace=”http://www.example.com/name” elementFormDefault=”qualified”>
<element name=”name”>
<complexType>
<sequence>
<element name=”first” type=”string”/>
<element name=”middle” type=”string”/>
<element name=”last” type=”string”/>
</sequence>
<attribute name=”title” type=”string”/>
</complexType>
</element>
</schema>
 <?xml version=”1.0”?>
<schema xmlns=”http://www.w3.org/2001/XMLSchema”
xmlns:target=”http://www.example.com/name”
targetNamespace=”http://www.example.com/name” elementFormDefault=”qualified”>
  <element name=”name”>
    <complexType>
      <sequence>
        <element name=”first” type=”string”/>
        <element name=”middle” type=”string”/>
        <element name=”last” type=”string”/>
      </sequence>
      <attribute name=”title” type=”string”/>
    </complexType>
  </element>
</schema>
name5.xsd
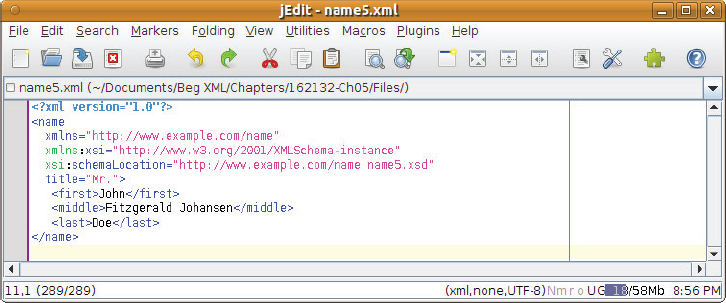
 <?xml version=”1.0”?>
<name
  xmlns=”http://www.example.com/name”
  xmlns:xsi=”http://www.w3.org/2001/XMLSchema-instance”
  xsi:schemaLocation=”http://www.example.com/name name5.xsd”
  title=”Mr.”>
   <first>John</first>
   <middle>Fitzgerald Johansen</middle>
   <last>Doe</last>
</name>
name5.xml
<?xml version=”1.0”?>
<schema xmlns=”http://www.w3.org/2001/XMLSchema”
     xmlns:target=”http://www.example.com/name”
     targetNamespace=”http://www.example.com/name”
     elementFormDefault=”qualified”>
<element name=”name”>
<complexType>
  <sequence>
    <element name=”first” type=”string”/>
    <element name=”middle” type=”string”/>
    <element name=”last” type=”string”/>
  </sequence>
  <attribute name=”title” type=”string”/>
</complexType>
Before moving on, take a quick look at the instance document from the preceding activity:
<name
  xmlns=”http://www.example.com/name”
  xmlns:xsi=”http://www.w3.org/2001/XMLSchema-instance”
  xsi:schemaLocation=”http://www.example.com/name name5.xsd”
  title=”Mr.”>
Within the root element of the instance document are two namespace declarations. The first indicates that the default namespace is http://www.example.com/name. This namespace matches the targetNamespace that you declared within your XML Schema. You also declare the namespace http://www.w3.org/2001/XMLSchema-instance. Several attributes from this namespace can be used within your instance document.
The instance document includes the attribute schemaLocation. This attribute tells the schema validator where to find the XML Schema document for validation. The schemaLocation attribute is declared within the namespace http://www.w3.org/2001/XMLSchema-instance, so the attribute has the prefix xsi. The value of the schemaLocation attribute is http://www.example.com/name name5.xsd. This is known as a namespace-location pair; it is the namespace of your XML document and the URL of the XML Schema that describes your namespace. This example used a very simple relative URL, name5.xsd. The XML Schema Recommendation allows you to declare several namespace-location pairs within a single schemaLocation attribute — simply separate the values with whitespace. This is useful when your XML document uses multiple namespaces.
The schemaLocation attribute is only a hint for the processor to use — the processor doesn’t have to use the provided location. For example, the validator may have a local copy of the XML Schema instead of loading the file specified, to decrease processor usage. If your XML Schema has no targetNamespace, you cannot use a namespace-location pair. Instead, you must refer to the XML Schema using the noNamespaceSchemaLocation attribute within your instance document.
This has been an extremely brief overview of some difficult concepts in XML Schemas. Don’t worry; the Try It Out from this section is intended to give you an overall context for what you will be learning throughout the chapter. Each of these concepts is covered in much greater detail.
DEFINING XML SCHEMAS
Now you have a general feel for what XML Schemas look like and how they are used, it’s time to move onto the details of their construction. The following sections go over the structure and function of the various components and declarations in in an XML Schema.
<schema> Declarations
The <schema> element is the root element within an XML Schema and it enables you to declare namespace information as well as defaults for declarations throughout the document. You can also include a version attribute that helps to identify the XML Schema and the version of your vocabulary, like so:
<schema targetNamespace=”URI”
  attributeFormDefault=”qualified or unqualified”
  elementFormDefault=”qualified or unqualified”
  version=”version number”>
The XML Schema Namespace
In the first example, the namespace http://www.w3.org/2001/XMLSchema was declared as the default within the <schema> element. This enables you to indicate that the <schema> element is part of the XML Schema vocabulary. Remember that because XML is case sensitive, namespaces are case sensitive.
Instead of making this the default, you could have used a prefix. For the following example, the XML Schema Recommendation itself uses the prefix xs:
<xs:schema xmlns:xs=”http://www.w3.org/2001/XMLSchema”>
As shown in Chapter 3, the namespace prefix is insignificant — it is only a shortcut to the namespace declaration. Which prefix you use is a matter of personal preference; just remember to be consistent throughout your document.
Target Namespaces
The primary purpose of XML Schemas is to declare vocabularies. These vocabularies can be identified by a namespace that is specified in the targetNamespace attribute. Not all XML Schemas will have a targetNamespace. Many XML Schemas define vocabularies that are reused in another XML Schema, or vocabularies that are used in documents where the namespace is not necessary.
When declaring a targetNamespace, it is important to include a matching namespace declaration. You can choose any prefix you like, or you can use a default namespace declaration. The namespace declaration is used when you are referring to declarations within the XML Schema. You will see what this means in more detail later in the section “Referring to an Existing Global Element.”
Some possible targetNamespace declarations include the following:
<schema xmlns=”http://www.w3.org/2001/XMLSchema”
  targetNamespace=”http://www.example.com/name”
  xmlns:target=”http://www.example.com/name”>
or
<xs:schema xmlns:xs=”http://www.w3.org/2001/XMLSchema”
  targetNamespace=”http://www.example.com/name”
  xmlns=”http://www.example.com/name”>
Notice that in the first declaration the <schema> element uses the default namespace. Because of this, the target namespace http://www.example.com/name requires the use of a prefix. However, in the second declaration you see the exact opposite; the <schema> element requires the use of a prefix because the target namespace http://www.example.com/name is using a default namespace declaration. Again, user preference is the only difference.
Element and Attribute Qualification
Within the instance document, elements and attributes may be qualified or unqualified. An element or attribute is qualified if it has an associated namespace. For example, the following elements are qualified:
<name xmlns=”http://www.example.com/name”>
   <first>John</first>
   <middle>Fitzgerald</middle>
   <last>Doe</last>
</name>
Even though the elements in this example don’t have namespace prefixes, they still have an associated namespace, http://www.example.com/name, making them qualified but not prefixed. Each of the child elements is also qualified because of the default namespace declaration in the <name> element. Again, these elements have no prefixes.
In the following example, all of the elements are qualified and prefixed:
<n:name xmlns:n=”http://www.example.com/name”>
   <n:first>John</n:first>
   <n:middle>Fitzgerald</n:middle>
   <n:last>Doe</n:last>
</n:name>
Unqualified elements have no associated namespace:
<n:name xmlns:n=”http://www.example.com/name”>
   <first>John</first>
   <middle>Fitzgerald</middle>
   <last>Doe</last>
</n:name>
The <name> element is qualified, but the <first>, <middle>, and <last> elements are not. The <first>, <middle>, and <last> elements have no associated namespace declaration (default or otherwise); therefore, they are unqualified. This mix of qualified and unqualified elements may seem strange; nevertheless, it is the default behavior in XML Schemas.
Within the <schema> element you can modify the defaults specifying how elements should be qualified by including the following attributes:
- elementFormDefault
- attributeFormDefault
The elementFormDefault and attributeFormDefault attributes enable you to control the default qualification form for elements and attributes in the instance documents. The default value for both elementFormDefault and attributeFormDefault is unqualified.
Even though the value of the elementFormDefault attribute is unqualified, some elements must be qualified regardless. For example, global element declarations must always be qualified in instance documents (global and local declarations are discussed in detail in the next section). In the preceding example, this is exactly what was done. The <name> element was qualified with a namespace, but not the <first>, <middle>, and <last> elements.
On some occasions you will want a mix of qualified and unqualified elements; for example, XSLT and SOAP documents may contain both. But as a rule of thumb it’s best to qualify all of the elements in your documents. In other words, always include the elementFormDefault attribute with the value qualified. This makes reuse of the vocabulary a little easier.
Content Models
XML Schemas specify what may appear in a document by providing a structural model of the allowable content. Where elements and attributes could be seen as the “atoms” of XML, it’s also possible to group these together into “molecules.” These molecules are the content models.
In the first example you saw a <complexType> and a <sequence> declaration used to specify an element’s allowable content. The <sequence> declaration is one of three distinct ways of interpreting a list of elements. All three are as follows:
- <sequence>: Elements must appear in the given order.
- <choice>: Only one of the elements in the list may appear.
- <all>: Elements can appear in any order, with each child element occurring zero or one time.
What’s more, the contents of the <sequence> and <choice> elements aren’t limited to individual elements. You can use these structures as components of other structures. For example:
    <complexType name=”NameOrEmail”>
    <choice>
      <element name=”email” type=”string”/>
      <sequence>
        <element name=”first” type=”string”/>
        <element name=”middle” type=”string”/>
        <element name=”last” type=”string”/>
      </sequence>
      </choice>
    </complexType>
Here, the content model specifies that the NameOrEmail type is something that’s either a string in an <email> element or an ordered list of <first>, <middle>, <last> elements containing strings.
There is also the <group> declaration, which, as you see later, can be used to wrap <sequence>, <choice>, or <all> blocks for reuse elsewhere in the schema.
The <sequence> and <choice> declarations are pretty straightforward in their interpretations, but there are some special rules that govern the use of <all>.
Restrictions on <all>
The <all> declaration says that the elements can appear in any order, with each child element occurring zero or one time.
To use this mechanism, you must adhere to several rules:
- The <all> declaration must be the only content model declaration that appears as a child of a <complexType> definition.
- The <all> declaration can contain only <element> declarations as its children. It is not permitted to contain <sequence>, <choice>, or <group> declarations.
- The <all> declaration’s children may appear once each in the instance document. This means that within the <all> declaration, the values for minOccurs for maxOccurs are limited to 0 or 1.
Even with these additional restrictions, the <all> declaration can be very useful. It is commonly used when the expected content is known, but not the order.
Suppose you declared the <name> content model using the <all> mechanism:
<element name=”name”>
  <complexType>
    <all>
      <element name=”first” type=”string”/>
      <element name=”middle” type=”string”/>
      <element name=”last” type=”string”/>
    </all>
    <attribute name=”title” type=”string”/>
  </complexType>
</element>
Notice that the <all> element is the only content model declaration within the <complexType> (<attribute> declarations do not count as content model declarations). In addition, note that the <all> declaration contains only <element> declarations as its children. Because the default value for minOccurs and maxOccurs is 1, each element can appear in the instance document once and only once. By declaring the content model as shown in the preceding example, you can validate your element content but still allow your elements to appear in any order. The allowable content for a <name> element declared using an <all> declaration might include
<first>John</first>
<middle>Fitzgerald</middle>
<last>Doe</last>
or
<first>John</first>
<last>Doe</last>
<middle>Fitzgerald</middle>
As long as all of the elements you have specified appear, they can appear in any order. In the second example, the <middle> element was added last. Because the content model is declared using <all>, this is still allowable.
<element> Declarations
When declaring an element, you are actually performing two primary tasks — specifying the element name and defining the allowable content:
<element
  name=”name of the element”
  type=”global type”
  ref=”global element declaration”
  form=”qualified or unqualified”
  minOccurs=”non-negative number”
  maxOccurs=”non-negative number or 'unbounded'”
  default=”default value”
  fixed=”fixed value”>
When specifying the name, standard XML restrictions exist on what names you can give elements. Though XML names can include numerical digits, periods (.), hyphens (-), and underscores (_), they must begin with a letter or an underscore (_). Because of the way namespaces are dealt with in XML Schema, the colon (:) is also disallowed anywhere in the name.
An element’s allowable content is determined by its type, which may be simple or complex. You can specify the type in three main ways: by creating a local type, using a global type, or by referring to a global element declaration.
Global versus Local
Before you can understand these different methods for declaring elements, you must understand the difference between global and local declarations:
- Global declarations are declarations that appear as direct children of the <schema> element. Global element declarations can be reused throughout the XML Schema.
- Local declarations do not have the <schema> element as their direct parent and can be used only in their specific context.
Look at the first example (name5.xsd) again:
<?xml version=”1.0”?>
<schema xmlns=”http://www.w3.org/2001/XMLSchema”
  xmlns:target=”http://www.example.com/name”
  targetNamespace=”http://www.example.com/name”
  elementFormDefault=”qualified”>
  <element name=”name”>
    <complexType>
      <sequence>
        <element name=”first” type=”string”/>
        <element name=”middle” type=”string”/>
        <element name=”last” type=”string”/>
      </sequence>
      <attribute name=”title” type=”string”/>
    </complexType>
  </element>
</schema>
This XML Schema has four element declarations. The first declaration, the <name> element, is a global declaration because it is a direct child of the <schema> element. The declarations for the <first>, <middle>, and <last> elements are considered local because the declarations are not direct children of the <schema> element. The declarations for the <first>, <middle>, and <last> elements are valid only within the <sequence> declaration — they cannot be reused elsewhere in the XML Schema.
Creating a Local Type
Of the two methods of element declaration, creating a local type should seem the most familiar. This model was used when declaring the <name> element in the example. To create a local type, you simply include the type declaration as a child of the element declaration, as in the following example:
<element name=”name”>
  <complexType>
    <sequence>
      <element name=”first” type=”string”/>
      <element name=”middle” type=”string”/>
      <element name=”last” type=”string”/>
    </sequence>
    <attribute name=”title” type=”string”/>
  </complexType>
</element>
or
<element name=”name”>
  <simpleType>
    <restriction base=”string”>
      <enumeration value=”Home”/>
      <enumeration value=”Work”/>
      <enumeration value=”Cell”/>
      <enumeration value=”Fax”/>
    </restriction>
  </simpleType>
</element>
These examples show that an element declaration can contain a <complexType> definition or a <simpleType> definition, but it cannot contain both at the same time.
Creating a Global Type
Often, many of your elements will have the same content. Instead of declaring duplicate local types throughout your schema, you can create a global type. Within your element declarations, you can refer to a global type by name. In fact, you have already seen this:
<element name=”first” type=”string”/>
Here, the type attribute refers to the built-in data type string. XML Schemas have many built-in data types, most of which will be described in the “Data Types” section later in the chapter. You can also create your own global declarations and refer to them. For example, suppose you had created a global type for the content of the <name> element like so:
<schema xmlns=”http://www.w3.org/2001/XMLSchema”
  xmlns:target=”http://www.example.com/name”
  targetNamespace=”http://www.example.com/name”
  elementFormDefault=”qualified”>
  <complexType name=”NameType”>
    <sequence>
      <element name=”first” type=”string”/>
      <element name=”middle” type=”string”/>
      <element name=”last” type=”string”/>
    </sequence>
    <attribute name=”title” type=”string”/>
  </complexType>
  <element name=”name” type=”target:NameType”/>
</schema>
Even though the type is global, it is still part of the target namespace. Therefore, when referring to the type, you must include the target namespace prefix (if any). This example used the prefix target to refer to the target namespace, but it is equally correct to do the following:
<xs:schema xmlns:xs=”http://www.w3.org/2001/XMLSchema”
  xmlns=”http://www.example.com/name”
  targetNamespace=”http://www.example.com/name”
  elementFormDefault=”qualified”>
  <xs:complexType name=”NameType”>
    <xs:sequence>
      <xs:element name=”first” type=”xs:string”/>
      <xs:element name=”middle” type=”xs:string”/>
      <xs:element name=”last” type=”xs:string”/>
    </xs:sequence>
    <xs:attribute name=”title” type=”xs:string”/>
  </xs:complexType>
  <xs:element name=”name” type=”NameType”/>
</xs:schema>
Here, the XML Schema namespace is declared using the prefix xs, and the target namespace has no prefix. Therefore, to refer to the global type NameType, you do not need to include any prefix.
Now that you know the theory behind global types, you can try them out in practice.
name6.xsd
xsi:schemaLocation=”http://www.example.com/name name6.xsd”
<complexType
  mixed=”true or false”
  name=”Name of complexType”>
Referring to an Existing Global Element
As shown in the preceding example, referring to global types enables you to reuse content model definitions within your XML Schema. Often, you may want to reuse entire element declarations instead of just the type. To refer to a global element declaration, simply include a ref attribute and specify the name of the global element as the value, like so:
<element ref=”target:first”/>
Again, the name of the element must be qualified with the namespace. The preceding example is an element reference to a global element named first that was declared in the target namespace. Notice that when you refer to a global element declaration, you have no type attribute and no local type declaration. Your element declaration uses the type of the <element> declaration in the reference.
This is very straightforward; now you can add a reference to the global type.
name7.xsd
xsi:schemaLocation=”http://www.example.com/name name7.xsd”
What a Validator Does with Global Types
At this point, it might help to examine what the schema validator is doing in more detail. As the schema validator processes your instance document, it first encounters the root element, in this case <name>. When it encounters the <name> element, it looks it up in the XML Schema. When attempting to find the declaration for the root element, the schema validator looks through only the global element declarations.
Once the schema validator finds the matching declaration, it finds the associated type (in this case it is a global <complexType> definition NameType). It then validates the content of the <name> element within the instance against the content model defined in the associated type. When the schema validator encounters the <element> reference declarations, it imports the global <element> declarations into the <complexType> definition, as if they had been included directly.
Now that you have learned some of the basics of how elements are declared, the following sections look briefly at some of the features element declarations offer.
Cardinality
Cardinality specifies the number of times a particular element appears within a content model. In XML Schemas, you can modify an element’s cardinality by specifying the minOccurs and maxOccurs attributes within the element declaration.
Some possible uses of the minOccurs and maxOccurs attributes include the following:
<element name=”first” type=”string” minOccurs=”2” maxOccurs=”2”/>

<element ref=”target:first” maxOccurs=”10”/>

<element name=”location” “minOccurs=”0” maxOccurs=”unbounded”/>
The first of the preceding examples declares that the element <first> must appear within the instance document a minimum of two times and a maximum of two times. The second example declares your element using a reference to the global <first> declaration. Even though it is declared using the ref attribute, you are permitted to use the minOccurs and maxOccurs attributes to specify the element’s cardinality. In this case, a maxOccurs attribute was included with the value 10. A minOccurs attribute was not included, so a schema validator would use the default value, 1. The final example specifies that <location> may or may not appear within your instance document because the minOccurs attribute has the value 0. It also indicates that it may appear an infinite number of times because the value of maxOccurs is unbounded.
The default value for the minOccurs attribute and the maxOccurs attribute is 1. This means that, by default, an element must appear only once. You can use the two attributes separately or in conjunction. The maxOccurs attribute enables you to enter the value unbounded, which indicates there is no limit to the number of occurrences. The only additional rule you must adhere to when specifying minOccurs and maxOccurs is that the value of maxOccurs must be greater than or equal to the value for minOccurs.
Default and Fixed Values
When designing the DTD for your contacts list in the previous chapter, you made use of attribute default and fixed values. In XML Schemas, you can declare default and fixed values for elements as well as attributes. When declaring default values for elements, you can only specify a text value. You are not permitted to specify a default value for an element whose content model will contain other elements, unless the content model is mixed. By specifying a default value for your element, you ensure that the schema validator will treat the value as if it were included in the XML document — even if it is omitted.
To specify a default value, simply include the default attribute with the desired value. Suppose your <name> elements were being used to design the Doe family tree. You might want to make “Doe” the default for the last name element, like so:
<element name=”last” type=”string” default=”Doe”/>
This example declares that the element <last> has the default value of “Doe”, so when a schema validator encounters the <last> element in the instance document, it inserts the default value if there is no content. For example, if the schema validator encounters:
<last></last>
or
<last/>
it would treat the element as follows:
<last>Doe</last>
Note that if the element does not appear within the document or if the element already has content, the default value is not used.
In some circumstances you may want to ensure that an element’s value does not change, such as an element whose value is used to indicate a version number. As the schema validator processes an element declared to have a fixed value, it checks whether the element’s content and fixed attribute values match. If they do not match, the validator raises a schema-validity error. If the element is empty, the parser inserts the fixed value.
To specify a fixed value, simply include the fixed attribute with the desired value, like so:
<element name=”version” type=”string” fixed=”1.0”/>
The preceding example specifies that the <version> element, if it appears, must contain the value 1.0. The fixed value is a valid string value (the type of the <version> element is string). Therefore, the following elements are legal:
<version>1.0</version>

<version></version>

<version/>
As the schema validator processes the file, it accepts elements with the value 1.0 or empty elements. When it encounters empty elements, it treats them as though the value 1.0 had been included. The following value is not legal:
<version>2.0</version>
When specifying fixed or default values in element declarations, you must ensure that the value you specify is allowable content for the type you have declared. For example, if you specify that an element has the type positiveInteger, you cannot use Doe as a default value because it is not a positive integer.
Element Wildcards: the <any> Declaration
You’ll often want to include elements in your XML Schema without explicitly declaring which elements should be allowed. Suppose you want to specify that your element can contain any of the elements declared in your namespace, or any elements from another namespace. Declarations that allow you to include any element from a namespace are called element wildcards.
To declare an element wildcard, use the <any> declaration, like so:
<any
  minOccurs=”non negative number”
  maxOccurs=”non negative number or unbounded”
  namespace=”allowable namespaces”
  processContents=”lax or skip or strict”>
The <any> declaration can appear only within a content model. You are not allowed to create global <any> declarations. When specifying an <any> declaration, you can specify the cardinality just as you would within an <element> declaration. By specifying the minOccurs or the maxOccurs attributes, you can control the number of wildcard occurrences allowed within your instance document.
The <any> declaration also enables you to control which namespace or namespaces the elements are allowed to come from. You do this by including the namespace attribute. The namespace attribute allows several values, shown in Table 5-1:
TABLE 5-1: Namespace Values
| VALUE | DESCRIPTION |
| ##any | Enables elements from all namespaces to be included as part of the wildcard. |
| ##other | Enables elements from namespaces other than the targetNamespace to be included as part of the wildcard. |
| ##targetNamespace | Enables elements from only the targetNamespace to be included as part of the wildcard. |
| ##local | Enables any well-formed elements that are not qualified by a namespace to be included as part of the wildcard. |
| Whitespace-separated | Enables elements from any listed namespaces to be included as part of the list of allowable wildcards. Possible list values also include ##targetNamespace namespace URIs and ##local. |
For example, suppose you wanted to allow any well-formed XML content from any namespace within the <name> element. To do this, you simply include an element wildcard within the content model for your NameType complex type, like so:
<complexType name=”NameType”>
  <sequence>
    <element ref=”target:first”/>
    <element ref=”target:middle”/>
    <element ref=”target:last”/>
    <!-- allow any element from any namespace -->
    <any namespace=”##any”
         processContents=”lax”
         minOccurs=”0”
         maxOccurs=”unbounded”/>
  </sequence>
  <attribute name=”title” type=”string”/>
</complexType>
By setting the namespace attribute to ##any, you have specified that elements from all namespaces can be included as part of the wildcard. You have also included cardinality attributes to indicate the number of allowed wildcard elements. This case specifies any number of elements because the value of the minOccurs attribute is set to 0 and the value of maxOccurs is set to unbounded. Therefore, the content model must contain a <first>, <middle>, and <last> element in sequence, followed by any number of elements from any namespace.
When the schema validator is processing an element that contains a wildcard declaration, it validates the instance documents in one of three ways:
- If the value of the processContents attribute is set to skip, the processor skips any wildcard elements in the instance document.
- If the value of processContents attribute is set to lax, the processor attempts to validate the wildcard elements if it has access to a global XML Schema definition for them.
- If the value of the processContents attribute is set to strict (the default) or there is no processContents attribute, the processor attempts to validate the wildcard elements. However, in contrast to using the lax setting, the schema validator raises a validity error if a global XML Schema definition for the wildcard elements cannot be found.
Mixed Content
Mixed content models enable you to include both text and element content within a single content model. To create a mixed content model in XML Schemas, simply include the mixed attribute with the value true in your <complexType> definition, like so:
<element name=”description”>
  <complexType mixed=”true”>
    <choice minOccurs=”0” maxOccurs=”unbounded”>
      <element name=”em” type=”string”/>
      <element name=”strong” type=”string”/>
      <element name=”br” type=”string”/>
    </choice>
  </complexType>
</element>
The preceding example declares a <description> element, which can contain an infinite number of <em>, <strong>, and <br> elements. Because the complex type is declared as mixed, text can be interspersed throughout these elements. An allowable <description> element might look like the following:
<description>Joe is a developer & author for Beginning XML <em>5th edition</em></description>
In this <description> element, textual content is interspersed throughout the elements declared within the content model. As the schema validator is processing the preceding example, it skips over the textual content and entities while performing standard validation on the elements. Because the elements <em>, <strong>, and <br> may appear repeatedly (maxOccurs=”unbounded”), the example is valid.
To declare an empty content model in a <complexType> definition, you simply create the <complexType> definition without any <element> or content model declarations. Consider the following declarations:
<element name=”knows”>
  <complexType>
  </complexType>
</element>

<element name=”knows”>
  <complexType/>
</element>
Each of these declares an element named knows. In both cases, the <complexType> definition is empty, indicating that knows will not contain text or element children. When used in your instance document, <knows> must be empty.
<group> Declarations
In addition to <complexType> definitions, XML Schemas also enable you to define reusable groups of elements. By creating a global <group> declaration like the following, you can easily reuse and combine entire content models:
<group name=”name of global group”>
Just as you have seen with global <complexType> definitions, all global <group> declarations must be named. Simply specify the name attribute with the desired name. Again, the name that you specify must follow the rules for XML names and should not include a prefix. The basic structure of a global <group> declaration follows:
<group name=”NameGroup”>
 <!-- content model goes here -->
</group>
In the following activity you will practice creating and naming a global <group> declaration.
name8.xsd
xsi:schemaLocation=”http://www.example.com/name name8.xsd”
<attribute> Declarations
So far, you have spent most of this chapter learning how to create element declarations. Within XML Schemas, attribute declarations are very similar to element declarations. So rather than describe all the features of attribute declarations in detail, here is a quick overview, followed by an example of attributes used in practice through which you can work.
In the examples for the <name> element, you have already seen an attribute declaration for the title attribute. As with element declarations, you have two primary methods for declaring attributes: creating a local type and using a global type.
Unlike elements, which are divided into simple types and complex types, attribute declarations are restricted to simple types. Remember that complex types are used to define types that contain attributes or elements; simple types are used to restrict text-only content. A basic attribute declaration looks like this:
<attribute name=”title”>
  <simpleType>
    <!-- type information -->
  </simpleType>
</element>
Like elements, you can also reuse attributes by referring to global declarations.
At this point you have heard about most of the major features of XML Schema, and before you go on to learn the remaining ones, you should apply what you know so far in a longer example to see how everything thus far fits together.
An XML Schema for Contacts
In the previous chapter you saw a way of expressing contact lists in XML, backed by a DTD. Here, the same idea will be revisited using an XML Schema for validation.
Listing 5-1 provides a sample document to work from.
![]() LISTING 5-1: contacts5.xml
LISTING 5-1: contacts5.xml
<?xml version=”1.0”?>
<contacts xmlns=”http://www.example.com/contacts”
    xmlns:xsi=”http://www.w3.org/2001/XMLSchema-instance”
    xsi:schemaLocation=”http://www.example.com/contacts contacts5.xsd”
    source=”Beginning XML 5E”
    version=”1.0”>

  <contact>
    <name>
      <first>Joseph</first>
      <first>John</first>
      <last>Fawcett</last>
    </name>
    <location>
      <address>Exeter, UK</address>
      <latitude>50.7218</latitude>
      <longitude>-3.533617</longitude>
    </location>
    <phone kind=”Home”>001-234-567-8910</phone>
    <knows/>
    <description> Joseph is a developer and author for Beginning XML
<em>5th edition</em>.<br/>Joseph <strong>loves</strong> XML!</description>
  </contact>
  <contact>

    <name>

      <first>Liam</first>

      <last>Quin</last>

    </name>

    <location>

      <address>Ontario, Canada</address>

    </location>

    <phone>+1 613 476 8769</phone>

    <knows/>

    <description>XML Activity Lead at W3C</description>

  </contact>
</contacts>
This is very similar to the instance documents you saw in the previous chapter, but with one significant change: the declarations on the root element, highlighted here:
<contacts xmlns=”http://www.example.com/contacts”
    xmlns:xsi=”http://www.w3.org/2001/XMLSchema-instance”
    xsi:schemaLocation=”http://www.example.com/contacts contacts5.xsd”
    source=”Beginning XML 5E”
    version=”1.0”>
This document is associated with the identified XML Schema, which will live in the file contacts5.xsd.
To begin to build your XML, perform the following steps:
<schema xmlns=”http://www.w3.org/2001/XMLSchema”
  xmlns:contacts=”http://www.example.com/contacts”
  targetNamespace=”http://www.example.com/contacts”
  elementFormDefault=”qualified”>
<element name=”contacts”>
    <complexType>
      <sequence>
<element name=”contact” minOccurs=”0” maxOccurs=”unbounded”> <complexType>
<sequence>
<element name=”name” type=”contacts:NameType”/>
<element name=”location” type=”contacts:LocationType”/> <element name=”phone”>
<complexType>
<simpleContent>
<extension base=”string”>
<attribute name=”kind” type=”string” default=”Home” />
</extension>
</simpleContent>
</complexType>
</element>
<phone kind=”Home”>001-909-555-1212</phone>
<phone>001-909-555-1212</phone>
<phone />
       <element name=”knows” type=”contacts:KnowsType”/>
              <element name=”description” type=”contacts:DescriptionType”/>
            </sequence>
          </complexType>
</element> <element name=”contacts”>
<complexType>
<sequence>
<element name=”contact” ...
...
</sequence>
<attributeGroup ref=”contacts:ContactAttributes”/>
</complexType>
</element> <attributeGroup name=”ContactAttributes”>
<attribute name=”version” type=”string” fixed=”1.0” />
<attribute name=”source” type=”string”/>
</attributeGroup>
  <group name=”NameGroup”>
    <sequence>
      <element name=”first” type=”string” minOccurs=”1”
      maxOccurs=”unbounded”/>
      <element name=”middle” type=”string” minOccurs=”0” maxOccurs=”1”/>
      <element name=”last” type=”string”/>
    </sequence>
  </group>
  <complexType name=”LocationType”>
    <choice minOccurs=”0” maxOccurs=”unbounded”>
      <element name=”address” type=”string”/>
      <sequence>
        <element name=”latitude” type=”string”/>
        <element name=”longitude” type=”string”/>
      </sequence>
    </choice>
  </complexType>
  <complexType name=”KnowsType”>
  </complexType>
  <complexType name=”DescriptionType” mixed=”true”>
    <choice minOccurs=”0” maxOccurs=”unbounded”>
      <element name=”em” type=”string”/>
      <element name=”strong” type=”string”/>
      <element name=”br” type=”string”/>
    </choice>
</complexType>
</schema>
After reading and following along with all the preceding steps, you now know how to develop an XML Schema. The following activity builds on these steps to express a list of contacts using XML Schema.
<?xml version=“1.0“?>
<schema xmlns=“http://www.w3.org/2001/XMLSchema“
xmlns:contacts=“http://www.example.com/contacts“
targetNamespace=“http://www.example.com/contacts“ elementFormDefault=“qualified“>

  <element name=“contacts“>
    <complexType>
      <sequence>
        <element name=“contact“ minOccurs=“0“ maxOccurs=“unbounded“>
          <complexType>
            <sequence>
              <element name=“name“ type=“contacts:NameType“/>
              <element name=“location“ type=“contacts:LocationType“/>

              <element name=“phone“>
                 <complexType>
                    <simpleContent>
                       <extension base=“string“>
                          <attribute name=“kind“ type=“string“ default=“Home“ />
                       </extension>
                    </simpleContent>
                 </complexType>
              </element>
              <element name=“knows“ type=“contacts:KnowsType“/>
              <element name=“description“ type=“contacts:DescriptionType“/>
            </sequence>
          </complexType>
        </element>
      </sequence>
      <attributeGroup ref=“contacts:ContactAttributes“/>
    </complexType>
  </element>

  <attributeGroup name=“ContactAttributes“>
    <attribute name=“version“ type=“string“ fixed=“1.0“ />
    <attribute name=“source“ type=“string“/>
  </attributeGroup>

  <attribute name=“title“ type=“string“/>

  <complexType name=“NameType“>
    <group ref=“contacts:NameGroup“/>
  </complexType>

  <group name=“NameGroup“>
    <sequence>
      <element name=“first“ type=“string“ minOccurs=“1“ maxOccurs=“unbounded“/>
      <element name=“middle“ type=“string“ minOccurs=“0“ maxOccurs=“1“/>
      <element name=“last“ type=“string“/>
    </sequence>
  </group>

  <complexType name=“LocationType“>
    <choice minOccurs=“0“ maxOccurs=“unbounded“>
      <element name=“address“ type=“string“/>
      <sequence>
        <element name=“latitude“ type=“string“/>
        <element name=“longitude“ type=“string“/>
      </sequence>
    </choice>
  </complexType>

  <complexType name=“KnowsType“></complexType>

  <complexType name=“DescriptionType“ mixed=“true“>
    <choice minOccurs=“0“ maxOccurs=“unbounded“>
      <element name=“em“ type=“string“/>
      <element name=“strong“ type=“string“/>
      <element name=“br“ type=“string“/>
    </choice>
  </complexType>
</schema>Data Types
You have seen how to declare allowable elements and attributes using <complexType> definitions. In addition, you can define the allowable content for text-only elements and attribute values. The XML Schema Recommendation allows you to use two kinds of data types:
- Built-in data types
- User-defined data types
Built-in Data Types
The examples throughout this chapter have used the string type for our text-only content. The string type is a primitive data type that allows any textual content. XML Schemas provide a number of built-in simple types that allow you to exercise greater control over textual content in your XML document. Table 5-2 lists all of the simple types built into XML Schemas:
TABLE 5-2: XML Schema simple Types
| TYPE | DESCRIPTION |
| string | Any character data |
| normalizedString | A whitespace-normalized string in which all spaces, tabs, carriage returns, and linefeed characters are converted to single spaces |
| token | A string that does not contain sequences of two or more spaces, tabs, carriage returns, or linefeed characters |
| byte | A numeric value from -128 to 127 |
| unsignedByte | A numeric value from 0 to 255 |
| base64Binary | Base64-encoded binary information |
| hexBinary | Hexadecimal-encoded binary information |
| integer | A numeric value representing a whole number |
| positiveInteger | An integer whose value is greater than 0 |
| negativeInteger | An integer whose value is less than 0 |
| nonNegativeInteger | An integer whose value is 0 or greater |
| nonPositiveInteger | An integer whose value is less than or equal to 0 |
| int | A numeric value from –2147483648 to 2147483647 |
| unsignedInt | A numeric value from 0 to 4294967295 |
| long | A numeric value from –9223372036854775808 to 9223372036854775807 |
| unsignedLong | A numeric value from 0 to 18446744073709551615 |
| short | A numeric value from –32768 to 32767 |
| unsignedShort | A numeric value from 0 to 65535 |
| decimal | A numeric value that may or may not include a fractional part |
| float | A numeric value that corresponds to the IEEE single-precision 32-bit floating-point type defined in the standard IEEE 754-1985. -0, INF, -INF, and NaN are also valid values. |
| double | A numeric value that corresponds to the IEEE double-precision 64-bit floating-point type defined in the standard IEEE 754-1985. -0, INF, -INF, and NaN are also valid values. |
| boolean | A logical value, including true, false, 0, and 1 |
| time | An instant of time that occurs daily as defined in Section 5.3 of ISO 8601. For example, 15:45:00.000 is a valid time value. |
| dateTime | An instant of time, including both a date and a time value, as defined in Section 5.4 of ISO 8601. For example, 1998–07–12T16:30:00.000 is a valid dateTime value. |
| duration | A span of time as defined in Section 5.5.3.2 of ISO 8601. For example, P30D is a valid duration value indicating a duration of 30 days. |
| date | A date according to the Gregorian calendar as defined in Section 5.2.1 of ISO 8601. For example, 1995–05–25 is a valid date value. |
| gMonth | A month in the Gregorian calendar as defined in Section 3 of ISO 8601. For example, —07 is a valid gMonth value. |
| gYear | A year in the Gregorian calendar as defined in Section 5.2.1 of ISO 8601. For example, 1998 is a valid gYear value. |
| gYearMonth | A specific month and year in the Gregorian calendar as defined in Section 5.2.1 of ISO 8601. For example, 1998–07 is a valid gYearMonth value. |
| gDay | A recurring day of the month as defined in Section 3 of ISO 8601, such as the 12th day of the month. For example, —-12 is a valid gDay value. |
| gMonthDay | A recurring day of a specific month as defined in Section 3 of ISO 8601, such as the 12th day of July. For example, —07–12 is a valid gMonthDay value. |
| name | An XML name according to the Namespace Recommendation. XML names must begin with a letter or an underscore. Though this type can allow for “:” characters, it is best to avoid them for compatibility. |
| QName | A qualified XML name as defined in the Namespaces Recommendation. QNames may or may not contain a namespace prefix and colon. |
| NCName | A noncolonized XML name that does not include a namespace prefix or colon as defined in the Namespaces Recommendation |
| anyURI | A valid Uniform Resource Identifier (URI) |
| language | A language constant as defined in RFC 1766, such as en-US (RFC 1766 can be found at www.ietf.org/rfc/rfc1766.txt) |
In addition to the types listed, the XML Schema Recommendation also allows the types defined within the XML Recommendation. These types include ID, IDREF, IDREFS, ENTITY, ENTITIES, NOTATION, NMTOKEN, and NMTOKENS.
Although you have used the string type throughout most of the examples, any of the preceding types can be used to restrict the allowable content within your elements and attributes. Suppose you want to modify the declarations of the <latitude> and <longitude> elements within your contacts XML Schema. By specifying a more restrictive type, you could ensure that users of your XML Schema enter valid values. You could modify your declarations as follows:
<element name=”latitude” type=”float”/>
<element name=”longitude” type=”float”/>
Now, instead of allowing any textual content, you require that users specify a floating-point number. For a more in-depth look at these types, see the XML Schema Recommendation at www.w3.org/TR/xmlschema-2.
It will be straightforward to integrate built-in data types with the contacts example, as you will now see.
contacts6.xsd
contacts6.xml
<attribute name=”version” type=”decimal” fixed=”1.0” />
<attribute name=”tags” type=”token”/>
<attribute name=”person” type=”ID”/>
    <complexType name=”KnowsType”>
      <attribute name=”contacts” type=”IDREFS”/>
    </complexType>
<element name=”phone” type=”contacts:PhoneType”/>
    <complexType name=”PhoneType”>
        <simpleContent>
          <extension base=”string”>
            <attribute name=”kind” type=”string” default=”Home” />
          </extension>
        </simpleContent>
    </complexType>
User-Defined Data Types
Although the XML Schema Recommendation includes a wealth of built-in data types, it doesn’t include everything. As you are developing your XML Schemas, you will run into many elements and attribute values that require a type not defined in the XML Schema Recommendation. Consider the kind attribute for the <phone> element. Because you restricted its value to the string type, it still accepts unwanted values such as the following:
kind=”Walkie-Talkie”
According to the declaration for the kind attribute, the value Walkie-Talkie is valid. What you need is to create a list of allowable values as you did in your DTD. No such built-in type exists within the XML Schema Recommendation, so you must create a new type using a <simpleType> definition.
<simpleType> Declarations
When designing your XML Schemas, you may need to design your own data types. You can create custom user-defined data types using the <simpleType> definition that follows:
<simpleType
  name=”name of the simpleType”
  final=”#all or list or union or restriction”>
When you declare a <simpleType>, you must always base your declaration on an existing data type. The existing data type may be a built-in XML Schema data type, or it may be another custom data type. Because you must derive every <simpleType> definition from another data type, <simpleType> definitions are often called derived types. There are three primary derived types:
- Restriction types
- List types
- Union types
The following sections describe these three derived types in detail.
<restriction> Declarations
The most common <simpleType> derivation is the restriction type. Restriction types are declared using the <restriction> declaration as follows:
<restriction base=”name of the simpleType you are deriving from”>
A derived type declared using the <restriction> declaration is a subset of its base type. Facets control all simple types within XML Schemas. A facet is a single property or trait of a <simpleType>. For example, the built-in numeric type nonNegativeInteger was created by deriving from the built-in Integer type and setting the facet minInclusive to zero. This specifies that the minimum value allowed for the type is zero. By constraining the facets of existing types, you can create your own more restrictive types.
There are 12 constraining facets, described in Table 5-3:
TABLE 5-3: simpleType Constraining Facets
| FACET | DESCRIPTION |
| minExclusive | Enables you to specify the minimum value for your type that excludes the value you specify |
| minInclusive | Enables you to specify the minimum value for your type that includes the value you specify |
| maxExclusive | Enables you to specify the maximum value for your type that excludes the value you specify |
| maxInclusive | Enables you to specify the maximum value for your type that includes the value you specify |
| totalDigits | Enables you to specify the total number of digits in a numeric type |
| fractionDigits | Enables you to specify the number of fractional digits in a numeric type (for example, the number of digits to the right of the decimal point) |
| length | Enables you to specify the number of items in a list type, or the number of characters in a string type |
| minLength | Enables you to specify the minimum number of items in a list type, or the minimum number of characters in a string type |
| maxLength | Enables you to specify the maximum number of items in a list type, or the maximum number of characters in a string type |
| enumeration | Enables you to specify an allowable value in an enumerated list |
| whiteSpace | Enables you to specify how whitespace should be treated within the type |
| pattern | Enables you to restrict string types using regular expressions |
Not all types use every facet. In fact, most types can be constrained only by a couple of facets.
Within a <restriction> declaration, you must specify the type you are restricting using the base attribute. The value of the base attribute is a reference to a global <simpleType> definition or built-in XML Schema data type. As you have seen with all references in your XML Schema, the reference is a namespace-qualified value and, therefore, may need to be prefixed.
Suppose you want to create a restriction type that uses enumeration facets to restrict the allowable values for the kind attribute in your <phone> element. The declaration would look like this:
<attribute name=”kind”>
  <simpleType>
    <restriction base=”string”>
      <enumeration value=”Home”/>
      <enumeration value=”Work”/>
      <enumeration value=”Cell”/>
      <enumeration value=”Fax”/>
    </restriction>
  </simpleType>
</attribute>
This declaration contains a <restriction> declaration with the base type string. Within the restriction are multiple enumeration facets to create a list of all of the allowable values for your type.
Now that you have seen the theory, you can use the preceding Try It Out to practice.
<complexType name=”PhoneType”>
  <simpleContent>
    <extension base=”string”>
      <attribute name=”kind” default=”Home”>
        <simpleType>
          <restriction base=”string”>
            <enumeration value=”Home”/>
            <enumeration value=”Work”/>
            <enumeration value=”Cell”/>
            <enumeration value=”Fax”/>
          </restriction>
        </simpleType>
      </attribute>
    </extension>
  </simpleContent>
</complexType>xsi:schemaLocation=”http://www.example.com/contacts contacts7.xsd
<attribute name=”kind” default=”Home”>
  <simpleType>
    <restriction base=”string”>
      <enumeration value=”Home”/>
      <enumeration value=”Work”/>
      <enumeration value=”Cell”/>
      <enumeration value=”Fax”/>
    </restriction>
  </simpleType>
</attribute>
<list> Declarations
You’ll often need to create a list of items. Using a <list> declaration like the following, you can base your list items on a specific <simpleType>:
<list itemType=”name of simpleType used for validating items in the list”>
When creating your <list> declaration, you can specify the type of items in your list by including the itemType attribute. The value of the itemType attribute should be a reference to a global <simpleType> definition or built-in XML Schema data type. The reference is a namespace-qualified value, so it may need to be prefixed. The <list> declaration also allows you to specify your itemType by creating a local <simpleType> definition.
When choosing the itemType, remember that you are creating a whitespace-separated list, so your items cannot contain whitespace. Therefore, types that include whitespace cannot be used as itemTypes. A side effect of this limitation is that you cannot create a list whose itemType is itself a list.
Suppose you created a global <simpleType> called ContactTagsType whereby you enumerated all of the allowable tags for a contact, like so:
  <simpleType name=”ContactTagsType”>
    <restriction base=”string”>
      <enumeration value=”author”/>
      <enumeration value=”xml”/>
      <enumeration value=”poetry”/>
      <enumeration value=”consultant”/>
      <enumeration value=”CGI”/>
      <enumeration value=”semantics”/>
      <enumeration value=”animals”/>
    </restriction>
  </simpleType>
This simple type only allows for one of the enumerated values to be used. If you want to allow for multiple items, you can make a type called ContactTagsListType, which allows for a list of tags using the <list> declaration, as in the following:
<simpleType name=”ContactTagsListType”>
    <list itemType=”contacts:ContactTagsType”/>
  </simpleType>
If you use this within your contacts XML Schema, it would allow you to specify multiple tags within your instance document, but still require that they adhere to the enumerations you provide. In practice, you would probably want to expand your list of possible tags to include all kinds of values, but for now this ensures that each tag is validated.
<union> Declarations
Finally, when creating your derived types, you may need to combine two or more types. By declaring a <union> in the following example, you can validate the values in your instance document against multiple types at once:
<union memberTypes=”whitespace separated list of types”>
When creating a <union> declaration, you can specify the types you are combining by including the memberTypes attribute. The value of the memberTypes attribute should be a whitespace-separated list of references to global <simpleType> definitions or built-in XML Schema data types. Again, these references are namespace-qualified values, so they may need to be prefixed. The <union> declaration also allows you to specify your memberTypes by creating local <simpleType> definitions.
Suppose that you wanted to allow the value Unknown in the <latitude> and <longitude> elements. To do this you could use a union of the built-in float type and a custom type that allows only the string Unknown, as shown in the following example:
  <simpleType name=”UnknownString”>
    <restriction base=”string”>
      <enumeration value=”Unknown”/>
    </restriction>
  </simpleType>

  <simpleType name=”UnknownOrFloatType”>
    <union memberTypes=”float contacts:UnknownString”/>
  </simpleType>
In this declaration, you have created the custom UnknownString type and a union of the two simple types, float and UnknownString. Note that when you refer to the names of the <simpleType> definitions, you must make sure they are qualified with a namespace. In this case, the reference to float has no prefix because the default namespace for this document is the XML Schema namespace. The prefix contacts is used when referring to the type UnknownString, however, because it was declared in the target namespace. By referring to your newly created type, you can specify that your <latitude> and <longitude> elements must contain either float values or the string Unknown, shown here:
<element name=”latitude” type=”contacts:UnknownStringOrFloatType”/>
<element name=”longitude” type=”contacts:UnknownStringOrFloatType”/>
Some valid elements include the following:
<latitude>43.847156</latitude>
<longitude>Unknown</longitude>
Some invalid elements include these:
<latitude>unknown</latitude>
<longitude>43.847156 Unknown</longitude>
The first two elements both contain valid values. The third element is invalid because the value unknown is not listed in either of the unioned types — the values are case sensitive. The fourth element is invalid because the schema validator treats this as a single value. Although Unknown and 43.847156 are allowable by themselves, the value 43.847156 Unknown is not listed in either of the union types.
In this section you have seen (and experimented with) many of the constructs that can be used inside XML Schema. In the next section you will zoom out a little to see a technique for simplifying the management of schemas.
CREATING A SCHEMA FROM MULTIPLE DOCUMENTS
So far, the XML Schemas in this chapter have used a single schema document to keep things simple. The XML Schema Recommendation introduces mechanisms for combining XML Schemas and reusing definitions. As mentioned in Chapter 4, “Document Type Definitions,” reusing existing definitions is good practice — it saves you time when creating the documents and increases your document’s interoperability.
The XML Schema Recommendation provides two primary declarations for use with multiple XML Schema documents:
- <import>
- <include>
<import> Declarations
The <import> declaration, as the name implies, allows you to import global declarations from other XML Schemas. The <import> declaration is used primarily for combining XML Schemas that have different targetNamespaces. By importing the declarations, the two XML Schemas can be used in conjunction within an instance document. Note that the <import> declaration allows you to refer to declarations only within other XML Schemas.
This is the typical shape of an import declaration:
<import
  namespace=””
  schemaLocation=””>
The <import> declaration is always declared globally within an XML Schema (it must be a direct child of the <schema> element). This means that the <import> declaration applies to the entire XML Schema. When importing declarations from other namespaces, the schema validator attempts to look up the document based on the schemaLocation attribute specified within the corresponding <import> declaration. Of course, as shown earlier, the schemaLocation attribute serves only as a hint to the processor. The processor may elect to use another copy of the XML Schema. If the schema validator cannot locate the XML Schema for any reason, it may raise an error or proceed with lax validation.
To get a better idea of how this works, you need a sample XML Schema that uses the <import> declaration. Let’s combine the examples that you have been working with throughout this chapter.
Within the XML Schema for your contacts listing, import the declarations from your <name> vocabulary. Use the imported <name> declarations in place of the existing declarations. Though it means you need to remove some declarations in this case, it is better to reuse XML Schemas whenever possible.
Next, you will use <import> declarations to combine the example you have already worked on.
<schema xmlns=”http://www.w3.org/2001/XMLSchema”
  xmlns:contacts=”http://www.example.com/contacts”
  xmlns:name=”http://www.example.com/name”
  targetNamespace=”http://www.example.com/contacts”
  elementFormDefault=”qualified”>

  <import namespace=”http://www.example.com/name” schemaLocation=”name8.xsd”/>
<element name=”contacts”>
    <complexType>
      <sequence>
        <element name=”contact” minOccurs=”0” maxOccurs=”unbounded”>
          <complexType>
            <sequence>
              <element ref=”name:name”/>
              <element name=”location” type=”contacts:LocationType”/>
              <element name=”phone” type=”contacts:PhoneType”/>
              <element name=”knows” type=”contacts:KnowsType”/>
              <element name=”description” type=”contacts:DescriptionType”/>
            </sequence>
            <attribute name=”person” type=”ID”/>
            <attribute name=”tags” type=”token”/>
          </complexType>
        </element>
      </sequence>
      <attributeGroup ref=”contacts:ContactAttributes”/>
    </complexType>
</element><?xml version=”1.0”?> <contacts xmlns=”http://www.example.com/contacts” xmlns:name=”http://www.example.com/name” xmlns:xsi=”http://www.w3.org/2001/XMLSchema-instance” xsi:schemaLocation=”http://www.example.com/contacts contacts8.xsd” source=”Beginning XML 5E” version=”1.0”> <contact person=”Joe_Fawcett” tags=”author xml”> <name:name title=”Mr.”> <name:first>Joseph</name:first> <name:middle>John</name:middle> <name:last>Fawcett</name:last> </name:name> <location> <address>Exeter, UK</address> <latitude>50.7218</latitude> <longitude>-3.533617</longitude> </location> <phone kind=”Home”>001-909-555-1212</phone> <knows contacts=”Joe_Fawcett Danny_Ayers”/> <description>Joe is a developer and author for Beginning XML <em>5th edition</em>.<br/>Joe <strong>loves</strong> XML!</description> </contact> <contact person=”Liam_Quin” tags=”author consultant w3c”> <name:name> <name:first>Liam</name:first> <name:last>Quin</name:last> </name:name> <location> <address>Ontario, Canada</address> </location> <phone kind=”Work”>+1 613 476 8769</phone> <knows contacts=”Joe_Fawcett Danny_Ayers”/> <description>XML Activity Lead at W3C</description> </contact> <contact person=”Danny_Ayers” tags=”author semantics animals”> <name:name> <name:first>Daniel</name:first> <name:middle>John</name:middle> <name:last>Ayers</name:last> </name:name> <location> <latitude>43.847156</latitude> <longitude>10.50808</longitude> <address>Mozzanella, Italy</address> </location> <phone>+39-0555-11-22-33-</phone> <knows contacts=”Joe_Fawcett Liam_Quin”/> <description>Web Research and Development.</description> </contact> </contacts>
<?xml version=”1.0”?>
<schema xmlns=”http://www.w3.org/2001/XMLSchema”
  xmlns:contacts=”http://www.example.com/contacts”
  xmlns:name=”http://www.example.com/name”
  targetNamespace=”http://www.example.com/contacts”
  elementFormDefault=”qualified”>
  <import namespace=”http://www.example.com/name”
    schemaLocation=”name8.xsd”/>
<element ref=”name:name” />
    <contact person=”Jeff_Rafter” tags=”author xml poetry”>
    <name:name title=”Mr.”>
      <name:first>Jeff</name:first>
      <name:middle>Craig</name:middle>
      <name:last>Rafter</name:last>
    </name:name>
    <location>
      <address>Redlands, CA, USA</address>
      <latitude>34.031892</latitude>
      <longitude>-117.207642</longitude>
    </location>
    <phone kind=”Home”>001-909-555-1212</phone>
    <knows contacts=”David_Hunter Danny_Ayers”/>
    <description>Jeff is a developer and author for Beginning XML <em>4th
 edition</em>.<br/>Jeff <strong>loves</strong> XML!</description>
  </contact>
<include> Declarations
The <include> declaration is very similar to the <import> declaration, except that the <include> declaration allows you to combine XML Schemas that are designed for the same targetNamespace (or no targetNamespace) much more effectively. When a schema validator encounters an <include> declaration, it treats the global declarations from the included XML Schema as if they had been declared in the XML Schema that contains the <include> declaration. This subtle distinction makes quite a difference when you are using many modules to define a single vocabulary.
This is the shape of a typical <include> declaration:
<include
  schemaLocation=””>
Notice that within the <include> declaration there is no namespace attribute. Again, unlike the <import> declaration, the <include> declaration can be used only on documents with the same targetNamespace, or no targetNamespace. Because of this, a namespace attribute would be redundant. Just as you saw before, the schemaLocation attribute allows you to specify the location of the XML Schema you are including. The schemaLocation value functions as a validator hint. If the schema validator cannot locate a copy of the XML Schema for any reason, it may raise an error or proceed with lax validation.
To demonstrate the <include> declaration, you will now create an example that utilizes two XML Schema documents with the same targetNamespace. To do this, you will break your contacts XML Schema into two parts — moving the type declarations for the ContactTagsType to a new XML Schema that can be included in your main document. The following Try It Out exemplifies this process.
 <?xml version=”1.0”?>
<schema xmlns=”http://www.w3.org/2001/XMLSchema”
  xmlns:contacts=”http://www.example.com/contacts”
  targetNamespace=”http://www.example.com/contacts”
  elementFormDefault=”qualified”>
  <simpleType name=”ContactTagsType”>
    <restriction base=”string”>
      <enumeration value=”author”/>
      <enumeration value=”xml”/>
      <enumeration value=”poetry”/>
      <enumeration value=”consultant”/>
      <enumeration value=”CGI”/>
      <enumeration value=”semantics”/>
      <enumeration value=”animals”/>
    </restriction>
  </simpleType>
</schema>
Contact_tags.xsd
contacts9.xsd
xsi:schemaLocation=”http://www.example.com/contacts contacts12.xsd”
<include schemaLocation=”contact_tags.xsd” />
DOCUMENTING XML SCHEMAS
For other people to be able to reuse your schemas, and for them to make sense to you at a later date, it’s good practice to include documentation. The XML Schema Recommendation provides several mechanisms for documenting your code:
- XML comments
- Other-namespace components
- XML Schema annotations
You should already be reasonably familiar with the first two of these — they exploit the fact that XML Schemas are XML themselves. Standard XML techniques can be used to include information that won’t be used by the primary processor, the validator, or any other tool. However, they will be available to any human reader and/or dedicated documentation tool.
But XML Schemas also have their own system for including documentation known as annotations. This is provided by three terms in the XSD namespace: annotation, appinfo, and documentation.
These are all very straightforward, so in a moment you will see an example that includes all three kinds of documentation. But first it’s worth mentioning again the special XML attribute xml:lang. This is used to specify that a particular chunk of text is in a specific (human) language. Obviously this can be very important in documentation. The following example includes only English text (xml:lang=”en”, the language codes being defined in www.ietf.org/rfc/bcp/bcp47.txt). But it’s not uncommon to see pieces of text repeated in different languages within a document.
Listing 5-2 is a self-documenting XML Schema:
![]() LISTING 5-2: name-documented.xsd
LISTING 5-2: name-documented.xsd
<?xml version=”1.0”?>
<schema xmlns=”http://www.w3.org/2001/XMLSchema”
  xmlns:target=”http://www.example.com/name”
  xmlns:doc=”http://www.example.com/documentation”
  targetNamespace=”http://www.example.com/name”
  elementFormDefault=”qualified”>
    <annotation>
    <appinfo source=”name-sample.xml”/>
    <documentation xml:lang=”en”>
        The name vocabulary was created for an example of a DTD. We have
        recycled it into an XML Schema.
    </documentation>
  </annotation>

  <!-- Specification of name elements -->
 <group name=”NameGroup”>
    <sequence>
      <element name=”first” type=”string” minOccurs=”1” maxOccurs=”unbounded”/>
      <element name=”middle” type=”string” minOccurs=”0” maxOccurs=”1”/>
      <element name=”last” type=”string”/>
    </sequence>
  </group>
  <!-- Specification of name datatype -->

<complexType name=”NameType” doc:comments=”This complexType allows you to
 describe a person's name broken down by first, middle and last parts of the
name. You can also specify a greeting by including the title attribute.”>

    <group ref=”target:NameGroup” />
    <attribute name=”title” type=”string”/>
  </complexType>
  <element name=”name” type=”target:NameType”/>
</schema>
The first thing to notice here is the added namespace declaration:
xmlns:doc=”http://www.example.com/documentation”
This namespace has been invented for demonstration purposes. Its purpose here is effectively to hide an attribute from processors for which it has no meaning. That attribute is doc:comments, included here on the <complexType> element:
<complexType name=”NameType” doc:comments=”This complexType allows you to
describe a person's name broken down by first, middle and last parts of the name.
You can also specify a greeting by including the title attribute.”>
When applied to an XML document, an XML Schema validator will read and apply the appropriate rules for the <complexType> element, but it will ignore this “foreign” attribute. However, you can write your own custom processing; for example, to convert the XML Schema to HTML for documentation purposes, which could pull out and display these comments as you see fit.
The <annotation> element is used as a block container with two distinct elements. The <appinfo> element is used to pass information to external tools (such as documentation formatters). The XML Schema specification includes the definition of one attribute for this element, source, which is used here to point to a sample document that conforms to this schema. You can also add any foreign-namespace attributes here as well. This is the shape of a typical <annotation> element:
    <annotation>
    <appinfo source=”name-sample.xml”/>
The <documentation> element is used to wrap human-oriented text. It too may contain a source attribute, although one is not included here. What is included is an xml:lang attribute to say that the text is in English, as shown in the following code snippet:
    <documentation xml:lang=”en”>
        The name vocabulary was created for an example of a DTD. We have
        recycled it into an XML Schema.
    </documentation>
  </annotation>
The <annotation> element can contain as many <appinfo> and <documentation> sub-elements as you like (including zero), so providing documentation in multiple languages is straightforward.
Finally, the third kind of documentation in this document is the regular XML comment:
<!-- Specification of name elements -->
Primarily intended for readers of the document source, these will be ignored by most processors.
XML SCHEMA 1.1
As mentioned in the introduction, at the time of this writing the 1.1 revision of the specification is under development. Although not quite finished, it is at the W3C’s Candidate Recommendation status, so only minor changes are likely to be made before it achieves full Recommendation status.
As the small increment suggests, this version isn’t very much different from XML Schema 1.0. The important thing to note is that in general, schemas developed according to the 1.0 specification will still work with the 1.1 specification. Compatibility is maintained to the extent of reusing the same namespace URI (http://www.w3.org/2001/XMLSchema). So an XML document defined using a 1.0 schema can be validated using a 1.1 schema processor/validator.
The main changes in XML Schema 1.1 from 1.0 are:
- It relaxes certain rules
- Assertions can be defined over the document content
- The spec is clearer and a little easier to read
Relaxed Rules
One of the rules that has relaxed is when a particular block in the schema specifies both an explicit element and a wildcard that may include that element. When the validator encounters the element in a document, it can’t tell whether to interpret it as specified by the explicit element (and check whatever other conditions apply there) or by the wildcard.
For example, say you have a schema containing the following:
<sequence>
   <element name=”size” type=”xsd:decimal” minOccurs=”0”/>
   <any namespace=”##any” minOccurs=”0”/>
</sequence>
This could try to validate a document that contains:
<size>large</size>
Is that element valid, because the <any> declaration allows any element from any namespace, or invalid because the <element> declaration states it should be a decimal?
To avoid this situation XML Schema 1.0 disallowed any such ambiguity; such constructions are forbidden in the schema. However, in XML Schema 1.1 this kind of thing is allowed, with ambiguity being avoided by using the rule that named elements take precedence over wildcards. So in XML Schema 1.1 the <size> element is associated with the named element in the schema, and in this example is judged invalid because the content types don’t match.
Other changes in XML Schema 1.1 relate to other restrictions but they are quite detailed, and beyond the scope of this book. Once the new specification has been finalized and published, status updates will be linked from http://www.w3.org/XML/Schema.
<assert>
XML Schema 1.1 adds an <assert> component to provide rule-based validation (along similar lines of Schematron, which you will see in the next chapter).
The rule is specified using a Boolean XPath expression. The assertion may pass (true) or fail (false) depending on the evaluation of the expression. Assertions are treated like other validation features; failure of the assertion means the document isn’t valid.
Here’s an example:
<element name=”sizeRange”>
  <complexType>
     <sequence>
         <element name=”minSize” type=”xsd:decimal”/>
         <element name=”maxSize” type=”xsd:decimal”/>
     </sequence>
    <assert test=”minSize le maxSize”/>
</complexType>
</element>
Here, the schema specifies an element <sizeRange> with two nested elements, <minSize> and <maxSize>, each of which should contain a decimal value. The assertion tests whether the value in <minSize> is less than or equal to the value in <maxSize>. The XPath expression for this comparison is le.
As you will see later, XPath is a powerful language. In the context of XML Schema 1.1 this means much more sophisticated assertions are possible.
SUMMARY
- XML Schemas can be used to schema-validate your XML documents.
- XML Schemas have many advantages over Document Type Definitions.
- You can associate XML Schema with an XML Document by declaring element and attribute groups.
- You can specify allowable XML content using simple types and complex types.
- You can create an XML Schema using multiple documents and namespaces.
EXERCISE
Answers to Exercises can be found in Appendix A.
WHAT YOU LEARNED IN THIS CHAPTER
| TOPIC | KEY POINTS |
| Advantages of XML Schemas over DTDs | XML syntax |
| Associating an XML Schema with an XML document | Options include direct linking and association with a file and/or indirectly using <import> or <include> declarations |
| Declaring element and attribute types | These are based on the XML Schema depending on the <element> and <attribute> elements |
| Declaring groups and attribute groups | Use <sequence>, <choice>, and <all> blocks |
| Specifying allowable XML content | Constraints may build up from combinations of simple types and complex types |
| Creating an XML Schema using namespace and multiple documents | Various approaches are available, notably using <import> and <include>declarations |