
Chapter 6
RELAX NG and Schematron
WHAT YOU WILL LEARN IN THIS CHAPTER:
- Why you need more ways of validating
- Definition of RELAX NG and its aims
- How to write and use RELAX NG
- How to convert between RELAX NG and other validation methods
- Definition of Schematron and its aims
- How to write and use Schematron
Validation of XML documents is an exceedingly common requirement, especially when your software is accepting XML from another source. Unfortunately, checking whether the XML you have received meets the expectations of the software that will process it can be difficult, as there are a myriad of rules that may need to be applied. You’ve already met two different ways of validating XML documents to make sure they conform to a specific format: document type definitions (DTDs) and W3C XML Schema. Both of these techniques have their uses but neither offers a full validation solution; in fact, most experts agree that there isn’t a single technique that can cope with every validation rule that you may want to apply. In this chapter you meet two further solutions, RELAX NG and Schematron. Neither of these is expected to completely replace DTDs or Schemas; they are actually both designed to be used in conjunction with other validation methods. The expectation is that combining two or more techniques will enable users to completely specify the rules that a document must follow before it is said to be valid and therefore suitable for consumption by their business applications.
In this chapter you first see how RELAX NG and Schematron can be used in isolation to perform validation, and then you’ll learn how they are used in conjunction with different aspects of XML Schemas to produce a complete solution.
WHY DO YOU NEED MORE WAYS OF VALIDATING XML?
As you’ve seen in the preceding two chapters, it’s important to be able to assert whether or not an XML document conforms to a predetermined structure. One of the main driving forces behind XML — interoperability — means that the XML output by one application will most likely be used as the input to another. If both of these applications are your own home-grown systems, you might be able to assume that everything will function correctly and validation is not a primary concern. If, however, you are receiving documents from external suppliers, especially if they are from people with whom you have had no previous contact, you need to be sure that the document is valid and will not, unintentionally or maliciously, cause an error in your systems.
People have not been satisfied with the two most popular validation methods, DTDs and XML Schema, for a few reasons. DTDs were designed long before XML was created to work with SGML. Although SGML is a superset of XML, DTDs are too limited in many respects to cope with the huge diversity of constraints that occur in many XML formats. They have very limited support for namespaces and only a very small range of data types. W3C XML Schemas are more versatile but extremely complicated; they have a wider variety of data types available as well as ways to extend and restrict these types. They also have built-in support for namespaces, and the advantage that they themselves are written in XML means that you can often use the same tools to create them as you would for the actual instance documents, something not possible with DTDs.
Both of the alternatives in this chapter seek to address these limitations. RELAX NG (usually pronounced as relaxing) tries to be a simple yet powerful and natural way to describe the format of an XML document, without some of the baggage carried by XML Schema, such as appending information to the document in the form of default attributes. Schematron’s main selling point is that it provides a way of reporting errors in the document in a very friendly manner. The messages from Schematron, which are defined by the author, can be in a non-technical format such as The book element must have an ID, rather than the sometimes more cryptic output received from XML Schema–based parsers. Schematron can also cope with constraints in XML documents that are difficult or impossible to express using other validation methods.
The first stage in learning about these two validation techniques is to set up your environment.
SETTING UP YOUR ENVIRONMENT
The examples in this chapter use the <oXygen/> XML editor. This editor is widely acknowledged as one of the leading applications in its field. Unfortunately, but perhaps not surprisingly, it is not free, but it does have a 31-day trial period. One of the reasons it was chosen for the examples in this chapter is that it has good support for both RELAX NG and Schematron, which is a change from the command-line operations that you’ve been using a lot elsewhere in the book. It only takes a few steps to get started with the editor:
Now that the environment is ready you can start to learn what RELAX NG is all about.
USING RELAX NG
RELAX NG came out shortly after XML Schema and one of its aims—simplicity—arose because many thought that W3C XML Schemas were too difficult to use. Users were also hopeful that having a more compact non-XML format would make it easier to hand-write RELAX NG, while the XML version would be more suitable for creation and use by software. The main precepts of RELAX NG include the following:
- Simple to learn
- Has two representations, both XML and textual
- Does not alter the target document in any way
- Can cope with namespaces
- Treats elements and attributes equally as far as possible
- Can use data types from other vocabularies such as W3C XML Schema
- Has a solid theoretical basis
There was also a feeling that DTDs suffered two main failings: they could be used to add default content to documents at run-time, making it difficult to determine what data the document held just by inspection, and could only deal with a very limited set of data types. Both these deficiencies are addressed in RELAX NG: no default content is added and data types from other technologies can be used if the built-in ones are insufficient. RELAX NG has therefore stood the test of time and is extensively used. In the rest of the chapter you cover all these points in detail and you should be able to judge if RELAX NG succeeds in its goals.
Understanding the Basics of RELAX NG
RELAX NG is built on the idea of pattern matching. The XML document you are trying to validate, commonly called the target document, can be visualized as a tree, starting with the root element and spreading out to cover all child elements and attributes. Other items, such as comments and processing instructions, cannot be validated using RELAX NG; this is similar to the situation with DTDs and XML Schema.
The following examples use an XML file that represents a collection of books. The document element is <library> and underneath are one or more <book> elements. Each book element has attributes and elements that contain information about the authors, the characters in the book, a description, and technical data such as publication date. The full file is shown in Listing 6-1.
![]() LISTING 6-1: Library.xml
LISTING 6-1: Library.xml
<library>
    <book id=”ACMAS-20” publishedDate=”1920” genre=”Detective Fiction”>
        <title>The Mysterious Affair at Styles</title>
        <authors count=”1”>
            <author id=”AC”>Agatha Christie</author>
        </authors>
        <characters>
            <character id=”HP”>
                <name>Hercule Poirot</name>
                <description>A former Belgian detective,
                now a private investigator.</description>
            </character>
            <character id=”JJ”>
                <name>James Japp</name>
                <description>A detective from London's
                Scotland Yard.</description>
            </character>
            <character id=”AH”>
                <name>Arthur Hastings</name>
                <description>The narrator of the tale
                and an old friend of Poirot.</description>
            </character>
            <character id=”AI”>
                <name>Alfred Inglethorpe</name>
                <description>The new husband of Emily Cavendish,
                who is disliked by her family.</description>
            </character>
        </characters>
        <description>Emily Cavendish, a wealthy widow,
        marries again to Alfred Inglethorp.
        One night she is found poisoned and
      Alfred immediately becomes the main suspect.</description>
    </book>
    <book id=”EGOSC-77” publishedDate=”1977” genre=”Science Fiction”>
        <title>Ender's Game</title>
        <authors count=”1”>
            <author id=”OSC”>Orson Scott Card</author>
        </authors>
        <characters>
            <character id=”AW”>
                <name>Andrew “Ender” Wiggin</name>
                <description>A young boy
                who is selected for Battle School following an incident
                with a local bully.</description>
            </character>
            <character id=”MR”>
                <name>Mazer Rackham</name>
                <description>A hero from the earlier Formic wars.</description>
            </character>
        </characters>
        <description>Earth is at war with an alien species known as Formics
        which nearly succeeded in destroying the human race.
        Ender is unwittingly thrust into combat against
            them.</description>
    </book>
</library>
If you were to describe this document in plain English, you would probably start by stating that:
- A <library> element is composed of:
- one or more <book> elements that have
- id, publishedDate, and genre attributes
- a <title> element
- an <authors> element
- a <characters> element
- a <description> element
- one or more <book> elements that have
RELAX NG tries to mimic this explanation, stating the patterns that different elements and attributes match. To show that an element matches a certain pattern you need to use an <element> element. So, because all XML documents start with an element, the basic RELAX NG schema starts with
<element xmlns=”http://relaxng.org/ns/structure/1.0” name=”library”></element>
where the name attribute of <element> is the document element of the target XML. Note that there is a default namespace associated with the document identifying it as a RELAX NG schema. So far you’ve provided a pattern for the <library> element but haven’t described its children; you describe them by adding a pattern for the <book> element. There can be one or more <book> elements so you start with a <oneOrMore> element and within the <oneOrMore> element is another <element> to match <book>. The following snippet shows how the RELAX NG schema looks when the <book> element is included:
<element xmlns=”http://relaxng.org/ns/structure/1.0” name=”library”>
    <oneOrMore>
     <element name=”book”></element>
    </oneOrMore>
</element>
A <book> element has three attributes; these are described using an <attribute> matching element like so:
<element xmlns=”http://relaxng.org/ns/structure/1.0” name=”library”>
    <oneOrMore>
        <element name=”book”>
            <attribute name=”id”/>
            <attribute name=”publishedDate”/>
            <attribute name=”genre”/>
        </element>
    </oneOrMore>
</element>
You can now use your editor to see if your schema is accurate so far.
![]() LISTING 6-2: Library-1.xml
LISTING 6-2: Library-1.xml
<library>
    <book id=”ACMAS-20” publishedDate=”1920” genre=”Detective Fiction”>

    </book>
    <book id=”EGOSC-77” publishedDate=”1977” genre=”Science Fiction”>

    </book>
</library>![]() LISTING 6-3: Library-1.rng
LISTING 6-3: Library-1.rng
<element xmlns=”http://relaxng.org/ns/structure/1.0” name=”library”>
    <oneOrMore>
        <element name=”book”>
            <attribute name=”id”/>
            <attribute name=”publishedDate”/>
            <attribute name=”genre”/>
        </element>
    </oneOrMore>
</element>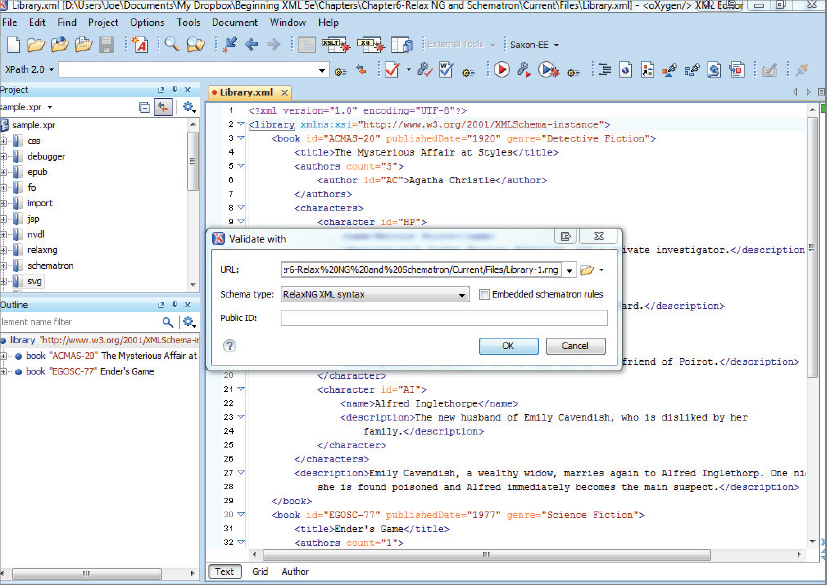
    <element xmlns=”http://relaxng.org/ns/structure/1.0” name=”library”>
        <oneOrMore>
            <element name=”book”>
                <attribute name=”id”/>
                <attribute name=”publishedDate”/>
                <attribute name=”genre”/>
                <element name=”title”>
                    <text/>
                </element>
                <element name=”authors”>
                    <attribute name=”count”/>
                </element>
                <element name=”characters”/>
                <element name=”description”>
                    <text/>
                </element>
            </element>
        </oneOrMore>
</element>![]() LISTING 6-4: Library-2.rng
LISTING 6-4: Library-2.rng
<element xmlns=”http://relaxng.org/ns/structure/1.0” name=”library”>
    <oneOrMore>
        <element name=”book”>
            <attribute name=”id”/>
            <attribute name=”publishedDate”/>
            <attribute name=”genre”/>
            <element name=”title”>
                <text/>
            </element>
            <element name=”authors”>
                <attribute name=”count”/>
                <oneOrMore>
                    <element name=”author”>
                        <attribute name=”id”/>
                        <text/>
                    </element>
                </oneOrMore>
            </element>
            <element name=”characters”>
                <zeroOrMore>
                    <element name=”character”>
                        <attribute name=”id”/>
                        <element name=”name”>
                            <text/>
                        </element>
                        <element name=”description”>
                            <text/>
                        </element>
                    </element>
                </zeroOrMore>
            </element>
            <element name=”description”>
                <text/>
            </element>
        </element>
    </oneOrMore>
</element>
Now suppose you decide that the <description> element of the book is not mandatory — it can be omitted from the XML. To denote this in your RELAX NG schema you can make use of the <optional> element, which looks like the following:
            <optional>
                <element name=”description”>
                    <text/>
                </element>
            </optional>
If you now comment out one of the <description> elements like this:
    </characters>
    <!-- <description>Emily Cavendish, a wealthy widow,
 marries again to Alfred Inglethorp. One night
        she is found poisoned and
  Alfred immediately becomes the main suspect.</description> -->
</book>
and then revalidate, you find the file still passes.
You’ve now covered the basics of RELAX NG, but only using the XML representation. You’ll now see how to describe the same XML using the compact syntax.
Understanding RELAX NG’s Compact Syntax
Instead of XML elements, the compact syntax makes use of curly braces ({}), parentheses (()), and commas (,) in its syntax. There are two ways to make a declaration:
- For your basic declaration — that the file starts with a <library> element — you use the following:
element library {}
- A similar structure can declare an attribute named id that has a data type of text, which is the only data type that is recognized by RELAX NG without recourse to external definition sets such as W3C XML Schema:
attribute id { text }
You can now use these two declarations to build your schema using the compact syntax:
element library {
  element book {}+ }
- ?: Indicates that the item is optional, zero or one occurrence at most
- +: Indicates that the item occurs at least once with no maximum
- *: Indicates that the item occurs zero or more times, again with no upper limit
element library {
  element book {
    attribute id { text },
    attribute publishedDate { text },
    attribute genre { text }
  }+
}
element library {
  element book {
    attribute id { text },
    attribute publishedDate { text },
    attribute genre { text },
    element title { text },
    element authors {
      attribute count { text }
    },
    element characters {},
    element description { text }?
  }+
}
Notice how the <description> element is made optional by the addition of the question mark after the closing curly brace.
![]() LISTING 6-5: Library.rnc
LISTING 6-5: Library.rnc
element library {
  element book {
    attribute id { text},
    attribute publishedDate { text },
    attribute genre { text },
    element title { text },
    element authors {
      attribute count { text },
      element author {
        attribute id { text },
        text
      }+
    },
    element characters {
      element character {
        attribute id { text },
        element name { text },
        element description { text }
      }*
    },
    element description { text }?
  }+
}
In general, most people find it easier to write RELAX NG schema using the compact syntax. If you compare the two versions you’ll see that the XML one is more than 65 percent longer for the same functionality. The best thing is that the two formats are completely interchangeable; you can test this out using the <oXygen/> editor.
Converting Between the Two RELAX NG Formats
Conversion using your chosen editor is very straightforward, as demonstrated by converting the XML version, Library.rng, to the compact version.
So far, although you’ve described the format of the XML documents you want to validate, you haven’t constrained the actual values that elements or attributes hold. For example, the publishedDate attribute should hold a valid year but your document just defines the content as text. In the next section you see how to further constrain content to suit your requirements.
Constraining Content
The first type of constraint you’ll look at is limiting content to an enumeration — a list of specific values. For example, in your Library.xml file the <book> element has a genre attribute. It’s likely that this is taken from a fixed list of values. You can specify this in your schema by using the following declaration in the XML format:
    <attribute name=”genre”>
        <choice>
            <value>Detective Fiction</value>
            <value>Science Fiction</value>
            <value>General Fiction</value>
            <value>Non-fiction</value>
        </choice>
    </attribute>
This limits the value of genre to one of four values. If you modify Library.xml so that the genre attribute of the first <book> is Crime Fiction the validator will mark it as an error. If you want to use the compact syntax, use this:
    attribute genre {
      “Detective Fiction”
      | “Science Fiction”
      | “General Fiction”
      | “Non-fiction”
    }
In compact syntax the pipe character (|) is used to indicate a choice.
RELAX NG has a deliberately limited set of data types; in fact, there are only two: string and token. You’re no doubt familiar with the first of these, which represents a sequence of characters. Token is more difficult to describe. It’s a way of normalizing string types such that insignificant whitespace is removed. In practice this means that leading and trailing whitespace is removed and any sequence of more than one whitespace character is combined to form a single space.
Token is the default data type used when no other is specified, as is the case with the genre attribute defined previously. If you want to explicitly state which type you want, use the type attribute, like so:
    <attribute name=”genre”>
        <choice>
            <value type=”token”>Detective Fiction</value>
            <value type=”token”>Science Fiction</value>
            <value type=”token”>General Fiction</value>
            <value type=”token”>Non-fiction</value>
        </choice>
    </attribute>
or, in the compact syntax:
    attribute genre {
      token “Detective Fiction”
      | token “Science Fiction”
      | token “General Fiction”
      | token “Non-fiction”
    }
Having only two data types is a bit limiting, so RELAX NG schemas are able to import data types from other libraries. The most common library used is the W3C XML Schema library; this then gives access to a host of useful types. To show that you want data types from the XML Schema library, use the datatypeLibrary attribute on the schema’s document element, like so:
<element xmlns=”http://relaxng.org/ns/structure/1.0”
    datatypeLibrary=”http://www.w3.org/2001/XMLSchema-datatypes”
    name=”library”>
Now that you have access to the XML Schema data types, you can constrain content, such as the following publishedDate attribute:
    <attribute name=”publishedDate”>
        <data type=”gYear”></data>
    </attribute>
Notice how the type is specified within a <data> element. The <data> element is more restrictive than the <text> pattern because, in theory, content specified with the <text> pattern can contain unlimited text nodes, whereas the <data> pattern can accept only one text node, which can be further constrained by the type attribute. If you want to use the XML Schema types within the compact syntax, it’s slightly easier. The use is so common that these types are accessible without an initial declaration. All that is needed is to prefix the data type with xsd::
attribute publishedDate { xsd:gYear }
The XML Schema data type gYear specifies a Gregorian year, which means a year without any associated month and day information. If the target document contains anything else, there will be a validation error.
An alternative library to the XML Schema library is the DTD Compatibility Library. You can specify that you’re using this library by using the namespace http://relaxng.org/ns/compatibility/datatypes/1.0 on the document element as before. Alternatively, you can declare it in situ, on the actual pattern that needs it. For example, using the following code you could use the ID type from this library for the id attribute on the <book> attribute while keeping the XML Schema library for the rest of the document:
<element name=”book”>
            <attribute name=”id”>
                <data
 datatypeLibrary=”http://relaxng.org/ns/compatibility/datatypes/1.0” type=”ID”/>
            </attribute>
If you want to use the compact syntax, use this:
datatypes dtd = “http://relaxng.org/ns/compatibility/datatypes/1.0”

element library {
  element book {
    attribute id { dtd:ID }
As an alternative, or in combination with external data types, you can also use regular expressions to constrain data. For example, suppose you want to specify that the id attribute for characters must consist of two or three uppercase characters from the Latin alphabet. The regular expression for this is:
[A-Z]{2,3}
This means any character in the range A to Z. The curly braces indicate the minimum and maximum times the characters must appear. To use this expression in your schema you add the following code:
<element name=”character”>
        <attribute name=”id”>
                <data type=”token”>
               <param name=”pattern”>[A-Z]{2,3}</param>
               </data>
        </attribute>
In the RELAX NG compact version it looks like this:
      element character {
        attribute id {
          xsd:token { pattern = “[A-Z]{2,3}” }
        }
The final aspect of RELAX NG is that of code re-use.
Reusing Code in RELAX NG Schema
In most programming languages there is the facility to define blocks of code that can be reused; RELAX NG is no exception in this regard. The idea behind this is similar to other languages — it saves having to write the same code more than once, and when modifications are needed the schema has to be changed only in one place. This facility enables patterns to be defined, which can then be used throughout the document. For example, suppose you want to reuse the constraint you developed for the <character> element’s id attribute — that it must be two or three uppercase letters. You can define this constraint separately from the main schema and apply it when needed.
    <define name=”person-id”>
        <attribute name=”id”>
            <data type=”token”>
                <param name=”pattern”>[A-Z]{2,3}</param>
            </data>
        </attribute>
    </define>
    person-id =
      attribute id {
        xsd:token { pattern = “[A-Z]{2,3}” }
} <oneOrMore>
<element name=”author”>
<ref name=”person-id”/>
<text/>
</element>
</oneOrMore>
            <zeroOrMore>
               <element name=”character”>
                   <ref name=”person-id”/>
                   <element name=”name”>
                      <text/>
                   </element>
                   <element name=”description”>
                      <text/>
                   </element>
               </element>
            </zeroOrMore>
element author { person-id, text }+
        element character {
          person-id,
          element name { text },
          element description { text }
}*![]() LISTING 6-6: LibraryWithConstraints.rng
LISTING 6-6: LibraryWithConstraints.rng
<?xml version=”1.0” encoding=”UTF-8”?>
<grammar xmlns=”http://relaxng.org/ns/structure/1.0”
    datatypeLibrary=”http://www.w3.org/2001/XMLSchema-datatypes”>
    <define name=“person-id“>
        <attribute name=“id“>
            <data type=“token“>
                <param name=“pattern“>[A-Z]{2,3}</param>
            </data>
        </attribute>
    </define>
    <start>
        <element name=”library”>
            <oneOrMore>
                <element name=”book”>
                    <attribute name=”id”>
                        <data
 datatypeLibrary=”http://relaxng.org/ns/compatibility/datatypes/1.0”
                            type=”ID”/>
                    </attribute>
                    <attribute name=”publishedDate”>
                        <data type=”gYear”/>
                    </attribute>
                    <attribute name=”genre”>
                        <choice>
                            <value type=”token”>Detective Fiction</value>
                            <value type=”token”>Science Fiction</value>
                            <value type=”token”>General Fiction</value>
                            <value type=”token”>Non-fiction</value>
                        </choice>
                    </attribute>
                    <element name=”title”>
                        <text/>
                    </element>
                    <element name=”authors”>
                        <attribute name=”count”/>
                        <oneOrMore>
                            <element name=”author”>
                                <ref name=”person-id”/>
                                <text/>
                            </element>
                        </oneOrMore>
                    </element>
                    <element name=”characters”>
                        <zeroOrMore>
                            <element name=”character”>
                                <ref name=”person-id”/>
                                <element name=”name”>
                                    <text/>
                                </element>
                                <element name=”description”>
                                    <text/>
                                </element>
                            </element>
                        </zeroOrMore>
                    </element>
                    <element name=”description”>
                        <text/>
                    </element>
                </element>
            </oneOrMore>
        </element>
    </start>
</grammar>
The complete version in the compact syntax is shown in Listing 6-7.
![]() LISTING 6-7: LibraryWithConstraints.rnc
LISTING 6-7: LibraryWithConstraints.rnc
datatypes d = “http://relaxng.org/ns/compatibility/datatypes/1.0”

person-id =
  attribute id {
    xsd:token { pattern = “[A-Z]{2,3}” }
  }
start =
  element library {
    element book {
      attribute id { d:ID },
      attribute publishedDate { xsd:gYear },
      attribute genre {
        xsd:token “Detective Fiction”
        | xsd:token “Science Fiction”
        | xsd:token “General Fiction”
        | xsd:token “Non-fiction”
      },
      element title { text },
      element authors {
        attribute count { text },
        element author { person-id, text }+
      },
      element characters {
        element character {
          person-id,
          element name { text },
          element description { text }
        }*
      },
      element description { text }
    }+
  }
There’s plenty more to RELAX NG — there are ways to describe most of the XML formats that you’re likely to come across in real-world situations. Unless you’re a dyed-in-the-wool XML Schema aficionado, you’ll almost certainly find them easier to write by hand, and converting them to other formats is easy enough with tools, such as the <oXygen/> editor you’ve used, and others, such as Trang, a free conversion tool, which you can find at http://www.thaiopensource.com/relaxng/trang.html.
That concludes your introduction to RELAX NG. Next, you meet Schematron and see what unique features it has that make it particularly attractive when designing schemas that will be used by more non-technical users.
USING SCHEMATRON
The second validation tool discussed is Schematron, which looks at the problem of describing and validating an XML document in a different way than the three methods you’ve encountered thus far. These other methods (DTDs, XML Schema, and RELAX NG) all set to create a model of the target document. If the document doesn’t match that model, an error is raised. Schematron’s approach uses hand-crafted rules to describe what should appear and where in a document. It’s up to the author to decide how many rules are needed, how strict they are and, most importantly, what messages should appear if any of them are broken.
Understanding the Basics of Schematron
As stated, Schematron revolves around the concept of rules; you can create any number of rules, such as:
- The <character> element’s id attribute must be two or three uppercase letters from the Roman alphabet.
- The count attribute on the <authors> element must equal the number of <author> elements.
You can add as many rules as you see fit and attach a message to each one alerting the user if it has been broken. Schematron uses XPath to express these rules; XPath is a fundamental part of many XML-related technologies and is covered in depth in Chapter 7. This section gives a very quick introduction and sticks to simple examples. This will give you enough to appreciate Schematron’s power, which can be harnessed in full when your XPath skills are honed later on.
Understanding XPath
Similar to the way RELAX NG portrays an XML document, XPath also seeks to represent an XML document as a tree, starting at the root node and branching out through the document element and all its children. It uses a format similar to that used for paths in the filesystem. The root is represented by a forward slash (/) and then you can specify the direction or axis you want to travel and the name of any element you want to target. There are many directions that you can use but in this chapter you’ll use only two: you can travel along the child axis or the attribute axis. So, if you want to single out the <library> element in your Library.xml file, you would use the following XPath expression:
/library
You have moved from the root (/) along the child axis (which is the default, so it doesn’t need specifying) to all elements named library, which are directly under the root. In this case there is only one such element. You could then move to all the <book> elements by using:
/library/book
If you then change by switching onto the attribute axis, denoted by the @ sign, you can pick out the genre attributes:
/library/book/@genre
Finally, you can filter these expressions using a predicate, which is denoted using square brackets ([]). For instance, if you want to target all <book> elements that have an id attribute of ACMAS-20, you can specify:
/library/book[@id = 'ACMAS-20']
Now that you have a basic understanding of XPath you can put this knowledge to good use by employing Schematron to validate XML. First though, you need to decide exactly which version of Schematron to use.
Choosing a Version of Schematron
Schematron comes in more than one flavor. The original version was developed by Rick Jelliffe in 1999 and is generally known as Schematron 1.5. Since Schematron’s origin, there has been an effort for it to be recognized as an international standard, which led to the development of a new version known as ISO Schematron. The original, however, is typically more popular, probably because it seems easier to use. This is likely due to the fact that it was designed by one man rather than the newer version that was designed by a group of people, all with their own favorite parts that they wanted to include, forced to compromise over what exactly was left in and what was omitted. This group design led to a product that doesn’t quite suit anybody. For these reasons you’ll be using the original Schematron 1.5. Most of the examples will work in either version; where this is not the case it will be mentioned explicitly.
Understanding the Basic Process
Although Schematron relies on the creation of rules to describe an XML document, how those rules are tested deserves a mention. Once the rules are written, using an XML format, they are transformed using XSLT. The basic usage of XSLT is to transform XML from one format to another using templates (see Chapter 8, “XSLT” for more information). So Schematron takes the rules and uses XSLT to produce a second transformation. This is then applied to the XML to be validated, and the output produced lists whether the document passes all the tests or, if not, what rules have been broken. Although this may seem quite complicated, it’s fairly straightforward once you’ve seen it in action. The <oXygen/> application you’re using also hides a lot of the background processing, enabling you to concentrate on the core tasks in Schematron: rule creation and error messages.
Writing Basic Rules in Schematron
The first thing a rule needs is a context — when is this rule to be applied? Schematron rules start by defining this context using an attribute like so:
<rule context=”...”>
  <!-- rest of rule -->
The context is an XPath expression that defines when the rule should be tested. Say you want to define a rule relating to your Library.xml file you used in Listing 6-1. You know that <book> elements should possess three attributes: id, publishedDate, and genre. You can test that this is the case by choosing the <book> element as your context and adding three tests, one for each attribute.
In Schematron there are two types of tests: a positive one that says this statement should be true; if it’s not show an error message; or a negative one that says this statement should not be true; if it is show an error message. The positive test is defined using an <assert> element and the negative test is defined using a <report> element.
You can therefore write your first test — that there is an id attribute — by using a positive <assert> element after setting the context attribute to book:
<rule context=”book”>
  <assert test=”@id”>The 'book' element must have an 'id' attribute.</assert>
</rule>
Here, the test is simple. The Schematron processor looks for an id attribute on all <book> elements. The XPath expression @id returns the id attribute if it exists, otherwise no value is returned. The test attribute on the <assert> element expects a Boolean. Using XPath’s built-in rules, if there is no value returned then it is treated as false, if any value is returned then the test is true. So if an id attribute is returned, the <assert> succeeds; otherwise, if no id attribute is returned, the test is false and the <assert> fails. If the <assert> fails, the text within the element is shown to the user. In simple English this rule asserts that every <book> element has an id attribute.
You could equally well have written this <rule> using the <report> element, as follows:
<rule context=”book”>
  <report test=”not(@id)”>The 'book' element does not have
 an 'id' attribute.</report>
</rule>
This time the test has been changed; if any <book> element does not have an id attribute, the message is shown to the user. It’s entirely up to you whether you use <assert> or <report> elements. It’s really a matter of style. Before you decide, think about the test you are going to write — which way will be easier, the positive assert or the negative report?
You can extend this rule to cover the other two attributes, publishedDate and genre like so:
<rule context=”book”>
  <assert
   test=”@id”>The 'book' element must have an 'id' attribute.</assert>
  <assert
   test=”@publishedDate”>
               The 'book' element must have a 'publishedDate' attribute.</assert>
  <assert
       test=”@genre”>The 'book' element must have a 'genre' attribute.</assert>
</rule>
Again, you could have used <report> elements for the tests or, if feeling very contrary, mixed the use of <assert> and <report>:
<rule context=”book”>
  <assert
   test=”@id”>The 'book' element must have an 'id' attribute.</assert>
  <report
   test=”not(@publishedDate)”>
      The 'book' element does not have a 'publishedDate' attribute.</report>
  <assert
       test=”@genre”>The 'book' element must have a 'genre' attribute.</assert>
</rule>
The practice of using both <assert> and <report> elements for the sake of it, rather than sticking to one or the other, isn’t recommended, but it’s perfectly legal in Schematron.
So far your rules have targeted a <book> element, but Schematron lets you target items other than elements; for example, comments, processing instructions, and text. This makes it stand out from other validation techniques. DTDs and W3C Schema can’t handle comments and processing instructions. Schematron doesn’t, however, let you target attributes directly; you need to target their parent element as you did in the previous examples.
So far you’ve seen how to write simple rules; it’s now time to put these rules into the framework of a full Schematron document.
Creating a Schematron Document
A Schematron 1.5 document begins with a <schema> element that is in the www.ascc.net/xml/Schematron namespace. The <rule> elements themselves are grouped under <pattern> elements. The reason for this is that once a node has passed or failed a rule within a pattern, no more rules are processed against that node. Therefore, if you want two rules to be applied to a node, you need to put each <rule> into a separate <pattern> element. Your first Schematron document therefore looks like Listing 6-8.
![]() LISTING 6-8: Library-1.sch
LISTING 6-8: Library-1.sch
<schema xmlns=”http://www.ascc.net/xml/schematron”>
     <pattern name=”book attributes”>
          <rule context=”book”>
               <assert
   test=”@id”>The 'book' element must have an 'id' attribute.</assert>
               <assert
   test=”@publishedDate”>The 'book' element must have a 'publishedDate'
                    attribute.</assert>
               <assert
   test=”@genre”>The 'book' element must have a 'genre' attribute.</assert>
          </rule>
     </pattern>
</schema>
You’ve grouped the rule applying to <book> elements into a <pattern> element with the name book attributes (this name is just for your benefit; it is ignored by the validator).
You can use this schema to validate Library.xml. The process is similar to before — open Library.xml in <oXygen/> and choose Document ![]() Validate
Validate ![]() Validate with . . . from the menu. Then browse to Library-1.sch in the URL text box and click OK. You should see a Validation successful message next to a green square in the status bar. If you modify Library.xml by removing the id=”EGOSC-77” from the second <book> element and revalidate, you’ll see the message: The 'book' element must have an 'id' attribute. (@id) [assert]. The first part of this is the text from your <assert> element; the latter parts indicate the XPath of the test attribute and that an assert caused the message, rather than a report.
Validate with . . . from the menu. Then browse to Library-1.sch in the URL text box and click OK. You should see a Validation successful message next to a green square in the status bar. If you modify Library.xml by removing the id=”EGOSC-77” from the second <book> element and revalidate, you’ll see the message: The 'book' element must have an 'id' attribute. (@id) [assert]. The first part of this is the text from your <assert> element; the latter parts indicate the XPath of the test attribute and that an assert caused the message, rather than a report.
Although this message informs you of the problem, it doesn’t specify which <book> caused the problem. This is an essential piece of information — after all, you could have thousands of <book> elements in your <library>. Next, you see how to add extra information to messages to help the user correct any errors.
Adding More Information to Messages
Two techniques are available that help you improve any error messages. The first is of limited use and only really makes your code less repetitious and more maintainable; this method is to make use of the <name> element.
Using the <name> Element
The <name> element enables you to output the name of any node that can be accessed from the current context. For example, instead of hard-coding the name book into your error message you could write:
<assert test=”@id”>
The '<name path=”.”/>' element must have an 'id' attribute.</assert>
Here the <name> element has an attribute, path, that points to the current context, which is the <book> element that is being processed.
For this example, using the <name> element is not very helpful. Your rule is set only to process <book> elements so it will always resolve to book in the output. However, your rule could have been specified differently such that knowing the name of the failing element would have been more helpful. In this example supplying the path attribute is actually unnecessary. It’s so common to output the name of the element currently being processed that including just <name/> in the message is sufficient. It’s only if you want the name of a different element that the path attribute is needed. So your full schema would now look like Listing 6-9:
![]() LISTING 6-9: Library-2.sch
LISTING 6-9: Library-2.sch
<schema xmlns=”http://www.ascc.net/xml/schematron” >
     <pattern name=”book attributes”>
          <rule context=”book”>
               <assert test=”@id”>
  The '<name/>' element must have an 'id' attribute.</assert>
               <assert test=”@publishedDate”>
  The '<name/>' element must have a 'publishedDate' attribute.</assert>
               <assert test=”@genre”>
  The '<name/>' element must have a 'genre' attribute.</assert>
          </rule>
     </pattern>
 </schema>
The second technique you can use to improve error messages is much more useful; this is the <diagnostic> element.
Using the <diagnostic> Element
The <diagnostic> element has three advantages:
- It allows you to easily reuse error messages that apply to more than one context.
- It allows you to display more than one error message for each rule violation.
- It enables more detailed inspection of the offending node.
- The <diagnostic> element has the following form:
<diagnostic id=”id-attribute”><!-- error message --></diagnostic>
The id attribute needs to be unique and is used to associate the message with the <assert> or <report> that uses it. Within the error message you can use a <value-of> element that lets you obtain data from any part of the targeted XML document. This means you can show the user exactly where the error occurred.
To associate a <diagnostic> element with an <assert> or <report> that uses it, add a diagnostics attribute like so:
<assert
    diagnostics=”id-attribute”
    test=”@id”>The 'book' element must have an 'id' attribute.</assert>
Now the <diagnostic> element with the relevant id will be called if this assertion fails.
You can add a <value-of> element to make the output even more useful. This has a select attribute, which takes an XPath expression. You can use this expression to retrieve the title of the invalid <book> element to make it easier for the user to identify where the target XML needs modifying.
To keep the <diagnostic> elements separate they are wrapped in a <diagnostics> element. The full schema is shown in Listing 6-10.
![]() LISTING 6-10: Library-3.sch
LISTING 6-10: Library-3.sch
<schema xmlns=”http://www.ascc.net/xml/schematron” >
     <pattern name=”book attributes”>
          <rule context=”book”>
               <assert
                 diagnostics=”id-attribute”
             test=”@id”>The 'book' element must have an
             'id' attribute.</assert>
               <assert test=”@publishedDate”>
             The 'book' element must have a 'publishedDate' attribute.</assert>
               <assert test=”@genre”>
             The 'book' element must have a 'genre' attribute.</assert>
          </rule>
     </pattern>

     <diagnostics>
          <diagnostic id=”id-attribute”>The 'id' was missing on book/title:
 <value-of select=”title”/></diagnostic>
     </diagnostics>
 </schema>
If you validate the example file with the id attribute missing from the second book, you’ll get an error message this time like this one:
Diagnostics: [id-attribute] The 'id' was missing on book/title: Ender's Game
When it comes to choosing where to put what in error messages, again it’s somewhat a matter of style. In general the <assert> and <report> elements should contain a simple explanation of the broken rule. The <diagnostic> elements should help narrow down exactly where the rule was broken. You can associate more than one <diagnostic> element to an <assert> or <report> element if you want; you just need to separate the id values by a single space. A common use of this facility is to display the more detailed message in more than one language, as shown in Listing 6-11.
![]() LISTING 6-11: Library-4.sch
LISTING 6-11: Library-4.sch
<schema xmlns=”http://www.ascc.net/xml/schematron” >
     <pattern name=“book attributes“>
          <rule context=“book“>
               <assert
                 diagnostics=“id-attribute-en id-attribute-fr“
             test=“@id“>The 'book' element must have an 'id' attribute.</assert>
               <assert test=“@publishedDate“>
               The 'book' element must have a 'publishedDate' attribute.</assert>
               <assert test=“@genre“>
               The 'book' element must have a 'genre' attribute.</assert>
          </rule>
     </pattern>

<diagnostics>
          <diagnostic id=“id-attribute-en”>
  The 'id' was missing on book/title: <value-of select=”title”/></diagnostic>
          <diagnostic id=”id-attribute-fr”>
book/title: <value-of select=”title”/> manque de l'attribut 'id'.
</diagnostic>
     </diagnostics>

</schema>
Now the user will see a full explanation in both English and French if the id attribute is missing.
So far your checks have been fairly perfunctory, just testing for the presence of an attribute. The next section details what to do if you want to test not only for the existence, but also that the value it contains is valid.
Constraining Values in Schematron
Testing for the existence of attributes is not really enough; you also need to make sure that the actual value is a valid one. For example, you tested that there was an id attribute on the <book> element; however, it could have been empty and the test would still have passed.
Using publishedDate as an example, you know that it represents the year the book was first published. You can express this in a test by seeing if the actual value can be cast to a gYear.
Because gYear is defined as one of the W3C XML Schema types, you’ll need a way to reference these. You can declare a namespace mapping using the <ns> element, which takes two attributes to hold the namespace URI and the prefix you want to use to refer to it:
<schema xmlns=”http://www.ascc.net/xml/schematron”>
     <ns uri=“http://www.w3.org/2001/XMLSchema“ prefix=“xs“/>
     <pattern name=”book attributes”>
     <!-- rest of schema -->
</schema>
You then need an assertion that the value is suitable. For this you’ll use the castable as operator in XPath.
You’ll test whether the publishedDate is castable as a gYear:
<schema xmlns=”http://www.ascc.net/xml/schematron”>
<ns uri=“http://www.w3.org/2001/XMLSchema“ prefix=“xs“/>
<pattern name=“book attributes“>
<rule context=“book“>
<assert
diagnostics=“id-attribute-en id-attribute-fr“ test=“@id“>The 'book' element
must have an 'id' attribute.</assert>
<assert test=“@publishedDate“>
The 'book' element must have a 'publishedDate' attribute.</assert>
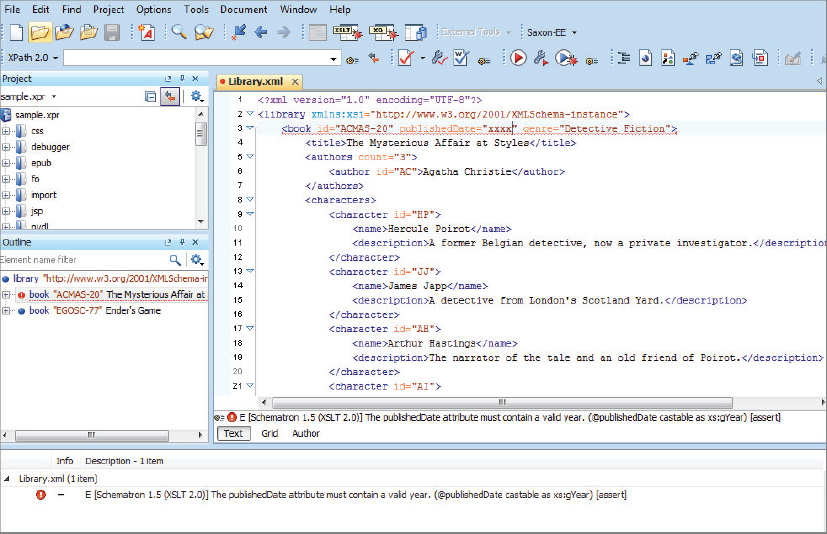
<assert test=”@publishedDate castable as xs:gYear”>
The publishedDate attribute must contain a valid year.</assert>
<!-- rest of schema -->
</schema>
Now you can test your new schema. If you replace the date of the first book in your example file, 1920, with an illegal entry, such as xxxx, you’ll get an error message such as that shown in Figure 6-2.
You’ve now covered the basics of Schematron and seen how it copes with some of the traditional validation requirements, such as mandatory content and checking whether data is of the correct type. However these things can be done equally well with XML Schemas. One of the reasons for Schematron being popular is that is can also cope with scenarios that can’t be handled using constructs found in existing technologies. One of these situations is known as co-constraints, a common requirement that neither DTDs nor XML Schemas can handle but which is easy using Schematron.
Handling Co-Constraints in Schematron
A co-constraint refers to the situation where you want to say if this then that. This is impossible to with DTDs and is achievable in W3C XML Schema only if you are using version 1.1, which adds the <assert> element to provide this capability. Unfortunately, few products implement XML Schema 1.1 yet.
As an example, notice that the <authors> element in Library-1.xml document has a count attribute, the value of which is equal to the number of <author> elements contained within it. If you want to check that this is indeed the case you need to create a new rule to deal with it.
    <pattern name=”authors”>
      <rule context=”authors”>
        <!-- asserts to go here -->
      </rule>
</pattern> <pattern name=”authors”>
<rule context=”authors”>
<assert test=”@count = count(author)”>
The count attribute must equal the number of author elements.</assert>
</rule>
</pattern>![]() LISTING 6-12: Library-6.sch
LISTING 6-12: Library-6.sch
<schema xmlns=”http://www.ascc.net/xml/schematron”>
<ns uri=”http://www.w3.org/2001/XMLSchema” prefix=”xs”/>
<pattern name=”book attributes”>
<rule context=”book”>
<assert
diagnostics=”id-attribute-en id-attribute-fr” test=”@id”>
The 'book' element must have an 'id' attribute.</assert>
<assert
test=”@publishedDate”>
The 'book' element must have a 'publishedDate' attribute.</assert>
<assert
test=”@publishedDate castable as xs:gYear”>
The publishedDate attribute must contain a valid year.</assert>
<assert test=”@genre”>
The 'book' element must have a 'genre' attribute.</assert>
</rule>
</pattern>
    <pattern name=”authors”>
      <rule context=”authors”>
        <assert test=”@count = count(author)”>
    The count attribute must equal the number of author elements.</assert>
      </rule>
    </pattern>
<diagnostics>
<diagnostic id=”id-attribute-en”>
The 'id' was missing on book/title: <value-of select=”title”/>
</diagnostic>
<diagnostic id=”id-attribute-fr”>
book/title: <value-of select=”title”/> manque de l'attribut 'id'.</diagnostic>
</diagnostics>
</schema>You’ve looked at the basics of Schematron and it definitely has its advantages over XML Schema. However, it’s inconvenient to have to write every rule by hand, and specifying the basic structure of the target document is tiresome. A better way to go about this is to have some basic validation performed using XML Schema and then use Schematron to add rules that are difficult or impossible to express otherwise. You can then also take advantage of Schematron’s friendlier error messages. This is a supported scenario and achieved by embedding Schematron rules within a W3C XML Schema.
Using Schematron from Within XML Schema
The code download for this chapter contains a simple W3C XML Schema, Library.xsd, which can be used to validate your example file. You’ll now go through the process of adding a Schematron rule to test the co-constraint that you used previously — that the count attribute on the <authors> element does in fact equal the number of <author> elements.
<xs:schema xmlns:xs=”http://www.w3.org/2001/XMLSchema”
xmlns:sch=“http://www.ascc.net/xml/schematron“ elementFormDefault=”qualified”><sch:pattern id=”authors”>
<sch:rule context=”authors”>
<sch:assert
test=”@count = count(author)”>
The count attribute must equal the number of author elements.
</sch:assert>
</sch:rule>
</sch:pattern>
<xs:annotation>
  <xs:appinfo>
    <!-- Schematron patterns go here -->
  </xs:appinfo>
</xs:annotation><xs:element name=”authors”>
<xs:annotation>
<xs:appinfo>
<sch:pattern id=”authors”>
<sch:rule context=”authors”>
<sch:assert
test=”@count = count(author)”>
The count attribute must equal the number of author elements.</sch:assert>
</sch:rule>
</sch:pattern>
</xs:appinfo>
</xs:annotation>
<xs:complexType>
<!-- rest of authors element definition -->
</xs:element><library xmlns:xsi=”http://www.w3.org/2001/XMLSchema-instance” xsi:noNamespaceSchemaLocation=”LibraryWithSchematronRules.xsd”>
<?oxygen SCHSchema=”LibraryWithSchematronRules.xsd”?>
![]() LISTING 6-13: LibraryWithSchematronRules.xsd
LISTING 6-13: LibraryWithSchematronRules.xsd
<?xml version=”1.0” encoding=”UTF-8”?>
<xs:schema xmlns:xs=”http://www.w3.org/2001/XMLSchema”
           xmlns:sch=”http://www.ascc.net/xml/schematron”
           elementFormDefault=“qualified“>
  <xs:element name=“library“>
    <xs:complexType>
      <xs:sequence>
        <xs:element maxOccurs=“unbounded“ ref=“book“/>
      </xs:sequence>
    </xs:complexType>
  </xs:element>
  <xs:element name=“book“>
    <xs:complexType>
      <xs:sequence>
        <xs:element ref=“title“/>
        <xs:element ref=“authors“/>
        <xs:element ref=“characters“/>
        <xs:element ref=“description“/>
      </xs:sequence>
      <xs:attribute name=“genre“ use=“required“/>
      <xs:attribute name=“id“ use=“required“ type=“xs:token“/>
      <xs:attribute name=“publishedDate“ use=“required“ type=“xs:gYear“/>
    </xs:complexType>
  </xs:element>
  <xs:element name=“title“ type=“xs:string“/>
  <xs:element name=“authors“>
    <xs:annotation>
      <xs:appinfo>
        <sch:pattern id=“authors“>
          <sch:rule context=“authors“>
            <sch:assert test=“@count = count(author)“>
The count attribute must equal the number of author elements.</sch:assert>
          </sch:rule>
        </sch:pattern>
      </xs:appinfo>
    </xs:annotation>
    <xs:complexType>
      <xs:sequence>
        <xs:element ref=“author“/>
      </xs:sequence>
      <xs:attribute name=“count“ use=“required“ type=“xs:integer“/>
    </xs:complexType>
  </xs:element>
  <xs:element name=“author“>
    <xs:complexType mixed=“true“>
      <xs:attribute name=“id“ use=“required“ type=“xs:token“/>
    </xs:complexType>
  </xs:element>
  <xs:element name=“characters“>
    <xs:complexType>
      <xs:sequence>
        <xs:element maxOccurs=“unbounded“ ref=“character“/>
      </xs:sequence>
    </xs:complexType>
  </xs:element>
  <xs:element name=“character“>
    <xs:complexType>
      <xs:sequence>
        <xs:element ref=“name“/>
        <xs:element ref=“description“/>
      </xs:sequence>
      <xs:attribute name=“id“ use=“required“ type=“xs:token“/>
    </xs:complexType>
  </xs:element>
  <xs:element name=“name“ type=“xs:string“/>
  <xs:element name=“description“ type=“xs:string“/>
</xs:schema>
Some of the features you haven’t covered are phases, where you split the validation into separate sections and only validate specific phases at any one time. This is useful where the full validation takes a long time and you only want to check a specific part of the document. There are also abstract patterns and rules, where you can define commonly occurring functionality that can then be inherited by concrete ones later, similar to abstract classes in traditional computer languages. If you’re interested you can find a list of online resources at www.schematron.com.
SUMMARY
- There is a need for other schema languages; no one language can express all possible rules.
- The reasons behind RELAX NG include simplicity and the ability to use data types from other languages.
- RELAX NG has two possible formats: an XML version where the files have a .rng extension and the compact syntax where the files have a .rnc suffix.
- Conversion between the two different schema formats or between other formats, such as XML Schema and RELAX NG, is possible and there are many tools that can do this.
- Schematron’s idea of using XPath for validation rules enables complicated rules that are not possible in other languages.
- Schematron deals with co-constraints by comparing values from more than one item using XPath.
- XML Schema can combine with Schematron to get the best of both technologies.
In the next chapter, you see some of the different ways that you can extract data from XML documents.
EXERCISES
Answers to the exercises can be found in Appendix A.
WHAT YOU LEARNED IN THIS CHAPTER
| TOPIC | KEY POINTS |
| The reasons for more validation languages | Each language has its own strong and weak points. None can manage to express every possible validation rule. |
| The main principles of RELAX NG | Simplicity. Two formats, XML and plain text. Can use data types from elsewhere. Does not add extra data. |
| The main principles of Schematron | Designed to be used in conjunction with other validation languages (mainly XML Schemas). Uses XPath to specify rules. Can define co-constraints (a constraint on data based on another item’s data). |
| Combining Schematron with XML Schema | Standard practice is to use a basic XML Schema to describe the format of an XML document and then add Schematron rules where the ability to reference more than one information item is needed. |