
Chapter 16
AJAX
WHAT YOU WILL LEARN IN THIS CHAPTER:
- What AJAX is used for
- How to use AJAX
- When to use JSON, HTML, or XML with AJAX
- How to generate JSON on the web server
- Web architecture, REST, and best practices
AJAX stands for Asynchronous JavaScript And XML, but the term refers to a way of writing web-based applications that are responsive and give a fast, positive user experience by leveraging the fact that the web server can be working at the same time as the client computer running the web browser. The trick that AJAX enables is to update parts of the current web page without having to reload the entire page. The extra interactivity this allows, combined with big shiny buttons and a particularly fashionable sort of color scheme, is known as Web 2.0. The biggest challenge, as you’ll learn, is to create web applications that are accessible to people regardless of their needs and abilities, and that fit in with the web architecture of links and bookmarks. In this chapter you’ll learn how AJAX works (including the JavaScript part) and you’ll make a working AJAX-based web page so you can see how AJAX and XML fit together.
AJAX OVERVIEW
The AJAX pattern has several uses. This section first describes the situations in which you use AJAX, and then goes into detail about what it really is and how it works. The short description is that AJAX is a way for a web page to use the JavaScript language to fetch data quietly in the background without any need for the web page to reload in the browser. The “X” in AJAX stands for XML, although as you learn in this chapter, AJAX is more commonly used with other data formats.
AJAX Provides Feedback
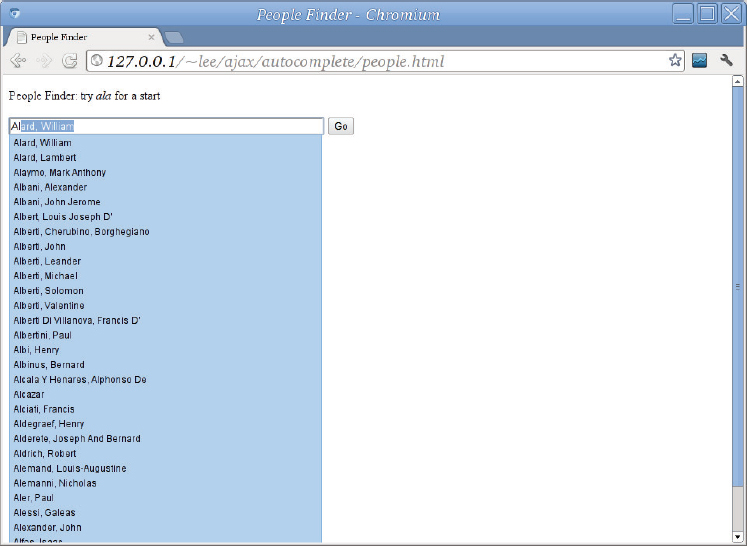
Consider a search page on a website, such as that shown in Figure 16-1. You enter a person’s name, click Submit, and a second or two later you get a message saying that the person wasn’t found, or, in a more favorable circumstance, you get a page giving information about the person.

A Web 2.0 version of the same screen might look more like Figure 16-2. It’s got more style, but that’s not really the interesting part for this chapter. Instead, notice that now when you start typing a name, you get instant feedback of possible search terms. And when you click Submit, the resulting list of matches appears right under the Search box, without any flicker.
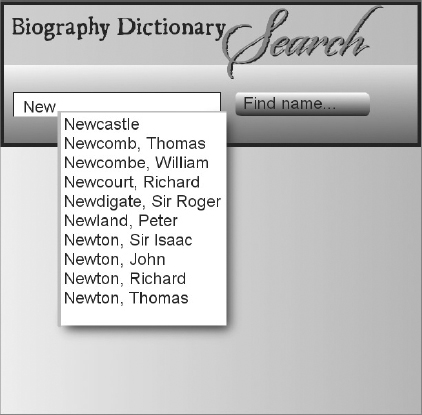
Loading Incomplete Data With AJAX
The complete XML file for the biographical dictionary from Chapter 9, “XQuery” is more than 50 megabytes in size. It’s too large to load into a web browser and still have good network performance. If you want to be able to search the text of the dictionary, the traditional approach is the one shown in Figure 16-1: you have a search engine on the server and you click Search and wait for the results.
With AJAX, you can start typing your search, and even before you click Search, you can start to see results. This is possible only because the JavaScript code has updated the contents of the web page with the search box without disrupting the search box.
One difference between this pattern and the feedback pattern is that the search can indeed fall back to a remote server and still work, but feedback is not possible after you click a Submit button: the enter web page goes away and is replaced with the results. Another difference is data set size. The list of possible search terms in the feedback example could have been loaded along with the page (although it’s large enough in this example that it also falls into the incomplete data pattern). Very often such completion lists are indeed loaded as part of the web page. But you couldn’t load the entire 32-volume dictionary for a full text search.
AJAX Performs Asynchronous Operations
A web page might display a news feed, or recently added photographs on a popular site, and might update the display in real time without disrupting the reader by refreshing the page. The JavaScript updating the page again runs in the background using AJAX as opposed to relying on the user to refresh the page, or using the older style HTTP refresh which reloads the entire page every few seconds, annoyingly losing the user’s scroll position along with any data entered into text boxes.
The obvious thing the AJAX use cases all have in common is that the Web page is fetching stuff quietly in the background, without stopping to wait for it. That’s the meaning of the “A” in AJAX: asynchronous. As opposed to synchronous, asynchronous in computing means something that happens without the main programming stopping to wait for it. The “J” means JavaScript, the programming language for web applications. The next section introduces a little JavaScript, and then looks at a real code example.
INTRODUCTION TO JAVASCRIPT
In this section, you learn only enough JavaScript to make it through the examples and decide if you want to learn more. This is, after all, an XML book and not a JavaScript book. A good thin book on JavaScript is Douglas Crockford’s JavaScript: The Good Parts.
JavaScript is a programming language used primarily in conjunction with web browsers. There is also at least one web server (node.js) that uses JavaScript as its main extension language, and the open source GNOME desktop uses JavaScript extensively; but for the purpose of this chapter you just need to know enough JavaScript to make sense of the AJAX examples, and perhaps to write some code yourself.
JavaScript should not be confused with Java: both languages were heavily influenced by the C programming language, but only in syntax.
The Web Browser Console
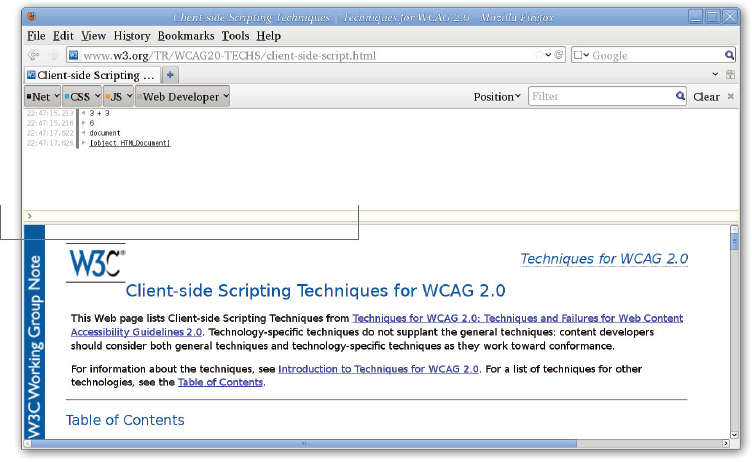
Before you try to learn any JavaScript, you should find a web browser with a console that lets you type simple expressions and shows their values. In Firefox, you can press Ctrl+Shift+K at the same time to bring up a console (see Figure 16-3), or you can use the Tools ![]() Web Developer
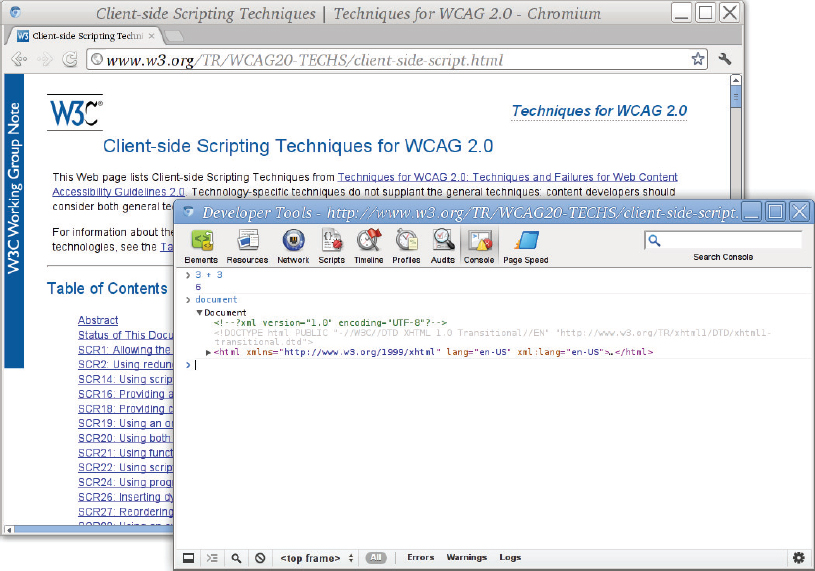
Web Developer ![]() Web Console menu item. In the Chrome (see Figure 16-4) browser, Midori, Epiphany, Safari, and other Webkit browsers, there’s a picture of a spanner or wrench to the right of the location bar, and if you click that, you can choose JavaScript Console from the Tools submenu. Alternatively, you can right-click in the document window and choose Inspect Element.
Web Console menu item. In the Chrome (see Figure 16-4) browser, Midori, Epiphany, Safari, and other Webkit browsers, there’s a picture of a spanner or wrench to the right of the location bar, and if you click that, you can choose JavaScript Console from the Tools submenu. Alternatively, you can right-click in the document window and choose Inspect Element.
There is also a JavaScript console in Internet Explorer, but the exact method to get to it may depend greatly on the version of Internet Explorer you are using; in IE 7 you have to go to Internet Options and uncheck the Browsing option Disable Script Debugging; after that, if your web page contains an error, Internet Explorer may ask you if you want to run the Microsoft Script Debugger. You could add a line like this to get an error:
var j = 1/0;
Inside the Microsoft Script Debugger, if you click Break, you can choose Window from the Debug menu, and enable the Immediate Window, which is Microsoft’s name for the JavaScript Console.
All of these instructions to get to the JavaScript console change fairly often as the web browsers are updated, but the principle is always that, in the end, you get a window that lets you type JavaScript expressions and see the results, and, more importantly, displays error messages, syntax errors, and warnings. Without this, you are programming blind, and a faintly unpleasant but ultimately highly rewarding experience becomes a nightmare.
Figure 16-3 shows a JavaScript console in the Mozilla Firefox web browser, where it is connected to a web page, and Figure 16-4 shows the Google Chrome version, where it is a separate window. Both consoles have some example expressions: 3 + 3, which turned out to equal 6 in both browsers, and document, which gave a slightly different representation of the HTML document in the corresponding document window in each browser.
Values, Expressions, and Variables
It’s time to dive in to JavaScript, if not at the deep end, at least in the paddling pool, so take off your shoes and socks and get started. In JavaScript, the result of evaluating an expression is a value, and (as in many other languages) you can store values in variables. Since almost everything in JavaScript boils down to values and expressions, that’s where you’ll start.
Simple Values
The simplest values are numbers, like 3, 0.5, and scientific, or exponential notation, 2.3e4, meaning 2.3 × 10⁴, or 23000.
Next come strings, like “Henry’s argyle socks” or 'don’t look back’. You can use the usual C-like escapes in strings: for newline, for tab, ” and ' for quotes, \ for itself, and, as an addition, uDDDD, where DDDD is exactly four hexadecimal digits, and represents the corresponding 16-bit Unicode codepoint. JavaScript can’t handle Unicode characters above 65535 easily; it uses a mechanism called surrogate pairs for others.
JavaScript also has booleans, which can be true or false; these are even simpler than numbers, but the rules to decide equality are confusing. Take the following example:
“1” == true
This is true, because true is first converted to a number, and the string is converted to a number. However, the object identity test, ===, does not perform conversions. Therefore, the following example is false:
“1” === true
Always use === to test whether two values are the same, and !== to test if two values are not the same.
Expressions
An expression is a combination of values and operators; anywhere you can put a value, you can put an expression that computes a value. You can use simple arithmetical expressions, like 2 + 2, and of course more complex ones with various operators. The most important operators are listed in Table 16-1.
TABLE 16.1: The Most Important JavaScript Operators
| OPERATOR | MEANING | EXAMPLE |
| . | property access | document.all |
| [] | array subscript | lines[3] |
| ( ) | grouping | 3 * (2 + 6) |
| ++, -- | increment, decrement | ++i |
| ! | logical not | !false is true |
| *, /, % | multiply, divide, modulo (remainder) | |
| +, - | normal addition and subtraction; + also joins strings | var str = “hello” + “ “ + “world” |
| <, < | less than, less than or equal to | |
| >, > | greater than, greater than or equal to | |
| === | equality, identity (three = signs in a row) | if (a === b) {...} |
| !== | not identical to (! and two = signs) | if (a !== b) {...} |
| && | logical and | if (a && (b > 6)) { … } |
| || | logical or | if (a == 0 || a > 42) { … } |
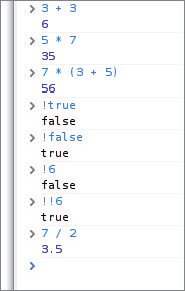
Now that you have seen values and operators, you can put them together in expressions like the following:
3 + 3
5 * 7
7 * (3 + 5)
Figure 16-5 shows the result of evaluating these expressions in the JavaScript console. You can put multiple expressions on a line if you separate them with a semicolon.
Variables
A variable is a named value; you can modify variables in JavaScript, unlike in XQuery or XSLT. Declare variables before you use them: the value can be any expression. Here are some examples of variables:
var pi = 3; // some people say it should be 4
var c = pi * r; // problem, r undeclared
var j = ++pi; // now pi is indeed 4, and j is also 4
Control Flow Statements
Normally the computer executes the statements in your program from beginning to end, one at a time, in order. You can use control flow statements to change this — to make the computer execute some statements repeatedly in a loop, or to make it skip some statements, or to make it choose to execute one group or statements or another.
JavaScript has quite a few control flow statements. For the examples in this chapter, and for using jQuery, it’s enough to know if, while, and for. The following example shows a JavaScript if expression that will make the computer interpret either one set of statements (called a block) or another set depending on the value of an expression:
if (expression) {
block used when the expression is true;
} else {
block used when the expression is false;
}
The while loop tests its condition and, if it is true, executes the block just like an if, but then, after running through once, starts over, testing the condition again. The code in the block had better affect the condition, like so:
var sunshine = 6;
while (sunshine--) {
  make_hay();
  make_hay();
  rest();
}
The for statement is actually just the same as a while loop with a couple of extra parts. For example:
for (firstpart; test; secondpart) {
   block;
}
is the same as:
firstpart;
while (test) {
  block;
  secondpart;
}
You often see for used to loop over an array or a fixed number of values like so:
for (var i = 0; i < array.length; i++) {
   process(array[i];
}
A variant of for iterates over all items in an array, or all properties of an object as shown here:
for (person in peopleList) {
   process(person)
}
A number of other control structures exist, including try/catch/throw and switch. Additionally, the break statement jumps out of the nearest enclosing loop, and there is a return statement that is discussed in the “Functions” section in a moment.
Properties, Objects, Functions and Classes
JavaScript is a very dynamic language, and has a much stronger relationship between objects, object properties, functions, and classes than most other languages. The following sections explain this in a little more detail.
Objects and Properties
An object in JavaScript is a set of name/value pairs called properties:
var socks = {
  “size” : 44,
  “pattern” : “argyle”,
  “are clean” : true,
};
You get at the properties with the dot operator. In this example, socks.pattern has the value argyle. You can’t use the dot operator to find out if your sock is clean, though, because of the space in the name, so you have to use socks[“are clean”] instead. The two notations are equivalent when the property names are simple words.
The values can actually be objects, or arrays, as well as simple expressions.
Functions
Another kind of object is a function. Functions are declared like this:
var triangle = function(width, height) {
   return width * height / 2;
}
This example makes a new function that is shorthand for calculating an expression, similar to the named templates and functions you saw in Chapter 8, “XSLT,” and Chapter 9, “XQuery.” This particular function works out the area of a right-angled triangle given the lengths of the two shorter sides.
Now you can use your new function to find the area of a particular triangle:
var area = triangle(12, 7);
When an object has a function as the value of one of its properties, the property is said to be a method:
socks.wash = function() {
   this[“are clean”] = 1;
}
The variable called this is the object, socks in this case. And now you can wash your socks:
socks.wash();
Calling the wash() method on an object — here, socks.wash() — will set its “are clean” member to true.
Classes
A class is a way to represent common properties and methods of a whole family of objects. For example, all String objects share a length() method. Defining your own classes is much more JavaScript that you need to know for this book, but you should know that, behind the scenes, there is a class mechanism in JavaScript, because documentation for libraries such as jQuery may mention it.
THE XMLHTTPREQUEST FUNCTION
The central part of AJAX is a single JavaScript function called XMLHttpRequest. It was originally introduced by Microsoft in Internet Explorer, was copied by other web browsers, and was later adopted by W3C.
The idea of XMLHttpRequest is that, when you build your web page, you arrange for this function to be called with a URL and a JavaScript function. The web browser will automatically call that JavaScript function when the resource at the requested URL has been downloaded by the Browser.
The call might look like this:
var client = new XMLHttpRequest();
client.onreadystatechange = handler;
client.open(“GET”, theURL);
client.send();
In this example, you create a new JavaScript object of class XHTMLHttpRequest and save a reference to it in the variable client so you can use it later. Then you set its onreadystatechange property to the name of a function you will define, handler in this example. You then tell the object that you are going to use the HTTP GET method to fetch the resource located at theURL. Finally, after setting everything up, client.send() sends the actual HTTP request off into space.
At some time later, the HTTP GET request will connect, and, if all goes well, will result in a document being loaded into memory. Once that has happened, your handler function will automatically be called. The function will also be called if there was an error when trying to fetch the document.
The handler looks like this:
function handler() {
  if (this.readyState == this.DONE) {
   if (this.status == 200 && this.responseXML != null) {
    for (var i = 0; i < this.responseXML.childNodes.length; i++) {
     document.getElementById(“replaceme”).appendChild(
      this.responseXML.childNodes[i]
     );
    }
   } else {
    alert(“something went wrong”);
   }
  }
}
The first thing your handler function does is to see if the HTTP transaction is finished. The DONE constant is defined by the browser just to make the code more readable; older web browsers need a number there, and DONE was always equal to four, so in older code you will see a test to see if readyState === 4. The handler will be called whenever the readyState property changes; it can be any of the values shown in Table 16-2.
TABLE 16.2: readyState Values, Constants, and Meanings
| VALUES | CONSTANTS | MEANINGS |
| 0 | UNSENT | The object has been constructed (this one is not normally very useful). |
| 1 | OPENED | This happens after you’ve called open() on the object and before you have called send(), so that you can set HTTP headers. |
| 2 | HEADERS_RECEIVED | The HTTP response has started to arrive: all redirects have been followed, the browser is connected to the HTTP server at the final address, and the server has sent the HTTP headers to you. |
| 3 | LOADING | The data is coming in! |
| 4 | DONE | The data has all arrived, or there was a problem. You can check the object’s error flag to see if there was an error. |
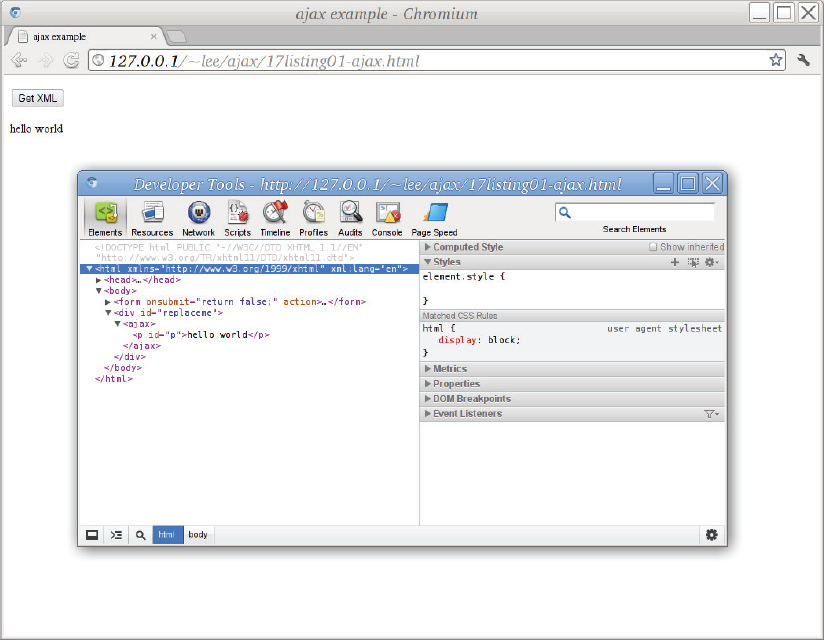
Now that you have seen just enough JavaScript and have read about XMLHttpRequest, you should try it out for yourself and see how easy it is. In the upcoming activity you’ll make an HTML page to contain the AJAX example, and you should start to see how all the parts fit together.
<!DOCTYPE html
  PUBLIC “-//W3C//DTD XHTML 1.1//EN”
   “http://www.w3.org/TR/xhtml11/DTD/xhtml11.dtd”>
<html xmlns=”http://www.w3.org/1999/xhtml” xml:lang=”en”>
 <head>
  <title>ajax example</title>
  <meta http-equiv=”Content-Type” content=”text/html; charset=utf-8” />
  <script type=”text/javascript”><!--
   function handler() {
    if (this.readyState == this.DONE) {
     if (this.status == 200 && this.responseXML != null) {
      for (var i = 0; i < this.responseXML.childNodes.length; i++) {
       document.getElementById(“replaceme”).appendChild(
        this.responseXML.childNodes[i]
         );
      }
       } else {
        alert(“something went wrong”);
    }
   }
  }
  function getXML() {
   var client = new XMLHttpRequest();
   client.onreadystatechange = handler;
   client.open(“GET”, “hello.xml”);
   client.send();
   alert(“getXML done.”);
  }
  //-->
  </script>
 </head>
 <body>
  <form onsubmit=”return false;” action=””>
   <p><input type=”button” onclick=”getXML();” value=”Get XML”/></p>
  </form>
   <div id=”replaceme”></div>
  </body>
</html><ajax> <p id=”p”>hello world</p> </ajax>
USING HTTP METHODS WITH AJAX
The asynchronous part of the AJAX design pattern is the idea that the JavaScript code in your web page uses HTTP to ask your web server for some data and, sometime later, receives a response. AJAX-based applications can use any of the methods defined by the HTTP specification. You may have noticed the HTTP GET method used for the previous Try It Out exercise. It’s also possible to use HTTP POST or HEAD methods. Other HTTP methods exist, but they are not so widely supported. How do you know when to use which method?
For the Try it Out example, no changes on the server were made. The client (the web browser) is affected, but not the server. No files are written, no database fields are updated, and no purchases are made. Therefore, the appropriate HTTP method to use in that case is GET.
For the other methods, the short answer is this: use POST when you are changing state on the remote server, use GET when you are fetching something without changing anything. Use other methods only if you know exactly what you are doing.
One of the results of loading a web page with POST is that when you refresh, the web browser may warn you that, for example, if you just bought a yacht, refreshing the page might buy a second yacht. When you use HTTP POST with XMLHttpRequest there’s no way for the browser to warn the user, so you need to be careful when you write AJAX-based applications.
When you write the back-end part of an AJAX implementation, then, make sure your program does not require the use of POST if there is no state change. For example, logging in to a site is a state change, because you get back something different from pages before and after you log in, and the set of actions available to the user will probably change.
On the other hand, fetching a railway timetable would not change the railway company’s server, and you’d expect to use HTTP GET for that; similarly, the first steps in reserving a train ticket can probably be repeated without problems and would use HTTP GET, even if moments later you used HTTP POST to buy a ticket.
Note also that users can only bookmark GET pages, not POST ones. It wouldn’t make sense to bookmark the page to pay for a train ticket on a particular date, because you can generally do it only once. A well-designed application would include a transaction number to make sure that, if you did somehow reload the page, you didn’t buy an extra set of tickets by mistake.
This begs the question, for an AJAX application, how do you represent state when parts of the page have been loaded separately? In older-style Web 1.0 applications, the URL changes whenever the user does anything, so it’s easy to bookmark a state or to know where you are. With AJAX, any part of the page can change at any time!
One convention that is gaining traction is to change the displayed URL of the current web page when state changes. However, you can’t actually change the URL itself from JavaScript, for obvious security reasons, but only the fragment identifier, the part starting with a #, for example, in http://www.example.org/telephones.html#rotary. It’s important not to overdo this: when it makes sense, don’t be afraid to move the user to a new web page.
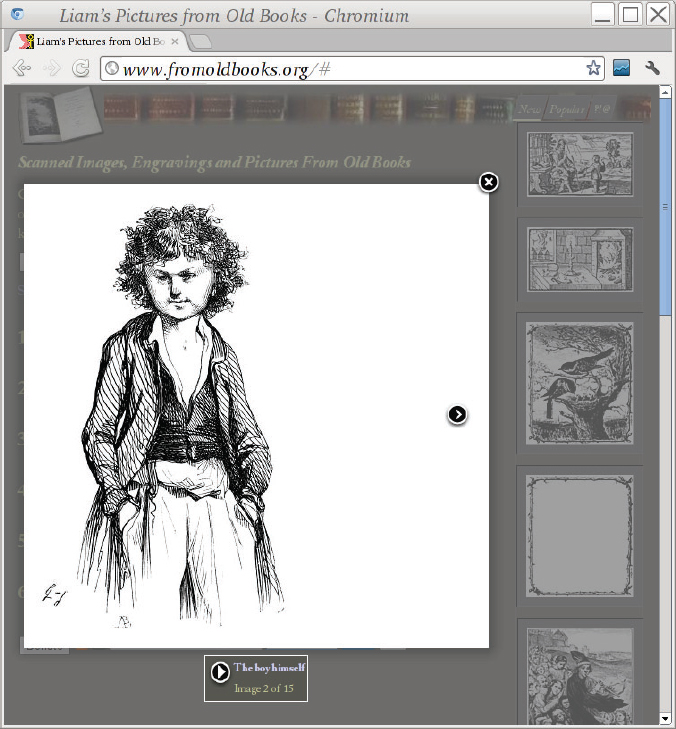
For example, one of the authors of this book (Liam Quin) uses this # technique on his own website. The URL http://www.fromoldbooks.org/Tymms-Illuminating/pages/43-letterR/ is a picture of a pretty medieval letter “R” in red; controls on the page let the user change the colors in the picture, and this is encoded in the URL like this: http://www.fromoldbooks.org/Tymms-Illuminating/pages/43-letterR/#fg=%235f00bf_bg=%23ffff56.
Here the fg and bg codes after the # encode the colors — this example is a purple “R” on a yellow background. This way people can share the link, bookmark it, and even experiment with editing the hexadecimal color codes. It’s not perfect, however. If you change the color codes in the location bar of the web browser, the colors are not updated. Note also that the fragment identifier (the part after the first #) is not sent by the web browser to the web server, so the interaction must all be written using JavaScript.
The JavaScript to manage this has three parts:
The code on that page actually avoids using XMLHttpRequest; instead, the JavaScript changes the URL in the HTML <img> element that shows the image. XMLHttpRequest is, however, used elsewhere on the same page for the list of similar images. In that case, HTTP GET is used with XMLHTTPRequest to fetch a list of images.
A rule of thumb is that if you are writing data back to the server, or changing state, you will use HTTP PUT, and if fetching the same page over HTTP multiple times will give the same result, use HTTP GET.
ACCESSIBILITY CONSIDERATIONS
It is easy to use JavaScript to make web pages that sing, dance, and move about. But you can also easily make web pages that are inaccessible by large numbers of people, or that are needlessly unpleasant or difficult to use.
It’s sometimes tempting to ignore the needs of other people and to say your web page doesn’t have to be accessible. However, there’s generally no upper limit to civil liability for accessibility issues, and in increasing numbers of areas there’s legislation requiring that pages be accessible. Even where there is no specific legislation about accessibility, there may be laws against discriminating against minorities.
If these reasons are not compelling enough (and they should be), remember that “Google is Blind” — the search engines tend to rank accessible pages more highly, leading to large increases in traffic — and also that a web page that is pleasant to use leaves a much more positive impression than one that is difficult.
Following is a list of pointers that address common accessibility issues:
- When you are manipulating the contents of the page, use createElement() with appendChild(), removeChild(), insertBefore(), and replaceChild(), and avoid innerHTML, innerText, and document.write().
- Avoid using small text sizes, particularly in user interface controls.
- Remember that a significant proportion of the population may see colors differently than you do (color blindness).
- Inserting or removing controls dynamically can affect the tab order of the page; do not use the tabindex property on new controls, and remember that some people are using keyboards to interact with your page, not mice or fingers.
- Do not make things blink or flash.
- Do not put a time limit on completing an interaction. It’s very frustrating if you are using a keyboard in which you have to wait for the right letter to be highlighted and then press a pedal, for example, if you are only given five or ten minutes to complete a transaction! Because users can wander off from the computer at any time, there is no amount of time that will provide complete security against a person leaving and another person wandering in and making financial transactions. Instead of “your session timed out,” ask the user to re-enter a password and then continue the session without loss of data.
- Some users will have JavaScript disabled. You may want to provide an alternative web page in that case, but at the very least test for it. For example, if you rely on JavaScript to show information that starts out hidden, some users will never see it.
- Try to keep it obvious when something is happening, and what you expect from the user. A common convention is to use text with a yellow background saying “loading” when your JavaScript code sends off an AJAX request to fetch something that will be displayed to the user.
You learn more about accessibility in Chapter 17.
THE JQUERY LIBRARY
Although it’s possible to use JavaScript directly, most modern web pages use a framework or library together with JavaScript. There are three main reasons for this:
- The libraries can hide differences between browsers, making programming more reliable, less error-prone, and more portable.
- The libraries are high level, with one line of jQuery (for example) often replacing dozens of lines of JavaScript manipulating the DOM directly.
- The libraries are popular, so lots of widgets and plug-ins are written for them, further speeding up development.
In this section you learn a little about jQuery, one of the more popular JavaScript libraries and (not by coincidence) one of the easiest to learn and use. You can get more information at http://www.jquery.com/, where you can also find hundreds of plug-ins, most freely available.
Learning jQuery
The jQuery JavaScript library introduces some top-level (global) objects and functions, and also introduces a new way of using JavaScript.
If you are not familiar with cascading style sheets (CSS) or HTML, see Chapter 17, “XHTML and HTML 5.”
If you are not familiar with the idea of the document object model (DOM), you should review Chapter 7, “Extracting Data from XML,” which contains a brief introduction; because jQuery shields you from using the DOM API, in most cases you only need the basic ideas to start.
The Domain-Specific Language (DSL) Approach
As you might have guessed, jQuery uses CSS selectors to locate and process nodes in the web browser’s HTML DOM tree. The following jQuery JavaScript code turns all <span> elements in the document that have a class attribute of born a bright yellow color:
$(“span.born”).css(“background-color”, “yellow”);
Notice how the oddly named $() function in jQuery actually returns an object with a css method; that css method is in turn a jQuery function that returns another jQuery object, which of course also has a css method, so you can chain the calls like so:
$(“span.born”).css(“background-color”, “yellow”).css(“color”, “blue”);
This approach lets the programmer think more in terms of the actual problem she’s trying to solve and less in terms of the mechanics of how to solve it. It’s higher level. This style, with function names that correspond to the problem domain and with chained calls, is sometimes called a domain-specific language.
You can use pretty much any CSS selectors with jQuery, and you don’t have to worry about whether the particular selector works in any given web browser: jQuery emulates them where they are not available natively.
There is, of course, a lot more to jQuery than this, but you have probably now seen enough to know whether you want to know more, and to make some sense of the example that follows in the next Try It Out exercise.
jQuery Plug-ins and Add-On Libraries
Much of the power and popularity of jQuery comes from its clean and simple design, but there is also a huge array of add-ons. These come in two forms: plug-ins and libraries.
jQuery Plug-ins
Plug-ins usually provide a single feature. A widely used example is FancyBox, which produces a border around an HTML element to make it behave almost like a pop-up dialog box. An example of this is shown in Figure 16-7: the white pop-up box has a cross in a circle at its upper right to close it, and triangular arrows to move forward to the next image.
You can find literally hundreds of plug-ins, each with documentation and demos and examples; most are in the master index on www.jquery.com, which has both categories and a rudimentary search function. There is even an XPath plug-in, although it implements only a subset of XPath 1, unfortunately.
You’ll see how to use a sample plug-in shortly.
Add-on Libraries
Add-on libraries typically extend jQuery in multiple ways, rather than just providing a single feature, as a plug-in might. The most common add-on library is called jQueryUI and adds a lot of user-interface features such as notebook tabs and widgets; because those aren’t needed for learning AJAX, this chapter won’t cover jQueryUI, but if you start using jQuery yourself, you will want to read about it on the Web.
JQuery and AJAX
The jQuery library includes support for a lot of things that are often done on web pages, and it should be no surprise that it has direct support for AJAX using XMLHttpRequest. In the following activity you’ll learn how to use jQuery to make a web page that is updated asynchronously (in the background) without being reloaded.
<!DOCTYPE html
  PUBLIC “-//W3C//DTD XHTML 1.1//EN”
     “http://www.w3.org/TR/xhtml11/DTD/xhtml11.dtd”>
<html xmlns=”http://www.w3.org/1999/xhtml” xml:lang=”en”>
  <head>
   <title>jQuery ajax example</title>
   <meta http-equiv=”Content-Type” content=”text/html; charset=utf-8” />
   <script type=”text/javascript”
    src=”https://ajax.googleapis.com/ajax/libs/jquery/1.7.1/jquery.min.js”></script>
 </head>
 <body>
   <form onsubmit=”return false;” action=””>
     <p><input type=”button” onclick=”getXML();” value=”Get XML”/></p>
   </form>
   <div id=”replaceme”></div>
   <script type=”text/javascript”>
    function handler(theData, theStatus, jqXHR) {
     $(“div”).append(theData.firstChild);
    }
    function getXML() {
     $.ajax({
      type: “GET”,
      url: “hello.xml”,
      dataType: “xml”,
      success: handler
     });
    }
   </script>
  </body>
</html><ajax> <p id=”p”>hello world</p> </ajax>
<p><input type=”button” onclick=”getXML();” value=”Get XML”/></p>
<script type=”text/javascript”
  src=”https://ajax.googleapis.com/ajax/libs/jquery/1.7.1/jquery.min.js”></script>
JSON AND AJAX
Although the “X” in AJAX stands for XML (itself, in turn, not an exact acronym, of course!), people these days are more likely to use other formats with XMLHttpRequest. The main reason for this is that the XML DOM is too unpleasant to use, and now that you’ve seen some jQuery you can see why people think that way. Of course, XQuery is just as easy as using jQuery, but it’s not supported in today’s browsers.
The most common format for interchange of JavaScript objects between a web browser and a server was designed by Douglas Crockford, and is called JSON. In fact, a JSON stream is itself a JavaScript expression that, when evaluated, constructs the objects it represents.
JSON Example
The JSON format is defined by IETF RFC 4627, available at http://www.ietf.org/rfc/rfc4627.
A JSON text represents either a single JavaScript object or a single array. This object or array can, in turn, contain other arrays and objects. Arrays (with square brackets) contain simple values, and objects (with curly braces) contain member-lists. Here is a simple example:
{
   “students” : [
    {
     “name” : “Caitlin”,
     “id” : 6
    },
    {
     “name” : “David”,
     “eyes” : “blue”,
     “age” : 26
    },
    {
     “id” : 12,
     “name” : “Leslie”,
     “car” : {
      “make” : “Jeep”,
      “color” : “green”
     }
    }
   ]
}
If you use this example in a JavaScript console, perhaps with:
var a = { “students” : [ ... } ;
a.students[2]name;
you will get “Leslie” printed back at you. That is the beauty of JSON: not only is it simple, but you can use it immediately. You can find JSON libraries for most programming languages, but it really shines with JavaScript on the web.
JSON Syntax
More formally, the syntax rules that define JSON are as follows:
- A JSON text is a single object or a single array.
- An object is a list of members (a member-list) enclosed in curly braces:
{ member-list } - An array is a list of simple values enclosed in square brackets:
[ value-list ]
- A member-list is a list, possibly empty, of pairs:
“string” : value
- A value-list is just a list, again possibly empty, of values separated by commas.
- A value is a string, a number, an object, an array, true, false, or null. Strings must use double quotes, but you can use ” inside a string, as for JavaScript strings. You can also use the other JavaScript - escapes described earlier in this chapter in the section on JavaScript strings.
JSON and jQuery
If you have a JSON text as a string you can use the following to turn the string into a JavaScript object:
var myJson = jQuery.parseJSON(theString);
You can use $.getJSON as a wrapper around $.ajax(), or you can use $.ajax() directly as in the following example, but with dataType set to JSON:
$.ajax({
  url: url,
  dataType: 'json',
  data: data,
  success: callback
   });
Note that if your JSON stream has a syntax error in it, the call to $.ajax() will generally just fail silently.
JSONP and CORS
In most modern web browsers the XMLHttpRequest function implements a Same Origin policy, or Same Origin restriction. This means that you can only fetch data from the same domain as the caller; that is, the server that served the HTML document or the JavaScript code doing the fetching.
Sometimes you need to fetch data from another web server. JSONP and CORS are two mechanisms for doing this. Of these, JSONP (JSON with Padding) is supported by jQuery directly, but is very insecure because it is evaluated directly as raw JavaScript, and it is not recommended by experts. CORS is a newer, mechanism that lets you use XMLHttpRequest to fetch data from other sites as long as the remote web server is configured correctly. At the time of writing, CORS is not widely deployed, and the best way to fetch data from another server is often to write a proxy on your own server and fetch the data through that, rather than risk the insecure nature of JSONP.
THE WEB SEVER BACK END
Web architects sometimes speak of web applications as being divided into a front end, the web browser part that the user sees, and a back end, the part that’s running on a server somewhere. Sometimes everything is running on the same machine, but the web server and the application code behind it still form the back end. This section takes a closer look at this back end.
So far in the examples, when the web browser sent an AJAX request to the server, it was to fetch a file. In real applications it’s more often a request to a database server or some other application, and the glue that connects the web server to the database or application is part of the back end. The most common languages used to write the back end of a small web application are first PHP, then Microsoft C# or Visual Basic with Active Server Pages (ASP), and finally Java (not JavaScript so often) with a “servlet” API. But you also see XSLT and XQuery used.
Chapter 19, “Case Study: XML in Publishing” revisits the use of XQuery and XSLT, and later in this chapter you use the PHP language to generate data for an AJAX script. You could as easily use XSLT or XQuery, of course, as long as you arrange for those to be called appropriately on the server.
Just as you can use different languages on the back end, on the web server, you can send different formats to communicate with the browser, not just JSON. Although JSON is probably the format most often used with XMLHttpRequest, plaintext and HTML are the next most often used. The jQuery plug-in you’ll see shortly uses plaintext in a simple line-based format the plug-in author devised. HTML is often used when you are sending HTML content back to the client to insert into the document, such as search results.
Sending Images and Other Non-Textual Data
Because the web browser is expecting XML or JSON, your back end should not try to send binary data. Instead, send an HTML or XHTML fragment with a link to the image or other data, and insert the link into the document, perhaps with appendChild().
Performance
If your back end is too slow, things can go wrong silently. You can supply the jQuery $.ajax() function with a timeout parameter to counteract this; if you don’t, there is generally a browser-specific default. Some programs and servers also buffer up the data until there’s a certain amount of it, and you can often turn that off (for example, setting $| to 0 in Perl; see the perldoc perlvar command in a console or terminal, if you have Perl documentation available) so that the web browser will see the start of the data sooner.
If you know the data will take a long time to arrive, your JavaScript client can arrange for a function to be called each time data is available, instead of only at the end. An alternative is to send a short message saying “working...” every so often and have the client make a new request for the next part, but you have to make sure that if the user gets bored and wanders off, your server isn’t still working hard!
The Server Logs Are Your Friend
One of the most useful things to do when you’re writing the back end server part of web applications is to watch the error messages, and these usually go into files called server error logs.
Make sure you know where the web server’s error logs are (/var/log/httpd/error_log or /var/log/apache/error_log are common locations); some Web hosting companies give you a log directory under your account somewhere instead.
You can also have a window running tail -f /var/log/httpd/access_log or some similar command to see each HTTP request logged as it completes. This will show you whether your Web browser sent out the AJAX request.
A LARGER EXAMPLE
It’s time for an example to glue all the parts together. The example uses a jQuery plug-in that can handle the autocompletion suggestions, as you saw for the search page at the start of this chapter.
You may already have an extract from the biographical dictionary that was mentioned in Chapter 9; now you will make a web search form that takes the user to a chosen entry. Because the complete list of entries for the 32-volume dictionary is more than 350 kilobytes of text, it makes sense to design the interaction to do the searching on the server, even though the extract for this book is smaller. You can find the complete XML file at http://words.fromoldbooks.org/xml if you want to experiment with it.
 <!DOCTYPE html
PUBLIC “-//W3C//DTD XHTML 1.1//EN”
“http://www.w3.org/TR/xhtml11/DTD/xhtml11.dtd”>
<html xmlns=”http://www.w3.org/1999/xhtml” xml:lang=”en”>
<head>
<title>People Finder</title>
<meta http-equiv=”Content-Type” content=”text/html; charset=utf-8” />
<script type=”text/javascript” src=”js/jquery.js”></script>
<script type=”text/javascript” src=”js/jquery.autocomplete.js”></script>
<link rel=”stylesheet” href=”css/jquery.autocomplete.css” type=”text/css” />
</head>
<body>
<form method=”GET” action=”go.php”>
<p>People Finder: try <i>ala</i> for a start</p>
<p>
<input type=”text” tabindex=”10” style=”width: 400px;” value=””
id=”Person” class=”ac_input”/>
<input type=”submit” tabindex=”20” id=”gobutton” value=”Go”/>
</p>
</form>
<script type=”text/javascript”>//<![CDATA
function findhref(row) {
return row.extra[0];
}
function selectItem(row) {
// set the form to go to the page on a select
$(“form”).get(0).setAttribute('action', findhref(row));
}
$(“#Person”).autocomplete(“people.php”, {
delay: 40, // in milliseconds
minChars: 2,
matchContains: 1,
cacheLength: 10, // for better performance, see docs
onItemSelect: selectItem,
onFindValue: findhref,
autoFill: true // put the value in the text box
}
);
// ]]></script>
</body>
</html>
 <!DOCTYPE html
  PUBLIC “-//W3C//DTD XHTML 1.1//EN”
    “http://www.w3.org/TR/xhtml11/DTD/xhtml11.dtd”>
<html xmlns=”http://www.w3.org/1999/xhtml” xml:lang=”en”>
  <head>
   <title>People Finder</title>
   <meta http-equiv=”Content-Type” content=”text/html; charset=utf-8” />
   <script type=”text/javascript” src=”js/jquery.js”></script>
   <script type=”text/javascript” src=”js/jquery.autocomplete.js”></script>
   <link rel=”stylesheet” href=”css/jquery.autocomplete.css” type=”text/css” />
  </head>
  <body>
   <form method=”GET” action=”go.php”>
    <p>People Finder: try <i>ala</i> for a start</p>
    <p>
     <input type=”text” tabindex=”10” style=”width: 400px;” value=””
           id=”Person” class=”ac_input”/>
     <input type=”submit” tabindex=”20” id=”gobutton” value=”Go”/>
    </p>
   </form>

  <script type=”text/javascript”>//<![CDATA
   function findhref(row) {
    return row.extra[0];
   }

   function selectItem(row) {
    // set the form to go to the page on a select
   $(“form”).get(0).setAttribute('action', findhref(row));
   }
   $(“#Person”).autocomplete(“people.php”, {
    delay: 40, // in milliseconds
    minChars: 2,
    matchContains: 1,
    cacheLength: 10, // for better performance, see docs
    onItemSelect: selectItem,
    onFindValue: findhref,
    autoFill: true // put the value in the text box
   }
  );
  // ]]></script>
 </body>
</html>people.html
<?php
$q = strtolower($_GET[“q”]);
if (!$q) $q = “ama”; # silly default for testing more easily

$items = file(“entries.txt”, FILE_IGNORE_NEW_LINES);
if (!$items) return; # file not found
if (!$items[0]) return; # file was empty

$maxitems = 30; # too many completions...
$n_found = 0; # number found so far

# look for titles starting with $q
foreach ($items as $key => $value) {
   $where = strpos(strtolower($value), $q);
   if ($where !== false && $where == 0) {
    echo “$value
”;
    if (++$n_found > $maxitems) {
     return;
    }
   }
  }
?>
people.php
xfn:string-join(
  for $e in doc(“chalmers-biography-extract.xml”)//entry
  return
   concat(
    normalize-space(data($e/title)),
    “|”,
    substring($e/@id, 1, 1), “/”, $e/@id,
    “.html
”
   )
  ,
  “”
)saxon -query make-entries.xq !method=text > entries.txt
title|id
Aa, Christian Charles Henry Vander|a/aa-christian-charles-henry-vander.html
Aagard, Christian|a/aagard-christian.html
Aarsens, Francis|a/aarsens-francis.html
Abeille, Gaspar|a/abeille-gaspar.html
Abeille, Louis Paul|a/abeille-louis-paul.html
Abel, Gaspar|a/abel-gaspar.html
Abel, Frederick Gottfried|a/abel-frederick-gottfried.html
Abelli, Louis|a/abelli-louis.html
Aben-Ezra|a/aben-ezra.html
Abercromby, Patrick|a/abercromby-patrick.html
Abraham, Nicholas|a/abraham-nicholas.html
Abu-Nowas|a/abu-nowas.html
$(“#Person”).autocomplete(“people.php”, { … } );
echo “Entries.txt not found|oops
”; return;
SUMMARY
- AJAX is an acronym for Asynchronous JavaScript And XML, and is the name of a common design pattern in web development.
- AJAX is used in HTML or XHTML web pages to fetch data from a remote web server without having to wait for a network connection and response.
- The data fetched in the AJAX pattern does not need to be in XML; plain text, structured text, HTML, JSON, and XML are all widely used.
- JSON is an acronym for JavaScript Object Notation and is a useful text-based format for exchanging objects; it is not so useful for document fragments, since it does not handle XML’s mixed content.
- You can easily generate XML or JSON on your web server using XQuery, XSLT, or almost any programming or scripting language.
- Use the AJAX pattern to make web pages that seem fast and responsive, updating without the user having to wait for a new page to load.
- Use the REST (Representational State Transfer) HTTP design pattern, making sure the user can bookmark a page in its current state whenever that makes sense.
EXERCISES
You can find solutions to these exercises in Appendix A.
WHAT YOU LEARNED IN THIS CHAPTER
| TOPIC | KEY POINTS |
| What is AJAX | AJAX is an asynchronous programming technique used in web browsers. AJAX is often used with XML, JSON, HTML, or ad hoc text formats. To make the most out of AJAX, you need server-side programs as well as client-side JavaScript. |
| What is JSON | JSON is a text format for transmitting JavaScript data objects. |
| JavaScript syntax | JavaScript is a C-like interpreted language. It is not directly related to Java. Use the web browser console to help debug JavaScript programs. |