
Chapter 15
SOAP and WSDL
WHAT YOU WILL LEARN IN THIS CHAPTER:
- Why SOAP can provide more flexibility than previous RPC protocols
- How to format SOAP messages
- When to use GET versus POST in an HTTP request
- What SOAP intermediaries are
- How to describe a service using WSDL
- The difference between SOAP styles
In Chapter 14 you learned about web services and how they work toward enabling disparate systems to communicate. You can now see that if everyone just chose their own formats in which to send messages back and forth, interoperability would be quite difficult, so a standard format is a must. XML-RPC is good for remote procedure calls, but otherwise limited. SOAP overcomes that problem by enabling rich XML documents to be transferred easily between systems, even allowing for the possibility of attachments. Of course, this flexibility means that you need a way to describe your SOAP messages, and that’s where Web Services Description Language (WSDL) comes in. WSDL provides a standard way to describe where and how to make requests to a SOAP-based service.
In this chapter you take your knowledge of web services a step further by creating a simple web service using a method called REST (covered in the previous chapter). You’ll expand your horizons by creating a SOAP service and accessing it via SOAP messages, describing it using WSDL so that other developers can make use of it if desired.
LAYING THE GROUNDWORK
Any web services project requires planning, so before you jump into installing software and creating files, take a moment to look at what you’re trying to accomplish. Ultimately, you want to send and receive SOAP messages, and describe them using WSDL. To do that, you need the following in place:
- The client: In the previous chapter, you created an XML-RPC client in Internet Explorer. This chapter uses a lot of the same techniques to create a SOAP client.
- The server: You create two kinds of SOAP services in this chapter, and they both use ASP.NET. Both use standard .aspx pages, rather than .NET’s specialized .asmx page or the more modern Windows Communication Foundation (WCF). There are two reasons for not using the built-in web services tools. First, coding by hand ensures that you see how it works, and more importantly, you learn how to diagnose problems in real-life situations. Second, if you want to use these techniques in other languages, it’s easier to port the code when it’s not hidden by .NET’s web service abstraction layer.
The examples in this chapter are all developed with Visual Studio. If you don’t have the full version you can use Visual Studio Express Web Edition, which you can download free from http://www.microsoft.com/visualstudio/en-us/products/2010-editions/visual-web-developer-express. See the Introduction of this book for more details on downloading Visual Studio.
THE NEW RPC PROTOCOL: SOAP
According to the W3C SOAP specification at http://www.w3.org/TR/2000/NOTE-SOAP-20000508/, SOAP is “a lightweight protocol for exchange of information in a decentralized, distributed environment.” Although many would argue about the lightweight part of that statement, SOAP is a standard way to send information from one computer to another using XML to represent the information.
SOAP originally stood for Simple Object Access Protocol, but because most people found it anything but simple, and it’s not limited to object access, it is now officially a name rather than an acronym, so it doesn’t stand for anything. You can find information on the current version of SOAP (SOAP 1.2 at the time of this writing) at www.w3.org/2000/xp/Group/.
In a nutshell, the SOAP recommendation defines a protocol whereby all information sent from computer to computer is marked up in XML, with the information transmitted, in most cases, via HTTP or HTTPS.
Following is a list of advantages that SOAP has over other protocols such as DCOM or Java RMI:
- It’s platform-, language-, and vendor-neutral: Because SOAP is implemented using XML and (usually) HTTP, it is easy to process and send SOAP requests in any language, on any platform, without having to depend on tools from a particular vendor.
- It’s easy to implement: SOAP was designed to be less complex than the other protocols. Even if it has moved away from simplicity in recent years, a SOAP server can still be implemented using nothing more than a web server and an ASP page or a CGI script.
- It’s firewall-safe: Assuming that you use HTTP as your network protocol, you can pass SOAP messages across a firewall without having to perform extensive configuration.
SOAP also has a few disadvantages that have led people to search for other methods. The three main disadvantages are as follows:
- SOAP and traditional web services have become more and more complicated as time has progressed.
- The size of the messages is quite large in many cases compared to the actual payload.
- Although it is supposed to be a standard, you will still find interoperability issues between SOAP-based services implemented in, for example, Java and those written in .NET.
It’s these sorts of problems that have led to the adoption of such techniques as JSON, which are discussed in Chapters 16 and 17.
Even though SOAP is not without its faults, it is still has the advantages of working across platforms and can be used from a large number of clients. It also has the flexibility to represent complex messages, and can cope with situations where the processing of these messages requires them to pass along a chain of computers, rather than just a simple client to server journey. None of the other services that are in common use, such as REST or JSON, can compete on all these features. For this reason, SOAP is likely to be around for quite some time and is definitely a technology worth learning if you want to develop distributed systems.
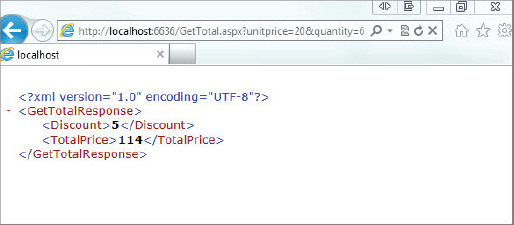
Before you start creating SOAP messages though, you need to look at the process of creating an RPC server that receives a request and sends back a response. The following example begins with a fairly simple procedure to write: one that takes a unit price and quantity and returns the appropriate discount along with the total price.
<%@ Page Language=”C#” AutoEventWireup=”true”
CodeFile=”GetTotal.aspx.cs” Inherits=”GetTotal” ContentType=”text/xml” %>![]() LISTING 15-1: GetTotal.aspx.cs
LISTING 15-1: GetTotal.aspx.cs
using System;
using System.Xml.Linq;
public partial class GetTotal : System.Web.UI.Page
{
protected void Page_Load(object sender, EventArgs e)
{
string clientXml = string.Empty;
try
{
double unitPrice = Convert.ToDouble(Request.QueryString[“unitPrice”]);
int quantity = Convert.ToInt16(Request.QueryString[“quantity”]);
double discount = GetQuantityDiscount(quantity);
double basicTotal = GetBasicTotal(unitPrice, quantity);
double finalTotal = basicTotal * (1 - discount);
clientXml = GetSuccessXml(finalTotal, discount * 100);
}
catch (Exception ex)
{
clientXml = GetErrorXml(ex);
}
XElement doc = XElement.Parse(clientXml);
doc.Save(Response.OutputStream);
}
private double GetBasicTotal(double unitPrice, int quantity)
{
return unitPrice * quantity;
}
private double GetQuantityDiscount(int quantity)
{
if (quantity < 6) return 0;
if (quantity < 11) return 0.05;
if (quantity < 51) return 0.1;
return 0.2;
}
private string GetSuccessXml(double totalPrice, double discount)
{
string clientXml = “<GetTotalResponse><Discount>{0}</Discount>”
+ “<TotalPrice>{1}</TotalPrice></GetTotalResponse>”;
return string.Format(clientXml, Convert.ToString(discount),
Convert.ToString(totalPrice));
}
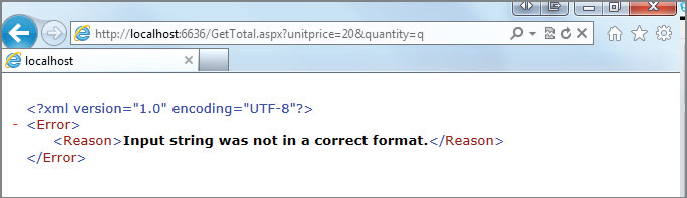
private string GetErrorXml(Exception ex)
{
string clientXml = “<Error><Reason>{0}</Reason></Error>”;
return string.Format(clientXml, ex.Message);
}
}
Sub Main()
  Dim doc = new XDocument.Load
    (“http://localhost/BasicOrderService/gettotal.aspx?unitprice=20&quantity=6”)

    If doc.Root.Name = “Error” Then
        MsgBox (“Unable to perform calculation”)
    Else
        MsgBox(XDocument...<TotalPrice>.Value)
    End If
End Sub
Comparing SOAP to REST
Technically speaking, what you just did in the preceding activity isn’t actually a SOAP transaction, but maybe not for the reasons you might think. The issue isn’t that you sent a URL rather than a SOAP message to make the request; SOAP actually defines just such a transaction. The problem is that the response wasn’t actually a SOAP message.
Take a look at the output:
<GetTotalResponse>
  <Discount>0.95</Discount>
  <TotalPrice>44.46</TotalPrice>
</GetTotalResponse>
This doesn’t conform to the structure of a SOAP message (as you’ll see in the following section), but it is still a well-formed XML message and a perfectly valid way of creating a web service.
One of the main objections to SOAP is its complexity, and because of this many have looked for alternatives. One of the main contenders is known as REST which stands for REpresentational State Transfer. REST is based on the idea that any piece of information on the World Wide Web should be addressable via a URL. In this case, that URL included a query string with parameter information. REST also dictates that operations other than straightforward retrieval of information (deleting an item, for example) should ideally be instigated via the corresponding HTTP verb. So to delete a resource you send an HTTP DELETE request and pass the relevant URL rather than the use the normal HTTP GET.
REST is growing in popularity as people discover that it is, in many ways, much easier to use than SOAP. After all, you don’t have to create an outgoing XML message, and you don’t have to figure out how to POST it, as demonstrated in the previous chapter.
All of this begs the question: If REST is so much easier, why use SOAP at all? Aside from the fact that in some cases the request data is difficult or impossible to provide as a URL, the answer lies in the fundamental architecture of the Web. You submitted this request as a GET, which means that any parameters were part of the URL and not the body of the message. If you were to remain true to the way the Web is supposed to be constructed, GET requests are only for actions that have no side effects, such as making changes to a database. That means you could use this method for getting information, but you couldn’t use it for, say, placing an order, because the act of making that request changes something on the server.
When SOAP was still growing in popularity, some developers insisted that REST was better because it was simpler. SOAP 1.2 ends the controversy by adopting a somewhat RESTful stance, making it possible to use an HTTP GET request to send information and parameters and in turn receive a SOAP response. You’ll see this combination in action later, but first you should look at how SOAP itself works.
Basic SOAP Messages
As mentioned before, SOAP messages are basically XML documents, usually sent across HTTP. Following are the specifications that SOAP requires:
- Rules regarding how the message should be sent: Although the SOAP specification says that any network protocol can be used, specific rules are included in the specification for HTTP because that’s the protocol most people use.
- The overall structure of the XML that is sent: This is called the envelope. Any information to be sent back and forth over SOAP is contained within this envelope, and is known as the payload.
- Rules regarding how data is represented in this XML: These are called the encoding rules.
When you send data to a SOAP server, the data must be represented in a particular way so that the server can understand it. The SOAP 1.2 specification outlines a simple XML document type, which is used for all SOAP messages. The basic structure of that document is as follows:
<soap:Envelope xmlns:soap=”http://www.w3.org/2003/05/soap-envelope”>
  <soap:Header>
    <head-ns:someHeaderElem xmlns:head-ns=”some URI”
                            env:mustUnderstand=”true OR false”
                            env:relay=”true OR false”
                            env:role=”some URI”/>
  </soap:Header>
  <soap:Body encodingStyle=”http://www.w3.org/2003/05/soap-encoding”>
    <some-ns:someElem xmlns:some-ns=”some URI”/>
    <!-- OR -->
    <soap:Fault>
     <soap:Code>
       <soap:Value>Specified values</soap:Value>
       <soap:Subcode>
         <soap:Value>Specified values</soap:Value>
       </soap:Subcode>
     </soap:Code>
     <soap:Reason>
       <soap:Text xml:lang=”en-US”>English text</soap:Text>
       <v:Text xml:lang=”fr”>Texte francais</soap:Text>
     </soap:Reason>
     <soap:Detail>
       <!-- Application specific information -->
     </soap:Detail>
    </soap:Fault>
  </soap:Body>
</soap:Envelope>
Only three main elements are involved in a SOAP message itself (unless something goes wrong): <Envelope>, <Header>, and <Body>, and starting in version 1.2 of SOAP, a number of error-related elements. Of these elements, only <Envelope> and <Body> are mandatory; <Header> is optional, and <Fault> and its child elements are required only when an error occurs. In addition, all of the attributes (encodingStyle, mustUnderstand, and so on) are optional. The following sections take a closer look at these elements and the various attributes.
<Envelope>
Other than the fact that it resides in SOAP’s envelope namespace (http://www.w3.org/2003/05/soap-envelope), the <Envelope> element doesn’t really need any explanation. It simply provides the root element for the XML document and is usually used to include any namespace declarations.
<Body>
The <Body> element contains the main body of the SOAP message. The actual RPC calls are made using direct children of the <Body> element (which are called body blocks). For example, consider the following:
<soap:Envelope xmlns:env=”http://www.w3.org/2003/05/soap-envelope”>
    <soap:Body>
       <o:AddToCart xmlns:o=”http://www.wiley.com/soap/ordersystem”>
          <o:CartId>THX1138</o:CartId>
          <o:Item>ZIBKA</o:Item>
          <o:Quantity>3</o:Quantity>
          <o:TotalPrice>34.97</o:TotalPrice>
       </o:AddToCart>
    </soap:Body>
</soap:Envelope>
In this case, you’re making one RPC call, to a procedure called AddToCart, in the http://www.wiley.com/soap/ordersystem namespace. (You can add multiple calls to a single message, if necessary.) The AddToCart procedure takes four parameters: CartId, Item, Quantity, and TotalPrice. Direct child elements of the <soap:Body> element must reside in a namespace other than the SOAP namespace. This namespace is what the SOAP server uses to uniquely identify this procedure so that it knows what code to run. When the procedure is done running, the server uses the HTTP response to send back a SOAP message. The <soap:Body> of that message might look similar to this:
<soap:Envelope xmlns:soap=”http://www.w3.org/2003/05/soap-envelope”>
  <soap:Body>
    <o:AddToCartResponse xmlns:o=”http://www.wiley.com/soap/ordersystem”>
      <o:CartId>THX1138</o:CartId>
      <o:Status>OK</o:Status>
      <o:Quantity>3</o:Quantity>
      <o:ItemId>ZIBKA</o:ItemId>
      </so:AddToCartResponse>
    </soap:Body>
</soap:Envelope>
The response is just another SOAP message, using an XML structure similar to the request, in that it has a Body in an Envelope, with the relevant information included as the payload.
Encoding Style
Usually, in the realm of XML, when you talk about encoding, you’re talking about esoteric aspects of passing text around, but in the SOAP world, encoding is pretty straightforward. It simply refers to the way in which you represent the data. These examples use SOAP-style encoding, which means you’re using plain-old elements and text, with maybe an attribute or two thrown in. You can let an application know that’s what you’re doing by adding the optional encodingStyle attribute, as shown here:
<soap:Envelope xmlns:soap=”http://www.w3.org/2003/05/soap-envelope”>
  <soap:Body soap:encodingStyle=”http://www.w3.org/2003/05/soap-encoding”>
    <o:AddToCartResponse xmlns:o=”http://www.wiley.com/soap/ordersystem”>
      <o:CartId>THX1138</o:CartId>
      <o:Status>OK</o:Status>
      <o:Quantity>3</o:Quantity>
      <o:ItemId>ZIBKA</o:ItemId>
    </o:AddToCartResponse>
  </soap:Body>
</soap:Envelope>
This distinguishes it from other encodings, such as RDF, shown in the following code:
<soap:Envelope xmlns: soap=”http://www.w3.org/2003/05/soap-envelope”>
  <soap:Body>
    <rdf:RDF xmlns:rdf=”http://www.w3.org/1999/02/22-rdf-syntax-ns#”
           xmlns:o=”http://www.wiley.com/soap/ordersystem”
       env:encodingStyle=”http://www.w3.org/1999/02/22-rdf-syntax-ns#”>
      <o:AddToCartResponse
         rdf:About=
         “http://www.wiley.com/soap/ordersystem/addtocart.asp?cartid
          =THX1138”>
        <o:CartId>THX1138</o:CartId>
        <o:Status>OK</o:Status>
        <o:qQuantity>3</o:Quantity>
        <o:ItemId>ZIBKA</o:ItemId>
      </o:AddToCartResponse>
    </rdf:RDF>
  </soap:Body>
</soap:Envelope>
The information is the same, but it’s represented, or encoded, differently. You can also create your own encoding, but of course if your goal is interoperability, you need to use a standard encoding style. In the preceding example env:encodingStyle is an attribute of the <rdf:RDF> element, but it could equally well have appeared on the <soap:Body>. In general, the attribute can appear anywhere and applies to all descendants of the element on which it appears, as well as the element itself. This means that different parts of the same SOAP message can use different encodings if needed.
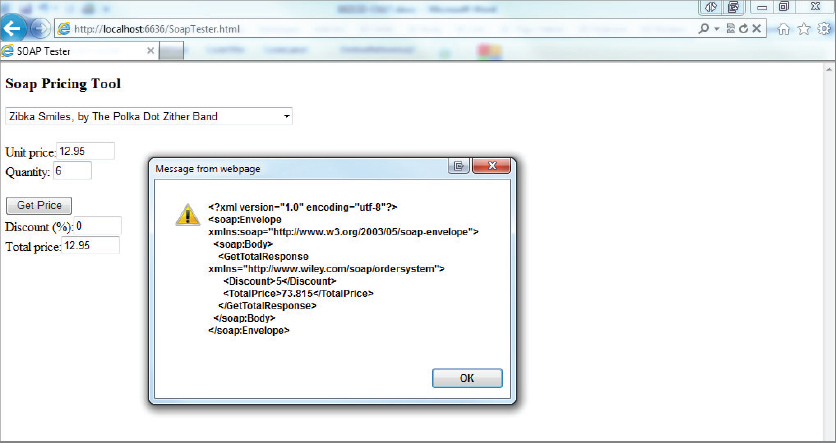
You’ve now seen the core components of SOAP and how they fit together. It’s now time to put this into practice and see how a SOAP web service uses the elements, such as <soap:Envelope> and <soap:Body>, to wrap the request and response messages. This turns a web service into a SOAP web service.
The previous Try It Out presented almost all of the benefits of SOAP. It works easily with a firewall, and all the information is passed over HTTP in XML, meaning you could implement your remote procedure using any language, on any platform, and you can call it from any language, on any platform. However, the solution is still a little proprietary. To make the procedure more universal, you need to go one step further and use a SOAP envelope for your XML.
<soap:Envelope xmlns:soap=”http://www.w3.org/2003/05/soap-envelope”>
  <soap:Body>
    <GetTotalResponse xmlns=”http://www.wiley.com/soap/ordersystem”>
      <Discount>10</Discount>
      <TotalPrice>243</TotalPrice>
    </GetTotalResponse>
  </soap:Body>
</soap:Envelope>
![]() LISTING 15-2: SoapTester.html
LISTING 15-2: SoapTester.html
<html>
<head>
  <title>SOAP Tester</title>
  <!-- script will go here -->
</head>
<body onload=”init();”>
  <h3>
    Soap Pricing Tool</h3>
  <form name=”orderForm”>
  <select name=”lstItems” id=”lstItems” style=”width: 350px”
    onchange=”setPriceAndQuantity();”>
    <option value=”10.50” id=”item1” selected>
      Cool Britannia, by The Bonzo Dog Doo-Dah Band</option>
    <option value=”12.95” id=”item2”>
      Zibka Smiles, by The Polka Dot Zither Band</option>
    <option value=”20.00” id=”item3”>
      Dr Frankenstein's Disco Party, by Jonny Wakelin</option>
  </select>
  <p>
    Unit price:<input type=”text”
                 name=”txtUnitPrice” id=”txtUnitPrice”
                 size=”6” readonly><br>
    Quantity:
    <input type=”text”
      name=”txtQuantity” id=”txtQuantity”
      size=”2”>
  </p>
  <input type=”button” value=”Get Price” onclick=”doGet()”><br>
  Discount (%):<input type=”text” id=”txtDiscount”
                  name=”txtDiscount” size=”4” readonly><br>
  Total price:<input type=”text” id=”txtTotalPrice”
                 name=”txtTotalPrice” size=”6” readonly>
  </form>
</body>
</html>
 <head>
<title>SOAP Tester</title>
<script type=”text/javascript”
src=”http://code.jquery.com/jquery-1.6.4.js”></script>
<script type=”text/javascript”>
function doGet()
{
var dUnitPrice = $(“#txtUnitPrice”).val();
var iQuantity = $(“#txtQuantity”).val();
var sBaseUrl = “GetTotal2.aspx”;
var sQuery = “?unitprice=” + dUnitPrice + “&quantity=” + iQuantity;
var sRequest = sBaseUrl + sQuery;
$.get(sRequest, null, handleGetTotalResponse, “xml”);
}
function handleGetTotalResponse(data, textStatus, jqXHR)
{
if (textStatus == “success”)
{
alert(jqXHR.responseText);
var oBody = $(“[nodeName=soap:Body]”, jqXHR.responseXML);
var dDiscount = oBody.find(“[nodeName=Discount]”).text();
var dTotalPrice = oBody.find(“[nodeName=TotalPrice]”).text();
if (!dDiscount)
{
var oError = $(“[nodeName=Error]”, jqXHR.responseXML);
if (oError)
{
var sErrorMessage = oError.find(“[nodeName=Reason]”).text();
alert(sErrorMessage);
}
else
{
alert(“Unreadable error message.”);
}
}
showResults(dDiscount, dTotalPrice);
}
else
alert(“Error accessing web service.”);
}
function showResults(discount, totalPrice)
{
$(“#txtDiscount”).val(discount);
$(“#txtTotalPrice”).val(totalPrice);
}
function setPriceAndQuantity()
{
$(“#txtUnitPrice”).val($(“#lstItems”).val());
$(“#txtQuantity”).val(1);
}
function init()
{
setPriceAndQuantity();
}
</script>
</head>
 <head>
  <title>SOAP Tester</title>
  <script type=”text/javascript”
          src=”http://code.jquery.com/jquery-1.6.4.js”></script>
  <script type=”text/javascript”>
    function doGet()
    {
      var dUnitPrice = $(“#txtUnitPrice”).val();
      var iQuantity = $(“#txtQuantity”).val();
      var sBaseUrl = “GetTotal2.aspx”;
      var sQuery = “?unitprice=” + dUnitPrice + “&quantity=” + iQuantity;
      var sRequest = sBaseUrl + sQuery;
      $.get(sRequest, null, handleGetTotalResponse, “xml”);
    }

    function handleGetTotalResponse(data, textStatus, jqXHR)
    {
      if (textStatus == “success”)
      {
        alert(jqXHR.responseText);
        var oBody = $(“[nodeName=soap:Body]”, jqXHR.responseXML);
        var dDiscount = oBody.find(“[nodeName=Discount]”).text();
        var dTotalPrice = oBody.find(“[nodeName=TotalPrice]”).text();
        if (!dDiscount)
        {
          var oError = $(“[nodeName=Error]”, jqXHR.responseXML);
          if (oError)
          {
            var sErrorMessage = oError.find(“[nodeName=Reason]”).text();
            alert(sErrorMessage);
          }
          else
          {
            alert(“Unreadable error message.”);
          }
        }
        showResults(dDiscount, dTotalPrice);
      }
      else
        alert(“Error accessing web service.”);
    }

    function showResults(discount, totalPrice)
    {
      $(“#txtDiscount”).val(discount);
      $(“#txtTotalPrice”).val(totalPrice);
    }

    function setPriceAndQuantity()
    {
      $(“#txtUnitPrice”).val($(“#lstItems”).val());
      $(“#txtQuantity”).val(1);
    }

    function init()
    {
      setPriceAndQuantity();
    }

  </script>
</head>
SoapTester.html
<%@ Page Language=”C#” AutoEventWireup=”true” CodeFile=”GetTotal2.aspx.cs”
         Inherits=”GetTotal” ContentType=”text/xml” %>
GetTotal2.aspx
private string GetSuccessXml(double totalPrice, double discount)
{
  string clientXml = “<soap:Envelope xmlns:soap=
“http://www.w3.org/2003/05/soap-envelope”><soap:Body>”
 + “<GetTotalResponse”
 + “ xmlns=”http://www.wiley.com/soap/ordersystem”><Discount>{0}</Discount>”
 + “<TotalPrice>{1}</TotalPrice>”
 + “</GetTotalResponse></soap:Body></soap:Envelope>”;
  return string.Format(clientXml,
                       Convert.ToString(discount),
                       Convert.ToString(totalPrice));
}
GetTotal2.aspx
Response.ContentType = “application/soap+xml”
So far you’ve only scratched the surface of what SOAP can do. The following section looks at some more detailed uses.
More Complex SOAP Interactions
Now that you know the basics of how SOAP works, it’s time to delve a little more deeply. SOAP messages can consist of not just a Body, which contains the payload or data to be processed, but also a Header element that contains information about the payload. The Header also gives you a good deal of control over how its information is processed.
Additionally SOAP messages also use <Fault> elements to return fault code errors, and can substitute the use of the GET operation with the POST operation in some circumstances. The following sections explain these more complex elements of SOAP.
<Header>
The <Header> element comes into play when you need to add additional information to your SOAP message. For example, suppose you created a system whereby orders can be placed into your database using SOAP messages, and you have defined a standard SOAP message format that anyone communicating with your system must use. You might use a SOAP header for authentication information, so that only authorized persons or systems can use your system. These elements, called header blocks, are specifically designed for meta information, or information about the information contained in the body.
When a <Header> element is used, it must be the first element child of the <Envelope> element. Functionally, the <Header> element works very much like the <Body> element; it is simply a placeholder for other elements in namespaces other than the SOAP envelope namespace. The <Header> element contains instructions, such as routing information; or meta data, such as user credentials, which need to be taken into account when processing the main SOAP message in the <Body>. In general, however, the <Header> doesn’t contain information to be processed.
The SOAP 1.2 Recommendation also defines three optional attributes you can include on those header entries: mustUnderstand, role, and relay.
The mustUnderstand Attribute
The mustUnderstand attribute specifies whether it is absolutely necessary for the SOAP server to process a particular header block. A value of true indicates that the header entry is mandatory, and the server must either process it or indicate an error. For example, consider the following:
<soap:Envelope xmlns:soap=”http://www.w3.org/2003/05/soap-envelope”>
  <soap:Header xmlns:some-ns=”http://www.wiley.com/soap/headers/”>

    <some-ns:authentication mustUnderstand=”true”>
      <UserID>User ID goes here...</UserID>
      <Password>Password goes here...</Password>
    </some-ns:authentication>

    <some-ns:log mustUnderstand=”false”>
      <additional-info>Info goes here...</additional-info>
    </some-ns:log>
    <some-ns:log>
      <additional-info>Info goes here...</additional-info>
    </some-ns:log>
  </soap:Header>
  <soap:Body xmlns:body-ns=”http://www.wiley.com/soap/rpc”>
    <body-ns:mainRPC>
      <additional-info/>
    </body-ns:mainRPC>
  </soap:Body>
</soap:Envelope>
This SOAP message contains three header entries: one for authentication and two for logging purposes.
For the <authentication> header entry, a value of true was specified for mustUnderstand. (In SOAP 1.1, you would have specified it as 1.) This means that the SOAP server must process the header block. If the SOAP server doesn’t understand this header entry, it rejects the entire SOAP message — the server is not allowed to process the entries in the SOAP body. This forces the server to use proper authentication.
The second header entry specified a value of false for mustUnderstand, which makes this header entry optional. This means that when the SOAP server doesn’t understand this particular header entry, it can still go ahead and process the SOAP body anyway.
Finally, in the third header entry the mustUnderstand attribute was omitted. In this case, the header entry is optional, just as if you had specified the mustUnderstand attribute with a value of false.
The role Attribute
In some cases a SOAP message may pass through a number of applications on a number of computers before it arrives at its final destination. You might send a SOAP message to computer A, which might then send that message on to computer B. Computer A would be called a SOAP intermediary.
In these cases, you can use the role attribute to specify that some SOAP headers must be processed by a specific intermediary. The value of the attribute is a URI, which uniquely identifies each intermediary. The SOAP specification also defines the following three roles:
- http://www.w3.org/2003/05/soap-envelope/role/next applies to the next intermediary in line, wherever it is.
- http://www.w3.org/2003/05/soap-envelope/role/ultimateReceiver applies only to the very last stop.
- http://www.w3.org/2003/05/soap-envelope/role/none effectively “turns off” the header block so that it is ignored at this stage of the process.
When an intermediary processes a header entry, it must remove that header from the message before passing it on. Conversely, the SOAP specification also says that a similar header entry can be inserted in its place, so you can process the SOAP header entry and then add another identical header block.
The relay Attribute
The SOAP specification also requires a SOAP intermediary to remove any headers it doesn’t process, which presents a problem. What if you want to add a new feature and target it at any intermediary that might understand it? The solution to this is the relay attribute. By setting the relay attribute to true, you can instruct any intermediary that encounters it to either process it or leave it alone. (If the intermediary does process the header, the intermediary still must remove it.) The default value for the relay attribute is false.
<Fault>
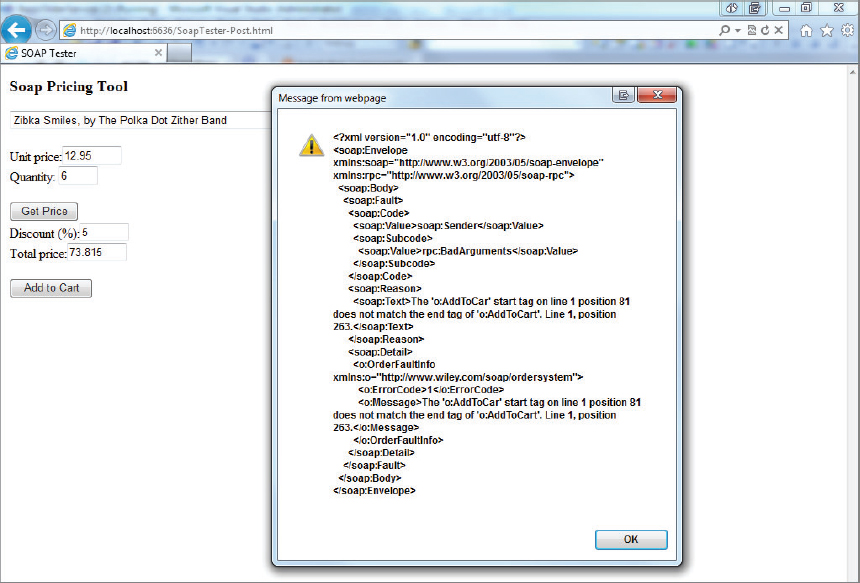
Whenever computers are involved, things can go wrong, and there may be times when a SOAP server is unable to process a SOAP message, for whatever reason. Perhaps a resource needed to perform the operation isn’t available, invalid parameters were passed, or the server doesn’t understand the SOAP request in the first place. In these cases, the server returns fault codes to the client to indicate errors.
Fault codes are sent using the same format as other SOAP messages. However, in this case, the <Body> element has only one child, a <Fault> element. Children of the <Fault> element contain details of the error. A SOAP message indicating a fault might look similar to this:
<soap:Envelope xmlns:soap=”http://www.w3.org/2003/05/soap-envelope”
              xmlns:rpc=”http://www.w3.org/2003/05/soap-rpc”>
  <soap:Body>
   <soap:Fault>
     <soap:Code>
       <soap:Value>soap:Sender</soap:Value>
       <soap:Subcode>
         <soap:Value>rpc:BadArguments</soap:Value>
       </soap:Subcode>
     </soap:Code>
     <soap:Reason>
       <soap:Text xml:lang=”en-US”>Processing error</soap:Text>
       <soap:Text xml:lang="fr">Erreur de traitement</soap:Text>
     </soap:Reason>
     <soap:Detail>
       <o:orderFaultInfo xmlns:o=”http://www.wiley.com/soap/ordersystem”>
         <o:errorCode>WA872</o:errorCode>
         <o:message>Cart doesn't exist</o:message>
       </o:OrderFaultInfo>
     </soap:Detail>
   </soap:Fault>
  </soap:Body>
</soap:Envelope>
The <Code> element contains a <Value> consisting of a unique identifier that identifies this particular type of error. The SOAP specification defines five such identifiers, described in the Table 15-1:
TABLE 15.1: Fault Code Values in SOAP
| FAULT CODE | DESCRIPTION |
| VersionMismatch | A SOAP message was received that specified a version of the SOAP protocol that this server doesn’t understand. (This would happen, for example, if you sent a SOAP 1.2 message to a SOAP 1.1 server.) |
| MustUnderstand | The SOAP message contained a mandatory header that the SOAP server doesn’t understand. |
| Sender | The message was not properly formatted. That is, the client made a mistake when creating the SOAP message. This identifier also applies if the message itself is well formed, but doesn’t contain the correct information. For example, if authentication information were missing, this identifier would apply. |
| Receiver | The server had problems processing the message, even though the contents of the message were formatted properly. For example, perhaps a database was down. |
| DataEncodingUnknown | The data in the SOAP message is organized, or encoded, in a way the server doesn’t understand. |
You also have the option to add information in different languages, as shown in the previous example’s <Text> elements, as well as application-specific information as part of the <Detail> element. Note that application-specific information in the <Detail> element must have its own namespace.
The previous two Try It Outs were devoted to simply getting information from the SOAP server. Because you weren’t actually changing anything on the server, you could use the GET method and simply pass all of the information as part of the URL. (Remember that you’re supposed to use GET only when there are no side effects from calling the URL.)
Now you examine a situation where that isn’t the case. In this Try It Out, you look at a SOAP procedure that adds an item to a hypothetical shopping cart. Because this is not an “idempotent” process—it causes side effects, in that it adds an item to the order—you have to submit the information via the POST method, which means creating a SOAP message within the client.
<soap:Envelope xmlns:soap=”http://www.w3.org/2003/05/soap-envelope”>
<soap:Body>
  <o:AddToCart xmlns:o=”http://www.wiley.com/soap/ordersystem”>
    <o:CartId>CARTID</o:CartId>
    <o:Item itemId=”ITEMID”>
      <o:Quantity>QUANTITY</o:Quantity>
      <o:TotalPrice>PRICE</o:TotalPrice>
    </o:Item>
  </o:AddToCart>
</soap:Body>
</soap:Envelope>
<soap:Envelope xmlns:soap=”http://www.w3.org/2003/05/soap-envelope”>
  <soap:Body>
    <o:AddToCartResponse xmlns:o=”http://www.wiley.com/soap/ordersystem”>
      <o:CartId>CARTID</o:CartId>
      <o:Status>STATUS</o:Status>
      <o:Quantity>QUANTITY</o:Quantity>
      <o:ItemId>ITEMID</o:ItemId>
    </o:AddToCartResponse>
  </soap:Body>
</soap:Envelope>
<soap:Envelope xmlns:soap=”http://www.w3.org/2003/05/soap-envelope”
              xmlns:rpc=”http://www.w3.org/2003/05/soap-rpc”>
  <soap:Body>
   <soap:Fault>
     <soap:Code>
       <soap:Value>soap:FAULTCODE</soap:Value>
       <soap:Subcode>
         <soap:Value>SUBVALUE</soap:Value>
       </soap:Subcode>
     </soap:Code>
     <soap:Reason>
       <soap:Text>ERROR DESCRIPTION</soap:Text>
     </soap:Reason>
     <soap:Detail>
       <o:OrderFaultInfo xmlns:o=”http://www.wiley.com/soap/ordersystem”>
         <o:ErrorCode>APPLICATION-SPECIFIC ERROR CODE</o:ErrorCode>
         <o:Message>APPLICATION-SPECIFIC ERROR MESSAGE</o:Message>
       </o:OrderFaultInfo>
     </soap:Detail>
   </soap:Fault>
  </soap:Body>
</soap:Envelope>
 <%@ Page Language="C#" AutoEventWireup="true" CodeFile="AddToCart.aspx.cs"
         Inherits="AddToCart" ContentType="text/xml" ValidateRequest="false" %>
AddToCart.aspx
 using System;
using System.Linq;
using System.Xml.Linq;

public partial class AddToCart : System.Web.UI.Page
{

  private readonly XNamespace cartNS = “http://www.wiley.com/soap/ordersystem”;
  private readonly XNamespace soapNS = “http://www.w3.org/2003/05/soap-envelope”;

  protected void Page_Load(object sender, EventArgs e)
  {
    try
    {
      XElement message = XElement.Load(Request.InputStream);
      // More code here to read incoming message
    }
    catch (Exception ex)
    {
      SendSoapFault(“soap:Sender”,
                    “rpc:BadArguments”,
                    ex.Message,
                    “1”,
                    ex.Message);
    }
  }
AddToCart.aspx.cs
 try
    {
      XElement message = XElement.Load(Request.InputStream);
      string cartId = message.Descendants(cartNS + "CartId").First().Value;
      string itemId =
        message.Descendants(cartNS + "Item").First().Attribute("itemId").Value;
      string quantity =
        message.Descendants(cartNS + "Quantity").First().Value;
      string totalPrice =
        message.Descendants(cartNS + "TotalPrice").First().Value;
      string status = ProcessData(cartId, itemId, quantity, totalPrice);
      SendSoapResponse(status, cartId, itemId, quantity);
    }
    catch (Exception ex)
AddToCart.aspx.cs
 private string ProcessData(string cartId,
                             string itemid,
                             string quantity,
                             string totalPrice)
  {
    // do something with data
    return “OK”;
  }
AddToCart.aspx.cs
 private void SendSoapResponse(string status,
                                string cartId,
                                string itemid,
                                string quantity)
  {
    string template =
      “<soap:Envelope xmlns:soap=”http://www.w3.org/2003/05/soap-envelope”>”
                    + “<soap:Body>”
                    + “<o:AddToCartResponse”
                    + “xmlns:o=”http://www.wiley.com/soap/ordersystem”>”
                    + “<o:CartId></o:CartId>”
                    + “<o:Status></o:Status>”
                    + “<o:Quantity></o:Quantity>”
                    + “<o:ItemId></o:ItemId>”
                    + “</o:AddToCartResponse>”
                    + “</soap:Body>”
                    + “</soap:Envelope>”;
    XElement soapResponse = XElement.Parse(template);
    XElement addToCartResponse =
             soapResponse.Descendants(cartNS + “AddToCartResponse”).First();
    addToCartResponse.SetElementValue(cartNS + “CartId”, cartId);
    addToCartResponse.SetElementValue(cartNS + “Status”, status);
    addToCartResponse.SetElementValue(cartNS + “Quantity”, quantity);
    addToCartResponse.SetElementValue(cartNS + “ItemId”, cartId);
    soapResponse.Save(Response.OutputStream);
  }
AddToCart.aspx.cs
 private void SendSoapFault(string faultCode,
                             string subvalue,
                             string description,
                             string appCode,
                             string appMessage)
  {
    string template =
      “<soap:Envelope xmlns:soap=”http://www.w3.org/2003/05/soap-envelope””
                    + “ xmlns:rpc=”http://www.w3.org/2003/05/soap-rpc”>”
                    + “<soap:Body>”
                    + “<soap:Fault>”
                    + “<soap:Code>”
                    + “<soap:Value></soap:Value>”
                    + “<soap:Subcode>”
                    + “<soap:Value></soap:Value>”
                    + “</soap:Subcode>”
                    + “</soap:Code>”
                    + “<soap:Reason>”
                    + “<soap:Text></soap:Text>”
                    + “</soap:Reason>”
                    + “<soap:Detail>”
                    + “<o:OrderFaultInfo”
                    + “ xmlns:o=”http://www.wiley.com/soap/ordersystem”>”
                    + “<o:ErrorCode></o:ErrorCode>”
                    + “<o:Message></o:Message>”
                    + “</o:OrderFaultInfo>”
                    + “</soap:Detail>”
                    + “</soap:Fault>”
                    + “</soap:Body>”
                    + “</soap:Envelope>”;
    XElement soapResponse = XElement.Parse(template);
    XElement soapFault = soapResponse.Descendants(soapNS + “Fault”).First();
    soapFault.Element(soapNS + “Code”).
               SetElementValue(soapNS + “Value”, faultCode);
    soapFault.Element(soapNS + “Code”).
        Element(soapNS + “Subcode”).SetElementValue(soapNS + “Value”, subvalue);
    soapFault.Element(soapNS + “Reason”).
       SetElementValue(soapNS + “Text”, description);
    XElement orderFaultInfo =
         soapResponse.Descendants(cartNS + “OrderFaultInfo”).First();
    orderFaultInfo.SetElementValue(cartNS + “ErrorCode”, appCode);
    orderFaultInfo.SetElementValue(cartNS + “Message”, appMessage);
    soapResponse.Save(Response.OutputStream);
  }
}
AddToCart.aspx.cs
  <select name=”lstItems” id=”lstItems” style=”width: 350px”
     onchange=”setPriceAndQuantity();”>
    <option value=”10.50” id=”item1”
     selected>Cool Britannia, by The Bonzo Dog Doo-Dah Band</option>
    <option value=”12.95”
       id=”item2”>Zibka Smiles, by The Polka Dot Zither Band</option>
    <option value=”20.00”
      id=”item3”>Dr Frankenstein's Disco Party, by Jonny Wakelin</option>
  </select>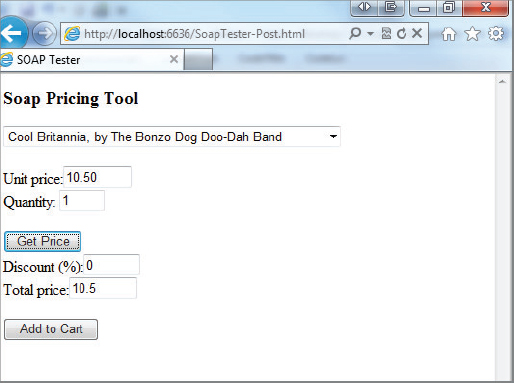
![]() LISTING 15-3: SoapTester-Post.html
LISTING 15-3: SoapTester-Post.html
<html>
<head>
  <title>SOAP Tester</title>
  <script type=”text/javascript”
     src=”http://code.jquery.com/jquery-1.6.4.js”></script>
  <script type=”text/javascript”>
    function doGet()
    {
      var dUnitPrice = $(“#txtUnitPrice”).val();
      var iQuantity = $(“#txtQuantity”).val();
      var sBaseUrl = “GetTotal2.aspx”;
      var sQuery = “?unitprice=” + dUnitPrice + “&quantity=” + iQuantity;
      var sRequest = sBaseUrl + sQuery;
      $.get(sRequest, null, handleGetTotalResponse, “xml”);
    }

    function handleGetTotalResponse(data, textStatus, jqXHR)
    {
      if (textStatus == “success”)
      {
        alert(jqXHR.responseText);
        var oBody = $(“[nodeName=soap:Body]”, jqXHR.responseXML);
        var dDiscount = oBody.find(“[nodeName=Discount]”).text();
        var dTotalPrice = oBody.find(“[nodeName=TotalPrice]”).text();
        if (!dDiscount)
        {
          var oError = $(“[nodeName=Error]”, jqXHR.responseXML);
          if (oError)
          {
            var sErrorMessage = oError.find(“[nodeName=Reason]”).text();
            alert(sErrorMessage);
          }
          else
          {
            alert(“Unreadable error message.”);
          }
        }
        showResults(dDiscount, dTotalPrice);
      }
      else
        alert(“Error accessing web service.”);
    }

    function showResults(discount, totalPrice)
    {
      $(“#txtDiscount”).val(discount);
      $(“#txtTotalPrice”).val(totalPrice);
    }

    function setPriceAndQuantity()
    {
      $(“#txtUnitPrice”).val($(“#lstItems”).val());
      $(“#txtQuantity”).val(1);
    }

    function doPost()
    {
      var oLst = document.getElementById(“lstItems”);
      var sItemId = oLst.options[oLst.selectedIndex].id;
      var sCartId = $(“#hdCartId”).val();
      var iQuantity = $(“#txtQuantity”).val();
      var dTotalPrice = $(“#txtTotalPrice”).val();
      var sSoapRequest =
        “<soap:Envelope xmlns:soap=”http://www.w3.org/2003/05/soap-envelope”>”
                       + “<soap:Body>”
             + “<o:AddToCart xmlns:o=”http://www.wiley.com/soap/ordersystem”>”
                       + “<o:CartId>” + sCartId + “</o:CartId>”
                       + “<o:Item itemId=”” + sItemId + “”>”
                       + “<o:Quantity>” + iQuantity + “</o:Quantity>”
                       + “<o:TotalPrice>” + dTotalPrice + “</o:TotalPrice>”
                       + “</o:Item>”
                       + “</o:AddToCart>”
                       + “</soap:Body>”
                       + “</soap:Envelope>”;
      alert(sSoapRequest);
      $.ajax({ url: “AddToCart.aspx”,
               type: “post”,
               data: sSoapRequest,
               processData: false,
               contentType: “text/xml”,
               success: handleAddToCartResponse});
    }

    function handleAddToCartResponse(data, textStatus, jqXHR)
    {
      if (textStatus == “success”)
      {
        alert(jqXHR.responseText);
        var oBody = $(“[nodeName=soap:Body]”, jqXHR.responseXML);
        var sStatus = oBody.find(“[nodeName=o:Status]”).text();
        if (!sStatus)
        {
          var sMessage = oBody.find(“[nodeName=o:Message]”).text();
          alert(“Unable to add item to cart.
” + sMessage);
        }
        else
        {
          if (sStatus == “OK”)
          {
            alert(“Item added to cart”);
          }
          else
          {
            alert(“Unable to add item to cart.”);
          }
        }
      }
      else
      {
        alert(“Unable to add item to cart.”);
      }
    }

    function init()
    {
      setPriceAndQuantity();
    }

  </script>
</head>
<body onload=”init();”>
  <h3>
    Soap Pricing Tool</h3>
  <form name=”orderForm”>
  <select name=”lstItems”
    id=”lstItems” style=”width: 350px” onchange=”setPriceAndQuantity();”>
    <option value=”10.50”
    id=”item1” selected>Cool Britannia, by The Bonzo Dog Doo-Dah Band</option>
    <option value=”12.95”
    id=”item2”>Zibka Smiles, by The Polka Dot Zither Band</option>
    <option value=”20.00”
    id=”item3”>Dr Frankenstein's Disco Party, by Jonny Wakelin</option>
  </select>
  <p>
    Unit price:<input type=”text” name=”txtUnitPrice”
     id=”txtUnitPrice” size=”6” readonly><br>
    Quantity:
    <input type=”text” name=”txtQuantity” id=”txtQuantity” size=”2”>
  </p>
  <input type=”button” value=”Get Price” onclick=”doGet()”><br>
  Discount (%):
    <input type=”text” id=”txtDiscount” name=”txtDiscount” size=”4” readonly><br>
  Total price:
   <input type=”text” id=”txtTotalPrice”
     name=”txtTotalPrice” size=”6” readonly><br>

  <input type=”hidden” readonly name=”hdCartId”
   id=”hdCartId” value=”cart123”><br>
  <input type=”button” value=”Add to Cart” onclick=”doPost();”>

  </form>
</body>
</html>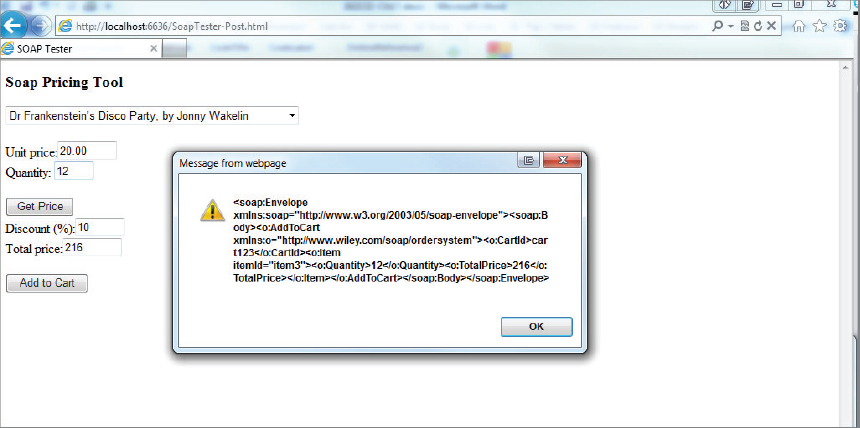
This may seem like a lot of work for a very simple operation, but realize that you have created, from scratch, all of the plumbing necessary to create an entire SOAP service. Implementing a more difficult SOAP service, such as some type of order-processing system, would require the same level of plumbing, even though the functionality being provided would be much more difficult.
In addition, several SOAP toolkits are available, meaning you won’t necessarily have to generate the SOAP messages by hand like this every time you want to use SOAP to send messages from one computer to another. In any case, when you use those toolkits now, you’ll understand what’s going on under the hood. Until vendors get their respective acts together, that will come in handy when the inevitable inconsistencies and incompatibilities appear.
DEFINING WEB SERVICES: WSDL
You’ve built a web service. Now you hope that other people and organizations start using the service you’ve built. To do that, however, they need to know two things:
- How to call the service
- What to expect as a response from the service
Fortunately, there’s a relatively easy way to provide answers to both questions: Web Services Description Language (WSDL). WSDL provides a standardized way to describe a web service. That means you can create a WSDL file describing your service, make the file available, and then sit back as people use it.
Of course, a WSDL file isn’t just for people. Recall the toolkits that take most of the work out of creating SOAP messages. They’re built on the principle that they can automatically generate a client for your web service just by analyzing the WSDL file. In this way, WSDL helps to make web services truly platform- and language-independent.
How’s that, you ask? It’s simple. A WSDL file is written in XML, describing the data to be passed and the method for passing it, but it doesn’t lean toward any particular language. That means a web-services client generator can use the WSDL information to generate a client in any language. For example, a code generator for Java could create a client to access your ASP-based service, and the best part is that the client is pure Java. A developer writing an application around it doesn’t have to know the details of the service, just the methods of the proxy class that actually accesses the service. The proxy sits between the client and the actual service, translating messages back and forth.
This chapter uses WSDL to describe a service that sends SOAP messages over HTTP, but in actuality WSDL is designed to be much more general. First, you define the data that will be sent, and then you define the way it will be sent. In this way, a single WSDL file can describe a service that’s implemented as SOAP over HTTP as well as, say, SOAP over e-mail or even a completely different means. This chapter sticks with SOAP over HTTP because that’s by far the most common usage right now.
The following sections discuss the various XML elements and attributes that make up a WSDL file and how they are mapped to a SOAP message.
<definitions>
A WSDL file starts with a <definitions> element like so:
<?xml version=”1.0”?>
<definitions name=”temperature”
    targetNamespace=”http://www.example.com/temperature”
    xmlns:typens=”http://www.example.com/temperature”
    xmlns:xsd=”http://www.w3.org/2000/10/XMLSchema”
    xmlns:soap=”http://schemas.xmlsoap.org/wsdl/soap/”
    xmlns=”http://schemas.xmlsoap.org/wsdl/”>
</definitions>
The first task in a WSDL file is to define the information that will be sent to and from the service. A WSDL file builds up the service in levels. First, it defines the data to be sent and received, and then it uses that data to define messages.
<types>
Remember that there’s no way to know for sure that the web service being described will use SOAP, or even that the information passed in the request will be XML, but WSDL enables you to define the information set—in other words, the information itself, regardless of how it’s ultimately represented—using XML Schemas (discussed in Chapter 5). For example, consider a simple service that takes a postal code and date and returns an average temperature. The service would have two types of data to deal with, as shown in the following code:
<types>
   <xsd:schema xmlns=””
        xmlns:xsd=”http://www.w3.org/2000/10/XMLSchema”
        targetNamespace=”http://www.example.com/temperature”>
      <xsd:complexType name=”temperatureRequestType”>
         <xsd:sequence>
            <xsd:element name=”where” type=”xsd:string” />
            <xsd:element name=”when” type=”xsd:date”/>
         </xsd:sequence>
      </xsd:complexType>
      <xsd:complexType name=”temperatureResponseType”>
         <xsd:sequence>
            <xsd:element name=”temperature” type=”xsd:integer”/>
         </xsd:sequence>
      </xsd:complexType>
   </xsd:schema>
</types>
Just as in a normal schema document, you define two types: temperatureRequestType and temperatureResponseType. You can use them to define messages.
<messages>
When you define a message in a WSDL file, you’re defining the content, rather than the representation. Sure, when you send SOAP messages, you are sending XML in a SOAP envelope, but that doesn’t matter when you define the messages in the WSDL file. All you care about is what the message is, what it’s called, and what kind of data it holds. Take the following example:
<message name=”TemperatureRequestMsg”>
   <part name=”getTemperature” type=”typens:temperatureRequestType”/>
</message>
<message name=”TemperatureResponseMsg”>
   <part name=”temperatureResponse” type=”typens:temperatureResponseType”/>
</message>
The preceding code defines a message that consists of an element called getTemperature of the type temperatureRequestType. This translates into the following SOAP message:
<env:Envelope xmlns:env=”http://www.w3.org/2003/05/soap-envelope”>
  <env:Body>
    <getTemperature>
      <where>POSTAL CODE</where>
      <when>DATE</when>
    </getTemperature>
  </env:Body>
</env:Envelope>
Notice that the namespace for the payload is still missing. You take care of that later in the WSDL file. In WSDL 2.0, messages are described within the types element and rely on XML Schemas.
<portTypes>
The <portTypes> element contains a number of <portType> elements that describe the individual operation provided by the service. These operations come in two varieties, input and output, and are made up of the messages you defined earlier. Consider the following example:
<portType name=”TemperatureServicePortType”>
   <operation name=”GetTemperature”>
      <input message=”typens:TemperatureRequestMsg”/>
      <output message=”typens:TemperatureResponseMsg”/>
   </operation>
</portType>
This portType shows that you’re dealing with a request-response pattern; the user sends an input message, the structure of which is defined as a TemperatureRequestMsg, and the service returns an output message in the form of a TemperatureResponseMsg.
One of the major improvements coming in WSDL 2.0 is the change of the <portTypes> element to the <interfaces> element. Although portType seems to make sense from a structural point of view — later, you reference it when you define an actual port — it really is more of an interface, because it defines the various operations you can carry out with the service. The <interfaces> element can also be extended using the extends attribute, which allows inheritance and greater reuse of already successful code.
Next, you have to define how those messages are sent.
<binding>
Up until now, this section actually hasn’t described anything related to SOAP. You’ve defined messages and put them together into operations, but you haven’t learned anything about the protocol you use to send them. The <binding> element sets up the first part of this process. In this case, you bind the operations to SOAP as follows:
<binding name=”TemperatureBinding” type=”typens:TemperatureServicePortType”>
   <soap:binding style=”rpc” transport=”http://schemas.xmlsoap.org/soap/http”/>
   <operation name=”GetTemperature”>
      <soap:operation />
      <input>
         <soap:body use=”encoded”
                    encodingStyle=”http://www.w3.org/2003/05/soap-encoding”
                    namespace=”http://www.example.com/temperature” />
      </input>
      <output>
         <soap:body use=”encoded”
                    encodingStyle=”http://www.w3.org/2003/05/soap-encoding”
                    namespace=”http://www.example.com/temperature” />
      </output>
   </operation>
</binding>
Notice that the soap: namespace finally comes into play at this point. There are two elements in this namespace: <soap:binding> and <soap:operation>. The following sections describe each one in detail.
<soap:binding>
The <soap:binding> element specifies that you are, in fact, dealing with a SOAP message, but it does more than that. The transport attribute is easy; it simply specifies that you’re sending the message via HTTP. The style attribute is a little more complex (but just a little).
Both this chapter and the previous one concentrate on using web services as another means of performing remote procedure calls, but that’s not their only use. In fact, in many cases information is simply passed to the service, which acts upon the data, rather than the data determining what should be done.
The style attribute has two possible values: rpc and document. The rpc value is a message in which you simply have a method name and parameters. For example, in this message, the payload represents a call to the getTemperature method with the parameters 34652 and 2004-5-23, as shown in the following code:
<env:Envelope xmlns:env=”http://www.w3.org/2003/05/soap-envelope">
  <env:Body>
    <getTemperature>
      <where>34652</where>
      <when>2004-05-23</when>
    </getTemperature>
  </env:Body>
</env:Envelope>
The data is contained in an outer element (getTemperature), which is itself contained within the <env:Body> element.
When you use the document style, however, the situation is slightly different. In that case, the entire contents of the <env:Body> element are considered to be the data in question. For example, you might have created a SOAP message of the following:
<env:Envelope xmlns:env="http://www.w3.org/2003/05/soap-envelope">
  <env:Body>
    <where>34652</where>
    <when>2004-05-23</when>
  </env:Body>
</env:Envelope>
The document style also enables you to send more complex documents that might not fit into the RPC mold. Note that neither of these examples shows the namespaces for the payload. That is set in the soap:body element, which you learn about shortly.
<soap:operation>
The <soap:operation> element is part of the <binding> section. If the <soap:operation> element looks out of place just sitting there with no attributes; that’s because in many ways it is out of place. The SOAP 1.1 specification required all services to use a SOAPAction header defining the application that was supposed to execute it. This was an HTTP header, so you’d see something like this:
POST /soap.asp HTTP/1.1
Accept: image/gif, image/x-xbitmap, image/jpeg, image/pjpeg, */*
Accept-Language: en-us
Content-Type: application/x-www-form-urlencoded
Accept-Encoding: gzip, deflate
User-Agent: Mozilla/4.0 (compatible; MSIE 5.5; Windows NT 5.0)
Host: www.example.com
Content-Length: 242
SOAPAction: “http://www.example.org/soap/TemperatureService.asp”

<env:Envelope xmlns:env=”http://www.w3.org/2003/05/soap-envelope”>
  <env:Body>
    <getTemperature>
      <where>34652</where>
      <when>2004-05-23</when>
    </getTemperature>
  </env:Body>
</env:Envelope>
The SOAP 1.2 specification did away with the SOAPAction header, but it’s still necessary to specify that this is a SOAP message — hence, the soap:operation element.
<soap:body>
The binding element references an operation, which in this case, is already defined as having an input and an output message. Within the binding element, you define how those messages are to be presented using the soap:body element. For example, you specify the following:
<soap:body use=”encoded”
  encodingStyle=”http://www.w3.org/2003/05/soap-encoding”
    namespace=”http://www.example.com/temperature” />
For the input message, you’re specifying that it’s a SOAP message. Like the style attribute, the use attribute has two possible values: literal and encoded. When the use attribute is specified as literal, it means that the server is not to assume any particular meaning in the XML, but to take it as a whole. Normally, you use literal with the document style. If you specify the use attribute as encoded, you have to specify the encodingStyle. In this case, you specify the SOAP style, but you could use other encodings, such as RDF or even an entirely new encoding style. Finally, you specify the namespace of the payload, so you wind up with a complete message as follows:
<env:Envelope xmlns:env=”http://www.w3.org/2003/05/soap-envelope”>
  <env:Body>
    <t:getTemperature xmlns:t=”http://www.example.com/temperature”>
      <t:where>34652</t:where>
      <t:when>2004-05-23</t:when>
    </t:getTemperature>
  </env:Body>
</env:Envelope>
Now you just need to know where to send it.
<service>
The final step in creating a WSDL file is to specify the service that you’re creating by putting all of these pieces together, as shown in the following code:
<service name=”TemperatureService”>
   <port name=”TemperaturePort” binding=”typens:TemperatureBinding”>
      <soap:address location=”http://www.example.com/temp/getTemp.asp”/>
   </port>
</service>
When you create a service, you’re specifying where and how to send the information. In fact, the <port> element shown here will likely be renamed to endpoint in WSDL 2.0 because that’s what it is: the endpoint for the connection between the server and a client. First, you reference the binding you just created, and then you send it as a SOAP message to the address specified by the location attribute. That’s it. Now let’s try this out in the following activity.
<?xml version=”1.0”?>
<definitions name=”WileyShopping”
    targetNamespace=”http://www.wiley.com/soap/ordersystem”
    xmlns:typens=”http://www.wiley.com/soap/ordersystem”
    xmlns:xsd=”http://www.w3.org/2000/10/XMLSchema”
    xmlns:soap=”http://schemas.xmlsoap.org/wsdl/soap/”
    xmlns:soapenc=”http://schemas.xmlsoap.org/soap/encoding/”
    xmlns:wsdl=”http://schemas.xmlsoap.org/wsdl/”
    xmlns=”http://schemas.xmlsoap.org/wsdl/”>
  <!-- more WSDL will go here -->
</definitions><types>
<xsd:schema xmlns=””
xmlns:xsd=”http://www.w3.org/2000/10/XMLSchema”
targetNamespace=”http://www.wiley.com/soap/ordersystem”>
<xsd:complexType name=”AddToCartType”>
<xsd:sequence>
<xsd:element name=”CartId” type=”xsd:string” />
<xsd:element name=”Item”>
<xsd:complexType>
<xsd:sequence>
<xsd:element name=”Quantity”
type=”xsd:string”/>
<xsd:element name=”TotalPrice”
type=”xsd:string”/>
</xsd:sequence>
<xsd:attribute name=”ItemId”
type=”xsd:string” />
</xsd:complexType>
</xsd:element>
</xsd:sequence>
</xsd:complexType>
<xsd:complexType name=”AddToCartResponseType”>
<xsd:sequence>
<xsd:element name=”CartId” type=”xsd:string”/>
<xsd:element name=”Status” type=”xsd:string”/>
<xsd:element name=”Quantity” type=”xsd:string”/>
<xsd:element name=”ItemId” type=”xsd:string”/>
</xsd:sequence>
</xsd:complexType>
</xsd:schema>
</types><message name=”AddToCartRequestMsg”> <part name=”AddToCart” type=”typens:AddToCartType”/> </message> <message name=”AddToCartResponseMsg”> <part name=”AddToCartResponse” type=”typens:AddToCartResponseType”/> </message>
<portType name=”WileyPort”>
<operation name=”AddToCart”>
<input message=”typens:AddToCartRequestMsg”/>
<output message=”typens:AddToCartResponseMsg”/>
</operation>
</portType><binding name=”WileyBinding”
type=”typens:WileyPort”>
<soap:binding style=”rpc”
transport=”http://schemas.xmlsoap.org/soap/http”/>
<operation name=”AddToCart”>
<soap:operation />
<input>
<soap:body use=”encoded”
namespace=”http://www.wiley.com/soap/ordersystem”
encodingStyle=”http://schemas.xmlsoap.org/soap/encoding/”/>
</input>
<output>
<soap:body use=”encoded”
namespace=”http://www.wiley.com/soap/ordersystem”
encodingStyle=”http://schemas.xmlsoap.org/soap/encoding/”/>
</output>
</operation>
</binding>LISTING 15-4: WileyShopping.wsdl
<?xml version=”1.0”?>
<definitions name=”WileyShopping”
targetNamespace=”http://www.wiley.com/soap/ordersystem”
xmlns:typens=”http://www.wiley.com/soap/ordersystem”
xmlns:xsd=”http://www.w3.org/2000/10/XMLSchema”
xmlns:soap=”http://schemas.xmlsoap.org/wsdl/soap/”
xmlns:soapenc=”http://schemas.xmlsoap.org/soap/encoding/”
xmlns:wsdl=”http://schemas.xmlsoap.org/wsdl/”
xmlns=”http://schemas.xmlsoap.org/wsdl/”>
<types>
<xsd:schema xmlns=””
xmlns:xsd=”http://www.w3.org/2000/10/XMLSchema”
targetNamespace=”http://www.wiley.com/soap/ordersystem”>
<xsd:complexType name=”AddToCartType”>
<xsd:sequence>
<xsd:element name=”CartId” type=”xsd:string” />
<xsd:element name=”item”>
<xsd:complexType>
<xsd:sequence>
<xsd:element name=”Quantity”
type=”xsd:string”/>
<xsd:element name=”TotalPrice”
type=”xsd:string”/>
</xsd:sequence>
<xsd:attribute name=”ItemId”
type=”xsd:string” />
</xsd:complexType>
</xsd:element>
</xsd:sequence>
</xsd:complexType>
<xsd:complexType name=”addToCartResponseType”>
<xsd:sequence>
<xsd:element name=”CartId” type=”xsd:string”/>
<xsd:element name=”Status” type=”xsd:string”/>
<xsd:element name=”Quantity” type=”xsd:string”/>
<xsd:element name=”ItemId” type=”xsd:string”/>
</xsd:sequence>
</xsd:complexType>
</xsd:schema>
</types>
<message name=”AddToCartRequestMsg”>
   <part name=”AddToCart” type=”typens:AddToCartType”/>
</message>
<message name=”AddToCartResponseMsg”>
   <part name=”AddToCartResponse” type=”typens:AddToCartResponseType”/>
</message>
<portType name=”WileyPort”>
  <operation name=”AddToCart”>
    <input message=”typens:AddToCartRequestMsg”/>
    <output message=”typens:AddToCartResponseMsg”/>
  </operation>
</portType>
<binding name=”WileyBinding”
type=”typens:WileyPort”>
<soap:binding style=”rpc”
transport=”http://schemas.xmlsoap.org/soap/http”/>
<operation name=”AddToCart”>
<soap:operation/>
<input>
<soap:body use=”encoded”
namespace=”http://www.wiley.com/soap/ordersystem”
encodingStyle=”http://schemas.xmlsoap.org/soap/encoding/”/>
</input>
<output>
<soap:body use=”encoded”
namespace=”http://www.wiley.com/soap/ordersystem”
encodingStyle=”http://schemas.xmlsoap.org/soap/encoding/”/>
</output>
</operation>
</binding>
<service name=”WileyService”>
<port name=”WileyPort” binding=”typens:WileyBinding”>
<soap:address
location=”http://localhost/BasicOrderService/AddToCart.aspx”/>
</port>
</service>
</definitions>Other Bindings
It’s important to understand that WSDL doesn’t necessarily describe a SOAP service. Earlier in this chapter, you looked at a situation in which messages were passed by HTTP without the benefit of a SOAP wrapper. These REST messages can also be defined via WSDL by adding the HTTP binding.
The basic process is the same as it was for SOAP:
![]() LISTING 15-5: WileyShopping-Rest.wsdl
LISTING 15-5: WileyShopping-Rest.wsdl
<?xml version=”1.0”?>
<definitions name=”WileyShopping”
    targetNamespace=”http://www.wiley.com/soap/ordersystem”
    xmlns:typens=”http://www.wiley.com/soap/ordersystem”
    xmlns:xsd=”http://www.w3.org/2000/10/XMLSchema”
    xmlns:soap=”http://schemas.xmlsoap.org/wsdl/soap/”
    xmlns:soapenc=”http://schemas.xmlsoap.org/soap/encoding/”
    xmlns:wsdl=”http://schemas.xmlsoap.org/wsdl/”

    xmlns:http=”http://schemas.xmlsoap.org/wsdl/http/”
    xmlns:mime=”http://schemas.xmlsoap.org/wsdl/mime/”
    xmlns=”http://schemas.xmlsoap.org/wsdl/”>

  <types>
    <xsd:schema xmlns=””
       xmlns:xsd=”http://www.w3.org/2000/10/XMLSchema”
       targetNamespace=”http://www.wiley.com/soap/ordersystem”>
      <xsd:complexType name=”AddToCartType”>
        <xsd:sequence>
          <xsd:element name=”CartId” type=”xsd:string” />
          <xsd:element name=”ItemId” type=”xsd:string”/>
          <xsd:element name=”Quantity” type=”xsd:string”/>
          <xsd:element name=”TotalPrice” type=”xsd:string”/>
        </xsd:sequence>
      </xsd:complexType>
      <xsd:complexType name=”AddToCartResponseType”>
        <xsd:sequence>
          <xsd:element name=”CartId” type=”xsd:string”/>
          <xsd:element name=”Status” type=”xsd:string”/>
          <xsd:element name=”Quantity” type=”xsd:string”/>
          <xsd:element name=”ItemId” type=”xsd:string”/>
        </xsd:sequence>
      </xsd:complexType>

      <xsd:complexType name=”GetTotalResponseType”>
        <xsd:sequence>
          <xsd:element name=”Discount” type=”xsd:string” />
          <xsd:element name=”TotalPrice”
  type=”xsd:string”/>
        </xsd:sequence>
      </xsd:complexType>
    </xsd:schema>
  </types>
  <message name=”AddToCartRequestMsg”>
    <part name=”AddToCart” type=”typens:AddToCartType”/>
  </message>
  <message name=”AddToCartResponseMsg”>
    <part name=”AddToCartResponse” type=”typens:AddToCartResponseType”/>
  </message>

  <message name=”UpdateTotalsRequestMsg”>
    <part name=”Quantity” type=”xsd:number”/>
    <part name=”UnitPrice” type=”xsd:number”/>
  </message>
  <message name=”GetTotalResponseMsg”>
    <part name=”GetTotalResponse” type=”typens:
         GetTotalResponseType”/>
  </message>
  <portType name=”WileyPort”>
    <operation name=”AddToCart”>
      <input message=”typens:AddToCartRequestMsg”/>
      <output message=”typens:AddToCartResponseMsg”/>
    </operation>
  </portType>
  <portType name=”WileyRESTPort”>

    <operation name=”GetTotal2.aspx”>
      <input message=”typens:UpdateTotalsRequestMsg”/>
      <output message=”typens:UpdateTotalsResponseMsg”/>
    </operation>
  </portType>

  <binding name=”WileyBinding”
                           type=”typens:WileyPort”>
    <soap:binding style=”rpc”
          transport=”http://schemas.xmlsoap.org/soap/http”/>
    <operation name=”AddToCart”>
      <soap:operation/>
      <input>
        <soap:body use=”encoded”
  namespace=”http://www.wiley.com/soap/ordersystem”
  encodingStyle=”http://schemas.xmlsoap.org/soap/encoding/”/>
      </input>
      <output>
        <soap:body use=”encoded”
  namespace=”http://www.wiley.com/soap/ordersystem”
  encodingStyle=”http://schemas.xmlsoap.org/soap/encoding/”/>
      </output>
    </operation>
  </binding>
  <binding name=”WileyRESTBinding”
                           type=”typens:WileyRESTPort”>
    <http:binding verb=”GET”/>
    <operation name=”GetTotal2.aspx”>
      <http:operation location=”GetTotal.aspx”/>
      <input>
        <http:urlEncoded/>
      </input>
      <output>
        <mime:content type=”text/xml”/>
      </output>
    </operation>
  </binding>
  <service name=”WileyService”>
    <port name=”WileyPort” binding=”typens:WileyBinding”>
      <soap:address
  location=”http://localhost/BasicOrderService/GetTotal.aspx”/>
    </port>

    <port name=”WileyRESTPort” binding=”typens:WileyRESTBinding”>
      <http:address location=”http://localhost/BasicOrderService/”/>
    </port>

  </service>
</definitions>
In this way, you can define a service that uses any protocol using WSDL.
SUMMARY
This chapter covered the following areas:
- The advantages of SOAP include interoperability for web services; there is no tie-in between the client platform and the server one.
- SOAP is backed by many top name companies including Microsoft, Sun, IBM, and Google so the familiar proprietary wrangles are less prevalent.
- SOAP is flexible: You can choose to follow the XML-RPC style of message or just use the <soap:Body> to contain a system specific message that is processed on the server. You can also add any number of extra items to the <soap:Header> to implement security, message chaining, and any other instructions you may need.
- SOAP is not the only choice when it comes to web services. REST is a very popular standard that makes use of the underlying HTTP protocol to implement remote procedure calls. Although it lacks some of the lesser-used features of SOAP, REST is a good choice for simple services especially when they need to be made public and security is not a major consideration.
- WSDL is an XML format used to describe web services.
- With just a WSDL file you can create a web services client that produces messages in the correct format, can understand the responses and knows where the service is based.
In the next chapter you look at AJAX and how it uses XML.
EXERCISES
You can find suggested solutions to these questions in Appendix A.
- It corresponds to an RPC called GetStockPrice().
- It takes one parameter, a string holding the recognized stock exchange code of the company whose stock price you require. For example Microsoft’s code is MSFT.
- The server responds with a decimal that is the latest stock price for the requested company.
WHAT YOU LEARNED IN THIS CHAPTER
| TOPIC | KEY POINTS |
| SOAP basics | A way to implement web services that is flexible yet standards based and platform independent. |
| Message format | Messages can be simple RPC style or just an abstraction of the data you need to send and receive. |
| SOAP header | The header contains any meta data and instructions that the service needs. These can include such things as credentials and routing information. |
| Other web service options | REST is another popular choice of web service implementation. It lacks the more sophisticated features of SOAP but is simpler to implement and client design is easier. |
| WSDL | WSDL is the web service description language. It is an XML format that provides a complete description of a service’s location, message structure and available methods. |
| WSDL uses | All major software frameworks, such as Java and .NET, enable you to automatically construct a web services client by passing the WSDL to an appropriate application. |