
CHAPTER 10
Lights, Camera, Transformations!
A 3D scene may include many cameras, lights, and objects. Creating some classes to represent these objects will make your game a lot easier to manage.
In this chapter, you will create a basic framework to manage cameras, lights, and object transformations. You'll see how your game structure benefits from these classes in Chapters 11, 12, and 13, where the framework is used to create a complete 3D game.
One of the most essential components of a 3D game is the camera. Therefore, this chapter will start by showing how you can manage your camera system.
Cameras
Depending on the genre of game that you're creating, you might want to use a different type of camera, such as a fixed-position camera, a first-person camera, a third-person camera, a real-time strategy (RTS) camera, and so on. With so many different types of cameras, it is helpful to create a basic camera that can be extended to create more specific types of cameras.
A Base Camera Class
In this section, you're going to create a generic base class for cameras, called BaseCamera. This class will handle the camera view and projection matrices, defining its viewing volume, its frustum (truncated pyramid). Only the objects that are inside this frustum are in sight of the camera.
The camera's frustum is defined by the camera's view and projection matrices, as explained in this section. These matrices are required when your graphics card transforms your 3D scene to a 2D image. The frustum can also be used to detect whether objects are within the sight of the camera, which can help you decide whether an object should be drawn.
Camera Perspective Projection
The projection matrix created in this section defines the boundaries (the shape, if you will) of the camera frustum, which is the viewing volume that defines what is in sight of the camera. The camera frustum is specified by the viewing angle of the camera and the near and far clipping planes. You'll create the projection matrix in the SetPerspectiveFov method (given this name because the camera's field of view partly defines the viewing volume). You'll also define the Projection property, which allows your program to get the projection matrix.
The BaseCamera class supports only perspective projection, which is the most common type used in games. You can use the following code to create and update the camera perspective projection matrix:
// Perspective projection parameters

float fovy;

float aspectRatio;

float nearPlane;

float farPlane;


// Matrices and flags

protected bool needUpdateProjection;

protected bool needUpdateFrustum;

protected Matrix projectionMatrix;


// Get the camera projection matrix

public Matrix Projection

{

    get

    {

        if (needUpdateProjection)  UpdateProjection();

        return projectionMatrix;

    }

}


// Set the camera perspective projection

public void SetPerspectiveFov(float fovy, float aspectRatio, float nearPlane,

    float farPlane)

{

    this.fovy = fovy;

    this.aspectRatio = aspectRatio;

    this.nearPlane = nearPlane;

    this.farPlane = farPlane;

    needUpdateProjection = true;

}


// Update the camera perspective projection matrix

protected virtual void UpdateProjection()

{

    // Create a perspective field of view matrix

    projectionMatrix = Matrix.CreatePerspectiveFieldOfView(

        MathHelper.ToRadians(fovy), aspectRatio, nearPlane, farPlane);

    needUpdateProjection = false;

    needUpdateFrustum = true;

}
The SetPerspectiveFov method stores the new perspective projection parameters, but it does not generate the new projection matrix. Instead, it sets the needUpdateProjection variable as true, indicating that the projection matrix needs to be updated before it can be used. When the perspective projection is retrieved through the Projection property, it will update the projection matrix if needed. Finally, inside the UpdateProjection method, you generate the new perspective projection matrix using the CreatePerspectiveFieldOfView method of XNA's Matrix class.
Notice that the camera's frustum needs to be updated whenever the projection matrix is updated, as it depends on all four of the arguments that define the projection matrix.
Camera View (Position and Orientation)
A camera is not defined solely by its frustum. You also need to specify where to position your camera in your 3D world, as well as how to orient it. The camera's position and orientation in the world are defined by the view matrix created in this section. You'll create the SetLookAt method to set the camera view matrix, and the View property to retrieve it. By allowing your game to retrieve both the view and projection matrix, you make it possible for XNA to transform all 3D objects to your 2D screen.
In order to create a view matrix using the Matrix.CreateLookAt method, you need to know three camera vectors (or directions): the heading (forward) vector, the strafe (right) vector, and the up vector. These vectors uniquely define the orientation of any object in 3D space. The SetLookAt method calculates these three vectors, starting from the camera's position, its target, and its up vector.
You can find the heading vector as you would calculate any vector between two points: by subtracting its starting position from its ending position. To find the strafe vector, you're looking for the vector that is perpendicular to both the heading vector and the up vector, which is exactly what the Vector3.Cross method does. You can find more information about this operation in the next section.
You can use the following code to modify and update the camera's view matrix:
// Position and target

Vector3 position;

Vector3 target;


// Orientation vectors

Vector3 headingVec;

Vector3 strafeVec;

Vector3 upVec;


// Matrices and flags

protected bool needUpdateView;

protected bool needUpdateFrustum;

protected Matrix viewMatrix;
// Get the camera view matrix

public Matrix View

{

    get

    {

        if (needUpdateView)  UpdateView();

        return viewMatrix;

    }

}


// Set the camera view

public void SetLookAt(Vector3 cameraPos, Vector3 cameraTarget, Vector3 cameraUp)

{

    this.position = cameraPos;

    this.target = cameraTarget;

    this.upVec = cameraUp;


    // Calculate the camera axes (heading, upVector, and strafeVector)

    headingVec = cameraTarget - cameraPos;

    headingVec.Normalize();

    upVec = cameraUp;

    strafeVec = Vector3.Cross(headingVec, upVec);

    needUpdateView = true;

}


// Update the camera view

protected virtual void UpdateView()

{

    viewMatrix = Matrix.CreateLookAt(position, target, upVec);

    needUpdateView = false;

    needUpdateFrustum = true;

}
Like the SetPerspectiveFov method, the SetLookAt method stores the new view parameters of the camera but does not generate the new view matrix. Instead, it only activates the needUpdateView flag. This way, whenever your program requests the view matrix through the View property, it will be updated only when necessary.
Finally, inside the UpdateView method, you generate the new view matrix using the CreateLookAt method of XNA's Matrix class. Notice that the camera's frustum needs to be updated whenever the view matrix is updated.
Camera Coordinate System
Every time you change the camera's configuration through the SetLookAt method, you need to calculate the three camera coordinate system vectors: its heading (z axis), strafe (x axis), and up (y axis). Figure 10-1 illustrates the camera's coordinate system placed in the world coordinate system. Notice that because these vectors compose the camera's coordinate system, they must be unitary (their length must be exactly 1) and perpendicular to each other. You can use unitary vectors to represent directions, because the size of the vector doesn't matter in this case. For more information about coordinate systems, refer to Chapter 8.
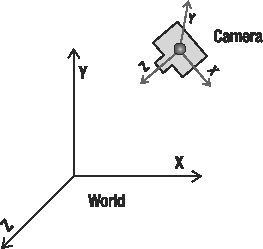
Figure 10-1. Camera's coordinate system placed in the world coordinate system. The camera's x, y, and z axes are represented by the strafe, up, and heading vectors, respectively.
You can calculate the camera vectors as follows:
- Heading:
- The heading vector is the direction from the camera's position to its target position. It describes the direction the camera is facing. You can calculate this direction by subtracting the camera's position from its target position.
- Up:
- The up vector defines the camera's up direction and is used to orient the camera. For example, you can use the vector (0, 1, 0) to orient the camera up vector as the world y axis.
- Strafe:
- The strafe vector is the vector that is perpendicular to the heading and up vectors. This can be found by using the vector cross-product operation, which calculates a vector that is perpendicular to two other vectors at the same time. The Cross method of XNA's Vector3 class performs a cross-production operation. Note that the vectors used in the cross-product operation must be unitary vectors (or you must normalize the resulting vector after the operation), and the order in which they are passed to the Cross method changes the direction of the resulting vector.
These three vectors form the camera's coordinate system, and are used whenever you need to transform the camera based on its axes; for example, whenever you need to move the camera toward the direction it is facing.
As we mentioned, the three vectors must be perpendicular to each other, which is not fully guaranteed by the code shown earlier. For example, suppose that the camera is facing mainly forward, but also slightly upward. If you called the SetLookAt method and used the regular up vector (0, 1, 0) as a third argument, you would run into trouble, because this up vector is not completely perpendicular to the camera's heading vector. (The strafe vector will be completely perpendicular to the heading and up vectors, because it was obtained through the cross product of both vectors.) If you want to make sure that the up vector is perpendicular to the heading vector, after calculating the strafe vector, you must calculate a new up vector using a second cross-product operation between the heading and strafe vectors, as follows:
upVec = Vector3.Cross(strafeVec, headingVec);
This will give you three vectors that you can be sure are perpendicular to each other.
Camera Frustum
You'll represent the camera's frustum using XNA's BoundingFrustum class. XNA has some classes to represent volume, each of which has collision test methods. This allows you to quickly check for intersection between two objects of these classes. Specific to the camera frustum, these collision checks allow you to check whether an object is in sight of the camera.
The bounding volumes available in the XNA Framework are the BoundingBox (an axis-aligned box), BoundingSphere, and BoundingFrustum classes. To make sure the collision tests are as accurate as possible, you should use the class that most closely resembles the actual 3D object it represents. For the camera's frustum, use the BoundingFrustum class. To represent an entire person, use a BoundingBox. Use a BoundingSphere only if you want to detect collisions on a person's hand or head. So, using the XNA BoundingFrustum class, you already have methods to check whether objects are inside the frustum, which will tell you whether they are inside or outside the sight of the camera.
You'll create the UpdateFrustum method to generate the camera's frustum, and the Frustum property to retrieve it. Here, you'll generate the camera's frustum by combining the camera's view and projection matrices and using it to construct a new XNA BoundingFrustum.
As described earlier, the camera is defined by the view matrix (position and orientation) and the projection matrix (shape of the camera frustum), which is why both matrices are needed when you create the BoundingFrustum. You can use the following code to build the camera's frustum:
public BoundingFrustum Frustum

{

    get

    {

        if (needUpdateProjection)

            UpdateProjection();

        if (needUpdateView)

            UpdateView();

        if (needUpdateFrustum)

            UpdateFrustum();

        return frustum;

    }

}


protected virtual void UpdateFrustum()

{

    frustum = new BoundingFrustum(viewMatrix * projectionMatrix);


    needUpdateFrustum = false;

}
Finally, the BaseCamera class must have the abstract method Update, which defines how the camera should be updated. As Update is an abstract method, each camera class you're going to add later that inherits from the BaseCamera class must implement this method. The Update method's signature is as follows:
public abstract void Update(GameTime time);
A Third-Person Camera
In this section, you'll extend the BaseCamera class from the previous section to create a more specific type of camera: a third-person camera. For this type of camera, you'll create a class named ThirdPersonCamera, which inherits from the BaseCamera class. The third-person camera's goal is to follow an object while it moves, and the distance at which the camera follows an object must be variable. Otherwise, it would appear that the object is bound to the camera, resulting in jerky camera movement.
To make the camera follow an object—for example, the player-controlled character—you need to define some parameters, such as the following:
- The chase position, which is the position of the target object the camera must follow
- The chase direction, which is the direction the camera should move to in order to reach the target object
- The chase speed
- The chase distance, which is the distance between the camera and the chase position
Here, we will characterize the chase distance by means of three variables: minimum, desired, and maximum distances between the camera and the object. Figure 10-2 illustrates some of the parameters that need to be configured.
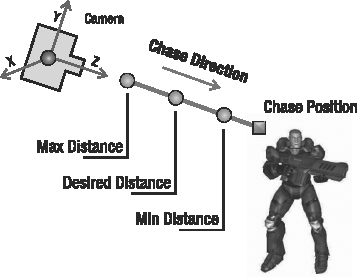
Figure 10-2. For the third-person camera, the square is the camera's chase position and the dots are the camera's maximum, desired, and minimum allowed positions.
Setting Chase Parameters
In the ThirdPersonCamera class, you create the SetChaseParameters method to set the camera's chase parameters that are not updated each frame: the chase distances and speed. You can configure the chase position and direction parameters, which are more frequently updated, through getter and setter methods:
// Chase parameters

float desiredChaseDistance;

float minChaseDistance;

float maxChaseDistance;

float chaseSpeed;


Vector3 chasePosition;

public Vector3 ChasePosition

{

    get { return chasePosition; }

    set { chasePosition = value; }

}


Vector3 chaseDirection;

public Vector3 ChaseDirection

{

    get { return chaseDirection; }

    set { chaseDirection = value; }

}


public void SetChaseParameters(float chaseSpeed,

    float desiredChaseDistance, float minChaseDistance, float maxChaseDistance){

    this.chaseSpeed = chaseSpeed;

    this.desiredChaseDistance = desiredChaseDistance;

    this.minChaseDistance = minChaseDistance;

    this.maxChaseDistance = maxChaseDistance;

}
Updating the Camera's Position
Every time the camera is updated, its position needs to be recalculated. The ideal, new camera position is equal to the camera's chase position, minus the chase direction, multiplied by the chase distance, as shown in Figure 10-2. The desired new camera position would be the camera's final position if it were placed at a fixed distance from the chase position. However, to allow the camera to move smoothly, the distance between the camera and the chase position may vary between a minimum and maximum range (defined in the attributes minChaseDistance and maxChaseDistance).
Vector3 targetPosition = chasePosition;

Vector3 desiredCameraPosition = chasePosition -

    chaseDirection * desiredChaseDistance;


float interpolatedSpeed = MathHelper.Clamp(chaseSpeed *

    elapsedTimeSeconds, 0.0f, 1.0f);

desiredCameraPosition = Vector3.Lerp(position, desiredCameraPosition,

    interpolatedSpeed);
This way, the new camera position is calculated through a linear interpolation between its current position and its desired position. A linear interpolation is an interpolation between two values that varies linearly according to a defined weight, where the weight is usually a floating-point number defined between 0 and 1. For example, a linear interpolation between the numbers 10 and 20 using the weight value 0.50 is the same as saying, "Give me 50 percent between 10 and 20," which results in the value 15. Linear interpolations using the weights 0, 0.25, and 1 result in the values 10, 12.5, and 20, respectively, as these values are 0, 25, and 100 percent between 10 and 20. Also, a linear interpolation between two 3D vectors interpolates the value of each component of the vectors (x, y, and z) linearly.
The weight used to interpolate the camera's position is calculated based on the time elapsed since the last update and the camera speed. However, because the interpolation weight must be between 0 and 1, you need to clamp its value, limiting its range between 0 and 1. You use the XNA Vector3 class's Lerp method to help you interpolate vectors. As a result, smaller values for chaseSpeed will result in a slowly reacting camera, and a longer time for the camera to start moving after the object does. Higher values for chaseSpeed will result in a quickly reacting camera and shorter time between the movement of the camera in relation to the movement of the object. (This camera reaction time is often referred to as the lag.)
Create the UpdateFollowPosition method to update the camera's position. Following is the code for the UpdateFollowPosition method. Note that to keep things tidy, you want all of your directions to have a length of exactly 1. This can be done by calling their Normalize method, or manually by dividing them by their length, as done for the targetVector in the following code.
private void UpdateFollowPosition(float elapsedTimeSeconds,

    bool interpolate)


{

    Vector3 targetPosition = chasePosition;

    Vector3 desiredCameraPosition = chasePosition- chaseDirection *

        desiredChaseDistance;


    if (interpolate)

    {

        float interpolatedSpeed = MathHelper.Clamp(

            chaseSpeed * elapsedTimeSeconds, 0.0f, 1.0f);

        desiredCameraPosition = Vector3.Lerp(position,

            desiredCameraPosition, interpolatedSpeed);

        // Clamp the min and max follow distances

        Vector3 targetVector = desiredCameraPosition - targetPosition;

        float targetLength = targetVector.Length();

        targetVector /= targetLength;

        if (targetLength < minChaseDistance)

        {

            desiredCameraPosition = targetPosition +

                targetVector * minChaseDistance;

        }

        else if (targetLength > maxChaseDistance)

        {

            desiredCameraPosition = targetPosition +

                targetVector * maxChaseDistance;

        }

    }


    // Needed to recalculate heading, strafe, and up vectors

    SetLookAt(desiredCameraPosition, targetPosition, upVec);

}
The UpdateFollowPosition method has the interpolate parameter, which defines whether the camera will be placed at its desired position (if the interpolate value is false), or will be smoothly interpolated to the desired position. When the camera chases an object for the first time, you must set the interpolate value as false, because there will be no target or movement to take into account, and initialize the camera to its starting position. You use the Boolean variable interpolate to determine whether the camera should be initialized to its starting position.
When the final camera position is calculated by interpolating its current position with its desired position, you need to check if the distance from the camera to the chase position is between the minimum and maximum chase distances defined, as shown in Figure 10-2. If the distance is smaller than the minimum, you set it to the minimum allowed distance. Otherwise, if the camera distance is greater than the maximum distance, you set it to the maximum allowed distance. These tests are important, as they ensure that the camera can chase objects that have a greater speed than the camera.
Rotating the Camera Around the Target
Another feature you'll add to the camera is the ability to rotate around its target. For that feature, you'll want a way to define the maximum rotation speed of the camera and the current rotation of the camera. Also, because you want your camera's rotation to start and stop smoothly, you'll need to keep track of the current rotational speed. Add these three properties to your ThirdPersonCamera class:
// Maximum allowed rotation

public static float MAX_ROTATE = 30.0f;


// Current rotation angles over the camera axes (heading, up, and strafe)

Vector3 eyeRotate;

// Rotation velocity over the camera axes

Vector3 eyeRotateVelocity;

public Vector3 EyeRotateVelocity

{

    get { return eyeRotateVelocity; }

    set { eyeRotateVelocity = value; }

}
The allowed camera rotation range is defined between the -MAX_ROTATE and MAX_ROTATE values. If the camera rotation is outside this range, you'll set it so that it is clamped to the borders of this range. The eyeRotate vector will store the current camera rotation, where the X, Y, and Z components of this vector represent the angle of the rotation around the camera's strafe, up, and heading axes. Finally, the eyeRotateVelocity vector will store the velocity at which the camera rotation angle is updated.
To calculate the camera view matrix taking into account the camera rotation, you'll need to overwrite the UpdateView method of the BaseCamera class. Remember that the UpdateView method is called when the camera view matrix is retrieved through the View property, and the needUpdateView flag was set to true. Following is the code for the UpdateView method of the ThirdPersonCamera class:
protected override void UpdateView()

{

    Vector3 newPosition = Position - Target;


    // Calculate the new camera position, rotating it around its axes

    newPosition = Vector3.Transform(newPosition,

        Matrix.CreateFromAxisAngle(UpVector,

            MathHelper.ToRadians(eyeRotate.Y)) *

        Matrix.CreateFromAxisAngle(StrafeVector,

            MathHelper.ToRadians(eyeRotate.X)) *

        Matrix.CreateFromAxisAngle(HeadingVector,

            MathHelper.ToRadians(eyeRotate.Z))

        );


    viewMatrix = Matrix.CreateLookAt(newPosition + Target,

        Target, UpVector);


    needUpdateView = false;

    needUpdateFrustum = true;

}
In the overwritten UpdateView method, you need to calculate the camera's position considering its rotation. The camera rotation is stored in the eyeRotation attribute and is relative to its axes. To rotate the camera around its own axes you'll first need to create a rotation matrix that rotates around an arbitrary axis. You can create this matrix using the CreateFromAxisAngle method of XNA's Matrix class. Then you can calculate the final matrix used to rotate the camera by combining the matrices that rotate the camera around its y, x, and z axes in order. You use this combined matrix to transform the position defined in world 3D coordinates into the corresponding position defined in camera coordinates (see Figure 10-1).
Updating the Camera
You must implement a final method in the ThirdPersonCamera class: the Update method, as it was defined as an abstract method in the BaseCamera class earlier in this chapter. This Update method is called every time the camera needs to be updated. Inside the Update method, you need to update the camera's attributes, as well as call the methods used to update the camera. The UpdateView and UpdateProjection methods use the camera's attributes to update the camera's view and projection matrix. These methods are called only when the view and projection matrices are retrieved through properties and need to be updated. Following is the code for the Update method of the ThirdPersonCamera class:
public override void Update(GameTime time)

{

    float elapsedTimeSeconds =

        (float)time.ElapsedGameTime.TotalSeconds;


    // Update the follow position

    UpdateFollowPosition(elapsedTimeSeconds, !isFirstTimeChase);

    if (isFirstTimeChase)

    {

        eyeRotate = Vector3.Zero;

        isFirstTimeChase = false;

    }


    // Calculate the new rotation based on the rotation speed

    if (eyeRotateVelocity != Vector3.Zero)

    {

        eyeRotate += eyeRotateVelocity * elapsedTimeSeconds;

        eyeRotate.X = MathHelper.Clamp(eyeRotate.X,

            -MAX_ROTATE, MAX_ROTATE);

        eyeRotate.Y = MathHelper.Clamp(eyeRotate.Y,

            -MAX_ROTATE, MAX_ROTATE);

        eyeRotate.Z = MathHelper.Clamp(eyeRotate.Z,

            -MAX_ROTATE, MAX_ROTATE);

        needUpdateView = true;

    }

}
In the Update method, you first update the camera's position using the UpdateFollowPosition method. Then, assuming that the camera's rotational velocity is not zero, you calculate the camera's current rotation based on its rotation velocity and the elapsed time since the last update. This ensures the camera behaves exactly the same way on PCs with different processor speeds.
Lights
Along with a working camera system, your game needs to contain lights. Lights make a big contribution to the realism of a game, especially a 3D game. A game scene can have various light sources scattered around it, which can be, for example, activated or deactivated dynamically depending on the player's position. The main drawback of placing many lights in a scene is that the higher the number of light sources, the more processing needed to render the scene. Some types of light sources used in games are directional light (for example, sunlight), spotlight (as the name says), and point light (a point that emits light in all directions).
In this section, you'll create some helper classes for the lights in your scene. Dealing with lights in this way will keep them structured, allowing your light system to be easily managed and integrated into your game engine, as demonstrated in Chapter 13.
Base Light
In this section, you'll create a base class for all the lights, named BaseLight. The BaseLight class doesn't have any methods other than its constructor. Because the different light types don't have that many resources in common, you will store only the light source color inside this base class. Each specific light will inherit from this base class and add its specific properties:
// Light diffuse and specular color

Vector3 color;

public Vector3 Color

{

    get { return color; }

    set { color = value; }

}
The color attribute of the BaseLight class is used as the color of the diffuse and specular components of the light. The diffuse color's intensity depends on the angle between the incoming light and the surface of the object, and the specular color is visible only when the light is mirrored on the object straight into the camera. An alternative would be to store the colors of the diffuse and specular components separately. Note that the (X, Y, Z) components of the color vector are used to represent a color in the RGB format.
Also, note that the lights don't have an ambient component. The ambient component is the amount and color of light that is always present in any part of the scene, and as such, it does not depend on the location of the camera or a light. It is the same for all lights in the scene.
Point Light/Omnidirectional Light
In this section, you'll create a class that inherits from the BaseLight class to define a more specific type of light: a point light (or omnidirectional light). For this type of light, you'll create a class named PointLight, which extends the BaseLight class.
Point lights are easy to define and keep track of, as you need to store only the light position inside the PointLight class:
public class PointLight : BaseLight

{

    // Omnidirectional light position: inherits from base class

    Vector3 position;

    public Vector3 Position

    {

        get { return position;  }

        set { position = value;  }

    }

}
Along with their position, you could also store the range of the point lights, which you could use to calculate the light's attenuation. However, to simplify the illumination calculus, only the light position is stored in this example.
Camera and Light Managers
To ease the camera and light management for the game, you'll create two different managers: one for cameras and another for lights.
Camera Manager
In this section, you'll create a class to manage the cameras, named CameraManager. The camera manager allows many cameras to be placed in the scene, managing which camera is active at a determined time. The active camera is the camera from which the scene is observed. Following is the complete code for the CameraManager class:
public class CameraManager

{

    // Active camera index and reference

    int activeCameraIndex;

    BaseCamera activeCamera;

    // Sorted list containing all cameras

    SortedList<string, BaseCamera> cameras;


    #region Properties

    public int ActiveCameraIndex

    {

        get { return activeCameraIndex; }

    }

    public BaseCamera ActiveCamera

    {

        get { return activeCamera;  }

    }

    public BaseCamera this[int index]

    {

        get { return cameras.Values[index];  }

    }

    public BaseCamera this[string id]

    {

        get { return cameras[id]; }

    }

    public int Count

    {

        get { return cameras.Count;  }

    }

    #endregion


    public CameraManager()

    {

        cameras = new SortedList<string, BaseCamera>(4);

        activeCameraIndex = −1;

    }


    public void SetActiveCamera(int cameraIndex)

    {

        activeCameraIndex = cameraIndex;

        activeCamera = cameras[cameras.Keys[cameraIndex]];

    }


    public void SetActiveCamera(string id)

    {

        activeCameraIndex = cameras.IndexOfKey(id);

        activeCamera = cameras[id];

    }


    public void Clear()

    {

        cameras.Clear();

        activeCamera = null;

        activeCameraIndex = −1;

    }


    public void Add(string id, BaseCamera camera)

    {

        cameras.Add(id, camera);

        if (activeCamera == null)

        {

            activeCamera = camera;

            activeCameraIndex = −1;

        }

    }

    public void Remove(string id)

    {

        cameras.Remove(id);

    }

}
In the CameraManager class, the cameras are stored in a SortedList, which stores cameras as values with a string containing the camera name as their keys. With that, the cameras can be accessed through an integer's index or by its name. Note that the index used to access the cameras doesn't represent the order in which they were added to the camera manager, as they are sorted by name. The CameraManager class provides methods for the addition and removal of cameras, as well as methods to define the active camera.
Light Manager
In this section, you'll create a class to manage the lights, named LightManager. Similar to the camera manager, the light manager allows you to add various lights to a scene. Unlike with the camera manager, all the lights added to the light manager are considered to be active; thus, you will not need to define active light classes, as with cameras. Since the amount of ambient lighting is related to a scene, this is the place to store it. Following is the complete code for the LightManager class:
public class LightManager

{

    // Global ambient component of the scene

    Vector3 ambientLightColor;

    // Sorted list containing all lights

    SortedList<string, BaseLight> lights;


    #region Properties

    public Vector3 AmbientLightColor

    {

        get { return ambientLightColor; }

        set { ambientLightColor = value; }

    }

    public BaseLight this[int index]

    {

       get { return lights.Values[index]; }

    }

    public BaseLight this[string id]

    {

        get { return lights[id]; }

    }

    public int Count

    {

        get { return lights.Count; }

    }

    #endregion

    public LightManager()

    {

        lights = new SortedList<string, BaseLight>();

    }


    public void Clear()

    {

        lights.Clear();

    }


    public void Add(string id, BaseLight light)

    {

        lights.Add(id, light);

    }


    public void Remove(string id)

    {

        lights.Remove(id);

    }

}
In the LightManager class, the lights are stored in a SortedList, similar to the CameraManager class. In this way, the lights can be accessed through an integer's index or by its name. The LightManager class provides methods for adding and removing lights.
Object Transformation
Transformations are very important in 3D games. Any transformation is the combination of a translation, rotation, and scaling. As such, transformations are used to store the position and orientation of any object in your 3D world.
A transformation is stored in a matrix (which is a 4 × 4 matrix of floats). The transformation that stores the position and orientation of an object in your game is called the World matrix, as it defines where and how the object is positioned in your world. Other than World matrices, you also need the camera's View and Projection matrices to transform 3D positions to 2D screen coordinates.
To help with handling the transformation of the objects, you'll create a class named Transformation. This class stores the objects' translation, rotation, and scale, and creates a matrix that holds the combination of all these transformations, as shown in the following code:
// Translate

Vector3 translate;

// Rotate around the (X, Y, Z) world axes

Vector3 rotate;

// Scale the X, Y, Z axes

Vector3 scale;

bool needUpdate;

// Store the combination of the transformations

Matrix matrix;

public Vector3 Translate

{

    get { return translate; }

    set { translate = value; needUpdate = true; }

}

public Vector3 Rotate

{

    get { return rotate; }

    set { rotate = value; needUpdate = true; }

}

public Vector3 Scale

{

    get { return scale; }

    set { scale = value; needUpdate = true; }

}


public Matrix Matrix

{

    get

    {


        if (needUpdate)

        {

            // Compute the final matrix (Scale * Rotate * Translate)

            matrix = Matrix.CreateScale(scale) *

                Matrix.CreateRotationY(MathHelper.ToRadians(rotate.Y)) *

                Matrix.CreateRotationX(MathHelper.ToRadians(rotate.X)) *

                Matrix.CreateRotationZ(MathHelper.ToRadians(rotate.Z)) *

                Matrix.CreateTranslation(translate);

            needUpdate = false;

        }


        return matrix;

    }

}
In the Transformation class, the translation, rotation, and scale transformations are stored as XNA Vector3 objects, in the translate, rotate, and scale attributes, respectively, and you can set and retrieve them through properties. For the translation, a Vector3 object stores the X, Y, and Z components of the translation/position. For the rotation, another Vector3 object stores the amount of rotation over the three axes. The matrix attribute stores the combination of the translation, rotation, and scale transformation as an XNA Matrix. The combination of these three transformations is called the world transformation, as it uniquely defines where and how an object is positioned in the 3D world. You can set and retrieve this matrix attribute through the Matrix property, and it is recalculated whenever the translate, rotate, or scale transformation is updated.
You can use the CreateTranslate, CreateRotation, and CreateScale methods of XNA's Matrix class to generate the matrices used to translate, rotate, and scale an object.
Notice that the object's world transformation matrix is calculated by multiplying the scale, rotation, and translation transformations of the object, in this order. Because the matrix product is not commutative, the order in which you combine the transformations is very important.
Summary
In this chapter, you created a basic framework to handle cameras, lights, and transformations, which are common objects used in a game. You learned how to structure the camera and light classes hierarchically by having a base class that stores the common attributes and methods of the classes and that could be extended to create specific types of the base class. Using this concept, you extended the base camera class to create a third-person camera, and extended the base light class to create a point light. Finally, you created some managers to handle the cameras and lights in a scene.