
CHAPTER 13
Creating a Third-Person Shooter Game
In this chapter, you'll build a complete 3D game using most of the concepts covered in the previous chapters. You'll create a third-person shooter game. First, you'll create a basic engine for the game containing all the required objects, such as cameras, lights, terrains, and animated models. Then you'll create all the game play and logic for the game.
Designing the Game
Today's gaming market is full of first-person shooter (FPS) and third-person shooter (TPS) games, such as Crysis, Gears of War, and Resident Evil 4. These games all share certain common characteristics. They tend to either partially or totally lack a user interface (UI) on the main screen (unlike older games in this genre, such as Doom), they contain a good selection of indoor and outdoor scenery for realism, and they have higher-quality graphics than you would find in a strategy or an RPG game to promote immersive game play.
Bearing these features in mind, you're now going to create a basic design to guide you through the creation of your own game.
Game Definition
The game will be a TPS game, where the player will control a survivor of a human expedition that went to an unknown planet. The objective of the player is to avenge the death of his companions, fighting and destroying every living creature on this planet. The game environment will be a completely outdoor scene.
Game Play
The player will start the game equipped with a machine gun and ammunition. The player should be able to run (both forward and backward), jump, and attack (aiming and shooting). The player should not be able to move while aiming. A sprite with a circle will be used to show the target of the player's weapon.
The player will be controlled using the Xbox 360 controller or the keyboard. The game controls were created based on the principles of the game Resident Evil 4. Figure 13-1 shows the game controller.
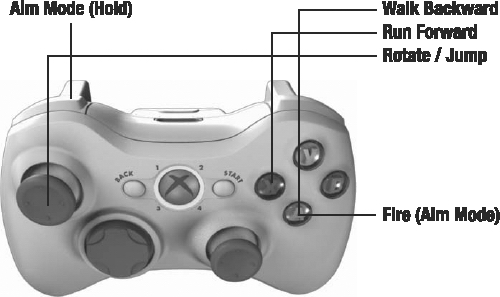
Figure 13-1. The game controller
Using the Xbox 360 controller, the left directional button is used to rotate the player and jump (when clicked). The X and A buttons move the player forward and backward. Button LB is used to enter into the aim mode. While in the aim mode, the player cannot move, and the A button is used to shoot.
The game map will have a few monsters (called NPCs for nonplayable characters, or less commonly mobs, for mobile objects) scattered in different positions. Each monster will be randomly walking around the map until it sees the player or is attacked by the player. When this happens, the monster will chase the player, and after approaching him, the monster will attack. Whenever the monster loses all its hit points, it will die. And if the player loses all his hit points, the game will be over.
Finally, the game UI will be as simple as possible. It will display the player's health points, ammunition, and the number of remaining creatures alive on the planet.
Technical Design
Now you'll define some technical design items. To ease the building of the game, you'll divide the game code into three different namespaces:
GameBase: This namespace contains the entire game engine, with objects such as cameras, lights, terrain, models, and effects. Note that you created almost the entire game engine in Chapters 10, 11, and 12.GameLogic: This namespace contains the logic of the game, including player logic, the artificial intelligence (AI) for the NPCs, unit types, and others.Helpers: This namespace contains various helper objects, such as a controller helper and a random generator helper.
Using these namespaces makes it easier to keep the game logic separate from the game engine, which helps you to develop, reuse, and maintain the game code.
You'll start constructing the XNA TPS game by creating its game engine, and then you'll work on its game play.
Starting the Game Engine
Start the game development by creating a new Windows Game (3.0) project named XNA TPS. In this new game project, create the folders GameBase, GameLogic, and Helpers in the Solution Explorer. These folders will help you maintain the different parts of the game code, separated as described in the previous section. The game assets will be added to the Content project, which is inside the XNA TPS project.
As noted in the previous section, you made most of the XNA TPS game engine in Chapters 10, 11, and 12. Here, you'll add the classes that you created in the previous chapters to the GameBase namespace in the XNA TPS project.
Cameras, Lights, and Transformations
You made the Cameras, Lights, and Transformation classes in Chapter 10. To add these classes to the project in a clean way, you should first create the folders Cameras and Lights inside the GameBase folder. Then add all the camera and light classes created in Chapter 10 to the Cameras and Lights folders, respectively, and the Transformation class to the GameBase folder.
Terrain
You created the Terrain class and its effect and material classes in Chapter 11. To add these classes to the project, you first need to create the Shapes, Materials, and Effects folders. Then add the Terrain class to the Shapes folder, the TerrainEffect class to the Effects folder, and all the material classes to the Materials folder. You also need to add the VertexPositionNormalTangentBinormalTexture class used by the Terrain class to the Helpers folder in the XNA TPS project.
Finally, add the terrain assets (height map, textures, and effects) to the XNA TPS Content project. To add these assets to the Content project, create a few different folders: the Terrains folder, used to store the terrain's height map; the Textures folder, used to store the game textures; and the Effects folder, used to store the effects. After adding all the assets to their folders, remember to modify the properties of the terrain's height map, changing its Build Action property to None and its Copy to Output Directory property to Copy if Newer.
Animated Model
You created the animated model processor, content library, runtime class, and effects in Chapter 12. One way to import this would be to add the Content Pipeline project to your solution. Alternatively, assuming you have built the Content Pipeline and verified that it works, you can just add references to the compiled assemblies of these projects. To do that, in the Solution Explorer, on each References entry in your main project and in its Content folder, right-click and select Add Reference. In the dialog box that appears, select the Browse tab, and browse to the assemblies of your Content Pipeline project (at AnimatedModelContentWin/bin/x86/Release/AnimatedModelContentWin.dll).
After referencing the content library and processor, add the AnimatedModel and AnimatedModelEffect classes to the XNA TPS project. Add the AnimatedModel class to the Shapes folder and the AnimatedModelEffect class to the Effects folder.
Finally, you should add the animated model assets (model, textures, and effects) of the player and NPCs to the XNA TPS Content entry in the Solution Explorer. In the Content project, you just need to create a new folder named Models in which to put all the animated model files. You should add the animated model effect to the Effects folder and its textures to the Textures folder. After adding all the assets to the project, remember to select your custom content processor for the animated model files, as done at the end of Chapter 12.
Sky
In a game, the sky is used to create a background that covers all the scene objects, giving the sensation of infinite scenery around the player. Besides that, the sky also helps to place the player in the scene, allowing the player to have a notion of the environment around him.
When we refer to the game's sky, we are talking about all the landscape surrounding the player. One way to create a landscape around the player would be to draw a large amount of objects around the scene, positioned far away from the player. However, the cost of drawing these objects in real time would be far too high. Furthermore, these models would be positioned at such a great distance that they would not present a high level of detail.
A common way game designers use to create the landscape is to construct a solid volume that covers the entire scene. This volume can be a box, called a skybox; a hemisphere, called skydome; or any other type of solid. The landscape around the player is then stored into textures that are mapped to the skybox or skydome. To give the feeling of an infinite horizon, the camera is always positioned in the center of the sky. Whenever the camera moves, the skybox or skydome should move with the camera, so the camera always remains in the center of the volume. This will create the illusion that the horizon is infinitely far away from the camera.
The landscape creation techniques work as follows:
- Skybox:
In the skybox, the sky is created as a box, containing six faces, where each face has a different texture, as illustrated in Figure 13-2. Special care needs to be taken so that the textures transition seamlessly from one to another, or the edges of the box will be visible, and the illusion of a far horizon will be gone. The created box covers the entire scene, and all its faces are oriented to the inside of the cube--because you view the cube from its interior, not its exterior. One of the skybox's advantages is that it is simple to construct, as it has only 12 triangles. A disadvantage is that its textures are not so easy to create and must remain static.
- Skydome:
In the skydome, the sky is created as a hemisphere using only one texture, and is positioned above the scene. Figure 13-3 shows a wireframe model of a skydome. One of the advantages of the skydome is that it is easy to animate its textures. For example, you could use two textures for the sky: one for its background and the other to draw a second layer effect, such as moving clouds. One of the disadvantages of the skydome is that it has a much more detailed mesh than a skybox, as can be seen in Figure 13-3.
In your game, you'll use a skydome to draw the scene's horizon, as you'll want to animate it. The skydome you'll use is a conventional 3D model, previously made in a modeling tool and processed by the Content Pipeline. This allows the sky model to be loaded and handled through XNA's Model class. Note that it is also possible to generate a sky model dynamically, instead of loading it.
Now you'll create the class to load, update, and draw the sky model: the SkyDome class. You should create the SkyDome class inside the Shapes folder.

Figure 13-2. A skybox
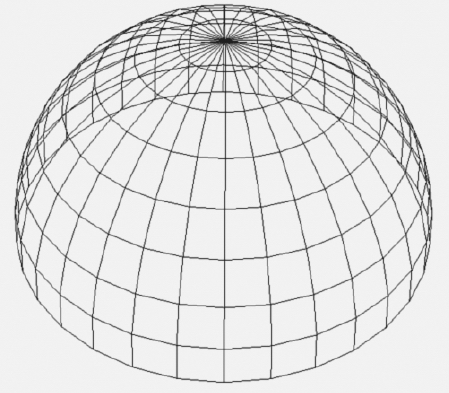
Figure 13-3. A skydome wireframe model
Loading the Sky
Because the skydome is an XNA Model, you simply use the content manager to load it. Following is the code for the Load method of the SkyDome class:
public void Load(string modelFileName)

{

    model = Content.Load<Model>(GameAssetsPath.MODELS_PATH

        + modelFileName);

}
Updating the Sky
Every time the Update method of the sky is called, you need to move its center position to the camera's position, ensuring that the camera remains positioned in the center of the sky. You can also rotate the sky model very slowly over the world's y axis, giving the impression of a moving horizon around the player. Following is the code for the Update method of the SkyDome class:
public override void Update(GameTime time)

{

    BaseCamera camera = cameraManager.ActiveCamera;


    // Center the camera in the SkyDome

    transformation.Translate = new Vector3(camera.Position.X,

        0.0f, camera.Position.Z);


    // Rotate the SkyDome slightly

    transformation.Rotate += new Vector3(0,

        (float)time.ElapsedGameTime.TotalSeconds * 0.5f, 0);


    base.Update(time);

}
Drawing the Sky
The skydome model has a BasicEffect linked to it, which you can use to draw it. As always, before rendering a model, you need to configure its effect. First, set the sky texture that you want to use in the model by means of basicEffect.Texture (this is necessary because no texture was imported with the sky model). Then, set the model's world and the camera's view and projection matrices to the basicEffect. Finally, draw the sky model.
Notice that it is important to disable the depth buffer before drawing the sky model; because the sky is the farthest drawing object, you don't need to store its depth. Also, if you draw the sky model with the depth buffer enabled, you would need to enlarge the far plane distance of your camera, which will cause precision problems when drawing other objects closer to the camera. Following is the code for the SetEffectMaterial and Draw methods used to draw the sky:
private void SetEffectMaterial(BasicEffect basicEffect)

{

    BaseCamera activeCamera = cameraManager.ActiveCamera;


    // Texture material

    basicEffect.Texture = textureMaterial.Texture;

    basicEffect.TextureEnabled = true;


    // Transformation

    basicEffect.World = transformation.Matrix;

    basicEffect.View = activeCamera.View;

    basicEffect.Projection = activeCamera.Projection;

}


public override void Draw(GameTime time)

{

    GraphicsDevice.RenderState.DepthBufferEnable = false;

    foreach (ModelMesh modelMesh in model.Meshes)

    {

        // We are only rendering models with BasicEffect

        foreach (BasicEffect basicEffect in modelMesh.Effects)

            SetEffectMaterial(basicEffect);


        modelMesh.Draw();

    }

    GraphicsDevice.RenderState.DepthBufferEnable = true;


    base.Draw(time);

}
Creating Helper Classes
In this section, you'll create some helper classes to manage the game input and settings, and to generate random values. You'll create all these classes inside the Helpers namespace.
Input Helper
Earlier, we noted that your game can be played using the keyboard or the Xbox 360 gamepad. The XNA Framework has all the classes that you need to manage the input through the keyboard, gamepad, or mouse (supported only in Windows). However, you will want to handle the keyboard and gamepad simultaneously in order to streamline the helper classes and create more robust code. In this regard, a helper class could be useful. Also, the XNA input classes lack some features, such as checking when a key is first pressed (pressed when it is released), which you can add to the input helper class. In this section, you'll create a helper class for the keyboard and gamepad input, named InputHelper.
Because you can play your game using the gamepad, you first map all the game actions to the gamepad, and then map the gamepad buttons to some keyboard keys. For example, you can define that the gamepad's A button is used to make the player jump. Then you can map the keyboard's spacebar to the gamepad's A button.
InputHelper Attributes and Constructor
The InputHelper class stores the state of the gamepad, the state of the keyboard, and the map of the gamepad buttons to the keyboard. The InputHelper class also stores the index of the current player, because each instance of the InputHelper class handles the input of only one player. So, if you have a two-player game, you need to have two InputHelper objects.
The current state and last state of the gamepad and keyboard are stored because you need them to check when a button or key is pressed for the first time. Following is the code for the attributes and constructor of the InputHelper class:
PlayerIndex playerIndex;


// Keyboard

KeyboardState keyboardState;

KeyboardState lastKeyboardState;

Dictionary<Buttons, Keys> keyboardMap;


// Gamepad

GamePadState gamePadState;

GamePadState lastGamePadState;


public InputHelper(PlayerIndex playerIndex)

    : this(playerIndex, null)

{

}


public InputHelper(PlayerIndex playerIndex,

    Dictionary<Buttons, Keys> keyboardMap)

{

    this.playerIndex = playerIndex;

    this.keyboardMap = keyboardMap;

}
The InputHelper constructor's parameters are the player index and the keyboard map. However, if you are not interested in using a keyboard, the class provides a version of the InputHelper method that takes only a PlayerIndex argument. This method calls the bottom InputHelper method by specifying null as second argument.
Updating the Input
To update the input, you need to save the last read state of the keyboard and gamepad and then read their new state. Note that in XNA 3.0, the GetState method of the Keyboard class receives the index of the current player. Following is the code for the Update method of the InputHelper class:
public void Update()

{

    lastKeyboardState = keyboardState;

    keyboardState = Keyboard.GetState(playerIndex);


    lastGamePadState = gamePadState;

    gamePadState = GamePad.GetState(playerIndex);

}
Checking Pressed Keys
In XNA 3.0, both the KeyboardState and the GamePadState have a method to check whether a button or a key was pressed. Because you're handling the input through the gamepad and keyboard, you need to check if the button or key was pressed on either of them, but you could avoid checking them both at the same time.
The InputHelper class allows checking if a gamepad button is pressed, but it internally checks whether the button was pressed on either the gamepad or on the keyboard. In this case, it first checks if the current player's gamepad is connected, and if so, it checks if a button was pressed on the gamepad. Otherwise, if the InputHelper class has a valid keyboard map, it will check if the keyboard key that is mapped to the gamepad button is pressed. This is done in the IsKeyPressed method of the InputHelper class:
public bool IsKeyPressed(Buttons button)

{

    bool pressed = false;


    if (gamePadState.IsConnected)

        pressed = gamePadState.IsButtonDown(button);

    else if (keyboardMap != null)

    {

        Keys key = keyboardMap[button];

        pressed = keyboardState.IsKeyDown(key);

    }

    return pressed;

}
Along with checking when a button is pressed, you also want to cover the possibility of a button being pressed for the first time. To do that, you can check if the desired button is pressed but was released in the previous update. Following is the code for the IsKeyJustPressed method of the InputHelper class:
public bool IsKeyJustPressed(Buttons button)

{

    bool pressed = false;


    if (gamePadState.IsConnected)

        pressed = (gamePadState.IsButtonDown(button) &&

            lastGamePadState.IsButtonUp(button));

    else if (keyboardMap != null)

    {

        Keys key = keyboardMap[button];

        pressed = (keyboardState.IsKeyDown(key) &&

            lastKeyboardState.IsKeyUp(key));

    }


    return pressed;

}
Checking Analog Button State
You can use the IsKeyPressed and IsKeyJustPressed methods that you created for the InputHelper class to check whether a digital key is pressed or not. But if you try to use these methods to retrieve the state of the thumbsticks and triggers of the Xbox 360 gamepad, you'll just get a Boolean result, indicating whether the buttons are pressed or not. For thumbsticks, you need a more granular result in order to take full advantage of them and create the illusion of smooth motion.
In the XNA GamePadState class, the position of each thumbstick of the Xbox 360 controller is retrieved as a Vector2 object, and the triggers' state as a float value. In your InputHelper class, you'll create some methods to retrieve the state of the gamepad's thumbsticks in the same way it's done in the GamePadState class. Notice that you also need to properly handle the keyboard keys that are mapped to the thumbsticks. Following is the code for the GetLeftThumbStick method of the InputHelper class, used to retrieve the position of the gamepad's left thumbstick:
public Vector2 GetLeftThumbStick()

{

    Vector2 thumbPosition = Vector2.Zero;


    if (gamePadState.IsConnected)

        thumbPosition = gamePadState.ThumbSticks.Left;

    else if (keyboardMap != null)

    {

        if (keyboardState.IsKeyDown(

            keyboardMap[Buttons.LeftThumbstickUp]))

            thumbPosition.Y = 1;

        else if (keyboardState.IsKeyDown(

            keyboardMap[Buttons.LeftThumbstickDown]))

            thumbPosition.Y = −1;

        if (keyboardState.IsKeyDown(

            keyboardMap[Buttons.LeftThumbstickRight]))

            thumbPosition.X = 1;

        else if (keyboardState.IsKeyDown(

            keyboardMap[Buttons.LeftThumbstickLeft]))

            thumbPosition.X = −1;

    }

    return thumbPosition;

}
In the GetLeftThumbStick method, you take the same approach you did in the IsKeyPressed method: you first check if the gamepad is connected, and if so, you just return the desired value. Otherwise, you check the state of the keyboard keys that are mapped to the left thumbstick (up, down, left, and right) and return a Vector2 containing the resulting thumbstick position.
In addition to the GetLeftThumbStick method, you also need to create the GetRightThumbStick method to retrieve the position of the gamepad's right thumbstick. Following is the code for the GetRightThumbStick method:
public Vector2 GetRightThumbStick()

{

    Vector2 thumbPosition = Vector2.Zero;


    if (gamePadState.IsConnected)

        thumbPosition = gamePadState.ThumbSticks.Right;

    else if (keyboardMap != null)

    {

        if (keyboardState.IsKeyDown(

            keyboardMap[Buttons.RightThumbstickUp]))

            thumbPosition.Y = 1;

        else if (keyboardState.IsKeyDown(

            keyboardMap[Buttons.RightThumbstickDown]))

            thumbPosition.Y = −1;

        if (keyboardState.IsKeyDown(

            keyboardMap[Buttons.RightThumbstickRight]))

            thumbPosition.X = 1;

        else if (keyboardState.IsKeyDown(

            keyboardMap[Buttons.RightThumbstickLeft]))

            thumbPosition.X = −1;

    }


    return thumbPosition;

}
Settings Manager
You might want to configure different settings for your game for each computer on which the game is running, such as the screen resolution, the full screen mode, and the keyboard map. These settings can be stored and read from files, so you don't need to reconfigure your game every time you run it. To do that, you'll create some structures to store the game settings, and a helper class to help you store and read these settings from a file. The game settings will be read and saved from an XML file, for which the structures need to have the [Serializable] attribute. The XML format has the benefit of being human-readable and can be modified in any text editor.
Start the construction of the settings manager by creating a new class named SettingsManager in the Helpers namespace. Inside the file created for the SettingsManager class, create a struct named KeyboardSettings to store the keyboard map. Following is the definition of the KeyboardSettings struct:
[Serializable]

public struct KeyboardSettings

{

    public Keys A;

    public Keys B;

    public Keys X;

    public Keys Y;

    public Keys LeftShoulder;

    public Keys RightShoulder;

    public Keys LeftTrigger;

    public Keys RightTrigger;

    public Keys LeftStick;

    public Keys RightStick;

    public Keys Back;

    public Keys Start;


    public Keys DPadDown;

    public Keys DPadLeft;

    public Keys DPadRight;

    public Keys DPadUp;


    public Keys LeftThumbstickDown;

    public Keys LeftThumbstickLeft;

    public Keys LeftThumbstickRight;

    public Keys LeftThumbstickUp;

    public Keys RightThumbstickDown;

    public Keys RightThumbstickLeft;

    public Keys RightThumbstickRight;

    public Keys RightThumbstickUp;

}
In KeyboardSettings, you created an attribute of type Keys for each gamepad button that can be mapped to a keyboard key. Next, create the main game settings structure, named GameSettings. Following is the code for the GameSettings struct:
[Serializable]

public struct GameSettings

{

    public bool PreferredFullScreen;

    public int PreferredWindowWidth;

    public int PreferredWindowHeight;


    public KeyboardSettings[] KeyboardSettings;

}
The game settings structure stores the screen resolution, full-screen mode, and an array of keyboard settings, used to map the gamepad buttons to the keyboard.
Finally, you should create two methods inside the SettingsManager class to read and save the game settings. Because you don't need a specific instance of the SettingsManager class, you should make it and its methods static. Following is the code for the Read method of the SettingsManager class:
public static GameSettings Read(string settingsFilename)

{

    GameSettings gameSettings;

    Stream stream = File.OpenRead(settingsFilename);

    XmlSerializer serializer =

        new XmlSerializer(typeof(GameSettings));


    gameSettings = (GameSettings)serializer.Deserialize(stream);

    return gameSettings;

}
The Read method receives the name of the settings file to be read. It then uses the File class to open the file, and the XmlSerializer to transform the XML document into an object of the type GameSettings, and deserializes gameSettings into stream. You can save the GameSettings data into an XML file in a similar way that you used to read it. Following is the code for the Save method of the SettingsManager class:
public static void Save(string settingsFilename, GameSettings gameSettings)

{

    Stream stream = File.OpenWrite(settingsFilename);

    XmlSerializer serializer = new

        XmlSerializer(typeof(GameSettings));


    serializer.Serialize(stream, gameSettings);

}
Last, you'll create a method to transform the KeyboardSettings structure into a dictionary that maps a gamepad button to a key. The InputHelper class that you created needs this dictionary, instead of a KeyboardSettings, to map the gamepad buttons to the keyboard. Creating this dictionary is simple: add an entry to the dictionary for each gamepad button, mapping it to the key that is stored in the KeyboardSettings structure. Following is the code for the GetKeyboardDictionary, used to transform KeyboardSettings into a dictionary:
public static Dictionary<Buttons, Keys>

    GetKeyboardDictionary(KeyboardSettings keyboard)

{

    Dictionary<Buttons, Keys> dictionary =

        new Dictionary<Buttons, Keys>();


    dictionary.Add(Buttons.A, keyboard.A);

    dictionary.Add(Buttons.B, keyboard.B);

    dictionary.Add(Buttons.X, keyboard.X);

    dictionary.Add(Buttons.Y, keyboard.Y);

    dictionary.Add(Buttons.LeftShoulder, keyboard.LeftShoulder);

    dictionary.Add(Buttons.RightShoulder, keyboard.RightShoulder);

    dictionary.Add(Buttons.LeftTrigger, keyboard.LeftTrigger);

    dictionary.Add(Buttons.RightTrigger, keyboard.RightTrigger);

    dictionary.Add(Buttons.LeftStick, keyboard.LeftStick);

    dictionary.Add(Buttons.RightStick, keyboard.RightStick);

    dictionary.Add(Buttons.Back, keyboard.Back);

    dictionary.Add(Buttons.Start, keyboard.Start);

    dictionary.Add(Buttons.DPadDown, keyboard.DPadDown);

    dictionary.Add(Buttons.DPadLeft, keyboard.DPadLeft);

    dictionary.Add(Buttons.DPadRight, keyboard.DPadRight);

    dictionary.Add(Buttons.DPadUp, keyboard.DPadUp);

    dictionary.Add(Buttons.LeftThumbstickDown,

        keyboard.LeftThumbstickDown);

    dictionary.Add(Buttons.LeftThumbstickLeft,

        keyboard.LeftThumbstickLeft);

    dictionary.Add(Buttons.LeftThumbstickRight,

        keyboard.LeftThumbstickRight);

    dictionary.Add(Buttons.LeftThumbstickUp,

        keyboard.LeftThumbstickUp);

    dictionary.Add(Buttons.RightThumbstickDown,

        keyboard.RightThumbstickDown);

    dictionary.Add(Buttons.RightThumbstickLeft,

        keyboard.RightThumbstickLeft);

    dictionary.Add(Buttons.RightThumbstickRight,

        keyboard.RightThumbstickRight);

    dictionary.Add(Buttons.RightThumbstickUp,

        keyboard.RightThumbstickUp);


    return dictionary;

}
Random Helper
To help you generate random values and random positions over the game terrain—used to randomly position the enemies—you'll create a RandomHelper class inside the Helpers namespace. The RandomHelper class and all its attributes and methods will be static. To keep this example relatively simple, let's ignore obvious possibilities like NPCs spawning on top of each other, as this would require a more complex solution.
Inside the RandomHelper class, declare a public attribute of type Random, named RandomGenerator. The RandomGenerator will be used as the main random generator by all the game classes. Next, to generate a random position over the game terrain—constructed over the x and z axes—create a method named GeneratePositionXZ. Inside the GeneratePositionXZ method, you need to generate a random value for the x and z axes according to a distance parameter. To generate a random number, use the Random class's Next method. The Next method of the Random class generates a positive random value that is lower than the value passed as its parameter. Because the center of the game terrain is positioned at the scene origin in (0, 0, 0), your GeneratePositionXZ method must generate positive and negative values to cover the entire terrain. You can achieve this by subtracting the random values generated by half their maximum value. Following is the complete code for the RandomHelper class:
public static class RandomHelper

{

    public static Random RandomGenerator = new Random();


    public static Vector3 GeneratePositionXZ(int distance)

    {

        float posX = (RandomGenerator.Next(distance * 201)

            - distance * 100) * 0.01f;

        float posZ = (RandomGenerator.Next(distance * 201)

            - distance * 100) * 0.01f;


        return new Vector3(posX, 0, posZ);

    }

}
Creating the Game Logic
For each unit type in the game—player, player weapon, enemy (NPC)—you'll create a class in the GameLogic namespace. A game unit needs to store its attributes (for example: speed, hit points, damage, and so on) and its logic (states and actions). Besides the logic of the game units, you'll construct the main game logic, which defines the game controls and how the units are updated and drawn, outside the GameLogic namespace in the GameScreen class. You'll create the GameScreen class at the end of this chapter.
Before you start constructing the game logic classes, let's review some of the game play features described earlier in the chapter:
- The player will start the game equipped with a machine gun, ammunition, and the doable actions of running (forward and backward), jumping, and attacking (aiming and shooting).
- Each monster will be randomly walking around the map until it sees the player or is attacked by the player. When this happens, the monster will chase the player, and after approaching him, the monster will attack. Whenever the monster loses all its hit points, it will die. And if the player loses all hit points, the game will be over.
From the game play description, you can see that both the player and the enemies share some common attributes and actions, such as having hit points, moving over a terrain, being able to cause and receive damage, being drawn as animated models, and so on. Because of these common characteristics, you can create a generic base class for them, capable of storing the common attributes and methods they share. Then you create the player and enemy classes by extending this base class.
The Terrain Unit
In this section, you'll create the base class for the game units that are animated models. They should be able to move over the terrain, cause and receive damage. Create a new class in the GameLogic namespace and name it TerrainUnit. Begin constructing the TerrainUnit class by declaring some of the common attributes shared by the units, which are their hit points and speed:
// Basic attributes (life and speed)

int life;

int maxLife;

float speed;
You'll draw the TerrainUnit as an animated model using the AnimatedModel class defined in the previous chapter. Add an attribute of type AnimatedModel to your TerrainUnit class to store the TerrainUnit animated model. Next, declare an attribute of type int to store the current unit's animation reference, which you further need to properly control and change the unit's animation.
Each unit also needs a bounding box and bounding sphere volume used for collision detection, represented through the XNA's BoundingBox and BoundingSphere classes. The collision volumes of the unit are the collision volumes of its animated model, which are created by the animated model's content processor. Because the collision volumes of the animated model need to be moved as the unit moves around the map, you need an original copy of them inside the TerrainUnit class. To identify when the collision volumes need to be updated, create the needUpdateCollision flag:
// Animated model

AnimatedModel animatedModel;

int currentAnimationId;


// Collision volumes

BoundingBox boundingBox;

BoundingSphere boundingSphere;

bool needUpdateCollision;
Note that the animated model processor created in Chapter 12 doesn't create the collision volumes for the animated models, but in the "Unit Collision Volume" section you'll extend the animated model processor once again, creating a new one capable of generating the collision volumes for the models.
Each unit has two velocities: the linear velocity is used to update the unit's position (or translation), and the angular velocity is used to update the unit's orientation (or rotation). The angular and linear velocities are represented as a 3D vector. In the angular velocity, each component of this vector represents the angular velocity around the x, y, and z world axes. The last velocity that acts over the unit is caused by the gravity. The axis of gravity is globally defined as the world's y (up) axis (0, 1, 0). The velocity resulting from the gravity force may have a negative value (when the unit is falling) and a positive value (when the unit is jumping):
// Velocities and gravity

Vector3 linearVelocity;

Vector3 angularVelocity;

float gravityVelocity;
You store the unit's orientation similarly to the camera's orientation, using three orientation vectors: headingVec, strafeVec, and upVec. These vectors are oriented to the front, right side, and top of the unit, respectively:
// Unit coordinate system

Vector3 headingVec;

Vector3 strafeVec;

Vector3 upVec;
You use these vectors whenever you want to move a unit according to its axes. For example, if you wanted a unit to move backward, you would set its linear velocity by means of a negative headingVec value.
To identify when the unit is over the terrain or is alive, or if you need to adjust the unit's position to account for a jump, create some flags:
// Some flags

bool isOnTerrain;

bool isDead;

bool adjustJumpChanges;
Creating and Loading the Unit
The TerrainUnit class extends the DrawableGameComponent class, which needs a Game instance to be constructed. This means that the TerrainUnit constructor must receive a Game object as a parameter and use it in the constructor of its base class (the DrawableGameComponent). Its attributes are initialized inside the constructor of the TerrainUnit class. Following is the constructor code for the TerrainUnit class:
public TerrainUnit(Game game)

    : base(game)

{

    gravityVelocity = 0.0f;

    isOnTerrain = false;

    isDead = false;

    adjustJumpChanges = false;


    needUpdateCollision = true;

}
To load the unit's animated model, create a Load method. The Load method receives the animated model's file name, loads the model, positions the model above the terrain, and updates its orientation vectors. Following is the code for the Load method:
protected void Load(string unitModelFileName)

{

    animatedModel = new AnimatedModel(Game);

    animatedModel.Initialize();

    animatedModel.Load(unitModelFileName);


    // Put the player above the terrain

    UpdateHeight(0);

    isOnTerrain = true;


    NormalizeBaseVectors();

}
Making the Unit Jump
One of the unit's actions is jumping, which makes the unit move upward and then downward. The velocity that acts over the unit and makes it moves down is the gravity velocity. In the game, the gravity velocity is a negative scalar value that acts over the gravity axis, which points to the world's y (up) axis (0, 1, 0).
In order to make the unit jump, you could change the value of the gravity velocity that acts over it to a positive value, which makes the unit move upward. Then, while the unit is in the air, you slowly reduce the gravity velocity until it has a negative value again, which makes the unit move downward. Note that to make a smooth jump, you need to define a minimum and maximum value for the gravity velocity. So, when the unit is falling, its velocity decreases until it reaches its minimum value. For this example, you will skip the more complex inertial calculations that could provide a better illusion of real jumping, since the main aim here is to demonstrate the core principles at work and get you started coding in XNA.
While the unit is jumping, it moves faster than while it is walking. In this case, the camera's chase velocity is not enough to chase a unit while it jumps. To solve this problem, whenever a unit jumps, the camera's chase velocity is increased; when the unit reaches the ground, it is restored. You can also increase the unit's speed while it jumps, allowing it to jump bigger distances. Following is the code for the Jump method:
public void Jump(float jumpHeight)

{

    if (isOnTerrain)

    {

        // Update camera chase speed and unit speed

        ThirdPersonCamera camera = cameraManager.ActiveCamera

            as ThirdPersonCamera;

        camera.ChaseSpeed *= 4.0f;

        speed *= 1.5f;

        adjustJumpChanges = true;


        // Set the gravity velocity

        gravityVelocity = (float)GRAVITY_ACCELERATION *

            jumpHeight * 0.1f;

        isOnTerrain = false;

    }

}
Before the unit can jump, you need to check if it is positioned over the terrain, avoiding having the unit jump while it is in the air. The Jump method receives a parameter that is the height value that you want the unit to jump. Notice that after changing the camera's chase speed and unit speed, you set the adjustJumpChanges flag to true, reporting that these modifications need to be restored.
Updating the Unit's Height
The units created based on the TerrainUnit class are units that move only over the game terrain. These units need to have their height updated every time you update their position to ensure that they remain on the terrain. When a unit moves to a new position, the terrain's height in this new position could be equal to, higher, or lower than the unit's previous height, as shown in Figure 13-4.
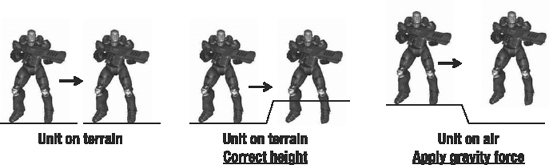
Figure 13-4. Moving the unit over the terrain
If the terrain's height at the new unit position is equal to or higher than the unit's current height, the unit is over the terrain. In this case, you need to set the unit's height as the terrain's height in that position. If the position is higher than the terrain's height, the unit is in the air, and you need to decrement the gravity velocity that acts over the unit. To update the unit's height according to its position over the terrain, you'll create the UpdateHeight method.
Note that to make sure that the unit is over the terrain, you need to verify that the gravity velocity is not positive. If the gravity velocity is positive, the unit is moving upward, and you cannot assume that it is over the terrain. Following is the code for the UpdateHeight method:
private void UpdateHeight(float elapsedTimeSeconds)

{

    // Get terrain height

    float terrainHeight = terrain.GetHeight(Transformation.Translate);

    Vector3 newPosition = Transformation.Translate;


    // Unit is on terrain

    if (Transformation.Translate.Y <= terrainHeight &&

        gravityVelocity <= 0)

    {

        // Put the unit over the terrain

        isOnTerrain = true;

        gravityVelocity = 0.0f;

        newPosition.Y = terrainHeight;


        // Restore the changes made when the unit jumped

        if (adjustJumpChanges)

        {

            ThirdPersonCamera camera = cameraManager.ActiveCamera

                as ThirdPersonCamera;

            camera.ChaseSpeed /= 4.0f;

            speed /= 1.5f;

            adjustJumpChanges = false;

        }

     }

    // Unit is in the air

    else

    {

        // Decrement the gravity velocity

        if (gravityVelocity > MIN_GRAVITY)

            gravityVelocity -= GRAVITY_ACCELERATION *

                elapsedTimeSeconds;

        // Apply the gravity velocity

        newPosition.Y = Math.Max(terrainHeight,

            Transformation.Translate.Y+gravityVelocity);

    }


    // Update the unit position

    Transformation.Translate = heightTranslate;

}
Whenever the unit is over the terrain, you check whether it is necessary to correct the changes that were made by the Jump method, through the adjustJumpChanges flag. Otherwise, if the gravityVelocity is bigger than the minimum gravity velocity, you decrement gravityVelocity and move the player. All transformations applied on the unit are made through the Transformation property, which actually modifies its animated model transformation. This way, whenever you draw the animated model, all the unit's transformations are already stored in it.
Updating the Unit
When updating the unit, you need to update its position and orientation (transformation), and its animated model. To update the unit's animated model, you just need to call the Update method of the AnimatedModel class. To update the unit's position, you calculate its displacement, based on its velocity and on the elapsed time since the last update, and add this displacement to its current position. The same is done to update its orientation, where the angular velocity is used to calculate the displacement on the unit's rotation. Following is the code for the Update and NormalizeBaseVectors methods:
public override void Update(GameTime time)

{

    // Update the animated model

    float elapsedTimeSeconds =

        (float)time.ElapsedGameTime.TotalSeconds;

    animatedModel.Update(time, Matrix.Identity);


    // Update the height and collision volumes if the unit moves

    if (linearVelocity != Vector3.Zero || gravityVelocity != 0.0f)

    {

        Transformation.Translate += linearVelocity *

            elapsedTimeSeconds * speed;

        UpdateHeight(elapsedTimeSeconds);

        needUpdateCollision = true;

    }

    // Update coordinate system when the unit rotates

    if (angularVelocity != Vector3.Zero)

    {

        Transformation.Rotate += angularVelocity *

            elapsedTimeSeconds * speed;

        NormalizeBaseVectors();

    }


    base.Update(time);

}


private void NormalizeBaseVectors()

{

    // Get the vectors from the animated model matrix

    headingVec = Transformation.Matrix.Forward;

    strafeVec = Transformation.Matrix.Right;

    upVec = Transformation.Matrix.Up;

}
In the Update method, you first update the unit's animated model, passing the elapsed time since the last update and a parent matrix used to transform the animated model. Because there is no need to transform the animated model, you can pass the identity matrix to update it. After that, you update the unit's linear and angular velocity. If the unit's linearVelocity or gravityVelocity is not zero, the unit is moving, and you need to call the UpdateHeight method to ensure that the unit is correctly positioned over the terrain. You also need to set the needUpdateCollision flag to true, to update the position of the unit's collision volumes.
Last, if the unit's angularVelocity is not zero, you call the NormalizeBaseVectors method to update its orientation vectors (heading, strafe, and up vectors) and make sure their lengths are exactly 1. You can extract these vectors from the transformation matrix of the unit's animated model.
Unit Collision Volume
You can check for collisions between the scene objects using some different approaches. One way is to check the intersection between all of their triangles. This method is the most accurate one, but it is also the most calculation-intensive. For example, to test the collision between two meshes having 2,000 triangles each, you would need to make 2000 × 2000 collision tests. This is more than you generally can afford.
Another method for checking for collisions between two models is to simply check whether their collision volumes collide. Collision volumes provide a faster, although more inaccurate, way of checking the intersection between objects. In your game, you'll use two different collision volumes for each unit—a box and a sphere—to check its collision against other objects. When the collision volume is a box, it's called a bounding box; when the volume is a sphere, it's called a bounding sphere. The bounding box of a model is the smallest box that fits around a model. The bounding sphere of a model is the smallest sphere that surrounds a model.
You can build the box you'll use for the collision aligned to the world axes. In this case, the box is called an axis-aligned bounding box (AABB). One of the advantages of the AABB is that the collision test with it is simple. However, the AABB can't be rotated, because it needs to keep its axes aligned with the world's axes. If the box used for collision is oriented with the unit's axes, it's then called an object-oriented bounding box (OOBB). A collision test using an OOBB is slower than one using an AABB, but the OOBB provides a box that always has the same orientation as the unit. Figure 13-5 illustrates the creation of an AABB and an OOBB for a unit with two different orientations.
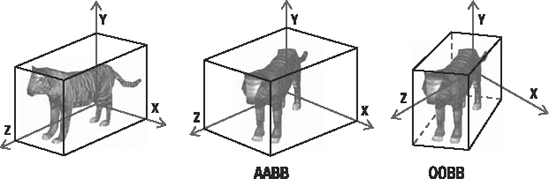
Figure 13-5. Creating an AABB and an OOBB for a model. The AABB and the OOBB are the same when the model has the same orientation as the world (left). The AABB created for the new model orientation (middle). The OOBB created for the new model orientation (right).
Because XNA already has a class to handle an AABB, you'll use it as the box volume for the unit. So, each unit will have an AABB and a bounding sphere volume, represented using XNA's BoundingBox and BoundingSphere classes.
The default model processor of the Content Pipeline generates a bounding sphere volume for each bone present in a model that is processed. In this way, you have a bounding sphere for each model's submesh. You can avoid testing the collision with each mesh of the model, by creating a global bounding sphere for the entire model. Also, because the default model processor doesn't generate a bounding box (AABB) volume, you need to generate one for the model.
You can create the bounding box and bounding sphere for the unit by extending its model processor, which is the AnimatedModelProcessor class created in Chapter 12. First, open the AnimatedModelProcessor class, which is inside the AnimatedModelProcessorWin project. Then create a method named GetModelVertices to extract all the vertices of the model's meshes. You'll use these vertices to create the collision volumes of the model, through the CreateFromPoints method of XNA's BoundingBox and BoundingSphere classes. The CreateFromPoints method creates a volume, making sure the volume contains all of the specified points. Following is the code for the GetModelVertices method:
private void GetModelVertices(NodeContent node,

    List<Vector3> vertexList)

{

    MeshContent meshContent = node as MeshContent;

    if (meshContent != null)

    {

        for (int i = 0; i < meshContent.Geometry.Count; i++)

        {

            GeometryContent geometryContent = meshContent.Geometry[i];

            for (int j = 0; j <

                geometryContent.Vertices.Positions.Count; j++)

                vertexList.Add(geometryContent.Vertices.Positions[j]);

        }

    }


    foreach (NodeContent child in node.Children)

        GetModelVertices(child, vertexList);

}
In the GetModelVertices method, you travel through all the model nodes, starting at the root node, searching for the MeshContent nodes. The MeshContent nodes have the model's mesh data, from where you can extract the vertices of the mesh from its Geometry property. After processing a node, you need to call the GetModelVertices method for its children, ensuring that all nodes are processed. Note that all the vertices are stored in the vertexList variable of the type List<Vector3>.
You should call the GetModelVertices method at the end of the Process method of the AnimatedModelProcessor class, where you processed the model and extracted its skeletal animation data. You will use these vertices to generate the collision volumes for its model, after which you can store them in the model's Tag property. You can do that by adding the collision volumes to the dictionary you stored there, which already has the model's animation data. Following is the code that you can use to generate the collision volumes:
// Extract all model's vertices

List<Vector3> vertexList = new List<Vector3>();

GetModelVertices(input, vertexList);


// Generate the collision volumes

BoundingBox modelBoundBox = BoundingBox.CreateFromPoints(vertexList);

BoundingSphere modelBoundSphere =

    BoundingSphere.CreateFromPoints(vertexList);


// Store everything in a dictionary

Dictionary<string, object> tagDictionary =

    new Dictionary<string, object>();

tagDictionary.Add("AnimatedModelData", animatedModelData);

tagDictionary.Add("ModelBoudingBox", modelBoundBox);

tagDictionary.Add("ModelBoudingSphere", modelBoundSphere);


// Set the dictionary as the model tag property

model.Tag = tagDictionary;

return model;
Unit Collision Tests
Now, whenever you load a model using your custom-defined model processor, each model has a bounding box and a bounding sphere volume that you'll use to perform a few collision tests. To make things simple, you will perform only two different collision tests with the units in your game. The first verifies whether a ray collides with a unit, which is needed to check if a gunshot has hit the unit. The second verifies when the unit is inside the camera's visualization volume (the camera's frustum, as discussed in Chapter 10) and is used to avoid updating and drawing units that are not visible.
To check if a ray collides with a unit, you use the unit's bounding box, which is an AABB. The first thing you need to do is apply the same transformations made over the unit (translations and rotations) to the unit's AABB. This is necessary because you want to move the volume to the location of the model. Second, you need to make sure that the model is aligned with the world's axes to use its AABB, which prohibits you from rotating the unit.
To tackle this, instead of transforming the model's AABB, you can transform the ray that you are testing with the inverse transformation of the model. This guarantees that the AABB remains aligned with the world's axes. Following is the code for the BoxIntersects method of the TerrainUnit class, used to test the collision between a ray and the unit's AABB:
public float? BoxIntersects(Ray ray)

{

    Matrix inverseTransform = Matrix.Invert(Transformation.Matrix);

    ray.Position = Vector3.Transform(ray.Position,

        inverseTransform);

    ray.Direction = Vector3.TransformNormal(ray.Direction,

        inverseTransform);


    return animatedModel.BoundingBox.Intersects(ray);

}
In the BoxIntersects method, you first calculate the inverse transformation matrix of the unit and then transform the position and the direction of the ray by this matrix. You need to use the Transform method of the XNA's Vector3 class to transform the ray's start position because it is a 3D point, and the TransformNormal method to transform the ray's direction because it is a vector (which should not be affected by the translation contained in the transformation). After that, you can use the Intersects method of the bounding volume to do the collision test between the box and the ray.
Now, to verify if a unit is found inside the camera's frustum, you use the unit's bounding sphere. In this case, a collision test with the unit's bounding sphere is simpler, and the precision is not very important. To test the collision between the unit's bounding sphere and the camera's frustum, you need to use only the Intersects method of the XNA's BoundingSphere class:
boundingSphere.Intersects(activeCamera.Frustum);
Finally, whenever the unit moves, you must update its bounding sphere. To update the unit's bounding sphere, you just need to translate it, because a rotation has little effect on a sphere. Following is the code for the UpdateCollision method used to update the collision solids:
private void UpdateCollision()

{

    // Update bounding sphere

    boundingSphere = animatedModel.BoundingSphere;

    boundingSphere.Center += Transformation.Translate;


    needUpdateCollision = false;

}
Receiving Damage
To allow the unit to receive damage, you'll create the ReceiveDamage method, which receives the damage intensity as a parameter. The code for the ReceiveDamage method follows:
public virtual void ReceiveDamage(int damageValue)

{

    life = Math.Max(0, life - damageValue);

    if (life == 0)

        isDead = true;

}
When the unit's hit points reach zero, the isDead flag is marked as true. In this case, you can avoid updating this unit. The ReceiveDamage method should be virtual, allowing the units that extend the TerrainUnit class to override this method and, for example, play a death animation for the unit.
Changing Animations
During the game, every time a unit changes its current action (or state), you need to change its animation. For example, the animation used when the unit is idle is different from the animation used when the unit is running. The unit's animated model (AnimatedModel class) has an array that stores all the unit's animations. You can change the unit's animation manually, but to do that, you need to go over all its animations, searching for the desired animation. This is necessary because you don't know which animations the unit has, or in which order they were stored.
To ease the swap between animations, you can create an enumeration for the unit's animations inside each class that extends the TerrainUnit, where each enumeration lists the available animations of the unit's animated model in the order they were stored. For example, the Player class has an enumeration called PlayerAnimations and the Enemy class has an enumeration called EnemyAnimations, as shown in the following code:
public enum PlayerAnimations

{

    Idle = 0,

    Run,

    Aim,

    Shoot

}


public enum EnemyAnimations

{

    Idle = 0,

    Run,

    Bite,

    TakeDamage,

    Die

}
You use these enumerations to change the current animation of the model. To change the unit's animation, you create the SetAnimation method in the TerrainUnit class. In the SetAnimation method, you set the model's current animation using an integer value, which is the index of the animation inside the animation's array, stored inside the AnimatedModel class. However, because you don't know the index of the animations, this method is protected so only the classes that extend the TerrainUnit class (Player and Enemy) can use it. Then, in the Player and Enemy classes, you can change the model animation using the PlayerAnimations and EnemyAnimations enumerations. Following is the code for the SetAnimation method of the TerrainUnit class:
protected void SetAnimation(int animationId,

    bool reset, bool enableLoop, bool waitFinish)

{

    if (reset || currentAnimationId != animationId)

    {

        if (waitFinish && !AnimatedModel.IsAnimationFinished)

            return;


        AnimatedModel.ActiveAnimation =

            AnimatedModel.Animations[animationId];

        AnimatedModel.EnableAnimationLoop = enableLoop;

        currentAnimationId = animationId;

    }

}
The other parameters of the SetAnimation method allow the animation to be reset or looped, or prevent it from being changed before it has finished. Whenever an animation is set, its identifier is stored in the currentAnimationId variable and is used to prevent the current animation from being reset, unless you desire that, by setting the reset parameter to true. Following is the code for the SetAnimation method of the Player class:
// Player class

public class Player : TerrainUnit

{

    ...


    public void SetAnimation(PlayerAnimations animation,

        bool reset, bool enableLoop, bool waitFinish)

    {

        SetAnimation((int)animation, reset, enableLoop, waitFinish);

    }

}
And following is the code for the SetAnimation method of the Enemy class:
// Enemy class

public class Enemy : TerrainUnit

{

    ...

    public void SetAnimation(EnemyAnimations animation,

        bool reset, bool enableLoop, bool waitFinish)

    {

        SetAnimation((int)animation, reset, enableLoop, waitFinish);

    }

}
The SetAnimation methods defined in the Player and Enemy classes allow the unit's animation to be easily switched and guarantee that a valid animation will always be set. The following code example illustrates how you would change the animation in the Player and Enemy classes:
player.SetAnimation(PlayerAnimations.Idle, false, true, false);

enemy.SetAnimation(EnemyAnimations.Run, false, true, false);
Drawing the Unit
To draw the unit, you just need to call the Draw method of the unit's animated model, which was defined in the previous chapter. Because all the unit transformations are stored directly in its animated model, you don't need to configure anything else. Following is the code for the Draw method of the TerrainUnit class:
public override void Draw(GameTime time)

{

    animatedModel.Draw(time);

}
Unit Types
The next classes you'll create are Player, Enemy, and PlayerWeapon. You'll use each of these classes to create (or instantiate) different types of units. For example, your game may have many types of enemies (created using the Enemy class), where each enemy may have specific attributes, such as velocity, hit points, and so on. To tackle this, you can create a class that stores the available types of units in the game and the attributes of each unit type.
To store the available types of a unit and its attributes, create a static class named UnitTypes. Although in this game you have only one type of each unit in your game—one type of player (a marine), one type of enemy (an alien spider), and one type of weapon—the UnitTypes class allows you to add new unit types to the game easily.
In the UnitTypes class, first create an enumeration with all the types of players. For each type of player, you need to store its animated model file name, hit points, and velocity, as shown in the following code:
// Player

// -------------------------------------------------------------------

public enum PlayerType

{

    Marine

}

public static string[] PlayerModelFileName = { "PlayerMarine" };

public static int[] PlayerLife = { 100 };

public static float[] PlayerSpeed = { 1.0f };
Next, create an enumeration with all the types of player weapons. For each player weapon, you need to store its animated model file name, its maximum amount of ammunition, and the amount of damage inflicted by its shot:
// Player Weapons

// -------------------------------------------------------------------

public enum PlayerWeaponType

{

    MachineGun

}


public static string[] PlayerWeaponModelFileName =

    {"WeaponMachineGun"};

public static int[] BulletDamage = { 12 };

public static int[] BulletsCount = { 250 };
Finally, you create an enumeration with all the types of enemies, where for each enemy you should store the name of its animated model, hit points, velocity, distance of perception, distance of attack, and damage. The distance of perception is the distance at which the enemy perceives the player and starts to chase him (sometimes referred to as aggro range), while the distance of attack is the distance within which the enemy is near enough to attack the player.
// Enemies

// -------------------------------------------------------------------

public enum EnemyType

{

    Beast

}


public static string[] EnemyModelFileName = { "EnemyBeast" };

public static int[] EnemyLife = { 300 };

public static float[] EnemySpeed = { 1.0f };

public static int[] EnemyPerceptionDistance = { 140 };

public static int[] EnemyAttackDistance = { 25 };

public static int[] EnemyAttackDamage = { 13 };
Player Weapon
Now you'll create the PlayerWeapon class, which is one of the simplest logic classes in your game. Just as in the TerrainUnit class, the player's weapon is drawn as an animated model. Although the weapon doesn't have any animation, it does have three bones:
- The first is the root bone, which doesn't have any transformation.
- The second bone is the weapon's butt bone, used to attach the weapon to the player's hand.
- The third bone is placed at the weapon's muzzle and is used as the starting point for the bullet shot.
Figure 13-6 illustrates the player's weapon and the weapon's bones.
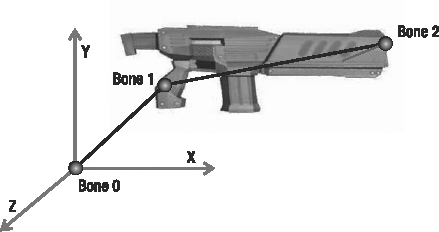
Figure 13-6. Player's weapon and its bones
You begin constructing the PlayerWeapon class by declaring its attributes. The PlayerWeapon class needs to store its weapon type, because you might have some different types of weapons in the game. You'll use the PlayerWeaponType enumeration of the UnitsType class to store the weapon type. The PlayerWeapon also stores other attributes, such as the current and maximum number of bullets, and the bullet damage:
UnitsType.PlayerWeaponType weaponType;

int maxBullets;

int bulletsCount;

int bulletDamage;
In the PlayerWeapon class, you need to store the position and direction in which a bullet exits the weapon (the fire position and direction). You'll use the fire position and direction to trace the shot ray, used to check whether the bullet hits an object. Finally, you need to declare an AnimatedModel for the weapon:
AnimatedModel weaponModel;

Vector3 firePosition;

Vector3 targetDirection;
Creating the Player Weapon
The PlayerWeapon class extends the DrawableGameComponent class. So, the PlayerWeapon constructor receives a Game (needed by its base class constructor) and a PlayerWeaponType as the constructor parameters. You use the PlayerWeaponType parameter to define which type of weapon you want to create. Inside the class constructor, the weapon's attributes are queried from the UnitTypes class, according to its weapon type. Following is the constructor code for the PlayerWeapon class:
public PlayerWeapon(Game game, UnitTypes.PlayerWeaponType weaponType)

    : base(game)

{

    this.weaponType = weaponType;

    // Weapon configuration

    bulletDamage = UnitTypes.BulletDamage[(int)weaponType];

    bulletsCount = UnitTypes.BulletsCount[(int)weaponType];

    maxBullets = bulletsCount;

}
Loading the Player Weapon
You can override the LoadContent method of the PlayerWeapon base class to load the weapon's animated model. You get the file name of the weapon's animated model from the UnitTypes class. Following is the code for the LoadContent method:
protected override void LoadContent()

{

    // Load weapon model

    weaponModel = new AnimatedModel(Game);

    weaponModel.Initialize();

    weaponModel.Load(PlayerWeaponModelFileName[(int)weaponType]);


    base.LoadContent();

}
Updating the Weapon
To update the weapon, you create a new Update method, which receives a GameTime and a Matrix. You use the GameTime to retrieve the elapsed time since the last update, and the Matrix class to update the weapon model according to a parent bone. The weapon's parent bone is the player's hand bone, as you saw in the previous chapter. In this case, the weapon is translated and rotated to the player's hand. You update the weapon by calling the Update method of its animated model and passing the received GameTime and parent Matrix.
After updating the weapon's animated model, the weapon's fire position—which is the position of its third bone, shown in Figure 13-6—is stored in the firePosition attribute. Following is the code for the Update method:
public void Update(GameTime time, Matrix parentBone)

{

    weaponModel.Update(time, parentBone);

    firePosition = BonesAbsolute[WEAPON_AIM_BONE].Translation;

}
Finally, to draw the weapon, you just need to call the Draw method of its AnimatedModel.
Player
In this section, you'll create the Player class, which has the player's attributes and logic. The Player class extends and adds some functionalities to the TerrainUnit class. Figure 13-7 shows the marine model used as the game player.
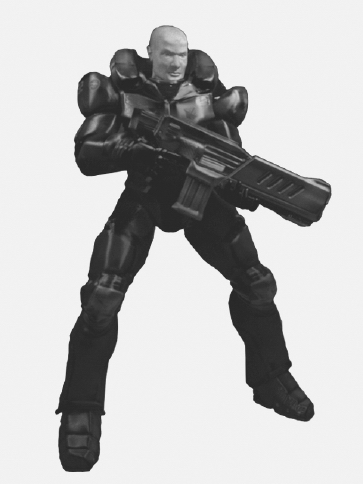
Figure 13-7. The marine model used in this game (courtesy of Carlos Augusto, http://www.floatbox.com.br)
In the Player class, you first store the type of player you're creating, because you might have some different types of players in the game. You also store the player's weapon, because it is updated according to the player. For example, the player's weapon is always positioned in the player's right hand.
// Player type

UnitTypes.PlayerType playerType;

// Player weapon

PlayerWeapon playerWeapon;
Next, declare two attributes to store and control the transformations made over the waist bone of the player's animated model. You can use this transformation to rotate the player's torso around his waist, in addition to the current animation of the character.
// Waist bone

float rotateWaistBone;

float rotateWaistBoneVelocity;
Updating the Camera's Chase Position
The camera's default chase position is the center of the player's bounding sphere. In this way, the camera is always focusing on the center of the player's model. You can make the camera focus on other parts of the player, such as his upper body, by changing the camera's chase position through an offset vector. Figure 13-8 illustrates the offset vectors used to modify the camera's chase position.
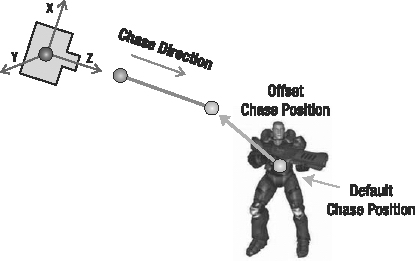
Figure 13-8. Changing the camera's default chase position using the player's chase vector
To change the camera's chase position, add a new attribute of type Vector3[] to the Player class, and name it chaseOffsetPosition. This attribute stores an offset vector for each camera in the scene:
// Camera chase position

Vector3[] chaseOffsetPosition;
Note that you need to manually set the camera offset vectors for the player character when he is created. When the player character is updated, you need to update the position and direction in which the camera chases him. To do that, create the UpdateChasePosition method inside the Player class. You can update the camera's chase position by setting it to the center of the player's bounding sphere summed with the camera's offset, which is stored in the player's chaseOffsetPosition attribute. And you can update the camera's chase direction by setting it as the player's heading vector. Note that the camera offset vector is oriented according to the player's orientation vectors (headingVec, strafeVec, and upVec vectors), and not according to the world axes. Following is the code for the UpdateChasePosition method:
private void UpdateChasePosition()

{

    ThirdPersonCamera camera = cameraManager.ActiveCamera

        as ThirdPersonCamera;

    if (camera != null)

    {

        // Get camera offset position for the active camera

        Vector3 cameraOffset =

            chaseOffsetPosition[cameraManager.ActiveCameraIndex];

        // Get the model center

        Vector3 center = BoundingSphere.Center;


        // Calculate chase position and direction

        camera.ChasePosition = center +

            cameraOffset.X * StrafeVector +

            cameraOffset.Y * UpVector +

            cameraOffset.Z * HeadingVector;

        camera.ChaseDirection = HeadingVector;

    }

}
Attaching a Weapon to the Player
To be able to attach a weapon to the player, create the AttachWeapon method. This method receives the type of weapon to be attached as a parameter. Inside the AttachWeapon method, create and initialize a new PlayerWeapon for the player. Following is the code for the AttachWeapon method:
public void AttachWeapon(EntityTypes.PlayerWeaponType weaponType)

{

    playerWeapon = new PlayerWeapon(Game, weaponType);

    playerWeapon.Initialize();

}
Aiming Objects
Since the player should be able to aim anywhere in the scenery, the player must be able to move his weapon's aim to the sides and also up and down. The player's weapon is connected to the player character through a bone in the weapon and a bone in the player character's right hand. You can make the player aim to the sides by rotating the player character around his y (up) axis, but you can't make the player aim up and down by rotating the player character around his x (right) axis, because that would visually detach the player model's feet from the floor. To solve this, instead of rotating the entire player model, you rotate only the player model's upper body around his waist bone. Figure 13-9 illustrates the rotation being applied over the waist bone of the player.
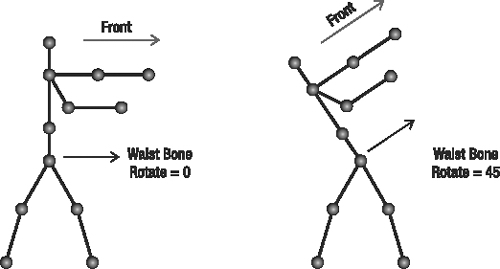
Figure 13-9. Rotating the waist bone of the player's model
You use the rotateWaistBone and rotateWaistBoneVelocity attributes of the Player class to apply a rotation over the player character's waist bone (see Chapter 12 for details on this technique). The rotateWaistBone attribute stores the current waist bone rotation, and the rotateWaistBoneVelocity attribute stores the velocity in which the waist bone is currently being rotated. You can modify the rotateWaistBoneVelocity through the player's RotateWaistVelocity property. To update the player's waist bone's rotation, you create the UpdateWaistBone method with the following code:
static float MAX_WAIST_BONE_ROTATE = 0.50f;

static int WAIST_BONE_ID = 2;


public float RotateWaistVelocity

{

    get { return rotateWaistBoneVelocity; }

    set { rotateWaistBoneVelocity = value; }

}


private void UpdateWaistBone(float elapsedTimeSeconds)

{

    if (rotateWaistBoneVelocity != 0.0f)

    {

        rotateWaistBone += rotateWaistBoneVelocity *

            elapsedTimeSeconds;

        rotateWaistBone = MathHelper.Clamp(rotateWaistBone,

            -MAX_WAIST_BONE_ROTATE, MAX_WAIST_BONE_ROTATE);

        // Rotate waist bone

        Matrix rotate = Matrix.CreateRotationZ(rotateWaistBone);

        AnimatedModel.BonesTransform[WAIST_BONE_ID] = rotate;

    }

}
Note that you're clamping the rotateWaistBone value to a range between -MAX_WAIST_BONE_ROTATE and MAX_WAIST_BONE_ROTATE. The index of the player character's waist bone is stored in the WAIST_BONE_ID attribute, and the waist bone is rotated around its z axis.
Updating the Player
To update the player, you'll override the Update method of the player's base class (TerrainUnit). In the Update method, you first update the transformation of the player's waist bone. Then you can call the Update method of its base class, which updates the player's position and animated model. You must call the Update method of the player's base class after the player's waist bone has been transformed, to let the current animation take the new waist bone configuration into account. After that, you need to call the UpdateChasePosition method to update the camera's chase position and direction, and finally update the player's weapon.
You update the player's weapon by calling the weapon's Update method and passing the player's right hand bone as the weapon's parent bone. In this way, the weapon is updated according to the player's right hand. You also need to set the weapon's target direction as the player's front direction (as illustrated in Figure 13-9). Note that you need to transform the player's right hand bone by the player's transformation matrix before using it to update the player's weapon. Following is the code for the player's Update methods:
public override void Update(GameTime time)

{

    // Update the player's waist bone

    float elapsedTimeSeconds = (float)time.ElapsedGameTime.TotalSeconds;

    UpdateWaistBone(elapsedTimeSeconds);


    // Update player's base class

    // It's where the player's position and animated model are updated

    base.Update(time);

    // Update camera chase position

    UpdateChasePosition();


    // Update player weapon

    Matrix transformedHand = AnimatedModel.BonesAnimation[RIGHT_HAND_BONE_ID] *

        Transformation.Matrix;

    playerWeapon.Update(time, transformedHand);

    playerWeapon.TargetDirection = HeadingVector + UpVector * rotateWaistBone;

}
Enemy
The Enemy class is the one that has the enemy NPC's logic and attributes. Figure 13-10 shows the spider model used as an enemy in the game.
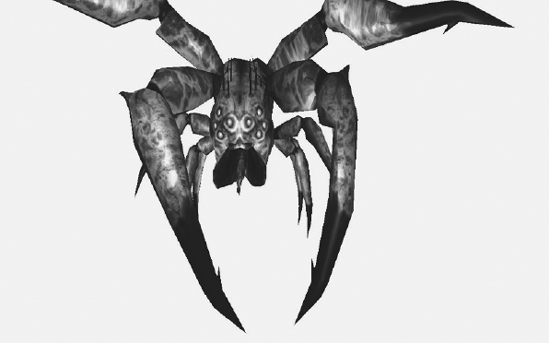
Figure 13-10. An alien spider model (courtesy of Psionic, http://www.psionic3d.co.uk)
Unlike the player, the enemy is computer-controlled, so you need to implement its AI. The enemy's AI is simple, with only four different states: Wandering, Chasing Player, Attacking Player, and Dead. Figure 13-11 shows the diagram of the AI built for the enemies.
In the AI diagram shown in Figure 13-11, each circle represents a different enemy state, and the arrows represent the actions that make an enemy change its state. The enemy's AI starts in the Wandering state. In this state, the enemy keeps moving around the map randomly looking for the player. Whenever the enemy sees the player or gets shot by the player, it changes its state to Chasing Player. In the Chasing Player state, the enemy moves closer to the player until it is near enough to attack the player. When that happens, the enemy state is altered to Attacking Player. In this state, the enemy attacks the player successively until the player dies or the player runs. If the player tries to run away from the enemy, the enemy's state is changed back to Chasing Player. Notice that once the enemy starts to chase the player, the enemy stays in a cycle between the states Chasing Player and Attacking Player, not returning to the Wandering state.
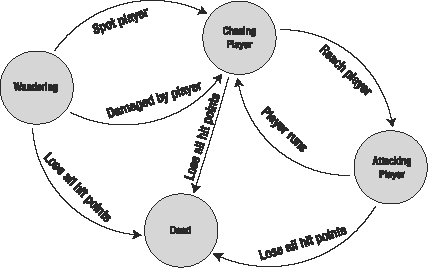
Figure 13-11. Enemy AI diagram
Each enemy has an attribute to store its current state, among an enumeration of possible states.
// Possible enemy states

public enum EnemyState

{

    Wander = 0,

    ChasePlayer,

    AttackPlayer,

    Dead

}


// Current enemy state (default = Wander)

EnemyState state;
For each one of the possible enemy states, you'll declare some attributes and create a method to execute this state. To control the transitions between the enemy states, you'll override the Update method of its base class.
Updating the Enemy
The enemy's Update method manages the transition between the enemy states. For every arrow in the AI state diagram shown in Figure 13-11, there must be a condition in the Update method.
In the beginning of the Update method, you calculate the enemy's chaseVector, which contains the direction from the enemy's position to the player's position. You use the length of this vector to check the distance between the enemy and the player. Then, for each player's state, you check if you can execute this state or need to change it to a new state. Note that all enemies have a reference to the Player class, which is used to obtain the player's current position. Following is the Update method's code:
public override void Update(GameTime time)

{

    // Calculate chase vector every time

    chaseVector = player.Transformation.Translate -

        Transformation.Translate;

    float distanceToPlayer = chaseVector.Length();


    switch (state)

    {

        case EnemyState.Wander:

            // Enemy perceives or is hit by the player - Change state

            if (isHit || distanceToPlayer < perceptionDistance)

                state = EnemyState.ChasePlayer;

            else

                Wander(time);

            break;


        case EnemyState.ChasePlayer:

            // Enemy is near enough to attack - Change state

            if (distanceToPlayer <= attackDistance)

            {

                state = EnemyState.AttackPlayer;

                nextActionTime = 0;

            }

            else

                ChasePlayer(time);

            break;


        case EnemyState.AttackPlayer:

            // Player flees - Change state

            if (distanceToPlayer > attackDistance * 2.0f)

                state = EnemyState.ChasePlayer;

            else

                 AttackPlayer(time);

            break;


        default:

            break;

    }


    base.Update(time);

}
Wandering
In the Wandering state, the enemy walks randomly through the map, without a specific goal. To execute this action, you need to generate random positions over the map within a radius from the enemy's actual position and make the enemy move to these positions. Following are the attributes of the Enemy class used by the Wandering state:
static int WANDER_MAX_MOVES = 3;

static int WANDER_DISTANCE = 70;

static float WANDER_DELAY_SECONDS = 4.0f;


static float MOVE_CONSTANT = 35.0f;

static float ROTATE_CONSTANT = 100.0f;


// Wander

int wanderMovesCount;

Vector3 wanderStartPosition;

Vector3 wanderPosition;
The WANDER_MAX_MOVES variable defines the number of random movements that the enemy makes until it returns to its initial position, and the wanderMovesCount variable stores the number of movements that the unit has already made. You can use these variables to restrict the distance that the enemy could reach from its initial position, forcing it to return to its start position after a fixed number of random movements. Besides that, the WANDER_DELAY_SECONDS variable stores the delay time between each movement of the unit. The WANDER_DISTANCE variable stores the minimum distance that the unit walks in each movement, and the variables wanderStartPosition and wanderPosition store the enemy's initial position and destination while in the Wandering state, respectively. Finally, MOVE_CONSTANT and ROTATE_CONSTANT store a constant value used to move and rotate the enemy, respectively.
To execute the enemy's Wandering state, you'll create the Wander method. In the Wander method, you first check if the enemy has already reached its destination position, which is stored in the wanderPosition attribute. To do that, you create a vector from the enemy's position to its destination and use the length of this vector to check the distance between them. If the distance is below a defined epsilon value (for example, 10.0), the enemy has reached its destination, and a new destination must be generated:
// Calculate wander vector on X, Z axis

Vector3 wanderVector = wanderPosition - Transformation.Translate;

wanderVector.Y = 0.0f;

float wanderLength = wanderVector.Length();


// Reached the destination position

if (wanderVector.Length() < DISTANCE_EPSILON)

{

    // Generate a new wander position

}
In the preceding code, when an enemy is created, its first destination position is equal to its start position.
If the number of random movements the enemy makes is lower than the maximum number of consecutive random movements that it could make, its new destination position will be a randomly generated position. Otherwise, the next enemy destination will be its starting position.
// Generate a new random position

if (wanderMovesCount < WANDER_MAX_MOVES)

{

    wanderPosition = Transformation.Translate +

        RandomHelper.GeneratePositionXZ(WANDER_DISTANCE);

    wanderMovesCount++;

}

// Go back to the start position

else

{

    wanderPosition = wanderStartPosition;

    wanderMovesCount = 0;

}


// Next time wander

nextActionTime = (float)time.TotalGameTime.TotalSeconds +

    WANDER_DELAY_SECONDS + WANDER_DELAY_SECONDS *

    (float)RandomHelper.RandomGenerator.NextDouble();
The enemy's random destination position is generated through the GeneratePositionXZ method of your RandomHelper class. After generating the enemy's new destination, you also generate a random time when the enemy should start moving to its new destination so that it does not appear that all the enemies are moving in unison, which would ruin the game's realism. Following is the complete code for the Wander method of the Enemy class:
private void Wander(GameTime time)

{

    // Calculate wander vector on X, Z axis

    Vector3 wanderVector = wanderPosition - Transformation.Translate;

    wanderVector.Y = 0.0f;

    float wanderLength = wanderVector.Length();


    // Reached the destination position

    if (wanderLength < DISTANCE_EPSILON)

    {

        SetAnimation(EnemyAnimations.Idle, false, true, false);


        // Generate a new random position

        if (wanderMovesCount < WANDER_MAX_MOVES)

        {

            wanderPosition =  Transformation.Translate +

                RandomHelper.GeneratePositionXZ(WANDER_DISTANCE);

            wanderMovesCount++;

        }

        // Go back to the start position

        else

        {

            wanderPosition = wanderStartPosition;

            wanderMovesCount = 0;

        }


        // Next time wander

        nextActionTime = (float)time.TotalGameTime.TotalSeconds +

            WANDER_DELAY_SECONDS + WANDER_DELAY_SECONDS *

            (float)RandomHelper.RandomGenerator.NextDouble();

     }


     // Wait for the next action time

     if ((float)time.TotalGameTime.TotalSeconds > nextActionTime)

     {

        wanderVector *= (1.0f / wanderLength);

        Move(wanderVector);

     }

}
At the end of the Wander method, you check if the time for the next wander action has arrived. In this case, you normalize the wanderVector, which contains the direction from the enemy to its destination, and makes the enemy move in this direction through the Move method.
You'll create the Move method to move the enemy from its original position using an arbitrary direction vector. You can move the enemy by setting its linear velocity as the desired direction vector, inside the Move method. Remember that the enemy's position is updated according to its linear velocity by the Update method's base class (TerrainUnit). While moving the unit, you also need to set its angular velocity, heading the unit in the same direction it is moving. Following is the code for the Move method:
private void Move(Vector3 direction)

{

    // Change enemy's animation

    SetAnimation(EnemyAnimations.Run, false, true,

        (CurrentAnimation == EnemyAnimations.TakeDamage));

    // Set the new linear velocity

    LinearVelocity = direction * MOVE_CONSTANT;


    // Angle between heading and move direction

    float radianAngle = (float)Math.Acos(

         Vector3.Dot(HeadingVector, direction));

    if (radianAngle >= 0.1f)

    {

        // Find short side to rotate

        // Clockwise or counterclockwise

        float sideToRotate = Vector3.Dot(StrafeVector, direction);

        Vector3 rotationVector = new Vector3(0, ROTATE_CONSTANT *

            radianAngle, 0);


        if (sideToRotate > 0)

            AngularVelocity = -rotationVector;

        else

            AngularVelocity = rotationVector;

    }

}
In the Move method, you first activate the running animation and set the linear velocity of the enemy as its direction parameter multiplied by the MOVE_CONSTANT variable. Next, you calculate the angle between the enemy's heading vector and its direction vector. You need this angle to rotate the unit and head it in the same direction it is moving. You can use the Dot method of XNA's Vector3 class to get the cosine of the angle between the enemy's heading vector and its direction vector, and the Acos method of the Math class to get the angle between these vectors from its cosine. After calculating the angle between the enemy's heading and direction, you still need to know from which side to rotate the unit: clockwise or counterclockwise. For example, you can find that the angle between the enemy's heading and direction is 90 degrees, but you still don't know whether it should be rotated clockwise or counterclockwise.
You can find the correct side to rotate the enemy by calculating the cosine osf the angle between the enemy's strafe vector—which is perpendicular to the heading vector—and its direction vector. If the cosine is positive, you need to apply a negative rotation on the enemy (to its right), making it rotate clockwise; otherwise, you need to apply a positive rotation, making it rotate counterclockwise (to its left). The rotation is set as the enemy's AngularVelocity and is multiplied by the ROTATE_CONSTANT variable.
Chasing Player
In the Chasing Player state, the enemy needs to move to the player's current position. You can do this by making the enemy move through the chaseVector vector, which is the direction from the enemy to the player, and is calculated in the enemy's Update method. Following is the code for the ChasePlayer method:
private void ChasePlayer(GameTime time)

{

    Vector3 direction = chaseVector;

    direction.Normalize();

    Move(direction);

}
Attacking Player
In the Attacking Player state, the enemy keeps attacking the player character successively, causing damage to him. To make the enemy do that, you can simply execute the ReceiveDamage method of the Player instance and wait for the next time to attack. The attributes that you need to create to handle the Attacking Player state are the delay time in seconds between each attack and the time at which the enemy can execute a new attack action:
Following is the code for the AttackPlayer method:
private void AttackPlayer(GameTime time)

{

    float elapsedTimeSeconds = (float)time.TotalGameTime.TotalSeconds;

    if (elapsedTimeSeconds > nextActionTime)

    {

        // Set attacking animation

        SetAnimation(EnemyAnimations.Bite, false, true, false);


        // Next attack time

        player.ReceiveDamage(attackDamage);

        nextActionTime = elapsedTimeSeconds + ATTACK_DELAY_SECONDS;

    }

}
Finishing the Game Engine
At this point, you have created all the game engine classes, helper classes, and almost all the game logic classes. Now you need to create a class to control the main game logic, and some classes to store and create the game levels. You also need to create the main game class that extends the XNA Game class. You'll create all these classes in the following sections.
Game Level
Each game level is composed of a fixed set of objects: cameras, lights, a terrain, a skydome, a player, and enemies. For the game levels, create a structure named GameLevel inside the GameLogic namespace. Following is the code for the GameLevel struct:
public struct GameLevel

{

    // Cameras, lights, terrain, and sky

    public CameraManager CameraManager;

    public LightManager LightManager;

    public Terrain Terrain;

    public SkyDome SkyDome;


    // Player and enemies

    public Player Player;

    public List<Enemy> EnemyList;

}
In the XNA TPS game, you create the game levels inside the game code, instead of loading them from a file. To do that, create a static class named LevelCreator in the GameLogic namespace. The LevelCreator class is responsible for constructing the game levels and returning a GameLevel structure with the constructed level.
First, create an enumeration inside the LevelCreator class enumerating all the available game levels. You'll use this enumeration further to select the game level to be constructed. Initially, this enumeration has only one entry, as follows:
public enum Levels

{

    AlienPlanet

}
Next, create a static method named CreateLevel to create the game levels. This method needs to receive an instance of the Game class, because it uses the Game's ContentManager to load the game assets and the Game's ServicesContainer. When the level is created, you add the CameraManager, LightManager, and Terrain to this Game class ServiceContainer, allowing these objects to be shared with all the scene objects. The CreateLevel method also receives a Levels enumeration containing the desired level to be created. Following is the code for the CreateLevel method:
public static GameLevel CreateLevel(Game game, Levels level)

{

    // Remove all services from the last level

    game.Services.RemoveService(typeof(CameraManager));

    game.Services.RemoveService(typeof(LightManager));

    game.Services.RemoveService(typeof(Terrain));


    switch (level)

    {

        case Levels.AlienPlanet:

            return CreateAlienPlanetLevel(game);

            break;


        default:

            throw new ArgumentException("Invalid game level");

            break;

    }

}
In the beginning of the CreateLevel method, you must try to remove any CameraManager, LightManager, or Terrain objects from the game services container, avoiding adding two instances of these objects to the service container. Then you use a switch to select the desired level to be created.
The first level of the XNA TPS game is called AlienPlanet. Create the CreateAlienPlanetLevel method to construct this level. Inside the CreateAlienPlanetLevel method, first create the game cameras:
float aspectRate = (float)game.GraphicsDevice.Viewport.Width /

    game.GraphicsDevice.Viewport.Height;

// Create the game cameras

ThirdPersonCamera followCamera = new ThirdPersonCamera();

followCamera.SetPerspectiveFov(60.0f, aspectRate, 0.1f, 2000);

followCamera.SetChaseParameters(3.0f, 9.0f, 7.0f, 14.0f);

ThirdPersonCamera fpsCamera = new ThirdPersonCamera();

fpsCamera.SetPerspectiveFov(45.0f, aspectRate, 0.1f, 2000);

fpsCamera.SetChaseParameters(5.0f, 6.0f, 6.0f, 6.0f);


// Create the camera manager and add the game cameras

gameLevel.CameraManager = new CameraManager();

gameLevel.CameraManager.Add("FollowCamera", followCamera);

gameLevel.CameraManager.Add("FPSCamera", fpsCamera);


// Add the camera manager to the service container

game.Services.AddService(typeof(CameraManager),

    gameLevel.CameraManager);
You need to create two different game cameras, where each camera is of the type ThirdPersonCamera. The first camera, named followPlayer, is used to follow the player from behind, and the second camera, named fpsCamera, is used while the player is in the "aim mode." You need to add both cameras to the CameraManager of the GameLevel structure, and the CameraManager needs to be added to the Game's ServiceContainer. Next, create the game lights:
// Create the light manager

gameLevel.LightManager = new LightManager();

gameLevel.LightManager.AmbientLightColor = new Vector3(0.1f);


// Create the game lights and add them to the light manager

gameLevel.LightManager.Add("MainLight",

    new PointLight(new Vector3(10000, 10000, 10000),

    new Vector3(0.2f)));

gameLevel.LightManager.Add("CameraLight",

    new PointLight(Vector3.Zero, Vector3.One));


// Add the light manager to the service container

game.Services.AddService(typeof(LightManager),

    gameLevel.LightManager);
The game level has two lights: a main light positioned at (10000, 10000, 10000), which barely illuminates the scene, and a camera light positioned at the camera position, which highly illuminates the scene. You add these lights to the LightManager, which is also added to the game services container. After creating the camera and lights, create the game's terrain and its material:
// Create the terrain

gameLevel.Terrain = new Terrain(game);

gameLevel.Terrain.Initialize();

gameLevel.Terrain.Load("Terrain1", 128, 128, 12.0f, 1.0f);

// Create the terrain material and add it to the terrain

TerrainMaterial terrainMaterial = new TerrainMaterial();

terrainMaterial.LightMaterial = new LightMaterial(

    new Vector3(0.8f), new Vector3(0.3f), 32.0f);

terrainMaterial.DiffuseTexture1 = GetTextureMaterial(

    game, "Terrain1", new Vector2(40, 40));

terrainMaterial.DiffuseTexture2 = GetTextureMaterial(

    game, "Terrain2", new Vector2(25, 25));

terrainMaterial.DiffuseTexture3 = GetTextureMaterial(

    game, "Terrain3", new Vector2(15, 15));

terrainMaterial.DiffuseTexture4 = GetTextureMaterial(

    game, "Terrain4", Vector2.One);

terrainMaterial.AlphaMapTexture = GetTextureMaterial(

    game, "AlphaMap", Vector2.One);

terrainMaterial.NormalMapTexture = GetTextureMaterial(

    game, "Rockbump", new Vector2(128, 128));

gameLevel.Terrain.Material = terrainMaterial;


// Add the terrain to the service container

game.Services.AddService(typeof(Terrain), gameLevel.Terrain);
The terrain material is composed of a LightMaterial and some TextureMaterial. After creating the terrain material, you need to set it into the terrain's effect, and you also need to add the terrain to the game services container. In the preceding code, you're using the GetTextureMaterial method to ease the creation of the TextureMaterial. The code for the GetTextureMaterial follows:
private static TextureMaterial GetTextureMaterial(Game game,

    string textureFilename, Vector2 tile)

{

    Texture2D texture = game.Content.Load<Texture2D>(

        GameAssetsPath.TEXTURES_PATH + textureFilename);

    return new TextureMaterial(texture, tile);

}
Next, create the game's sky:
// Create the sky

gameLevel.SkyDome = new SkyDome(game);

gameLevel.SkyDome.Initialize();

gameLevel.SkyDome.Load("SkyDome");

gameLevel.SkyDome.TextureMaterial = GetTextureMaterial(

    game, "SkyDome", Vector2.One);
The game's sky also has a TextureMaterial that you can create through the GetTextureMaterial method.
Last, you need to create the game's logic objects, which are the player and the enemies. The code used to create the player follows:
// Create the player

gameLevel.Player = new Player(game, UnitTypes.PlayerType.Marine);

gameLevel.Player.Initialize();

gameLevel.Player.Transformation = new Transformation(

    new Vector3(−210, 0, 10), new Vector3(0, 70, 0), Vector3.One);

gameLevel.Player.AttachWeapon(UnitTypes.PlayerWeaponType.MachineGun);


// Player chase camera offsets

gameLevel.Player.ChaseOffsetPosition = new Vector3[2];

gameLevel.Player.ChaseOffsetPosition[0] =

    new Vector3(3.0f, 5.0f, 0.0f);

gameLevel.Player.ChaseOffsetPosition[1] =

    new Vector3(3.0f, 4.0f, 0.0f);
After creating the player character, you can set his initial position and rotation, modifying his transformation. To add a weapon to the player character, you use the AttachWeapon method. You can also change the default camera's chase position, creating an offset vector in the player for each game camera.
Now it's time to create the game's enemies. Because the game level usually has many enemies, create a method named ScatterEnemies, to create the enemies and randomly position them on the map:
private static List<Enemy> ScatterEnemies(Game game, int numEnemies,

    float minDistance, int distance, Player player)

{

    List<Enemy> enemyList = new List<Enemy>();

    for (int i = 0; i < numEnemies; i++)

    {

        Enemy enemy = new Enemy(game, UnitTypes.EnemyType.Beast);

        enemy.Initialize();


        // Generate a random position with a minimum distance

        Vector3 offset = RandomHelper.GeneratePositionXZ(distance);

        while (Math.Abs(offset.X) < minDistance &&

            Math.Abs(offset.Z) < minDistance)

            offset = RandomHelper.GeneratePositionXZ(distance);


        // Position the enemies around the player

        enemy.Transformation = new Transformation(

            player.Transformation.Translate + offset,

            Vector3.Zero, Vector3.One);


        enemy.Player = player;

        enemyList.Add(enemy);

    }


    return enemyList;

}
The ScatterEnemies method receives as its parameter the number of enemies to be created, the minimum distance from the player that an enemy can be created, the distance used to randomly position the enemies, and an instance of the Player. Inside the ScatterEnemies method, you generate all the enemies in a loop. For each enemy, you first generate a random offset vector using the distance parameter, and then check if each component of this offset vector is larger than the minDistance parameter. In this case, you set the enemy's position as the player's position summed to the generated offset vector. You also need to set a reference to the player in each enemy created. At the end, the ScatterEnemies method returns a list containing all the enemies created.
You should call the ScatterEnemies method at the end of the CreateAlienPlanet method, as follows:
// Enemies

gameLevel.EnemyList = ScatterEnemies(game, 20, 150, 800,

    gameLevel.Player);
Now that you've created all the game level objects, your level is ready to be played.
GameScreen Class
Now it's time to put all the game objects and logic together in a new class named GameScreen. GameScreen is the main game class, where you define which game map should be loaded, how the player is controlled, and how the scene objects are updated and drawn. In summary, the GameScreen class contains the main update and drawing logic.
You should create the GameScreen class in the main namespace of your game project, the XNA_TPS namespace. The GameScreen class extends the DrawableGameComponent class, allowing it to be added to the GameComponents collection of the Game class. Start the GameScreen class by declaring its attributes:
// Game level

LevelCreator.Levels currentLevel;

GameLevel gameLevel;


// Necessary services

InputHelper inputHelper;


// Text

SpriteBatch spriteBatch;

SpriteFont spriteFont;


// Weapon target sprite

Texture2D weaponTargetTexture;

Vector3 weaponTargetPosition;


// Aimed enemy

Enemy aimEnemy;

int numEnemiesAlive;
The gameLevel stores the game level that is currently being played, while the currentLevel stores an identifier for the current game level. The inputHelper attribute, of type InputHelper, handles the game inputs. Next, the spriteBatch handles the drawing of the game's UI components, which are sprites; the spriteFont stores a font used to write on the game screen; the weaponTargetTexture stores the sprite of the weapon target; and the weaponTargetPosition stores the position, in world coordinates, that the weapon is aiming at. Finally, aimEnemy stores a reference for the enemy, if any, that the weapon is targeting, and numEnemiesAlive stores the number of enemies alive. After declaring the attributes of the GameScreen class, create its constructor:
public GameScreen(Game game, LevelCreator.Levels currentLevel)

    : base(game)

{

    this.currentLevel = currentLevel;

}
The constructor for the GameScreen class is simple: it receives an instance of the Game class and an enumeration with the name of the level to be played, which is stored in the class's currentLevel attribute.
Initializing and Loading Content
You can override the Initialize method of the DrawableGameObject class to initialize the game objects and get all the necessary game services:
public override void Initialize()

{

    // Get services

    inputHelper = Game.Services.GetService(typeof(InputHelper)) as InputHelper;

    if (inputHelper == null)

        throw new InvalidOperationException("Cannot find an input service");


    base.Initialize();

}
In the preceding Initialize method, you're getting a service of type InputHelper from the service container of the Game class, and if the InputHelper service is not present in the service container, you throw an exception. Next, override the LoadContent method to load all the necessary game assets:
protected override void LoadContent()

{

    // Create SpriteBatch and add services

    spriteBatch = new SpriteBatch(GraphicsDevice);


    // Font 2D

    spriteFont = Game.Content.Load<SpriteFont>(

        GameAssetsPath.FONTS_PATH + "BerlinSans");

     // Weapon reticule

     weaponTargetTexture = Game.Content.Load<Texture2D>(

         GameAssetsPath.TEXTURES_PATH + "weaponTarget");


     // Load game level

     gameLevel = LevelCreator.CreateLevel(Game, currentLevel);


     base.LoadContent();

}
In the LoadContent method, you first create the SpriteBatch used to draw the game UI. Then, you load the SpriteFont used to write on the screen and the texture for the weapon's reticule sprite. Finally, you call the CreateLevel method of the LevelCreator class to generate the game level, which you store in the class's gameLevel attribute.
Game Update
The game update logic is divided into three methods: Update, UpdateInput, and UpdateWeaponTarget, where the main method called to update the game is the Update method. You use the UpdateInput method to handle the user input, and the UpdateWeaponTarget method to check which enemy the player's weapon is targeting.
You create the main Update method by overriding the Update method of the DrawableGameComponent class. In the Update method, you first need to call the UpdateInput method to handle the user input. Then you call the Update method of all the scene objects that need to be updated. Following is the code for the Update method:
public override void Update(GameTime gameTime)

{

    // Restart game if the player dies or kills all enemies

    if (gameLevel.Player.IsDead || numEnemiesAlive == 0)

        gameLevel = LevelCreator.CreateLevel(Game, currentLevel);


    UpdateInput();


    // Update player

    gameLevel.Player.Update(gameTime);

    UpdateWeaponTarget();


    // Update camera

    BaseCamera activeCamera = gameLevel.CameraManager.ActiveCamera;

    activeCamera.Update(gameTime);


    // Update light position

    PointLight cameraLight = gameLevel.LightManager["CameraLight"]

        as PointLight;

    cameraLight.Position = activeCamera.Position;

    // Update scene objects

    gameLevel.SkyDome.Update(gameTime);

    gameLevel.Terrain.Update(gameTime);


    // Update enemies

    foreach (Enemy enemy in gameLevel.EnemyList)

    {

        if (enemy.BoundingSphere.Intersects(activeCamera.Frustum) ||

            enemy.State == Enemy.EnemyState.ChasePlayer ||

            enemy.State == Enemy.EnemyState.AttackPlayer)


            enemy.Update(gameTime);


    }


    base.Update(gameTime);

}
Note that the order in which you update the objects is important. After reading the user input, you need to update the game's player. The player updates his position, the position that the camera uses to chase him, and the position of his weapon. Only after the player has been updated can you call the UpdateWeaponTarget method to update the enemy that the player's weapon is targeting, and you can also update the camera. After updating the camera, you can update the position of the point light that is placed in the same position as the camera. To do that, you just need to set the light position as the new camera position. Last, you should update the game terrain, sky, and enemies. Note that you don't need to update all the enemies in the scene; you can update only the visible enemies or the ones that are chasing or attacking the player.
Controlling the Player
To handle the user input and the player controls, you create a separate method named UpdateInput. Inside the UpdateInput method, you handle each player action as described in the section "Game Play" in the beginning of this chapter. The player has two different types of controls: the normal player controls and the "aim mode" controls.
While the user holds the left shoulder button of the gamepad, the player is in the aim mode and cannot move. In the aim mode, the left thumbstick of the gamepad is used to move the player's weapon target and the A button is used to fire. The following code handles the player controls while in the aim mode:
ThirdPersonCamera fpsCamera = gameLevel.CameraManager[

    "FPSCamera"] as ThirdPersonCamera;

ThirdPersonCamera followCamera = gameLevel.CameraManager[

    "FollowCamera"] as ThirdPersonCamera;


Player player = gameLevel.Player;

Vector2 leftThumb = inputHelper.GetLeftThumbStick();

// Aim mode

if (inputHelper.IsKeyPressed(Buttons.LeftShoulder)&&

    player.IsOnTerrain)

{

    // Change active camera if needed

    if (gameLevel.CameraManager.ActiveCamera != fpsCamera)

    {

        gameLevel.CameraManager.SetActiveCamera("FPSCamera");

        fpsCamera.IsFirstTimeChase = true;

        player.SetAnimation(Player.PlayerAnimations.Aim,

            false, false, false);

    }


    // Rotate the camera and move the player's weapon target

    fpsCamera.EyeRotateVelocity = new Vector3(leftThumb.Y * 50, 0, 0);

    player.LinearVelocity = Vector3.Zero;

    player.AngularVelocity = new Vector3(0, -leftThumb.X * 70, 0);

    player.RotateWaistVelocity = leftThumb.Y * 0.8f;


    // Fire

    if (inputHelper.IsKeyJustPressed(Buttons.A) &&

        player.Weapon.BulletsCount > 0)

    {

        // Wait for the last shoot animation to finish

        if (player.AnimatedModel.IsAnimationFinished)

        {

            player.SetAnimation(Player.PlayerAnimations.Shoot,

                true, false, false);


            // Damage the enemy

            player.Weapon.BulletsCount--;

            if (aimEnemy != null)

                aimEnemy.ReceiveDamage(

                player.Weapon.BulletDamage);

        }

    }

}
Every time the player mode is changed, you change the camera used to view him, and when the camera is changed, you need to set its IsFirstTimeChase property as true. Next, you use the left thumbstick to control the player's angular velocity, the player's waist bone rotation velocity, and the camera's rotation velocity. When the player aims up and down, you rotate the camera and the player's waist bone; when the player aims to the sides (left and right), you rotate the camera and the player. Finally, when the fire button is pressed, you first check if the player's weapon has any bullets. In this case, he fires a bullet at the aimed object. Here, you're using the duration time of the fire animation as a delay for the fire action. So, the player can fire again only after the last fire animation has finished.
If the player is not in the aim mode, he is in the normal mode. In the normal mode, the left thumbstick of the gamepad is used to rotate the player character to his left and right, and rotate the camera up and down, while the A and B buttons move the player character forward and backward. Also, clicking the left thumbstick makes the player jump, as defined by the following code:
// Normal mode

else

{

    bool isPlayerIdle = true;


    // Change active camera if needed

    if (gameLevel.CameraManager.ActiveCamera != followCamera)

    {

        // Reset fps camera

        gameLevel.CameraManager.SetActiveCamera("FollowCamera");

        followCamera.IsFirstTimeChase = true;

        player.RotateWaist = 0.0f;

        player.RotateWaistVelocity = 0.0f;

    }


    followCamera.EyeRotateVelocity = new Vector3(leftThumb.Y * 50, 0, 0);

    player.AngularVelocity = new Vector3(0, -leftThumb.X * 70, 0);


    // Run forward

    if (inputHelper.IsKeyPressed(Buttons.X))

    {

        player.SetAnimation(Player.PlayerAnimations.Run, false, true, false);

        player.LinearVelocity = player.HeadingVector * 30;

        isPlayerIdle = false;

    }

    // Run backward

    else if (inputHelper.IsKeyPressed(Buttons.A))

    {

        player.SetAnimation(Player.PlayerAnimations.Run,

            false, true, false);

        player.LinearVelocity = -player.HeadingVector * 20;

        isPlayerIdle = false;

    }

    else

        player.LinearVelocity = Vector3.Zero;


    // Jump

    if (inputHelper.IsKeyJustPressed(Buttons.LeftStick))

    {

        player.Jump(2.5f);

        isPlayerIdle = false;

    }

        if (isPlayerIdle)

        player.SetAnimation(Player.PlayerAnimations.Idle,

            false, true, false);

}
Updating the Weapon Target
The last method used to update the game is the UpdateWeaponTarget method. In this method, you need to check the nearest enemy that the player's weapon is targeting. To do that, you trace a ray starting at the muzzle of the player's weapon, with the same direction as the heading vector of the player's weapon. Then you check for possible collisions between this ray and the bounding box of each enemy. In case the ray collides with the bounding volume of multiple enemies, you store the enemy that is closest to the player's weapon. Finally, you calculate the position, in world coordinates, that is used to draw the sprite of the weapon's target and store it in the weaponTargetPosition variable. Following is the code for the UpdateWeaponTarget method:
private void UpdateWeaponTarget()

{

    aimEnemy = null;

    numEnemiesAlive = 0;


    // Fire ray

    Ray ray = new Ray(gameLevel.Player.Weapon.FirePosition,

        gameLevel.Player.Weapon.TargetDirection);


    // Distance from the ray start position to the terrain

    float? distance = gameLevel.Terrain.Intersects(ray);


    // Test intersection with enemies

    foreach (Enemy enemy in gameLevel.EnemyList)

    {

        if (!enemy.IsDead)

        {

            numEnemiesAlive++;


            float? enemyDistance = enemy.BoxIntersects(ray);

            if (enemyDistance != null &&

                (distance == null || enemyDistance < distance))

            {

                distance = enemyDistance;

                aimEnemy = enemy;

            }

        }

    }


    // Weapon target position

    weaponTargetPosition = gameLevel.Player.Weapon.FirePosition +

        gameLevel.Player.Weapon.TargetDirection * 300;

}
Drawing the Scene
You override the Draw method of the GameScreen base class to add your drawing code. You can separate the drawing code in two parts, where you first draw the 3D scene objects, and then draw the 2D objects (such as text and sprites) on top of those. Following is the code to draw the 3D scene objects:
GraphicsDevice.Clear(Color.Black);

BaseCamera activeCamera = gameLevel.CameraManager.ActiveCamera;


gameLevel.SkyDome.Draw(gameTime);

gameLevel.Terrain.Draw(gameTime);

gameLevel.Player.Draw(gameTime);


// Draw enemies

foreach (Enemy enemy in gameLevel.EnemyList)

{

    if (enemy.BoundingSphere.Intersects(activeCamera.Frustum))

        enemy.Draw(gameTime);

}
First, you clear the screen before drawing anything on it, and then you call the Draw method of all the scene objects to render them to the screen. Note that the order in which you draw the scene objects here is not important.
Next, you need to draw the 2D UI objects. You draw all these objects using the XNA's SpriteBatch class. Following is the code to draw the game's UI:
spriteBatch.Begin(SpriteBlendMode.AlphaBlend,

    SpriteSortMode.Deferred, SaveStateMode.SaveState);


// Project weapon target position

weaponTargetPosition = GraphicsDevice.Viewport.Project(weaponTargetPosition,

    activeCamera.Projection, activeCamera.View, Matrix.Identity);


// Draw weapon reticule

int weaponRectangleSize = GraphicsDevice.Viewport.Width / 40;

if (activeCamera == gameLevel.CameraManager["FPSCamera"])

    spriteBatch.Draw(weaponTargetTexture, new Rectangle(

        (int)(weaponTargetPosition.X - weaponRectangleSize * 0.5f),

        (int)(weaponTargetPosition.Y - weaponRectangleSize * 0.5f),

        weaponRectangleSize, weaponRectangleSize),

        (aimEnemy == null)? Color.White : Color.Red);


// Draw text

Player player = gameLevel.Player;

spriteBatch.DrawString(spriteFont, "Health: " + player.Life + "/" +

    player.MaxLife, new Vector2(10, 5), Color.Green);

spriteBatch.DrawString(spriteFont, "Weapon bullets: " +

    player.Weapon.BulletsCount + "/" + player.Weapon.MaxBullets,

    new Vector2(10, 25), Color.Green);

spriteBatch.DrawString(spriteFont, "Enemies Alive: " +

    numEnemiesAlive + "/" + gameLevel.EnemyList.Count,

    new Vector2(10, 45), Color.Green);


spriteBatch.End();


base.Draw(gameTime);
You should place all the code used to draw the 2D objects between the Begin and End methods of the SpriteBatch class. The SpriteBatch usually changes some render states before drawing the 2D objects. Because you don't want the hassle of restoring them after you finished using the SpriteBatch, you can make the SpriteBatch restore them for you automatically after the objects have been drawn. To do that, you need to call the Begin method of the SpriteBatch, passing its third parameter as the SaveStateMode.SaveState. The first and second parameters passed to the SpriteBatch's Begin method are the default parameters.
Next, you need to draw the weapon reticule sprite. However, before you can draw it, you need to transform its position from 3D world coordinates to 2D screen coordinates. To do that, you can project the weapon's target position on the screen using the Project method of the Viewport class. In this case, you need to call this method from the Viewport property of the current GraphicsDevice, which takes the screen resolution and aspect ratio into account. After that, you just need to scale the sprite, making it independent of the screen resolution. Finally, you use the DrawString method of the SpriteBatch class and the SpriteFont that you have loaded to draw the player's health, number of weapon bullets, and number of remaining enemies in the map.
TPSGame Class
The last class you create is the TPSGame class, which extends the Game class and is the main game class. Start the TPSGame class, declaring its attributes:
GraphicsDeviceManager graphics;

InputHelper inputHelper;
The GraphicsDeviceManager attribute is responsible for creating and managing the GraphicsDevice for the game. Also, you use the InputHelper attribute to handle the user input. Now, create the constructor for the TPSGame class:
public TPSGame()

{

    Window.Title = "XNA TPS v1.0";

    Content.RootDirectory = "Content";


    // Creating and configuring graphics device

    GameSettings gameSettings = SettingsManager.Read(

        Content.RootDirectory + "/" + GameAssetsPath.SETTINGS_PATH +

        "GameSettings.xml");

    graphics = new GraphicsDeviceManager(this);

    ConfigureGraphicsManager(gameSettings);

    // Input helper

    inputHelper = new InputHelper(PlayerIndex.One,

        SettingsManager.GetKeyboardDictionary(

        gameSettings.KeyboardSettings[0]));

    Services.AddService(typeof(InputHelper), inputHelper);


    // Game screen

    Components.Add(new GameScreen(this,

        LevelCreator.Levels.AlienPlanet));

}
In the class constructor, you first set the game screen title and the root directory of the content manager. Next, you read the game settings from an XML file, using the SettingsManager class, and use the game settings to configure the GraphicsDeviceManager and the InputHelper. After reading the game settings, you create the GraphicsDeviceManager and call the ConfigureGraphicsManager method, configuring it with the struct containing the GameSettings that have been read in and deserialized earlier in this chapter. After that, you create the InputHelper, and use the KeyboardSettings of the GameSettings to configure it. Last, you create a GameScreen and add it to the Components of the Game class. After you've added the GameScreen to the Components of the Game class, it will be updated and drawn automatically when needed by the XNA Framework, since it inherits from the GameComponent class. Following is the code for the ConfigureGraphicsManager method used to configure the GraphicsDeviceManager:
private void ConfigureGraphicsManager(GameSettings gameSettings)

{

#if XBOX360

    graphics.PreferredBackBufferWidth =

        GraphicsAdapter.DefaultAdapter.CurrentDisplayMode.Width;

    graphics.PreferredBackBufferHeight =

        GraphicsAdapter.DefaultAdapter.CurrentDisplayMode.Height;

    graphics.IsFullScreen = true;

#else

    graphics.PreferredBackBufferWidth =

        gameSettings.PreferredWindowWidth;

    graphics.PreferredBackBufferHeight =

        gameSettings.PreferredWindowHeight;

    graphics.IsFullScreen = gameSettings.PreferredFullScreen;

#endif


    // Minimum shader profile required

    graphics.MinimumVertexShaderProfile = ShaderProfile.VS_2_0;

    graphics.MinimumPixelShaderProfile = ShaderProfile.PS_2_A;

}
In the ConfigureGraphicsManager method, if the current platform is the Xbox 360, you set the width and height of the screen's buffer as the width and height of the current display adapter. Otherwise, you set the width and height of the screen's buffer according to the GameSettings parameter. Last, you check if the current video card supports shader 2.0.
Summary
In this chapter, you created a simple but complete TPS game. There's a lot of room for you to add more features to this game. For example, you could add more sophisticated enemy movement, more realistic movement animations, and enemy AI. However, the game is functionally complete. We've shown you an underlying structure on which you can build.
You began by creating a basic design for your game, divided into the game definition, game play, and technical design parts. After that, you started to develop the game code, which was divided into three main namespaces: GameBase, GameLogic, and Helpers. In the GameBase namespace, you added all the classes for the game engine, some of which you created in the previous chapters. Then you created all the helper classes in the Helpers namespace and all the game logic classes in the GameLogic namespace. After that, you created a LevelCreator class to create your game levels, and finally, you put it all together by creating a GameScreen class that handles the main game update and drawing logic.