Our Hello, World application was a good introduction to iOS development using Cocoa Touch, but it was missing a crucial capability—the ability to interact with the user. Without that, our application is severely limited in terms of what it can accomplish.
In this chapter, we’re going to write a slightly more complex application—one that will feature two buttons as well as a label (see Figure 3-1). When the user taps either of the buttons, the label’s text will change. This may seem like a rather simplistic example, but it demonstrates the key concepts involved in creating interactive iOS apps. Just for fun, we’re also going to introduce you to the NSAttributedString class, which lets you use styled text with many CocoaTouch GUI elements.
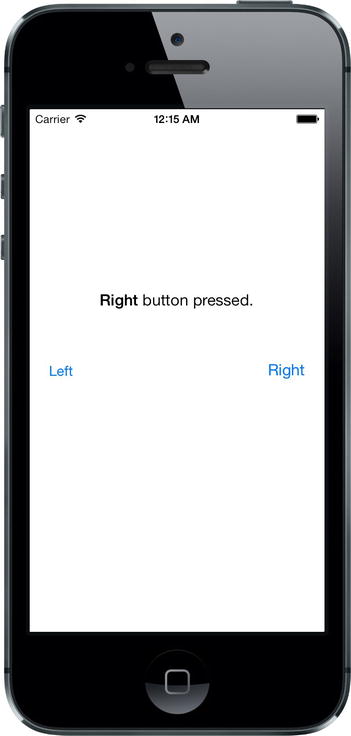
Figure 3-1. The simple two-button application we will build in this chapter
The Model-View-Controller Paradigm
Before diving in, a bit of theory is in order. The designers of Cocoa Touch were guided by a concept called Model-View-Controller (MVC), which is a very logical way of dividing the code that makes up a GUI-based application. These days, almost all object-oriented frameworks pay a certain amount of homage to MVC, but few are as true to the MVC model as Cocoa Touch.
The MVC pattern divides all functionality into three distinct categories:
- Model: The classes that hold your application’s data.
- View: Made up of the windows, controls, and other elements that the user can see and interact with.
- Controller: The code that binds together the model and view. It contains the application logic that decides how to handle the user’s inputs.
The goal in MVC is to make the objects that implement these three types of code as distinct from one another as possible. Any object you create should be readily identifiable as belonging in one of the three categories, with little or no functionality that could be classified as being either of the other two. An object that implements a button, for example, shouldn’t contain code to process data when that button is tapped, and an implementation of a bank account shouldn’t contain code to draw a table to display its transactions.
MVC helps ensure maximum reusability. A class that implements a generic button can be used in any application. A class that implements a button that does some particular calculation when it is clicked can be used only in the application for which it was originally written.
When you write Cocoa Touch applications, you will primarily create your view components using a visual editor within Xcode called Interface Builder, although you will also modify, and sometimes even create, your user interfaces from code.
Your model will be created by writing Objective-C classes to hold your application’s data or by building a data model using something called Core Data, which you’ll learn about in Chapter 13. We won’t be creating any model objects in this chapter’s application because we do not need to store or preserve data. However, we will introduce model objects as our applications get more complex in future chapters.
Your controller component will typically be composed of classes that you create and that are specific to your application. Controllers can be completely custom classes (NSObject subclasses), but more often they will be subclasses of one of several existing generic controller classes from the UIKit framework, such as UIViewController (as you’ll see shortly). By subclassing one of these existing classes, you will get a lot of functionality for free and won’t need to spend time recoding the wheel, so to speak.
As we get deeper into Cocoa Touch, you will quickly start to see how the classes of the UIKit framework follow the principles of MVC. If you keep this concept in the back of your mind as you develop, you will end up creating cleaner, more easily maintained code.
It’s time to create our next Xcode project. We’re going to use the same template that we used in the previous chapter: Single View Application. By starting with this simple template again, it will be easier for you to see how the view and controller objects work together in an iOS application. We’ll use some of the other templates in later chapters.
Launch Xcode and select File ![]() New
New ![]() Project . . . or press
Project . . . or press ![]()
![]() N. Select the Single View Application template, and then click Next.
N. Select the Single View Application template, and then click Next.
You’ll be presented with the same options sheet that you saw in the previous chapter. In the Product Name field, type the name of our new application, Button Fun. The Organization Name, Company Identifier, and Class Prefix fields should still have the values you used in the previous chapter (Apress, com.apress, and BID), so you can leave those alone. Just as we did with Hello, World, we’re going to write an iPhone application, so select iPhone for Devices. Figure 3-2 shows the completed options sheet.
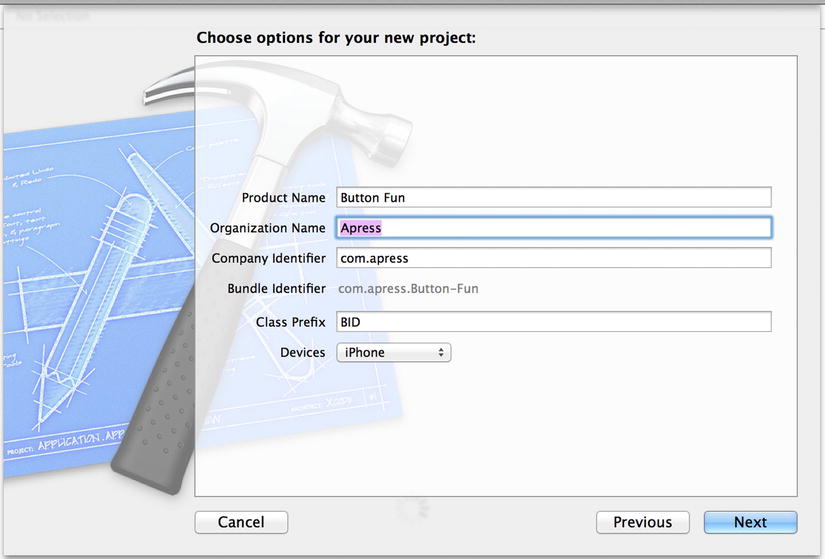
Figure 3-2. Naming your project and selecting options
Hit Next, and you’ll be prompted for a location for your project. You can leave the Create git repository checkbox checked or unchecked, whichever you prefer. Save the project with the rest of your book projects.
Looking at the View Controller
A little later in this chapter, we’ll design a view (or user interface) for our application using Interface Builder, just as we did in the previous chapter. Before we do that, we’re going to look at and make some changes to the source code files that were created for us. Yes, Virginia, we’re actually going to write some code in this chapter.
Before we make any changes, let’s look at the files that were created for us. In the project navigator, the Button Fun group should already be expanded; but if it’s not, click the disclosure triangle next to it (see Figure 3-3).

Figure 3-3. The project navigator showing the class files that were created for us by the project template. Note that our class prefix was automatically incorporated into the class file names
The Button Fun folder should contain four source code files (the ones that end in .h or .m) along with a storyboard file and an asset catalog for containing any images our app needs. The four source code files implement two classes that our application needs: our application delegate and the view controller for our application’s only view. Notice that Xcode automatically added the prefix we specified to all of our class names.
We’ll look at the application delegate a little later in the chapter. First, we’ll work with the view controller class that was created for us.
The controller class called BIDViewController is responsible for managing our application’s view. The BID part of the name is derived automatically from the class prefix we specified, and the ViewController part of the name identifies that this class is, well, a view controller. Click BIDViewController.h in the Groups & Files pane, and take a look at the contents of the class’s header file:
#import <UIKit/UIKit.h>

@interface BIDViewController : UIViewController

@end
Not much to it, is there? BIDViewController is a subclass of UIViewController, which is one of those generic controller classes we mentioned earlier. It is part of the UIKit framework, and by subclassing this class, we get a bunch of functionality for free. Xcode doesn’t know what our application-specific functionality is going to be, but it does know that we’re going to have some, so it has created this class for us to write that application-specific functionality.
Understanding Outlets and Actions
In Chapter 2, you used Xcode’s Interface Builder to design a simple user interface. A moment ago, you saw the shell of a view controller class. There must be some way for the code in this view controller class to interact with the objects in the storyboard, right?
Absolutely! A controller class can refer to objects in a storyboard or nib file by using a special kind of property called an outlet. Think of an outlet as a pointer that points to an object within the user interface. For example, suppose you created a text label in Interface Builder (as we did in Chapter 2) and wanted to change the label’s text from within your code. By declaring an outlet and connecting that outlet to the label object, you would then be able to use the outlet from within your code to change the text displayed by the label. You’ll see how to do just that in this chapter.
Going in the opposite direction, interface objects in our storyboard or nib file can be set up to trigger special methods in our controller class. These special methods are known as action methods (or just actions). For example, you can tell Interface Builder that when the user taps a button, a specific action method within your code should be called. You could even tell Interface Builder that when the user first touches a button, it should call one action method; and then later, when the finger is lifted off the button, it should call a different action method.
Xcode supports multiple ways of creating outlets and actions. One way is to specify them in our source code before using Interface Builder to connect them with our code. Xcode’s assistant view gives us a much faster and more intuitive approach that lets us create and connect outlets and actions in a single step, a process we’re going to look at shortly. But before we start making connections, let’s talk about outlets and actions in a little more detail. Outlets and actions are two of the most basic building blocks you’ll use to create iOS apps, so it’s important that you understand what they are and how they work.
Outlets
Outlets are special Objective-C class properties that are declared using the keyword IBOutlet. Declaring an outlet is done either in your controller’s class header file or in a special section (called the class extension) of your controller’s implementation file. It might look something like this:
@property (weak, nonatomic) IBOutlet UIButton *myButton;
This example is an outlet called myButton, which can be set to point to any button in Interface Builder.
The IBOutlet keyword isn’t built into the Objective-C language. It’s a simple C preprocessor definition in a system header file, where it looks something like this:
#ifndef IBOutlet
#define IBOutlet
#endif
Confused? IBOutletdoes absolutely nothing as far as the compiler is concerned. Its sole purpose is to act as a hint to tell Xcode that this is a property that we’re going to want to connect to an object in a nib file. Any property that you create and want to connect to an object in a nib file must be preceded by the IBOutlet keyword. Fortunately, Xcode will now create outlets for us automatically.
Over time, Apple has changed the way that outlets are declared and used. Since you are likely to run across older code at some point, let’s look at how outlets have changed.
In the first version of this book, we declared both a property and its underlying instance variable for our outlets. At that time, properties were a new construct in the Objective-C language, and they required you to declare a corresponding instance variable:
@interface MyViewController : UIViewController
{
    UIButton *myButton;
}
@property (weak, nonatomic) UIButton *myButton;
@end
Back then, we placed the IBOutlet keyword before the instance variable declaration:
IBOutlet UIButton *myButton;
This was how Apple’s sample code was written at the time. It was also how the IBOutlet keyword had traditionally been used in Cocoa and NeXTSTEP.
By the time we wrote the second edition of the book, Apple had moved away from placing the IBOutlet keyword in front of the instance variable, and it became standard to place it within the property declaration:
@property (weak, nonatomic) IBOutlet UIButton *myButton;
Even though both approaches continued to work (and still do), we followed Apple’s lead and changed the book code so that the IBOutlet keyword was in the property declaration rather than in the instance variable declaration.
When Apple switched the default compiler from the GNU C Compiler (GCC) to the Low Level Virtual Machine (LLVM) recently, it stopped being necessary to declare instance variables for properties. If LLVM finds a property without a matching instance variable, it will create one automatically. As a result, in this edition of the book, we’ve stopped declaring instance variables for our outlets altogether.
All of these approaches do exactly the same thing, which is to tell Interface Builder about the existence of an outlet. Placing the IBOutlet keyword on the property declaration is Apple’s current recommendation, so that’s what we’re going to use. But we wanted to make you aware of the history in case you come across older code that has the IBOutlet keyword on the instance variable.
You can read more about Objective-C properties in the book Learn Objective-C on the Mac by Scott Knaster, Waqar Malik, and Mark Dalrymple (Apress, 2012) and in the document called Introduction to the Objective-C Programming Language, available from Apple’s Developer web site at http://developer.apple.com/library/ios/#documentation/Cocoa/Conceptual/ProgrammingWithObjectiveC.
In a nutshell, actions are methods that are declared with a special return type, IBAction, which tells Interface Builder that this method can be triggered by a control in a nib file. The declaration for an action method will usually look like this:
- (IBAction)doSomething:(id)sender;
It might also look like this:
- (IBAction)doSomething;
The actual name of the method can be anything you want, but it must have a return type of IBAction, which is the same as declaring a return type of void. A void return type is how you specify that a method does not return a value. Also, the method must either take no arguments or take a single argument, usually called sender. When the action method is called, sender will contain a pointer to the object that called it. For example, if this action method was triggered when the user tapped a button, sender would point to the button that was tapped. The sender argument exists so that you can respond to multiple controls using a single action method. It gives you a way to identify which control called the action method.
Tip There’s actually a third, less frequently used type of IBAction declaration that looks like this:
- (IBAction)doSomething:(id)sender
forEvent:(UIEvent *)event;
We’ll begin talking about control events in the next chapter.
It won’t hurt anything if you declare an action method with a sender argument and then ignore it. You will likely see a lot of code that does just that. Action methods in Cocoa and NeXTSTEP needed to accept sender whether they used it or not, so a lot of iOS code, especially early iOS code, was written that way.
Now that you understand what actions and outlets are, you’ll see how they work as we design our user interface. Before we start doing that, however, we have one quick piece of housekeeping to do to keep everything neat and orderly.
Cleaning Up the View Controller
Single-click BIDViewController.m in the project navigator to open the implementation file. As you can see, there’s a small amount of boilerplate code in the form of viewDidLoad and didReceiveMemoryWarning methods that were provided for us by the project template we chose. These methods are commonly used in UIViewController subclasses, so Xcode gave us stub implementations of them. If we need to use them, we can just add our code there. However, we don’t need any of these stub implementations for this project, so all they’re doing is taking up space and making our code harder to read. We’re going to do our future selves a favor and clear away methods that we don’t need, so go ahead and delete those methods.
At the top of the file, you’ll also see an empty class extension ready for us to use. A class extension is a special kind of Objective-C category declaration that lets you declare methods and properties that will only be usable within a class’s primary implementation block, within the same file. We’ll use class extensions later in the book but not here, so delete the empty @implementation…@end pair as well. When you’re finished, your implementation should look like this:
#import "BIDViewController.h"

@implementation BIDViewController

@end
That’s much simpler, huh? Don’t worry about those methods you just deleted. You’ll be introduced to most of them throughout the course of the book.
Make sure you save the changes you just made, and then single-click Main.storyboard to open your application’s view in Xcode’s Interface Builder (see Figure 3-4). As you’ll remember from the previous chapter, the white window that shows up in the editor represents your application’s one and only view. If you look back at Figure 3-1, you can see that we need to add two buttons and a label to this view.
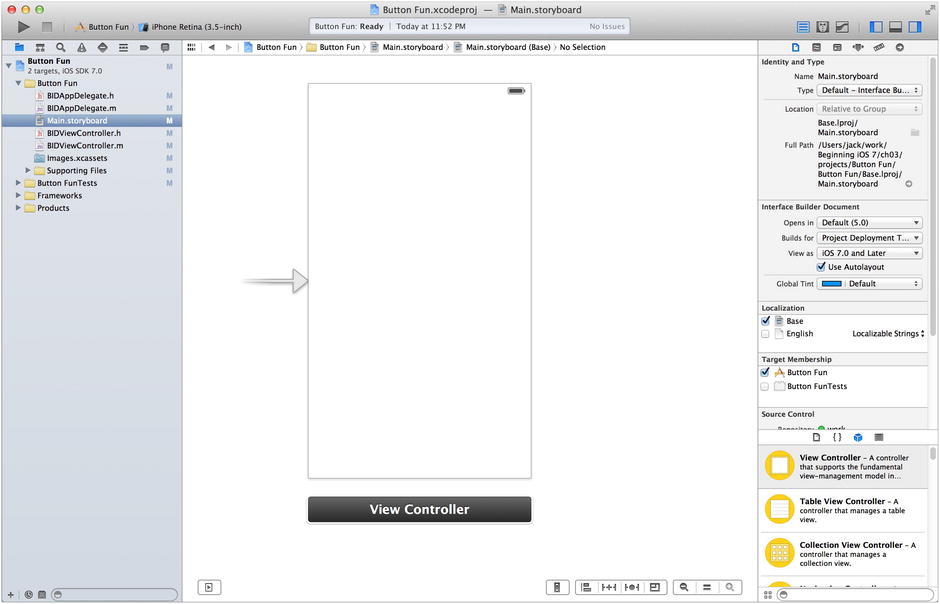
Figure 3-4. Main.storyboard open for editing in Xcode’s Interface Builder
Let’s take a second to think about our application. We’re going to add two buttons and a label to our user interface, and that process is very similar to what we did in the previous chapter. However, we’re also going to need outlets and actions to make our application interactive.
The buttons will need to each trigger an action method on our controller. We could choose to make each button call a different action method; but since they’re going to do essentially the same task (update the label’s text), we will need to call the same action method. We’ll differentiate between the two buttons using that sender argument we discussed earlier in the section on actions. In addition to the action method, we’ll also need an outlet connected to the label, so that we can change the text that the label displays.
Let’s add the buttons first and then place the label. We’ll create the corresponding actions and outlets as we design our interface. We could also manually declare our actions and outlets and then connect our user interface items to them, but why do extra work when Xcode will do it for us?
Adding the Buttons and Action Method
Our first order of business is to add two buttons to our user interface. We’ll then have Xcode create an empty action method for us, and we can connect both buttons to that action method. This will cause the buttons, when tapped by the user, to call that action method. Any code we place in that action method will be executed when the user taps the button.
Select View ![]() Utilities
Utilities ![]() Show Object Library or press ^
Show Object Library or press ^![]()
![]() 3 to open the object library. Type UIButton into the object library’s search box (you actually need to type only the first four characters, UIBu, to narrow down the list). Once you’re finished typing, only one item should appear in the object library: Button (see Figure 3-5).
3 to open the object library. Type UIButton into the object library’s search box (you actually need to type only the first four characters, UIBu, to narrow down the list). Once you’re finished typing, only one item should appear in the object library: Button (see Figure 3-5).

Figure 3-5. The Button as it appears in the object library
Drag Button from the library and drop it on the white window inside the editing area. This will add a button to your application’s view. Place the button along the left side of the view the appropriate distance from the left edge by using the blue guidelines that appear to place it. For vertical placement, use the blue guidelines to place the button halfway down in the view. You can use Figure 3-1 as a placement guide, if that helps.
Note The little, blue guidelines that appear as you move objects around in Interface Builder are there to help you stick to the iOS Human Interface Guidelines (usually referred to as the HIG). Apple provides the HIG for people designing iPhone and iPad applications. The HIG tells you how you should—and shouldn’t—design your user interface. You really should read it because it contains valuable information that every iOS developer needs to know. You’ll find it at http://developer.apple.com/library/ios/documentation/UserExperience/Conceptual/MobileHIG/.
Double-click the newly added button. This will allow you to edit the button’s title. Give this button a title of Left.
Now, it’s time for some Xcode magic. Select View ![]() Assistant Editor
Assistant Editor ![]() Show Assistant Editor, or press
Show Assistant Editor, or press ![]()
![]()
![]() to open the assistant editor. You can also show and hide the assistant editor by clicking the middle editor button in the collection of seven buttons on the upper-right side of the project window (see Figure 3-6).
to open the assistant editor. You can also show and hide the assistant editor by clicking the middle editor button in the collection of seven buttons on the upper-right side of the project window (see Figure 3-6).

Figure 3-6. The Show the Assistant editor toggle button
Unless you specifically request otherwise (see the options in the Assistant Editor menu), the assistant editor will appear to the right of the editing pane. The left side will continue to show Interface Builder, but the right will display either BIDViewController.h or BIDViewController.m, which are the header and implementation files for the view controller that “owns” the view you’re looking at.
Tip After opening the assistant editor, you may need to resize your window to have enough room to work. If you’re on a smaller screen, like the one on a MacBook Air, you might need to close the utility view and/or project navigator to give yourself enough room to use the assistant editor effectively. You can do this easily using the three view buttons in the upper right of the project window (see Figure 3-6).
Remember the View Controller icon we discussed in the previous chapter? This is the same thing all over again. Xcode knows that our view controller class is responsible for displaying this view, and so the assistant editor knows to show us the header and/or implementation of the view controller class, which are the most likely places we’ll want to create to connect actions and outlets.
As you saw earlier, there’s really not much in the BIDViewController class. It’s just an empty UIViewController subclass. But it won’t be an empty subclass for long!
We’re now going to ask Xcode to automatically create a new action method for us and associate that action with the button we just created. We’re going to add these definitions to the header file. If that’s not currently shown in the assistant view, use the jump bar above it to select BIDViewController.h.
To do this, begin by clicking your new button so it is selected. Now, hold down the control key on your keyboard, and then click-and-drag from the button over to the source code in the assistant editor. You should see a blue line running from the button to your cursor (see Figure 3-7). This blue line is how we connect objects in IB to code or other objects.

Figure 3-7. Control-dragging to source code will give you the option to create an outlet, action, or outlet collection
Tip You can drag that blue line to anything you want to connect to your button: to the header file in the assistant editor, to the File’s Owner icon, to any of the other icons on the left side of the editing pane, or even to other objects in the editing area.
If you move your cursor so it’s between the @interface and @end keywords (see Figure 3-7), a gray box will appear, letting you know that releasing the mouse button will insert an outlet, an action, or an outlet collection for you.
Note We use actions and outlets in this book, but we do not use outlet collections. Outlet collections allow you to connect multiple objects of the same kind to a single NSArray property, rather than creating a separate property for each object.
To finish this connection, release your mouse button, and a floating pop-up will appear, like the one shown in Figure 3-8. This window lets you customize your new action. In the window, click the pop-up menu labeled Connection and change the selection from Outlet to Action. This tells Xcode that we want to create an action instead of an outlet.

Figure 3-8. The floating pop-up that appears after you control-drag to source code
The pop-up will change to look like Figure 3-9. In the Name field, type buttonPressed. When you’re finished, do not hit the Return key. Pressing Return would finalize our outlet, and we’re not quite ready to do that. Instead, press the Tab key to move to the Type field and type in UIButton, replacing the default value of id.
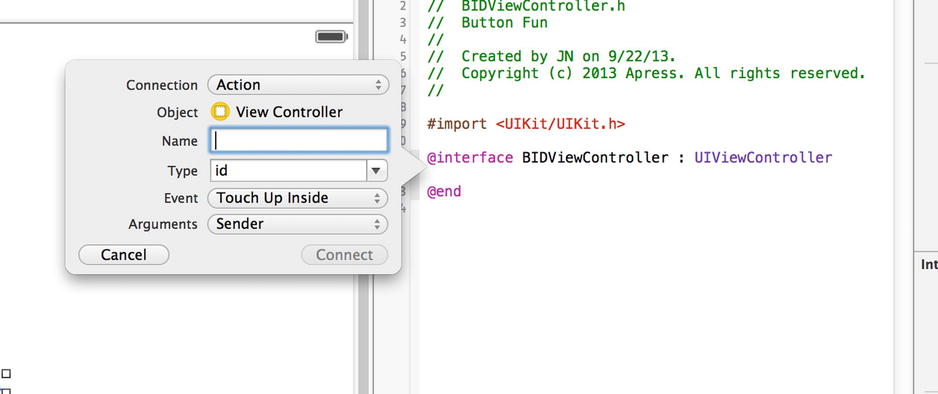
Figure 3-9. Changing the connection type to Action changes the appearance of the pop-up
Note As you probably remember, an id is a generic pointer that can point to any Objective-C object. We could leave this as id, and it would work fine; but if we change it to the class we expect to call the method, the compiler can warn us if we try to do this from the wrong type of object. There are times when you’ll want the flexibility to be able to call the same action method from different types of controls; and in those cases, you would want to leave this set to id. In our case, we’re only going to call this method from buttons, so we’re letting Xcode and LLVM know that. Now, it can warn us if we unintentionally try to connect something else to it.
There are two fields below Type, which we will leave at their default values. The Event field lets you specify when the method is called. The default value of Touch Up Inside fires when the user lifts a finger off the screen if—and only if—the finger is still on the button. This is the standard event to use for buttons. This gives the user a chance to reconsider. If the user moves a finger off the button before lifting it off the screen, the method won’t fire.
The Argumentsfield lets you choose between the three different method signatures that can be used for action methods. We want the sender argument, so that we can tell which button called the method. That’s the default, so we just leave it as is.
Hit the Return key or click the Connect button, and Xcode will insert the action method for you. Your BIDViewController.h file should now look like this:
#import <UIKit/UIKit.h>

@interface BIDViewController : UIViewController
- (IBAction)buttonPressed:(UIButton *)sender;

@end
Xcode has now added a method declaration to your class’s header file for you. Use the jump bar above the assistant editor to switch over to BIDViewController.m, and you’ll see that it has also added a method stub for you.
- (IBAction)buttonPressed:(UIButton *)sender {
}
In a few moments, we’ll come back here to write the code that needs to run when the user taps either button. In addition to creating the method declaration and implementation, Xcode has also connected that button to this action method and stored that information in the storyboard. That means we don’t need to do anything else to make that button call this method when our application runs.
Go back to Main.storyboard and drag out another button, this time placing the button on the right side of the screen. After placing it, double-click it and change its name to Right. The blue lines will pop up to help you align it with the right margin, as you saw before, and they will also help you align the button vertically with the other button.
Tip Instead of dragging a new object out from the library, you could hold down the ![]() key (the Option key) and drag the original object (the Left button in this example) over. Holding down the
key (the Option key) and drag the original object (the Left button in this example) over. Holding down the ![]() key tells Interface Builder to drag out a copy of the original object.
key tells Interface Builder to drag out a copy of the original object.
This time, we don’t want to create a new action method. Instead, we want to connect this button to the existing one that Xcode created for us a moment ago. How do we do that? We do it pretty much the same way as we did for the first button.
After changing the name of the button, control-click the new button and drag toward your code in the assistant editor. It doesn’t matter if you’re looking at the .h or the .m file—just drag towards the declaration of the buttonPressed: method. This time, as your cursor gets near buttonPressed:, that method should highlight, and you’ll get a gray pop-up saying Connect Action (see Figure 3-10). When you see that pop-up, release the mouse button, and Xcode will connect this button to the existing action method. That will cause this button, when tapped, to trigger the same action method as the other button.
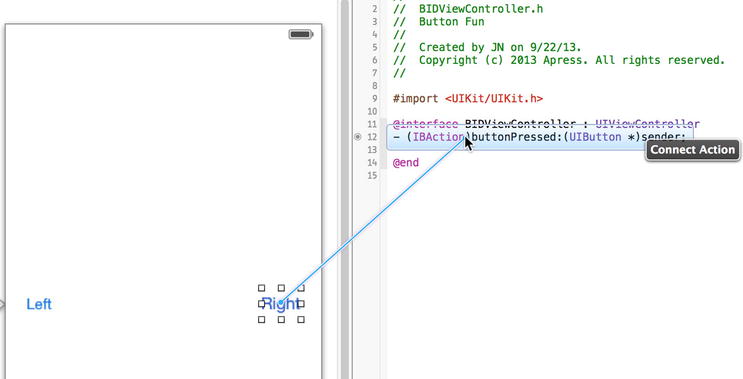
Figure 3-10. Dragging to an existing action will connect the button to an existing action
Again, note that this will work even if you control-drag to connect your button to a method in your implementation file. In other words, you can control-drag from your new button to the buttonPressed declaration in BIDViewController.h or to the buttonPressed method implementation in BIDViewController.m. Xcode sure am smart!
In the object library, type Label into the search field to find the Label user interface item (see Figure 3-11). Drag the Label to your user interface, somewhere above the two buttons you placed earlier. After placing it, use the resize handles to stretch the label from the left margin to the right margin. That should give it plenty of room for the text we’ll be displaying to the user.
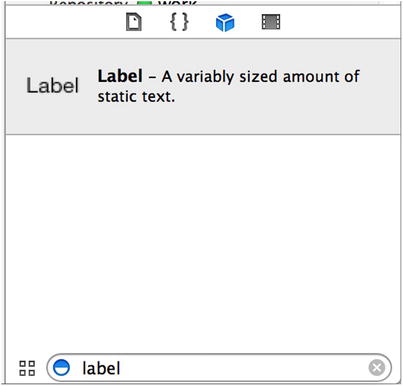
Figure 3-11. The label as it appears in the object library
Labels, by default, are left-aligned, but we want this one to be centered. Select View ![]() Utilities
Utilities ![]() Show Attributes Inspector (or press
Show Attributes Inspector (or press ![]()
![]() 4) to bring up the attributes inspector (see Figure 3-12). Make sure the label is selected, and then look in the attributes inspector for the Alignment buttons. Select the middle Alignment button to center the label’s text.
4) to bring up the attributes inspector (see Figure 3-12). Make sure the label is selected, and then look in the attributes inspector for the Alignment buttons. Select the middle Alignment button to center the label’s text.
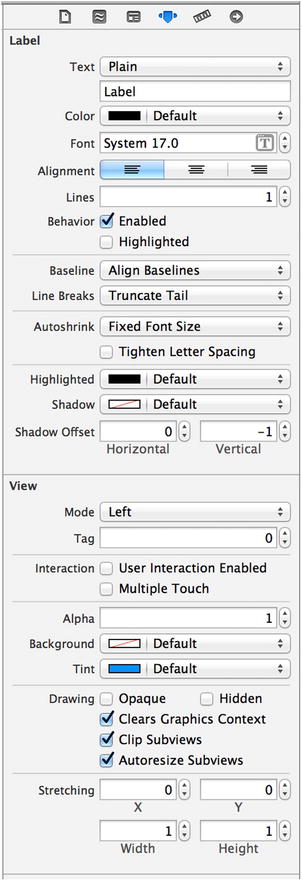
Figure 3-12. The attribute inspector for the label
Before the user taps a button, we don’t want the label to say anything, so double-click the label (so the text is selected) and press the Delete button on your keyboard. That will delete the text currently assigned to the label. Hit Return to commit your changes. Even though you won’t be able to see the label when it’s not selected, don’t worry—it’s still there.
Tip If you have invisible user interface elements, like empty labels, and want to be able to see where they are, select Canvas from the Editor menu. Next, from the submenu that pops up, turn on Show Bounds Rectangles.
All that’s left is to create an outlet for the label. We do this exactly the way we created and connected actions earlier. Make sure the assistant editor is open and displaying BIDViewController.h. If you need to switch files, use the pop-up in the jump bar above the assistant editor.
Next, select the label in Interface Builder and control-drag from the label to the header file. Drag until your cursor is right above the existing action method. When you see something like Figure 3-13, let go of the mouse button, and you’ll see the pop-up window again (shown earlier in Figure 3-8).

Figure 3-13. Control-dragging to create an outlet
We want to create an outlet, so leave the Connection at the default type of Outlet. We want to choose a descriptive name for this outlet so we’ll remember what it is used for when we’re working on our code. Type statusLabel into the Name field. Leave the Type field set to UILabel. The final field, labeled Storage, can be left at the default value.
Hit Return to commit your changes, and Xcode will insert the outlet property into your code. Your controller class’s header file should now look like this:
#import <UIKit/UIKit.h>

@interface BIDViewController : UIViewController
@property (weak, nonatomic) IBOutlet UILabel *statusLabel;
- (IBAction)buttonPressed:(UIButton *)sender;
@end
Now we have an outlet, and Xcode has automagically connected the label to our outlet. This means that if we make any changes to statusLabel in code, those changes will affect the label on our user interface. If we set the text property on statusLabel, for example, it will change what text is displayed to the user.
If you’re already familiar with Objective-C, or if you’ve read earlier versions of this book, you might have noticed that we don’t have a dealloc method. We’re not releasing our instance variables!
Warning! Warning! Danger, Will Robinson!
Actually, Will, you can relax. We’re quite OK. There’s no danger at all—really.
It’s no longer necessary to release objects. Well, that’s not entirely true. It is necessary, but the LLVM compiler that Apple includes with Xcode these days is so smart that it will release objects for us, using a new feature called Automatic Reference Counting, or ARC, to do the heavy lifting. That means less frequent use of dealloc methods and no more worrying about calling release or autorelease. ARC is such a big improvement that we’re using it for all examples in this book. ARC has been an option in Xcode for the past couple of years, but now it’s enabled by default for each new project you create.
ARC applies to only Objective-C objects, not to Core Foundation objects or to memory allocated with malloc() and the like, and there are some caveats and gotchas that can trip you up. But for the most part, worrying about memory management is a thing of the past.
To learn more about ARC, check out the ARC release notes at this URL:
http://developer.apple.com/library/ios/#releasenotes/ObjectiveC/RN-TransitioningToARC/
ARC is very cool, but it’s not magic. You should still understand the basic rules of memory management in Objective-C to avoid getting in trouble with ARC. To brush up on the Objective-C memory management contract, read Apple’s Memory Management Programming Guide at this URL:
http://developer.apple.com/library/ios/#documentation/Cocoa/Conceptual/MemoryMgmt/
So far, we’ve designed our user interface and wired up both outlets and actions to our user interface. All that’s left to do is to use those actions and outlets to set the text of the label when a button is pressed. Single-click BIDViewController.m in the project navigator to open it in the editor. Find the empty buttonPressed: method that Xcode created for us earlier.
To differentiate between the two buttons, we’re going to use the sender parameter. We’ll retrieve the title of the button that was pressed using sender, and then create a new string based on that title and assign that as the label’s text. Add the bold code below to your empty method:
- (IBAction)buttonPressed:(UIButton *)sender {
    NSString *title = [sender titleForState:UIControlStateNormal];
    NSString *plainText = [NSString stringWithFormat:@"%@ button pressed.", title];
    _statusLabel.text = plainText;
}
This is pretty straightforward. The first line retrieves the tapped button’s title using sender. Since buttons can have different titles depending on their current state, we use the UIControlStateNormal parameter to specify that we want the title when the button is in its normal, untapped state. This is usually the state you want to specify when asking a control (a button is a type of control) for its title. We’ll look at control states in more detail in Chapter 4.
The next line creates a new string by appending this text to the title we retrieved in the previous line: “button pressed.” So, if the left button, which has a title of Left, is tapped, this line will create a string that says, “Left button pressed.” The final line assigns the new string to the label’s text property, which is how we change the text that the label is displaying.
Objective-C messages are often nested by some developers. You may come across code like this in your travels:
NSString *plainText = [NSString stringWithFormat:@"%@ button
pressed.",
[sender titleForState:UIControlStateNormal]];
This one line of code will function exactly the same as the first two lines of our buttonPressed: method. This is because Objective-C methods can be nested, which essentially substitutes the return value from the nested method call.
For the sake of clarity, we won’t generally nest Objective-C messages in the code examples in this book, with the exception of calls to alloc and init, which, by long-standing convention, are almost always nested.
Guess what? We’re basically finished. Are you ready to try out our app? Let’s do it!
Select Product ![]() Run. If you run into any compile or link errors, go back and compare your code changes to those shown in this chapter. Once your code builds properly, Xcode will launch the iOS simulator and run your application. When you tap the right button, this text should appear: “Right button pressed.” (See Figure 3-1 again). If you then tap the left button, the label will change to say, “Left button pressed.”
Run. If you run into any compile or link errors, go back and compare your code changes to those shown in this chapter. Once your code builds properly, Xcode will launch the iOS simulator and run your application. When you tap the right button, this text should appear: “Right button pressed.” (See Figure 3-1 again). If you then tap the left button, the label will change to say, “Left button pressed.”
So far, so good. But if you look back at Figure 3-1, you’ll see that one thing is missing. The screenshot we showed you for our end result displays the name of the chosen button in bold text; however, what we’ve made just shows a plain string. We’ll bring on the boldness using an NSAttributedString class.
The NSAttributedString class lets you attach formatting information, such as fonts and paragraph alignment to a string. This metadata can be applied to an entire string, or different attributes can be applied to different parts. If you think about the ways that formatting can be applied to pieces of text in a word processor, that’s basically the model for how NSAttributedString works.
However, until recently, none of the Apple-provided UIKit classes have been able to do anything with attributed strings. If you wanted to present a label containing both bold text and normal text, you’d have to either use two labels or draw the text directly into a view on your own. Those approaches aren’t insurmountable hurdles, but they’re tricky enough that most developers would rather not follow those paths too often. iOS 6 brought many improvements for anyone who wants to display styled text, since most of the main UIKit controls now let you use attributed strings. In the case of a UILabel such as the one we have here, it’s as simple as creating an attributed string, then passing it to the label via its attributedText property.
So, update the buttonPressed: method by deleting the crossed-out line and adding the bold lines shown in this snippet:
- (IBAction)buttonPressed:(UIButton *)sender {
    NSString *title = [sender titleForState:UIControlStateNormal];
    NSString *plainText = [NSString stringWithFormat:@"%@ button pressed.", title];
    _statusLabel.text = plainText;

    NSMutableAttributedString *styledText = [[NSMutableAttributedString alloc]
                                             initWithString:plainText];
    NSDictionary *attributes =
    @{
      NSFontAttributeName : [UIFont boldSystemFontOfSize:_statusLabel.font.pointSize]
      };

    NSRange nameRange = [plainText rangeOfString:title];

    [styledText setAttributes:attributes range:nameRange];
    _statusLabel.attributedText = styledText;
}
The first thing that new code does is create an attributed string—specifically, an NSMutableAttributedString instance—based on the string we want to display. We need a mutable attributed string here because we want to change its attributes.
Next, we create a dictionary to hold the attributes we want to apply to our string. Really, we have just one attribute right now, so this dictionary contains a single key-value pair. The key, NSFontAttributeName, lets you specify a font for a portion of an attributed string. The value we pass in is something called the bold system font, which is specified to be the same size as the font currently used by the label. Specifying the font this way is more flexible in the long run than specifying a font by name, since we know that the system will always have a reasonable idea of what to use for a bold font.
Tip If you’ve been using Objective-C for a while, you may not be familiar with this new dictionary syntax—but it’s pretty simple. Instead of requiring an explicit call to a class method on NSDictionary, the version of LLVM included with Xcode now provides a shorthand form, which is nicer to use. It basically looks like this:
@{
key1 : value1,
key2 : value2
}
Apart from eliminating the need to type the same lengthy class name and method name every time you want to make a dictionary, it also puts the keys and values in the “right order”—at least according to anyone who’s ever used a language with built-in dictionaries, such as Ruby, Python, Perl, or JavaScript.
This new dictionary syntax was introduced in 2012, along with similar syntax for arrays and numbers. We’ll be using these new pieces of syntax throughout the book.
Next, we ask our plainText string to give us the range (consisting of a start index and a length) of the substring where our title is found. We apply the attributes to the attributed string and pass it off to the label.
Now you can hit the Run button, and you’ll see that the app now shows the name of the clicked button in bold text.
Looking at the Application Delegate
Well, cool! Your application works! Before we move on to our next topic, let’s take a minute to look through the two source code files we have not yet examined, BIDAppDelegate.h and BIDAppDelegate.m. These files implement our application delegate.
Cocoa Touch makes extensive use of delegates, which are objects that take responsibility for doing certain tasks on behalf of another object. The application delegate lets us do things at certain predefined times on behalf of the UIApplication class. Every iOS application has exactly one instance of UIApplication, which is responsible for the application’s run loop and handles application-level functionality, such as routing input to the appropriate controller class. UIApplication is a standard part of the UIKit, and it does its job mostly behind the scenes, so you generally don’t need to worry about it.
At certain well-defined times during an application’s execution, UIApplication will call specific methods on its delegate, if there is a delegate and that delegate implements the method. For example, if you have code that needs to fire just before your program quits, you would implement the method applicationWillTerminate: in your application delegate and put your termination code there. This type of delegation allows your application to implement common application-wide behavior without needing to subclass UIApplication or, indeed, without needing to know anything about the inner workings of UIApplication.
Click BIDAppDelegate.h in the project navigator to see the application delegate’s header file. It should look similar to this:
#import <UIKit/UIKit.h>

@interface BIDAppDelegate : UIResponder <UIApplicationDelegate>

@property (strong, nonatomic) UIWindow *window;

@end
One thing worth pointing out is this line of code:
@interface BIDAppDelegate : UIResponder <UIApplicationDelegate>
Do you see that value between the angle brackets? This indicates that this class conforms to a protocol called UIApplicationDelegate. Hold down the ![]() key. Your cursor should turn into crosshairs. Move your cursor so that it is over the word, UIApplicationDelegate. Your cursor should turn into a question mark, and the word UIApplicationDelegate should be highlighted, as if it were a link in a browser (see Figure 3-14).
key. Your cursor should turn into crosshairs. Move your cursor so that it is over the word, UIApplicationDelegate. Your cursor should turn into a question mark, and the word UIApplicationDelegate should be highlighted, as if it were a link in a browser (see Figure 3-14).
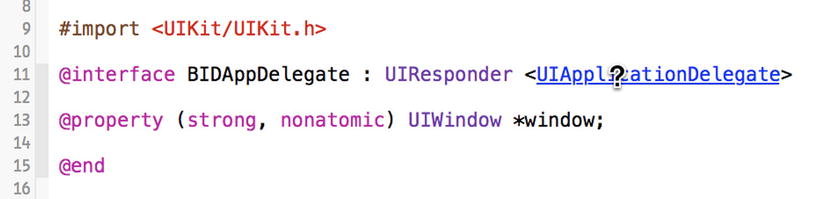
Figure 3-14. When you hold down the ![]() key (the Option key) in Xcode and point at a symbol in your code, the symbol is highlighted and your cursor changes into a pointing hand with a question mark
key (the Option key) in Xcode and point at a symbol in your code, the symbol is highlighted and your cursor changes into a pointing hand with a question mark
With the ![]() key still held down, click this link. This will open a small pop-up window showing a brief overview of the UIApplicationDelegate protocol (see Figure 3-15).
key still held down, click this link. This will open a small pop-up window showing a brief overview of the UIApplicationDelegate protocol (see Figure 3-15).

Figure 3-15. When we option-clicked <UIApplicationDelegate> from within our source code, Xcode popped up this window, called the Quick Help panel, which describes the protocol
Notice the two links at the bottom of this new pop-up documentation window (see Figure 3-15). Click theReference link to view the full documentation for this symbol or click theDeclared In link to view the symbol’s definition in a header file. This same trick works with class, protocol, and category names, as well as method names displayed in the editor pane. Just option-click a word, and Xcode will search for that word in the documentation browser.
Knowing how to look up things quickly in the documentation is definitely worthwhile, but looking at the definition of this protocol is perhaps more important. Here’s where you’ll find which methods the application delegate can implement and when those methods will be called. It’s probably worth your time to read over the descriptions of these methods.
Note If you’ve worked with Objective-C before but not with Objective-C 2.0, you should be aware that protocols can now specify optional methods. UIApplicationDelegate contains many optional methods. However, you do not need to implement any of the optional methods in your application delegate unless you have a reason to do so.
Back in the project navigator, click BIDAppDelegate.m to see the implementation of the application delegate. It should look something like this:
#import "BIDAppDelegate.h"

@implementation BIDAppDelegate

- (BOOL)application:(UIApplication *)application didFinishLaunchingWithOptions:
    (NSDictionary *)launchOptions
{
    // Override point for customization after application launch.
    return YES;
}

- (void)applicationWillResignActive:(UIApplication *)application
{
    // Sent when the application is about to move from active to inactive state.
       This can occur for certain types of temporary interruptions (such as an
       incoming phone call or SMS message) or when the user quits the
       application and it begins the transition to the background state.
    // Use this method to pause ongoing tasks, disable timers, and throttle down
       OpenGL ES frame rates. Games should use this method to pause the game.

}

- (void)applicationDidEnterBackground:(UIApplication *)application
{
    // Use this method to release shared resources, save user data, invalidate
       timers, and store enough application state information to restore your
       application to its current state in case it is terminated later.
    // If your application supports background execution, this method is called
       instead of applicationWillTerminate: when the user quits.

}

- (void)applicationWillEnterForeground:(UIApplication *)application
{
    // Called as part of the transition from the background to the inactive
       state; here you can undo many of the changes made on entering the
       background.

}

- (void)applicationDidBecomeActive:(UIApplication *)application
{
    // Restart any tasks that were paused (or not yet started) while the
       application was inactive. If the application was previously in the
       background, optionally refresh the user interface.

}

- (void)applicationWillTerminate:(UIApplication *)application
{
    // Called when the application is about to terminate. Save data if
       appropriate. See also applicationDidEnterBackground:.

}

@end
At the top of the file, you can see that our application delegate has implemented one of those protocol methods covered in the documentation, called application:didFinishLaunchingWithOptions:. As you can probably guess, this method fires as soon as the application has finished all the setup work and is ready to start interacting with the user. This method is often used to create any objects that need to exist for the entire lifetime of the running app.
You’ll see more of this later in the book. We just wanted to give you a bit of background on application delegates and show how this all ties together before closing this chapter.
Bring It on Home
This chapter’s simple application introduced you to MVC, creating and connecting outlets and actions, implementing view controllers, and using application delegates. You learned how to trigger action methods when a button is tapped and saw how to change the text of a label at runtime. Although we built a simple application, the basic concepts we used are the same as those that underlie the use of all controls under iOS, not just buttons. In fact, the way we used buttons and labels in this chapter is pretty much the way that we will implement and interact with most of the standard controls under iOS.
It’s critical that you understand everything we did in this chapter and why we did it. If you don’t, go back and review the parts that you don’t fully understand. This is important stuff! If you don’t make sure you understand everything now, you will only get more confused as we get into creating more complex interfaces later in this book.
In the next chapter, we’ll take a look at some of the other standard iOS controls. You’ll also learn how to use alerts to notify the user of important happenings and how to use action sheets to indicate that the user needs to make a choice before proceeding. When you feel you’re ready to proceed, give yourself a pat on the back for being such an awesome student and head on over to the next chapter.