From a technical standpoint, programming for the iPad is pretty much the same as programming for any other iOS platform. Apart from the screen size, there’s very little that differentiates a 3G iPad from an iPhone, or a Wi-Fi iPad from an iPod touch. In spite of the fundamental similarities between the iPhone and iPad, from the user’s point of view these devices are really quite different. Fortunately, Apple had the good sense to recognize this fact from the outset and to equip the iPad with additional UIKit components that help developers create applications that better utilize the iPad’s screen size and usage patterns. In this chapter, you’ll learn how to use these components. Let’s get started!
In Chapter 9, you spent a lot of time dealing with app navigation based on selections in table views, where each selection causes the top-level view, which fills the entire screen, to slide to the left and bring in the next view in the hierarchy (or perhaps yet another table view). Plenty of iPhone and iPod touch apps work this way, both among Apple’s own apps and third-party apps.
One typical example is Mail, which lets you drill down through servers and folders until you finally make your way to a message. Technically, this approach can work on the iPad as well, but it leads to a user interaction problem.
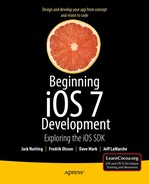
On a screen the size of the iPhone or iPod touch, having a screen-sized view slide away to reveal another screen-sized view works well. On a screen the size of the iPad, however, that same interaction feels a little wrong, a little exaggerated, and even a little overwhelming. In addition, consuming such a large display with a single table view is inefficient in most cases. As a result, you’ll see that the built-in iPad apps do not actually behave that way. Instead, any drill-down navigation functionality, like that used in Mail, is relegated to a narrow column whose contents slide left or right as the user drills down or backs out. With the iPad in landscape mode, the navigation column is in a fixed position on the left, with the content of the selected item displayed on the right. This is what’s called, in the iPad world, a split view (see Figure 11-1).
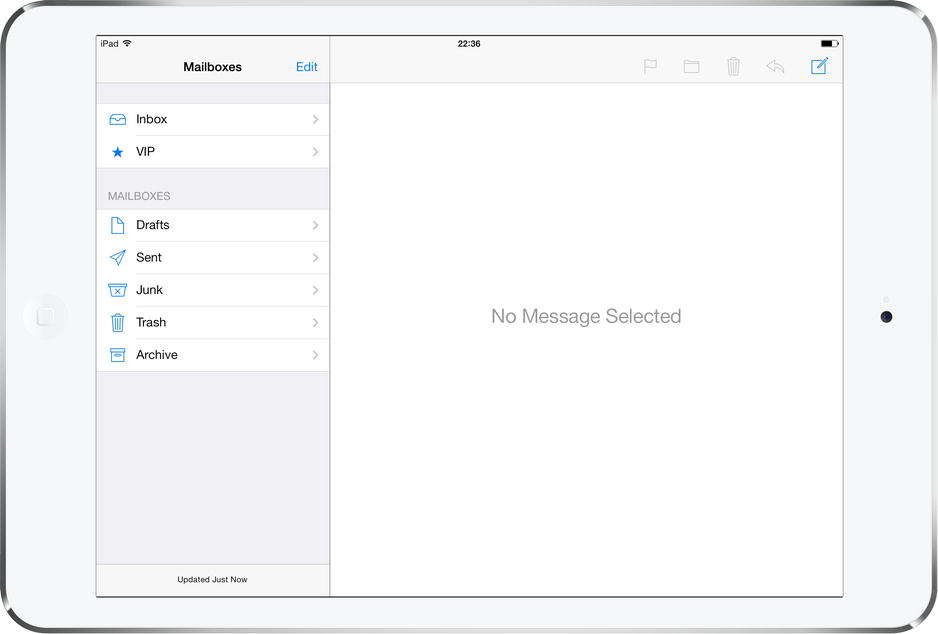
Figure 11-1. This iPad, in landscape mode, is showing a split view. The navigation column is on the left. Tap an item in the navigation column—in this case, a specific mail account—and that item’s content is displayed in the area on the right
The left side of the split view is always 320 points wide (the same width as an iPhone in its vertical position). The split view itself, with navigation and content side by side, typically appears only in landscape mode. If you turn the device to a portrait orientation, the split view is still in play, but it’s no longer visible in the same way. The navigation view loses its permanent location and can be activated only by pressing a toolbar button, which causes the navigation view to pop up in a view that floats in front of everything else on the screen (see Figure 11-2). This is what’s called a popover.
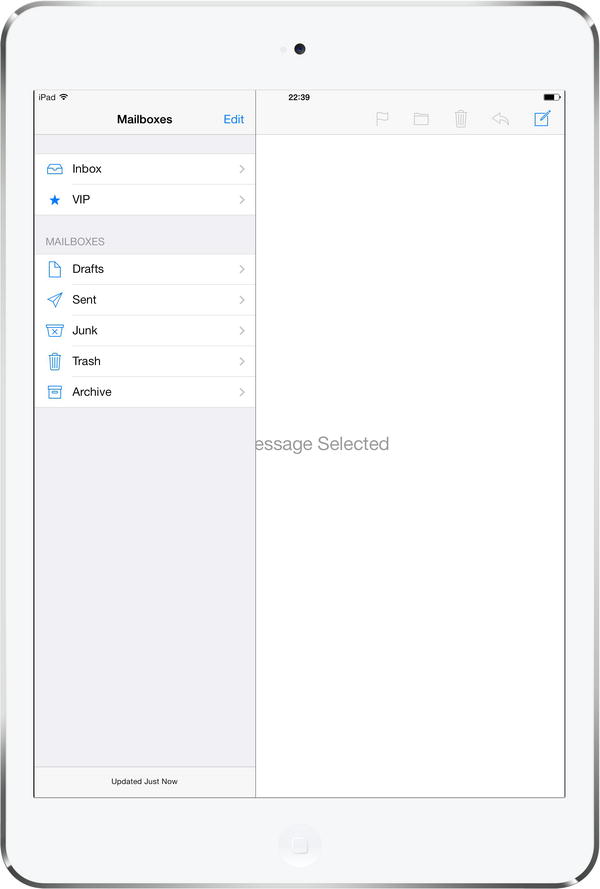
Figure 11-2. This iPad, in portrait mode, does not show the same split view as seen in landscape mode. Instead, the information that made up the left side of the split view in landscape mode is embedded in a popover. Mmmm, popovers
Some applications don’t follow this rule strictly, though. The iPad Settings app, for instance, uses a split view that is visible all the time, and the left side neither disappears nor covers the content view on the right. In this chapter, however, we’ll stick to the standard usage pattern.
The popover displayed by a split view is visually different from some popovers you may have seen before. This popover always fills the screen and appears at the left edge, but that’s not the case for all popovers. They can be configured for different sizes and positioned anywhere on the screen. For example, by the time you’re through with this chapter you’ll be displaying a small popover hanging off a button in a toolbar (see Figure 11-3). In this chapter’s example project, you’ll see how to create an iPad application that uses a split view and its associated popover. You’ll also learn how to create and display your own popover that isn’t attached to any split view.
Figure 11-3. A traditional popover, which visually seems to sprout from the button that triggered its appearance
We’re going to start off with an easy task: taking advantage of one of Xcode’s predefined templates to create a split view project. We’ll build an app that presents a slightly different take on Chapter 9’s presidential app, listing all the US presidents and showing the Wikipedia entry for whichever one you select.
Go to Xcode and select File ![]() New
New ![]() Project . . . . From the iOS Application group, select Master-Detail Application and click Next. On the next screen, name the new project Presidents, set the Class Prefix to BID, and switch Devices to iPad. Make sure the Use Core Data checkbox is unchecked. Click Next, choose the location for your project, and then click Create. Xcode will do its usual thing, creating a handful of classes and a storyboard file for you, and then showing the project. If it’s not already open, expand the Presidents folder and take a look at what it contains.
Project . . . . From the iOS Application group, select Master-Detail Application and click Next. On the next screen, name the new project Presidents, set the Class Prefix to BID, and switch Devices to iPad. Make sure the Use Core Data checkbox is unchecked. Click Next, choose the location for your project, and then click Create. Xcode will do its usual thing, creating a handful of classes and a storyboard file for you, and then showing the project. If it’s not already open, expand the Presidents folder and take a look at what it contains.
From the start, the project contains an app delegate (as usual), a class called BIDMasterViewController, and a class called BIDDetailViewController. Those two view controllers represent, respectively, the views that will appear on the left and right sides of the split view. BIDMasterViewController defines the top level of a navigation structure and BIDDetailViewController defines what’s displayed in the larger area when a navigation element is selected. When the app launches, both of these are contained inside a split view, which, as you may recall, does a bit of shape-shifting as the device is rotated.
To see what this particular application template gives you in terms of functionality, build the app and run it in the simulator. Switch between landscape mode (see Figure 11-4) and portrait mode (see Figure 11-5), and you’ll see the split view in action. In landscape mode, the split view works by showing the navigation view on the left and the detail view on the right. In portrait mode, the detail view occupies most of the picture, with the navigation elements confined to the popover, which is brought into view with the press of the button in the top left of the view.
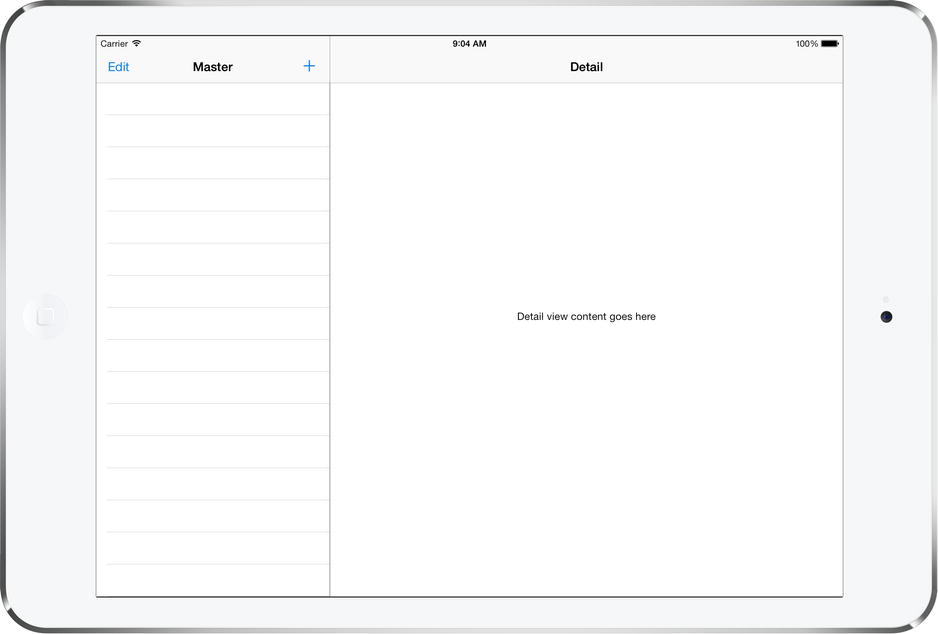
Figure 11-4. The default Master-Detail Application template in landscape mode. Note the similar layouts shown in this figure and Figure 11-1
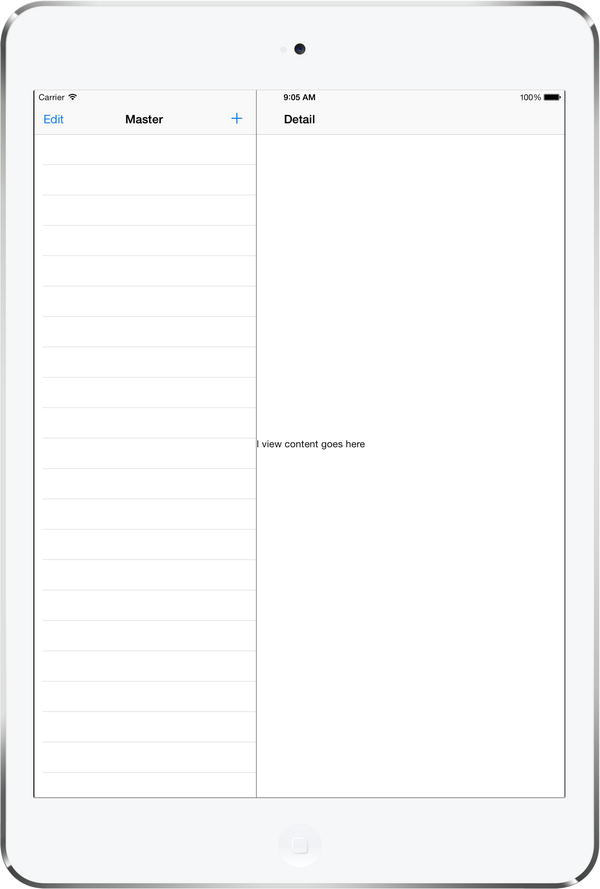
Figure 11-5. The default Master-Detail Application template in portrait mode with the popover showing. Note the similarity between this figure and Figure 11-2
We’re going to build on this to make the president-presenting app we want, but first let’s dig into what’s already there.
The Storyboard Defines the Structure
Right off the bat, you have a pretty complex set of view controllers in play:
- A split view controller that contains all the elements
- A navigation controller to handle what’s happening on the left side of the split
- A master view controller (displaying a master list of items) inside the navigation controller
- A detail view controller on the right
- Another navigation controller as a container for the detail view controller on the right
In the default Master-Detail Application template that we used, these view controllers are set up and interconnected primarily in the main storyboard file, rather than in code. Apart from doing GUI layout, Interface Builder really shines as a way of letting you connect different components without writing a bunch of code just to establish relationships. Let’s dig into the project’s storyboard to see how things are set up.
Select MainStoryboard.storyboard to open it in Interface Builder. This storyboard really has a lot of stuff going on. You’ll definitely want to open the document outline for the best results (see Figure 11-6). Zooming out, by using the controls at the lower right corner of the editor, can also help you see the big picture.
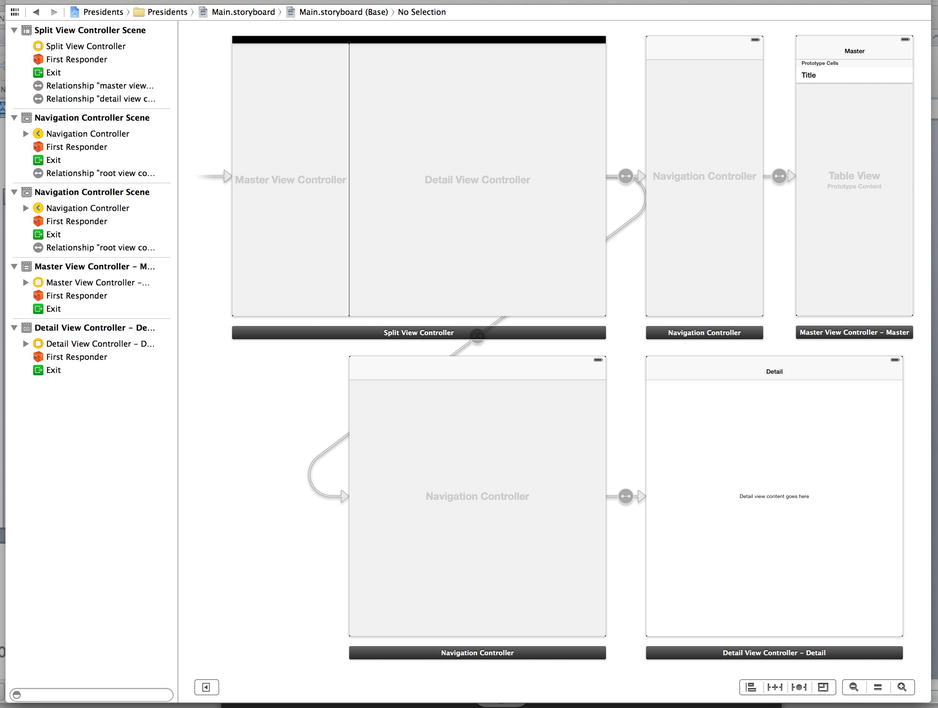
Figure 11-6. MainStoryboard.storyboard open in Interface Builder. This complex object hierarchy is best viewed in list mode
To get a better sense of how these controllers relate to one another, open the Connections Inspector, and then spend some time clicking each of the view controllers in turn.
The split view controller and the two navigation controller objects each have one or more connections to other controllers from the start, as shown in the Storyboard Seguessection of the Connections Inspector. In Chapter 9, you gained some familiarity with these sorts of connections, including the rootViewController relationship that each UINavigationController has. Here, you’ll find that the UISplitViewController actually has two relationships connected to other controllers: masterViewController and detailViewController. These are used to tell the UISplitViewController what it should use for the narrow strip it displays on the left or in a popup (the masterViewController), as well as what it should use for the larger display area (the detailViewController). Note that the masterViewController and detailViewController are instances of UINavigationController, rather than the specific classes that will contain our application’s GUI. Each navigation controller in turn has a rootViewControllerconnection to another view controller, which will display the actual content. Using a navigation controller this way is pretty common, even in apps like this one that don’t really much use of the navigation controller’s central feature. That’s because, apart from the ability to push and pop view controllers from its stack, the navigation controller provides a built-in navigation bar at the top, which is nice for displaying a title and, in our case, a few buttons. This navigation bar also gives us the fuzzy, transparent background effect that is a hallmark of iOS 7.
At this point, the content of MainStoryboard.storyboard is really a definition of how the app’s various controllers are interconnected. As in most cases where you’re using storyboards, this eliminates a lot of code, which is usually a good thing. If you’re the kind of person who likes to see all such configuration done in code, you’re free to do so; but for this example, we’re going to stick with what Xcode has provided.
The Code Defines the Functionality
One of the main reasons for keeping the view controller interconnections in a storyboard is that they don’t clutter up your source code with configuration information that doesn’t need to be there. What’s left is just the code that defines the actual functionality.
Let’s look at what we have as a starting point. Xcode defined several classes for us when the project was created, and we’re going to peek into each of them before we start making any changes.
First up is BIDAppDelegate.h, which looks something like this:
#import <UIKit/UIKit.h>

@interface BIDAppDelegate : UIResponder <UIApplicationDelegate>

@property (strong, nonatomic) UIWindow *window;

@end
This is pretty similar to several other application delegates you’ve seen in this book so far.
Switch over to the implementation in BIDAppDelegate.m, which looks something like the following (we’ve deleted most comments and empty methods here for the sake of brevity):
#import "BIDAppDelegate.h"

@implementation BIDAppDelegate

- (BOOL)application:(UIApplication *)application
didFinishLaunchingWithOptions:(NSDictionary *)launchOptions
{
    // Override point for customization after application launch.
    UISplitViewController *splitViewController =
        (UISplitViewController *)self.window.rootViewController;
    UINavigationController *navigationController =
        [splitViewController.viewControllers lastObject];
    splitViewController.delegate =
        (id)navigationController.topViewController;
    return YES;
}

@end
This code really does just one thing: it sets the UISplitViewController’s delegate property, pointing it at the controller for the main part of the display (the view labeled Detail in Figure 11-6). Later in this chapter, when we dig into split views, we’ll explore the logic behind that UISplitViewController delegate connection. But why make this connection here in code, instead of having it hooked up directly in the storyboard? After all, just a few paragraphs ago, you were told that elimination of boring code—“connect this thing to that thing”—is one of the main benefits of both nibs and storyboards. And you’ve seen us hook up delegates in interface builder plenty of times, so why can’t we do that here?
To understand why using a storyboard to make the connections can’t really work here, you need to consider how a storyboard differs from a nib file. We’ve only used nib files a little bit in this book, since storyboards are preferable for most use cases now, but they’re still around and have a few differences that you should be aware of.
A nib file is really a frozen object graph. When you load a nib into a running application, the objects it contains all “thaw out” and spring into existence, including all interconnections specified in the nib file. The system creates a fresh instance of every single object in the nib file, one after another, and connects all the outlets and connections between objects.
A storyboard, however, is something more than that. You could say that each scene in a storyboard corresponds roughly to a nib file. When you add in the metadata describing how the scenes are connected via segues, you end up with a storyboard. Unlike a single nib, a complex storyboard is not normally loaded all at once. Instead, any activity that causes a new scene to come into focus will end up loading that particular scene’s frozen object graph from the storyboard. This means that the objects you see when looking at a storyboard won’t necessarily all exist at the same time.
Since Interface Builder has no way of knowing which scenes will coexist, it actually forbids you from making any outlet or target/action connections from an object in one scene to an object in another scene. In fact, the only connections it allows you to make from one scene to another are segues.
But don’t take our word for it, try it out yourself! First, select the Split View Controller in the storyboard (you’ll find it within the dock in the Split View Controller Scene). Now bring up the Connections Inspector and try to drag a connection from the delegate outlet to another view controller or object. You can drag all over the layout view and the list view, and you won’t find any spot that highlights (which would indicate it was ready to accept a drag).
So, we’ll need to connect the delegate outlet from our UISplitViewController to its destination in code. Referring back to BIDAppDelegate.m, that sequence starts like this:
UISplitViewController *splitViewController =
    (UISplitViewController *)self.window.rootViewController;
This lets us grab the window’s rootViewController, which you may recall is pointed out in the storyboard by the free-floating arrow directed at our UISplitViewController instance. This code comes next:
UINavigationController *navigationController =
    [splitViewController.viewControllers lastObject];
On this line, we dig into the UISplitViewController’s viewControllers array. We happen to know that it always has exactly two view controllers: one for the left side and one for the right (more on that later). So, we grab the one for the right side, which will contain our detail view. Finally, we see this:
splitViewController.delegate =
    (id)navigationController.topViewController;
This last line simply assigns the detail view controller as the UISplitViewController’s delegate.
All in all, this extra bit of code is a small price to pay, considering how much other code is eliminated by our use of storyboards.
The Master View Controller
Now, let’s take a look at BIDMasterViewController, which controls the setup of the table view containing the app’s navigation. BIDMasterViewController.h looks like this:
#import <UIKit/UIKit.h>

@class BIDDetailViewController;

@interface BIDMasterViewController : UITableViewController

@property (strong, nonatomic) BIDDetailViewController *detailViewController;

@end
Its corresponding BIDMasterViewController.m file starts off like this (we’re just looking at the first few methods now and will deal with the rest later):
#import "BIDMasterViewController.h"

#import "BIDDetailViewController.h"

@interface BIDMasterViewController () {
    NSMutableArray *_objects;
}
@end

@implementation BIDMasterViewController

- (void)awakeFromNib
{
    self.clearsSelectionOnViewWillAppear = NO;
    self.preferredContentSize = CGSizeMake(320.0, 600.0);
    [super awakeFromNib];
}

- (void)viewDidLoad
{
    [super viewDidLoad];
    // Do any additional setup after loading the view, typically from a nib.
    self.navigationItem.leftBarButtonItem = self.editButtonItem;

    UIBarButtonItem *addButton =
        [[UIBarButtonItem alloc]
            initWithBarButtonSystemItem:UIBarButtonSystemItemAdd
                                 target:self
                                 action:@selector(insertNewObject:)];
    self.navigationItem.rightBarButtonItem = addButton;
    self.detailViewController =
        (BIDDetailViewController *)[[self.splitViewController.viewControllers
                                     lastObject] topViewController];
}
.
.
.
@end
A fair amount of configuration is happening here. Fortunately, Xcode provides it as part of the split view template. This code contains a few things that are relevant to the iPad that you may not have come across before.
First, the awakeFromNib method starts like this:
self.clearsSelectionOnViewWillAppear = NO;
The clearsSelectionOnViewWillAppear property is defined in the UITableViewController class (our superclass) and lets us tweak the controller’s behavior a bit. By default, UITableViewController is set up to deselect all rows each time it’s displayed. That may be OK in an iPhone app, where each table view is usually displayed on its own; however, in an iPad app featuring a split view, you probably don’t want that selection to disappear. To revisit an earlier example, consider the Mail app. The user selects a message on the left side and expects that selection to remain there, even if the message list disappears (due to rotating the iPad or closing the popover containing the list). This line fixes that.
The awakeFromNib method also includes a line that sets the view’s preferredContentSize property. That property sets the size of the view if this view controller should happen to be used to provide the display for some other view controller that allows a variable size. In this case, it’s for the popover controller that will contain our master view controller when it’s displayed in portrait mode. This rectangle must be at least 320 pixels wide. Apart from that, you can set the size pretty much however you like. We’ll talk more about popover issues later in this chapter.
The final point of interest here is the viewDidLoad method. In previous chapters, when you implemented a table view controller that responds to a user row selection, you typically responded to the user selecting a row by creating a new view controller and pushing it onto the navigation controller’s stack. In this app, however, the view controller we want to show is already in place, and it will be reused each time the user makes a selection on the left. It’s the instance of BIDDetailViewController contained in the storyboard file. Here, we’re grabbing that BIDDetailViewController instance and hanging onto it with a property, anticipating that we’ll want to use it later, when we have some content to display.
There are several more methods included in the template for this class, but don’t worry about those right now. We’re going to delete some of those and rewrite the others, but only after taking a detour through the detail view controller.
The Detail View Controller
The final class created for us by Xcode is BIDDetailViewController, which takes care of the actual display of the item the user chooses. Here’s what BIDDetailViewController.h looks like:
#import <UIKit/UIKit.h>

@interface BIDDetailViewController : UIViewController <UISplitViewControllerDelegate>

@property (strong, nonatomic) id detailItem;

@property (weak, nonatomic) IBOutlet UILabel *detailDescriptionLabel;
@end
Apart from the detailItem property that we’ve seen referenced before (in the BIDMasterViewController class), BIDDetailViewController also has an outlet for connecting to a label in the storyboard (detailDescriptionLabel).
Switch over to BIDDetailViewController.m, where you’ll find the following (once again, this is somewhat abridged):
#import "BIDDetailViewController.h"

@interface BIDDetailViewController ()
@property (strong, nonatomic) UIPopoverController *masterPopoverController;
- (void)configureView;
@end

@implementation BIDDetailViewController

#pragma mark - Managing the detail item

- (void)setDetailItem:(id)newDetailItem
{
    if (_detailItem != newDetailItem) {
        _detailItem = newDetailItem;
        [self configureView];
    }
    if (self.masterPopoverController != nil) {
        [self.masterPopoverController dismissPopoverAnimated:YES];
    }
}

- (void)configureView
{
    if (self.detailItem) {
        self.detailDescriptionLabel.text = [self.detailItem description];
    }
}

- (void)viewDidLoad
{
    [super viewDidLoad];
    [self configureView];
}

#pragma mark - Split view

- (void)splitViewController:(UISplitViewController *)splitController
     willHideViewController:(UIViewController *)viewController
          withBarButtonItem:(UIBarButtonItem *)barButtonItem
       forPopoverController:(UIPopoverController *)popoverController
{
    barButtonItem.title = NSLocalizedString(@"Master", @"Master");
    [self.navigationItem setLeftBarButtonItem:barButtonItem animated:YES];
    self.masterPopoverController = popoverController;
}

- (void)splitViewController:(UISplitViewController *)splitController
     willShowViewController:(UIViewController *)viewController
  invalidatingBarButtonItem:(UIBarButtonItem *)barButtonItem
{
    [self.navigationItem setLeftBarButtonItem:nil animated:YES];
    self.masterPopoverController = nil;
}

@end
Much of this should look familiar to you, but this class contains a few items worth going over. The first of these is something called a class extension, which is declared near the top of the file:
@interface BIDDetailViewController ()
@property (strong, nonatomic) UIPopoverController *masterPopoverController;
- (void)configureView;
@end
We’ve talked a bit about class extensions before, but their purpose is worth mentioning again. Creating a class extension lets you define some methods and properties that are going to be used within your class, but that you don’t want to expose to other classes in a header file. Here, we’ve declared a masterPopoverController property and a utility method which will be called whenever we need to update the display. We still haven’t told you what the masterPopoverController property is meant to be used for, but we’re getting there!
Just a bit further down, you’ll see this method:
- (void)setDetailItem:(id)newDetailItem
{
    if (_detailItem != newDetailItem) {
        _detailItem = newDetailItem;
        [self configureView];
    }
    if (self.masterPopoverController != nil) {
        [self.masterPopoverController dismissPopoverAnimated:YES];
    }
}
The setDetailItem: method may seem surprising to you. We did, after all, define detailItem as a property, and it is automatically synthesized to create the getter and setter for us, so why create a setter in code? In this case, we need to be able to react whenever the user calls the setter (by selecting a row in the master list on the left), so that we can update the display. This is a good way to do that. The first part of the method seems pretty straightforward, but at the end it diverges into a call to dismiss the current masterPopoverController, if there is one. Where in the world is that hypothetical masterPopupController coming from? Scroll down a bit, and you’ll see that this method contains the answer:
- (void)splitViewController:(UISplitViewController *)splitController
     willHideViewController:(UIViewController *)viewController
          withBarButtonItem:(UIBarButtonItem *)barButtonItem
       forPopoverController:(UIPopoverController *)popoverController
{
    barButtonItem.title = NSLocalizedString(@"Master", @"Master");
    [self.navigationItem setLeftBarButtonItem:barButtonItem animated:YES];
    self.masterPopoverController = popoverController;
}
This is a delegate method for UISplitViewController. It’s called when the split view controller is no longer going to show the left side of the split view as a permanent fixture (that is, when the iPad is rotated to portrait orientation). The first thing this method does is configure the title displayed in barButtonItem’s title using the NSLocalizedString function, which gives you a chance to use text strings in other languages, if you’ve prepared any. We’ll talk more about localization issues in Chapter 21; but for now, all you need to know is that one parameter is basically a key that the function uses to retrieve a localized string from a dictionary, and the other is simply a comment.
The split view controller calls this method in the delegate when the left side of the split is about to disappear, and then passes in a couple of interesting items: a UIBarButtonItem and a UIPopoverController. The UIPopoverController is already preconfigured to contain whatever was in the left side of the split view, and the UIBarButtonItem is set up to display that very same popover. This means that if our GUI contains a UIToolBar or a UINavigationItem (the standard toolbar presented by UINavigationController), we just need to add the button item to it to let the user bring up the navigation view (wrapped inside a popover) with a single tap on the button item.
In this case, since this controller is itself wrapped inside a UINavigationController, we have immediate access to a UINavigationItemwhere we can place the button item. If our GUI didn’t contain a UINavigationItem or a UIToolbar, we would still have the popover controller passed in, which we could assign to some other element of our GUI so it could pop open the popover for us. We’re also handed the wrapped UIViewController itself (BIDMasterViewController, in this example) in case we would rather present its contents in some other way.
So, that’s where the popover controller comes from. You may not be too surprised to learn that the next method effectively takes it away:
- (void)splitViewController:(UISplitViewController *)splitController
     willShowViewController:(UIViewController *)viewController
  invalidatingBarButtonItem:(UIBarButtonItem *)barButtonItem
{
    [self.navigationItem setLeftBarButtonItem:nil animated:YES];
    self.masterPopoverController = nil;
}
This method is called when the user switches back to landscape orientation. At that point, the split view controller wants to draw the left-side view in a permanent position again, so it tells us to get rid of the UIBarButtonItem we were given previously.
That concludes our overview of what Xcode’s Master-Detail Application template gives you. It might be a lot to absorb at a glance, but, ideally, by presenting it a piece at a time, we’ve helped you understand how all the pieces fit together.
Here Come the Presidents
Now that you’ve seen the basic layout of our project, it’s time to fill in the blanks and turn this autogenerated app into something all your own. Start by looking in the book’s source code archive, where the folder 11 – Presidents contains a file called PresidentList.plist. Drag that file into your project’s Presidents folder in Xcode to add it to the project, making sure that the checkbox telling Xcode to copy the file itself is in the on state. This plist file contains information about all the US presidents so far, consisting of just the name and Wikipedia entry URL for each of them.
Now, let’s look at the BIDMasterViewController class and see how we need to modify it to handle the presidential data properly. It’s going to be a simple matter of loading the list of presidents, presenting them in the table view, and passing a URL to the detail view for display. In BIDMasterViewController.m, start off by adding the bold line shown here to the class extension and removing the crossed-out portion:
#import "BIDMasterViewController.h"

#import "BIDDetailViewController.h"

@interface BIDMasterViewController (){
    NSMutableArray *_objects;
}
@property (copy, nonatomic) NSArray *presidents;
@end
Instead of holding our list of presidents in the mutable array that was created by Xcode, we’ll create our own array and store it as a property.
Now divert your attention to the viewDidLoad method, where the changes are a little more involved (but still not too bad). You’re going to add a few lines to load the list of presidents, and then remove a few other lines that set up edit and insertion buttons in the toolbar:
- (void)viewDidLoad
{
    [super viewDidLoad];
    // Do any additional setup after loading the view, typically from a nib.
    self.navigationItem.leftBarButtonItem = self.editButtonItem;

    NSString *path = [[NSBundle mainBundle] pathForResource:@"PresidentList"
                                                     ofType:@"plist"];
    NSDictionary *presidentInfo = [NSDictionary
        dictionaryWithContentsOfFile:path];
    self.presidents = [presidentInfo objectForKey:@"presidents"];

    UIBarButtonItem *addButton =
    [[UIBarButtonItem alloc] initWithBarButtonSystemItem:UIBarButtonSystemItemAdd
                                                 target:self
                                                action:@selector(insertNewObject:)];
    self.navigationItem.rightBarButtonItem = addButton;
    self.detailViewController =
    (BIDDetailViewController *)[[self.splitViewController.viewControllers
                                 lastObject] topViewController];
}
This template-generated class also includes a method called insertNewObject:for adding items to the _objects array. We don’t even have that array anymore, so we delete the entire method:
- (void)insertNewObject:(id)sender
{
    if (!_objects) {
        _objects = [[NSMutableArray alloc] init];
    }
    [_objects insertObject:[NSDate date] atIndex:0];
    NSIndexPath *indexPath = [NSIndexPath indexPathForRow:0 inSection:0];
    [self.tableView insertRowsAtIndexPaths:@[indexPath]
withRowAnimation:UITableViewRowAnimationAutomatic];
}
Also, we have a couple of data source methods that deal with letting users edit rows in the table view. We’re not going to allow any editing of rows in this app, so let’s just remove this code before adding our own:
- (BOOL)tableView:(UITableView *)tableView
canEditRowAtIndexPath:(NSIndexPath *)indexPath
{
    // Return NO if you do not want the specified item to be editable.
    return YES;
}

- (void)tableView:(UITableView *)tableView commitEditingStyle:(UITableViewCellEditingStyle)editingStyle
forRowAtIndexPath:(NSIndexPath *)indexPath
{
    if (editingStyle == UITableViewCellEditingStyleDelete) {
        [_objects removeObjectAtIndex:indexPath.row];
        [tableView deleteRowsAtIndexPaths:@[indexPath]
                         withRowAnimation:UITableViewRowAnimationFade];
    } else if (editingStyle == UITableViewCellEditingStyleInsert) {
    }
}
Now it’s time to get to the main table view data source methods, adapting them for our purposes. Let’s start by editing the method that tells the table view how many rows to display:
- (NSInteger)tableView:(UITableView *)tableView
    numberOfRowsInSection:(NSInteger)section
{
    return [_objects count];
    return [self.presidents count];
}
After that, edit the tableView:cellForRowAtIndexPath: method to make each cell display a president’s name:
- (UITableViewCell *)tableView:(UITableView *)tableView
         cellForRowAtIndexPath:(NSIndexPath *)indexPath
{
    UITableViewCell *cell = [tableView
        dequeueReusableCellWithIdentifier:@"Cell"
                             forIndexPath:indexPath];
    NSDate *object = _objects[indexPath.row];
    cell.textLabel.text = [object description];

    NSDictionary *president = self.presidents[indexPath.row];
    cell.textLabel.text = president[@"name"];
    return cell;
}
Finally, it’s time to edit tableView:didSelectRowAtIndexPath: to pass the URL to the detail view controller, as follows:
- (void)tableView:(UITableView *)tableView
    didSelectRowAtIndexPath:(NSIndexPath *)indexPath
{
    NSDate *object = _objects[indexPath.row];
    self.detailViewController.detailItem = object;
    NSDictionary *president = self.presidents[indexPath.row];
    NSString *urlString = president[@"url"];
    self.detailViewController.detailItem = urlString;
}
That’s all we need to do for BIDMasterViewController. At this point, you can build and run the app. Use landscape mode, or tap the Master button in the upper-left corner to bring up a popover with a list of presidents (see Figure 11-7). Tap a president’s name to display that president’s Wikipedia page URL in the detail view.
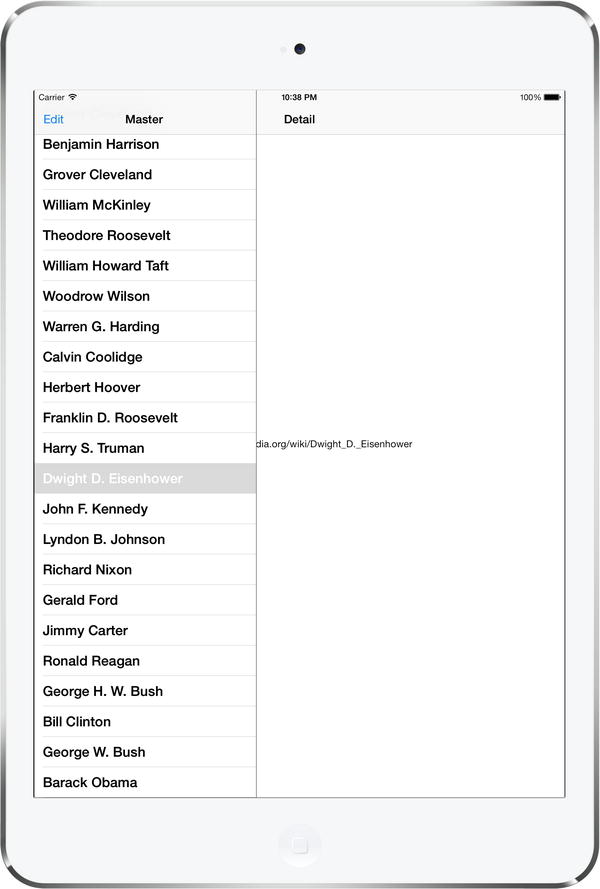
Figure 11-7. Our first run of the Presidents app. Note that we tapped the Master button to bring up the popover. Tap a president’s name, and the link to that president’s Wikipedia entry will be displayed
Let’s finish this section by making the detail view do something a little more useful with the URL. Start with BIDDetailViewContoller.h, where we’ll add an outlet for a web view to display the Wikipedia page for the selected president. Add the bold line shown here:
#import <UIKit/UIKit.h>

@interface BIDDetailViewController : UIViewController <UISplitViewControllerDelegate>

@property (strong, nonatomic) id detailItem;

@property (weak, nonatomic) IBOutlet UILabel *detailDescriptionLabel;
@property (weak, nonatomic) IBOutlet UIWebView *webView;
@end
Next, switch to BIDDetailViewController.m, where we have a bit more to do (though really, not too much). Scroll down to the configureView method and add the methods shown in bold here:
- (void)configureView
{
    NSURL *url = [NSURL URLWithString:self.detailItem];
    NSURLRequest *request = [NSURLRequest requestWithURL:url];
    [self.webView loadRequest:request];
    if (self.detailItem) {
        self.detailDescriptionLabel.text = [self.detailItem description];
    }
}
These new lines are all we need to get our web view to load the requested page.
Next, move on to the splitViewController: willHideViewController:withBarButtonItem:forPopoverController: method, where we’re simply going to give the UIBarButtonItem a more relevant title:
    barButtonItem.title = NSLocalizedString(@"Master", @"Master");
    barButtonItem.title = NSLocalizedString(@"Presidents", @"Presidents");
Believe it or not, these few edits are all the code we need to write at this point.
The final changes we need to make are in MainStoryboard.storyboard. Open it for editing, find the detail view at the lower right, and start by taking care of the label in the GUI (the text of which reads, “Detail view content goes here”).
Start by selecting the label. You might find it easiest to select the label in the document outline, in the section labeled Detail View Controller – Detail Scene. You can find it quickly by typing label in the document outline’s search field.
Once the label is selected, drag the label to the top of the window. Note that the label should run from the left to right blue guideline and fit snugly under the navigation bar. This label is being repurposed to show the current URL. But when the application launches, before the user has chosen a president, we want this field to give the user a hint about what to do.
Double-click the label and change it to Select a President. You should also use the Size Inspector to make sure that the label’s position is constrained to both the left and right sides of its superview, as well as the top edge (see Figure 11-8). If you need to adjust these constraints, use the methods described previously to set them up. You can probably get almost exactly what you want by selecting Editor ![]() Resolve Auto Layout Issues
Resolve Auto Layout Issues ![]() Reset to Suggested Constraints from the menu.
Reset to Suggested Constraints from the menu.
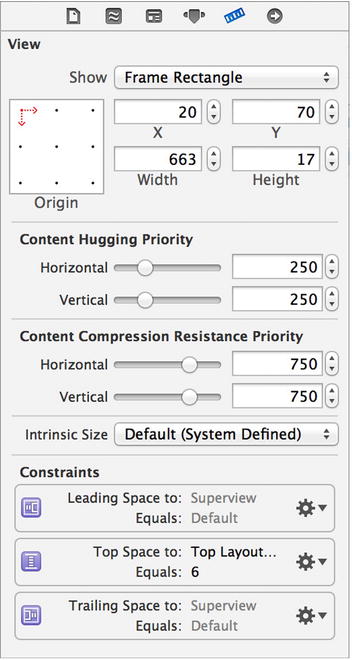
Figure 11-8. The Size Inspector, showing the constraints settings for the “Select a President” label at the bottom
Next, use the library to find a UIWebView and drag it into the space below the label you just moved. After dropping the web view there, use the resize handles to make it fill the rest of the view below the label. Make it go from the left edge to the right edge, and from the blue guideline just below the bottom of the label all the way to the very bottom of the window. Now use the Size Inspector to constrain the web view to the left, bottom, and right edges of the superview, as well as to the label for the top edge (see Figure 11-9). Once again, you can probably get exactly what you need by selecting Editor ![]() Resolve Auto Layout Issues
Resolve Auto Layout Issues ![]() Reset to Suggested Constraints from the menu.
Reset to Suggested Constraints from the menu.
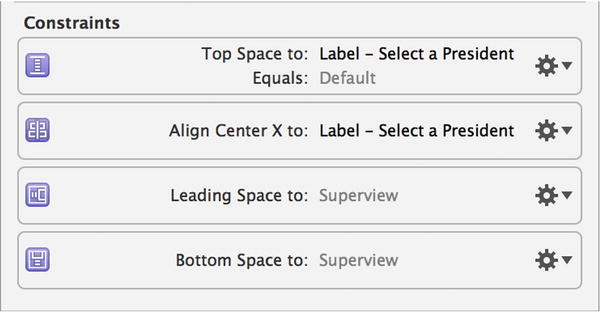
Figure 11-9. The Size Inspector, showing the constraints settings for the web view
We have one last bit of trickery to perform. To hook up the outlet you created, control-drag from the Detail View Controller icon (in the Detail View Controller – Detail section in the dock, just below the First Responder icon) to our new web view (same section, just below the label), and connect the webView outlet. Save your changes, and you’re finished!
Now you can build and run the app, and it will let you see the Wikipedia entries for each of the presidents. Rotate the display between the two orientations, and you’ll see how the split view controller takes care of everything for you, with a little help from the detail view controller. The latter handles the toolbar item required for showing a popover (just as in the original app before we made our changes).
The final change to make in this section is strictly a cosmetic one. When you run this app in landscape orientation, the heading above the navigation view on the left is still Master. Switch to portrait orientation, tap the Presidents toolbar button, and you’ll see the same heading.
To fix the heading, open MainStoryboard.storyboard, double-click the navigation bar above the table view at the upper right, double-click the text shown there, and change it to Presidents (see Figure 11-10). Save the storyboard, build and run the app, and you should see your change in place.

Figure 11-10. The current state of MainStoryboard.storyboard. We’ve changed the title of the master detail view’s table view to Presidents
Creating Your Own Popover
There’s still one piece of iPad GUI technology that we haven’t dealt with in quite enough detail yet: the creation and display of your own popover. So far, we’ve had a UIPopoverController handed to us from a UISplitView delegate method, which let us keep track of it in an instance variable so we could force it to go away. However, popovers really come in handy when we want to present our own view controllers.
To see how this works, we’re going to add a popover to be activated by a permanent toolbar item (unlike the one that the UISplitView delegate method gives us, which is meant to come and go). This popover will display a table view containing a list of languages. If the user picks a language from the list, the web view will load (in the new language) whatever Wikipedia entry was already showing. This will be simple enough to do, since switching from one language to another in Wikipedia is just a matter of changing a small piece of the URL that contains an embedded country code.
Note Both uses of popovers in this example are in the service of showing a UITableView, but don’t let that mislead you—UIPopoverController can be used to handle the display of any view controller content you like! We’re sticking with table views for this example because it’s a common use case, it’s easy to show in a relatively small amount of code, and it’s something with which you should already be quite familiar.
Start by right-clicking the Presidents folder in Xcode and selecting New File . . . from the contextual menu. When the assistant appears, select Cocoa Touch, select Objective-C class, and then click Next. On the next screen, name the new class BIDLanguageListController and select UITableViewController from the Subclass of field. Turn on the checkbox next to Targeted for iPad and turn off the checkbox next to With XIB for user interface. Click Next, double-check the location where you’re saving the file, and click Create.
The BIDLanguageListController is going to be a pretty standard table view controller class. It will display a list of items and let the detail view controller know when a choice is made by using a pointer back to the detail view controller. Edit BIDLanguageListController.h, adding the bold lines shown here:
#import <UIKit/UIKit.h>

@class BIDDetailViewController;

@interface BIDLanguageListController : UITableViewController

@property (weak, nonatomic) BIDDetailViewController *detailViewController;
@property (copy, nonatomic) NSArray *languageNames;
@property (copy, nonatomic) NSArray *languageCodes;

@end
These additions define a pointer back to the detail view controller (which we’ll set from code in the detail view controller itself when we’re about to display the language list), as well as a pair of arrays for containing the values that will be displayed (English, French, etc.) and the underlying values that will be used to build an URL from the chosen language (en, fr, and so on). Note that we’ve declared these arrays to have copy storage semantics instead of strong. This means that whenever some piece of code calls one of these setters, the parameter is sent a copy message instead of just being held as a strong pointer. This is done to prevent a situation where another class might send in an NSMutableArray instead of an NSArray, and then make changes to the array without our knowledge. Sending copy to an NSMutableArray instance always returns an immutable NSArray, so we know that the array we’re using can’t be changed by someone else. At the same time, sending copy to an NSArray, which is already immutable, doesn’t actually make a new copy, it just returns a strong pointer to self, so sending it a copy message isn’t wasteful in any way.
If you copied and pasted this code from the book’s source archive (or e-book) into your own project or typed it yourself a little sloppily, you may not have noticed an important difference in how the detailViewController property was declared earlier. Unlike most properties that reference an object pointer, we declared this one using weak instead of strong. This is something that we must do to avoid a retain cycle.
What’s a retain cycle? It’s a situation where a set of two or more objects have retained one another in a circular fashion. Each object has a retain counter of one or higher and will therefore never release the pointers it contains. Thus, objects in a retain cycle will never be deallocated, either. Most potential retain cycles can be avoided by carefully considering the creation of your objects, often by trying to figure out which object “owns” which. In this sense, an instance of BIDDetailViewController owns an instance of BIDLanguageListController because it’s the BIDDetailViewController that actually creates the BIDLanguageListController to get a piece of work done. Whenever you have a pair of objects that need to refer to one another, you’ll usually want the owner object to retain the other object, while the other object should specifically not retain its owner. Since we’re using the ARC feature that Apple introduced in Xcode 4.2, the compiler does most of the work for us. Instead of paying attention to the details about releasing and retaining objects, all we need to do is declare a property with the weak keyword instead of strong. ARC will do the rest!
Now, switch over to BIDLanguageListController.m to implement the following changes. At the top of the file, start by importing the header for BIDDetailViewController:
#import "BIDLanguageListController.h"
#import "BIDDetailViewController.h"
.
.
.
Next, scroll down a bit to the viewDidLoad method and add a bit of setup code:
- (void)viewDidLoad
{
    [super viewDidLoad];

    self.languageNames = @[@"English", @"French", @"German", @"Spanish"];
    self.languageCodes = @[@"en", @"fr", @"de", @"es"];
    self.clearsSelectionOnViewWillAppear = NO;
    self.preferredContentSize = CGSizeMake(320.0,
                                           [self.languageCodes count] * 44.0);

    [self.tableView registerClass:[UITableViewCell class]
           forCellReuseIdentifier:@"Cell"];

}
This sets up the language arrays and also defines the size that this view will use if shown in a popover (which, as we know, it will be). Without defining the size, we would end up with a popover stretching vertically to fill nearly the whole screen, even if it can be displayed in full with a much smaller view. And finally, we register a default table view cell class to use, as explained previously in Chapter 8.
Further down, we have a few methods generated by Xcode’s template that don’t contain particularly useful code—just a warning and some placeholder text. Let’s replace those with something real:
- (NSInteger)numberOfSectionsInTableView:(UITableView *)tableView
{
#warning Potentially incomplete method implementation.
    return 0;
    return 1;
}

- (NSInteger)tableView:(UITableView *)tableView
    numberOfRowsInSection:(NSInteger)section
{
#warning Incomplete method implementation.
    // Return the number of rows in the section.
    return 0;
    return [self.languageCodes count];
}
Now add a line near the end of tableView:cellForRowAtIndexPath: to put a language name into a cell:
// Configure the cell...
cell.textLabel.text = self.languageNames[indexPath.row];
return cell;
Next, implement tableView:didSelectRowAtIndexPath:: so that you can respond to a user’s touch by passing the language selection back to the detail view controller:
- (void)tableView:(UITableView *)tableView
didSelectRowAtIndexPath:(NSIndexPath *)indexPath
{
    self.detailViewController.languageString =
        self.languageCodes[indexPath.row];
}
Note BIDDetailViewController doesn’t actually have a languageString property, so you will see a compiler error. We’ll take care of that in just a bit.
Now it’s time to make the changes required for BIDDetailViewControllerto handle the popover, as well as to generate the correct URL whenever the user either changes the display language or picks a different president. Start by making the following changes in BIDDetailViewController.h:
#import <UIKit/UIKit.h>

@interface BIDDetailViewController : UIViewController <UISplitViewControllerDelegate,
 UIPopoverControllerDelegate>

@property (strong, nonatomic) id detailItem;

@property (weak, nonatomic) IBOutlet UILabel *detailDescriptionLabel;
@property (weak, nonatomic) IBOutlet UIWebView *webView;
@property (strong, nonatomic) UIBarButtonItem *languageButton;
@property (strong, nonatomic) UIPopoverController *languagePopoverController;
@property (copy, nonatomic) NSString *languageString;

@end
Here, we declared that this class conforms to the UIPopoverControllerDelegate protocol (to handle a notification from the popover controller later) and added some properties to keep track of the GUI components required for the popover and the user’s selected language. All we need to do now is fix BIDDetailViewController.m so that it can handle the language popover and the URL construction. Start by adding this import somewhere at the top:
#import "BIDLanguageListController.h"
The next thing we’re going to add is a function that takes as arguments a URL pointing to a Wikipedia page and a two-letter language code, and then returns a URL that combines the two. We’ll use this at appropriate spots in our controller code later. You can place this function just about anywhere, including within the class’s implementation. The compiler is smart enough to always treat a function as just a function. Place it just after the setDetailItem: method:
static NSString * modifyUrlForLanguage(NSString *url, NSString *lang) {
    if (!lang) {
        return url;
    }

    // We're relying on a particular Wikipedia URL format here. This
    // is a bit fragile!
    NSRange codeRange = NSMakeRange(7, 2);
    if ([[url substringWithRange:codeRange] isEqualToString:lang]) {
        return url;
    } else {
        NSString *newUrl = [url stringByReplacingCharactersInRange:codeRange
                                                        withString:lang];
        return newUrl;
    }
}
Why make this a function instead of a method? There are a couple of reasons. First, instance methods in a class are typically meant to do something involving one or more instance variables, or accessing an object’s internal state either through getters and setters or through direct instance variable access. This function does not use any instance variables. It simply performs an operation on two strings and returns another. We could have made it a class method, but even that feels a bit wrong, since what the method does isn’t really related specifically to the controller class. Sometimes, a function is just what you need.
Our next move is to update the setDetailItem: method. This method will use the function we just defined to combine the URL that’s passed in with the chosen languageString to generate the correct URL. It also makes sure that our second popover, if present, disappears just like the first popover (the one that was defined for us) does:
- (void)setDetailItem:(id)newDetailItem
{
    if (self.detailItem != newDetailItem) {
        _detailItem = newDetailItem;
        _detailItem = modifyUrlForLanguage(newDetailItem, self.languageString);

        // Update the view.
        [self configureView];
    }

    if (self.masterPopoverController != nil) {
        [self.masterPopoverController dismissPopoverAnimated:YES];
    }
}
Now let’s update the viewDidLoad method. Here, we’re going to create a UIBarButtonItem and put it into the UINavigationItem at the top of the screen:
- (void)viewDidLoad
{
    [super viewDidLoad];
    self.languageButton =
     [[UIBarButtonItem alloc] initWithTitle:@"Choose Language"
                                      style:UIBarButtonItemStyleBordered
                                     target:self
                                     action:@selector(toggleLanguagePopover)];
    self.navigationItem.rightBarButtonItem = self.languageButton;
    [self configureView];
}
Next, we implement setLanguageString:. This also calls our modifyUrlForLanguage() function so that the URL can be regenerated (and the new page loaded) immediately. Add this method to the bottom of the file, just above the @end:
- (void)setLanguageString:(NSString *)newString {
    if (![newString isEqualToString:self.languageString]) {
        _languageString = [newString copy];
        self.detailItem = modifyUrlForLanguage(_detailItem, self.languageString);
    }
    if (self.languagePopoverController != nil) {
        [self.languagePopoverController dismissPopoverAnimated:YES];
        self.languagePopoverController = nil;
    }
}
Now, let’s define what will happen when the user taps the Choose Language button. Simply put, we create a BIDLanguageListController, wrap it in a UIPopoverController, and display it. Place this method after the viewDidLoad method:
- (void)toggleLanguagePopover
{
    if (self.languagePopoverController == nil) {
        BIDLanguageListController *languageListController =
            [[BIDLanguageListController alloc] init];
        languageListController.detailViewController = self;
        UIPopoverController *poc =
            [[UIPopoverController alloc]
                 initWithContentViewController:languageListController];
        [poc presentPopoverFromBarButtonItem:self.languageButton
                    permittedArrowDirections:UIPopoverArrowDirectionAny
                                    animated:YES];
        self.languagePopoverController = poc;
    } else {
        if (self.languagePopoverController != nil) {
            [self.languagePopoverController dismissPopoverAnimated:YES];
            self.languagePopoverController = nil;
        }
    }
}
Finally, we need to implement one more method to handle the situation where the user taps to open our Languages popover, and then taps somewhere outside the popover to make it go away. In that case, our toggleLanguagePopover method isn’t called. However, we can implement a method declared in UIPopoverControllerDelegate to be notified when that happens, and then remove the language popover:
- (void)popoverControllerDidDismissPopover:
    (UIPopoverController *)popoverController
{
    if (popoverController == self.languagePopoverController) {
        self.languagePopoverController = nil;
    }
}
And that’s all! You should now be able to run the app in all its glory, switching willy-nilly between presidents and languages. Switching from one language to another should always leave the chosen president intact; likewise, switching from one president to another should leave the language intact.
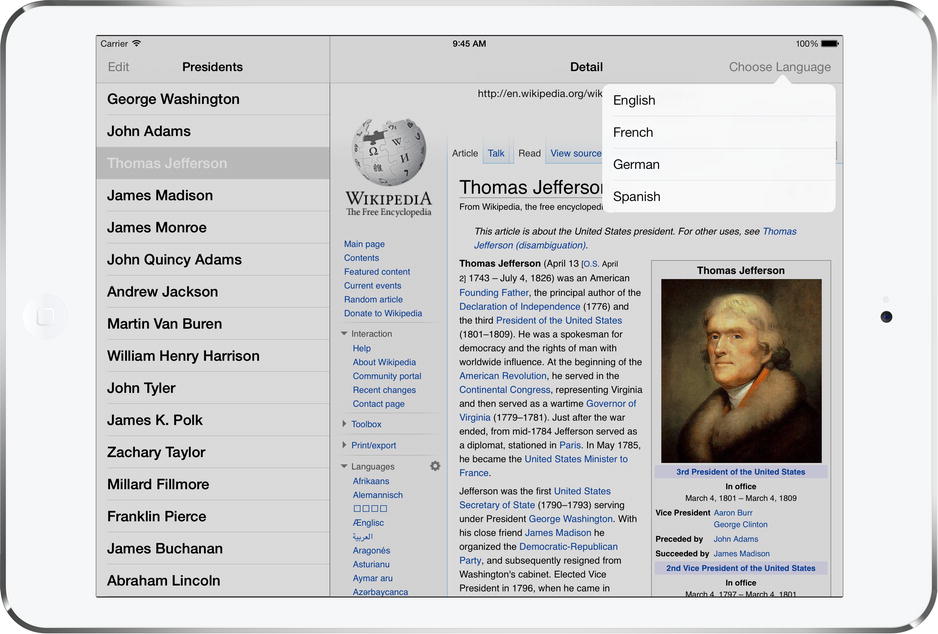
Figure 11-11. The Abraham Lincoln Wikipedia entry shown in the details view, along with a language list popover
iPad Wrap-Up
In this chapter, you learned about the main GUI components that are available only on the iPad: popovers and split views. You’ve also seen an example of how a complex iPad application with several interconnected view controllers can be configured entirely within Interface Builder. With this hard-won knowledge, you should be well on your way to building your first great iPad app. If you want to dig even further into the particulars of iPad development, you may want to take a look at Beginning iPad Development for iPhone Developers by David Mark, Jack Nutting, and Dave Wooldridge (Apress, 2010).
Next up, it’s time to visit application settings and user defaults.